CHEVROLET VOLT BATTERY PACK TESTS - Hughes Associates, Inc.
CHEVROLET VOLT BATTERY PACK TESTS - Hughes Associates, Inc.
CHEVROLET VOLT BATTERY PACK TESTS - Hughes Associates, Inc.

Create successful ePaper yourself
Turn your PDF publications into a flip-book with our unique Google optimized e-Paper software.
Report No. GTL-DOT-11-<strong>VOLT</strong>BAT<br />
<strong>CHEVROLET</strong> <strong>VOLT</strong> <strong>BATTERY</strong> <strong>PACK</strong> <strong>TESTS</strong><br />
Prepared by<br />
GENERAL TESTING LABORATORIES, INC.<br />
1623 LEEDSTOWN ROAD<br />
COLONIAL BEACH, VIRGINIA 22443<br />
January 20, 2012<br />
FINAL REPORT<br />
Prepared For<br />
U. S. DEPARTMENT OF TRANSPORTATION<br />
NATIONAL HIGHWAY TRAFFIC SAFETY ADMINISTRATION<br />
ENFORCEMENT<br />
OFFICE OF VEHICLE SAFETY COMPLIANCE<br />
1200 NEW JERSEY AVE., SE<br />
WASHINGTON, D.C. 20590
1. Title and Subtitle<br />
Chevrolet Volt Battery Pack Tests<br />
3. Author(s)<br />
Alan Aylor, General Testing Laboratories, <strong>Inc</strong>.<br />
Gerard Back, <strong>Hughes</strong> <strong>Associates</strong>, <strong>Inc</strong>.<br />
Clint Winchester, NSWC – Carderock Division<br />
6. Performing Organization Name and Address<br />
General Testing Laboratories, <strong>Inc</strong>.<br />
1623 Leedstown Road<br />
Colonial Beach, Va 22443<br />
12. Sponsoring Agency Name and Address<br />
U.S. Department of Transportation<br />
National Highway Traffic Safety Admin. Enforcement<br />
Office of Vehicle Safety Compliance (NVS-220)<br />
1200 New Jersey Ave., S.E.,<br />
Washington, DC 20590<br />
Technical Report Documentation Page<br />
2. Report Date:<br />
January 20, 2012<br />
4. Performing Organ. Rep#<br />
GTL-DOT-11-<strong>VOLT</strong>BAT<br />
5. Contract or Grant No.(s)<br />
DTNH22-12-P-01452<br />
DTNH22-12-P-01464<br />
8.Type of Report and Period Covered:<br />
November 4 2011 to January 6, 2012
This publication is distributed by the U.S. Department of Transportation, National<br />
Highway Traffic Safety Administration, in the interest of information exchange. The<br />
opinions, findings and conclusions expressed in this publication are those of the<br />
author(s) and not necessarily those of the Department of Transportation or the National<br />
Highway Traffic Safety Administration. The United States Government assumes no<br />
liability for its contents or use thereof. If trade or manufacturers' names or products are<br />
mentioned, it is only because they are considered essential to the object of the<br />
publication and should not be construed as an endorsement. The United States<br />
Government does not endorse products or manufacturers.<br />
Prepared By: General Testing Laboratories, Alan Aylor<br />
Prepared By: <strong>Hughes</strong> <strong>Associates</strong>, Gerard Back<br />
Prepared By: NSWC – Carderock, Clint Winchester<br />
Date: January 20, 2012<br />
FINAL REPORT ACCEPTANCE BY OVSC:<br />
Accepted By:<br />
Accepted Date:
CONTENTS<br />
Page<br />
1.0 INTRODUCTION 1<br />
2.0 TEST ITEM DESCRIPTION 2<br />
3.0 <strong>BATTERY</strong> INSTRUMENTATION 4<br />
3.1 Voltage 4<br />
3.2 Temperature 4<br />
3.3 Video 4<br />
3.4 Gas Detection 5<br />
4.0 TEST SETUP 7<br />
4.1 Impact Block 7<br />
4.2 Battery Cradle 8<br />
4.3 Supports 9<br />
4.4 Moving Barrier 10<br />
4.5 Cooling System 11<br />
5.0 TEST PROCEDURE 12<br />
5.1 Rollover Procedures 13<br />
5.2 Long Term Monitoring 13<br />
6.0 TEST OBJECTIVES 14<br />
7.0 <strong>BATTERY</strong> <strong>PACK</strong> TEST RESULTS 15<br />
7.1 Battery Pack Test Results Overview 15<br />
7.2 Test 1 and Test 2 Detailed Results 16<br />
7.2.1 Test 1 and Test 2 Battery Fire 18<br />
7.3 Test 3 Detailed Results 22<br />
7.3.1 Instrumentation check 24<br />
7.3.2 Battery Damage Operations 24<br />
7.3.3 Arcing Scenario Description 28<br />
7.4 Test 4 Detailed Results 28<br />
7.5 Test 5 Detailed Results 29<br />
7.6 Test 6 Detailed Results 32<br />
8.0 CONDUCTIVITY TEST OF <strong>BATTERY</strong> COOLANT 33<br />
9.0 CHEMICAL ANALYSIS 36<br />
10.0 FINDINGS AND CONCLUSIONS 36
11.0 REFERENCES 37<br />
ATTACHMENT 1 – REPORT ON CHEMICAL ANALYSIS
Executive Summary<br />
A test program was established to narrow down the potential causes of the MGA fire<br />
and to identify the variables that may have contributed to the event. The test program<br />
was conducted at General Testing Laboratories in Colonial Beach, Virginia. Six tests<br />
were conducted on Chevrolet Volt battery packs, not entire vehicles.<br />
The first three tests consisted of damaging the battery in a similar manner as that<br />
occurred during the side impact vehicle test conducted on the Chevrolet Volt at the<br />
MGA facility in May, 2011. A separate battery was used for each test. A battery cooling<br />
system representative of that installed in the Volt was attached to the battery during<br />
each test. This allowed the coolant contained in the system to flow into the battery<br />
housing as during the MGA test.<br />
During each of the first three tests, after the battery was impacted, the battery was xrayed<br />
and rotated around the longitudinal centerline, 360 degrees, at 90 degree<br />
increments. Once the battery was rotated 90 degrees, the battery was held in that<br />
position for five minutes prior to rotating to the next position. This is representative of<br />
the post crash rollover procedures conducted by MGA on the Chevrolet Volt during the<br />
test in May.<br />
After the first two batteries were tested, they were placed in a shed for surveillance for a<br />
period of four weeks. The shed was heated to control temperature between 70°F and<br />
90°F. Less than a week into the four week surveillance period, the battery damaged<br />
during Test 2 caught fire and destroyed the contents of the shed including the battery<br />
from Test 1. During Test 3, while the battery was at 180° of rotation, an event occurred<br />
that jetted sparks and flames from the battery housing in the area of the impact block for<br />
about a second.<br />
To further investigate the anomalies observed during these first three tests, an<br />
electrolysis experiment was conducted on the battery coolant using a variable power<br />
supply and two copper wires. The current flow through the coolant and associated<br />
electrolysis rapidly produced metallic compounds and carbon particles that floated on<br />
the coolant surface during the experiment. Compounds like these are believed to have<br />
created the external shorts in the wiring and circuit boards that occurred during the post<br />
test surveillance period.<br />
In the remaining three tests (Tests 4-6), the parameters believed to have contributed to<br />
the MGA event were further isolated. In tests 4 and 5 coolant was introduced into<br />
undamaged batteries and then subjected to a rollover. Test 5 was a repeat of Test 4<br />
with the battery externally grounded to the frame to create the current path. Test 6<br />
consisted of impacting to damage the battery but without the rollover that exposes the<br />
wiring and circuitry to the coolant solution.
After the tests 4-6 were completed, the batteries were placed in separate heated sheds<br />
for surveillance. Less than a week into the surveillance period, the Test 5 battery caught<br />
fire due to shorting of a connector on the passenger side end of battery Module 3. The<br />
fire was quickly suppressed by discharging water into the battery case. Water flow into<br />
the battery case was continued until the test team returned to the facility (approximately<br />
18 hours later). The batteries for Test 4 and Test 6 produced minor heating during the<br />
surveillance period but never caught fire.<br />
The results of these tests demonstrate that intrusion damage to the battery with coolant<br />
leakage followed by a rollover has the potential to expose energized battery<br />
components to the battery cooling solution. A fire hazard is produced when the<br />
electrically conductive liquid cooling solution comes in contact with the energized<br />
battery components (terminals and circuits). The ensuing fire can occur relatively<br />
quickly or take weeks to develop. There are little if any precursors to the fire event (i.e.<br />
there are no warning signs that an event is about to occur).<br />
Although two of the batteries caught fire during this test program and one battery<br />
experienced an arcing event, the conditions that occurred at the MGA facility in May 20,<br />
2011 were never truly replicated. Specifically, the conditions to over pressurize the<br />
occupant compartment of the vehicle and displace the windshield without causing heat<br />
damage and/or smoke deposition were never produced.
1.0 INTRODUCTION<br />
A fire occurred at the MGA Research facility in Burlington, Wisconsin over the weekend<br />
of June 3–6, 2011 involving a 2011 Chevrolet Volt.<br />
NHTSA initiated a program to determine the cause of Chevrolet Volt fire. This program<br />
consisted of a thorough forensic examination of the burned vehicle and battery, a<br />
supplemental Chevrolet Volt crash test and a series of battery pack tests conducted<br />
at General Testing Laboratories (GTL) in Colonial Beach, Virginia. This report<br />
summarizes the battery pack tests and monitoring conducted at GTL during November<br />
and December 2011 and January 2012.<br />
1
2.0 TEST ITEM DESCRIPTION<br />
Six 2011 Chevrolet Volt Battery packs were tested during this program. For the<br />
remainder of this report, the term “battery” will refer to the lithium-ion propulsion battery<br />
in the Volt. Three of the batteries were removed from NHTSA vehicles and three were<br />
new batteries supplied by General Motors. The table below identifies each battery by<br />
test number.<br />
Test Number Description<br />
1 Removed from Vehicle<br />
2 Removed from Vehicle<br />
3 Removed from Vehicle<br />
4 New<br />
5 New<br />
6 New<br />
All batteries were inspected for mechanical and electrical soundness and were fully<br />
charged to a nominal 390 volts 87% state of charge (SOC) prior to testing.<br />
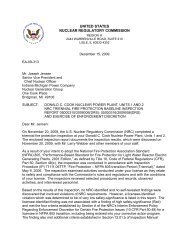
An illustration of the battery is provided in Figure 2.1. The battery is “T” shaped and<br />
consists of 288 LG P1 pouch cells arranged in three modules. One side of each cell is<br />
adjacent to a cooling fin that contains a glycol/water solution designed to thermally<br />
manage the cell environment (both cooling and heating). The first module (Module 1) is<br />
located in the tunnel between the two front seats and contains 90 cells and 45 cooling<br />
fins. The second module (Module 2) is located in the tunnel just in front of the backseat<br />
and contains 72 cells and 36 cooling fins. The third module (Module 3) is located under<br />
the back seat of the vehicle and contains 126 cells and 63 cooling fins. From a<br />
numbering standpoint, the cells adjacent to the fins are; fin # times 2 minus 1 and fin #<br />
times 2. The cooling fins are numbered from the back of the battery working forward<br />
(i.e. fin 1 is on the driver’s side end of Module 3). The modules are shown from left to<br />
right in Figure 2.1. A photograph of an individual cell and cooling fin are provided as<br />
Figure 2.2.<br />
As a general description of the LG P1 cell, each cell is about 5 inches wide, 7 inches tall<br />
and about ¼ inch thick. Each cell consists of 33 layers of alternating sheets of different<br />
metals referred to as current collectors. There are 16 cathode sheets (lithium<br />
manganese coated aluminum) and 17 anode sheets (carbon coated copper) in a LG P1<br />
cell. These sheets are separated by a thin, ceramic coated film of plastic (polyethylene)<br />
referred to as a separator. The lithium ions travel between the anode and the cathode<br />
through a liquid referred to as an electrolyte which is a carbonate solution containing<br />
lithium hexafluorophosphate (LiPF6). The cell casing consists of a polymer coated<br />
aluminum pouch.<br />
2
Module 3<br />
Figure 2.1 – Battery Configurations and Location<br />
Figure 2.2 – LG P1 Cell and Cooling Fin<br />
The battery is equipped with a voltage and temperature monitoring system. The system<br />
consists of four circuits boards referred to as Voltage Temperature Sub Modules<br />
(VTSMs). The VTSMs are located on the top of each battery module. The locations of<br />
the VTSMs are shown as the numbers on Figure 2.1.<br />
The main power lines, referred to as bus bars, run along the outside of each module<br />
and can be seen in Figure 2.1 as the orange stripes along the sides of each module.<br />
3<br />
Module 2<br />
Module 1
3.0 <strong>BATTERY</strong> INSTRUMENTATION<br />
With the exception of voltage measurement, all of the instrumentation described in this<br />
section was installed by The Naval Surface Warfare Center – Carderock Division.<br />
3.1 <strong>VOLT</strong>AGE<br />
Battery voltages were monitored during and after testing by utilizing the GM Can Bus<br />
and data acquisition software recorded on a separate computer for each battery.<br />
3.2 TEMPERATURE<br />
Type K thermocouples were installed at the following locations.<br />
Thermocouple<br />
Location<br />
Number<br />
1 Top of forward electronics (VITM)<br />
2 Top of positive bus bar forward of module 1<br />
3 Top of black connector for VTSM* 1 Module 1<br />
4 Center Top of VTSM 1 Module 1<br />
5 Center Bottom of VTSM 1 Module 1<br />
6 Top on negative bus bar between Modules 1 and 2<br />
7 Top of black connector for VTSM 2 Module 2<br />
8 Center Top of VTSM 2 Module 2<br />
9 Center Bottom of VTSM 2 Module 2<br />
10 Top of black connector for VTSM 3 Module 3 Passenger Side<br />
11 Center Top of VTSM 3 Module 3 Passenger Side<br />
12 Center Bottom of VTSM 3 Module 3 Passenger Side<br />
13 Top of black connector for VTSM 4 Module 3 Driver Side<br />
14 Center Top of VTSM 4 Module 3 Driver Side<br />
15 Center Bottom of VTSM 4 Module 3 Driver Side<br />
*VTSM refers to “Voltage and Temperature Sub Module”<br />
The thermocouples were monitored using an Argent 34970A data acquisition/switch<br />
unit. The data was continuously recorded throughout the testing and long term<br />
monitoring. This digital data has been supplied under separate cover.<br />
3.3 VIDEO<br />
The batteries used in tests 1, 2 and 3 had three internal miniature video cameras and<br />
led lights installed inside the batteries.<br />
The testing was also monitored with stationary and hand held video cameras as<br />
required. For long term monitoring additional video cameras were installed in the<br />
storage sheds. All video was recorded on hard drives and has been delivered under<br />
separate cover.<br />
4
3.4 GAS DETECTION<br />
For the gas analysis portion of testing, Carderock used a Crowcon TriplePlus+ gas<br />
detector. It was configured to measure four gases: methane (CH4), ammonia (NH3),<br />
sulfur dioxide (SO2), and volatile organics (VO). Methane concentration was expressed<br />
using lower explosive limit values, and the remaining gases NH3, SO2 and VO had their<br />
concentrations recorded in parts per million (ppm).<br />
The test setup required a 50 foot polyethylene tubing to extend from the battery cases<br />
to the Crowcon inlet port. A pump was installed inside of the Crowcon, which pulled the<br />
air source from the testing location to the internal sensors. When the gases reached the<br />
sensor, they exited the Crowcon through the inlet port. The outlet port was instrumented<br />
with a polyethylene tubing long enough for the exhaust to exit safely.<br />
Tests 1-3<br />
For the first three tests, the Crowcon used a very small pump that was unable to bring<br />
air from the battery to the sensors. In this case, the tubing from the battery case, sealed<br />
by putty, went directly to the Crowcon (Figure 3.1). The data from these tests were<br />
unreliable. This is attributed to the small pump. The pump was not powerful enough to<br />
handle the resistance caused by the 50 feet of tubing necessary to extend from each of<br />
the batteries to the Crowcon.<br />
Figure 3.1 – Battery-Crowcon Configuration for Tests 1-3<br />
Test 4-6<br />
The next series of tests used a different configuration. Because the internal pump<br />
wasn’t sufficient, another vacuum pump was added to the end of the system. This<br />
ensured that battery out-gassing would reach the sensors inside of the Crowcon. In this<br />
case, the polypropyelene tubing extended from inside of the battery case to the inlet<br />
port of the Crowcon, and the second vacuum pump was attached to the outlet port of<br />
the Crowcon (Figure 3.2).<br />
Figure 3.1 – Battery-Crowcon Configuration for Tests 4-6<br />
The three batteries were continuously monitored and recorded for gas production, after<br />
impact. All three batteries had equal lengths of tubing, which were combined, using<br />
brass compression fittings; these fed into one polypropylene tube, which went to the<br />
Crowcon and then to the Vacuum Pump.<br />
5
The data collected from the Crowcon was accessed using the Portables PC software,<br />
provided by Crowcon. The gas data was continuously recorded during testing and long<br />
term monitoring. The data has been supplied under separate cover.<br />
6
4.0 TEST SETUP<br />
4.1 IMPACTOR BLOCK<br />
NHTSA designed an impactor block to replicate the damage that the Volt battery<br />
received during the 214 pole test that resulted in a fire. NSWC – Carderock fabricated<br />
three of these impactor blocks and supplied them to GTL for the battery impact testing.<br />
See photograph at Figure 4.1.<br />
Figure 4.1 – Impactor Block<br />
The impactor block was shaped to simulate the side of the tunnel and stiffener that<br />
penetrated the battery during the test at MGA. The impactor block was made of HY100<br />
steel plate. The block was installed on the driver’s side of the battery at the junction<br />
between Modules 1 and 2. Two 1” diameter rods were connected to the impactor block,<br />
run through the opening between the two modules and through a wood block assembly<br />
on the opposite side of the battery. Crimp rings were installed on the rods in the center<br />
of the wooden block to keep the device in compression after impact. A photograph of<br />
the impactor block assembly is shown in Figure 4.2. Photographs of the impactor block<br />
in position both before and after impact are shown in Figure 4.3.<br />
Figure 4.2 – Impactor Block Assembly<br />
7
4.2 <strong>BATTERY</strong> CRADLE<br />
Before Impact After Impact<br />
Figure 4.3 Sample Impactor Block Penetration<br />
NSWC Carderock designed and fabricated three cradles to support the batteries during<br />
testing, rollover, and long term monitoring.<br />
The primary design features of the Chevrolet Volt battery cradle allow the battery pack<br />
and tray to maintain system level structural integrity during component level testing.<br />
Due to the nature of the test series, the composite shell of the battery pack was required<br />
to be completely unobstructed from both driver and passenger sides. Factory<br />
installation requires the battery pack to be fastened to the chassis of the vehicle from<br />
the underside of the pack, distributing the load of the battery pack to the chassis by<br />
means of fasteners and metallic standoffs which are integrated into the composite shell<br />
at each of the structural bolt locations. The cradle designed to constrain the pack<br />
during this test series was required to support the pack from the underside rather the<br />
top, by means of a steel frame deemed structurally comparable to the chassis of the<br />
Chevy volt. The installation of the pack to the frame, utilized the factory installed<br />
standoffs as well as additional standoffs on the underside of the pack to mimic the<br />
distribution of stresses seen by the battery and tray during factory installation. During<br />
the test, the composite cover would be attached using factory hardware followed by the<br />
fastening of the fully assembled battery pack to the cradle, utilizing all of the factory bolt<br />
locations.<br />
The battery cradle was designed to transfer forces seen by the pack through the cradle<br />
by means of half inch steel transfer plates mounted to the forward and rear sections of<br />
the battery pack, perpendicular to the forward- rear axis of the pack. The battery cradle<br />
was supported vertically and horizontally during testing by GTL’s battery impact support<br />
fixture to provide adequate axial energy transfer to the battery during the test.<br />
8
Additional test procedures required the battery to be rotated 360 degrees about the<br />
forward rear axis of the pack. To accomplish this, two 1000 pound rated engine stands<br />
were attached to the steel transfer plates, about the assembly’s center of gravity, on the<br />
forward and rear ends of the cradle. The use of such engine stands allowed for full<br />
rotation of the test item as well as locking in position at 90 degree intervals. Throughout<br />
the procedure both engine stands remained attached for safety, transportation and<br />
storage purposes. See photograph at Figure 4.4.<br />
4.3 SUPPORTS<br />
Figure 4.4 – Battery Cradle with Engine Stand & Battery<br />
GTL designed and fabricated supports that were attached to its fixed impact barrier to<br />
hold the battery during testing. See photograph at Figure 4.5. These supports also<br />
acted as a stop for the impacting moving barrier.<br />
Figure 4.5 – Battery supports<br />
9
4.4 MOVING BARRIER<br />
GTL utilized its SAE J972 moving rigid barrier common carriage with a flat impact<br />
surface attached for impact testing of the batteries. A cone shaped jack stand was<br />
attached to the barrier face, herein after referred to as the “Stinger”. See photograph at<br />
Figure 4.6. The stinger has a 3 inch diameter acme threaded nose that provides a<br />
means to adjust the amount of stinger protrusion outward from the moving barrier face.<br />
See photograph at Figure 4.7.<br />
Figure 4.6 – Stinger attached to moving barrier face<br />
Figure 4.7 - Stinger<br />
10
4.5 COOLING SYSTEM<br />
A cooling system was assembled to simulate the one that is installed in the Chevrolet<br />
Volt and was attached to the battery during each test. This allowed the coolant<br />
contained in the system to flow into the battery housing as observed during the MGA<br />
test. The cooling system consisted of a heat exchanger, a coolant reservoir, a coolant<br />
pump and the associated hoses to connect all of the components together. A<br />
photograph of the battery cooling system is shown in Figure 4.8.<br />
Figure 4.8 Battery Cooling System Test Setup<br />
The first three tests were conducted with a 50/50 mixture of commercially available<br />
Prestone DEX-COOL and de-mineralized water. The Prestone DEX-COOL is approved<br />
by GM for use in GM vehicles. The final three tests were conducted with a 50/50<br />
mixture of GM DEX-COOL and de-mineralized water purchased from a General Motors<br />
dealer.<br />
11
5.0 TEST PROCEDURE<br />
The charged battery and cradle assemblies were placed on the fixed barrier support<br />
fixture. Next the impact block and guide system were positioned on the battery. The<br />
cooling system was connected and coolant was circulated through the battery until there<br />
was no evidence of entrapped air in the coolant. The circulation pump was then turned<br />
off.<br />
The voltage monitoring, thermocouples and gas detection instrumentation was<br />
connected to the battery and checked out. See photograph at Figure 5.1.<br />
Figure 5.1 Thermocouples & Gas Detection<br />
Instrumentation connected to Battery<br />
The distance from the moving barrier stops to the impact block was measured and the<br />
Stinger was adjusted to produce the desired penetration of the impact block into the<br />
battery. The moving barrier was accelerated to test speed using GTL’s crash test<br />
monorail and tow system. Speed was measured using GTL’s 3 foot speed trap and<br />
Systron Donner counter to measure time. Speed was measured approximately one foot<br />
prior to impact of the Stinger into the impact block. The impact block traveled forward<br />
into the battery until the moving barrier bottomed out on the battery supports/stops.<br />
After impact the battery was photographed and the instrumentation was checked.<br />
The battery remained on the support fixture for approximately one hour while it was<br />
being x-rayed. After completion of x-rays the battery/cradle was removed from the<br />
support fixture and an FMVSS 305 type rollover was initiated. The battery was<br />
manually rolled over taking approximately one minute to rotate each 90° increment and<br />
pausing for five minutes at the 90°, 180° and 270° increments.<br />
Coolant fluid leaking from the battery was collected during rollover. After completion of<br />
the rollover, the battery/cradle assemblies with instrumentation attached were moved to<br />
storage sheds for long term monitoring. The sheds were heated to control temperature<br />
between 70°F and 90°F.<br />
12
5.1 ROLLOVER PROCEDURES<br />
For tests that included rollover, the battery was rotated around the longitudinal axis 360<br />
degrees at 90 degree increments as shown in Figure 5.2. The battery was rotated<br />
toward the passenger side of the vehicle. Once the battery was rotated each 90 degree<br />
increment, the battery was held in that position for five minutes prior to rotating to the<br />
next position. This is representative of the post crash procedures used by MGA on the<br />
Chevrolet Volt during the test in May 2011.<br />
0 degrees 90 degrees 180 degrees 270 degrees 360 degrees<br />
5.2 LONG TERM MONITORING<br />
Figure 5.2 Battery Rollover Photographs<br />
After the test procedures were completed, the batteries were placed inside of sheds for<br />
long term monitoring. The batteries were stored and monitored for a period of four<br />
weeks. The instruments installed on each battery were scanned at one minute<br />
increments for the entire period.<br />
Each shed was equipped with at least one video camera to visually monitor the battery<br />
and the conditions in the shed. Each shed was also equipped with a photo/ion smoke<br />
detector connected to an auto-dialer. In the event of an alarm, the auto-dialer would<br />
notify lab personnel of the incident. During the last three tests (Tests 4, 5 and 6), the<br />
data acquisition system was also programmed to provide an audible alarm if the battery<br />
temperatures exceeded 40 o C. In addition a hose fitting and shut off valve was added to<br />
the battery case so that the battery case could be flooded with water in case of a fire<br />
event.<br />
13
6.0 TEST OBJECTIVES<br />
Six tests were conducted during this program. All six tests were conducted on Chevrolet<br />
Volt battery packs, not complete vehicles. A brief description of rationale for the test is<br />
provided in the Table below. Additional details are provided in the following paragraphs.<br />
Battery Pack Test Description and Rationale<br />
Test<br />
Rationale<br />
No.<br />
1 Reproduce the battery damage and conditions that<br />
occurred during the side impact test and roll over at MGA<br />
2 Reproduce the battery damage and conditions that<br />
occurred during the side impact test and roll over at MGA<br />
3 Reproduce the battery damage and conditions that<br />
occurred during the side impact test and roll over at MGA<br />
4 Reproduce the conditions that occurred during the roll over<br />
at MGA (i.e. the exposure of the electronics to the coolant)<br />
without the battery being damaged<br />
5 Reproduce the conditions that occurred during the roll over<br />
at MGA (i.e. the exposure of the electronics to the coolant)<br />
without the battery being damaged but the negative bus<br />
bar was shorted to ground<br />
6 Reproduce battery damage that occurred during the side<br />
impact test at MGA without exposing the components to<br />
the coolant<br />
The first three tests consisted of reproducing the battery damage and conditions that<br />
occurred during the side impact test conducted on the Chevrolet Volt at the MGA facility<br />
in May, 2011. A separate battery was used for each test.<br />
During the remaining three tests, the parameters believed to have contributed to the<br />
MGA event were further isolated. Specifically, during Test 4, the battery was not<br />
physically damaged but the electronics were exposed to the coolant solution by pouring<br />
a known quantity of coolant solution in the battery case and rotating the battery as<br />
described above. Test 5 was a repeat of Test 4 except that the battery negative bus bar<br />
was externally grounded to the frame to create a current path. Test 6 consisted of<br />
physically damaging the battery without exposing the wiring and circuitry to the coolant<br />
solution.<br />
After the test procedures were completed, the batteries were stored and monitored for a<br />
period of four weeks. As a refresher, the MGA fire occurred about three weeks after the<br />
side impact test was conducted.<br />
14
7.0 <strong>BATTERY</strong> <strong>PACK</strong> TEST RESULTS<br />
7.1 <strong>BATTERY</strong> <strong>PACK</strong> TEST RESULTS OVERVIEW<br />
An overview of the six tests conducted during this program is provided in the table<br />
below.<br />
Test # Type of<br />
Test<br />
Date<br />
1 Impact<br />
11/16/11<br />
with<br />
Rollover<br />
2 Impact<br />
11/17/11 with<br />
Rollover<br />
3 Impact<br />
with<br />
11/18/11<br />
Rollover<br />
Intentional<br />
Grounding<br />
None Leakage<br />
due to<br />
impact<br />
Impact<br />
Block<br />
Grounded to<br />
Battery<br />
Frame<br />
Same as<br />
Test 2<br />
Coolant in Battery<br />
Case<br />
How Amount<br />
Introduced (L)<br />
Leakage<br />
due to<br />
impact<br />
Leakage<br />
due to<br />
impact<br />
4 Rollover None Poured<br />
12/05/11<br />
through<br />
Flooding<br />
Port<br />
5 Rollover Negative Poured<br />
12/05/11<br />
Bus Bar<br />
Grounded to<br />
through<br />
Flooding<br />
Battery<br />
Frame<br />
Port<br />
6 Impact<br />
with<br />
12/06/11<br />
Rollover<br />
Same as<br />
Test 2<br />
Leakage<br />
due to<br />
impact<br />
15<br />
Test<br />
Speed<br />
(MPH)<br />
Impactor<br />
Displacement<br />
Setting<br />
(<strong>Inc</strong>hes)<br />
NOTE 1<br />
Notable<br />
Observations<br />
2.871 7.58 2 ½ Destroyed<br />
during the<br />
11/24 fire<br />
initiated by Test<br />
2 battery<br />
2.951 6.80 2 15/16 Battery caught<br />
fire on 11/24.<br />
Fire originated<br />
in Module 3<br />
4.041 6.38 3 9/16 Spark and<br />
Flames jetted<br />
from the pack at<br />
the 180° mark<br />
of rollover.<br />
Battery<br />
disassembled.<br />
No surveillance<br />
period<br />
2.341 N/A N/A Minor Heating,<br />
Discolored<br />
VTSM 1 wiring<br />
3.20 N/A N/A Rapid<br />
electrolysis<br />
observed at the<br />
180°-270°<br />
mark. Battery<br />
caught fire on<br />
12/12/11<br />
5.07 6.86 3 ¼ Minor Heating,<br />
One Cell Group<br />
dropped to .2<br />
volts.<br />
NOTE 1: X-rays were used as a non-invasive method of assessing the post impact<br />
internal structural deformation to the battery. The x-rays were compared to the previous<br />
x-rays of the MGA side impact damaged battery that resulted in a fire. This information<br />
along with physical measurements were used as an aid in making adjustments to the<br />
impactor displacement and moving barrier speed for each test.<br />
The first three tests consisted of damaging the battery and conducting a post test<br />
rollover in a similar manner to the side impact test conducted on the Chevrolet Volt at
the MGA facility in May, 2011. Once the batteries were damaged during the first two<br />
tests and the test procedures were completed, the batteries were placed in a shed<br />
under surveillance for a period of four weeks. Less than a week into the four week<br />
surveillance period, the battery damaged during Test 2 caught fire and destroyed the<br />
contents of the shed including the battery from Test 1.<br />
During Test 3, while the battery was inverted, an event occurred that jetted sparks and<br />
flames from the battery housing for about a second. An assessment of the battery<br />
remains from the first three tests indicated that the exposure to the coolant solution<br />
during the post damage roll-over was creating external shorts in the battery wiring and<br />
circuitry.<br />
For the remaining three tests, the parameters believed to have contributed to the MGA<br />
event were isolated. Specifically, during the fourth test, the battery was not physically<br />
damaged but the electronics were exposed to the coolant solution. The fifth test was a<br />
repeat of the fourth with the battery externally grounded to the frame to create the<br />
current path produced by the physical damage to the battery in the MGA side impact<br />
test. The sixth test consisted of physically damaging the battery without exposing the<br />
wiring and circuitry to the coolant solution.<br />
After the test procedures were completed for Tests 4, 5 and 6, the batteries were placed<br />
in separate sheds for surveillance. Less than a week into the surveillance period, the<br />
battery from Test 5 caught fire due to shorting of a connector on the passenger side end<br />
of battery Module 3. The fire was quickly suppressed by discharging water into the<br />
battery case. The battery was submersed until the test team had returned to the facility<br />
(approximately 18 hours later). The batteries from Test 4 and Test 6 produced minor<br />
heating during the surveillance period but never caught fire. The details of each test are<br />
provided in the following sections.<br />
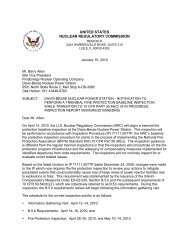
7.2 TEST 1 AND TEST 2 DETAILED RESULTS<br />
Test 1 and Test 2 were designed to reproduce the physical damage and conditions that<br />
occurred during the side impact test conducted at the MGA facility in May. Test 1 was<br />
conducted on November 16 th and Test 2 was conducted on November 17 th , 2011.<br />
There were only two minor differences between the two tests. During Test 1, the<br />
impactor block was not intentionally grounded to the mounting frame as was the case<br />
for Test 2. In addition, the degree of physical damage was slightly increased for Test 2<br />
by adjusting the depth of impact and increasing the test impact velocity. A photograph<br />
and an X-ray of the damage for the two tests are provided in Figures 7.1 and 7.2.<br />
16
Figure 7.1 – Test 1 Battery Damage and X-Ray<br />
Figure 7.2 – Test 2 Battery Damage and X-Ray<br />
Other than the physical damage to the battery and cover, there were no signs of an<br />
ensuing reaction while the batteries were located on the test deck prior to being moved<br />
into the shed. There were no indications of either arcing or smoking within the battery<br />
case.<br />
After the batteries were physically damaged and the test procedures were completed,<br />
the batteries were placed in a shed for surveillance for a period of four weeks. Less than<br />
one week into the four week surveillance period, the battery from Test 2 caught fire and<br />
destroyed the contents of the shed including the battery from Test 1. The details of the<br />
fire and the forensic examination of batteries are provided in the following sections.<br />
17
7.2.1 TEST 1 AND TEST 2 <strong>BATTERY</strong> FIRE<br />
7.2.1.1 Event Description<br />
The orientation of the two batteries within the shed is shown in Figure 7.3.<br />
Test 1<br />
Battery<br />
Figure 7.3 – Storage Configuration for Batteries from Tests 1 and 2<br />
The fire occurred in the late afternoon on November 24, 2011 (Thanksgiving Day).<br />
There were no indications visually or empirically that a reaction was about to happen up<br />
to about an hour before the event. The following is a high level overview of the events<br />
that occurred on that day.<br />
1. The cameras installed inside the Test 2 battery show smoke logging within the case at<br />
4:30 PM<br />
2. The thermocouples on the Test 2 battery began to increase about 4:35 PM<br />
3. The thermocouples on the Test 2 battery heat from back to front (Section 3, Section 2<br />
then Section 1)<br />
4. Smoke detector triggered auto-dialer at about 4:38 PM<br />
5. Video camera in shed shows smoke coming from the Test 2 battery about 4:40 PM<br />
6. Video camera in shed is completely obscured with smoke by 4:45 PM<br />
7. Video camera in shed shows sight of flames in the shed about 4:50 PM<br />
8. About 4:50 PM, the cameras installed in the Test 2 battery began to malfunction<br />
9. At 4:55 PM, the thermocouples in battery began heating faster<br />
10. Ambient temperatures in the shed begin to increase shortly after 4:55 PM<br />
11. Just before 5:00 PM temperatures spike in the batteries and shed and video is lost<br />
12. GTL Tech/FF arrives on site shortly after 5:00, heavy smoke coming from shed eves<br />
13. Doors of shed blew open shortly after arriving on scene (whoosh sound heard as door<br />
blew open). This overpressure blew out the back window of the shed with pieces located<br />
over 10 ft away<br />
14. Interior of shed significantly charred when door blew open indicating that the fire had<br />
been burning for a while prior to the pressure event. Test 2 battery fully involved, Test 1<br />
battery heating but not involved.<br />
15. Only the Test 2 battery is involved at the time of the initial attack<br />
16. Flames jetting from drivers side end of Module 3 and opening in cover observed at that<br />
location<br />
17. Fire spreads to the Test 1 battery<br />
18. Fire is extinguished about 7:30 PM<br />
19. Fire burned for about 2 hours and 30 minutes total<br />
18<br />
Test 2<br />
Battery
Figure 7.4 – Photograph Showing Early Stage of Fire<br />
Figure 7.5 – Photograph Showing Final Attack on Fire<br />
Before After<br />
Figure 7.6 – Photograph Showing the Contents of the Shed Before and After the Event<br />
19
7.2.1.1 Forensic Investigation of the Shed and Contents<br />
The forensic investigation of the shed was performed on November 26 th 2011.The<br />
investigation was conducted by Jerry Back of <strong>Hughes</strong> <strong>Associates</strong> <strong>Inc</strong>. and Ron Orlando<br />
of General Motors.<br />
The forensic investigation is consistent with the measurements, video footage and<br />
observation solicited from the fire fighters that combated the fire. The damage to the<br />
shed structure, based on visual observations and char depth, supports the fire<br />
originating in Battery from Test 2. The area above and adjacent to the open end of<br />
Battery from Test 2 experienced the greatest damage during the event.<br />
There were a number of potential ignition sources located in the shed other than the two<br />
batteries. These included a power distribution box, a duplex outlet, an electric light<br />
installed on the ceiling and an electric heater located in the center of the space. All of<br />
these components were inspected and showed no signs of shorting or arcing and were<br />
eliminated as potential ignition sources.<br />
The damage is consistent with the following scenario: The fire originated in the Battery<br />
in Test 2. The fire then spread to the paper facing on the insulation installed on the inner<br />
surfaces of the shed. As the paper facing was consumed, the oxygen concentration in<br />
the shed dropped causing the fire to become oxygen limited. The fire then smoldered<br />
for about 10 minutes prior to the overpressure that blew open the door.<br />
There are two potential causes for the over-pressure event; a rapid influx of air into the<br />
shed and/or a single or multiple cell rupture in Section 3 of Battery from Test 2. The<br />
likelihood of a rapid influx of air is extremely low based on the conditions of the shed<br />
before and after the event. In short, there were no openings into the shed to allow a<br />
rapid influx of air. In addition, there was little if any wind the day of the fire.<br />
A single or multiple cell level event (i.e. rapid venting of electrolyte) is the most likely<br />
scenario. This would also explain the opening in the case at the driver’s side end -<br />
Module 3 of Battery from Test 2. A photograph of the opening is provided in Figure 7.7.<br />
Figure 7.7 – Photograph Showing Cover Damage on the Driver’s Side end of Module 3<br />
20
7.2.1.3 Forensic Investigation of Batteries from Tests 1 and 2<br />
As a general statement, a significant amount of the combustible materials in both<br />
batteries were consumed during the fire. A photograph showing to two batteries is<br />
provided as Figure 7.8.<br />
Figure 7.8 – Photograph of Batteries from Tests 1 and 2 (Battery from Test 2 is closest<br />
to the photographer)<br />
The battery from Test 2 that initiated the fire inside of the shed was disassembled in an<br />
attempt to determine the exact origin of the fire. All of Module 3 and the impact<br />
damaged ends of Modules 1 and 2 were disassembled cell by cell in the same manner<br />
as the forensic investigation conducted on the battery involved in the MGA fire.<br />
The forensic investigation of the battery fromTest 2 placed the origin of the fire on the<br />
top of the module. However, the exact origin of the fire could not be determined. The<br />
electrical shorting caused by the coolant solution that was observed during the other<br />
tests conducted during this program suggest that the fire could have originated in any of<br />
the circuitry (i.e. VTSM cards and/or cable connections) located on the top of Module 3.<br />
The battery forensic investigation also concluded that a number of cells vented during<br />
the fire, due to the elevated temperatures inside of the battery case adding to the<br />
severity of the fire. This conclusion was based on the damaged observed to a limited<br />
number of cells throughout the module. Specifically, there were a number of cells where<br />
the copper current collector sheets had been melted and/or consumed just below the<br />
cell tabs. Since copper melts at approximately 1080 o C, this could only occur if the<br />
electrolyte was venting out of the cell at this location. The aluminum current collector<br />
sheets and cooling fins were also destroyed at these locations (i.e. aluminum melts at<br />
approximately 660 o C). A photograph of this damage is provided as Figure 7.9.<br />
As stated previously, it is also believed that this cell venting blew apart the battery cover<br />
at the end of Module 3 during the fire and may have blown open the doors to the shed<br />
when the fire department first arrived on scene.<br />
21
Figure 7.9 – Photograph Showing Cell Level Damage within Module 3<br />
7.3 TEST 3 DETAILED RESULTS<br />
During Test 3, while the battery was inverted, an event occurred within the battery pack<br />
that jetted flames and sparks (incandescent particles) out of the pack for about a<br />
second.<br />
The impact penetration was slightly increased for each test in an attempt to reproduce<br />
the damage to the battery produced during the crash test conducted in May at the MGA<br />
facility in Wisconsin. The amount of battery coolant (ethylene glycol/water mix 50/50)<br />
leaked into the pack was also greater than that leaked during the first two tests. A<br />
photograph and an X-ray of the damage for this test is provided in Figures 7.10.<br />
Figure 7.10 – Test 3 Battery Damage and X-Ray<br />
22
The event occurred during the rotation of the battery after the impact (about an hour<br />
after the impact). The battery was x-rayed after the impact. The battery pack was then<br />
tilted about 1 degree downward (the front end of the battery was 1 degree lower than<br />
the back end) to simulate the conditions during the rotation at MGA in May. The battery<br />
was then rotated at 90 degree increments (toward the passenger side) and held at that<br />
orientation for five minutes prior to continuing the rotation. The battery was upside-down<br />
at the time of the event. It was estimated that a majority of the coolant was located in<br />
the front section of the battery (Module 1) at the time of the event. A photograph of the<br />
event is provided as Figure 7.11.<br />
Figure 7.11 – Photograph Showing Flames and Sparks from Test 3 Battery<br />
The observations made are listed as follows:<br />
1. There was no unusual activity on the cameras or instrumentation prior to rotating<br />
the battery to the 180 degree mark.<br />
2. Shortly after the battery was rotated to the 180 degree mark, two thermocouples<br />
installed on the front section of the battery began to rising at about 2-5 degrees C<br />
per minute.<br />
3. Consistent with the previous two tests, GM’s battery monitoring system began to<br />
malfunction/short out during this period due to the exposure of the electronics to<br />
the coolant.<br />
4. About 5 minutes after the rotation to the 180 degree position, the battery housing<br />
began to fill with smoke as the temperatures continued to rise.<br />
5. Smoke was observed leaking out of the pack at the impact location.<br />
6. The area was then cleared and the rotation to the 270 degree mark was delayed<br />
until all parties believed the area around the battery was safe.<br />
7. During this period, the two thermocouples that were rising began to heat faster,<br />
about 5-10 degrees C per minute.<br />
8. About 10-20 minutes later (about 25 minutes after reaching the 180 degree<br />
mark), the event occurred.<br />
9. Sparks and flames jetted from the pack for about a second.<br />
10. During the event, most of the thermocouples installed on the battery measured a<br />
temperature spike.<br />
11. Almost immediately after the event, the smoke began to clear from the pack and<br />
the thermocouple began to return to normal with the exception of one installed on<br />
23
the top of Module 1 of the battery pack. This thermocouple remained near 40 o C<br />
(104 o F) until the battery was disassembled the following week.<br />
12. Once the battery was stable and all temperatures dropped below 40 o C, the test<br />
sequence was continued and the battery was rotated to 270 degrees and held<br />
there for 5 minutes and then rotated back to the upright position (the 360 degree<br />
mark).<br />
13. Once the battery was upright, smoke was again observed exiting the impact<br />
location.<br />
14. The battery was left at that location overnight and then the following morning,<br />
moved inside a test camber for further monitoring and disassembly.<br />
7.3.1 INSTRUMENTATION CHECK<br />
The first assessment conducted on the battery was to determine the potential<br />
involvement of the instrumentation, cameras and lighting installed in the battery pack to<br />
monitor the test. This assessment was conducted after the cover was removed from the<br />
battery. The findings are summarized as follows:<br />
1. All 15 thermocouples worked properly after the test. There were no breaks in<br />
wiring or leaks to ground.<br />
2. The accelerometers and wiring were still operational with no observable damage<br />
or leaks to ground.<br />
3. Two video cameras were damaged during the event but the other two were still<br />
operational after the event. There were no breaks in wiring or leaks to ground.<br />
4. All of the LED lights were operational after the event. There were no breaks in<br />
wiring or leaks to ground in 3 of the 4 lights. The 4 th LED strip had a slight nick in<br />
the coating but showed no sign of any abnormal electrical activity at this location.<br />
It should be noted that these LED lights operate off of 12V with virtually no<br />
current draw.<br />
It was concluded by the NHTSA team and agreed to by GM that the devices installed in<br />
the battery pack to monitor the test had no contribution to the event.<br />
7.3.2 <strong>BATTERY</strong> DAMAGE OBSERVATIONS<br />
Impact damage looked similar to that of the MGA battery with the back end of Module 1<br />
and the front end of Module 2 slightly crushed and pushed about an inch toward the<br />
passenger side of the vehicle. The cooling system was also breached at this location<br />
allowing the coolant to flow out of the pack into the battery enclosure.<br />
At the time the cover was removed, all three modules were determined to be almost<br />
fully charged. Module 1 had just under 120V, Module 2 had just over 96V and Module 3<br />
had approximately 170V. All three modules were discharge using an electrical heater<br />
provided by NSWC-Carderock. During the discharge of Module 1, a limited number of<br />
cells were observed to heat to about 90 o F near the damage location. During the<br />
discharge, it was also determined that Module 1 was partially discharged and was being<br />
drained by the damaged electrical circuitry of the battery, probably VTSM1 located on<br />
top of Module 1.<br />
24
The post-test inspection of the battery revealed that there were four areas where arcing<br />
occurred;<br />
1. In and above the electronics at the front end of Module 1,<br />
2. On VTSM 1 located above the center of Module 1,<br />
3. At the front end of Module 2 near the impact location, and<br />
4. At the negative end of Module 3 (drivers side end).<br />
These locations are shown in Figure 7.12. and are discussed in the following<br />
paragraphs.<br />
1<br />
2<br />
Figure 7.12 – Test 3 Arcing Locations<br />
The front of Module 1 had arcing damage near the positive battery terminal and was<br />
stained with smoke and combustion products as shown in Figure 7.13. In addition, the<br />
front end plate of Module 1 had arced to the bottom support frame.<br />
Figure 7.13 – Arcing Damage to the Front of Module 1<br />
25<br />
3<br />
4
The plastic cover over VTSM1 had a small penny size area where the plastic had started to melt.<br />
Circuitry below the cover was visibly damaged and was warn to the touch and was still generating a<br />
small amount of heat at the time that the battery was disassembled. A photograph of VTSM 1 is provided<br />
as Figure 7.14.<br />
Figure 7.14 – Arcing and Heating Damage to VTSM 1<br />
The greatest amount of electrical activity occurred at the front end of Module 2 as<br />
shown in Figure 7.15. As shown in the figure, most of the arcing occurred at the impact<br />
location. The negative bus bar that runs from Module 3 to the front of the battery was<br />
damaged by the impact and had arced to the front end plate of Module 2. The bottom of<br />
the end plate that supports the cooling line had arced to the impactor block and was<br />
completely destroyed in the process.<br />
Figure 7.15 – Arcing Damage to the Front of Module 2<br />
The final area of damage was in Module 3 at the negative terminal as shown in Figure<br />
7.16. There was evidence of arcing between the cells and the terminal at this location.<br />
Specifically, there was an opening in the cover plate directly below the junction between<br />
the terminal and the negative bus bar where the activity occurred.<br />
26
Figure 7.16 – Arcing Damage at the Driver’s Side End of Module 3<br />
Generally speaking, the arcing was attributed to both the structural damage to the<br />
battery caused by the impact, and the shorting of various components due to the<br />
exposure to the electrically conductive coolant solution.<br />
27
7.3.3 ARCING SCENARIO DESCRIPTION<br />
The submersion of the electronics in front of, and on top of Module 1 caused a number<br />
of short circuits that altered the voltage potential and polarity of the battery pack. These<br />
short circuits generated heat and smoke that were observed by the cameras installed<br />
inside of the battery cover. The submersion of the electronics also produced electrolysis<br />
gases that along with the smoke became logged within the case. Within a few minutes<br />
of submersion, significant arcing occurred at numerous locations (at the front ends of<br />
both Module 1 and Module 2). The primary arcing location was in the front of Module 2.<br />
The arcing occurred between the negative return and the end plate of Module 2 and the<br />
impactor that was grounded to the battery frame. The arcing ignited the combustible<br />
smoke and electrolysis products logged in the case causing flames to momentarily jet<br />
from the case when the arcing occurred.<br />
To further investigate the shorting that was observed during these first three tests, an<br />
electrolysis experiment was conducted on the battery coolant using a variable power<br />
supply and two copper wires. The current flow through the coolant and associated<br />
electrolysis rapidly produced metallic compounds and carbon particles that floated on<br />
the coolant surface during the experiment. These compounds are believed to have<br />
created the external shorts in the wiring and circuit boards during the post test<br />
surveillance period.<br />
7.4 TEST 4 DETAILED RESULTS<br />
There were not any major electrical or thermal events noted within the battery from Test<br />
4. The thermocouples located on the top of VSTM 1 and 3 showed continuous slow<br />
heating from 26°C to 34°C. The temperature fluctuated about 33° for the last few days<br />
of the monitoring period.<br />
On January 6, 2012, 31 days from the test date, the battery was removed from the<br />
storage shed, deenergized, and retained at GTL.<br />
Post test visual inspection of the battery revealed discoloration(brown to black) on the<br />
wires and orange jacket leading from the orange connector on the battery to VSTM 3.<br />
See photograph at Figure 7.12.<br />
Figure 7.12 – Discoloration of wires and orange jacket<br />
28
7.5 TEST 5 DETAILED RESULTS<br />
Test 5 was a repeat of Test 4 with the exception that the negative bus bar running<br />
between modules 1 and 2 of the battery was grounded to the frame.<br />
During the rollover portion of the test, between 180 degrees and 270 degrees, the<br />
coolant must have submersed the positive and negative terminals located on the<br />
driver’s side of Module 1 causing rapid electrolysis of the coolant. A vigorous boiling<br />
sound could be heard as the battery was rotated through this orientation. The<br />
electrolysis abruptly stopped as the battery approached the 270 degree orientation and<br />
no other adverse effects were observed. A photograph showing the battery at the 270<br />
degree mark is provided as Figure 7.13. Smoke can still be seen in the area where the<br />
shorting and electrolysis is believed to have occurred.<br />
Figure 7.13 – Test 5 with the Battery at the 270 degree orientation<br />
Less than a week into the four week surveillance period, the Test 5 battery caught fire<br />
due to shorting of a connector on the passenger side end of battery Module 3. The<br />
location of the fire is shown in Figure7.14. The fire was quickly suppressed by<br />
discharging water into the battery case. The battery was submersed by flowing water<br />
through the battery case until the test team returned to the facility, approximately 18<br />
hours later.<br />
29
Figure 7.14 – Fire Damage to Passenger Side End of Module 3<br />
Due to the rapid suppression of the fire, the exact origin of the fire could be determined.<br />
The forensic investigation of the battery revealed that the fire originated at the<br />
passenger side end of Module 3. Specifically, the fire originated at/in the connector on<br />
the battery between the voltage monitoring system bus bar and the cable for VTSM 3 as<br />
shown in Figure 7.15.<br />
Origin<br />
Pretest Post Test – Post Fire<br />
Figure 7.15 – Fire Origin of Test 5 – Passenger Side End of Module 3<br />
During the forensic inspection, Module 3 of Battery from Test 5 was disassembled cell<br />
by cell in the same manner as the forensic investigation conducted on the battery from<br />
Test 2.<br />
The forensic inspection of the cells was consistent with the fire originating at the<br />
connection between the voltage monitoring system bus bar and the cable for VTSM 3.<br />
Specifically, there was no damage to any of the cells other than directly under the<br />
connector and there was no damage to VTSM 3. A photograph of VTSM 3 is provided<br />
as Figure 7.16.<br />
30
Figure 7.16 – VTSM 3 – No Apparent Fire Damage<br />
The voltage temperature monitoring system leads that run through the bus bar were<br />
destroyed between the connector location and the passenger’s side end of Module 3.<br />
These leads are fairly low gauge copper wires. Since copper melts at approximately<br />
1080 o C, this could only occur under high current flow conditions or if the electrolyte was<br />
vented out of the cell(s) directly below the leads. A photograph of these leads is<br />
provided as Figure 7.17.<br />
Figure 7.17 – Fire Damage to the Bus Bar Leads<br />
31<br />
Missing Leads
7.6 TEST 6 DETAILED RESULTS<br />
There were not any major electrical or thermal events with the battery in Test 6. The<br />
thermocouples located on the top of VSTM 1 and 3 showed continuous slow heating<br />
from 26°C to 34°C. The temperature fluctuated about 33° for the last few days of the<br />
monitoring period.<br />
One of the cell groups on the end of Module 1 located in the impact area slowly lost<br />
charge during the monitoring period. Voltage at the end of the monitoring period had<br />
dropped to 0.21 volts. A photograph and an X-ray of the damage for the test is provided<br />
in Figure 7.18.<br />
Figure 7.18 – Test 6 Battery Damage and X-Ray<br />
On January 6, 2012, 30 days from the test date, the battery was removed from the<br />
storage shed, de-energized, and retained at GTL.<br />
32
8.0 CONDUCTIVITY TEST OF <strong>BATTERY</strong> COOLANT<br />
The impact of electrical conductivity of the glycol-water coolant mixture used in the<br />
battery coolant system of the Chevrolet Volt battery was highlighted during GM<br />
contracted Exponent testing and fire-event investigation of the MGA Volt vehicle fire.<br />
The tests performed by Exponent demonstrated that with highly doped glycol-water<br />
solutions (9% by weight table salt added) that dendrite growth could be established that<br />
would cause carbonization of the underlying supporting plastic in the battery BMS<br />
electronics between cells and series connections of cells within a few hours to days of<br />
exposure.<br />
Literature values for glycol, and glycol-water solutions are available [1]. These are<br />
provided by glycol manufacturers, by various automotive test and documentations sites<br />
and MSDS sheets, and various activities including SAE publications. The values for<br />
conductivity of deminearlized water and ethylene/propylene glycol are cited as 1500 to<br />
2500 S/cm.<br />
During the initial three Volt battery tests, off-the-shelf Prestone 50-50 DEX-<br />
COO/WATER (GM approved) was utilized as the coolant fluid addition to the battery<br />
coolant circulation lines. This material met the specifications provided by GM<br />
representatives for the Chevrolet Volt battery to DOT/NHTSA representatives.<br />
After the Test 3 arcing event, followed by the Test 2 fire event 11/24/11, a crude test<br />
was conducted on the conductivity of the DEX-COOL solution at relatively high voltages<br />
to approximate possible battery driven effects within the volume and spacing of the Volt<br />
battery protective cover. Discussions by GM representatives also indicated that the use<br />
of the Prestone 50/50 mixture with “demineralized” water was inadequate and that the<br />
GM specified coolant mixture utilized ”deionized” water.<br />
A high voltage power supply (Sorenson 600-8) capable of providing 1200 watts of total<br />
power (1200 watt limiting power at combination of voltage and current) was utilized to<br />
evaluate the effects of moderate battery voltage through a test sample coolant from the<br />
Volt batteries. An impromptu set of electrodes were fashioned from AWG 12 wire<br />
cabling, exposing approximately 1” length with an electrode-to-electrode separation of<br />
approximately 1”. With the power supply set to 350 VDC and 4 ampere limit, a clean<br />
plastic container of DEX-COOL 50/50 was decanted and exposed to the electrodes.<br />
The coolant-electrode reaction was immediate with formation of bubbles, and<br />
dissolution of exposed copper wire. Approximately 150 ml of coolant was discolored<br />
and observed to have significant concentration of particulates floating after 30 seconds<br />
of exposure. Peak current was observed to be approximately 2.5 Amperes. 350 VDC<br />
was chosen as a moderately low voltage for the Volt battery. After 30 seconds,<br />
electrical arcs were visible through the coolant and mixture of water vapor and glycol<br />
were rising from the exposed material. Temperature of the sample had increased in<br />
temperature dramatically.<br />
The exposure was repeated with a fresh sample at various voltages from 12 VDC<br />
stepping to 100, 200 and 300 VDC. At increasing voltages, increasing levels of<br />
reactions were observed. No tests were conducted above 350 VDC. Battery voltage<br />
33
for the GTL test series were 390 VDC. Voltage for the MGA test event battery is<br />
estimated at 370 VDC.<br />
Two samples of OEM supplied materials were provided by GM representatives. OEM<br />
GM source 50-50 mixture of glycol-water was obtained by DOT/NHTSA representative<br />
from GM maintenance and repair dealership shop. “Neat” undiluted Prestone DEX-<br />
COOL was also obtained.<br />
The first batch of GM factory provided materials were provided in re-used 1-gallon<br />
plastic containers. A quick test of this material using the same technique described<br />
above resulted in the over-loading of the power supply from providing too much power<br />
and exceeding the 4 ampere limit imposed. This test was repeated twice, with similar<br />
results. This material was not used for additional tests.<br />
A second batch of GM factory material was sent by GM representatives. Again, the<br />
containers used to provide this sample were 1-gallon plastic containers (labeling<br />
indicated original use was for cleaning solution and solvents). This material was tested<br />
and was found to be no worse (no more conductive) than the original Prestone non-<br />
Hybrid vehicle quality DEX-COOL 50/50 mixture of material.<br />
GM OEM high purity DEX-COOL certified for use in HYBRID VEHICLE SYSTEMS was<br />
obtained by NHTSA/DOT personnel. This material was found to be equivalent at high<br />
voltages as the off-the-shelf Prestone DEX-COOL coolant mixtures.<br />
A comparative test of conductivity was conducted on the five basic coolant fluids<br />
available; Prestone DEX-COOL, GM Supplied Coolant #1, GM Supplied Coolant #2,<br />
and GM OEM HYBRID DEX-COOL. Neat (undiluted) DEX-COOL although available<br />
was not tested in this sequence. These were compared with Distilled water acquired<br />
from local hardware store. These tests were conducted with a HANNA total dissolved<br />
solid/conductivity water quality test meter. The HANNA meter, Model HI9835, was<br />
provided by GM representatives.<br />
(A) Distilled Water: 12.25 to 13.00 microSiemens<br />
(B) Prestone Pre-mix 50/50 DEX-COOL: 1900 - 2030 microS (used in initial tests)<br />
(C) OEM Sample #1 (original very conductive in HV test): 3600 microS<br />
(D) OEM Sample #2 (resend, last Fridays, issue): 1880 - 1900 microSiemens<br />
(E) Prestone 50/50 HYBRID Electrical System DEX-COOL Mix from GM Dealer):<br />
1950 - 1960 microS (used in subsequent Tests #4-6)<br />
NOTE: The HANNA HI9835 electrode assembly was disassembled, washed and<br />
cleaned with purchased distilled water in between conductivity tests to prevent<br />
contamination effects.<br />
These values ranges and levels match the observed high-voltage effects when exposed<br />
to 350 VDC. It should be noted that “neat” undiluted DEX-COOL (glycol) was observed<br />
to behavior very differently than literature values would allow inference when exposed to<br />
the 350 VDC source. Gylcol undiluted is reported to be more conductive that the 50/50<br />
water mixture typically used or sold. During the high-voltage exposure tests, the glycol<br />
was observed to be initially less conductive, lower current flow, than any of the 50/50<br />
34
glycol water mixtures. The reaction however did become seemingly more violent than<br />
any 50/50 mixture with apparent gassing or boiling of the glycol, ejecting substantial<br />
portions of the test sample out of the sample container.<br />
A literature survey and review located a potential alternative source for the deposition of<br />
carbon films detailed by Exponent [2] have demonstrated that application of high<br />
voltages in a water glycol solution can support formation and deposition of graphite by<br />
electrolysis reactions. Although these experiments were driven for approximately 12<br />
hours at a 3 to 4 times the applied voltage exposures anticipated in the <strong>VOLT</strong> battery<br />
coolant exposure, the lower-voltage and extended exposure times may be an alternate<br />
explanation for some behaviors observed.<br />
35
9.0 CHEMICAL ANALYSIS<br />
BAE Systems was contracted to provide chemical analysis on the following samples:<br />
SAMPLE DESCRIPTION<br />
A 50/50 DEX COOL PREMIX OTS PRESTONE<br />
B NEAT DEX COOL OTS PRESTONE<br />
C OEM DEX COOL DI 50/50 MIX<br />
D OEM DEX COOL DI 50/50 MIX<br />
D RESIDUE INSOLUBLE SOLIDS IN SAMPLE D<br />
E SWAB INSIDE OF IMPACTOR<br />
F Q-TIP DRIVER SIDE RESIDUE OF <strong>BATTERY</strong> FROM TEST 3<br />
G RESIDUE SECTION 3 BURN/ARC AREA<br />
G PLASTIC GRAY PLASTIC<br />
H SWAB SECTION 2 FRONT END PLATE<br />
I SWAB SECTION 1 FRONT END PLATE<br />
J SWAB BDU DRIVER SIDE SAMPLE BURN AREA<br />
K SWAB VTSM 4 WATERLINE MATERIAL #14 CARD COVER<br />
L Q-TIP SWAB OF GREEN BLACK RESIDUE ON<br />
CONNECTOR OF <strong>BATTERY</strong> ASSEMBLY INTERCONNECT<br />
The report of this analysis can be found as Attachment 1 to this report.<br />
10.0 FINDINGS AND CONCLUSIONS<br />
The results of these tests demonstrate that intrusion damage to the battery with coolant<br />
leakage followed by a rollover has the potential to expose energized battery<br />
components to the battery cooling solution. A fire hazard is produced when the<br />
electrically conductive liquid cooling solution comes in contact with the energized<br />
battery components (terminals and circuits). The fires that occurred during this test<br />
series took approximately a week to develop. It is conceivable that these fires could<br />
have occurred sooner under difference circumstances. It should also be noted that there<br />
were no indications that a fire was about to occur up to about an hour before ignition<br />
(i.e. there are no warning signs).<br />
Although two of the batteries caught fire during this test program and one battery<br />
experienced an arcing event, the conditions that occurred at the MGA facility on May<br />
20, 2011 were never truly replicated. Specifically, the conditions to over pressurize the<br />
occupant compartment of the vehicle and displace the windshield without causing heat<br />
damage and/or smoke deposition were never produced.<br />
36
11.0 REFERENCES<br />
[1] Electrical Conductivity of Typical Automotive Engine Compartment Fluids And A<br />
Method for Determining Their Effects When Inadvertently Present in Electrical<br />
Connectors of Powertrain Control Modules; Proceedings of the 57 th International Wire<br />
and cabling Symposium; NK Medora et al.<br />
[2] Deposition of carbon films by electrolysis of a water-ethylene glycol, Suzuki et al,<br />
Journal of Material Science, 30 (1995) 2067-2069<br />
37