

ESR II INSTALLATION SYSTEM FRAME - Kaldewei
ESR II INSTALLATION SYSTEM FRAME - Kaldewei
ESR II INSTALLATION SYSTEM FRAME - Kaldewei

Create successful ePaper yourself
Turn your PDF publications into a flip-book with our unique Google optimized e-Paper software.
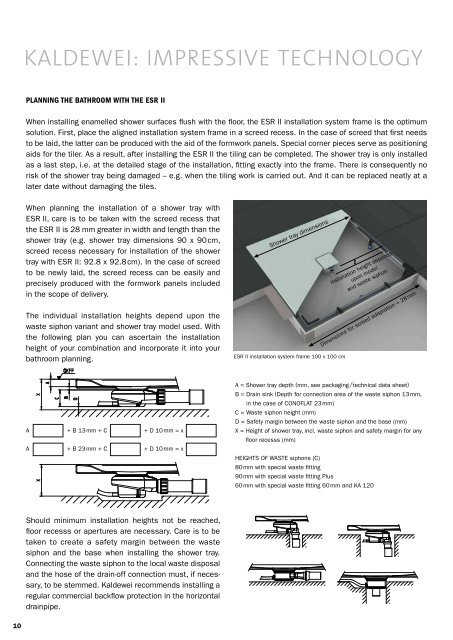
KALDEWEI: impressive technologyPlanning the bathroom with the <strong>ESR</strong> <strong>II</strong>When installing enamelled shower surfaces flush with the floor, the <strong>ESR</strong> <strong>II</strong> installation system frame is the optimumsolution. First, place the aligned installation system frame in a screed recess. In the case of screed that first needsto be laid, the latter can be produced with the aid of the formwork panels. Special corner pieces serve as positioningaids for the tiler. As a result, after installing the <strong>ESR</strong> <strong>II</strong> the tiling can be completed. The shower tray is only installedas a last step, i.e. at the detailed stage of the installation, fitting exactly into the frame. There is consequently norisk of the shower tray being damaged – e.g. when the tiling work is carried out. And it can be replaced neatly at alater date without damaging the tiles.To prevent the aligned <strong>ESR</strong> <strong>II</strong> from moving during later construction phases, floor attachments are included in thescope of delivery. The floor attachments can be positioned as shown in the illustration (depending upon the installationsituation). In order to guarantee optimum sound insulation, the floor attachments are removed again prior toinstalling the shower tray.When planning the installation of a shower tray with<strong>ESR</strong> <strong>II</strong>, care is to be taken with the screed recess thatthe <strong>ESR</strong> <strong>II</strong> is 28 mm greater in width and length than theshower tray (e.g. shower tray dimensions 90 x 90 cm,screed recess necessary for installation of the showertray with <strong>ESR</strong> <strong>II</strong>: 92.8 x 92.8 cm). In the case of screedto be newly laid, the screed recess can be easily andprecisely produced with the formwork panels includedin the scope of delivery.The individual installation heights depend upon thewaste siphon variant and shower tray model used. Withthe following plan you can ascertain the installationheight of your combination and incorporate it into yourbathroom planning.Shower tray dimensions<strong>ESR</strong> <strong>II</strong> installation system frame 100 x 100 cmInstallation height dependsupon modeland waste siphonDimensions for screed adaptation + 28 mmAA+ B 13 mm + C+ B 23 mm + C+ D 10 mm = x+ D 10 mm = xA = Shower tray depth (mm, see packaging /technical data sheet)B = Drain sink (Depth for connection area of the waste siphon 13 mm,in the case of CONOFLAT 23 mm)C = Waste siphon height (mm)D = Safety margin between the waste siphon and the base (mm)X = Height of shower tray, incl. waste siphon and safety margin for anyfloor recesss (mm)HEIGHTS OF WASTE siphons (C)80 mm with special waste fitting90 mm with special waste fitting Plus60 mm with special waste fitting 60 mm and KA 120The slick foot system enables the most varied installation heights and can be flexibly adjusted to meet variousdifferent installation requirements.Should minimum installation heights not be reached,floor recesss or apertures are necessary. Care is to betaken to create a safety margin between the wastesiphon and the base when installing the shower tray.Connecting the waste siphon to the local waste disposaland the hose of the drain-off connection must, if necessary,to be stemmed. <strong>Kaldewei</strong> recommends installing aregular commercial backflow protection in the horizontaldrainpipe.Installation heights with shower traysS: 49 mm – non-adjustableI: 63 – 77 mm<strong>II</strong>: 75 – 99 mm<strong>II</strong>I: 97 – 131 mm<strong>II</strong>I+V: 131 – 164 mmOKFF = Top edge of the finished base10 11