

CREATING CUSTOM SHORTCUT KEYS IN AUTODESK INVENTOR ...
CREATING CUSTOM SHORTCUT KEYS IN AUTODESK INVENTOR ...
CREATING CUSTOM SHORTCUT KEYS IN AUTODESK INVENTOR ...

Create successful ePaper yourself
Turn your PDF publications into a flip-book with our unique Google optimized e-Paper software.
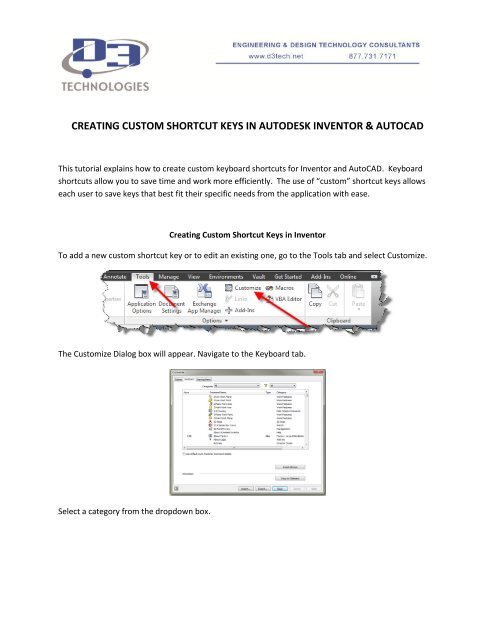
<strong>CREAT<strong>IN</strong>G</strong> <strong>CUSTOM</strong> <strong>SHORTCUT</strong> <strong>KEYS</strong> <strong>IN</strong> <strong>AUTODESK</strong> <strong>IN</strong>VENTOR & AUTOCADThis tutorial explains how to create custom keyboard shortcuts for Inventor and AutoCAD. Keyboardshortcuts allow you to save time and work more efficiently. The use of “custom” shortcut keys allowseach user to save keys that best fit their specific needs from the application with ease.Creating Custom Shortcut Keys in InventorTo add a new custom shortcut key or to edit an existing one, go to the Tools tab and select Customize.The Customize Dialog box will appear. Navigate to the Keyboard tab.Select a category from the dropdown box.
After you have selected the category, you can use the second drop down box to filter the list ofcommands to Assigned, Unassigned or All. Assigned indicates pre-existing shortcuts. Select Assigned ifyou wish to modify a saved shortcut. To create a new custom shortcut, select Unassigned.After filtering your list appropriately, in this case Unassigned, you are now able to input your newshortcut key value. Select the command you wish to create a shortcut key for and input the value underthe Keys column. Upon inputting your new value for the command, you can then select Apply. Yournew shortcut key is available for use in Inventor.
Creating Custom Shortcut Keys in AutoCADBefore creating custom shortcut keys, we need to verify that Express Tools are installed. To check this,you need to right-click on the Ribbon and then select Show Tabs. Look to see if Express Tools is anoption. If Express Tools is not listed, we will need to install this from the media. Please continue withthe following steps. If Express Tools are installed, skip to the asterisk ahead.
Installing Express ToolsYou will need to have access to the media to install Express Tools. Go to the Windows Start Menu andselect: Control Panel -> Programs -> Programs and Features. Next select AutoCAD 2013 from the namelist and then click: Uninstall/Change.The Autodesk Splash Screen appears and gives you the options: Add or Remove Features, Repair orReinstall, or to Uninstall. You will need to select Add or Remove Features.The Add or Remove Feature Dialog Box opens giving you a list of Features for selection. You will want toverify that you have Express Tools checked. Upon selecting Express Tools, click the Update button at thebottom of your screen. You will then be prompted to insert the media.
Once the update is finished you can open AutoCAD and you should now have access to Express Tools.You can verify this by performing the steps previously mentioned. Now we can move forward withcreating custom shortcut keys.*The first step is to launch a command called “ALIASEDIT”; you can launch this command by eithertyping “ALIASEDIT” in the command line or by selecting the Command Aliases button on the ExpressTools Tab of the Ribbon.Upon launching “ALIASEDIT”, the Alias Editor dialog box opens up. Select Add.
The New Command Alias Dialog box opens up allowing us to create a custom shortcut command. Tocreate a new Alias you need to input a value in the Alias section of the first dialog box. Then select theAutoCAD command you wish to assign to your new Alias from the list.For example, you might create a new keyboard shortcut for the command MATCHPROP. The currentkeyboard shortcut for MATCHPROP is MA. M and A are located on opposite sides of the keyboardmaking it difficult to quickly type the shortcut. Since N is currently not being used for a command, I amgoing to select it as my new Alias for the MATCHPROP command. Once I have input the values for mynew Alias, I select OK and then select Apply on the AutoCAD Alias Editor dialog box.A dialog box will warn you that the changes will overwrite your acad.pgp file. To proceed, select Yes.
You have now successfully created a custom keyboard shortcut. However, sometimes AutoCAD doesnot recognize the new command as it does not recheck the acad.pgp file during a single session. Youcan restart AutoCAD for the change to take effect, or keep reading for an easier way. On the commandline enter “RE<strong>IN</strong>IT”. Once you launch the command, the Re-Initialization dialog box opens up allowingus to select the PGP file to be re-initialized.Once you select the PGP file and hit OK, you will be ready to start using your new custom shortcut keysin AutoCAD.