

Euro-Concealo® Hinges - Liberty Hardware
Euro-Concealo® Hinges - Liberty Hardware
Euro-Concealo® Hinges - Liberty Hardware

You also want an ePaper? Increase the reach of your titles
YUMPU automatically turns print PDFs into web optimized ePapers that Google loves.
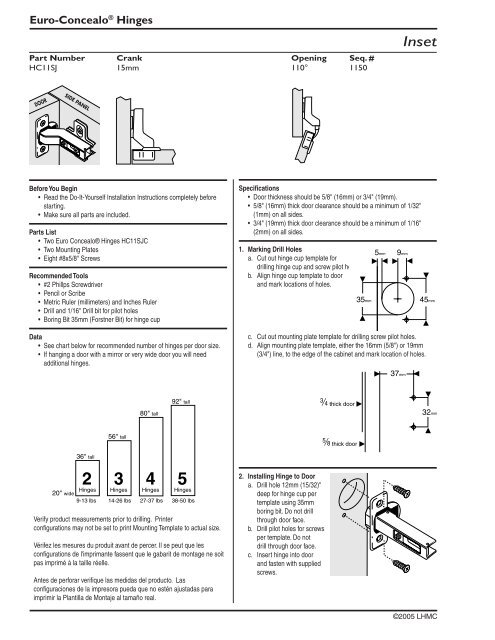
<strong>Euro</strong>-Concealo ® <strong>Hinges</strong>Part Number Crank Opening Seq. #HC11SJ 15mm 110° 1150InsetDOORSIDE PANELBefore You Begin• Read the Do-It-Yourself Installation Instructions completely beforestarting.• Make sure all parts are included.Parts List• Two <strong>Euro</strong> <strong>Concealo®</strong> <strong>Hinges</strong> HC11SJC• Two Mounting Plates• Eight #8x5/8" ScrewsRecommended Tools• #2 Phillps Screwdriver• Pencil or Scribe• Metric Ruler (millimeters) and Inches Ruler• Drill and 1/16" Drill bit for pilot holes• Boring Bit 35mm (Forstner Bit) for hinge cupData• See chart below for recommended number of hinges per door size.• If hanging a door with a mirror or very wide door you will needadditional hinges.Specifications• Door thickness should be 5/8" (16mm) or 3/4" (19mm).• 5/8" (16mm) thick door clearance should be a minimum of 1/32"(1mm) on all sides.• 3/4" (19mm) thick door clearance should be a minimum of 1/16"(2mm) on all sides.1. Marking Drill Holesa. Cut out hinge cup template fordrilling hinge cup and screw pilot holes.b. Align hinge cup template to doorand mark locations of holes.35mm5mm9mmc. Cut out mounting plate template for drilling screw pilot holes.d. Align mounting plate template, either the 16mm (5/8") or 19mm(3/4") line, to the edge of the cabinet and mark location of holes.45mm37mm80" tall92" tallX thick door32mm36" tall256" tall34520" wide<strong>Hinges</strong> <strong>Hinges</strong> <strong>Hinges</strong> <strong>Hinges</strong>9-13 lbs 14-26 lbs 27-37 lbs 38-50 lbsVerify product measurements prior to drilling. Printerconfigurations may not be set to print Mounting Template to actual size.Vérifez les mesures du produit avant de percer. Il se peut que lesconfigurations de l'imprimante fassent que le gabarit de montage ne soitpas imprimé à la taille réelle.Antes de perforar verifique las medidas del producto. Lasconfiguraciones de la impresora pueda que no estén ajustadas paraimprimir la Plantilla de Montaje al tamaño real.2. Installing Hinge to Doora. Drill hole 12mm (15/32)"deep for hinge cup pertemplate using 35mmboring bit. Do not drillthrough door face.b. Drill pilot holes for screwsper template. Do notdrill through door face.c. Insert hinge into doorand fasten with suppliedscrews.K thick door©2005 LHMC
<strong>Euro</strong>-Concealo ® <strong>Hinges</strong>3. Installing Mounting Plate to Cabineta. Drill pilot holes for screws per template.Do not drill through cabinet.b. Align mounting plate to holes and fastenwith supplied screws.Do not overtighten.5. Door AdjustmentAlign door using following adjustment feature.a. Lateral Adjustment allowsfor adjusting the doorplus or minus 2.5mmside to side.4. Installing Door to Cabineta. Open hinge to full extension.b. Connect door to cabinet as shown below.1 2b. Horizontal Adjustmentallows for adjusting thedoor in and out.34c. Vertical Adjustment allowsfor adjusting the doorup and down.Mounting Plate TemplateHinge Cup TemplateX lineVerify product measurements prior to drilling.Printer configurations may not be set to printMounting Template to actual size.Hinge CenterlineAx de Charni reL nea central de laBisagraK lineEdge of doorHinge CenterlineVérifez les mesures du produit avant de percer.Il se peut que les configurations de l'imprimantefassent que le gabarit de montage ne soit pasimprimé à la taille réelle.Antes de perforar verifique las medidas delproducto. Las configuraciones de la impresorapueda que no estén ajustadas para imprimir laPlantilla de Montaje al tamaño real.©2005 LHMC
