Sailing to Windward With the Gentry Tuft System - ArvelGentry.com
Sailing to Windward With the Gentry Tuft System - ArvelGentry.com
Sailing to Windward With the Gentry Tuft System - ArvelGentry.com

Create successful ePaper yourself
Turn your PDF publications into a flip-book with our unique Google optimized e-Paper software.
.<br />
<strong>Sailing</strong> <strong>to</strong> <strong>Windward</strong> <strong>With</strong> <strong>the</strong> <strong>Gentry</strong> <strong>Tuft</strong> <strong>System</strong><br />
Ranger 23 Newsletter<br />
Back in 1973 I wrote an article for SAIL magazine<br />
describing <strong>the</strong> leading edge separation bubble and <strong>the</strong> use<br />
of a special set of yarns near <strong>the</strong> luff of <strong>the</strong> genoa as an aid<br />
in sailing <strong>to</strong> windward. This article is included in <strong>the</strong> book,<br />
The Best of Sail Trim, page 77. And, whe<strong>the</strong>r you race or<br />
cruise, you will find that this system will improve your<br />
sailing.<br />
A recent conversation while at my sailmaker's loft has<br />
prompted me <strong>to</strong> try reintroducing this idea <strong>to</strong> <strong>the</strong> sailing<br />
<strong>com</strong>munity. I was describing my system of short telltales<br />
(tufts) for a new genoa <strong>to</strong> my sailmaker when one of <strong>the</strong><br />
best local sailors, Scott Rohrer, came in and overheard part<br />
of <strong>the</strong> conversation. Scott said that he had recently been<br />
driving a big boat that had a telltale near <strong>the</strong> luff of <strong>the</strong><br />
genoa. He felt that <strong>the</strong> boat was going <strong>to</strong> windward great,<br />
fast and pointing high, even though <strong>the</strong> telltale on <strong>the</strong><br />
leeward side was frequently twirling. The owner of <strong>the</strong><br />
boat argued that <strong>the</strong> telltale indicated that <strong>the</strong> sail was<br />
stalled and that he should be pointing higher.<br />
As I described <strong>the</strong> leading edge separation bubble idea<br />
and my tuft system, Scott quickly saw that this was <strong>the</strong><br />
information he needed <strong>to</strong> settle <strong>the</strong> argument with <strong>the</strong><br />
boat owner. I had a copy of The Best of Sail Trim with me,<br />
and Scott immediately made a copy of <strong>the</strong> article so that he<br />
could use it <strong>to</strong> describe <strong>the</strong> idea <strong>to</strong> <strong>the</strong> boat owner.<br />
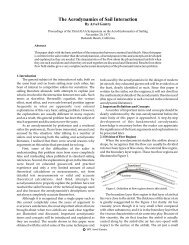
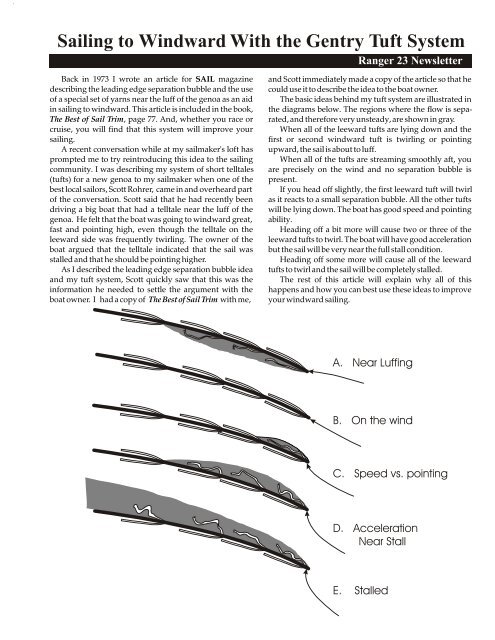
The basic ideas behind my tuft system are illustrated in<br />
<strong>the</strong> diagrams below. The regions where <strong>the</strong> flow is separated,<br />
and <strong>the</strong>refore very unsteady, are shown in gray.<br />
When all of <strong>the</strong> leeward tufts are lying down and <strong>the</strong><br />
first or second windward tuft is twirling or pointing<br />
upward, <strong>the</strong> sail is about <strong>to</strong> luff.<br />
When all of <strong>the</strong> tufts are streaming smoothly aft, you<br />
are precisely on <strong>the</strong> wind and no separation bubble is<br />
present.<br />
If you head off slightly, <strong>the</strong> first leeward tuft will twirl<br />
as it reacts <strong>to</strong> a small separation bubble. All <strong>the</strong> o<strong>the</strong>r tufts<br />
will be lying down. The boat has good speed and pointing<br />
ability.<br />
Heading off a bit more will cause two or three of <strong>the</strong><br />
leeward tufts <strong>to</strong> twirl. The boat will have good acceleration<br />
but <strong>the</strong> sail will be very near <strong>the</strong> full stall condition.<br />
Heading off some more will cause all of <strong>the</strong> leeward<br />
tufts <strong>to</strong> twirl and <strong>the</strong> sail will be <strong>com</strong>pletely stalled.<br />
The rest of this article will explain why all of this<br />
happens and how you can best use <strong>the</strong>se ideas <strong>to</strong> improve<br />
your windward sailing.<br />
A. Near Luffing<br />
B. On <strong>the</strong> wind<br />
C. Speed vs. pointing<br />
D. Acceleration<br />
Near Stall<br />
E. Stalled
.<br />
Some Telltale His<strong>to</strong>ry<br />
Somewhere back in time, a <strong>com</strong>petitive sailor placed a<br />
yarn telltale about two feet back from <strong>the</strong> luff. When <strong>the</strong><br />
leeward telltale twirled it indicated that <strong>the</strong> sail was stalled<br />
and <strong>the</strong> boat slowed down. But why was it placed two feet<br />
back from <strong>the</strong> luff? In Tom Whidden's book, The Art and<br />
Science of Sails, page 196, he states that <strong>the</strong> telltales "should<br />
be between 12 and 24 inches back from <strong>the</strong> luff--<strong>the</strong> bigger<br />
<strong>the</strong> boat, <strong>the</strong> far<strong>the</strong>r aft--<strong>to</strong> keep <strong>the</strong>m away from <strong>the</strong><br />
confusing local turbulence, or form drag, of <strong>the</strong> headstay."<br />
Well, this is not exactly correct. "...confusing local<br />
turbulence", yes! If <strong>the</strong> leeward telltale was placed <strong>to</strong>o<br />
close <strong>to</strong> <strong>the</strong> luff, it would often twirl even though <strong>the</strong> boat<br />
was still sailing fast. Confusing because of <strong>the</strong> "form drag<br />
of <strong>the</strong> headstay", no! The fact is, if you could magically<br />
replace <strong>the</strong> genoa with a curved sheet of aluminum<br />
without a headstay, <strong>the</strong> flow near <strong>the</strong> leading edge would<br />
still be "confusing." The cause of this confusion is <strong>the</strong> sail<br />
leading edge separation bubble that I discovered and<br />
described in <strong>the</strong> SAIL magazine article (March 1973).<br />
After <strong>the</strong> publication of my tuft system article, grand<br />
prix boats, maxis, and even America's Cup boats began <strong>to</strong><br />
use several telltales in a row instead of <strong>the</strong> single telltale.<br />
They were placed about a foot apart, with <strong>the</strong> first one a<br />
foot or more from <strong>the</strong> luff. <strong>With</strong> dacron sails it was usually<br />
difficult <strong>to</strong> see <strong>the</strong> leeward telltales, and because of <strong>the</strong>ir<br />
wide spacing, <strong>the</strong>y could not really be used as I had<br />
originally described. Instead, sailors started using <strong>the</strong> first<br />
windward telltale as an indication of when <strong>the</strong> sail is about<br />
<strong>to</strong> luff.<br />
In addition <strong>to</strong> <strong>the</strong> widely spaced row of telltales that <strong>the</strong><br />
big boats used, <strong>the</strong>y also usually had a round window with<br />
a single pair of telltales. The leeward telltale in this window<br />
<strong>to</strong>ld <strong>the</strong>m when <strong>the</strong> sail had already stalled. They had<br />
nothing <strong>to</strong> tell <strong>the</strong>m where <strong>the</strong>y were between <strong>the</strong> luffing<br />
and stalled condition except <strong>the</strong> experience of <strong>the</strong> sailor.<br />
However, my <strong>Tuft</strong> <strong>System</strong> tells you when <strong>the</strong> leeward<br />
separation bubble is formed and how big it is. The size of<br />
<strong>the</strong> bubble tells you when you are close <strong>to</strong> luffing, when<br />
you are close <strong>to</strong> stalling <strong>the</strong> entire sail, and how rapidly<br />
you are changing from one condition <strong>to</strong> <strong>the</strong> o<strong>the</strong>r. This<br />
helps in both driving <strong>the</strong> boat and in coordinating sail trim<br />
as <strong>the</strong> wind and sea conditions change.<br />
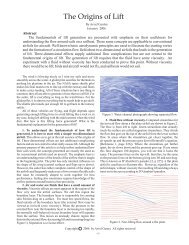
The Leading Edge Separation Bubble<br />
The leading edge separation bubble is best unders<strong>to</strong>od<br />
by studying <strong>the</strong> tuft system diagrams shown on <strong>the</strong> first<br />
page. These diagrams show only about <strong>the</strong> first 30 inches<br />
of <strong>the</strong> leading edge of a genoa on a large boat, or about 16<br />
inches on a boat <strong>the</strong> size of <strong>the</strong> Ranger 23. The airflow is<br />
from <strong>the</strong> right <strong>to</strong> <strong>the</strong> left. Four short pieces of yarn or<br />
spinnaker cloth, <strong>the</strong> tufts, are shown on each side of <strong>the</strong><br />
sail. Note that <strong>the</strong> first one is placed as close <strong>to</strong> <strong>the</strong> leading<br />
edge as possible, and that <strong>the</strong> subsequent tufts are placed<br />
head-<strong>to</strong>-tail. Each of <strong>the</strong> drawings show <strong>the</strong> sail at different<br />
angles <strong>to</strong> <strong>the</strong> wind.<br />
-2-<br />
Ranger 23 Newsletter<br />
The thin lines with <strong>the</strong> arrow show <strong>the</strong> direction of <strong>the</strong><br />
air as it <strong>com</strong>es in<strong>to</strong> <strong>the</strong> sail, and are what aerodynamicists<br />
call stagnation streamlines. They represent <strong>the</strong> dividing<br />
line between <strong>the</strong> air that flows on <strong>the</strong> lee side of <strong>the</strong> sail<br />
from <strong>the</strong> air flowing on <strong>the</strong> windward side (<strong>the</strong> lower side<br />
shown in <strong>the</strong>se diagrams). The separated regions are<br />
shown in gray. The angles shown in <strong>the</strong>se diagrams and<br />
<strong>the</strong> changes in <strong>the</strong> stagnation streamline have been<br />
exaggerated for illustrative purposes, as has <strong>the</strong> thickness<br />
of <strong>the</strong> separation bubbles.<br />
Diagram A shows <strong>the</strong> sail as it is just starting <strong>to</strong> luff. The<br />
stagnation streamline is <strong>com</strong>ing in<strong>to</strong> <strong>the</strong> leading edge<br />
slightly on <strong>the</strong> lee (<strong>to</strong>p) side of <strong>the</strong> sail. As <strong>the</strong> air on <strong>the</strong><br />
windward (lower) side of <strong>the</strong> sail tries <strong>to</strong> make <strong>the</strong> turn<br />
around <strong>the</strong> leading edge it will separate and form a bubble,<br />
shown in gray. The air inside <strong>the</strong> bubble is very unsteady,<br />
and is made up of twists and swirls of very confused air.<br />
Any tufts inside of <strong>the</strong> bubble will twirl wildly. The bubble<br />
gets thinner <strong>to</strong>ward <strong>the</strong> back end, and tufts downstream of<br />
<strong>the</strong> bubble will not twirl but will lie smoothly along <strong>the</strong><br />
surface of <strong>the</strong> sail. Except for <strong>the</strong> fact that <strong>the</strong> sail is about <strong>to</strong><br />
luff, <strong>the</strong> windward bubble has only a small effect on <strong>the</strong><br />
performance of <strong>the</strong> sail. On a real genoa, with <strong>the</strong> headstay<br />
swept back at an angle, <strong>the</strong> general direction of <strong>the</strong><br />
swirling air within <strong>the</strong> bubble will be upward. This is why<br />
<strong>the</strong> usual single windward telltale will lift and twirl<br />
somewhat upward when <strong>the</strong> sail is about <strong>to</strong> luff.<br />
Diagram B shows <strong>the</strong> sail at a slightly higher angle of<br />
attack where <strong>the</strong> stagnation streamline is <strong>com</strong>ing in<strong>to</strong> <strong>the</strong><br />
exact leading edge of <strong>the</strong> sail. Precisely at <strong>the</strong> point where<br />
<strong>the</strong> stagnation streamline hits <strong>the</strong> leading edge, <strong>the</strong> air<br />
actually <strong>com</strong>es <strong>to</strong> a <strong>com</strong>plete s<strong>to</strong>p (that's why we call it <strong>the</strong><br />
stagnation streamline). The airflow is smooth on both<br />
sides of <strong>the</strong> sail, and in fact starts <strong>to</strong> accelerate immediately<br />
as it splits <strong>to</strong> flow on both sides of <strong>the</strong> sail. As we know from<br />
modern sail <strong>the</strong>ory, <strong>the</strong> air on <strong>the</strong> leeward side accelerates<br />
much more rapidly than <strong>the</strong> air on <strong>the</strong> windward side.<br />
This leads <strong>to</strong> a lower pressure on <strong>the</strong> leeward side than on<br />
<strong>the</strong> windward side, giving us <strong>the</strong> pressure difference and<br />
lifting force necessary <strong>to</strong> make our boat go. Since <strong>the</strong> flow<br />
on both sides of <strong>the</strong> sail right at <strong>the</strong> leading edge is accelerating<br />
smoothly, no separation bubble is formed. The sail is<br />
pointing precisely in<strong>to</strong> <strong>the</strong> wind.<br />
In Diagram C <strong>the</strong> angle of attack of <strong>the</strong> sail has been<br />
again increased slightly. The stagnation streamline is<br />
actually around on <strong>the</strong> windward side of <strong>the</strong> sail. As <strong>the</strong> air<br />
flows around on<strong>to</strong> <strong>the</strong> leeward side, it separates in <strong>the</strong><br />
form of a small bubble with only <strong>the</strong> first tuft slightly<br />
agitated or twirling. Aft of this short bubble <strong>the</strong> flow is<br />
again reattached <strong>to</strong> <strong>the</strong> sail as shown by <strong>the</strong> fact that <strong>the</strong><br />
o<strong>the</strong>r tufts are lying down smoothly. The sail is not stalled.<br />
For many boats this represents <strong>the</strong> best condition for<br />
windward performance.<br />
In Diagram D <strong>the</strong> angle of attack has been increased<br />
even more by heading <strong>the</strong> boat off slightly. The bubble has
.<br />
grown in length as indicated by <strong>the</strong> fact that <strong>the</strong> first three<br />
tufts are twirling. If <strong>the</strong> first tuft is very close <strong>to</strong> <strong>the</strong> leading<br />
edge, <strong>the</strong> windward tuft may even twist around <strong>to</strong> <strong>the</strong> lee<br />
side of <strong>the</strong> leading edge.<br />
In Diagram E <strong>the</strong> angle of attack has been increased<br />
even more. But now, <strong>the</strong> bubble has burst and extends<br />
clear past <strong>the</strong> trailing edge of <strong>the</strong> airfoil. The whole sail has<br />
stalled. Lift goes down and drag goes up. The boat slows<br />
down and does not point well.<br />
By now you should have <strong>the</strong> idea as <strong>to</strong> how <strong>the</strong> <strong>Gentry</strong><br />
<strong>Tuft</strong> <strong>System</strong> works. Not only does <strong>the</strong> system tell you how<br />
close you are <strong>to</strong> luffing (all <strong>the</strong> leeward tufts lying down),<br />
how close you are <strong>to</strong> stalling <strong>the</strong> sail (<strong>the</strong> first two or three<br />
leeward tufts twirling), but how rapidly you are changing<br />
between <strong>the</strong>se two conditions. If you need <strong>to</strong> point high,<br />
make all <strong>the</strong> leeward tufts lay down, with only <strong>the</strong> first one<br />
occasionally twirling. For better speed, bear off slightly so<br />
that <strong>the</strong> first leeward tuft is agitated. For more power,<br />
briefly head off allowing <strong>the</strong> first, second, and maybe <strong>the</strong><br />
third tufts <strong>to</strong> twirl. The key in using this system is <strong>to</strong> watch<br />
<strong>the</strong> tufts on <strong>the</strong> leeward side of <strong>the</strong> sail.<br />
Communication between <strong>the</strong> helmsperson and <strong>the</strong><br />
genoa trimmer is obviously very important. If <strong>the</strong> trimmer<br />
sees <strong>the</strong> first, second, <strong>the</strong>n third tuft twirl in succession,<br />
he/she must ei<strong>the</strong>r let out on <strong>the</strong> sheet some, or ask <strong>the</strong><br />
helmsperson <strong>to</strong> head up <strong>to</strong> avoid stalling <strong>the</strong> genoa. If all of<br />
<strong>the</strong> leeward tufts are lying down, <strong>the</strong> sail is about <strong>to</strong> luff.<br />
The boat should be headed off slightly or <strong>the</strong> genoa<br />
trimmed in some.<br />
Experience with <strong>the</strong> system also has a side benefit in<br />
that it provides more precise steering. It also allows <strong>the</strong><br />
helmsperson <strong>to</strong> spend more time watching for waves and<br />
chop instead of watching for <strong>the</strong> sail <strong>to</strong> luff or watching a<br />
single telltale <strong>to</strong> indicate a stall, and all <strong>the</strong> time wandering<br />
back and forth between <strong>the</strong> luffing and stalled condition.<br />
The standard single telltale only tells you when <strong>the</strong> sail is<br />
stalled, and that's <strong>to</strong>o late. <strong>With</strong> <strong>the</strong> tuft system you can<br />
avoid stalling <strong>the</strong> sail because you can see <strong>the</strong> stall <strong>com</strong>ing<br />
before it happens.<br />
<strong>Tuft</strong> <strong>System</strong> Installation<br />
The actual length of <strong>the</strong> tufts and <strong>the</strong>ir placement on<br />
<strong>the</strong> genoa will depend upon <strong>the</strong> size of <strong>the</strong> boat. On a 23<br />
foot boat <strong>the</strong> tufts should be only 3 inches in length. Placed<br />
head-<strong>to</strong>-tail, usually three leeward tufts will twirl just<br />
before <strong>the</strong> sail will stall. On a 35-foot boat <strong>the</strong> tufts should<br />
be about 6 inches in length. It may take some experimenting<br />
<strong>to</strong> find <strong>the</strong> proper length and placement for <strong>the</strong> sails on<br />
your boat. One approach is <strong>to</strong> install several rows of tufts<br />
with different lengths and spacing. You might also attach a<br />
regular telltale about four feet back on <strong>the</strong> sail <strong>to</strong> help in<br />
calibrating <strong>the</strong> tuft system for <strong>the</strong> fully stalled condition.<br />
Then go sailing <strong>to</strong> find out which row works as described<br />
in this article, and <strong>the</strong>n remove all but <strong>the</strong> best row of tufts.<br />
The tufts on <strong>the</strong> port side of <strong>the</strong> sail should be red, those<br />
on <strong>the</strong> starboard side green. On a lightweight Mylar genoa<br />
-3-<br />
Ranger 23 Newsletter<br />
you may be able <strong>to</strong> see <strong>the</strong> tufts without a window.<br />
However, on some polyester-Mylar sails and on older<br />
dacron sails, you will want <strong>to</strong> install an elongated window<br />
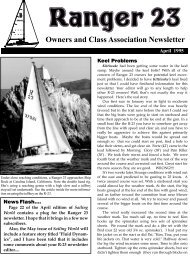
in <strong>the</strong> sail so that all of <strong>the</strong> leeward tufts can be seen. The<br />
front edge of <strong>the</strong> window should be right up against <strong>the</strong><br />
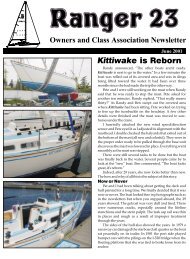
bolt rope or luff tape. The pho<strong>to</strong> below shows <strong>the</strong> tuft<br />
system installation on Kittiwake's heavy number 1<br />
polyester-Mylar genoa.<br />
If you have a good sewing machine you can install <strong>the</strong><br />
window yourself. A Window Kit is available from Sailrite<br />
for $6 (Toll free at 1-800-348-2769). The key is <strong>to</strong> sew <strong>the</strong><br />
window on<strong>to</strong> <strong>the</strong> sail first, <strong>the</strong>n carefully cut away <strong>the</strong><br />
dacron sail material with a sharp X-ac<strong>to</strong> knife without<br />
nicking <strong>the</strong> plastipane. I installed one on Kittiwake's 130%<br />
genoa. It was easy and works great.<br />
For <strong>the</strong> Ranger 23, first make a cutting pattern on a<br />
piece of paper. Draw a 5" x 11" rectangle and, with a<br />
drawing <strong>com</strong>pass, scribe a 5" diameter circle inside <strong>the</strong><br />
rectangle at each end. This rounded rectangle be<strong>com</strong>es <strong>the</strong><br />
template for cutting out <strong>the</strong> plastic window.<br />
Next, decide where you want <strong>the</strong> window on <strong>the</strong> sail.<br />
For a tall rig R-23, put it about 9 feet up <strong>the</strong> luff from <strong>the</strong><br />
tack. You may have <strong>to</strong> adjust this up or down some <strong>to</strong> keep<br />
<strong>the</strong> window away from any sail panel seams. <strong>With</strong> a pencil<br />
mark a reference point on <strong>the</strong> luff tape at <strong>the</strong> chosen<br />
location.<br />
<strong>With</strong> a protrac<strong>to</strong>r measure a 72 degree angle down<br />
from <strong>the</strong> luff tape. This will be <strong>the</strong> centerline of <strong>the</strong> window<br />
and will allow <strong>the</strong> tufts <strong>to</strong> flow nicely in <strong>the</strong><br />
streamwise direction when <strong>the</strong> sail is set.<br />
Lay <strong>the</strong> sail out smooth and, using <strong>the</strong> double stickybacked<br />
tape provided in <strong>the</strong> kit, attach <strong>the</strong> window <strong>to</strong> <strong>the</strong><br />
sail. The front edge of <strong>the</strong> window should be right up<br />
against <strong>the</strong> edge of <strong>the</strong> luff tape.<br />
Now, carefully sew a row of zig-zag stitches around <strong>the</strong><br />
outer edge of <strong>the</strong> plastic window. Turn <strong>the</strong> sail over and<br />
draw a line on <strong>the</strong> dacron that is 0.5" inside of <strong>the</strong> outer<br />
edge of <strong>the</strong> plastic window. This is your guideline for<br />
cutting out <strong>the</strong> dacron material. I used a sharp X-ac<strong>to</strong> knife<br />
<strong>to</strong> cut out <strong>the</strong> dacron. I made an incision in <strong>the</strong> center, <strong>the</strong>n<br />
carefully continued <strong>the</strong> cut <strong>to</strong> <strong>the</strong> guideline and around
.<br />
<strong>the</strong> inside of <strong>the</strong> window. Next, sew a final zig-zag seam<br />
around <strong>the</strong> inner edge of <strong>the</strong> window.<br />
<strong>Tuft</strong>s made of yarn can be treated with a water repellent<br />
<strong>to</strong> help keep <strong>the</strong>m from sticking <strong>to</strong> <strong>the</strong> window in wet<br />
wea<strong>the</strong>r. <strong>Tuft</strong>s made from spinnaker cloth are more<br />
sensitive than yarn. However, <strong>the</strong>y are more susceptible <strong>to</strong><br />
rain and may need <strong>to</strong> be replaced occasionally if <strong>the</strong>y get<br />
creased badly when <strong>the</strong> sail is folded.<br />
I prefer using <strong>the</strong> spinnaker cloth. I get red (or orange)<br />
and green scraps from my sailmaker for this purpose. To<br />
cut <strong>the</strong> half-inch wide strips, I have used a sharp-tipped<br />
soldering iron, or more recently a sailmaker's hot knife<br />
(from Sailrite). I have cut two 6" x 10" pieces from poster<br />
board and taped <strong>the</strong>m <strong>to</strong>ge<strong>the</strong>r <strong>to</strong> form a sort of book. I<br />
open up <strong>the</strong> book and lay a piece of spinnaker cloth over<br />
one side. I <strong>the</strong>n use <strong>the</strong> soldering iron or hot knife <strong>to</strong> cut<br />
half-inch wide strips of spinnaker cloth. The heat from <strong>the</strong><br />
cutting will cause <strong>the</strong> cloth strips <strong>to</strong> stick <strong>to</strong> <strong>the</strong> poster<br />
board and keep <strong>the</strong>m nicely in place on <strong>the</strong> board until<br />
<strong>the</strong>y are used. When I sail on ano<strong>the</strong>r boat, I always take<br />
my little book with telltales along in my seabag!<br />
The tufts can be attached <strong>to</strong> <strong>the</strong> sail window or <strong>to</strong> a<br />
Mylar sail with a small square of clear plastic tape. On <strong>the</strong><br />
Ranger 23 <strong>the</strong>y should be about 3.5" long. Use a piece of<br />
spinnaker repair tape <strong>to</strong> fix <strong>the</strong> first tuft <strong>to</strong> <strong>the</strong> luff tape. In a<br />
sail with a window, <strong>the</strong> first tuft should be about 4" long<br />
with only <strong>the</strong> tail of <strong>the</strong> first tuft visible in <strong>the</strong> window.<br />
Driving The Boat<br />
Why should you use this tuft system? First, it's more<br />
fun <strong>to</strong> sail <strong>to</strong> windward more efficiently. Every racing<br />
sailor knows this. But what if you only day sail or cruise? I<br />
have had a number of sailors tell me that <strong>the</strong>y don't race;<br />
<strong>the</strong>y just enjoy being out on <strong>the</strong> water. Soon, however,<br />
<strong>the</strong>y tell me how this big boat was passing <strong>the</strong>m last<br />
weekend, and how <strong>the</strong>y sheeted <strong>the</strong> sails in a bit, watched<br />
<strong>the</strong> trim, and beat <strong>the</strong> o<strong>the</strong>r boat back <strong>to</strong> <strong>the</strong> marina. Sure,<br />
<strong>the</strong>y don't race!<br />
<strong>Sailing</strong> a boat <strong>to</strong> windward is not really a black art, but<br />
at <strong>the</strong> highest level, it requires a higher degree of concentration<br />
than most people realize. It also requires close<br />
coordination with your genoa trimmer. These facts<br />
remain, regardless of <strong>the</strong> size of <strong>the</strong> boat you are sailing.<br />
Each boat, however, has its own special characteristics, and<br />
<strong>the</strong> Ranger 23 is no exception.<br />
The keel on <strong>the</strong> R-23 is ra<strong>the</strong>r short <strong>com</strong>pared <strong>to</strong> a lot of<br />
newer designs. The boat is also heavier, but with <strong>the</strong> 1500<br />
pounds of lead in <strong>the</strong> keel, it is ra<strong>the</strong>r stiff (<strong>the</strong> R-23 with <strong>the</strong><br />
short rig is really, really stiff!). We can carry a little more sail<br />
area than <strong>the</strong> lighter boats as <strong>the</strong> wind increases.<br />
Different wind and sea conditions require different<br />
approaches <strong>to</strong> driving <strong>the</strong> R-23. In light wind <strong>the</strong> boat does<br />
not point as high as <strong>the</strong> newer designs. Part of this is<br />
design, but I am convinced that many people that I sail<br />
-4-<br />
Ranger 23 Newsletter<br />
against simply try <strong>to</strong> point <strong>to</strong>o high. I just foot off for speed<br />
and usually get <strong>to</strong> <strong>the</strong> wea<strong>the</strong>r mark before <strong>the</strong>m. The R-23<br />
does point very high when <strong>the</strong> wind increases and <strong>the</strong><br />
boatspeed gets up in <strong>the</strong> 4.8 <strong>to</strong> 5.3 knot range.<br />
Sail trim is always an important fac<strong>to</strong>r in sailing <strong>to</strong><br />
windward, and must be adjusted depending upon <strong>the</strong><br />
objective at hand. A recent race on Kittiwake is a good<br />
example. After rounding West Point we had a 4.5 mile port<br />
tack beat down and across <strong>the</strong> Sound <strong>to</strong> <strong>the</strong> first mark,<br />
Blakely Rock.<br />
We knew that we would not lay Blakely Rock and<br />
would have <strong>to</strong> take a short leg out on starboard before <strong>the</strong><br />
final port tack approach <strong>to</strong> <strong>the</strong> Rock. We had <strong>the</strong> genoa<br />
trimmed <strong>to</strong> 5 inches off of <strong>the</strong> spreader. The chop wasn't<br />
bad but <strong>the</strong> boatspeed would frequently drop from 5.0<br />
down <strong>to</strong> 4.8, <strong>the</strong>n accelerate back up again. Jeff Crouch was<br />
on <strong>the</strong> genoa trim, and I asked him <strong>to</strong> let <strong>the</strong> genoa out <strong>to</strong> 6<br />
inches off <strong>the</strong> spreader. We would try that setting for a<br />
while. The boatspeed <strong>the</strong>n began <strong>to</strong> stay rock steady on<br />
5.0 knots. Good move! We did not point quite as high but<br />
<strong>the</strong> steady 5.0 knot boatspeed made up for it. <strong>With</strong> a good<br />
downwind run we corrected out first in our class.