Set Up Pleasant Holidays with Live Connect in ClientBase Plus
Set Up Pleasant Holidays with Live Connect in ClientBase Plus
Set Up Pleasant Holidays with Live Connect in ClientBase Plus

Create successful ePaper yourself
Turn your PDF publications into a flip-book with our unique Google optimized e-Paper software.
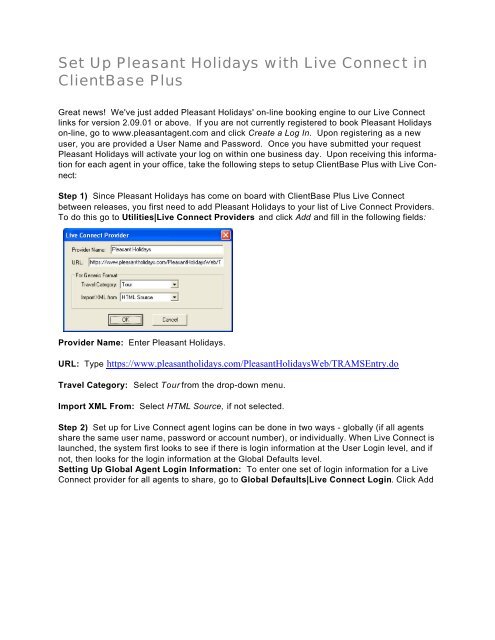
From the profile manager, retrieve the <strong>Pleasant</strong> <strong>Holidays</strong> vendor profile (or create if it is not <strong>in</strong>database). From the General Info tab, click <strong>Live</strong> <strong>Connect</strong> Providers. From here, click Add, thenselect <strong>Pleasant</strong> <strong>Holidays</strong> from the drop-down list. The vendor code is left blank. Click OK.From the General Info tab,click <strong>Live</strong> <strong>Connect</strong> Providers.From here, click Add, then select<strong>Pleasant</strong> <strong>Holidays</strong> fromthe drop-down list. The vendorcode is left blank. ClickOK.Step 4) Create a res card <strong>in</strong> <strong>ClientBase</strong> <strong>Plus</strong>, enter the Res Card Cycle and Trip Name, and adda reservation. Enter the Travel Category and select <strong>Pleasant</strong> <strong>Holidays</strong> as the vendor and then
click <strong>Live</strong> <strong>Connect</strong>.Enter Travel Type, <strong>Pleasant</strong><strong>Holidays</strong> as theVendor, and click <strong>Live</strong><strong>Connect</strong>.Step 5) Select <strong>Pleasant</strong> <strong>Holidays</strong> from the drop-down menu by <strong>Connect</strong> To (if not defaulted), andthen click Create New Reservations.Step 6) Select any customer <strong>in</strong>formation to use to book the <strong>Pleasant</strong> Holiday reservation. Thisdata is automatically passed to <strong>Pleasant</strong> <strong>Holidays</strong> and saves time dur<strong>in</strong>g the book<strong>in</strong>g process, as
less fields need to be completed manually. Click <strong>Connect</strong>.Click <strong>Connect</strong> afterselect<strong>in</strong>g any customer<strong>in</strong>formation to pass to <strong>Pleasant</strong><strong>Holidays</strong>.Step 7) Although still <strong>in</strong> <strong>ClientBase</strong> <strong>Plus</strong>, you are now on-l<strong>in</strong>e at the book<strong>in</strong>g site. Create thebook<strong>in</strong>g and when the reservation is confirmed, click Import Reservation.You are still <strong>in</strong> <strong>ClientBase</strong>when you create thereservation. Click ImportReservation afterbook<strong>in</strong>g is confirmed.All reservation data booked on-l<strong>in</strong>e is now located <strong>in</strong> the reservation fields <strong>in</strong> <strong>ClientBase</strong> <strong>Plus</strong>.Important Note: Although you can retrieve a reservation <strong>in</strong> <strong>Pleasant</strong> <strong>Holidays</strong>, you presentlycannot import (post) it <strong>in</strong>to <strong>ClientBase</strong> <strong>Plus</strong>. Also, at least for now, you CANNOT update reservations<strong>in</strong> <strong>ClientBase</strong> <strong>Plus</strong>, and cancellations have to be called <strong>in</strong>.