You also want an ePaper? Increase the reach of your titles
YUMPU automatically turns print PDFs into web optimized ePapers that Google loves.
<strong>Weener</strong> <strong>wah</strong>01.2012 madbeanpedalsPCB Dimensions: 1.825” W x 2.85” H
Resistors Caps DiodesR1 1M C1 100n D1 1n4001R2 68k C2 4uF TransistorsR3 22k C3 220n Q1 2n3565R4 390R C4 220n Q2 BC549CR5 2k2 C5 3n9 Q3 2N5457R6 470k C6 100n InductorR7 33k C7 47n L1 WhippleR8 100k C8 220nSwitchR9 470k C9 47uF SW1 SPDTR10 10kTrimpotsR11 1k PEAK 100kR12 1M FREQ 100kR13 10KPotsR14 10k SWEEP 100k ICARR15 1kR16 1k
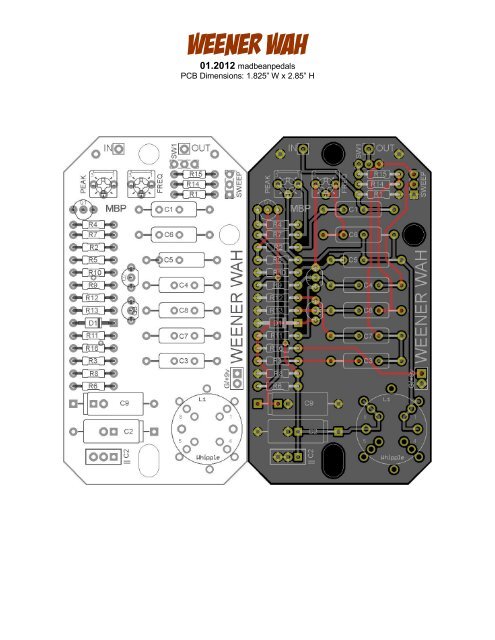
What Is It?The <strong>Weener</strong> Wah has roots in the classic Clyde McCoy but with some useful and more modernfeatures to meet the demands of today’s sophisticated guitar player….or something.One of the biggest complaints in older Wah Wahs is the incredible tone sucking they exhibit. This wasa consequence of the in input of the circuit always being present even when bypassed, and thusloading down the output of the guitar. The prevalence of DPDT and 3PDT switches nowadays makesthis easy to rectify, and the <strong>Weener</strong> Wah will not suffer from any loading whatsoever provided youuse one of those types of switches.A switchable output buffer has been added to keep the output level as close to the bypass aspossible, and to lower the overall output impedance of the effect.Additional controls have been added to fine tune and personalize allowing the builder much moretweaking ability than a standard <strong>wah</strong>. Extra pads have been included to allow for a variety ofinductors, as well.ControlsSweep – This pot controls the range of the Wah Wah filter and is what your foot controls with thepedal.Peak – This trimpot lets you adjust the Q of the resonant peak of the Wah filter from gentle to sharp.Freq – This trimpot allows you to adjust the frequency of the resonant peak. Fully counterclockwise isvery dark and clockwise is bright.SW1 – This switch lets you bypass the output buffer if you want to run the <strong>Weener</strong> before a fuzztypepedal.ModsC1 – lowering this to 10n will reduce the overall bass.R2 – lowering this to 47k or 33k will increase the output.R4 – A socket is recommended here to experiment. Lower values from the stock 390R will increasethe gain and dirtiness of the <strong>wah</strong>. Higher values such as 470R or 560R will clean it up. If you jumperR4 instead of using a resistor, it will connect the emitter of Q1 to ground. This will make a very dirty,dirty, bad, bad <strong>wah</strong> that deserves to be punished.
NotesWTF…..4uF?C2 is listed as 4uF, which is not at all a common value by guitar pedal standards. It was very commonin older <strong>wah</strong>s, though. Typically you will see newer <strong>wah</strong>s using 4u7 for this cap.A 4uF cap is not required to make the <strong>wah</strong> operate properly, but my advice is get one if you can. Ifnot, don’t worry about it! Or, use this convenient mod to approximate it:On the bottom left of the PCB there is a retangular area labeled “ ||C2”, whichmeans “parallel to C2”. This space allows you to add a secondary cap to C2 inparallel, which you should know means the resulting capacitance is additive. So,you could use, for example, a 2u2 for C2 and another 2u2 for ||C2 to get about4.4uF. Or, you could use a 1uF and 3.3uF to get a little closer to 4uF. You couldeven use forty 100n caps in series to get 4uF, but this would not only soundterrible but make your <strong>wah</strong> approximately the size of a toilet seat.Where can you get a 4uF electrolytic cap? Here!http://www.mouser.com/ProductDetail/VishaySprague/TE13021E3/?qs=sGAEpiMZZMtZ1n0r9vR22beeiJoI0EpCZfexeJLBHfY%3dA 2n3565 is suggested for Q1 and BC549C for Q2. These are not required and you can use anynumber of BJTs here. However, this particular combination sounds very, very good. Substitutionsinclude 2n3904, 2n5088, and similar. Note that the pinout for the BC549C is 180° opposite of a2n5088.
While the schematic lists the Whipple as the chosen inductor, this is not a requirement. You shouldbe able to use a number of other <strong>wah</strong> inductors on the <strong>Weener</strong>, including the Red and Yellow Faseltype. There are additional pads around L1 on the PCB to allow for some flexibility in mounting it.The green and red highlighted areas are for the two inductor pins. The pads in the green area areconnected to together and the pads as are the pads in the red area. The area with the blue highlighthas extra pads for connecting mounting pins on your inductor, if it has any. For example, the Whippleinductor has five mounting pins. One that goes in the green area, one in the red, two on oppositesides in the blue area and one at the top (by the L1 label).The Fasel inductors typically have two pins. These should mount properly on the two pads in themiddle, where the distance is 12.5mm between pads.Other inductors may have slightly different spacing on the pins. You will either want to use some ofthe extra pads included to mount it, or use a small adaptor board such a perf board or vero in thatcase.The buffer bypass switch is also a good idea for making the <strong>Weener</strong> work best with different pedalsetups. I do recommend you use it. If you prefer not to use the buffer bypass, simply jumper themiddle and left pad of SW1 together to keep the output buffer always connected.If you instead want to bypass the output buffer altogether, connect the middle and right pads of SW1
I highly recommend making the FREQ control external rather than a trimpot. The FREQ control givesyou a very wide range of resonant frequencies for the Wah, and allows you to dial in some sweetspots. See below for some mod suggestions on other ways to implement the FREQ control if youwant to experiment.The PEAK control, while useful, is mostly “set and forget” in my opinion. You can certainly make thisan external pot, too, but I found it to be unnecessary.There are alternatives to using just a plain pot for the FREQ control. Here are some ideas:· A notched pot, which typically has 10 or 11 detents, will give you the same range as a regularpot, but allow you to turn it in fixed increments. This might be helpful for keeping the pot in afixed position if you find a sweet spot, but still offer the flexibility of changing it.· A rotary switch could be used in place of the pot. In this application, you would typically usesomething like a 3P4T or even a 1P12T rotary to utilize any number of fixed capacitors. In thiscase, you would omit the FREQ pot altogether, and C6. Leave C5 in, but wire the two pads tothe rotary switch so that each cap is added in parallel to C5. Typical values might be 22n, 47n,68n and 100n.· Lastly, Smallbear offers a 9mm 1P6T rotary switch that works perfectly for the same kind ofapplication, but in a much smaller package. This switch is here:http://www.smallbearelec.com/Detail.bok?no=581. This switch works best by using a smallbreakout PCB or a bit of perf. Note that I do not offer PCBs for this switch, so it’s up to you tomake that one work JLicensingThe user may utilize a purchased <strong>Weener</strong> Wah PCB from madbeanpedals for DIY/noncommercial purposes. You maynot use the artwork to sell your own version of the PCB design or as part of a “kit” or similar commercial product.www.madbeanpedals.comBUILD IT. ROCK IT. BOX IT.
You can use either axial or radial caps for the <strong>Weener</strong> Wah. The radial spacing is 5mm and is similarto most other madbeanpedals projects. The axial spacing is about 19mm or so. Something like theMallory 150’s would be a good choice for axial film here. It’s possible to use Orange Drop caps, too,like the Sprague 715 or 716, but note that this might require some finessing since they are physicallylarge caps. The 100n and 220n Orange Drops are pretty huge!Other considerationsIf you are building a Wah, you are going to have to have a <strong>wah</strong> shell, obviously! Smallbear does offerblank shells at a decent price. You can typically find cheap <strong>wah</strong> on eBay or Craigslist which you canrepurpose for the <strong>Weener</strong>. An old, cheap Crybaby is a good candidate. You may even be able to geta decent inductor off it, too.There are three mounting holes on the PCB. There is one round and one slotted hole in the middlearea of the board. These will fit through the long screw bodies that poke through on some shells.There is one other round hole on the top right, and this is where you can actually attach the <strong>Weener</strong>PCB with a screw. Note that there are a variety of shells out there, and not all are standardized sothere may be some variance in screw or hole placement. I measured the mounting holes using twoolder Crybaby shells, so it should cover most needs.Wah shells are pretty tough. They are thicker than the average Hammond type enclosure.Make sure you use a fairly new bit if you are going to drill any extra holes. You can also applysome oil to your bit to facilitate drilling.If you are going to use a 3PDT switch for bypassing for the purposes of applying an LED indicator,please note that the actuator shaft of the 3PDT is a bit short compared to a DPDT or the olderSPDTs. However, I found that if you remove the bottom nut of a 3PDT and mount the base directly tothe enclosure, then use the locking washer and nut on the top side of the shell, the actuator is just theright height for the <strong>wah</strong> plate to engage it.Lastly, you need to grease your <strong>Weener</strong>. Rather, you need to grease the rack and pinion where thepot and shell connect. There are a number of greases you can use. I use lithium grease purchasedfrom an autoparts store that cost abut $3. There’s enough in the container to build probably 100<strong>wah</strong>s.


