Loctite Products - Sequoia Equipment Company
Loctite Products - Sequoia Equipment Company
Loctite Products - Sequoia Equipment Company

Create successful ePaper yourself
Turn your PDF publications into a flip-book with our unique Google optimized e-Paper software.
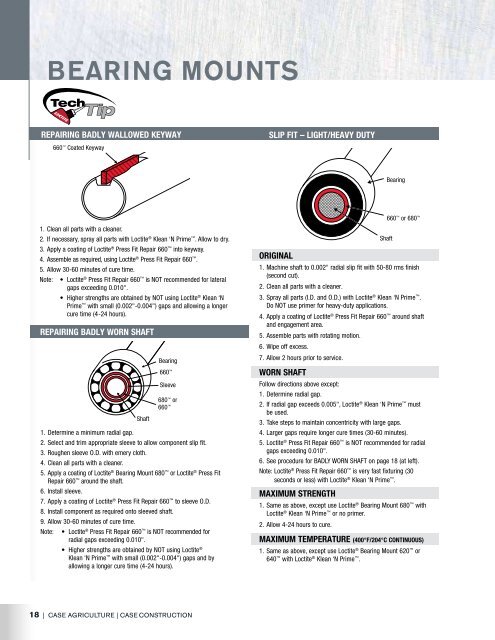
Bearing MountsREPAIRING BADLY WALLOWED KEYWAY680 or6602. If radial gap exceeds 0.005", <strong>Loctite</strong> ® Klean ‘N Prime mustbe used.SLIP FIT – LIGHT/HEAVY DUTY660 Coated KeywayBearing660 or 680 1. Clean all parts with a cleaner.2. If necessary, spray all parts with <strong>Loctite</strong> ® Klean ‘N Prime . Allow to dry.Shaft3. Apply a coating of <strong>Loctite</strong> ® Press Fit Repair 660 into keyway.4. Assemble as required, using <strong>Loctite</strong> ® Press Fit Repair 660 .5. Allow 30-60 minutes of cure time.ORIGINAL1. Machine shaft to 0.002" radial slip fit with 50-80 rms finishNote: • <strong>Loctite</strong> ® Press Fit Repair 660 is NOT recommended for lateralgaps exceeding 0.010".• Higher strengths are obtained by NOT using <strong>Loctite</strong> ® Klean ‘NPrime with small (0.002"-0.004") gaps and allowing a longercure time (4-24 hours).(second cut).2. Clean all parts with a cleaner.3. Spray all parts (I.D. and O.D.) with <strong>Loctite</strong> ® Klean ‘N Prime .Do NOT use primer for heavy-duty applications.4. Apply a coating of <strong>Loctite</strong> ® Press Fit Repair 660 around shaftand engagement area.REPAIRING BADLY WORN SHAFT5. Assemble parts with rotating motion.6. Wipe off excess.Bearing7. Allow 2 hours prior to service.660 WORN SHAFTSleeveFollow directions above except:1. Determine radial gap.Shaft3. Take steps to maintain concentricity with large gaps.1. Determine a minimum radial gap.2. Select and trim appropriate sleeve to allow component slip fit.3. Roughen sleeve O.D. with emery cloth.4. Clean all parts with a cleaner.5. Apply a coating of <strong>Loctite</strong> ® Bearing Mount 680 or <strong>Loctite</strong> ® Press FitRepair 660 around the shaft.4. Larger gaps require longer cure times (30-60 minutes).5. <strong>Loctite</strong> ® Press Fit Repair 660 is NOT recommended for radialgaps exceeding 0.010".6. See procedure for BADLY WORN SHAFT on page 18 (at left).Note: <strong>Loctite</strong> ® Press Fit Repair 660 is very fast fixturing (30seconds or less) with <strong>Loctite</strong> ® Klean ‘N Prime .6. Install sleeve.7. Apply a coating of <strong>Loctite</strong> ® Press Fit Repair 660 to sleeve O.D.8. Install component as required onto sleeved shaft.9. Allow 30-60 minutes of cure time.Note:• <strong>Loctite</strong> ® Press Fit Repair 660 is NOT recommended forradial gaps exceeding 0.010".• Higher strengths are obtained by NOT using <strong>Loctite</strong> ®Klean ‘N Prime with small (0.002"-0.004") gaps and byallowing a longer cure time (4-24 hours).MAXIMUM STRENGTH1. Same as above, except use <strong>Loctite</strong> ® Bearing Mount 680 with<strong>Loctite</strong> ® Klean ‘N Prime or no primer.2. Allow 4-24 hours to cure.MAXIMUM TEMPERATURE (400°F/204°C continuous)1. Same as above, except use <strong>Loctite</strong> ® Bearing Mount 620 or640 with <strong>Loctite</strong> ® Klean ‘N Prime .SLIP FITORIGINAL1. Select component to fit shaft.2. Machine to reduce component O.D. or increase housing I.D. to permitapproximate 0.002"-0.004" diametral slip fit.3. Clean all parts with a cleaner and spray with <strong>Loctite</strong> ® Klean ‘N Prime.4. Apply <strong>Loctite</strong> ® Press Fit Repair 660 to component O.D.5. Install component. Do not rotate.6. Wipe off excess.7. Allow 5 minutes prior to service.WORNShaft660 660 HousingProcedures identical to original slip fit, except:1. Determine the maximum radial gap.2. If the maximum gap exceeds 0.005", <strong>Loctite</strong> ® Klean ‘N Prime mustbe used.3. Take steps to maintain concentricity on large gaps.4. Large gaps require longer cure times (30-60 minutes).5. <strong>Loctite</strong> ® Press Fit Repair 660 is NOT recommended for radial gapsexceeding 0.010".STANDARD DUTYASSEMBLY1. Clean all parts with a cleaner.2. If necessary, spray all parts (I.D. and O.D.) with <strong>Loctite</strong> ® Klean‘N Prime .3. Apply <strong>Loctite</strong> ® Press Fit Repair 660 coating into keywayand on key.4. Apply dab(s) of <strong>Loctite</strong> ® Press Fit Repair 660 onto shaftopposite keyway or evenly spaced around shaft.5. Assemble parts. Wipe off excess.6. Apply a dab of <strong>Loctite</strong> ® Press Fit Repair 660 to set screw.7. Tighten set screw.8. Allow 5-10 minutes prior to service.Note: • <strong>Loctite</strong> ® Press Fit Repair 660 is NOT recommendedfor radial gaps exceeding 0.010" on shaft or keyway.• See REPAIRING BADLY WALLOWED KEYWAY on page18 for procedure.DISASSEMBLYDab 660 or 242 ® Here1. Tap component and key with hammer.2. Pull as usual.Dab 660 Here18 | Case agriculture | Case constructionadhesives & sealants guide | 19