ASSEMBLY INSTRUCTIONS SOLID WOODEN BED ... - Dormiente
ASSEMBLY INSTRUCTIONS SOLID WOODEN BED ... - Dormiente
ASSEMBLY INSTRUCTIONS SOLID WOODEN BED ... - Dormiente

Create successful ePaper yourself
Turn your PDF publications into a flip-book with our unique Google optimized e-Paper software.
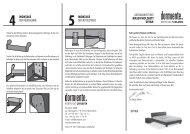
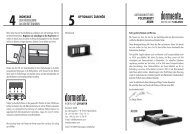
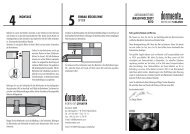
1SCOPEOF DELIVERY2<strong>ASSEMBLY</strong>OF THE <strong>BED</strong> FRAME3<strong>ASSEMBLY</strong>OF THE CENTRAL STRUT AND THESUPPORT RAILS FOR THE SLATTED FRAMEThe construction described in the following text should be done by two peoplein order to avoid damage. Please place textiles under all the components beforeassembly. Be careful when you use tools, so that there are no pressure marks onthe wooden parts in the working area.COMPONENTSPONTEAll the parts of the frame will be laid out in the correct position. The top partis identified by the extra holes used for fastening the back support later.Continue by placing the fastening bracket at the desired height on the bed frameand screw this firnly to the centre strut.Top partBottom partSide part (left/right)Central strut with Federleiste (starting from 140 cm bed width)Fastening bracket (central strut)Socket screws M8Support rails (incl. wooden dowels and screws)Threaded rods with washers and nuts M 8Wooden dowelsAllen keyWrench1 x1 x2 x1 x2 x6 x4 x4 x20 x1 x1 xThe threaded rods are fitted to the side parts after the feet have been attachedto the side part and the wooden dowels are pushed into the holes provided forthis purpose.Please fasten the support rails to the side parts of the bed frame. Use a rubberhammer to carefully tap the short wooden dowels into the holes of the four supportrails for the slatted frame. You need four dowels for each support rail, if these arenot already in the rail.The side parts are then connected to the top and bottom part. Then screw a nut(M8) with a washer onto the threaded rods. Tighten up the connection carefullywith enclosed wrtench. Work carefully with the wriench so that there are nopressure marks on the wooden parts.Push the support rails with the wooden dowels into the holes provided for thispurpose in the side parts. The option here of selecting between two differentheights of slatted frames. Please select the lower hole in case of doubt.There is a small hole in the middle of each support rail. Please screw in one of theenclosed screws here to secure the support rail.OPTIONAL ACCESSORY:Back support (the fittings are already preassembled)Socket screws M 81 x4 x<strong>BED</strong>SIDE TABLE