TI100 User Manual_2012_Black Cover__Issue 1.3.cdr - Laney
TI100 User Manual_2012_Black Cover__Issue 1.3.cdr - Laney
TI100 User Manual_2012_Black Cover__Issue 1.3.cdr - Laney
- No tags were found...

You also want an ePaper? Increase the reach of your titles
YUMPU automatically turns print PDFs into web optimized ePapers that Google loves.
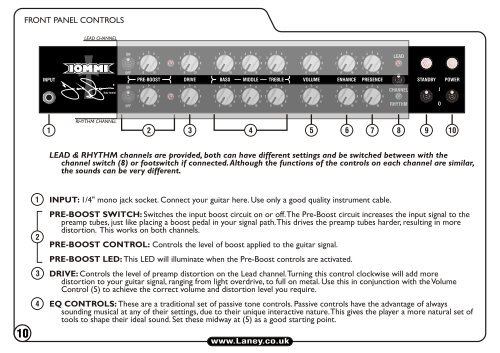
FRONT PANEL CONTROLSLEAD CHANNELRHYTHM CHANNELLEAD & RHYTHM channels are provided, both can have different settings and be switched between with thechannel switch (8) or footswitch if connected. Although the functions of the controls on each channel are similar,the sounds can be very different.INPUT: 1/4" mono jack socket. Connect your guitar here. Use only a good quality instrument cable.PRE-BOOST SWITCH: Switches the input boost circuit on or off. The Pre-Boost circuit increases the input signal to thepreamp tubes, just like placing a boost pedal in your signal path. This drives the preamp tubes harder, resulting in moredistortion. This works on both channels.PRE-BOOST CONTROL: Controls the level of boost applied to the guitar signal.PRE-BOOST LED: This LED will illuminate when the Pre-Boost controls are activated.DRIVE: Controls the level of preamp distortion on the Lead channel. Turning this control clockwise will add moredistortion to your guitar signal, ranging from light overdrive, to full on metal. Use this in conjunction with the VolumeControl (5) to achieve the correct volume and distortion level you require.EQ CONTROLS: These are a traditional set of passive tone controls. Passive controls have the advantage of alwayssounding musical at any of their settings, due to their unique interactive nature. This gives the player a more natural set oftools to shape their ideal sound. Set these midway at (5) as a good starting point.