I N S I D E T H I S I S S U E
insidethisissue - The Royal Astronomical Society of Canada
insidethisissue - The Royal Astronomical Society of Canada

You also want an ePaper? Increase the reach of your titles
YUMPU automatically turns print PDFs into web optimized ePapers that Google loves.
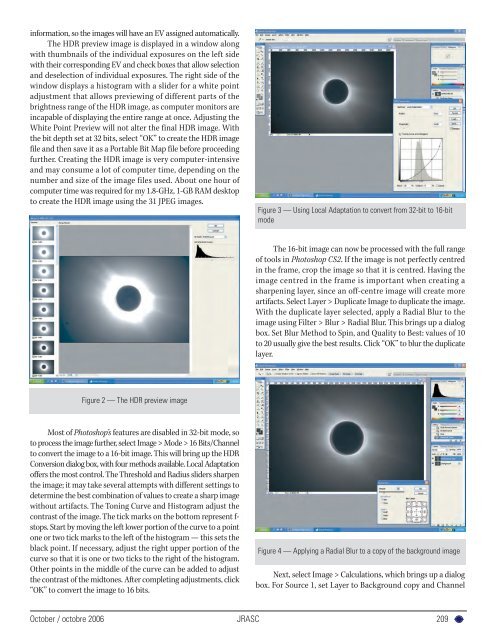
information, so the images will have an EV assigned automatically.The HDR preview image is displayed in a window alongwith thumbnails of the individual exposures on the left sidewith their corresponding EV and check boxes that allow selectionand deselection of individual exposures. The right side of thewindow displays a histogram with a slider for a white pointadjustment that allows previewing of different parts of thebrightness range of the HDR image, as computer monitors areincapable of displaying the entire range at once. Adjusting theWhite Point Preview will not alter the final HDR image. Withthe bit depth set at 32 bits, select “OK” to create the HDR imagefile and then save it as a Portable Bit Map file before proceedingfurther. Creating the HDR image is very computer-intensiveand may consume a lot of computer time, depending on thenumber and size of the image files used. About one hour ofcomputer time was required for my 1.8-GHz, 1-GB RAM desktopto create the HDR image using the 31 JPEG images.Figure 3 — Using Local Adaptation to convert from 32-bit to 16-bitmodeThe 16-bit image can now be processed with the full rangeof tools in Photoshop CS2. If the image is not perfectly centredin the frame, crop the image so that it is centred. Having theimage centred in the frame is important when creating asharpening layer, since an off-centre image will create moreartifacts. Select Layer > Duplicate Image to duplicate the image.With the duplicate layer selected, apply a Radial Blur to theimage using Filter > Blur > Radial Blur. This brings up a dialogbox. Set Blur Method to Spin, and Quality to Best: values of 10to 20 usually give the best results. Click “OK” to blur the duplicatelayer.Figure 2 — The HDR preview imageMost of Photoshop’s features are disabled in 32-bit mode, soto process the image further, select Image > Mode > 16 Bits/Channelto convert the image to a 16-bit image. This will bring up the HDRConversion dialog box, with four methods available. Local Adaptationoffers the most control. The Threshold and Radius sliders sharpenthe image; it may take several attempts with different settings todetermine the best combination of values to create a sharp imagewithout artifacts. The Toning Curve and Histogram adjust thecontrast of the image. The tick marks on the bottom represent f-stops. Start by moving the left lower portion of the curve to a pointone or two tick marks to the left of the histogram — this sets theblack point. If necessary, adjust the right upper portion of thecurve so that it is one or two ticks to the right of the histogram.Other points in the middle of the curve can be added to adjustthe contrast of the midtones. After completing adjustments, click“OK” to convert the image to 16 bits.Figure 4 — Applying a Radial Blur to a copy of the background imageNext, select Image > Calculations, which brings up a dialogbox. For Source 1, set Layer to Background copy and ChannelOctober / octobre 2006 JRASC209