Wireless Keyless Entry System
Wireless Keyless Entry System - Martin Garage Doors
Wireless Keyless Entry System - Martin Garage Doors
- No tags were found...

Create successful ePaper yourself
Turn your PDF publications into a flip-book with our unique Google optimized e-Paper software.
<strong>Wireless</strong> <strong>Keyless</strong> <strong>Entry</strong> <strong>System</strong><br />
Instructions (continued)<br />
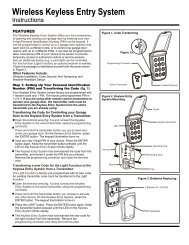
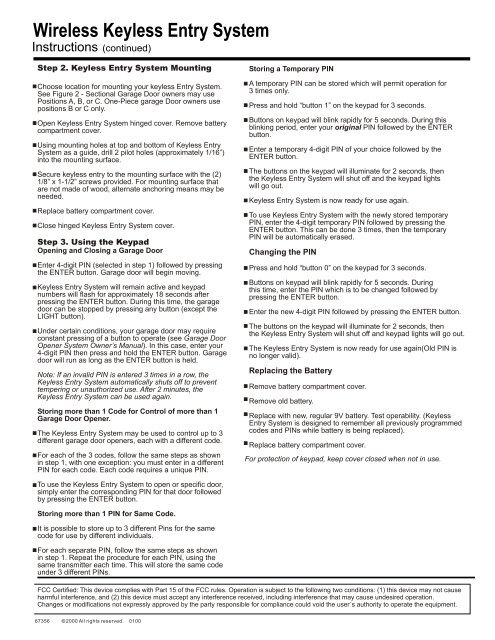
Step 2. <strong>Keyless</strong> <strong>Entry</strong> <strong>System</strong> Mounting<br />
Choose location for mounting your keyless <strong>Entry</strong> <strong>System</strong>.<br />
See Figure 2 - Sectional Garage Door owners may use<br />
Positions A, B, or C. One-Piece garage Door owners use<br />
positions B or C only.<br />
Open <strong>Keyless</strong> <strong>Entry</strong> <strong>System</strong> hinged cover. Remove battery<br />
compartment cover.<br />
Using mounting holes at top and bottom of <strong>Keyless</strong> <strong>Entry</strong><br />
<strong>System</strong> as a guide, drill 2 pilot holes (approximately 1/16”)<br />
into the mounting surface.<br />
Secure keyless entry to the mounting surface with the (2)<br />
1/8” x 1-1/2” screws provided. For mounting surface that<br />
are not made of wood, alternate anchoring means may be<br />
needed.<br />
Replace battery compartment cover.<br />
Close hinged <strong>Keyless</strong> <strong>Entry</strong> <strong>System</strong> cover.<br />
Step 3. Using the Keypad<br />
Opening and Closing a Garage Door<br />
Enter 4-digit PIN (selected in step 1) followed by pressing<br />
the ENTER button. Garage door will begin moving.<br />
<strong>Keyless</strong> <strong>Entry</strong> <strong>System</strong> will remain active and keypad<br />
numbers will flash for approximately 18 seconds after<br />
pressing the ENTER button. During this time, the garage<br />
door can be stopped by pressing any button (except the<br />
LIGHT button).<br />
Under certain conditions, your garage door may require<br />
constant pressing of a button to operate (see Garage Door<br />
Opener <strong>System</strong> Owner’s Manual). In this case, enter your<br />
4-digit PIN then press and hold the ENTER button. Garage<br />
door will run as long as the ENTER button is held.<br />
Note: If an invalid PIN is entered 3 times in a row, the<br />
<strong>Keyless</strong> <strong>Entry</strong> <strong>System</strong> automatically shuts off to prevent<br />
tempering or unauthorized use. After 2 minutes, the<br />
<strong>Keyless</strong> <strong>Entry</strong> <strong>System</strong> can be used again.<br />
Storing more than 1 Code for Control of more than 1<br />
Garage Door Opener.<br />
The <strong>Keyless</strong> <strong>Entry</strong> <strong>System</strong> may be used to control up to 3<br />
different garage door openers, each with a different code.<br />
For each of the 3 codes, follow the same steps as shown<br />
in step 1, with one exception: you must enter in a different<br />
PIN for each code. Each code requires a unique PIN.<br />
Storing a Temporary PIN<br />
A temporary PIN can be stored which will permit operation for<br />
3 times only.<br />
Press and hold “button 1” on the keypad for 3 seconds.<br />
Buttons on keypad will blink rapidly for 5 seconds. During this<br />
blinking period, enter your original PIN followed by the ENTER<br />
button.<br />
Enter a temporary 4-digit PIN of your choice followed by the<br />
ENTER button.<br />
The buttons on the keypad will illuminate for 2 seconds, then<br />
the <strong>Keyless</strong> <strong>Entry</strong> <strong>System</strong> will shut off and the keypad lights<br />
will go out.<br />
<strong>Keyless</strong> <strong>Entry</strong> <strong>System</strong> is now ready for use again.<br />
To use <strong>Keyless</strong> <strong>Entry</strong> <strong>System</strong> with the newly stored temporary<br />
PIN, enter the 4-digit temporary PIN followed by pressing the<br />
ENTER button. This can be done 3 times, then the temporary<br />
PIN will be automatically erased.<br />
Changing the PIN<br />
Press and hold “button 0” on the keypad for 3 seconds.<br />
Buttons on keypad will blink rapidly for 5 seconds. During<br />
this time, enter the PIN which is to be changed followed by<br />
pressing the ENTER button.<br />
Enter the new 4-digit PIN followed by pressing the ENTER button.<br />
The buttons on the keypad will illuminate for 2 seconds, then<br />
the <strong>Keyless</strong> <strong>Entry</strong> <strong>System</strong> will shut off and keypad lights will go out.<br />
The <strong>Keyless</strong> <strong>Entry</strong> <strong>System</strong> is now ready for use again(Old PIN is<br />
no longer valid).<br />
Replacing the Battery<br />
Remove battery compartment cover.<br />
Remove old battery.<br />
Replace with new, regular 9V battery. Test operability. ( <strong>Keyless</strong><br />
<strong>Entry</strong> <strong>System</strong> is designed to remember all previously programmed<br />
codes and PINs while battery is being replaced).<br />
Replace battery compartment cover.<br />
For protection of keypad, keep cover closed when not in use.<br />
To use the <strong>Keyless</strong> <strong>Entry</strong> <strong>System</strong> to open or specific door,<br />
simply enter the corresponding PIN for that door followed<br />
by pressing the ENTER button.<br />
Storing more than 1 PIN for Same Code.<br />
It is possible to store up to 3 different Pins for the same<br />
code for use by different individuals.<br />
For each separate PIN, follow the same steps as shown<br />
in step 1. Repeat the procedure for each PIN, using the<br />
same transmitter each time. This will store the same code<br />
under 3 different PINs.<br />
FCC Certified: This device complies with Part 15 of the FCC rules. Operation is subject to the following two conditions: (1) this device may not cause<br />
harmful interference, and (2) this device must accept any interference received, including interference that may cause undesired operation.<br />
Changes or modifications not expressly approved by the party responsible for compliance could void the user´s authority to operate the equipment.<br />
67356 © 2000 All rights reserved. 0100