Closer
PowerPoint íë ì í ì´ì - King Door Closers
PowerPoint íë ì í ì´ì - King Door Closers
- No tags were found...

You also want an ePaper? Increase the reach of your titles
YUMPU automatically turns print PDFs into web optimized ePapers that Google loves.
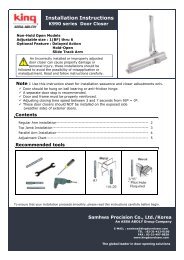
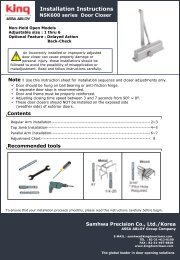
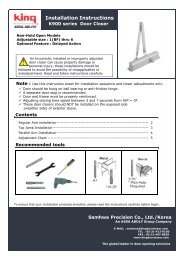
Non-Hold Open Models<br />
Installation Instructions<br />
K70 series Door <strong>Closer</strong><br />
Door <strong>Closer</strong><br />
An Incorrectly installed or improperly adjusted<br />
door closer can cause property damage or<br />
personal injury. these installations should be<br />
followed to avoid the possibility of misapplication or<br />
maladjustment. Read and follow instructions carefully.<br />
Note : Use this instruction sheet for installation sequence and closer adjustments only.<br />
Door should be hung on ball bearing or anti-friction hinge.<br />
A separate door stop is recommended.<br />
Door and frame must be properly reinforced.<br />
Adjusting closing time speed between 3 and 7 seconds from 90º ~ 0º.<br />
These door closers should NOT be installed on the exposed side<br />
(weather side) of exterior doors.<br />
Contents<br />
Regular Arm installation------------------------------------------------------------------ 2<br />
Top Jamb Installation--------------------------------------------------------------------- 3<br />
Parallel Arm Installation------------------------------------------------------------------ 4<br />
Adjustment Chart------------------------------------------------------------------------- 5<br />
Recommended tools<br />
To ensure that your installation proceeds smoothly, please read this instructions carefully before begin.<br />
Samhwa Precision Co., Ltd./Korea<br />
ASSA ABLOY Group Company<br />
E-MAIL : samhwa@kingdoorcloser.com<br />
TEL : 82-31-412-0100<br />
FAX : 82-31-497-8828<br />
www.kingdoorcloser.com<br />
The global leader in door opening solutions
K70 series Door <strong>Closer</strong><br />
Installation Instructions – Regular Arm Installation<br />
Diagram A<br />
K70<br />
Door <strong>Closer</strong><br />
1. Using the measurements from diagram A, mark screw hole center<br />
locations. Mark four(4) location on door to mount door closer and<br />
two(2) locations on frame to mount arm shoe.<br />
2. Drill pilot holes in door and frame, drill #14 all-purpose screws or<br />
drill and tap #7(.201″ diameter) for 1/4-20 machine screws.<br />
3. Install adjustable forearm/arm shoe to frame using screws provided.<br />
4. Mount closer onto door using screws provided.<br />
SPEED ADJUSTING VALVES MUST BE POSITIONED TOWARD<br />
HINGE SIDE.<br />
5. Install main arm to top pinion shaft, perpendicular to door, Secure<br />
tightly with arm screw/washer<br />
6. Adjust length of forearm so that forearm is perpendicular to frame when<br />
assembled to preloaded main arm. Secure forearm to main arm with<br />
screw/washer provided.<br />
7. Adjust door’s closing speed and power, see page 5 for reference.<br />
8. Snap pinion cap over shaft at bottom of closer or install (optional) cover<br />
with using small screw.<br />
K70 www.kingdoorcloser.com The global leader in door opening solutions 2<br />
The global leader in door opening solutions
K70 series Door <strong>Closer</strong><br />
Installation Instructions – Top Jamb Installation<br />
Diagram B<br />
K70<br />
Door <strong>Closer</strong><br />
1. Using the measurements from diagram B, mark screw hole center<br />
locations. Mark two(2) location on door to mount arm shoe and<br />
four(4) locations on frame to mount door closer.<br />
2. Drill pilot holes in door and frame, #14 all-purpose screws or<br />
drill and tap #7(.201″ diameter) for 1/4-20 machine screws.<br />
3. Install adjustable forearm/arm shoe to door using screws provided.<br />
4. Mount closer onto frame using screws provided.<br />
SPEED ADJUSTING VALVES MUST BE POSITIONED TOWARD<br />
HINGE SIDE.<br />
5. Install main arm to bottom pinion shaft, perpendicular to door, Secure<br />
tightly with arm screw/washer provided.<br />
6. Adjust length of forearm so that forearm is perpendicular to frame when<br />
assembled to preloaded main arm. Secure forearm to main arm with<br />
screw/washer provided.<br />
7. Adjust door’s closing speed and power, see page 5 for reference.<br />
8. Snap pinion cap over shaft at top of closer.<br />
K70<br />
www.kingdoorcloser.com<br />
The global leader in door opening solutions 3<br />
The global leader in door opening solutions
K70 series Door <strong>Closer</strong><br />
Installation Instructions – Parallel Arm Installation<br />
Diagram C<br />
K70<br />
Door <strong>Closer</strong><br />
1. Using the measurements from diagram C, mark screw hole center locations.<br />
Mark four(4) location on door to mount door closer and three(3) locations on<br />
inside frame to mount parallel bracket.<br />
2. Drill pilot holes in door and frame for #14 all-purpose screws or drill and tap<br />
#7(.201″ diameter) for 1/4-20 machine screws.<br />
3. Install Parallel bracket to frame using screws provided.<br />
4. Mount closer onto door using screws provided.<br />
SPEED ADJUSTING VALVES MUST BE POSITIONED AWAY FROM<br />
HINGE SIDE.<br />
5. Place main arm on closer pinion shaft, indexing main arm mark “L” or “R” with<br />
pinion flat as shown in diagram C, Secure tightly with screw/washer provided.<br />
6. Remove arm shoe from forearm, install forearm to bracket using the screw<br />
provided.<br />
7. With door closed, adjust length of forearm so that the tip of the main arm is<br />
approximately 1-1/2”(38mm) away from being parallel with door, when<br />
connected to the forearm, secure with screw/washer provided.<br />
8. Adjust door’s closing speed and power, see page 5 for reference.<br />
9. Install (standard) cover with using small screw or snap pinion cap over shaft<br />
at bottom of closer.<br />
K70<br />
www.kingdoorcloser.com<br />
The global leader in door opening solutions 4<br />
The global leader in door opening solutions
K70 series Door <strong>Closer</strong><br />
Installation Instructions – Adjustment Chart<br />
CAUTION!! Do not turn speed adjusting valve more than two(2) full<br />
turns counter-clockwise from its order not back the valves out of closer<br />
or a leak will result.<br />
K70<br />
CLOSING SPEED ADJUSTMENT<br />
NOTE: Closing arcs("SWEEP" and "LATCH")<br />
are controlled by two(2) separate adjusting<br />
valves. Adjust<br />
the CLOSING speed first, then adjust the<br />
LATCHING speed.<br />
Door <strong>Closer</strong><br />
STEP 1. "SWEEP" speed adjustment is<br />
accomplished by full rotation of the speed<br />
adjusting valve.<br />
- Turn the speed adjusting valve CLOCKWISE<br />
for SLOWER CLOSE arc closing speed.<br />
- Turn the speed adjusting valve COUNTER-<br />
CLOCKWISE for a FASTER CLOSE arc closing<br />
speed.<br />
STEP 2. "LATCH" speed adjustment is the<br />
same manner as "SWEEP" speed adjustment<br />
- Turn the speed adjusting valve CLOCKWISE<br />
for SLOWER CLOSE arc closing speed.<br />
- Turn the speed adjusting valve COUNTER-<br />
CLOCKWISE for a FASTER CLOSE arc closing<br />
speed.<br />
K70<br />
www.kingdoorcloser.com<br />
The global leader in door opening solutions 5<br />
The global leader in door opening solutions