

Amateur Radio - Free and Open Source Software
Amateur Radio - Free and Open Source Software
Amateur Radio - Free and Open Source Software
- No tags were found...

You also want an ePaper? Increase the reach of your titles
YUMPU automatically turns print PDFs into web optimized ePapers that Google loves.
,<br />
Number 8 0n your Feedback c:erd<br />
My SX-64 Runs Digicom!<br />
Low-cost packet solution foryour portable C-64.<br />
by Ted Drude KA9ELV<br />
B<br />
y now, most packet radio enthusiasts are<br />
probably aware of the excellent public<br />
domain software TNC-2 emulator called<br />
D igicom> 64. which runs on Commodore<br />
C-64 computers. It was originally<br />
written by West German hams Stefan Eckart<br />
D L2MDL <strong>and</strong> Florian Rad le he r r<br />
DLSMBT. (See Barry Kutner W 2U P's<br />
art icle on Digicom in the August 1988 issue<br />
of73.)<br />
Digicom is a great way ofgetting on packet<br />
radio, assuming you have a C-64 computer<br />
or a compatible sys tem (C-64C, C-128,<br />
or C- 128D). Yo u can use several types<br />
of inexpe nsive single chip modems with<br />
Digicom. Most can be built from scratch<br />
or from a kit for under $50. Version 2.0 of<br />
the program has many features not even<br />
found in hardware TNC-2s. including multiconnects.<br />
auto message store <strong>and</strong> forward.<br />
large text bu ffers. <strong>and</strong> many BBS-like functions.<br />
While C-64 users have been having a ball<br />
with Digjcom , Commodore SX-64 owners<br />
have been left out in the cold. That is. until<br />
now! If you couldn't fig ure out how to gel<br />
Digicom running on your SX-64 portable,<br />
you can gel the complete story here. including<br />
how to modify Digicom modems to work<br />
wit h the SX-64, <strong>and</strong> how to ma ke the proper<br />
internal connections.<br />
What Is An SX-64. Any way?<br />
The SX-64, a portable version ofthe C-64,<br />
operates on AC power. It consists of a C·64<br />
compatible CPU, a 1541 disk drive, a five<br />
inch color monitor, <strong>and</strong> a built-in audio am p<br />
<strong>and</strong> speaker. All components are housed in a<br />
15" x 16" x 5" metal case with a sturdy<br />
earrying h<strong>and</strong>le. The detachable keyboard<br />
folds up over the screen <strong>and</strong> disk drive for<br />
easy transportatio n.<br />
The design o f the SX-64, with its ample<br />
intern al power supply <strong>and</strong> its huge castaluminum<br />
heat sink, makes it more durable<br />
than the C-64. And, unlike most C-64s, you<br />
can leave the SX-64 on for days, usually<br />
without the worry o f overheating or other<br />
problems.<br />
Commodore originally sold the SX-64 for<br />
$995. When price wars drove the home computer<br />
market soft in 19 83- 19 84 , these<br />
machines were discontinued, <strong>and</strong> ma ny we re<br />
sold through surplus <strong>and</strong> liquidation chan-<br />
24 73 <strong>Amateur</strong> <strong>Radio</strong> • October, 1989<br />
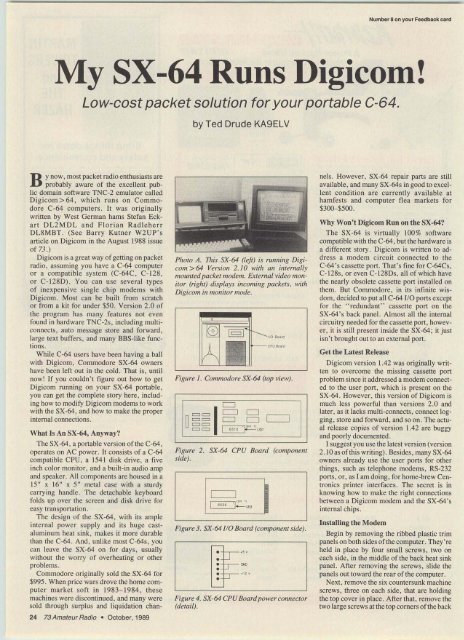
Photo A. This SX-64 (left) is running Digicom><br />
64 Version 2.10 wuh an internally<br />
mountedpacket modem. External video monitor<br />
(right) displays incoming packets. with<br />
Digicom in monitor mode.<br />
Figure 1. Commodore SX-64 (top view).<br />
1 8 n==<br />
U==<br />
Figure 2.<br />
side).<br />
c::::J<br />
= = 1 "'10<br />
B CI<br />
C<br />
SX-64 CPU Boa rd (component<br />
I<br />
....<br />
I<br />
I '1'''' ' 1<br />
-~<br />
Figu re 3. SX-64l10 Board (component side).<br />
-<br />
• ."<br />
• IJ<br />
• oo<br />
• I-'<br />
•<br />
,,, ,<br />
• ~<br />
Figure 4. SX-64 CPU Board power connector<br />
(detail).<br />
nels. However, SX·64 repair parts are still<br />
available, <strong>and</strong> many SX-64s in good 10 excellent<br />
condition are currently available at<br />
hamfests <strong>and</strong> computer flea markets fo r<br />
$300-$500.<br />
Why Won't Digicom Run on the SX-64?<br />
The SX-64 is virt ua lly 100% software<br />
compatible with the C·64, bUI the ha rdware is<br />
a different story . Digicom is written 10 add<br />
ress a modem circuit connected to the<br />
C-64's cassette port. That's fine for C-64Cs,<br />
C-128s, or even C-128Ds, all of which have<br />
the nearly obsolete cassette port installed on<br />
them. But Commodore, in its infi nite wisdom,<br />
decided to pu t all C-64 110 po ns except<br />
for the " redundant" cassette po n on the<br />
SX-64's back panel. Almost all the interna l<br />
circuitry needed for the cassette port, however,<br />
it is still present inside the SX-64; it just<br />
isn't brought out to an external pon.<br />
Get the Latest Release<br />
Digicom version 1.42 was originally writlen<br />
to overcome the missing cassette port<br />
problem since it addressed a modem connected<br />
10 the user port. which is present on the<br />
SX-64. However , th is version of Digicom is<br />
much less powerful than versions 2.0 <strong>and</strong><br />
later, as it lacks multi-connects, connectlogging<br />
, store <strong>and</strong> forward , <strong>and</strong> so on. The actual<br />
release copies of ve rsion 1.42 are buggy<br />
<strong>and</strong> poorly documented,<br />
I suggest you use the latest version (version<br />
2. 10 as ofthis writing). Besides, many SX-64<br />
owners already use Ihe user pon s for other<br />
thi ngs, such as telephone modems, RS-232<br />
pons, or, as I am doing , for horne-brew Centronics<br />
printer interfaces. The secret is in<br />
knowing how to make the right connections<br />
between a Digicom modem <strong>and</strong> the SX-64's<br />
internal chips.<br />
Installing the Modem<br />
Beg in by removing the ribbed plastic trim<br />
pa nels on both sides ofthe computer. They're<br />
held in place by four small screws. IWO on<br />
each side, in the middle of the back heal sink<br />
panel. After removing the screws, slide the<br />
panels out toward the rear of the computer.<br />
Next, remove the six countersunk machine<br />
screws, three on each side, that are holding<br />
the top cover in place. After that, remove the<br />
IWOlarge screws at the top comers ofthe back


