
Create successful ePaper yourself
Turn your PDF publications into a flip-book with our unique Google optimized e-Paper software.
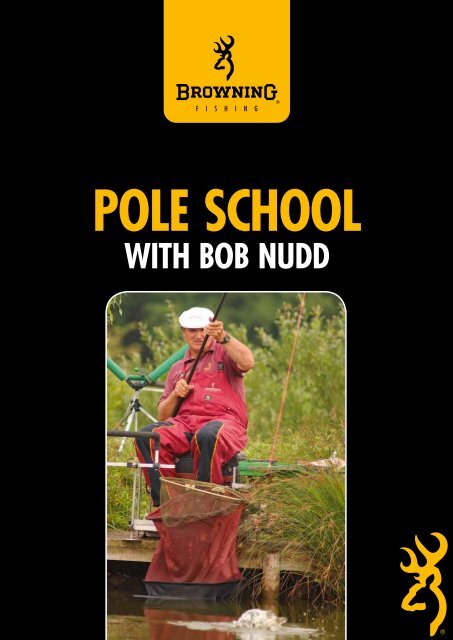
<strong>PoLE</strong> SchooL<br />
with BoB Nudd<br />
1
<strong>PoLE</strong> <strong>sCHooL</strong> BoB Nudd<br />
RIG IT<br />
LIKE A<br />
CHAMP<br />
Words: Bob Nudd Pictures: Mick Rouse<br />
Four times World Champ Bob Nudd gives you<br />
the definitive guide to pole elastication<br />
DELICATE, accurate and<br />
sensitive pole <strong>fishing</strong><br />
brings you a host of<br />
massive advantages.<br />
It is the most simple and effective<br />
way of catching fish and has won me<br />
multiple World Championships! In<br />
this booklet I'm going to pass on some<br />
of the knowledge and experience<br />
I've gained through many years of<br />
"<strong>fishing</strong> the pole".<br />
It doesn’t matter if you’ve never<br />
picked up a pole before or you’re a<br />
regular, I’m sure I’ll suggest things to<br />
help you catch more fish.<br />
To begin with I’m going to show<br />
you how to elasticate a pole properly.<br />
An awful lot of people I coach get<br />
this critical bit wrong and it will then<br />
affect the way they use the pole.<br />
I’ve spent many years fine-tuning<br />
the best way to elasticate a pole<br />
and you won’t need an engineering<br />
degree to follow it!<br />
2 3
<strong>PoLE</strong> <strong>sCHooL</strong> BoB Nudd<br />
Know<br />
youR<br />
<strong>PoLE</strong>...<br />
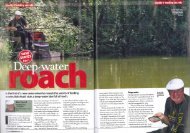
Before I dive head-long into chopping back top<br />
kits and fitting elastic I want to highlight pole<br />
terminology and how they are supplied.<br />
From the conversations I have there’s no<br />
doubt many anglers struggle to understand how<br />
a pole is labelled.<br />
Terminology isn’t consistent across<br />
manufacturers so it’s no surprise that confusion<br />
reigns. Here’s a typical pole package.<br />
1<br />
This is a <strong>Browning</strong> Xitan Z2 Carp Master<br />
pole .<br />
Like many modern carp or power poles<br />
it’s been beefed up to cope with <strong>fishing</strong> modern<br />
stillwaters where carp are the dominant species.<br />
For most anglers a pole like this is what you<br />
ELAsTICATInG<br />
youR <strong>PoLE</strong>...<br />
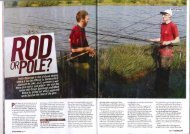
To begin, cut back the tip section and fit the bushes to act as a<br />
buffer between the pole and the elastic. You need the elastics<br />
you’re going to use, superglue, the bushes and a needle file<br />
Fit the bush but don’t push it all the way in. Dab it with a blob of<br />
glue and push it home<br />
Poles can be made to land small fish<br />
or giants<br />
want to use. They are more robust than traditional<br />
match poles that have been made for lightweight<br />
canal and lake <strong>fishing</strong>.<br />
Match poles are very light so they can easily be<br />
held at 15 or 16 metres all day. They are also very<br />
stiff and perfect for hitting shy bites from little fish.<br />
However, to keep these poles so light very thin<br />
carbon is used so they aren’t very strong. Hook<br />
a bruising carp on strong line and elastic and it’ll<br />
probably smash the pole.<br />
The sound of splintering carbon is also the sound<br />
of pound notes leaving your wallet!<br />
So there’s always a slight <strong>com</strong>promise over what<br />
The following sequence is designed to give you the<br />
full story when it <strong>com</strong>es to elasticating a match kit<br />
with fine, solid elastic and a carp kit with thick,<br />
Select the correct bush diameter for the size of elastic you’re<br />
using. To begin, I’m going to elasticate a match kit with a solid<br />
No.5 elastic so a 1.27mm bore bush is ideal. The elastic should be<br />
a neat fit for the bush – snug without sticking – as this will stop<br />
water flooding inside the pole tip<br />
Wipe away any excess glue to leave you with a snug fitting bush<br />
that won’t budge<br />
Beefed up top kits and No.4 sections<br />
are made for carp<br />
pole to pick. But unless you only fish for small fish,<br />
or you have a big enough budget to buy two poles,<br />
I’d advise you use a carp or power model and accept<br />
that it won’t be perfect for silverfish angling.<br />
2Most modern poles are marked with the<br />
section number and they also have alignment<br />
arrows. Due to the construction of poles you<br />
should line up these arrows on joining sections to<br />
optimise strength.<br />
strong, hollow elastics.<br />
Don’t be put off by the number of steps it takes,<br />
I’ve literally covered everything you need to know so I<br />
1 2 3 4<br />
5<br />
6<br />
The tip of your top kit will be too thin for the bush to fit properly<br />
so you must cut it back until it grips the tip. Cut the tip with needle<br />
file, not a hacksaw. Saws tear at the carbon and splinter it but a<br />
fine needle file cuts it neatly. A set of needle files costs a couple of<br />
quid and is worth the investment<br />
For a wide bore carp kit follow the same cutting back procedure.<br />
With heavy elastics I prefer an external bush that covers the<br />
outside of the pole section as it doesn’t restrict the diameter of<br />
the tip<br />
3<br />
The top kit you elasticate is called the ‘top 2’<br />
or ‘top 3’ and features the thinnest sections.<br />
Most poles are supplied with more than<br />
one top kit – a thin match kit which is softer and<br />
designed for silverfish and a carp or power kit which<br />
is thicker and stronger to handle big fish.<br />
This month I’ll show you how to elasticate<br />
a match kit and a carp kit as there are subtle<br />
differences.<br />
It is worth noting that some manufacturers supply<br />
joint power/match kits where you use the whole kit<br />
if you want a soft silverfish kit or you discard the<br />
haven’t left out any of my personal tips.<br />
What you see here is how I elasticate my own pole, I<br />
start by cutting back the top kit and fitting the bush...<br />
Cut back a bit at a time and test the bush to see if it fits snugly. If<br />
you do it carefully the bush should be too tight to fit<br />
Once you’ve got a neat fit chamfer the edge of the carbon with<br />
a fine needle file. It is <strong>com</strong>mon to discard the whole of the No.1<br />
section when fitting a carp elastic so the bush often fits straight on<br />
to the No.2 section<br />
short, thin No.1 section and elasticate just the No.2<br />
and No.3 sections for carp.<br />
Many poles such as the Z2 are also supplied with<br />
a short and beefed up No.4 section (above).<br />
The No.4 is the section where you break down a<br />
pole to land a large fish so it’s the part that takes<br />
the most strain and is most likely to break.<br />
The strengthened No.4 section avoids breakages<br />
and it’s a useful addition to a pole.<br />
Cut off a little bit more and repeat the bush fitting until it fits<br />
tightly inside the tip. This is called an internal bush because it goes<br />
inside the tip. I prefer these with light elastics<br />
7 8 9 10<br />
11<br />
12<br />
Push the bush on a little way, blob the pole with glue and push<br />
the bush right on. Wipe away any excess glue<br />
A match kit (above) takes thin solid elastic, a carp<br />
kit (below) holds thicker, stronger laccy<br />
4<br />
Some poles are also supplied with a mini<br />
extension, a ‘dolly’ section.<br />
When your rig is a little short of a key<br />
feature in the water this section <strong>com</strong>es in handy.<br />
It is also good for <strong>fishing</strong> just past the area<br />
you’ve fed. Fishing just beyond your feed is a tactic<br />
that often produces bonus fish for me and the mini<br />
extension helps you do this.<br />
Smooth off the edges with a fine needle file<br />
Here’s the fine bore match kit fitted with an internal bush (left)<br />
and the carp kit with a large diameter external bush (right)<br />
4 5
How To ELAsTICATE A <strong>PoLE</strong>... (ConT)<br />
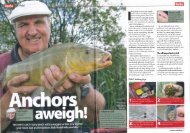
<strong>Browning</strong> bungs have a winder section to hold<br />
extra elastic. Wrap six turns on winder, thread<br />
elastic through runner on the top of bung and<br />
push into pole<br />
Thread the top section of the connector on to<br />
the elastic. The size of the connector should<br />
match the thickness of the elastic and be a<br />
snug fit<br />
1 2 3<br />
4<br />
5<br />
6<br />
To elasticate a top kit you need small and<br />
large bungs, a hacksaw, elastics, diamond eye<br />
threader, scissors and elastic connectors<br />
The knot will have slid up to the loop as you<br />
pulled the elastic through. Snip it off<br />
Bungs <strong>com</strong>e in different diameters to fit carp<br />
and match kits. Push the bung into the base of<br />
the top kit and mark with a pen where it stops<br />
Put the elastic through the small hole on the end<br />
of the bung<br />
Decide where to tie the rig connector. Pinch<br />
the laccy and pull it. Attach the connector at a<br />
point where the elastic pulls back smoothly into<br />
the pole<br />
Place the hacksaw half a centimetre above<br />
the mark. This is three or four steps up the<br />
bung. Hacksaw through the bung, reducing its<br />
diameter<br />
Once you’ve found the spot where the tension<br />
in the elastic smoothly pulls it back into the<br />
pole, cut it<br />
Hollow elastic is quite thick and can make bulky<br />
knots that would stop the connector slotting<br />
together neatly. This knot tightens down well<br />
Use a bung extractor rod to push the bung into<br />
the top kit. It should go 6in-7in inside so that<br />
when the next section is pushed in it doesn’t hit<br />
the bung<br />
7 8 9 10<br />
11<br />
12<br />
13<br />
Pull the elastic loop to partially close the knot<br />
but don’t fully tighten it<br />
Get a mini connector that’s suitable for using<br />
with fine lines and light elastic and slide the<br />
bottom sleeve section on to the elastic<br />
There should be no elastic sticking out of the<br />
connector which sits square to the pole tip in the<br />
perfect position to have the rig attached<br />
Ease your knot down to the top of the bung. Pull<br />
both ends of the elastic to tighten it. The coils of<br />
elastic actually bite into each other and form a<br />
vice-like grip<br />
14 15 16 17<br />
18<br />
19<br />
20<br />
21<br />
<strong>PoLE</strong> <strong>sCHooL</strong> BoB Nudd<br />
With the pole cut back and bushes fitted<br />
it’s time to fit the elastic.<br />
I'll show you how to run solid elastic<br />
through a thin match kit then I'll detail<br />
how you elasticate a carp kit with hollow<br />
elastic.<br />
The key thing to note is that you must<br />
use different knots with solid and hollow<br />
elastic.<br />
Pull the wire to drag the elastic into the tip and<br />
through the top two sections. For a match kit<br />
with light elastic you only run it through No.1<br />
and No.2 sections<br />
Ease the knot down to the connector and pull<br />
both ends to fully tighten the knot and nail it to<br />
the connector<br />
Now grab the elastic <strong>com</strong>ing out of the tip and<br />
give it a few good stretches. New elastic is extra<br />
stretchy and it helps to take out this softness<br />
22<br />
Trim tag and slide connector sleeve to cover<br />
knot. Sleeve should double click into place to<br />
stop collar on top of connector slipping when<br />
you hook a fish<br />
23<br />
3 4<br />
5<br />
6<br />
7<br />
Now you tie a different knot. Wrap three turns<br />
of the elastic tag end round the elastic <strong>com</strong>ing<br />
out of the pole tip<br />
Elastic should pull back smoothly into the tip. If<br />
it snaps back hard or is floppy and doesn’t pull<br />
back into the tip you need to alter the tension<br />
Tuck the end of elastic through the hole beneath<br />
the connector. Pull the knot really tight to make<br />
it small enough for the connector sleeve to push<br />
over the knot<br />
For a solid elastic only (hollow elastic needs a<br />
different knot which I’ll show you later). Create<br />
a normal overhand knot<br />
24<br />
Use the bung extractor to remove the bung<br />
and wind more elastic on to it to increase the<br />
tension, or unravel some laccy to release the<br />
tension<br />
fITTInG HoLLow ELAsTIC<br />
To A CARP KIT<br />
To elasticate a match kit with fine elastic slide<br />
the diamond eye wire threader into the tip and<br />
shake it down until it <strong>com</strong>es out the other end<br />
Now put the elastic through the hole in the<br />
bottom of the top section of the connector<br />
Hollow elastic has one great advantage when you are pole <strong>fishing</strong> for carp –<br />
the extra stretch it provides is far better at absorbing the power of the fish<br />
and ensures you land more of them.<br />
While it isn’t good when you’re <strong>fishing</strong> up to snags like lilies (the extra<br />
stretch helps big fish reach sanctuary) in open water situations size 10-20<br />
rated hollow elastics can’t be beaten.<br />
However, there are a few subtle differences you need to note about<br />
elasticating a pole with hollow elastic.<br />
Hollow elastic is great<br />
for controlling carp of<br />
this size<br />
Run your elastic through the wire diamond eye.<br />
If you’re using elastic rated number six or less<br />
tie an overhand knot in it (inset) to stop it sliding<br />
out of the wire loop<br />
Trim off the tag end to form a neat knot on<br />
the connector and give the elastic a final tug to<br />
make sure it doesn’t slip<br />
Tie an overhand knot in the elastic (the same as<br />
used to attach the bung) but don’t pull it tight<br />
6 7<br />
1<br />
You don’t need a threader. The weight of the<br />
elastic means it can be shaken through the No.2<br />
& 3 sections<br />
2<br />
Bung and connector are attached with a<br />
different knot to that used with solid elastic.<br />
To start, thread the hollow laccy through the<br />
connector sleeve
<strong>PoLE</strong> <strong>sCHooL</strong> BoB Nudd<br />
TEsT<br />
TAnK<br />
TRIAL<br />
Words: Bob Nudd Pictures: Mick Rouse<br />
To be successful on the pole Bob urges you<br />
to tie your rigs at home and test them in a<br />
tank of water. Here’s why…<br />
TIME is precious, and<br />
<strong>fishing</strong> time is even<br />
more so. It therefore<br />
makes sense to do<br />
whatever you can to<br />
avoid wasting it.<br />
To help you achieve this I’m going<br />
to show you how to tie the perfect<br />
pole rig at home.<br />
There are two reasons for doing<br />
this.<br />
For a start you will tie a better<br />
rig when you’re sat <strong>com</strong>fortably<br />
indoors than you will on the bank,<br />
especially when the wind’s blowing<br />
and it’s raining.<br />
Second, if you tie a rig at home<br />
with a body of water to hand – use a<br />
tall pasta jar or glass vase – you can<br />
create a rig that is perfectly shotted<br />
the second you drop it in your swim<br />
on the bank.<br />
If you’re not wasting time setting<br />
up your pole rig by the water you’ll<br />
have more time to catch fish.<br />
Here’s my guide to how I make<br />
up a rig at home proving it’s easier<br />
to be a precision-made pole angler<br />
than you might think…<br />
8 9
MAKInG A <strong>PoLE</strong> RIG<br />
3<br />
Fill your vase or pasta jar testing tank with<br />
water and drop the float in it<br />
8<br />
Push tubing on to the stem. Put one at the<br />
body base, one half way down and the<br />
longer piece overhanging the end<br />
12<br />
<strong>PoLE</strong> <strong>sCHooL</strong> BoB Nudd<br />
This step-by-step sequence shows<br />
you a foolproof way to tie the perfect<br />
pole rig – the process I use for every<br />
rig I ever use.<br />
Time-wise it won’t take you long<br />
to tie a rig – a few minutes once<br />
you’ve got the hang of things – but it<br />
will make a huge difference to your<br />
<strong>fishing</strong> as your hookbait will spend a<br />
lot more time in the water.<br />
I know some new<strong>com</strong>ers to pole<br />
<strong>fishing</strong> will think that the idea of<br />
shotting up a rig at home is crazy, a<br />
step too far in dedication to <strong>fishing</strong>.<br />
All I can say is that it will make<br />
your actual <strong>fishing</strong> time more<br />
pleasurable and more productive so<br />
it’s surely worth what little effort it<br />
takes.<br />
In these photos you’ll see my test<br />
tank. This is a plastic tube I’ve had<br />
for years, I can’t remember where I<br />
got it from!<br />
A simple alternative to this is a tall<br />
pasta jar, the type used for storing<br />
I use spring loaded long-nose pliers to<br />
attach shot to the line, easier than using<br />
your teeth!<br />
4<br />
A fraction of float body should stand<br />
proud of the water – dropper shot will<br />
dot this down<br />
9<br />
Pull the olivette off the float and slide it<br />
down the line with the thicker end nearest<br />
the hook<br />
13<br />
spaghetti, or a cheap glass vase. You<br />
can even let the missus borrow it for<br />
flowers when you’re not using it!<br />
Believe me, once you’ve started<br />
making your rigs at home and preshotting<br />
them you will soon realise<br />
what an advantage it is.<br />
No matter how well floats are<br />
made they are mass-produced and<br />
are constructed from different<br />
materials, including variable ones<br />
like balsa.<br />
A tiny variation in any <strong>com</strong>ponent<br />
will affect the shotting capacity so it<br />
makes sense to shot the float at home<br />
rather than waste time on the bank<br />
when you discover the float takes a<br />
different amount of shot than stated.<br />
Here’s what you do…<br />
The olivette and dropper shot are now<br />
placed near the end of the line just below<br />
the float<br />
5<br />
Cut two pieces of micro diameter silicone<br />
pole float tubing, one slightly longer<br />
10<br />
<strong>Browning</strong> olivettes are wedged with a tiny<br />
bristle of carbon to plug into the silicone<br />
tubing running through the olivette<br />
14<br />
Put the float in<br />
the testing tank<br />
and alter the<br />
shot until you<br />
get it sat with<br />
no more than<br />
half the bristle<br />
showing<br />
1<br />
2<br />
This is a 0.6gram float so I push a<br />
0.5gram olivette on to the float stem to<br />
test the shot load<br />
6 7<br />
Thread the mainline you’re going to<br />
make the rig from through the eye of the<br />
pole float<br />
11<br />
There’s still 0.1gram of the float’s shot<br />
capacity to add. Add three No.11 split<br />
shot<br />
15<br />
Slide the float and shot up the line then<br />
snip off the piece where the shot was<br />
pinched to avoid using damaged line<br />
Thread the pieces of silicone tube on to the end of the mainline and<br />
slide them down to the float<br />
sToRInG A RIG<br />
Slip the hook into one of the holes in the winder<br />
body. Then wrap the line round the winder<br />
The shot/olivette should be on the line in the centre<br />
section of the winder<br />
Some winders don’t need a pole anchor thanks to a<br />
sliding device that holds the rig loop<br />
10 11<br />
16<br />
Use the figure<br />
of 8 knot to put<br />
a loop in both<br />
ends of the line<br />
then attach a<br />
hooklink with<br />
the loop to loop<br />
knot. The rig<br />
is finished and<br />
just needs to<br />
be stored<br />
Check the size of the float capacity<br />
and select shot or an olivette<br />
slightly less than the capacity.<br />
As a general rule my float choice is<br />
governed by the depth of water I'm<br />
<strong>fishing</strong> multiplied by 0.1 gram. So,<br />
in a five foot swim I use a 0.5 gram<br />
float. For a 10 foot swim choose a 1<br />
gram float. If the float I choose has<br />
a capacity over 0.5 gram I use an<br />
olivette as the main weight, they’re<br />
neater and less tangle prone than a<br />
string of shot (see my guide to shot<br />
on page 22)<br />
Now that you’ve tied a rig you’ve got to store it without it getting damaged.<br />
This means putting it on a winder of which there are several types. Here’s<br />
how to safely store your rigs<br />
1<br />
Make sure the winder is long and deep enough so<br />
the float doesn’t overhang it<br />
3<br />
5<br />
7<br />
9<br />
Slip the other end of the anchor<br />
over the peg on the end of the<br />
2<br />
If the tip or body sticks out like this it will get broken<br />
4<br />
Ensure the spit shot or olivette isn’t wrapped around<br />
the end of the winder. This can knock the shot off<br />
the line or damage the mono<br />
6<br />
Attach a soft rubber pole anchor to the loop in the<br />
end of the pole rig<br />
8<br />
Attach a sticker<br />
to the winder and<br />
detail the shotting<br />
capacity, line<br />
diameter, breaking<br />
strain, hook size and<br />
the length of the rig
Code 9963 599<br />
<strong>PoLE</strong> <strong>sCHooL</strong> BoB Nudd<br />
sHoTTInG uP A <strong>PoLE</strong> RIG<br />
One of the biggest differences<br />
between pole and float <strong>fishing</strong> is the<br />
size of the shot used and the total<br />
loading applied to the line.<br />
Because a pole float is lowered<br />
into the water rather than being cast<br />
like a waggler float, there’s no need<br />
to use a large float carrying a heavy<br />
casting weight to propel the rig.<br />
Although small sizes of round<br />
split shot can be used different types<br />
of tiny shot are also available that<br />
make fine-tuning of pole rigs easier.<br />
To avoid confusion here’s a guide<br />
to what types of shot are available<br />
and what they weigh.<br />
Any shot larger than a No.8<br />
(0.06gram) up to 1oz (28.35gram)<br />
must be made of non-toxic material<br />
rather than lead or you could be<br />
fined £5,000!<br />
ZEBco EuroPE Ltd<br />
9400 GARSINGTON ROAD · OXFORD BUSINESS PARK<br />
OXFORD OX4 2HN · TEL. 0808 / 23 44 519<br />
INFO-UK@ZEBCO-EUROPE.COM<br />
www.BrowNiNg-fiShiNg.<strong>com</strong><br />
oLIvETTE<br />
These are streamlined bulk weights<br />
that are threaded on to the line so<br />
the nylon runs straight through the<br />
weight or is pinned to the outside of<br />
it by rubber sleeves.<br />
Available in sizes from 0.3gram to<br />
12gram they are used to ‘bomb’ the<br />
hookbait to the bottom, usually in<br />
water at least five foot deep.<br />
This issue was presented by:<br />
sPLIT sHoT<br />
Round with a central split cut into it, this is the classic<br />
type of shot. To shot a pole rig you need small ‘dust’ shot<br />
between size 11 and 8.<br />
sTyL<br />
This long thin, barrelshaped<br />
weight was<br />
designed by continental<br />
European anglers to allow finetuning<br />
of very delicate pole rigs.<br />
Available in tiny sizes so they<br />
allow the rig to fall through the water<br />
slower than <strong>com</strong>parable sizes of round shot,<br />
the downside is they are fiddly to attach to the<br />
line and are not often used by the majority of pole<br />
anglers in the UK.<br />
However, many pole floats still have their shotting<br />
capacity stated in styl weights so it is necessary to know what<br />
these weights are.<br />
Styls are classified in the reverse of split shot, the higher<br />
the number the larger the shot. Lead styls from No.12 to<br />
No.20 are illegal in the UK.<br />
No.7 = 0.01g, No.8 = 0.017g, No.9 = 0.025g,<br />
No.10 = 0.035g, No.11 = 0.048g<br />
You CaN see the full RaNge of BRowNiNg poles aNd pole aCCessoRies used BY BoB Nudd plus lots MoRe<br />
fishiNg aNd taCkle tips fRoM BoB Nudd aNd ouR otheR expeRt aNgleRs at www.BRowNiNg-fishiNg.CoM.