IP 65 BEGA 2222 Einbauleuchte Recessed luminaire Luminaire à ...
IP 65 BEGA 2222 Einbauleuchte Recessed luminaire Luminaire à ...
IP 65 BEGA 2222 Einbauleuchte Recessed luminaire Luminaire à ...

Create successful ePaper yourself
Turn your PDF publications into a flip-book with our unique Google optimized e-Paper software.
50.12 · Technische Änderungen vorbehalten · Technical amendments reserved · Modifications techniques réservées<br />
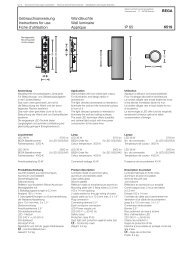
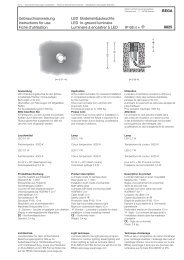
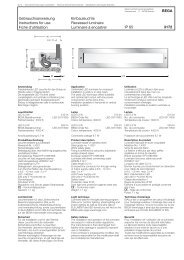
Gebrauchsanweisung<br />
Instructions for use<br />
Fiche d’utilisation<br />
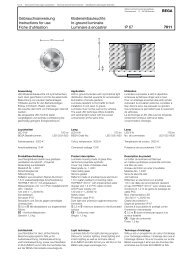
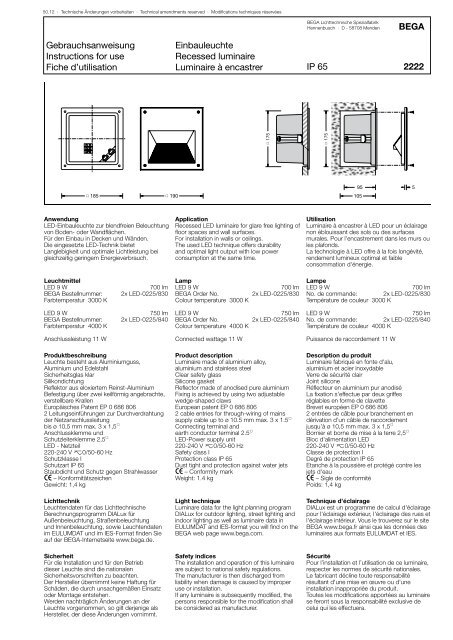
□ 185 □ 190<br />
Anwendung<br />
LED-<strong>Einbauleuchte</strong> zur blendfreien Beleuchtung<br />
von Boden- oder Wandflächen.<br />
Für den Einbau in Decken und Wänden.<br />
Die eingesetzte LED-Technik bietet<br />
Langlebigkeit und optimale Lichtleistung bei<br />
gleichzeitig geringem Energieverbrauch.<br />
Leuchtmittel<br />
LED 9 W 700 lm<br />
<strong>BEGA</strong> Bestellnummer: 2x LED-0225/830<br />
Farbtemperatur 3000 K<br />
LED 9 W 750 lm<br />
<strong>BEGA</strong> Bestellnummer: 2x LED-0225/840<br />
Farbtemperatur 4000 K<br />
Anschlussleistung 11 W<br />
Produktbeschreibung<br />
Leuchte besteht aus Aluminiumguss,<br />
Aluminium und Edelstahl<br />
Sicherheitsglas klar<br />
Silikondichtung<br />
Reflektor aus eloxiertem Reinst-Aluminium<br />
Befestigung über zwei keilförmig angebrachte,<br />
verstellbare Krallen<br />
Europäisches Patent EP 0 686 806<br />
2 Leitungseinführungen zur Durchverdrahtung<br />
der Netzanschlussleitung<br />
bis ø 10,5 mm max. 3 x 1,5@<br />
Anschlussklemme und<br />
Schutzleiterklemme 2,5@<br />
LED - Netzteil<br />
220-240 V x0/50-60 Hz<br />
Schutzklasse I<br />
Schutzart <strong>IP</strong> <strong>65</strong><br />
Staubdicht und Schutz gegen Strahlwasser<br />
c – Konformitätszeichen<br />
Gewicht: 1,4 kg<br />
Lichttechnik<br />
Leuchtendaten für das Lichttechnische<br />
Berechnungsprogramm DIALux für<br />
Außenbeleuchtung, Straßenbeleuchtung<br />
und Innenbeleuchtung, sowie Leuchtendaten<br />
im EULUMDAT und im IES-Format finden Sie<br />
auf der <strong>BEGA</strong>-Internetseite www.bega.de.<br />
Sicherheit<br />
Für die Installation und für den Betrieb<br />
dieser Leuchte sind die nationalen<br />
Sicherheitsvorschriften zu beachten.<br />
Der Hersteller übernimmt keine Haftung für<br />
Schäden, die durch unsachgemäßen Einsatz<br />
oder Montage entstehen.<br />
Werden nachträglich Änderungen an der<br />
Leuchte vorgenommen, so gilt derjenige als<br />
Hersteller, der diese Änderungen vornimmt.<br />
<strong>Einbauleuchte</strong><br />
<strong>Recessed</strong> <strong>luminaire</strong><br />
<strong>Luminaire</strong> à encastrer<br />
Application<br />
<strong>Recessed</strong> LED <strong>luminaire</strong> for glare free lighting of<br />
floor spaces and wall surfaces.<br />
For installation in walls or ceilings.<br />
The used LED technique offers durability<br />
and optimal light output with low power<br />
consumption at the same time.<br />
Lamp<br />
LED 9 W 700 lm<br />
<strong>BEGA</strong> Order No. 2x LED-0225/830<br />
Colour temperature 3000 K<br />
LED 9 W 750 lm<br />
<strong>BEGA</strong> Order No. 2x LED-0225/840<br />
Colour temperature 4000 K<br />
Connected wattage 11 W<br />
□ 175<br />
Product description<br />
<strong>Luminaire</strong> made of aluminium alloy,<br />
aluminium and stainless steel<br />
Clear safety glass<br />
Silicone gasket<br />
Reflector made of anodised pure aluminium<br />
Fixing is achieved by using two adjustable<br />
wedge-shaped claws<br />
European patent EP 0 686 806<br />
2 cable entries for through-wiring of mains<br />
supply cable up to ø 10.5 mm max. 3 x 1.5@<br />
Connecting terminal and<br />
earth conductor terminal 2.5@<br />
LED-Power supply unit<br />
220-240 V x0/50-60 Hz<br />
Safety class I<br />
Protection class <strong>IP</strong> <strong>65</strong><br />
Dust tight and protection against water jets<br />
c – Conformity mark<br />
Weight: 1.4 kg<br />
Light technique<br />
Luminare data for the light planning program<br />
DIALux for outdoor lighting, street lighting and<br />
indoor lighting as well as <strong>luminaire</strong> data in<br />
EULUMDAT and IES-format you will find on the<br />
<strong>BEGA</strong> web page www.bega.com.<br />
Safety indices<br />
The installation and operation of this <strong>luminaire</strong><br />
are subject to national safety regulations.<br />
The manufacturer is then discharged from<br />
liability when damage is caused by improper<br />
use or installation.<br />
If any <strong>luminaire</strong> is subsequently modified, the<br />
persons responsible for the modification shall<br />
be considered as manufacturer.<br />
<strong>BEGA</strong> Lichttechnische Spezialfabrik<br />
Hennenbusch · D - 58708 Menden<br />
<strong>IP</strong> <strong>65</strong><br />
□ 175<br />
95<br />
105<br />
<strong>BEGA</strong><br />
<strong>2222</strong><br />
Utilisation<br />
<strong>Luminaire</strong> à encastrer à LED pour un éclairage<br />
non éblouissant des sols ou des surfaces<br />
murales. Pour l'encastrement dans les murs ou<br />
les plafonds.<br />
La technologie à LED offre à la fois longévité,<br />
rendement lumineux optimal et faible<br />
consommation d'énergie.<br />
Lampe<br />
LED 9 W 700 lm<br />
No. de commande: 2x LED-0225/830<br />
Température de couleur 3000 K<br />
LED 9 W 750 lm<br />
No. de commande: 2x LED-0225/840<br />
Température de couleur 4000 K<br />
Puissance de raccordement 11 W<br />
Description du produit<br />
<strong>Luminaire</strong> fabriqué en fonte d'alu,<br />
aluminium et acier inoxydable<br />
Verre de sécurité clair<br />
Joint silicone<br />
Réflecteur en aluminium pur anodisé<br />
La fixation s’effectue par deux griffes<br />
réglables en forme de clavette<br />
Brevet européen EP 0 686 806<br />
2 entrées de câble pour branchement en<br />
dérivation d’un câble de raccordement<br />
jusqu’à ø 10,5 mm max. 3 x 1,5@<br />
Bornier et borne de mise à la terre 2,5@<br />
Bloc d'alimentation LED<br />
220-240 V x0/50-60 Hz<br />
Classe de protection I<br />
Degré de protection <strong>IP</strong> <strong>65</strong><br />
Etanche à la poussière et protégé contre les<br />
jets d'eau<br />
c – Sigle de conformité<br />
Poids: 1,4 kg<br />
Technique d’éclairage<br />
DIALux est un programme de calcul d'éclairage<br />
pour l'éclairage extérieur, l'éclairage des rues et<br />
l'éclairage intérieur. Vous le trouverez sur le site<br />
<strong>BEGA</strong> www.bega.fr ainsi que les données des<br />
<strong>luminaire</strong>s aux formats EULUMDAT et IES.<br />
Sécurité<br />
Pour l’installation et l’utilisation de ce <strong>luminaire</strong>,<br />
respecter les normes de sécurité nationales.<br />
Le fabricant décline toute responsabilité<br />
résultant d'une mise en œuvre ou d'une<br />
installation inappropriée du produit.<br />
Toutes les modifications apportées au <strong>luminaire</strong><br />
se feront sous la responsabilité exclusive de<br />
celui qui les effectuera.<br />
5
Einbau<br />
Die Leuchte darf nicht dauerhaft mit<br />
aggressiven Medien in Kontakt kommen.<br />
Aggressive Medien können durch Wasser<br />
aus Baustoffen gewaschen werden und<br />
das Gehäuse der Leuchte zerstören. Bei<br />
unbekannter Zusammensetzung der Baustoffe<br />
ist daher vor der Montage eine Materialanalyse<br />
vorzunehmen. Aggressive Medien können auch<br />
von der Oberfläche ausgehend auf die Leuchte<br />
einwirken, daher ist ein übermäßiger Einsatz<br />
von chemischen Reinigungsmitteln im Umfeld<br />
der Leuchte zu vermeiden.<br />
Montage<br />
Die Leuchte darf nur mit ihrer vollständigen<br />
Schutzabdeckung betrieben werden.<br />
l Leuchtengehäuse darf nicht in<br />
wärmedämmende Stoffe eingebaut werden.<br />
Die Einbauöffnung wird durch den Anschlagrahmen<br />
des Leuchtengehäuses abgedeckt.<br />
Die Befestigung der Leuchte erfolgt über zwei<br />
keilförmig angebrachte, verstellbare Krallen.<br />
Einbau in massive Wände:<br />
Hierfür steht das Einbaugehäuse<br />
- Ergänzungsteil 489 - zur Verfügung.<br />
Kommt dieses nicht zum Einsatz, ist eine<br />
Einbauöffnung von 175 x 175 mm mit einer<br />
Mindesttiefe von 105 mm erforderlich.<br />
Einbau in Leichtbauwände:<br />
Es ist eine Einbauöffnung von 175 x 175 mm<br />
mit einer Mindesttiefe von 105 mm erforderlich.<br />
Der seitliche Abstand vom Leuchtengehäuse<br />
zu Gebäudeteilen muss mindestens 50 mm<br />
betragen.<br />
Die Krallen greifen hinter die Wandverkleidung.<br />
Die Mindeststärke der Wandverkleidung beträgt<br />
5 mm. Bei geringerer Stärke muss die<br />
Wandverkleidung rückseitig verstärkt werden.<br />
Leuchte öffnen.<br />
Netzanschlussleitung durch die Leitungseinführung<br />
in das Leuchtengehäuse führen.<br />
Leuchtengehäuse in die Einbauöffnung<br />
einsetzen und Schrauben der Krallenbefestigung<br />
gleichmäßig anziehen.<br />
Schutzleiterverbindung herstellen und<br />
elektrischen Anschluss vornehmen.<br />
Schutzleiterverbindung zum Abdeckrahmen<br />
herstellen - Steckverbindung.<br />
Auf richtigen Sitz der Dichtung achten.<br />
Abdeckrahmen aufsetzen.<br />
Dabei ist darauf zu achten, daß die<br />
Schutzleiterader nicht zwischen Abdeckrahmen<br />
und Leuchtengehäuse eingeklemmt wird.<br />
Schrauben über Kreuz gleichmäßig anziehen.<br />
Reinigung · Pflege<br />
Leuchte regelmäßig mit lösungsmittelfreien<br />
Reinigungsmitteln von Schmutz und<br />
Ablagerungen säubern.<br />
Dafür keinen Hochdruckreiniger verwenden.<br />
Lampenwechsel<br />
Anlage spannungsfrei schalten.<br />
Leuchte öffnen. LED-Modul austauschen.<br />
Montagehinweise des LED-Moduls beachten.<br />
Dichtung überprüfen, ggf. ersetzen.<br />
Leuchte schließen.<br />
Ergänzungsteil<br />
Für die Herstellung der Einbauöffnung kann<br />
es zweckmäßig sein, Einbaugehäuse aus<br />
Aluminium zu verwenden.<br />
489 Einbaugehäuse<br />
Es gibt dazu eine gesonderte<br />
Gebrauchsanweisung.<br />
Ersatzteile<br />
Bezeichnung Bestellnummer<br />
Ersatzglas 140388<br />
LED-Netzteil 610738<br />
Reflektor 760469<br />
Dichtung 830936<br />
Installation<br />
The <strong>luminaire</strong> must not permanently get in<br />
contact with aggressive media.<br />
Aggressive media might be washed out of<br />
the building material and might corrode the<br />
housing of the <strong>luminaire</strong>. In case of an unknown<br />
composition of the building material an<br />
analysis of the material should be made before<br />
installation. Aggressive media that is outgoing<br />
from the installation surface might also affect<br />
the <strong>luminaire</strong>. Thus an overuse of chemical<br />
cleansing agents in the surroundings of the<br />
<strong>luminaire</strong> should be avoided.<br />
Installation<br />
The <strong>luminaire</strong> must only be operated with<br />
the complete protective cover.l <strong>Luminaire</strong><br />
housing must not be installed in heat-insulating<br />
material.<br />
The recessed opening will be covered<br />
by the frame of the <strong>luminaire</strong> housing.<br />
Fixing of the <strong>luminaire</strong> is achieved by using<br />
two adjustable wedge-shaped claws.<br />
Installation into solid walls:<br />
For this purpose installation housing<br />
- accessory 489 - is available.<br />
If installation housing <strong>BEGA</strong> 489 cannot be<br />
used a recessed opening 175 x 175 mm is<br />
necessary to accept the <strong>luminaire</strong> housing.<br />
<strong>Recessed</strong> depth min. 105 mm.<br />
Installation into wall panels:<br />
A recessed opening of 175 x 175 mm is<br />
necessary to accept the <strong>luminaire</strong> housing.<br />
<strong>Recessed</strong> depth min. 105 mm.<br />
The lateral distance between recessed<br />
<strong>luminaire</strong> and other building parts must be at<br />
least 50 mm. The claws catch the wall panel<br />
from the back side.<br />
Minimum thickness of the wall panel is 5 mm.<br />
If the wall panel has a thickness of less than<br />
5 mm, the panel thickness must be increased<br />
from the back side.<br />
Open the <strong>luminaire</strong>.<br />
Lead the mains supply cable through the<br />
cable entry into the <strong>luminaire</strong> housing.<br />
Push <strong>luminaire</strong> housing into the recessed<br />
opening. Tighten screws - claw fastener.<br />
Make earth conductor connection and electrical<br />
connection.<br />
Make earth conductor connection to the cover<br />
frame – plug connection.<br />
Make sure that gasket is positioned correctly.<br />
Install the cover frame.<br />
Please note that the earth conductor lead are<br />
not jammed between cover frame and <strong>luminaire</strong><br />
housing. Tighten the screws crosswise evenly.<br />
Cleaning · Maintenance<br />
Clean <strong>luminaire</strong> regularly with solvent-free<br />
cleansers from dirt and deposits.<br />
Do not use high pressure cleaners.<br />
Relamping<br />
Disconnect the electrical installation.<br />
Open the <strong>luminaire</strong>. Replace LED-Module.<br />
Note installation instructions of the<br />
LED module. Check the gasket and replace,<br />
if necessary. Close the <strong>luminaire</strong>.<br />
Accessory<br />
For preparing the recess opening it can be<br />
practical to use an installation housing made of<br />
aluminium.<br />
489 Installation housing<br />
A separate instructions for use can be<br />
provided upon request.<br />
Spares<br />
Description Part no<br />
Spare glass 140388<br />
LED-power supply unit 610738<br />
Reflector 760469<br />
Gasket 830936<br />
Installation<br />
Le <strong>luminaire</strong> ne doit pas être durablement en<br />
contact avec des substances corrosives.<br />
Des suintements corrosifs provenant des<br />
matériaux de construction peuvent altérer le<br />
boîtier. Si on ne connait pas la nature des<br />
matériaux de construction, il faut les analyser<br />
avant l'installation du <strong>luminaire</strong>.<br />
Certaines substances corrosives pouvant<br />
également attaquer la surface du <strong>luminaire</strong>,<br />
il faut donc limiter l'utilisation de produits<br />
chimiques de nettoyage aux abords<br />
de l'appareil.<br />
Installation<br />
Le <strong>luminaire</strong> ne doit jamais fonctionner sans<br />
son couvercle complet de protection.l Le<br />
boîtier du <strong>luminaire</strong> ne doît pas être installé<br />
dans des matériaux d'isolation.<br />
Les bords de la réservation sont recouverts<br />
par le cadre de butée du boîtier du <strong>luminaire</strong>.<br />
La fixation du <strong>luminaire</strong> s’effectue par deux<br />
griffes réglables en forme de clavette.<br />
Encastrement dans les murs:<br />
Pour ce type d’installation il existe le boîtier<br />
d’encastrement - accessoire 489 -.<br />
Si celui ci n’est n’est pas utilisé une réservation<br />
de 175 x 175 mm avec une profondeur<br />
minimale de 105 mm est nécessaire.<br />
Encastrement dans les parois creuses:<br />
Une réservation de 175 x 175 mm<br />
avec une profondeur minimale de 105 mm<br />
est nécessaire.<br />
La distance latérale entre le <strong>luminaire</strong> à<br />
encastrer et des parties de bâtiment étant<br />
normalement inflammables doit être au<br />
minimum 50 mm.<br />
Les griffes se coincent contre la paroi murale.<br />
L’épaisseur minimale de la paroi doit être<br />
5 mm. Si la paroi est moins épaisse elle doit<br />
être renforcée à l’arrière.<br />
Ouvrir le <strong>luminaire</strong>.<br />
Introduire le câble de raccordement par l'entrée<br />
de câble dans le boîtier du <strong>luminaire</strong>.<br />
Installer le boîtier dans la réservation.<br />
Serrer les vis du système de fixation à griffes.<br />
Mettre à la terre et procéder au raccordement<br />
électrique.<br />
Mettre à la terre le cadre.<br />
– Connecteur embrochable.<br />
Veiller au bon emplacement du joint.<br />
Reposer le cadre.<br />
Veiller à ce que la terre à la borne ne soit pas<br />
conincé entre le cadre et le boîtier du <strong>luminaire</strong>.<br />
Serrer en croix et régulièrement les vis.<br />
Nettoyage · Entretien<br />
Nettoyer régulièrement le <strong>luminaire</strong> et le<br />
débarrasser des dépôts et des souillures.<br />
Ne pas utiliser de nettoyeur haute pression.<br />
Changement de lampe<br />
Travailler hors tension.<br />
Ouvrir le <strong>luminaire</strong>. Remplacer le module à LED.<br />
Respecter la fiche d'utilisation du module<br />
à LED. Vérifier et remplacer le joint le cas<br />
échéant. Fermer le <strong>luminaire</strong>.<br />
Accessoire<br />
Pour la réservation, il peut être pratique<br />
d'utiliser des boîtiers d'encastrement<br />
en aluminium.<br />
489 Boîtier d'encastrement<br />
Une fiche d'utilisation pour ces boîtiers<br />
est disponible.<br />
Pièces de rechange<br />
Désignation No de commande<br />
Verre de rechange 140388<br />
Bloc d´alimentation LED 610738<br />
Réflecteur 760469<br />
Joint 830936