

1-33

Create successful ePaper yourself
Turn your PDF publications into a flip-book with our unique Google optimized e-Paper software.
Symfony2 – Franz Jordán 2011<br />
Symfony2 and HTTP Fundamentals<br />
Congratulations! By learning about Symfony2, you're well on your way towards being a<br />
moreproductive, well-rounded and popular web developer (actually, you're on your own for the<br />
last part). Symfony2 is built to get back to basics: to develop tools that let you develop faster<br />
and build more robust applications, while staying out of your way. Symfony is built on the best<br />
ideas from many technologies: the tools and concepts you're about to learn represent the efforts<br />
of thousands of people, over many years. In other words, you're not just learning "Symfony",<br />
you're learning the fundamentals of the web, development best practices, and how to use many<br />
amazing new PHP libraries, inside or independent of Symfony2. So, get ready.<br />
True to the Symfony2 philosophy, this chapter begins by explaining the fundamental concept<br />
common to web development: HTTP. Regardless of your background or preferred programming<br />
language, this chapter is a must-read for everyone.<br />
HTTP is Simple<br />
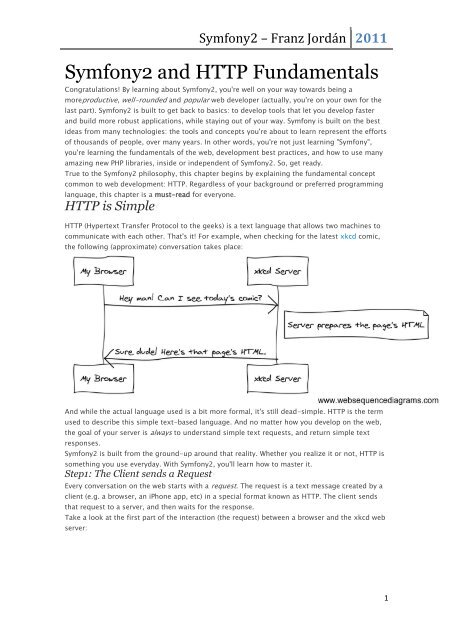
HTTP (Hypertext Transfer Protocol to the geeks) is a text language that allows two machines to<br />
communicate with each other. That's it! For example, when checking for the latest xkcd comic,<br />
the following (approximate) conversation takes place:<br />
And while the actual language used is a bit more formal, it's still dead-simple. HTTP is the term<br />
used to describe this simple text-based language. And no matter how you develop on the web,<br />
the goal of your server is always to understand simple text requests, and return simple text<br />
responses.<br />
Symfony2 is built from the ground-up around that reality. Whether you realize it or not, HTTP is<br />
something you use everyday. With Symfony2, you'll learn how to master it.<br />
Step1: The Client sends a Request<br />
Every conversation on the web starts with a request. The request is a text message created by a<br />
client (e.g. a browser, an iPhone app, etc) in a special format known as HTTP. The client sends<br />
that request to a server, and then waits for the response.<br />
Take a look at the first part of the interaction (the request) between a browser and the xkcd web<br />
server:<br />
1
Symfony2 – Franz Jordán 2011<br />
In HTTP-speak, this HTTP request would actually look something like this:<br />
GET / HTTP/1.1<br />
Host: xkcd.com<br />
Accept: text/html<br />
User-Agent: Mozilla/5.0 (Macintosh)<br />
This simple message communicates everything necessary about exactly which resource the<br />
client is requesting. The first line of an HTTP request is the most important and contains two<br />
things: the URI and the HTTP method.<br />
The URI (e.g. /, /contact, etc) is the unique address or location that identifies the resource the<br />
client wants. The HTTP method (e.g. GET) defines what you want to do with the resource. The<br />
HTTP methods are the verbs of the request and define the few common ways that you can act<br />
upon the resource:<br />
GET Retrieve the resource from the server<br />
POST<br />
PUT<br />
Create a resource on the server<br />
Update the resource on the server<br />
DELETE Delete the resource from the server<br />
With this in mind, you can imagine what an HTTP request might look like to delete a specific<br />
blog entry, for example:<br />
DELETE /blog/15 HTTP/1.1<br />
There are actually nine HTTP methods defined by the HTTP specification, but many of them are<br />
not widely used or supported. In reality, many modern browsers don't support<br />
the PUT and DELETE methods.<br />
In addition to the first line, an HTTP request invariably contains other lines of information called<br />
request headers. The headers can supply a wide range of information such as the<br />
requested Host, the response formats the client accepts (Accept) and the application the client<br />
is using to make the request (User-Agent). Many other headers exist and can be found on<br />
Wikipedia's List of HTTP header fields article.<br />
Step 2: The Server returns a Response<br />
Once a server has received the request, it knows exactly which resource the client needs (via the<br />
URI) and what the client wants to do with that resource (via the method). For example, in the<br />
case of a GET request, the server prepares the resource and returns it in an HTTP response.<br />
Consider the response from the xkcd web server:<br />
2
Symfony2 – Franz Jordán 2011<br />
Translated into HTTP, the response sent back to the browser will look something like this:<br />
HTTP/1.1 200 OK<br />
Date: Sat, 02 Apr 2011 21:05:05 GMT<br />
Server: lighttpd/1.4.19<br />
Content-Type: text/html<br />
<br />
<br />
<br />
The HTTP response contains the requested resource (the HTML content in this case), as well as<br />
other information about the response. The first line is especially important and contains the<br />
HTTP response status code (200 in this case). The status code communicates the overall<br />
outcome of the request back to the client. Was the request successful? Was there an error?<br />
Different status codes exist that indicate success, an error, or that the client needs to do<br />
something (e.g. redirect to another page). A full list can be found on Wikipedia's List of HTTP<br />
status codes article.<br />
Like the request, an HTTP response contains additional pieces of information known as HTTP<br />
headers. For example, one important HTTP response header is Content-Type. The body of the<br />
same resource could be returned in multiple different formats including HTML, XML, or JSON to<br />
name a few. The Content-Type header tells the client which format is being returned.<br />
Many other headers exist, some of which are very powerful. For example, certain headers can be<br />
used to create a powerful caching system.<br />
Requests, Responses and Web Development<br />
This request-response conversation is the fundamental process that drives all communication<br />
on the web. And as important and powerful as this process is, it's inescapably simple.<br />
3
Symfony2 – Franz Jordán 2011<br />
The most important fact is this: regardless of the language you use, the type of application you<br />
build (web, mobile, JSON API), or the development philosophy you follow, the end goal of an<br />
application isalways to understand each request and create and return the appropriate response.<br />
Symfony is architected to match this reality.<br />
To learn more about the HTTP specification, read the original HTTP 1.1 RFC or theHTTP Bis,<br />
which is an active effort to clarify the original specification. A great tool to check both the<br />
request and response headers while browsing is the Live HTTP Headers extension for Firefox.<br />
Requests and Responses in PHP<br />
So how do you interact with the "request" and create a "response" when using PHP? In reality,<br />
PHP abstracts you a bit from the whole process:<br />
Symfony2 – Franz Jordán 2011<br />
Symfony provides an alternative to the raw PHP approach via two classes that allow you to<br />
interact with the HTTP request and response in an easier way. The Request class is a simple<br />
object-oriented representation of the HTTP request message. With it, you have all the request<br />
information at your fingertips:<br />
use Symfony\Component\HttpFoundation\Request;<br />
$request = Request::createFromGlobals();<br />
// the URI being requested (e.g. /about) minus any query parameters<br />
$request->getPathInfo();<br />
// retrieve GET and POST variables respectively<br />
$request->query->get('foo');<br />
$request->request->get('bar');<br />
// retrieves an instance of UploadedFile identified by foo<br />
$request->files->get('foo');<br />
$request->getMethod();<br />
// GET, POST, PUT, DELETE, HEAD<br />
$request->getLanguages();<br />
// an array of languages the client accepts<br />
As a bonus, the Request class does a lot of work in the background that you'll never need to<br />
worry about. For example, the isSecure() method checks the three different values in PHP<br />
that can indicate whether or not the user is connecting via a secured connection (i.e. https).<br />
Symfony also provides a Response class: a simple PHP representation of an HTTP response<br />
message. This allows your application to use an object-oriented interface to construct the<br />
response that needs to be returned to the client:<br />
use Symfony\Component\HttpFoundation\Response;<br />
$response = new Response();<br />
5
Symfony2 – Franz Jordán 2011<br />
$response->setContent('Hello world!');<br />
$response->setStatusCode(200);<br />
$response->headers->set('Content-Type', 'text/html');<br />
// prints the HTTP headers followed by the content<br />
$response->send();<br />
If Symfony offered nothing else, you would already have a toolkit for easily accessing request<br />
information and an object-oriented interface for creating the response. Even as you learn the<br />
many powerful features in Symfony, keep in mind that the goal of your application is always to<br />
interpret a request and create the appropriate response based on your application logic.<br />
The Request and Response classes are part of a standalone component included with<br />
Symfony called HttpFoundation. This component can be used entirely independent of<br />
Symfony and also provides classes for handling sessions and file uploads.<br />
The Journey from the Request to the Response<br />
Like HTTP itself, the Request and Response objects are pretty simple. The hard part of<br />
building an application is writing what's comes in between. In other words, the real work comes<br />
in writing the code that interprets the request information and creates the response.<br />
Your application probably does many things, like sending emails, handling form submissions,<br />
saving things to a database, rendering HTML pages and protecting content with security. How<br />
can you manage all of this and still keep your code organized and maintainable?<br />
Symfony was created to solve these problems so that you don't have to.<br />
The Front Controller<br />
Traditionally, applications were built so that each "page" of a site was its own physical file:<br />
index.php<br />
contact.php<br />
blog.php<br />
There are several problems with this approach, including the inflexibility of the URLs (what if you<br />
wanted to change blog.php to news.php without breaking all of your links?) and the fact that<br />
each file must manually include some set of core files so that security, database connections and<br />
the "look" of the site can remain consistent.<br />
A much better solution is to use a front controller: a single PHP file that handles every request<br />
coming into your application. For example:<br />
/index.php executes index.php<br />
/index.php/contact executes index.php<br />
/index.php/blog<br />
executes index.php<br />
Using Apache's mod_rewrite (or equivalent with other web servers), the URLs can easily be<br />
cleaned up to be just /, /contact and /blog.<br />
6
Symfony2 – Franz Jordán 2011<br />
Now, every request is handled exactly the same. Instead of individual URLs executing different<br />
PHP files, the front controller is always executed, and the routing of different URLs to different<br />
parts of your application is done internally. This solves both problems with the original<br />
approach. Almost all modern web apps do this - including apps like WordPress.<br />
Stay Organized<br />
But inside your front controller, how do you know which page should be rendered and how can<br />
you render each in a sane way? One way or another, you'll need to check the incoming URI and<br />
execute different parts of your code depending on that value. This can get ugly quickly:<br />
// index.php<br />
$request = Request::createFromGlobals();<br />
$path = $request->getPathInfo(); // the URL being requested<br />
if (in_array($path, array('', '/')) {<br />
$response = new Response('Welcome to the homepage.');<br />
} elseif ($path == '/contact') {<br />
$response = new Response('Contact us');<br />
} else {<br />
$response = new Response('Page not found.', 404);<br />
}<br />
$response->send();<br />
Solving this problem can be difficult. Fortunately it's exactly what Symfony is designed to do.<br />
The Symfony Application Flow<br />
When you let Symfony handle each request, life is much easier. Symfony follows the same simple<br />
pattern for every request:<br />
7
Symfony2 – Franz Jordán 2011<br />
Incoming requests are interpreted by the routing and passed to controller functions that returnResponse objects.<br />
Each "page" of your site is defined in a routing configuration file that maps different URLs to different PHP functions. The job of each PHP function, called<br />
a controller, is to use information from the request - along with many other tools Symfony makes available - to create and return aResponse object. In other<br />
words, the controller is where your code goes: it's where you interpret the request and create a response.<br />
It's that easy! Let's review:<br />
Each request executes a front controller file;<br />
The routing system determines which PHP function should be executed based on information from the request and routing configuration you've created;<br />
The correct PHP function is executed, where your code creates and returns the appropriateResponse object.<br />
A Symfony Request in Action<br />
8
Symfony2 – Franz Jordán 2011<br />
Without diving into too much detail, let's see this process in action. Suppose you want to add<br />
a/contact page to your Symfony application. First, start by adding an entry for /contact to<br />
your routing configuration file:<br />
contact:<br />
pattern: /contact<br />
defaults: { _controller: AcmeDemoBundle:Main:contact }<br />
This example uses YAML to define the routing configuration. Routing configuration can also be<br />
written in other formats such as XML or PHP.<br />
When someone visits the /contact page, this route is matched, and the specified controller is<br />
executed. As you'll learn in the routing chapter, the AcmeDemoBundle:Main:contact string<br />
is a short syntax that points to a specific PHP method contactAction inside a class<br />
called MainController:<br />
class MainController<br />
{<br />
public function contactAction()<br />
{<br />
return new Response('Contact us!');<br />
}<br />
}<br />
In this very simple example, the controller simply creates a Response object with the HTML<br />
"Contact us!". In the controller chapter, you'll learn how a controller can render<br />
templates, allowing your "presentation" code (i.e. anything that actually writes out HTML) to live<br />
in a separate template file. This frees up the controller to worry only about the hard stuff:<br />
interacting with the database, handling submitted data, or sending email messages.<br />
Symfony2: Build your App, not your Tools.<br />
You now know that the goal of any app is to interpret each incoming request and create an<br />
appropriate response. As an application grows, it becomes more difficult to keep your code<br />
organized and maintainable. Invariably, the same complex tasks keep coming up over and over<br />
again: persisting things to the database, rendering and reusing templates, handling form<br />
submissions, sending emails, validating user input and handling security.<br />
The good news is that none of these problems is unique. Symfony provides a framework full of<br />
tools that allow you to build your application, not your tools. With Symfony2, nothing is imposed<br />
on you: you're free to use the full Symfony framework, or just one piece of Symfony all by itself.<br />
Standalone Tools: The Symfony2 Components<br />
So what is Symfony2? First, Symfony2 is a collection of over twenty independent libraries that<br />
can be used inside any PHP project. These libraries, called the Symfony2 Components, contain<br />
9
Symfony2 – Franz Jordán 2011<br />
something useful for almost any situation, regardless of how your project is developed. To name<br />
a few:<br />
HttpFoundation - Contains the Request and Response classes, as well as other classes<br />
for handling sessions and file uploads;<br />
Routing - Powerful and fast routing system that allows you to map a specific URI<br />
(e.g./contact) to some information about how that request should be handled (e.g.<br />
execute thecontactAction() method);<br />
Form - A full-featured and flexible framework for creating forms and handing form<br />
submissions;<br />
Validator A system for creating rules about data and then validating whether or not usersubmitted<br />
data follows those rules;<br />
ClassLoader An autoloading library that allows PHP classes to be used without needing to<br />
manually require the files containing those classes;<br />
Templating A toolkit for rendering templates, handling template inheritance (i.e. a<br />
template is decorated with a layout) and performing other common template tasks;<br />
Security - A powerful library for handling all types of security inside an application;<br />
Translation A framework for translating strings in your application.<br />
Each and every one of these components is decoupled and can be used in any PHP project,<br />
regardless of whether or not you use the Symfony2 framework. Every part is made to be used if<br />
needed and replaced when necessary.<br />
The Full Solution: The Symfony2 Framework<br />
So then, what is the Symfony2 Framework? The Symfony2 Framework is a PHP library that<br />
accomplishes two distinct tasks:<br />
1. Provides a selection of components (i.e. the Symfony2 Components) and third-party<br />
libraries (e.g. Swiftmailer for sending emails);<br />
2. Provides sensible configuration and a "glue" library that ties all of these pieces together.<br />
The goal of the framework is to integrate many independent tools in order to provide a<br />
consistent experience for the developer. Even the framework itself is a Symfony2 bundle (i.e. a<br />
plugin) that can be configured or replaced entirely.<br />
Symfony2 provides a powerful set of tools for rapidly developing web applications without<br />
imposing on your application. Normal users can quickly start development by using a Symfony2<br />
distribution, which provides a project skeleton with sensible defaults. For more advanced users,<br />
the sky is the limit.<br />
10
Symfony2 – Franz Jordán 2011<br />
Symfony2 versus Flat PHP<br />
Why is Symfony2 better than just opening up a file and writing flat PHP?<br />
If you've never used a PHP framework, aren't familiar with the MVC philosophy, or just wonder<br />
what all the hype is around Symfony2, this chapter is for you. Instead of telling you that<br />
Symfony2 allows you to develop faster and better software than with flat PHP, you'll see for<br />
yourself.<br />
In this chapter, you'll write a simple application in flat PHP, and then refactor it to be more<br />
organized. You'll travel through time, seeing the decisions behind why web development has<br />
evolved over the past several years to where it is now.<br />
By the end, you'll see how Symfony2 can rescue you from mundane tasks and let you take back<br />
control of your code.<br />
A simple Blog in flat PHP<br />
In this chapter, you'll build the token blog application using only flat PHP. To begin, create a<br />
single page that displays blog entries that have been persisted to the database. Writing in flat<br />
PHP is quick and dirty:<br />
<br />
<br />
<br />
List of Posts<br />
<br />
<br />
List of Posts<br />
<br />
11
Symfony2 – Franz Jordán 2011<br />
<br />
<br />
<br />
<br />
<br />
<br />
<br />
<br />
<br />
Symfony2 – Franz Jordán 2011<br />
$link = mysql_connect('localhost', 'myuser', 'mypassword');<br />
mysql_select_db('blog_db', $link);<br />
$result = mysql_query('SELECT id, title FROM post', $link);<br />
$posts = array();<br />
while ($row = mysql_fetch_assoc($result)) {<br />
$posts[] = $row;<br />
}<br />
mysql_close($link);<br />
// include the HTML presentation code<br />
require 'templates/list.php';<br />
The HTML code is now stored in a separate file (templates/list.php), which is primarily an<br />
HTML file that uses a template-like PHP syntax:<br />
<br />
<br />
List of Posts<br />
<br />
<br />
List of Posts<br />
<br />
<br />
<br />
13
Symfony2 – Franz Jordán 2011<br />
<br />
<br />
<br />
<br />
<br />
<br />
<br />
By convention, the file that contains all of the application logic - index.php - is known as a<br />
"controller". The term controller is a word you'll hear a lot, regardless of the language or<br />
framework you use. It refers simply to the area of your code that processes user input and<br />
prepares the response.<br />
In this case, our controller prepares data from the database and then includes a template to<br />
present that data. With the controller isolated, you could easily change jus the template file if<br />
you needed to render the blog entries in some other format (e.g. list.json.php for JSON<br />
format).<br />
Isolating the Application (Domain) Logic<br />
So far the application contains only one page. But what if a second page needed to use the same<br />
database connection, or even the same array of blog posts? Refactor the code so that the core<br />
behavior and data-access functions of the application are isolated in a new file<br />
called model.php:<br />
Symfony2 – Franz Jordán 2011<br />
function close_database_connection($link)<br />
{<br />
mysql_close($link);<br />
}<br />
function get_all_posts()<br />
{<br />
$link = open_database_connection();<br />
$result = mysql_query('SELECT id, title FROM post', $link);<br />
$posts = array();<br />
while ($row = mysql_fetch_assoc($result)) {<br />
$posts[] = $row;<br />
}<br />
close_database_connection($link);<br />
return $posts;<br />
}<br />
The filename model.php is used because the logic and data access of an application is<br />
traditionally known as the "model" layer. In a well-organized application, the majority of the<br />
code representing your "business logic" should live in the model (as opposed to living in a<br />
controller). And unlike in this example, only a portion (or none) of the model is actually<br />
concerned with accessing a database.<br />
The controller (index.php) is now very simple:<br />
Symfony2 – Franz Jordán 2011<br />
$posts = get_all_posts();<br />
require 'templates/list.php';<br />
Now, the sole task of the controller is to get data from the model layer of the application (the<br />
model) and to call a template to render that data. This is a very simple example of the modelview-controller<br />
pattern.<br />
Isolating the Layout<br />
At this point, the application has been refactored into three distinct pieces offering various<br />
advantages and the opportunity to reuse almost everything on different pages.<br />
The only part of the code that can't be reused is the page layout. Fix that by creating a<br />
newlayout.php file:<br />
<br />
<br />
<br />
<br />
<br />
<br />
<br />
<br />
<br />
The template (templates/list.php) can now be simplified to "extend" the layout:<br />
<br />
<br />
List of Posts<br />
<br />
<br />
<br />
16
Symfony2 – Franz Jordán 2011<br />
<br />
<br />
<br />
<br />
<br />
<br />
<br />
You've now introduced a methodology that allows for the reuse of the layout. Unfortunately, to<br />
accomplish this, you're forced to use a few ugly PHP functions<br />
(ob_start(), ob_get_clean()) in the template. Symfony2 uses a Templating component<br />
that allows this to be accomplished cleanly and easily. You'll see it in action shortly.<br />
Adding a Blog "show" Page<br />
The blog "list" page has now been refactored so that the code is better-organized and reusable.<br />
To prove it, add a blog "show" page, which displays an individual blog post identified by<br />
an id query parameter.<br />
To begin, create a new function in the model.php file that retrieves an individual blog result<br />
based on a given id:<br />
// model.php<br />
function get_post_by_id($id)<br />
{<br />
$link = open_database_connection();<br />
$id = mysql_real_escape_string($id);<br />
$query = 'SELECT date, title, body FROM post WHERE id = '.$id;<br />
$result = mysql_query($query);<br />
$row = mysql_fetch_assoc($result);<br />
17
Symfony2 – Franz Jordán 2011<br />
close_database_connection($link);<br />
return $row;<br />
}<br />
Next, create a new file called show.php - the controller for this new page:<br />
<br />
<br />
<br />
<br />
<br />
<br />
<br />
<br />
<br />
18
Symfony2 – Franz Jordán 2011<br />
Creating the second page is now very easy and no code is duplicated. Still, this page introduces<br />
even more lingering problems that a framework can solve for you. For example, a missing or<br />
invalid idquery parameter will cause the page to crash. It would be better if this caused a 404<br />
page to be rendered, but this can't really be done easily yet. Worse, had you forgotten to clean<br />
the id parameter via the mysql_real_escape_string() function, your entire database<br />
would be at risk for an SQL injection attack.<br />
Another major problem is that each individual controller file must include the model.php file.<br />
What if each controller file suddenly needed to include an additional file or perform some other<br />
global task (e.g. enforce security)? As it stands now, that code would need to be added to every<br />
controller file. If you forget to include something in one file, hopefully it doesn't relate to<br />
security...<br />
A "Front Controller" to the Rescue<br />
The solution is to use a front controller: a single PHP file through which all requests are<br />
processed. With a front controller, the URIs for the application change slightly, but start to<br />
become more flexible:<br />
Without a front controller<br />
/index.php<br />
=> Blog post list page (index.php executed)<br />
/show.php<br />
=> Blog post show page (show.php executed)<br />
With index.php as the front controller<br />
/index.php<br />
=> Blog post list page (index.php executed)<br />
/index.php/show<br />
=> Blog post show page (index.php executed)<br />
The index.php portion of the URI can be removed if using Apache rewrite rules (or equivalent).<br />
In that case, the resulting URI of the blog show page would be simply/show.<br />
When using a front controller, a single PHP file (index.php in this case) renders every request.<br />
For the blog post show page, /index.php/show will actually execute the index.php file,<br />
which is now responsible for routing requests internally based on the full URI. As you'll see, a<br />
front controller is a very powerful tool.<br />
Creating the Front Controller<br />
You're about to take a big step with the application. With one file handling all requests, you can<br />
centralize things such as security handling, configuration loading, and routing. In this<br />
application,index.php must now be smart enough to render the blog post list page or the blog<br />
post show page based on the requested URI:<br />
Symfony2 – Franz Jordán 2011<br />
require_once 'model.php';<br />
require_once 'controllers.php';<br />
// route the request internally<br />
$uri = $_SERVER['REQUEST_URI'];<br />
if ($uri == '/index.php') {<br />
list_action();<br />
} elseif ($uri == '/index.php/show' && isset($_GET['id'])) {<br />
show_action($_GET['id']);<br />
} else {<br />
header('Status: 404 Not Found');<br />
echo 'Page Not Found';<br />
}<br />
For organization, both controllers (formerly index.php and show.php) are now PHP functions<br />
and each has been moved into a separate file, controllers.php:<br />
function list_action()<br />
{<br />
$posts = get_all_posts();<br />
require 'templates/list.php';<br />
}<br />
function show_action($id)<br />
{<br />
$post = get_post_by_id($id);<br />
require 'templates/show.php';<br />
20
Symfony2 – Franz Jordán 2011<br />
}<br />
As a front controller, index.php has taken on an entirely new role, one that includes loading<br />
the core libraries and routing the application so that one of the two controllers<br />
(the list_action() andshow_action() functions) is called. In reality, the front controller is<br />
beginning to look and act a lot like Symfony2's mechanism for handling and routing requests.<br />
Another advantage of a front controller is flexible URLs. Notice that the URL to the blog post<br />
show page could be changed from /show to /read by changing code in only one location.<br />
Before, an entire file needed to be renamed. In Symfony2, URLs are even more flexible.<br />
By now, the application has evolved from a single PHP file into a structure that is organized and<br />
allows for code reuse. You should be happier, but far from satisfied. For example, the "routing"<br />
system is fickle, and wouldn't recognize that the list page (/index.php) should be accessible<br />
also via/ (if Apache rewrite rules were added). Also, instead of developing the blog, a lot of time<br />
is being spent working on the "architecture" of the code (e.g. routing, calling controllers,<br />
templates, etc.). More time will need to be spent to handle form submissions, input validation,<br />
logging and security. Why should you have to reinvent solutions to all these routine problems?<br />
Add a Touch of Symfony2<br />
Symfony2 to the rescue. Before actually using Symfony2, you need to make sure PHP knows how<br />
to find the Symfony2 classes. This is accomplished via an autoloader that Symfony provides. An<br />
autoloader is a tool that makes it possible to start using PHP classes without explicitly including<br />
the file containing the class.<br />
First, download symfony and place it into a vendor/symfony/ directory. Next, create<br />
anapp/bootstrap.php file. Use it to require the two files in the application and to<br />
configure the autoloader:<br />
Symfony2 – Franz Jordán 2011<br />
This tells the autoloader where the Symfony classes are. With this, you can start using Symfony<br />
classes without using the require statement for the files that contain them.<br />
Core to Symfony's philosophy is the idea that an application's main job is to interpret each<br />
request and return a response. To this end, Symfony2 provides both a Request and<br />
a Response class. These classes are object-oriented representations of the raw HTTP request<br />
being processed and the HTTP response being returned. Use them to improve the blog:<br />
Symfony2 – Franz Jordán 2011<br />
The controllers are now responsible for returning a Response object. To make this easier, you<br />
can add a new render_template() function, which, incidentally, acts quite a bit like the<br />
Symfony2 templating engine:<br />
// controllers.php<br />
use Symfony\Component\HttpFoundation\Response;<br />
function list_action()<br />
{<br />
$posts = get_all_posts();<br />
$html = render_template('templates/list.php', array('posts' => $posts));<br />
return new Response($html);<br />
}<br />
function show_action($id)<br />
{<br />
$post = get_post_by_id($id);<br />
$html = render_template('templates/show.php', array('post' => $post));<br />
return new Response($html);<br />
}<br />
// helper function to render templates<br />
function render_template($path, array $args)<br />
{<br />
extract($args);<br />
23
Symfony2 – Franz Jordán 2011<br />
ob_start();<br />
require $path;<br />
$html = ob_get_clean();<br />
return $html;<br />
}<br />
By bringing in a small part of Symfony2, the application is more flexible and reliable.<br />
The Requestprovides a dependable way to access information about the HTTP request.<br />
Specifically, thegetPathInfo() method returns a cleaned URI (always returning /show and<br />
never /index.php/show). So, even if the user goes to /index.php/show, the application is<br />
intelligent enough to route the request through show_action().<br />
The Response object gives flexibility when constructing the HTTP response, allowing HTTP<br />
headers and content to be added via an object-oriented interface. And while the responses in<br />
this application are simple, this flexibility will pay dividends as your application grows.<br />
The Sample Application in Symfony2<br />
The blog has come a long way, but it still contains a lot of code for such a simple application.<br />
Along the way, we've also invented a simple routing system and a method<br />
using ob_start() andob_get_clean() to render templates. If, for some reason, you needed<br />
to continue building this "framework" from scratch, you could at least use Symfony's<br />
standalone Routing and Templatingcomponents, which already solve these problems.<br />
Instead of re-solving common problems, you can let Symfony2 take care of them for you. Here's<br />
the same sample application, now built in Symfony2:<br />
Symfony2 – Franz Jordán 2011<br />
$posts = $this->get('doctrine')->getEntityManager()<br />
->createQuery('SELECT p FROM AcmeBlogBundle:Post p')<br />
->execute();<br />
return $this->render('AcmeBlogBundle:Post:list.html.php',<br />
array('posts' => $posts));<br />
}<br />
public function showAction($id)<br />
{<br />
$post = $this->get('doctrine')<br />
->getEntityManager()<br />
->getRepository('AcmeBlogBundle:Post')<br />
->find($id);<br />
if (!$post) {<br />
// cause the 404 page not found to be displayed<br />
throw $this->createNotFoundException();<br />
}<br />
=> $post));<br />
return $this->render('AcmeBlogBundle:Post:show.html.php', array('post'<br />
}<br />
}<br />
25
Symfony2 – Franz Jordán 2011<br />
The two controllers are still lightweight. Each uses the Doctrine ORM library to retrieve objects<br />
from the database and the Templating component to render a template and return<br />
a Response object. The list template is now quite a bit simpler:<br />
<br />
<br />
<br />
List of Posts<br />
<br />
<br />
<br />
Symfony2 – Franz Jordán 2011<br />
<br />
<br />
<br />
We'll leave the show template as an exercise, as it should be trivial to create based on the list<br />
template.<br />
When Symfony2's engine (called the Kernel) boots up, it needs a map so that it knows which<br />
controllers to execute based on the request information. A routing configuration map provides<br />
this information in a readable format:<br />
# app/config/routing.yml<br />
blog_list:<br />
pattern: /blog<br />
defaults: { _controller: AcmeBlogBundle:Blog:list }<br />
blog_show:<br />
pattern: /blog/show/{id}<br />
defaults: { _controller: AcmeBlogBundle:Blog:show }<br />
Now that Symfony2 is handling all the mundane tasks, the front controller is dead simple. And<br />
since it does so little, you'll never have to touch it once it's created (and if you use a Symfony2<br />
distribution, you won't even need to create it!):<br />
Symfony2 – Franz Jordán 2011<br />
The front controller's only job is to initialize Symfony2's engine (Kernel) and pass it<br />
a Request object to handle. Symfony2's core then uses the routing map to determine which<br />
controller to call. Just like before, the controller method is responsible for returning the<br />
final Response object. There's really not much else to it.<br />
For a visual representation of how Symfony2 handles each request, see the request flow<br />
diagram.<br />
Where Symfony2 Delivers<br />
In the upcoming chapters, you'll learn more about how each piece of Symfony works and the<br />
recommended organization of a project. For now, let's see how migrating the blog from flat PHP<br />
to Symfony2 has improved life:<br />
Your application now has clear and consistently organized code (though Symfony doesn't<br />
force you into this). This promotes reusability and allows for new developers to be<br />
productive in your project more quickly.<br />
100% of the code you write is for your application. You don't need to develop or maintain<br />
low-level utilities such as autoloading, routing, or rendering controllers.<br />
Symfony2 gives you access to open source tools such as Doctrine and the Templating,<br />
Security, Form, Validation and Translation components (to name a few).<br />
The application now enjoys fully-flexible URLs thanks to the Routing component.<br />
Symfony2's HTTP-centric architecture gives you access to powerful tools such as HTTP<br />
caching powered by Symfony2's internal HTTP cache or more powerful tools such<br />
asVarnish. This is covered in a later chapter all about caching.<br />
And perhaps best of all, by using Symfony2, you now have access to a whole set of high-quality<br />
open source tools developed by the Symfony2 community! For more information, check<br />
outSymfony2Bundles.org<br />
Better templates<br />
If you choose to use it, Symfony2 comes standard with a templating engine called Twig that<br />
makes templates faster to write and easier to read. It means that the sample application could<br />
contain even less code! Take, for example, the list template written in Twig:<br />
{# src/Acme/BlogBundle/Resources/views/Blog/list.html.twig #}<br />
{% extends "::layout.html.twig" %}<br />
{% block title %}List of Posts{% endblock %}<br />
{% block body %}<br />
List of Posts<br />
<br />
{% for post in posts %}<br />
28
Symfony2 – Franz Jordán 2011<br />
<br />
<br />
{{ post.title }}<br />
<br />
<br />
{% endfor %}<br />
<br />
{% endblock %}<br />
The corresponding layout.html.twig template is also easier to write:<br />
{# app/Resources/views/layout.html.twig #}<br />
<br />
<br />
{% block title %}Default title{% endblock %}<br />
<br />
<br />
{% block body %}{% endblock %}<br />
<br />
<br />
Twig is well-supported in Symfony2. And while PHP templates will always be supported in<br />
Symfony2, we'll continue to discuss the many advantages of Twig. For more information, see<br />
the templating chapter.<br />
Learn more from the Cookbook<br />
How to use PHP instead of Twig for Templates<br />
How to define Controllers as Services<br />
Installing and Configuring Symfony<br />
29
Symfony2 – Franz Jordán 2011<br />
The goal of this chapter is to get you up and running with a working application built on top of<br />
Symfony. Fortunately, Symfony offers "distributions", which are functional Symfony "starter"<br />
projects that you can download and begin developing in immediately.<br />
Downloading a Symfony2 Distribution<br />
First, check that you have installed and configured a Web server (such as Apache) with PHP 5.3.2<br />
or higher. For more information on Symfony2 requirements, see therequirements reference.<br />
Symfony2 packages "distributions", which are fully-functional applications that include the<br />
Symfony2 core libraries, a selection of useful bundles, a sensible directory structure and some<br />
default configuration. When you download a Symfony2 distribution, you're downloading a<br />
functional application skeleton that can be used immediately to begin developing your<br />
application.<br />
Start by visiting the Symfony2 download page at http://symfony.com/download. On this page,<br />
you'll see the Symfony Standard Edition, which is the main Symfony2 distribution. Here, you'll<br />
need to make two choices:<br />
Download either a .tgz or .zip archive - both are equivalent, download whatever you're<br />
more comfortable using;<br />
Download the distribution with or without vendors. If you have Git installed on your<br />
computer, you should download Symfony2 "without vendors", as it adds a bit more<br />
flexibility when including third-party/vendor libraries.<br />
Download one of the archives somewhere under your local web server's root directory and<br />
unpack it. From a UNIX command line, this can be done with one of the following commands<br />
(replacing ###with your actual filename):<br />
# for .tgz file<br />
tar zxvf Symfony_Standard_Vendors_2.0.###.tgz<br />
# for a .zip file<br />
unzip Symfony_Standard_Vendors_2.0.###.zip<br />
When you're finished, you should have a Symfony/ directory that looks something like this:<br />
www/
Symfony2 – Franz Jordán 2011<br />
src/<br />
...<br />
vendor/<br />
...<br />
web/<br />
app.php<br />
...<br />
Updating Vendors<br />
Finally, if you downloaded the archive "without vendors", install the vendors by running the<br />
following command from the command line:<br />
php bin/vendors install<br />
This command downloads all of the necessary vendor libraries - including Symfony itself - into<br />
thevendor/ directory.<br />
Configuration and Setup<br />
At this point, all of the needed third-party libraries now live in the vendor/ directory. You also<br />
have a default application setup in app/ and some sample code inside the src/ directory.<br />
Symfony2 comes with a visual server configuration tester to help make sure your Web server and<br />
PHP are configured to use Symfony. Use the following URL to check your configuration:<br />
http://localhost/Symfony/web/config.php<br />
If there are any issues, correct them now before moving on.<br />
Setting up Permissions<br />
One common issue is that the app/cache and app/logs directories must be writable both by the<br />
web server and the command line user. On a UNIX system, if your web server user is different<br />
from your command line user, you can run the following commands just once in your project to<br />
ensure that permissions will be setup properly. Change www-data to the web server user<br />
and yourname to your command line user:<br />
1. Using ACL on a system that supports chmod +a<br />
Many systems allow you to use the chmod +a command. Try this first, and if you get an error -<br />
try the next method:<br />
rm -rf app/cache/*<br />
rm -rf app/logs/*<br />
sudo chmod +a "www-data allow<br />
delete,write,append,file_inherit,directory_inherit" app/cache app/logs<br />
31
Symfony2 – Franz Jordán 2011<br />
sudo chmod +a "yourname allow<br />
delete,write,append,file_inherit,directory_inherit" app/cache app/logs<br />
2. Using Acl on a system that does not support chmod +a<br />
Some systems, like Ubuntu, don't support chmod +a, but do support another utility<br />
called setfacl. On some systems, this will need to be installed before using it:<br />
sudo setfacl -R -m u:www-data:rwx -m u:yourname:rwx app/cache app/logs<br />
sudo setfacl -dR -m u:www-data:rwx -m u:yourname:rwx app/cache app/logs<br />
3. Without using ACL<br />
If you don't have access to changing the ACL of the directories, you will need to change the<br />
umask so that the cache and log directories will be group-writable or world-writable (depending<br />
if the web server user and the command line user are in the same group or not). To achieve this,<br />
put the following line at the beginning of<br />
the app/console, web/app.php and web/app_dev.php files:<br />
umask(0002); // This will let the permissions be 0775<br />
// or<br />
umask(0000); // This will let the permissions be 0777<br />
Note that using the ACL is recommended when you have access to them on your server because<br />
changing the umask is not thread-safe.<br />
When everything is fine, click on "Go to the Welcome page" to request your first "real" Symfony2<br />
webpage:<br />
http://localhost/Symfony/web/app_dev.php/<br />
Symfony2 should welcome and congratulate you for your hard work so far!<br />
32
Symfony2 – Franz Jordán 2011<br />
Beginning Development<br />
Now that you have a fully-functional Symfony2 application, you can begin development! Your<br />
distribution may contain some sample code - check the README.rst file included with the<br />
distribution (open it as a text file) to learn about what sample code was included with your<br />
distribution and how you can remove it later.<br />
If you're new to Symfony, join us in the "Creating Pages in Symfony2", where you'll learn how to<br />
create pages, change configuration, and do everything else you'll need in your new application.<br />
Using Source Control<br />
If you're using a version control system like Git or Subversion, you can setup your version<br />
control system and begin committing your project to it as normal. For Git, this can be done<br />
easily with the following command:<br />
git init<br />
For more information on setting up and using Git, check out the GitHub Bootcamp tutorials.<br />
Ignoring the vendor/ Directory<br />
If you've downloaded the archive without vendors, you can safely ignore the<br />
entire vendors/directory and not commit it to source control. With Git, this is done by creating<br />
and adding the following to a .gitignore file:<br />
vendor/<br />
Now, the vendor directory won't be committed to source control. This is fine (actually, it's great!)<br />
because when someone else clones or checks out the project, he/she can simply run<br />
the phpbin/vendors install script to download all the necessary vendor libraries.<br />
<strong>33</strong>
Symfony2 – Franz Jordán 2011<br />
Creating Pages in Symfony2<br />
Creating a new page in Symfony2 is a simple two-step process:<br />
Create a route: A route defines the URL (e.g. /about) to your page and specifies a<br />
controller (which is a PHP function) that Symfony2 should execute when the URL of an<br />
incoming request matches the route pattern;<br />
Create a controller: A controller is a PHP function that takes the incoming request and<br />
transforms it into the Symfony2 Response object that's returned to the user.<br />
This simple approach is beautiful because it matches the way that the Web works. Every<br />
interaction on the Web is initiated by an HTTP request. The job of your application is simply to<br />
interpret the request and return the appropriate HTTP response.<br />
Symfony2 follows this philosophy and provides you with tools and conventions to keep your<br />
application organized as it grows in users and complexity.<br />
Sounds simple enough? Let's dive in!<br />
The "Hello Symfony!" Page<br />
Let's start with a spin off of the classic "Hello World!" application. When you're finished, the user<br />
will be able to get a personal greeting (e.g. "Hello Symfony") by going to the following URL:<br />
http://localhost/app_dev.php/hello/Symfony<br />
Actually, you'll be able to replace Symfony with any other name to be greeted. To create the<br />
page, follow the simple two-step process.<br />
The tutorial assumes that you've already downloaded Symfony2 and configured your webserver.<br />
The above URL assumes that localhost points to the web directory of your new Symfony2<br />
project. For detailed information on this process, see theInstalling Symfony2.<br />
Before you begin: Create the Bundle<br />
Before you begin, you'll need to create a bundle. In Symfony2, a bundle is like a plugin, except<br />
that all of the code in your application will live inside a bundle.<br />
A bundle is nothing more than a directory that houses everything related to a specific feature,<br />
including PHP classes, configuration, and even stylesheets and Javascript files (see The Bundle<br />
System).<br />
To create a bundle called AcmeHelloBundle (a play bundle that you'll build in this chapter),<br />
run the following command and follow the on-screen instructions (use all of the default<br />
options):<br />
php app/console generate:bundle --namespace=Acme/HelloBundle --format=yml<br />
Behind the scenes, a directory is created for the bundle at src/Acme/HelloBundle. A line is<br />
also automatically added to the app/AppKernel.php file so that the bundle is registered with<br />
the kernel:<br />
// app/AppKernel.php<br />
public function registerBundles()<br />
{<br />
$bundles = array(<br />
34
Symfony2 – Franz Jordán 2011<br />
// ...<br />
new Acme\HelloBundle\AcmeHelloBundle(),<br />
);<br />
// ...<br />
return $bundles;<br />
}<br />
Now that you have a bundle setup, you can begin building your application inside the bundle.<br />
Step 1: Create the Route<br />
By default, the routing configuration file in a Symfony2 application is located<br />
atapp/config/routing.yml. Like all configuration in Symfony2, you can also choose to use<br />
XML or PHP out of the box to configure routes.<br />
If you look at the main routing file, you'll see that Symfony already added an entry when you<br />
generated the AcmeHelloBundle:<br />
YAML<br />
# app/config/routing.yml<br />
AcmeHelloBundle:<br />
resource: "@AcmeHelloBundle/Resources/config/routing.yml"<br />
prefix: /<br />
This entry is pretty basic: it tells Symfony to load routing configuration from<br />
theResources/config/routing.yml file that lives inside the AcmeHelloBundle. This<br />
means that you place routing configuration directly in app/config/routing.yml or organize<br />
your routes throughout your application, and import them from here.<br />
Now that the routing.yml file from the bundle is being imported, add the new route that<br />
defines the URL of the page that you're about to create:<br />
# src/Acme/HelloBundle/Resources/config/routing.yml<br />
hello:<br />
pattern: /hello/{name}<br />
defaults: { _controller: AcmeHelloBundle:Hello:index }<br />
The routing consists of two basic pieces: the pattern, which is the URL that this route will<br />
match, and a defaults array, which specifies the controller that should be executed. The<br />
placeholder syntax in the pattern ({name}) is a wildcard. It means<br />
that /hello/Ryan, /hello/Fabien or any other similar URL will match this route.<br />
The {name} placeholder parameter will also be passed to the controller so that you can use its<br />
value to personally greet the user.<br />
The routing system has many more great features for creating flexible and powerful URL<br />
structures in your application. For more details, see the chapter all aboutRouting.<br />
Step 2: Create the Controller<br />
When a URL such as /hello/Ryan is handled by the application, the hello route is matched<br />
and theAcmeHelloBundle:Hello:index controller is executed by the framework. The<br />
second step of the page-creation process is to create that controller.<br />
The controller - AcmeHelloBundle:Hello:index is the logical name of the controller, and<br />
it maps to the indexAction method of a PHP class<br />
35
Symfony2 – Franz Jordán 2011<br />
called Acme\HelloBundle\Controller\Hello. Start by creating this file inside<br />
your AcmeHelloBundle:<br />
// src/Acme/HelloBundle/Controller/HelloController.php<br />
namespace Acme\HelloBundle\Controller;<br />
use Symfony\Component\HttpFoundation\Response;<br />
class HelloController<br />
{<br />
}<br />
In reality, the controller is nothing more than a PHP method that you create and Symfony<br />
executes. This is where your code uses information from the request to build and prepare the<br />
resource being requested. Except in some advanced cases, the end product of a controller is<br />
always the same: a Symfony2 Response object.<br />
Create the indexAction method that Symfony will execute when the hello route is matched:<br />
// src/Acme/HelloBundle/Controller/HelloController.php<br />
// ...<br />
class HelloController<br />
{<br />
public function indexAction($name)<br />
{<br />
return new Response('Hello '.$name.'!');<br />
}<br />
}<br />
The controller is simple: it creates a new Response object, whose first argument is the content<br />
that should be used in the response (a small HTML page in this example).<br />
Congratulations! After creating only a route and a controller, you already have a fully-functional<br />
page! If you've setup everything correctly, your application should greet you:<br />
http://localhost/app_dev.php/hello/Ryan<br />
An optional, but common, third step in the process is to create a template.<br />
Controllers are the main entry point for your code and a key ingredient when creating pages.<br />
Much more information can be found in the Controller Chapter.<br />
Optional Step 3: Create the Template<br />
Templates allows you to move all of the presentation (e.g. HTML code) into a separate file and<br />
reuse different portions of the page layout. Instead of writing the HTML inside the controller,<br />
render a template instead:<br />
// src/Acme/HelloBundle/Controller/HelloController.php<br />
namespace Acme\HelloBundle\Controller;<br />
1<br />
2<br />
3<br />
4<br />
5<br />
6<br />
7<br />
8<br />
9<br />
10<br />
11<br />
12<br />
use Symfony\Bundle\FrameworkBundle\Controller\Controller;<br />
class HelloController extends Controller<br />
{<br />
public function indexAction($name)<br />
{<br />
return $this->render('AcmeHelloBundle:Hello:index.html.twig', array('name' => $name));<br />
}<br />
}<br />
// render a PHP template instead<br />
// return $this->render('AcmeHelloBundle:Hello:index.html.php', array('name' => $name));<br />
36
Symfony2 – Franz Jordán 2011<br />
13<br />
14<br />
15<br />
In order to use the render() method, your controller must extend<br />
theSymfony\Bundle\FrameworkBundle\Controller\Controller class (API<br />
docs:Controller), which adds shortcuts for tasks that are common inside controllers. This is<br />
done in the above example by adding the use statement on line 4 and then<br />
extending Controller on line 6.<br />
The render() method creates a Response object filled with the content of the given, rendered<br />
template. Like any other controller, you will ultimately return that Response object.<br />
Notice that there are two different examples for rendering the template. By default, Symfony2<br />
supports two different templating languages: classic PHP templates and the succinct but<br />
powerfulTwig templates. Don't be alarmed - you're free to choose either or even both in the<br />
same project.<br />
The controller renders the AcmeHelloBundle:Hello:index.html.twig template, which<br />
uses the following naming convention:<br />
BundleName:ControllerName:TemplateName<br />
This is the logical name of the template, which is mapped to a physical location using the<br />
following convention.<br />
/path/to/BundleName/Resources/views/ControllerName/TemplateName<br />
In this case, AcmeHelloBundle is the bundle name, Hello is the controller,<br />
and index.html.twig the template:<br />
Twig<br />
1<br />
2<br />
3<br />
4<br />
5<br />
6<br />
{# src/Acme/HelloBundle/Resources/views/Hello/index.html.twig #}<br />
{% extends '::base.html.twig' %}<br />
{% block body %}<br />
Hello {{ name }}!<br />
{% endblock %}<br />
PHP<br />
Let's step through the Twig template line-by-line:<br />
line 2: The extends token defines a parent template. The template explicitly defines a<br />
layout file inside of which it will be placed.<br />
line 4: The block token says that everything inside should be placed inside a block<br />
calledbody. As you'll see, it's the responsibility of the parent template<br />
(base.html.twig) to ultimately render the block called body.<br />
The parent template, ::base.html.twig, is missing both<br />
the BundleName and ControllerNameportions of its name (hence the double colon (::) at the<br />
beginning). This means that the template lives outside of the bundles and in the app directory:<br />
Twig<br />
{# app/Resources/views/base.html.twig #}<br />
<br />
<br />
<br />
<br />
{% block title %}Welcome!{% endblock %}<br />
{% block stylesheets %}{% endblock %}<br />
<br />
<br />
37
Symfony2 – Franz Jordán 2011<br />
<br />
{% block body %}{% endblock %}<br />
{% block javascripts %}{% endblock %}<br />
<br />
<br />
PHP<br />
The base template file defines the HTML layout and renders the body block that you defined in<br />
theindex.html.twig template. It also renders a title block, which you could choose to<br />
define in theindex.html.twig template. Since you did not define the title block in the<br />
child template, it defaults to "Welcome!".<br />
Templates are a powerful way to render and organize the content for your page. A template can<br />
render anything, from HTML markup, to CSS code, or anything else that the controller may need<br />
to return.<br />
In the lifecycle of handling a request, the templating engine is simply an optional tool. Recall<br />
that the goal of each controller is to return a Response object. Templates are a powerful, but<br />
optional, tool for creating the content for that Response object.<br />
The Directory Structure<br />
After just a few short sections, you already understand the philosophy behind creating and<br />
rendering pages in Symfony2. You've also already begun to see how Symfony2 projects are<br />
structured and organized. By the end of this section, you'll know where to find and put different<br />
types of files and why.<br />
Though entirely flexible, by default, each Symfony application has the same basic and<br />
recommended directory structure:<br />
app/: This directory contains the application configuration;<br />
src/: All the project PHP code is stored under this directory;<br />
vendor/: Any vendor libraries are placed here by convention;<br />
web/: This is the web root directory and contains any publicly accessible files;<br />
The Web Directory<br />
The web root directory is the home of all public and static files including images, stylesheets,<br />
and JavaScript files. It is also where each front controller lives:<br />
// web/app.php<br />
require_once __DIR__.'/../app/bootstrap.php.cache';<br />
require_once __DIR__.'/../app/AppKernel.php';<br />
use Symfony\Component\HttpFoundation\Request;<br />
$kernel = new AppKernel('prod', false);<br />
$kernel->loadClassCache();<br />
$kernel->handle(Request::createFromGlobals())->send();<br />
The front controller file (app.php in this example) is the actual PHP file that's executed when<br />
using a Symfony2 application and its job is to use a Kernel class, AppKernel, to bootstrap the<br />
application.<br />
Having a front controller means different and more flexible URLs than are used in a typical flat<br />
PHP application. When using a front controller, URLs are formatted in the following way:<br />
http://localhost/app.php/hello/Ryan<br />
38
Symfony2 – Franz Jordán 2011<br />
The front controller, app.php, is executed and the "internal:" URL /hello/Ryan is routed<br />
internally using the routing configuration. By using Apache mod_rewriterules, you can force<br />
the app.php file to be executed without needing to specify it in the URL:<br />
http://localhost/hello/Ryan<br />
Though front controllers are essential in handling every request, you'll rarely need to modify or<br />
even think about them. We'll mention them again briefly in the Environments section.<br />
The Application (app) Directory<br />
As you saw in the front controller, the AppKernel class is the main entry point of the<br />
application and is responsible for all configuration. As such, it is stored in the app/ directory.<br />
This class must implement two methods that define everything that Symfony needs to know<br />
about your application. You don't even need to worry about these methods when starting -<br />
Symfony fills them in for you with sensible defaults.<br />
registerBundles(): Returns an array of all bundles needed to run the application<br />
(see The Bundle System);<br />
registerContainerConfiguration(): Loads the main application configuration<br />
resource file (see the Application Configuration section).<br />
In day-to-day development, you'll mostly use the app/ directory to modify configuration and<br />
routing files in the app/config/ directory (see Application Configuration). It also contains the<br />
application cache directory (app/cache), a log directory (app/logs) and a directory for<br />
application-level resource files, such as templates (app/Resources). You'll learn more about<br />
each of these directories in later chapters.<br />
Autoloading<br />
When Symfony is loading, a special file - app/autoload.php - is included. This file is<br />
responsible for configuring the autoloader, which will autoload your application files from<br />
the src/ directory and third-party libraries from the vendor/ directory.<br />
Because of the autoloader, you never need to worry about<br />
using include orrequire statements. Instead, Symfony2 uses the namespace of a class to<br />
determine its location and automatically includes the file on your behalf the instant you need a<br />
class.<br />
The autoloader is already configured to look in the src/ directory for any of your PHP classes.<br />
For autoloading to work, the class name and path to the file have to follow the same pattern:<br />
Class Name:<br />
Acme\HelloBundle\Controller\HelloController<br />
Path:<br />
src/Acme/HelloBundle/Controller/HelloController.php<br />
Typically, the only time you'll need to worry about the app/autoload.php file is when you're<br />
including a new third-party library in the vendor/ directory. For more information on<br />
autoloading, see How to autoload Classes.<br />
The Source (src) Directory<br />
Put simply, the src/ directory contains all of the actual code (PHP code, templates,<br />
configuration files, stylesheets, etc) that drives your application. When developing, the vast<br />
majority of your work will be done inside one or more bundles that you create in this directory.<br />
But what exactly is a bundle?<br />
39
Symfony2 – Franz Jordán 2011<br />
The Bundle System<br />
A bundle is similar to a plugin in other software, but even better. The key difference is<br />
thateverything is a bundle in Symfony2, including both the core framework functionality and the<br />
code written for your application. Bundles are first-class citizens in Symfony2. This gives you the<br />
flexibility to use pre-built features packaged in third-party bundles or to distribute your own<br />
bundles. It makes it easy to pick and choose which features to enable in your application and to<br />
optimize them the way you want.<br />
While you'll learn the basics here, an entire cookbook entry is devoted to the organization and<br />
best practices of bundles.<br />
A bundle is simply a structured set of files within a directory that implement a single feature.<br />
You might create a BlogBundle, a ForumBundle or a bundle for user management (many of<br />
these exist already as open source bundles). Each directory contains everything related to that<br />
feature, including PHP files, templates, stylesheets, JavaScripts, tests and anything else. Every<br />
aspect of a feature exists in a bundle and every feature lives in a bundle.<br />
An application is made up of bundles as defined in the registerBundles() method of<br />
the AppKernelclass:<br />
// app/AppKernel.php<br />
public function registerBundles()<br />
{<br />
$bundles = array(<br />
new Symfony\Bundle\FrameworkBundle\FrameworkBundle(),<br />
new Symfony\Bundle\SecurityBundle\SecurityBundle(),<br />
new Symfony\Bundle\TwigBundle\TwigBundle(),<br />
new Symfony\Bundle\MonologBundle\MonologBundle(),<br />
new Symfony\Bundle\SwiftmailerBundle\SwiftmailerBundle(),<br />
new Symfony\Bundle\DoctrineBundle\DoctrineBundle(),<br />
new Symfony\Bundle\AsseticBundle\AsseticBundle(),<br />
new Sensio\Bundle\FrameworkExtraBundle\SensioFrameworkExtraBundle(),<br />
new JMS\SecurityExtraBundle\JMSSecurityExtraBundle(),<br />
);<br />
if (in_array($this->getEnvironment(), array('dev', 'test'))) {<br />
$bundles[] = new Acme\DemoBundle\AcmeDemoBundle();<br />
$bundles[] = new Symfony\Bundle\WebProfilerBundle\WebProfilerBundle();<br />
$bundles[] = new Sensio\Bundle\DistributionBundle\SensioDistributionBundle();<br />
$bundles[] = new Sensio\Bundle\GeneratorBundle\SensioGeneratorBundle();<br />
}<br />
}<br />
return $bundles;<br />
With the registerBundles() method, you have total control over which bundles are used by<br />
your application (including the core Symfony bundles).<br />
A bundle can live anywhere as long as it can be autoloaded (via the autoloader configured<br />
at app/autoload.php).<br />
Creating a Bundle<br />
The Symfony Standard Edition comes with a handy task that creates a fully-functional bundle for<br />
you. Of course, creating a bundle by hand is pretty easy as well.<br />
To show you how simple the bundle system is, create a new bundle<br />
called AcmeTestBundle and enable it.<br />
The Acme portion is just a dummy name that should be replaced by some "vendor" name that<br />
represents you or your organization (e.g. ABCTestBundle for some company named ABC).<br />
40
Symfony2 – Franz Jordán 2011<br />
Start by creating a src/Acme/TestBundle/ directory and adding a new file<br />
calledAcmeTestBundle.php:<br />
// src/Acme/TestBundle/AcmeTestBundle.php<br />
namespace Acme\TestBundle;<br />
use Symfony\Component\HttpKernel\Bundle\Bundle;<br />
class AcmeTestBundle extends Bundle<br />
{<br />
}<br />
The name AcmeTestBundle follows the standard Bundle naming conventions. You could also<br />
choose to shorten the name of the bundle to simply TestBundle by naming this<br />
class TestBundle (and naming the file TestBundle.php).<br />
This empty class is the only piece you need to create the new bundle. Though commonly empty,<br />
this class is powerful and can be used to customize the behavior of the bundle.<br />
Now that you've created the bundle, enable it via the AppKernel class:<br />
// app/AppKernel.php<br />
public function registerBundles()<br />
{<br />
$bundles = array(<br />
// ...<br />
}<br />
// register your bundles<br />
new Acme\TestBundle\AcmeTestBundle(),<br />
);<br />
// ...<br />
return $bundles;<br />
And while it doesn't do anything yet, AcmeTestBundle is now ready to be used.<br />
And as easy as this is, Symfony also provides a command-line interface for generating a basic<br />
bundle skeleton:<br />
php app/console generate:bundle --namespace=Acme/TestBundle<br />
The bundle skeleton generates with a basic controller, template and routing resource that can be<br />
customized. You'll learn more about Symfony2's command-line tools later.<br />
Whenever creating a new bundle or using a third-party bundle, always make sure the bundle has<br />
been enabled in registerBundles(). When using thegenerate:bundle command, this is<br />
done for you.<br />
Bundle Directory Structure<br />
The directory structure of a bundle is simple and flexible. By default, the bundle system follows<br />
a set of conventions that help to keep code consistent between all Symfony2 bundles. Take a<br />
look atAcmeHelloBundle, as it contains some of the most common elements of a bundle:<br />
Controller/ contains the controllers of the bundle (e.g. HelloController.php);<br />
Resources/config/ houses configuration, including routing configuration<br />
(e.g.routing.yml);<br />
Resources/views/ holds templates organized by controller name<br />
(e.g.Hello/index.html.twig);<br />
41
Symfony2 – Franz Jordán 2011<br />
Resources/public/ contains web assets (images, stylesheets, etc) and is copied or<br />
symbolically linked into the project web/ directory via the assets:install console<br />
command;<br />
Tests/ holds all tests for the bundle.<br />
A bundle can be as small or large as the feature it implements. It contains only the files you need<br />
and nothing else.<br />
As you move through the book, you'll learn how to persist objects to a database, create and<br />
validate forms, create translations for your application, write tests and much more. Each of these<br />
has their own place and role within the bundle.<br />
Application Configuration<br />
An application consists of a collection of bundles representing all of the features and capabilities<br />
of your application. Each bundle can be customized via configuration files written in YAML, XML<br />
or PHP. By default, the main configuration file lives in the app/config/ directory and is called<br />
eitherconfig.yml, config.xml or config.php depending on which format you prefer:<br />
YAML<br />
# app/config/config.yml<br />
imports:<br />
- { resource: parameters.ini }<br />
- { resource: security.yml }<br />
framework:<br />
secret: %secret%<br />
charset: UTF-8<br />
router: { resource: "%kernel.root_dir%/config/routing.yml" }<br />
form: true<br />
csrf_protection: true<br />
validation: { enable_annotations: true }<br />
templating: { engines: ['twig'] } #assets_version: SomeVersionScheme<br />
session:<br />
default_locale: %locale%<br />
auto_start: true<br />
# Twig Configuration<br />
twig:<br />
debug: %kernel.debug%<br />
strict_variables: %kernel.debug%<br />
# ...<br />
You'll learn exactly how to load each file/format in the next section Environments.<br />
Each top-level entry like framework or twig defines the configuration for a particular bundle.<br />
For example, the framework key defines the configuration for the core<br />
Symfony FrameworkBundle and includes configuration for the routing, templating, and other<br />
core systems.<br />
For now, don't worry about the specific configuration options in each section. The configuration<br />
file ships with sensible defaults. As you read more and explore each part of Symfony2, you'll<br />
learn about the specific configuration options of each feature.<br />
42
Symfony2 – Franz Jordán 2011<br />
Configuration Formats<br />
Throughout the chapters, all configuration examples will be shown in all three formats (YAML,<br />
XML and PHP). Each has its own advantages and disadvantages. The choice of which to use is up<br />
to you:<br />
YAML: Simple, clean and readable;<br />
XML: More powerful than YAML at times and supports IDE autocompletion;<br />
PHP: Very powerful but less readable than standard configuration formats.<br />
Environments<br />
An application can run in various environments. The different environments share the same PHP<br />
code (apart from the front controller), but use different configuration. For instance,<br />
a devenvironment will log warnings and errors, while a prod environment will only log errors.<br />
Some files are rebuilt on each request in the dev environment (for the developer's convenience),<br />
but cached in the prod environment. All environments live together on the same machine and<br />
execute the same application.<br />
A Symfony2 project generally begins with three environments (dev, test and prod), though<br />
creating new environments is easy. You can view your application in different environments<br />
simply by changing the front controller in your browser. To see the application in<br />
the dev environment, access the application via the development front controller:<br />
http://localhost/app_dev.php/hello/Ryan<br />
If you'd like to see how your application will behave in the production environment, call<br />
the prodfront controller instead:<br />
http://localhost/app.php/hello/Ryan<br />
If you open the web/app.php file, you'll find that it's configured explicitly to use<br />
theprod environment:<br />
$kernel = new AppKernel('prod', false);<br />
You can create a new front controller for a new environment by copying this file and<br />
changing prod to some other value.<br />
Since the prod environment is optimized for speed; the configuration, routing and Twig<br />
templates are compiled into flat PHP classes and cached. When viewing changes in<br />
the prod environment, you'll need to clear these cached files and allow them to rebuild:<br />
php app/console cache:clear --env=prod<br />
The test environment is used when running automated tests and cannot be accessed directly<br />
through the browser. See the testing chapter for more details.<br />
Environment Configuration<br />
The AppKernel class is responsible for actually loading the configuration file of your choice:<br />
// app/AppKernel.php<br />
public function registerContainerConfiguration(LoaderInterface $loader)<br />
{<br />
$loader->load(__DIR__.'/config/config_'.$this->getEnvironment().'.yml');<br />
}<br />
You already know that the .yml extension can be changed to .xml or .php if you prefer to use<br />
either XML or PHP to write your configuration. Notice also that each environment loads its own<br />
configuration file. Consider the configuration file for the dev environment.<br />
43
Symfony2 – Franz Jordán 2011<br />
# app/config/config_dev.yml<br />
imports:<br />
- { resource: config.yml }<br />
framework:<br />
router: { resource: "%kernel.root_dir%/config/routing_dev.yml" }<br />
profiler: { only_exceptions: false }<br />
# ...<br />
The imports key is similar to a PHP include statement and guarantees that the main<br />
configuration file (config.yml) is loaded first. The rest of the file tweaks the default<br />
configuration for increased logging and other settings conducive to a development environment.<br />
Both the prod and test environments follow the same model: each environment imports the<br />
base configuration file and then modifies its configuration values to fit the needs of the specific<br />
environment. This is just a convention, but one that allows you to reuse most of your<br />
configuration and customize just pieces of it between environments.<br />
Summary<br />
Congratulations! You've now seen every fundamental aspect of Symfony2 and have hopefully<br />
discovered how easy and flexible it can be. And while there are a lot of features still to come, be<br />
sure to keep the following basic points in mind:<br />
creating a page is a three-step process involving a route, a controller and (optionally)<br />
atemplate.<br />
each project contains just a few main directories: web/ (web assets and the front<br />
controllers),app/ (configuration), src/ (your bundles), and vendor/ (third-party code)<br />
(there's also a bin/directory that's used to help updated vendor libraries);<br />
each feature in Symfony2 (including the Symfony2 framework core) is organized into<br />
abundle, which is a structured set of files for that feature;<br />
the configuration for each bundle lives in the app/config directory and can be specified<br />
in YAML, XML or PHP;<br />
each environment is accessible via a different front controller<br />
(e.g. app.php andapp_dev.php) and loads a different configuration file.<br />
From here, each chapter will introduce you to more and more powerful tools and advanced<br />
concepts. The more you know about Symfony2, the more you'll appreciate the flexibility of its<br />
architecture and the power it gives you to rapidly develop applications.<br />
44
Controller<br />
Symfony2 – Franz Jordán 2011<br />
A controller is a PHP function you create that takes information from the HTTP request and<br />
constructs and returns an HTTP response (as a Symfony2 Response object). The response could<br />
be an HTML page, an XML document, a serialized JSON array, an image, a redirect, a 404 error or<br />
anything else you can dream up. The controller contains whatever arbitrary logic your<br />
applicationneeds to render the content of a page.<br />
To see how simple this is, let's look at a Symfony2 controller in action. The following controller<br />
would render a page that simply prints Hello world!:<br />
use Symfony\Component\HttpFoundation\Response;<br />
public function helloAction()<br />
{<br />
return new Response('Hello world!');<br />
}<br />
The goal of a controller is always the same: create and return a Response object. Along the<br />
way, it might read information from the request, load a database resource, send an email, or set<br />
information on the user's session. But in all cases, the controller will eventually return<br />
the Responseobject that will be delivered back to the client.<br />
There's no magic and no other requirements to worry about! Here are a few common examples:<br />
Controller A prepares a Response object representing the content for the homepage of<br />
the site.<br />
Controller B reads the slug parameter from the request to load a blog entry from the<br />
database and create a Response object displaying that blog. If the slug can't be found<br />
in the database, it creates and returns a Response object with a 404 status code.<br />
Controller C handles the form submission of a contact form. It reads the form information<br />
from the request, saves the contact information to the database and emails the contact<br />
information to the webmaster. Finally, it creates a Response object that redirects the<br />
client's browser to the contact form "thank you" page.<br />
Requests, Controller, Response Lifecycle<br />
Every request handled by a Symfony2 project goes through the same simple lifecycle. The<br />
framework takes care of the repetitive tasks and ultimately executes a controller, which houses<br />
your custom application code:<br />
1. Each request is handled by a single front controller file (e.g. app.php or app_dev.php)<br />
that's bootstraps the application;<br />
2. The Router reads information from the request (e.g. the URI), finds a route that matches<br />
that information, and reads the _controller parameter from the route;<br />
3. The controller from the matched route is executed and the code inside the controller<br />
creates and returns a Response object;<br />
4. The HTTP headers and content of the Response object are sent back to the client.<br />
Creating a page is as easy as creating a controller (#3) and making a route that maps a URL to<br />
that controller (#2).<br />
Though similarly named, a "front controller" is different from the "controllers" we'll talk about in<br />
this chapter. A front controller is a short PHP file that lives in your web directory and through<br />
45
Symfony2 – Franz Jordán 2011<br />
which all requests are directed. A typical application will have a production front controller<br />
(e.g. app.php) and a development front controller (e.g.app_dev.php). You'll likely never need<br />
to edit, view or worry about the front controllers in your application.<br />
A Simple Controller<br />
While a controller can be any PHP callable (a function, method on an object, or a Closure), in<br />
Symfony2, a controller is usually a single method inside a controller object. Controllers are also<br />
called actions.<br />
1 // src/Acme/HelloBundle/Controller/HelloController.php<br />
2<br />
3 namespace Acme\HelloBundle\Controller;<br />
4 use Symfony\Component\HttpFoundation\Response;<br />
5<br />
6 class HelloController<br />
7 {<br />
8 public function indexAction($name)<br />
9 {<br />
10 return new Response('Hello '.$name.'!');<br />
11 }<br />
12 }<br />
Note that the controller is the indexAction method, which lives inside a controller<br />
class (HelloController). Don't be confused by the naming: a controller class is simply a<br />
convenient way to group several controllers/actions together. Typically, the controller class will<br />
house several controllers/actions (e.g. updateAction,deleteAction, etc).<br />
This controller is pretty straightforward, but let's walk through it:<br />
line 3: Symfony2 takes advantage of PHP 5.3 namespace functionality to namespace the<br />
entire controller class. The use keyword imports the Response class, which our<br />
controller must return.<br />
line 6: The class name is the concatenation of a name for the controller class (i.e. Hello)<br />
and the word Controller. This is a convention that provides consistency to controllers<br />
and allows them to be referenced only by the first part of the name (i.e. Hello) in the<br />
routing configuration.<br />
line 8: Each action in a controller class is suffixed with Action and is referenced in the<br />
routing configuration by the action's name (index). In the next section, you'll create a<br />
route that maps a URI to this action. You'll learn how the route's placeholders ({name})<br />
become arguments to the action method ($name).<br />
line 10: The controller creates and returns a Response object.<br />
Mapping a URL to a Controller<br />
The new controller returns a simple HTML page. To actually view this page in your browser, you<br />
need to create a route, which maps a specific URL pattern to the controller:<br />
# app/config/routing.yml<br />
hello:<br />
pattern:<br />
/hello/{name}<br />
defaults: { _controller: AcmeHelloBundle:Hello:index }<br />
46
Symfony2 – Franz Jordán 2011<br />
Going to /hello/ryan now executes the HelloController::indexAction() controller<br />
and passes inryan for the $name variable. Creating a "page" means simply creating a controller<br />
method and associated route.<br />
Notice the syntax used to refer to the controller: AcmeHelloBundle:Hello:index. Symfony2<br />
uses a flexible string notation to refer to different controllers. This is the most common syntax<br />
and tells Symfony2 to look for a controller class called HelloController inside a bundle<br />
namedAcmeHelloBundle. The method indexAction() is then executed.<br />
For more details on the string format used to reference different controllers, see Controller<br />
Naming Pattern.<br />
This example places the routing configuration directly in the app/config/ directory. A better<br />
way to organize your routes is to place each route in the bundle it belongs to. For more<br />
information on this, see Including External Routing Resources.<br />
You can learn much more about the routing system in the Routing chapter.<br />
Route Parameters as Controller Arguments<br />
You already know that the _controller parameter AcmeHelloBundle:Hello:index refers<br />
to aHelloController::indexAction() method that lives inside<br />
the AcmeHelloBundle bundle. What's more interesting is the arguments that are passed to<br />
that method:<br />
Symfony2 – Franz Jordán 2011<br />
Notice that both placeholder variables ({first_name}, {last_name}) as well as the<br />
default colorvariable are available as arguments in the controller. When a route is matched, the<br />
placeholder variables are merged with the defaults to make one array that's available to your<br />
controller.<br />
Mapping route parameters to controller arguments is easy and flexible. Keep the following<br />
guidelines in mind while you develop.<br />
The order of the controller arguments does not matter<br />
Symfony is able to match the parameter names from the route to the variable names in<br />
the controller method's signature. In other words, it realizes that<br />
the {last_name}parameter matches up with the $last_name argument. The<br />
arguments of the controller could be totally reordered and still work perfectly:<br />
public function indexAction($last_name, $color, $first_name)<br />
{<br />
}<br />
// ..<br />
Each required controller argument must match up with a routing parameter<br />
The following would throw a RuntimeException because there is no foo parameter<br />
defined in the route:<br />
public function indexAction($first_name, $last_name, $color, $foo)<br />
{<br />
// ..<br />
}<br />
Making the argument optional, however, is perfectly ok. The following example would not<br />
throw an exception:<br />
public function indexAction($first_name, $last_name, $color, $foo = 'bar')<br />
{<br />
// ..<br />
}<br />
Not all routing parameters need to be arguments on your controller<br />
If, for example, the last_name weren't important for your controller, you could omit it<br />
entirely:<br />
public function indexAction($first_name, $color)<br />
{<br />
// ..<br />
}<br />
Every route also has a special _route parameter, which is equal to the name of the route that<br />
was matched (e.g. hello). Though not usually useful, this is equally available as a controller<br />
argument.<br />
The Request as a Controller Argument<br />
For convenience, you can also have Symfony pass you the Request object as an argument to<br />
your controller. This is especially convenient when you're working with forms, for example:<br />
48
Symfony2 – Franz Jordán 2011<br />
use Symfony\Component\HttpFoundation\Request;<br />
public function updateAction(Request $request)<br />
{<br />
$form = $this->createForm(...);<br />
}<br />
$form->bindRequest($request);<br />
// ...<br />
The Base Controller Class<br />
For convenience, Symfony2 comes with a base Controller class that assists with some of the<br />
most common controller tasks and gives your controller class access to any resource it might<br />
need. By extending this Controller class, you can take advantage of several helper methods.<br />
Add the use statement atop the Controller class and then modify the HelloController to<br />
extend it:<br />
// src/Acme/HelloBundle/Controller/HelloController.php<br />
namespace Acme\HelloBundle\Controller;<br />
use Symfony\Bundle\FrameworkBundle\Controller\Controller;<br />
use Symfony\Component\HttpFoundation\Response;<br />
class HelloController extends Controller<br />
{<br />
public function indexAction($name)<br />
{<br />
return new Response('Hello '.$name.'!');<br />
}<br />
}<br />
This doesn't actually change anything about how your controller works. In the next section,<br />
you'll learn about the helper methods that the base controller class makes available. These<br />
methods are just shortcuts to using core Symfony2 functionality that's available to you with or<br />
without the use of the base Controller class. A great way to see the core functionality in<br />
action is to look in theController class itself.<br />
Extending the base class is optional in Symfony; it contains useful shortcuts but nothing<br />
mandatory. You can also<br />
extendSymfony\Component\DependencyInjection\ContainerAware. The service<br />
container object will then be accessible via the container property.<br />
You can also define your Controllers as Services.<br />
Common Controller Tasks<br />
Though a controller can do virtually anything, most controllers will perform the same basic tasks<br />
over and over again. These tasks, such as redirecting, forwarding, rendering templates and<br />
accessing core services, are very easy to manage in Symfony2.<br />
49
Symfony2 – Franz Jordán 2011<br />
Redirecting<br />
If you want to redirect the user to another page, use the redirect() method:<br />
public function indexAction()<br />
{<br />
return $this->redirect($this->generateUrl('homepage'));<br />
}<br />
The generateUrl() method is just a helper function that generates the URL for a given route.<br />
For more information, see the Routing chapter.<br />
By default, the redirect() method performs a 302 (temporary) redirect. To perform a 301<br />
(permanent) redirect, modify the second argument:<br />
public function indexAction()<br />
{<br />
}<br />
return $this->redirect($this->generateUrl('homepage'), 301);<br />
The redirect() method is simply a shortcut that creates a Response object that specializes<br />
in redirecting the user. It's equivalent to:<br />
use Symfony\Component\HttpFoundation\RedirectResponse;<br />
return new RedirectResponse($this->generateUrl('homepage'));<br />
Forwarding<br />
You can also easily forward to another controller internally with the forward() method. Instead<br />
of redirecting the user's browser, it makes an internal sub-request, and calls the specified<br />
controller. The forward() method returns the Response object that's returned from that<br />
controller:<br />
public function indexAction($name)<br />
{<br />
$response = $this->forward('AcmeHelloBundle:Hello:fancy', array(<br />
'name' => $name,<br />
'color' => 'green'<br />
));<br />
// further modify the response or return it directly<br />
}<br />
return $response;<br />
Notice that the forward() method uses the same string representation of the controller used in<br />
the routing configuration. In this case, the target controller class will<br />
be HelloController inside someAcmeHelloBundle. The array passed to the method<br />
becomes the arguments on the resulting controller. This same interface is used when<br />
embedding controllers into templates (see Embedding Controllers). The target controller method<br />
should look something like the following:<br />
public function fancyAction($name, $color)<br />
{<br />
// ... create and return a Response object<br />
50
Symfony2 – Franz Jordán 2011<br />
}<br />
And just like when creating a controller for a route, the order of the arguments<br />
to fancyActiondoesn't matter. Symfony2 matches the index key names (e.g. name) with the<br />
method argument names (e.g. $name). If you change the order of the arguments, Symfony2 will<br />
still pass the correct value to each variable.<br />
Like other base Controller methods, the forward method is just a shortcut for core<br />
Symfony2 functionality. A forward can be accomplished directly via the http_kernelservice. A<br />
forward returns a Response object:<br />
$httpKernel = $this->container->get('http_kernel');<br />
$response = $httpKernel->forward('AcmeHelloBundle:Hello:fancy', array(<br />
'name' => $name,<br />
'color' => 'green',<br />
));<br />
Rendering Templates<br />
Though not a requirement, most controllers will ultimately render a template that's responsible<br />
for generating the HTML (or other format) for the controller. The renderView() method<br />
renders a template and returns its content. The content from the template can be used to create<br />
a Responseobject:<br />
$content = $this->renderView('AcmeHelloBundle:Hello:index.html.twig', array('name' =><br />
$name));<br />
return new Response($content);<br />
This can even be done in just one step with the render() method, which returns<br />
a Response object containing the content from the template:<br />
return $this->render('AcmeHelloBundle:Hello:index.html.twig', array('name' => $name));<br />
In both cases, the Resources/views/Hello/index.html.twig template inside<br />
the AcmeHelloBundlewill be rendered.<br />
The Symfony templating engine is explained in great detail in the Templating chapter.<br />
The renderView method is a shortcut to direct use of the templating service.<br />
Thetemplating service can also be used directly:<br />
$templating = $this->get('templating');<br />
$content = $templating->render('AcmeHelloBundle:Hello:index.html.twig', array('name' =><br />
$name));<br />
Accessing other Services<br />
When extending the base controller class, you can access any Symfony2 service via<br />
the get()method. Here are several common services you might need:<br />
$request = $this->getRequest();<br />
$response = $this->get('response');<br />
$templating = $this->get('templating');<br />
$router = $this->get('router');<br />
51
Symfony2 – Franz Jordán 2011<br />
$mailer = $this->get('mailer');<br />
There are countless other services available and you are encouraged to define your own. To list<br />
all available services, use the container:debug console command:<br />
php app/console container:debug<br />
For more information, see the Service Container chapter.<br />
Managing Errors and 404 Pages<br />
When things are not found, you should play well with the HTTP protocol and return a 404<br />
response. To do this, you'll throw a special type of exception. If you're extending the base<br />
controller class, do the following:<br />
public function indexAction()<br />
{<br />
$product = // retrieve the object from database<br />
if (!$product) {<br />
throw $this->createNotFoundException('The product does not exist');<br />
}<br />
return $this->render(...);<br />
}<br />
The createNotFoundException() method creates a<br />
special NotFoundHttpException object, which ultimately triggers a 404 HTTP response<br />
inside Symfony.<br />
Of course, you're free to throw any Exception class in your controller - Symfony2 will<br />
automatically return a 500 HTTP response code.<br />
throw new \Exception('Something went wrong!');<br />
In every case, a styled error page is shown to the end user and a full debug error page is shown<br />
to the developer (when viewing the page in debug mode). Both of these error pages can be<br />
customized. For details, read the "How to customize Error Pages" cookbook recipe.<br />
Managing the Session<br />
Symfony2 provides a nice session object that you can use to store information about the user (be<br />
it a real person using a browser, a bot, or a web service) between requests. By default, Symfony2<br />
stores the attributes in a cookie by using the native PHP sessions.<br />
Storing and retrieving information from the session can be easily achieved from any controller:<br />
$session = $this->getRequest()->getSession();<br />
// store an attribute for reuse during a later user request<br />
$session->set('foo', 'bar');<br />
// in another controller for another request<br />
$foo = $session->get('foo');<br />
// set the user locale<br />
52
Symfony2 – Franz Jordán 2011<br />
$session->setLocale('fr');<br />
These attributes will remain on the user for the remainder of that user's session.<br />
Flash Messages<br />
You can also store small messages that will be stored on the user's session for exactly one<br />
additional request. This is useful when processing a form: you want to redirect and have a<br />
special message shown on the next request. These types of messages are called "flash"<br />
messages.<br />
For example, imagine you're processing a form submit:<br />
public function updateAction()<br />
{<br />
$form = $this->createForm(...);<br />
$form->bindRequest($this->getRequest());<br />
if ($form->isValid()) {<br />
// do some sort of processing<br />
$this->get('session')->setFlash('notice', 'Your changes were saved!');<br />
return $this->redirect($this->generateUrl(...));<br />
}<br />
return $this->render(...);<br />
}<br />
After processing the request, the controller sets a notice flash message and then redirects.<br />
The name (notice) isn't significant - it's just what you're using to identify the type of the<br />
message.<br />
In the template of the next action, the following code could be used to render<br />
the notice message:<br />
Twig<br />
{% if app.session.hasFlash('notice') %}<br />
<br />
{{ app.session.flash('notice') }}<br />
<br />
{% endif %}<br />
By design, flash messages are meant to live for exactly one request (they're "gone in a flash").<br />
They're designed to be used across redirects exactly as you've done in this example.<br />
The Response Object<br />
The only requirement for a controller is to return a Response object. The Response class is a<br />
PHP abstraction around the HTTP response - the text-based message filled with HTTP headers<br />
and content that's sent back to the client:<br />
// create a simple Response with a 200 status code (the default)<br />
$response = new Response('Hello '.$name, 200);<br />
// create a JSON-response with a 200 status code<br />
$response = new Response(json_encode(array('name' => $name)));<br />
$response->headers->set('Content-Type', 'application/json');<br />
53
Symfony2 – Franz Jordán 2011<br />
The headers property is a HeaderBag object with several useful methods for reading and<br />
mutating the Response headers. The header names are normalized so that using Content-<br />
Type is equivalent to content-type or even content_type.<br />
The Request Object<br />
Besides the values of the routing placeholders, the controller also has access to<br />
the Request object when extending the base Controller class:<br />
$request = $this->getRequest();<br />
$request->isXmlHttpRequest(); // is it an Ajax request?<br />
$request->getPreferredLanguage(array('en', 'fr'));<br />
$request->query->get('page'); // get a $_GET parameter<br />
$request->request->get('page'); // get a $_POST parameter<br />
Like the Response object, the request headers are stored in a HeaderBag object and are easily<br />
accessible.<br />
Final Thoughts<br />
Whenever you create a page, you'll ultimately need to write some code that contains the logic for<br />
that page. In Symfony, this is called a controller, and it's a PHP function that can do anything it<br />
needs in order to return the final Response object that will be returned to the user.<br />
To make life easier, you can choose to extend a base Controller class, which contains<br />
shortcut methods for many common controller tasks. For example, since you don't want to put<br />
HTML code in your controller, you can use the render() method to render and return the<br />
content from a template.<br />
In other chapters, you'll see how the controller can be used to persist and fetch objects from a<br />
database, process form submissions, handle caching and more.<br />
54
Routing<br />
Symfony2 – Franz Jordán 2011<br />
Beautiful URLs are an absolute must for any serious web application. This means leaving behind<br />
ugly URLs like index.php?article_id=57 in favor of something like /read/intro-tosymfony.<br />
Having flexibility is even more important. What if you need to change the URL of a page<br />
from /blogto /news? How many links should you need to hunt down and update to make the<br />
change? If you're using Symfony's router, the change is simple.<br />
The Symfony2 router lets you define creative URLs that you map to different areas of your<br />
application. By the end of this chapter, you'll be able to:<br />
Create complex routes that map to controllers<br />
Generate URLs inside templates and controllers<br />
Load routing resources from bundles (or anywhere else)<br />
Debug your routes<br />
Routing in Action<br />
A route is a map from a URL pattern to a controller. For example, suppose you want to match<br />
any URL like /blog/my-post or /blog/all-about-symfony and send it to a controller that<br />
can look up and render that blog entry. The route is simple:<br />
# app/config/routing.yml<br />
blog_show:<br />
pattern: /blog/{slug}<br />
defaults: { _controller: AcmeBlogBundle:Blog:show }<br />
The pattern defined by the blog_show route acts like /blog/* where the wildcard is given the<br />
nameslug. For the URL /blog/my-blog-post, the slug variable gets a value of my-blogpost,<br />
which is available for you to use in your controller (keep reading).<br />
The _controller parameter is a special key that tells Symfony which controller should be<br />
executed when a URL matches this route. The _controller string is called the logical name. It<br />
follows a pattern that points to a specific PHP class and method:<br />
// src/Acme/BlogBundle/Controller/BlogController.php<br />
namespace Acme\BlogBundle\Controller;<br />
use Symfony\Bundle\FrameworkBundle\Controller\Controller;<br />
class BlogController extends Controller<br />
{<br />
public function showAction($slug)<br />
{<br />
$blog = // use the $slug varible to query the database<br />
}<br />
}<br />
return $this->render('AcmeBlogBundle:Blog:show.html.twig', array(<br />
));<br />
'blog' => $blog,<br />
55
Symfony2 – Franz Jordán 2011<br />
Congratulations! You've just created your first route and connected it to a controller. Now, when<br />
you visit /blog/my-post, the showAction controller will be executed and the $slug variable<br />
will be equal to my-post.<br />
This is the goal of the Symfony2 router: to map the URL of a request to a controller. Along the<br />
way, you'll learn all sorts of tricks that make mapping even the most complex URLs easy.<br />
Routing: Under the Hood<br />
When a request is made to your application, it contains an address to the exact "resource" that<br />
the client is requesting. This address is called the URL, (or URI), and could<br />
be /contact, /blog/read-me, or anything else. Take the following HTTP request for<br />
example:<br />
GET /blog/my-blog-post<br />
The goal of the Symfony2 routing system is to parse this URL and determine which controller<br />
should be executed. The whole process looks like this:<br />
1. The request is handled by the Symfony2 front controller (e.g. app.php);<br />
2. The Symfony2 core (i.e. Kernel) asks the router to inspect the request;<br />
3. The router matches the incoming URL to a specific route and returns information about the<br />
route, including the controller that should be executed;<br />
4. The Symfony2 Kernel executes the controller, which ultimately returns a Response object.<br />
56
Symfony2 – Franz Jordán 2011<br />
The routing layer is a tool that translates the incoming URL into a specific controller to execute.<br />
Creating Routes<br />
Symfony loads all the routes for your application from a single routing configuration file. The file is usually app/config/routing.yml, but can be<br />
configured to be anything (including an XML or PHP file) via the application configuration file:<br />
# app/config/config.yml<br />
framework:<br />
# ...<br />
router: { resource: "%kernel.root_dir%/config/routing.yml" }<br />
57
Symfony2 – Franz Jordán 2011<br />
Even though all routes are loaded from a single file, it's common practice to include additional<br />
routing resources from inside the file. See the Including External Routing Resources section for<br />
more information.<br />
Basic Route Configuration<br />
Defining a route is easy, and a typical application will have lots of routes. A basic route consists<br />
of just two parts: the pattern to match and a defaults array:<br />
_welcome:<br />
pattern: /<br />
defaults: { _controller: AcmeDemoBundle:Main:homepage }<br />
This route matches the homepage (/) and maps it to<br />
the AcmeDemoBundle:Main:homepage controller. The _controller string is translated by<br />
Symfony2 into an actual PHP function and executed. That process will be explained shortly in<br />
the Controller Naming Pattern section.<br />
Routing with Placeholders<br />
Of course the routing system supports much more interesting routes. Many routes will contain<br />
one or more named "wildcard" placeholders:<br />
blog_show:<br />
pattern: /blog/{slug}<br />
defaults: { _controller: AcmeBlogBundle:Blog:show }<br />
The pattern will match anything that looks like /blog/*. Even better, the value matching<br />
the {slug}placeholder will be available inside your controller. In other words, if the URL<br />
is /blog/hello-world, a $slug variable, with a value of hello-world, will be available in<br />
the controller. This can be used, for example, to load the blog post matching that string.<br />
The pattern will not, however, match simply /blog. That's because, by default, all placeholders<br />
are required. This can be changed by adding a placeholder value to the defaults array.<br />
Required and Optional Placeholders<br />
To make things more exciting, add a new route that displays a list of all the available blog posts<br />
for this imaginary blog application:<br />
blog_show:<br />
pattern: /blog/{slug}<br />
defaults: { _controller: AcmeBlogBundle:Blog:show }<br />
So far, this route is as simple as possible - it contains no placeholders and will only match the<br />
exact URL /blog. But what if you need this route to support pagination,<br />
where /blog/2 displays the second page of blog entries? Update the route to have a<br />
new {page} placeholder:<br />
blog:<br />
pattern: /blog/{page}<br />
defaults: { _controller: AcmeBlogBundle:Blog:index }<br />
58
Symfony2 – Franz Jordán 2011<br />
Like the {slug} placeholder before, the value matching {page} will be available inside your<br />
controller. Its value can be used to determine which set of blog posts to display for the given<br />
page.<br />
But hold on! Since placeholders are required by default, this route will no longer match on<br />
simply/blog. Instead, to see page 1 of the blog, you'd need to use the URL /blog/1! Since<br />
that's no way for a rich web app to behave, modify the route to make the {page} parameter<br />
optional. This is done by including it in the defaults collection:<br />
blog:<br />
pattern: /blog/{page}<br />
defaults: { _controller: AcmeBlogBundle:Blog:index, page: 1 }<br />
By adding page to the defaults key, the {page} placeholder is no longer required. The<br />
URL /blogwill match this route and the value of the page parameter will be set to 1. The<br />
URL /blog/2 will also match, giving the page parameter a value of 2. Perfect.<br />
/blog {page} = 1<br />
/blog/1 {page} = 1<br />
/blog/2 {page} = 2<br />
Adding Requirements<br />
Take a quick look at the routes that have been created so far:<br />
blog:<br />
pattern: /blog/{page}<br />
defaults: { _controller: AcmeBlogBundle:Blog:index, page: 1 }<br />
blog_show:<br />
pattern: /blog/{slug}<br />
defaults: { _controller: AcmeBlogBundle:Blog:show }<br />
Can you spot the problem? Notice that both routes have patterns that match URL's that look<br />
like/blog/*. The Symfony router will always choose the first matching route it finds. In other<br />
words, theblog_show route will never be matched. Instead, a URL like /blog/my-blogpost<br />
will match the first route (blog) and return a nonsense value of my-blog-post to<br />
the {page} parameter.<br />
URL<br />
route parameters<br />
/blog/2 blog {page} = 2<br />
/blog/my-blog-post blog<br />
{page} = my-blog-post<br />
The answer to the problem is to add route requirements. The routes in this example would work<br />
perfectly if the /blog/{page} pattern only matched URLs where the {page} portion is an<br />
59
Symfony2 – Franz Jordán 2011<br />
integer. Fortunately, regular expression requirements can easily be added for each parameter.<br />
For example:<br />
blog:<br />
pattern: /blog/{page}<br />
defaults: { _controller: AcmeBlogBundle:Blog:index, page: 1 }<br />
requirements:<br />
page: \d+<br />
The \d+ requirement is a regular expression that says that the value of the {page} parameter<br />
must be a digit (i.e. a number). The blog route will still match on a URL like /blog/2 (because<br />
2 is a number), but it will no longer match a URL like /blog/my-blog-post (because myblog-post<br />
is not a number).<br />
As a result, a URL like /blog/my-blog-post will now properly match the blog_show route.<br />
URL route parameters<br />
/blog/2 blog {page} = 2<br />
/blog/my-blog-post blog_show {slug} = my-blog-post<br />
Earlier Routes always Win<br />
What this all means is that the order of the routes is very important. If theblog_show route<br />
were placed above the blog route, the URL /blog/2 would matchblog_show instead<br />
of blog since the {slug} parameter of blog_show has no requirements. By using proper<br />
ordering and clever requirements, you can accomplish just about anything.<br />
Since the parameter requirements are regular expressions, the complexity and flexibility of each<br />
requirement is entirely up to you. Suppose the homepage of your application is available in two<br />
different languages, based on the URL:<br />
homepage:<br />
pattern: /{culture}<br />
defaults: { _controller: AcmeDemoBundle:Main:homepage, culture: en }<br />
requirements:<br />
culture: en|fr<br />
For incoming requests, the {culture} portion of the URL is matched against the regular<br />
expression(en|fr).<br />
/ {culture} = en<br />
/en {culture} = en<br />
/fr<br />
{culture} = fr<br />
/es won't match this route<br />
60
Symfony2 – Franz Jordán 2011<br />
Adding HTTP Method Requirements<br />
In addition to the URL, you can also match on the method of the incoming request (i.e. GET,<br />
HEAD, POST, PUT, DELETE). Suppose you have a contact form with two controllers - one for<br />
displaying the form (on a GET request) and one for processing the form when it's submitted (on<br />
a POST request). This can be accomplished with the following route configuration:<br />
contact:<br />
pattern: /contact<br />
defaults: { _controller: AcmeDemoBundle:Main:contact }<br />
requirements:<br />
_method: GET<br />
contact_process:<br />
pattern: /contact<br />
defaults: { _controller: AcmeDemoBundle:Main:contactProcess }<br />
requirements:<br />
_method: POST<br />
Despite the fact that these two routes have identical patterns (/contact), the first route will<br />
match only GET requests and the second route will match only POST requests. This means that<br />
you can display the form and submit the form via the same URL, while using distinct controllers<br />
for the two actions.<br />
If no _method requirement is specified, the route will match on all methods.<br />
Like the other requirements, the _method requirement is parsed as a regular expression. To<br />
matchGET or POST requests, you can use GET|POST.<br />
Advanced Routing Example<br />
At this point, you have everything you need to create a powerful routing structure in Symfony.<br />
The following is an example of just how flexible the routing system can be:<br />
article_show:<br />
pattern: /articles/{culture}/{year}/{title}.{_format}<br />
defaults: { _controller: AcmeDemoBundle:Article:show, _format: html }<br />
requirements:<br />
culture: en|fr<br />
_format: html|rss<br />
year: \d+<br />
As you've seen, this route will only match if the {culture} portion of the URL is<br />
either en or fr and if the {year} is a number. This route also shows how you can use a period<br />
between placeholders instead of a slash. URLs matching this route might look like:<br />
/articles/en/2010/my-post<br />
/articles/fr/2010/my-post.rss<br />
The Special _format Routing Parameter<br />
This example also highlights the special _format routing parameter. When using this<br />
parameter, the matched value becomes the "request format" of the Requestobject. Ultimately,<br />
the request format is used for such things such as setting theContent-Type of the response<br />
(e.g. a json request format translates into aContent-Type of application/json). It can<br />
61
Symfony2 – Franz Jordán 2011<br />
also be used in the controller to render a different template for each value of _format.<br />
The _format parameter is a very powerful way to render the same content in different formats.<br />
Special Routing Parameters<br />
As you've seen, each routing parameter or default value is eventually available as an argument in<br />
the controller method. Additionally, there are 4 parameters that are special: each adds a unique<br />
piece of functionality inside your application:<br />
_controller: As you've seen, this parameter is used to determine which controller is<br />
executed when the route is matched;<br />
_format: Used to set the request format (read more);<br />
_locale: Used to set the locale on the session (read more);<br />
Controller Naming Pattern<br />
Every route must have a _controller parameter, which dictates which controller should be<br />
executed when that route is matched. This parameter uses a simple string pattern called<br />
the logical controller name, which Symfony maps to a specific PHP method and class. The<br />
pattern has three parts, each separated by a colon:<br />
bundle:controller:action<br />
For example, a _controller value of AcmeBlogBundle:Blog:show means:<br />
Bundle<br />
Controller Class Method Name<br />
AcmeBlogBundle BlogController<br />
showAction<br />
The controller might look like this:<br />
// src/Acme/BlogBundle/Controller/BlogController.php<br />
namespace Acme\BlogBundle\Controller;<br />
use Symfony\Bundle\FrameworkBundle\Controller\Controller;<br />
class BlogController extends Controller<br />
{<br />
public function showAction($slug)<br />
{<br />
}<br />
// ...<br />
}<br />
Notice that Symfony adds the string Controller to the class name<br />
(Blog => BlogController) andAction to the method name (show => showAction).<br />
You could also refer to this controller using its fully-qualified class name and<br />
method:Acme\BlogBundle\Controller\BlogController::showAction. But if you<br />
follow some simple conventions, the logical name is more concise and allows more flexibility.<br />
In addition to using the logical name or the fully-qualified class name, Symfony supports a third<br />
way of referring to a controller. This method uses just one colon separator<br />
(e.g. service_name:indexAction) and refers to the controller as a service (see How to<br />
define Controllers as Services).<br />
62
Symfony2 – Franz Jordán 2011<br />
Route Parameters and Controller Arguments<br />
The route parameters (e.g. {slug}) are especially important because each is made available as<br />
an argument to the controller method:<br />
public function showAction($slug)<br />
{<br />
// ...<br />
}<br />
In reality, the entire defaults collection is merged with the parameter values to form a single<br />
array. Each key of that array is available as an argument on the controller.<br />
In other words, for each argument of your controller method, Symfony looks for a route<br />
parameter of that name and assigns its value to that argument. In the advanced example above,<br />
any combination (in any order) of the following variables could be used as arguments to<br />
theshowAction() method:<br />
$culture<br />
$year<br />
$title<br />
$_format<br />
$_controller<br />
Since the placeholders and defaults collection are merged together, even<br />
the $_controllervariable is available. For a more detailed discussion, see Route Parameters<br />
as Controller Arguments.<br />
You can also use a special $_route variable, which is set to the name of the route that was<br />
matched.<br />
Including External Routing Resources<br />
All routes are loaded via a single configuration file -<br />
usually app/config/routing.yml (see Creating Routes above). Commonly, however, you'll<br />
want to load routes from other places, like a routing file that lives inside a bundle. This can be<br />
done by "importing" that file:<br />
# app/config/routing.yml<br />
acme_hello:<br />
resource: "@AcmeHelloBundle/Resources/config/routing.yml"<br />
When importing resources from YAML, the key (e.g. acme_hello) is meaningless. Just be sure<br />
that it's unique so no other lines override it.<br />
The resource key loads the given routing resource. In this example the resource is the full<br />
path to a file, where the @AcmeHelloBundle shortcut syntax resolves to the path of that<br />
bundle. The imported file might look like this:<br />
# src/Acme/HelloBundle/Resources/config/routing.yml<br />
acme_hello:<br />
pattern: /hello/{name}<br />
defaults: { _controller: AcmeHelloBundle:Hello:index }<br />
63
Symfony2 – Franz Jordán 2011<br />
The routes from this file are parsed and loaded in the same way as the main routing file.<br />
Prefixing Imported Routes<br />
You can also choose to provide a "prefix" for the imported routes. For example, suppose you<br />
want the acme_hello route to have a final pattern of /admin/hello/{name} instead of<br />
simply/hello/{name}:<br />
# app/config/routing.yml<br />
acme_hello:<br />
resource: "@AcmeHelloBundle/Resources/config/routing.yml"<br />
prefix: /admin<br />
The string /admin will now be prepended to the pattern of each route loaded from the new<br />
routing resource.<br />
Visualizing & Debugging Routes<br />
While adding and customizing routes, it's helpful to be able to visualize and get detailed<br />
information about your routes. A great way to see every route in your application is via<br />
the router:debug console command. Execute the command by running the following from the<br />
root of your project.<br />
php app/console router:debug<br />
The command will print a helpful list of all the configured routes in your application:<br />
homepage ANY /<br />
contact GET /contact<br />
contact_process POST /contact<br />
article_show ANY /articles/{culture}/{year}/{title}.{_format}<br />
blog ANY /blog/{page}<br />
blog_show ANY /blog/{slug}<br />
You can also get very specific information on a single route by including the route name after<br />
the command:<br />
php app/console router:debug article_show<br />
Generating URLs<br />
The routing system should also be used to generate URLs. In reality, routing is a bi-directional<br />
system: mapping the URL to a controller+parameters and a route+parameters back to a URL.<br />
Thematch() and generate() methods form this bi-directional system. Take<br />
the blog_show example route from earlier:<br />
$params = $router->match('/blog/my-blog-post');<br />
// array('slug' => 'my-blog-post', '_controller' => 'AcmeBlogBundle:Blog:show')<br />
$uri = $router->generate('blog_show', array('slug' => 'my-blog-post'));<br />
// /blog/my-blog-post<br />
64
Symfony2 – Franz Jordán 2011<br />
To generate a URL, you need to specify the name of the route (e.g. blog_show) and any<br />
wildcards (e.g. slug = my-blog-post) used in the pattern for that route. With this<br />
information, any URL can easily be generated:<br />
class MainController extends Controller<br />
{<br />
public function showAction($slug)<br />
{<br />
// ...<br />
}<br />
}<br />
$url = $this->get('router')->generate('blog_show', array('slug' => 'my-blog-post'));<br />
In an upcoming section, you'll learn how to generate URLs from inside templates.<br />
Generating Absolute URLs<br />
By default, the router will generate relative URLs (e.g. /blog). To generate an absolute URL,<br />
simply pass true to the third argument of the generate() method:<br />
$router->generate('blog_show', array('slug' => 'my-blog-post'), true);<br />
// http://www.example.com/blog/my-blog-post<br />
The host that's used when generating an absolute URL is the host of the currentRequest object.<br />
This is detected automatically based on server information supplied by PHP. When generating<br />
absolute URLs for scripts run from the command line, you'll need to manually set the desired<br />
host on the Request object:<br />
$request->headers->set('HOST', 'www.example.com');<br />
Generating URLs with Query Strings<br />
The generate method takes an array of wildcard values to generate the URI. But if you pass<br />
extra ones, they will be added to the URI as a query string:<br />
$router->generate('blog', array('page' => 2, 'category' => 'Symfony'));<br />
// /blog/2?category=Symfony<br />
Generating URLs from a template<br />
The most common place to generate a URL is from within a template when linking between<br />
pages in your application. This is done just as before, but using a template helper function:<br />
<br />
Read this blog post.<br />
<br />
Absolute URLs can also be generated.<br />
<br />
Read this blog post.<br />
<br />
65
Symfony2 – Franz Jordán 2011<br />
Summary<br />
Routing is a system for mapping the URL of incoming requests to the controller function that<br />
should be called to process the request. It both allows you to specify beautiful URLs and keeps<br />
the functionality of your application decoupled from those URLs. Routing is a two-way<br />
mechanism, meaning that it should also be used to generate URLs.<br />
Learn more from the Cookbook<br />
How to force routes to always use<br />
HTTPS<br />
Sometimes, you want to secure some routes and be sure that they are always accessed via the<br />
HTTPS protocol. The Routing component allows you to enforce the HTTP scheme via<br />
the _schemerequirement:<br />
secure:<br />
pattern: /secure<br />
defaults: { _controller: AcmeDemoBundle:Main:secure }<br />
requirements:<br />
_scheme: https<br />
The above configuration forces the secure route to always use HTTPS.<br />
When generating the secure URL, and if the current scheme is HTTP, Symfony will automatically<br />
generate an absolute URL with HTTPS as the scheme:<br />
# If the current scheme is HTTPS<br />
{{ path('secure') }}<br />
# generates /secure<br />
# If the current scheme is HTTP<br />
{{ path('secure') }}<br />
# generates https://example.com/secure<br />
The requirement is also enforced for incoming requests. If you try to access the /secure path<br />
with HTTP, you will automatically be redirected to the same URL, but with the HTTPS scheme.<br />
The above example uses https for the _scheme, but you can also force a URL to always<br />
use http.<br />
The Security component provides another way to enforce the HTTP scheme via<br />
therequires_channel setting. This alternative method is better suited to secure an "area" of<br />
your website (all URLs under /admin) or when you want to secure URLs defined in a third party<br />
bundle.<br />
66
Symfony2 – Franz Jordán 2011<br />
How to allow a "/" character in a<br />
route parameter<br />
Sometimes, you need to compose URLs with parameters that can contain a slash /. For example,<br />
take the classic /hello/{name} route. By default, /hello/Fabien will match this route but<br />
not/hello/Fabien/Kris. This is because Symfony uses this character as separator between<br />
route parts.<br />
This guide covers how you can modify a route so that /hello/Fabien/Kris matches<br />
the/hello/{name} route, where {name} equals Fabien/Kris.<br />
Configure the Route<br />
By default, the symfony routing components requires that the parameters match the following<br />
regex pattern: [^/]+. This means that all characters are allowed except /.<br />
You must explicitly allow / to be part of your parameter by specifying a more permissive regex<br />
pattern.<br />
_hello:<br />
pattern: /hello/{name}<br />
defaults: { _controller: AcmeDemoBundle:Demo:hello }<br />
requirements:<br />
name: ".+"<br />
That's it! Now, the {name} parameter can contain the / character.<br />
67
Symfony2 – Franz Jordán 2011<br />
Creating and using Templates<br />
As you know, the controller is responsible for handling each request that comes into a Symfony2<br />
application. In reality, the controller delegates the most of the heavy work to other places so that<br />
code can be tested and reused. When a controller needs to generate HTML, CSS or any other<br />
content, it hands the work off to the templating engine. In this chapter, you'll learn how to write<br />
powerful templates that can be used to return content to the user, populate email bodies, and<br />
more. You'll learn shortcuts, clever ways to extend templates and how to reuse template code.<br />
Templates<br />
A template is simply a text file that can generate any text-based format (HTML, XML, CSV, LaTeX<br />
...). The most familiar type of template is a PHP template - a text file parsed by PHP that contains<br />
a mix of text and PHP code:<br />
<br />
<br />
<br />
Welcome to Symfony!<br />
<br />
<br />
<br />
<br />
<br />
<br />
Symfony2 – Franz Jordán 2011<br />
<br />
<br />
<br />
Twig defines two types of special syntax:<br />
{{ ... }}: "Says something": prints a variable or the result of an expression to the<br />
template;<br />
{% ... %}: "Does something": a tag that controls the logic of the template; it is used to<br />
execute statements such as for-loops for example.<br />
There is a third syntax used for creating comments: {# this is a comment #}. This syntax<br />
can be used across multiple lines like the PHP-equivalent /* comment*/ syntax.<br />
Twig also contains filters, which modify content before being rendered. The following makes the<br />
title variable all uppercase before rendering it:<br />
{{ title | upper }}<br />
Twig comes with a long list of tags and filters that are available by default. You can even add<br />
your own extensions to Twig as needed.<br />
Registering a Twig extension is as easy as creating a new service and tagging it<br />
withtwig.extension tag.<br />
As you'll see throughout the documentation, Twig also supports functions and new functions can<br />
be easily added. For example, the following uses a standard for tag and the cycle function to<br />
print ten div tags, with alternating odd, even classes:<br />
{% for i in 0..10 %}<br />
<br />
<br />
<br />
{% endfor %}<br />
Throughout this chapter, template examples will be shown in both Twig and PHP.<br />
Why Twig?<br />
Twig templates are meant to be simple and won't process PHP tags. This is by design: the Twig<br />
template system is meant to express presentation, not program logic. The more you use Twig,<br />
the more you'll appreciate and benefit from this distinction. And of course, you'll be loved by<br />
web designers everywhere.<br />
Twig can also do things that PHP can't, such as true template inheritance (Twig templates<br />
compile down to PHP classes that inherit from each other), whitespace control, sandboxing, and<br />
the inclusion of custom functions and filters that only affect templates. Twig contains little<br />
features that make writing templates easier and more concise. Take the following example,<br />
which combines a loop with a logical if statement:<br />
<br />
{% for user in users %}<br />
{{ user.username }}<br />
{% else %}<br />
No users found<br />
{% endfor %}<br />
<br />
69
Symfony2 – Franz Jordán 2011<br />
Twig Template Caching<br />
Twig is fast. Each Twig template is compiled down to a native PHP class that is rendered at<br />
runtime. The compiled classes are located in the app/cache/{environment}/twig directory<br />
(where{environment} is the environment, such as dev or prod) and in some cases can be<br />
useful while debugging. See Environments for more information on environments.<br />
When debug mode is enabled (common in the dev environment), a Twig template will be<br />
automatically recompiled when changes are made to it. This means that during development you<br />
can happily make changes to a Twig template and instantly see the changes without needing to<br />
worry about clearing any cache.<br />
When debug mode is disabled (common in the prod environment), however, you must clear the<br />
Twig cache directory so that the Twig templates will regenerate. Remember to do this when<br />
deploying your application.<br />
Template Inheritance and Layouts<br />
More often than not, templates in a project share common elements, like the header, footer,<br />
sidebar or more. In Symfony2, we like to think about this problem differently: a template can be<br />
decorated by another one. This works exactly the same as PHP classes: template inheritance<br />
allows you to build a base "layout" template that contains all the common elements of your site<br />
defined as blocks (think "PHP class with base methods"). A child template can extend the base<br />
layout and override any of its blocks (think "PHP subclass that overrides certain methods of its<br />
parent class").<br />
First, build a base layout file:<br />
{# app/Resources/views/base.html.twig #}<br />
<br />
<br />
<br />
<br />
{% block title %}Test Application{% endblock %}<br />
<br />
<br />
<br />
{% block sidebar %}<br />
<br />
Home<br />
Blog<br />
<br />
{% endblock %}<br />
<br />
<br />
{% block body %}{% endblock %}<br />
<br />
<br />
<br />
70
Symfony2 – Franz Jordán 2011<br />
Though the discussion about template inheritance will be in terms of Twig, the philosophy is the<br />
same between Twig and PHP templates.<br />
This template defines the base HTML skeleton document of a simple two-column page. In this<br />
example, three {% block %} areas are defined (title, sidebar and body). Each block may<br />
be overridden by a child template or left with its default implementation. This template could<br />
also be rendered directly. In that case the title, sidebar and body blocks would simply<br />
retain the default values used in this template.<br />
A child template might look like this:<br />
{# src/Acme/BlogBundle/Resources/views/Blog/index.html.twig #}<br />
{% extends '::base.html.twig' %}<br />
{% block title %}My cool blog posts{% endblock %}<br />
{% block body %}<br />
{% for entry in blog_entries %}<br />
{{ entry.title }}<br />
{{ entry.body }}<br />
{% endfor %}<br />
{% endblock %}<br />
The parent template is identified by a special string syntax (::base.html.twig) that indicates<br />
that the template lives in the app/Resources/views directory of the project. This naming<br />
convention is explained fully in Template Naming and Locations.<br />
The key to template inheritance is the {% extends %} tag. This tells the templating engine to<br />
first evaluate the base template, which sets up the layout and defines several blocks. The child<br />
template is then rendered, at which point the title and body blocks of the parent are replaced<br />
by those from the child. Depending on the value of blog_entries, the output might look like<br />
this:<br />
<br />
<br />
<br />
<br />
My cool blog posts<br />
<br />
<br />
<br />
<br />
Home<br />
Blog<br />
<br />
<br />
<br />
My first post<br />
The body of the first post.<br />
Another post<br />
The body of the second post.<br />
71
Symfony2 – Franz Jordán 2011<br />
<br />
<br />
<br />
Notice that since the child template didn't define a sidebar block, the value from the parent<br />
template is used instead. Content within a {% block %} tag in a parent template is always<br />
used by default.<br />
You can use as many levels of inheritance as you want. In the next section, a common threelevel<br />
inheritance model will be explained along with how templates are organized inside a<br />
Symfony2 project.<br />
When working with template inheritance, here are some tips to keep in mind:<br />
If you use {% extends %} in a template, it must be the first tag in that template.<br />
The more {% block %} tags you have in your base templates, the better. Remember,<br />
child templates don't have to define all parent blocks, so create as many blocks in your<br />
base templates as you want and give each a sensible default. The more blocks your base<br />
templates have, the more flexible your layout will be.<br />
If you find yourself duplicating content in a number of templates, it probably means you<br />
should move that content to a {% block %} in a parent template. In some cases, a<br />
better solution may be to move the content to a new template and include it<br />
(see Including other Templates).<br />
If you need to get the content of a block from the parent template, you can use<br />
the {{parent() }} function. This is useful if you want to add to the contents of a<br />
parent block instead of completely overriding it:<br />
{% block sidebar %}<br />
Table of Contents<br />
...<br />
{{ parent() }}<br />
{% endblock %}<br />
Template Naming and Locations<br />
By default, templates can live in two different locations:<br />
app/Resources/views/: The applications views directory can contain applicationwide<br />
base templates (i.e. your application's layouts) as well as templates that override<br />
bundle templates (see Overriding Bundle Templates);<br />
path/to/bundle/Resources/views/: Each bundle houses its templates in<br />
itsResources/views directory (and subdirectories). The majority of templates will live<br />
inside a bundle.<br />
Symfony2 uses a bundle:controller:template string syntax for templates. This allows for several<br />
different types of templates, each which lives in a specific location:<br />
AcmeBlogBundle:Blog:index.html.twig: This syntax is used to specify a template<br />
for a specific page. The three parts of the string, each separated by a colon (:), mean the<br />
following:<br />
AcmeBlogBundle: (bundle) the template lives inside<br />
the AcmeBlogBundle (e.g.src/Acme/BlogBundle);<br />
72
Symfony2 – Franz Jordán 2011<br />
Blog: (controller) indicates that the template lives inside the Blog subdirectory<br />
ofResources/views;<br />
index.html.twig: (template) the actual name of the file is index.html.twig.<br />
Assuming that the AcmeBlogBundle lives at src/Acme/BlogBundle, the final path to<br />
the layout would<br />
be src/Acme/BlogBundle/Resources/views/Blog/index.html.twig.<br />
AcmeBlogBundle::layout.html.twig: This syntax refers to a base template that's<br />
specific to the AcmeBlogBundle. Since the middle, "controller", portion is missing<br />
(e.g. Blog), the template lives<br />
at Resources/views/layout.html.twig inside AcmeBlogBundle.<br />
::base.html.twig: This syntax refers to an application-wide base template or<br />
layout. Notice that the string begins with two colons (::), meaning that both<br />
the bundle and controllerportions are missing. This means that the template is not<br />
located in any bundle, but instead in the root app/Resources/views/ directory.<br />
In the Overriding Bundle Templates section, you'll find out how each template living inside<br />
theAcmeBlogBundle, for example, can be overridden by placing a template of the same name<br />
in theapp/Resources/AcmeBlogBundle/views/ directory. This gives the power to override<br />
templates from any vendor bundle.<br />
Hopefully the template naming syntax looks familiar - it's the same naming convention used to<br />
refer to Controller Naming Pattern.<br />
Template Suffix<br />
The bundle:controller:template format of each template specifies where the template file is<br />
located. Every template name also has two extensions that specify the format and engine for that<br />
template.<br />
AcmeBlogBundle:Blog:index.html.twig - HTML format, Twig engine<br />
AcmeBlogBundle:Blog:index.html.php - HTML format, PHP engine<br />
AcmeBlogBundle:Blog:index.css.twig - CSS format, Twig engine<br />
By default, any Symfony2 template can be written in either Twig or PHP, and the last part of the<br />
extension (e.g. .twig or .php) specifies which of these two engines should be used. The first<br />
part of the extension, (e.g. .html, .css, etc) is the final format that the template will generate.<br />
Unlike the engine, which determines how Symfony2 parses the template, this is simply an<br />
organizational tactic used in case the same resource needs to be rendered as HTML<br />
(index.html.twig), XML (index.xml.twig), or any other format. For more information,<br />
read the Template Formats section.<br />
The available "engines" can be configured and even new engines added. SeeTemplating<br />
Configuration for more details.<br />
Tags and Helpers<br />
You already understand the basics of templates, how they're named and how to use template<br />
inheritance. The hardest parts are already behind you. In this section, you'll learn about a large<br />
group of tools available to help perform the most common template tasks such as including<br />
other templates, linking to pages and including images.<br />
Symfony2 comes bundled with several specialized Twig tags and functions that ease the work of<br />
the template designer. In PHP, the templating system provides an extensible helper system that<br />
provides useful features in a template context.<br />
73
Symfony2 – Franz Jordán 2011<br />
We've already seen a few built-in Twig tags ({% block %} & {% extends %}) as well as an<br />
example of a PHP helper ($view['slots']). Let's learn a few more.<br />
Including other Templates<br />
You'll often want to include the same template or code fragment on several different pages. For<br />
example, in an application with "news articles", the template code displaying an article might be<br />
used on the article detail page, on a page displaying the most popular articles, or in a list of the<br />
latest articles.<br />
When you need to reuse a chunk of PHP code, you typically move the code to a new PHP class or<br />
function. The same is true for templates. By moving the reused template code into its own<br />
template, it can be included from any other template. First, create the template that you'll need<br />
to reuse.<br />
{# src/Acme/ArticleBundle/Resources/views/Article/articleDetails.html.twig #}<br />
{{ article.title }}<br />
by {{ article.authorName }}<br />
<br />
{{ article.body }}<br />
<br />
Including this template from any other template is simple:<br />
{# src/Acme/ArticleBundle/Resources/Article/list.html.twig #}<br />
{% extends 'AcmeArticleBundle::layout.html.twig' %}<br />
{% block body %}<br />
Recent Articles<br />
{% for article in articles %}<br />
{% include 'AcmeArticleBundle:Article:articleDetails.html.twig' with {'article': article} %}<br />
{% endfor %}<br />
{% endblock %}<br />
The template is included using the {% include %} tag. Notice that the template name follows<br />
the same typical convention. The articleDetails.html.twig template uses<br />
an article variable. This is passed in by the list.html.twig template using<br />
the with command.<br />
The {'article': article} syntax is the standard Twig syntax for hash maps (i.e. an array<br />
with named keys). If we needed to pass in multiple elements, it would look like<br />
this: {'foo': foo, 'bar': bar}.<br />
Embedding Controllers<br />
In some cases, you need to do more than include a simple template. Suppose you have a sidebar<br />
in your layout that contains the three most recent articles. Retrieving the three articles may<br />
include querying the database or performing other heavy logic that can't be done from within a<br />
template.<br />
The solution is to simply embed the result of an entire controller from your template. First,<br />
create a controller that renders a certain number of recent articles:<br />
74
Symfony2 – Franz Jordán 2011<br />
// src/Acme/ArticleBundle/Controller/ArticleController.php<br />
class ArticleController extends Controller<br />
{<br />
public function recentArticlesAction($max = 3)<br />
{<br />
// make a database call or other logic to get the "$max" most recent articles<br />
$articles = ...;<br />
return $this->render('AcmeArticleBundle:Article:recentList.html.twig', array('articles' =><br />
$articles));<br />
}<br />
}<br />
The recentList template is perfectly straightforward:<br />
{# src/Acme/ArticleBundle/Resources/views/Article/recentList.html.twig #}<br />
{% for article in articles %}<br />
<br />
{{ article.title }}<br />
<br />
{% endfor %}<br />
Notice that we've cheated and hardcoded the article URL in this example<br />
(e.g./article/*slug*). This is a bad practice. In the next section, you'll learn how to do this<br />
correctly.<br />
To include the controller, you'll need to refer to it using the standard string syntax for<br />
controllers (i.e. bundle:controller:action):<br />
{# app/Resources/views/base.html.twig #}<br />
...<br />
<br />
{% render "AcmeArticleBundle:Article:recentArticles" with {'max': 3} %}<br />
<br />
Whenever you find that you need a variable or a piece of information that you don't have access<br />
to in a template, consider rendering a controller. Controllers are fast to execute and promote<br />
good code organization and reuse.<br />
Linking to Pages<br />
Creating links to other pages in your application is one of the most common jobs for a template.<br />
Instead of hardcoding URLs in templates, use the path Twig function (or the router helper in<br />
PHP) to generate URLs based on the routing configuration. Later, if you want to modify the URL<br />
of a particular page, all you'll need to do is change the routing configuration; the templates will<br />
automatically generate the new URL.<br />
First, link to the "_welcome" page, which is accessible via the following routing configuration:<br />
_welcome:<br />
pattern: /<br />
defaults: { _controller: AcmeDemoBundle:Welcome:index }<br />
75
Symfony2 – Franz Jordán 2011<br />
To link to the page, just use the path Twig function and refer to the route:<br />
Home<br />
As expected, this will generate the URL /. Let's see how this works with a more complicated<br />
route:<br />
article_show:<br />
pattern: /article/{slug}<br />
defaults: { _controller: AcmeArticleBundle:Article:show }<br />
In this case, you need to specify both the route name (article_show) and a value for<br />
the {slug}parameter. Using this route, let's revisit the recentList template from the<br />
previous section and link to the articles correctly:<br />
{# src/Acme/ArticleBundle/Resources/views/Article/recentList.html.twig #}<br />
{% for article in articles %}<br />
<br />
{{ article.title }}<br />
<br />
{% endfor %}<br />
You can also generate an absolute URL by using the url Twig function:<br />
Home<br />
The same can be done in PHP templates by passing a third argument to<br />
thegenerate() method:<br />
Symfony2 – Franz Jordán 2011<br />
This section will teach you the philosophy behind including stylesheet and Javascript assets in<br />
Symfony. Symfony also packages another library, called assetic, which follows this philosophy<br />
but allows you to do much more interesting things with those assets. For more information on<br />
using assetic see How to Use Assetic for Asset Management.<br />
Start by adding two blocks to your base template that will hold your assets: one<br />
called stylesheetsinside the head tag and another called javascripts just above the<br />
closing body tag. These blocks will contain all of the stylesheets and Javascripts that you'll need<br />
throughout your site:<br />
{# 'app/Resources/views/base.html.twig' #}<br />
<br />
<br />
{# ... #}<br />
{% block stylesheets %}<br />
<br />
{% endblock %}<br />
<br />
<br />
{# ... #}<br />
{% block javascripts %}<br />
<br />
{% endblock %}<br />
<br />
<br />
That's easy enough! But what if you need to include an extra stylesheet or Javascript from a child<br />
template? For example, suppose you have a contact page and you need to include<br />
a contact.cssstylesheet just on that page. From inside that contact page's template, do the<br />
following:<br />
{# src/Acme/DemoBundle/Resources/views/Contact/contact.html.twig #}<br />
{# extends '::base.html.twig' #}<br />
{% block stylesheets %}<br />
{{ parent() }}<br />
<br />
{% endblock %}<br />
{# ... #}<br />
In the child template, you simply override the stylesheets block and put your new stylesheet<br />
tag inside of that block. Of course, since you want to add to the parent block's content (and not<br />
actuallyreplace it), you should use the parent() Twig function to include everything from<br />
the stylesheetsblock of the base template.<br />
The end result is a page that includes both the main.css and contact.css stylesheets.<br />
77
Symfony2 – Franz Jordán 2011<br />
Configuring and using the templating Service<br />
The heart of the template system in Symfony2 is the templating Engine. This special object is<br />
responsible for rendering templates and returning their content. When you render a template in<br />
a controller, for example, you're actually using the templating engine service. For example:<br />
return $this->render('AcmeArticleBundle:Article:index.html.twig');<br />
is equivalent to<br />
$engine = $this->container->get('templating');<br />
$content = $engine->render('AcmeArticleBundle:Article:index.html.twig');<br />
return $response = new Response($content);<br />
The templating engine (or "service") is preconfigured to work automatically inside Symfony2. It<br />
can, of course, be configured further in the application configuration file:<br />
# app/config/config.yml<br />
framework:<br />
# ...<br />
templating: { engines: ['twig'] }<br />
Several configuration options are available and are covered in the Configuration Appendix.<br />
The twig engine is mandatory to use the webprofiler (as well as many third-party bundles).<br />
Overriding Bundle Templates<br />
The Symfony2 community prides itself on creating and maintaining high quality bundles<br />
(seeSymfony2Bundles.org) for a large number of different features. Once you use a third-party<br />
bundle, you'll likely need to override and customize one or more of its templates.<br />
Suppose you've included the imaginary open-source AcmeBlogBundle in your project (e.g. in<br />
thesrc/Acme/BlogBundle directory). And while you're really happy with everything, you want<br />
to override the blog "list" page to customize the markup specifically for your application. By<br />
digging into theBlog controller of the AcmeBlogBundle, you find the following:<br />
public function indexAction()<br />
{<br />
$blogs = // some logic to retrieve the blogs<br />
$this->render('AcmeBlogBundle:Blog:index.html.twig', array('blogs' =><br />
$blogs));<br />
}<br />
When the AcmeBlogBundle:Blog:index.html.twig is rendered, Symfony2 actually looks<br />
in two different locations for the template:<br />
1. app/Resources/AcmeBlogBundle/views/Blog/index.html.twig<br />
2. src/Acme/BlogBundle/Resources/views/Blog/index.html.twig<br />
To override the bundle template, just copy the index.html.twig template from the bundle<br />
toapp/Resources/AcmeBlogBundle/views/Blog/index.html.twig (theapp/Resourc<br />
78
Symfony2 – Franz Jordán 2011<br />
es/AcmeBlogBundle directory won't exist, so you'll need to create it). You're now free to<br />
customize the template.<br />
This logic also applies to base bundle templates. Suppose also that each template<br />
inAcmeBlogBundle inherits from a base template<br />
called AcmeBlogBundle::layout.html.twig. Just as before, Symfony2 will look in the<br />
following two places for the template:<br />
1. app/Resources/AcmeBlogBundle/views/layout.html.twig<br />
2. src/Acme/BlogBundle/Resources/views/layout.html.twig<br />
Once again, to override the template, just copy it from the bundle<br />
toapp/Resources/AcmeBlogBundle/views/layout.html.twig. You're now free to<br />
customize this copy as you see fit.<br />
If you take a step back, you'll see that Symfony2 always starts by looking in<br />
theapp/Resources/{BUNDLE_NAME}/views/ directory for a template. If the template<br />
doesn't exist there, it continues by checking inside the Resources/views directory of the<br />
bundle itself. This means that all bundle templates can be overridden by placing them in the<br />
correct app/Resources subdirectory.<br />
Overriding Core Templates<br />
Since the Symfony2 framework itself is just a bundle, core templates can be overridden in the<br />
same way. For example, the core TwigBundle contains a number of different "exception" and<br />
"error" templates that can be overridden by copying each from<br />
the Resources/views/Exception directory of the TwigBundle to, you guessed it,<br />
the app/Resources/TwigBundle/views/Exception directory.<br />
Three-level Inheritance<br />
One common way to use inheritance is to use a three-level approach. This method works<br />
perfectly with the three different types of templates we've just covered:<br />
Create a app/Resources/views/base.html.twig file that contains the main layout<br />
for your application (like in the previous example). Internally, this template is<br />
called::base.html.twig;<br />
Create a template for each "section" of your site. For example, an AcmeBlogBundle,<br />
would have a template called AcmeBlogBundle::layout.html.twig that contains<br />
only blog section-specific elements;<br />
{# src/Acme/BlogBundle/Resources/views/layout.html.twig #}<br />
{% extends '::base.html.twig' %}<br />
{% block body %}<br />
Blog Application<br />
{% block content %}{% endblock %}<br />
{% endblock %}<br />
Create individual templates for each page and make each extend the appropriate section<br />
template. For example, the "index" page would be called something close<br />
toAcmeBlogBundle:Blog:index.html.twig and list the actual blog posts.<br />
79
Symfony2 – Franz Jordán 2011<br />
{# src/Acme/BlogBundle/Resources/views/Blog/index.html.twig #}<br />
{% extends 'AcmeBlogBundle::layout.html.twig' %}<br />
{% block content %}<br />
{% for entry in blog_entries %}<br />
{{ entry.title }}<br />
{{ entry.body }}<br />
{% endfor %}<br />
{% endblock %}<br />
Notice that this template extends the section template -<br />
(AcmeBlogBundle::layout.html.twig) which in-turn extends the base application layout<br />
(::base.html.twig). This is the common three-level inheritance model.<br />
When building your application, you may choose to follow this method or simply make each<br />
page template extend the base application template directly<br />
(e.g. {% extends '::base.html.twig' %}). The three-template model is a best-practice<br />
method used by vendor bundles so that the base template for a bundle can be easily overridden<br />
to properly extend your application's base layout.<br />
Output Escaping<br />
When generating HTML from a template, there is always a risk that a template variable may<br />
output unintended HTML or dangerous client-side code. The result is that dynamic content<br />
could break the HTML of the resulting page or allow a malicious user to perform a Cross Site<br />
Scripting (XSS) attack. Consider this classic example:<br />
Hello {{ name }}<br />
Imagine that the user enters the following code as his/her name:<br />
alert('hello!')<br />
Without any output escaping, the resulting template will cause a JavaScript alert box to pop up:<br />
Hello alert('hello!')<br />
And while this seems harmless, if a user can get this far, that same user should also be able to<br />
write JavaScript that performs malicious actions inside the secure area of an unknowing,<br />
legitimate user.<br />
The answer to the problem is output escaping. With output escaping on, the same template will<br />
render harmlessly, and literally print the script tag to the screen:<br />
Hello <script>alert('helloe')</script><br />
The Twig and PHP templating systems approach the problem in different ways. If you're using<br />
Twig, output escaping is on by default and you're protected. In PHP, output escaping is not<br />
automatic, meaning you'll need to manually escape where necessary.<br />
Output Escaping in Twig<br />
If you're using Twig templates, then output escaping is on by default. This means that you're<br />
protected out-of-the-box from the unintentional consequences of user-submitted code. By<br />
default, the output escaping assumes that content is being escaped for HTML output.<br />
80
Symfony2 – Franz Jordán 2011<br />
In some cases, you'll need to disable output escaping when you're rendering a variable that is<br />
trusted and contains markup that should not be escaped. Suppose that administrative users are<br />
able to write articles that contain HTML code. By default, Twig will escape the article body. To<br />
render it normally, add the raw filter: {{ article.body | raw }}.<br />
You can also disable output escaping inside a {% block %} area or for an entire template. For<br />
more information, see Output Escaping in the Twig documentation.<br />
Output Escaping in PHP<br />
Output escaping is not automatic when using PHP templates. This means that unless you<br />
explicitly choose to escape a variable, you're not protected. To use output escaping, use the<br />
special escape()view method:<br />
Hello <br />
By default, the escape() method assumes that the variable is being rendered within an HTML<br />
context (and thus the variable is escaped to be safe for HTML). The second argument lets you<br />
change the context. For example, to output something in a JavaScript string, use the js context:<br />
var myMsg = 'Hello ';<br />
Template Formats<br />
Templates are a generic way to render content in any format. And while in most cases you'll use<br />
templates to render HTML content, a template can just as easily generate JavaScript, CSS, XML or<br />
any other format you can dream of.<br />
For example, the same "resource" is often rendered in several different formats. To render an<br />
article index page in XML, simply include the format in the template name:<br />
XML template name: AcmeArticleBundle:Article:index.xml.twig<br />
XML template filename: index.xml.twig<br />
In reality, this is nothing more than a naming convention and the template isn't actually<br />
rendered differently based on its format.<br />
In many cases, you may want to allow a single controller to render multiple different formats<br />
based on the "request format". For that reason, a common pattern is to do the following:<br />
public function indexAction()<br />
{<br />
$format = $this->getRequest()->getRequestFormat();<br />
}<br />
return $this->render('AcmeBlogBundle:Blog:index.'.$format.'.twig');<br />
The getRequestFormat on the Request object defaults to html, but can return any other<br />
format based on the format requested by the user. The request format is most often managed<br />
by the routing, where a route can be configured so that /contact sets the request format<br />
to html while/contact.xml sets the format to xml. For more information, see the Advanced<br />
Example in the Routing chapter.<br />
To create links that include the format parameter, include a _format key in the parameter hash:<br />
81
Symfony2 – Franz Jordán 2011<br />
<br />
PDF Version<br />
<br />
Final Thoughts<br />
The templating engine in Symfony is a powerful tool that can be used each time you need to<br />
generate presentational content in HTML, XML or any other format. And though templates are a<br />
common way to generate content in a controller, their use is not mandatory.<br />
The Response object returned by a controller can be created with our without the use of a<br />
template:<br />
// creates a Response object whose content is the rendered template<br />
$response = $this->render('AcmeArticleBundle:Article:index.html.twig');<br />
// creates a Response object whose content is simple text<br />
$response = new Response('response content');<br />
Symfony's templating engine is very flexible and two different template renderers are available<br />
by default: the traditional PHP templates and the sleek and powerful Twig templates. Both<br />
support a template hierarchy and come packaged with a rich set of helper functions capable of<br />
performing the most common tasks.<br />
Overall, the topic of templating should be thought of as a powerful tool that's at your disposal.<br />
In some cases, you may not need to render a template, and in Symfony2, that's absolutely fine.<br />
Learn more from the Cookbook<br />
How to use PHP instead of Twig for Templates<br />
How to customize Error Pages<br />
82
Symfony2 – Franz Jordán 2011<br />
Databases and Doctrine ("The<br />
Model")<br />
Let's face it, one of the most common and challenging tasks for any application involves<br />
persisting and reading information to and from a database. Fortunately, Symfony comes<br />
integrated withDoctrine, a library whose sole goal is to give you powerful tools to make this<br />
easy. In this chapter, you'll learn the basic philosophy behind Doctrine and see how easy working<br />
with a database can be.<br />
Doctrine is totally decoupled from Symfony and using it is optional. This chapter is all about the<br />
Doctrine ORM, which aims to let you map objects to a relational database (such<br />
as MySQL, PostgreSQL or Microsoft SQL). If you prefer to use raw database queries, this is easy,<br />
and explained in the "How to use Doctrine's DBAL Layer" cookbook entry.<br />
You can also persist data to MongoDB using Doctrine ODM library. For more information, read<br />
the "DoctrineMongoDBBundle" documentation.<br />
A Simple Example: A Product<br />
The easiest way to understand how Doctrine works is to see it in action. In this section, you'll<br />
configure your database, create a Product object, persist it to the database and fetch it back<br />
out.<br />
Code along with the example<br />
If you want to follow along with the example in this chapter, create anAcmeStoreBundle via:<br />
php app/console generate:bundle --namespace=Acme/StoreBundle<br />
Configuring the Database<br />
Before you really begin, you'll need to configure your database connection information. By<br />
convention, this information is usually configured in an app/config/parameters.ini file:<br />
;app/config/parameters.ini<br />
[parameters]<br />
database_driver = pdo_mysql<br />
database_host = localhost<br />
database_name = test_project<br />
database_user = root<br />
database_password = password<br />
Defining the configuration via parameters.ini is just a convention. The parameters defined in<br />
that file are referenced by the main configuration file when setting up Doctrine:<br />
doctrine:<br />
dbal:<br />
driver: %database_driver%<br />
host: %database_host%<br />
dbname: %database_name%<br />
user: %database_user%<br />
password: %database_password%<br />
By separating the database information into a separate file, you can easily keep different version<br />
of the file on each server. You can also easily store database configuration (or any sensitive<br />
information) outside of your project, like inside your Apache configuration, for example. For<br />
more information, see How to Set External Parameters in the Service Container.<br />
83
Symfony2 – Franz Jordán 2011<br />
Now that Doctrine knows about your database, you can have it create the database for you:<br />
php app/console doctrine:database:create<br />
Creating an Entity Class<br />
Suppose you're building an application where products need to be displayed. Without even<br />
thinking about Doctrine or databases, you already know that you need a Product object to<br />
represent those products. Create this class inside the Entity directory of<br />
your AcmeStoreBundle:<br />
// src/Acme/StoreBundle/Entity/Product.php<br />
namespace Acme\StoreBundle\Entity;<br />
class Product<br />
{<br />
protected $name;<br />
protected $price;<br />
protected $description;<br />
}<br />
The class - often called an "entity", meaning a basic class that holds data - is simple and helps<br />
fulfill the business requirement of needing products in your application. This class can't be<br />
persisted to a database yet - it's just a simple PHP class.<br />
Once you learn the concepts behind Doctrine, you can have Doctrine create this entity class for<br />
you:<br />
php app/console doctrine:generate:entity --entity="AcmeStoreBundle:Product" --<br />
fields="name:string(255) price:float description:text"<br />
Add Mapping Information<br />
Doctrine allows you to work with databases in a much more interesting way than just fetching<br />
rows of column-based table into an array. Instead, Doctrine allows you to persist<br />
entire objects to the database and fetch entire objects out of the database. This works by<br />
mapping a PHP class to a database table, and the properties of that PHP class to columns on the<br />
table:<br />
For Doctrine to be able to do this, you just have to create "metadata", or configuration that tells<br />
Doctrine exactly how the Product class and its properties should be mapped to the database.<br />
84
Symfony2 – Franz Jordán 2011<br />
This metadata can be specified in a number of different formats including YAML, XML or directly<br />
inside the Product class via annotations:<br />
A bundle can accept only one metadata definition format. For example, it's not possible to mix<br />
YAML metadata definitions with annotated PHP entity class definitions.<br />
// src/Acme/StoreBundle/Entity/Product.php<br />
namespace Acme\StoreBundle\Entity;<br />
use Doctrine\ORM\Mapping as ORM;<br />
/**<br />
* @ORM\Entity<br />
* @ORM\Table(name="product")<br />
*/<br />
class Product<br />
{<br />
/**<br />
* @ORM\Id<br />
* @ORM\Column(type="integer")<br />
* @ORM\GeneratedValue(strategy="AUTO")<br />
*/<br />
protected $id;<br />
/**<br />
* @ORM\Column(type="string", length=100)<br />
*/<br />
protected $name;<br />
/**<br />
* @ORM\Column(type="decimal", scale=2)<br />
*/<br />
protected $price;<br />
}<br />
/**<br />
* @ORM\Column(type="text")<br />
*/<br />
protected $description;<br />
The table name is optional and if omitted, will be determined automatically based on the name<br />
of the entity class.<br />
Doctrine allows you to choose from a wide variety of different field types, each with their own<br />
options. For information on the available field types, see the Doctrine Field Types<br />
Reference section.<br />
You can also check out Doctrine's Basic Mapping Documentation for all details about mapping<br />
information. If you use annotations, you'll need to prepend all annotations<br />
with ORM\ (e.g. ORM\Column(..)), which is not shown in Doctrine's documentation. You'll<br />
also need to include the use Doctrine\ORM\Mapping asORM; statement,<br />
which imports the ORM annotations prefix.<br />
85
Symfony2 – Franz Jordán 2011<br />
Be careful that your class name and properties aren't mapped to a protected SQL keyword (such<br />
as group or user). For example, if your entity class name is Group, then, by default, your table<br />
name will be group, which will cause an SQL error in some engines. See Doctrine's Reserved SQL<br />
keywords documentation on how to properly escape these names.<br />
When using another library or program (ie. Doxygen) that uses annotations, you should place<br />
the @IgnoreAnnotation annotation on the class to indicate which annotations Symfony should<br />
ignore.<br />
For example, to prevent the @fn annotation from throwing an exception, add the following:<br />
/**<br />
* @IgnoreAnnotation("fn")<br />
*/<br />
class Product<br />
Generating Getters and Setters<br />
Even though Doctrine now knows how to persist a Product object to the database, the class<br />
itself isn't really useful yet. Since Product is just a regular PHP class, you need to create getter<br />
and setter methods (e.g. getName(), setName()) in order to access its properties (since the<br />
properties areprotected). Fortunately, Doctrine can do this for you by running:<br />
php app/console doctrine:generate:entities Acme/StoreBundle/Entity/Product<br />
This command makes sure that all of the getters and setters are generated for<br />
the Product class. This is a safe command - you can run it over and over again: it only<br />
generates getters and setters that don't exist (i.e. it doesn't replace your existing methods).<br />
The doctrine:generate:entities command saves a backup of the<br />
originalProduct.php named Product.php~. In some cases, the presence of this file can cause a<br />
"Cannot redeclare class" error. It can be safely removed.<br />
You can also generate all known entities (i.e. any PHP class with Doctrine mapping information)<br />
of a bundle or an entire namespace:<br />
php app/console doctrine:generate:entities AcmeStoreBundle<br />
php app/console doctrine:generate:entities Acme<br />
Doctrine doesn't care whether your properties are protected or private, or whether or not you<br />
have a getter or setter function for a property. The getters and setters are generated here only<br />
because you'll need them to interact with your PHP object.<br />
Creating the Database Tables/Schema<br />
You now have a usable Product class with mapping information so that Doctrine knows exactly<br />
how to persist it. Of course, you don't yet have the corresponding product table in your<br />
database. Fortunately, Doctrine can automatically create all the database tables needed for every<br />
known entity in your application. To do this, run:<br />
php app/console doctrine:schema:update --force<br />
Actually, this command is incredibly powerful. It compares what your databaseshould look like<br />
(based on the mapping information of your entities) with how itactually looks, and generates the<br />
SQL statements needed to update the database to where it should be. In other words, if you add<br />
86
Symfony2 – Franz Jordán 2011<br />
a new property with mapping metadata to Product and run this task again, it will generate the<br />
"alter table" statement needed to add that new column to the existing products table.<br />
An even better way to take advantage of this functionality is via migrations, which allow you to<br />
generate these SQL statements and store them in migration classes that can be run<br />
systematically on your production server in order to track and migrate your database schema<br />
safely and reliably.<br />
Your database now has a fully-functional product table with columns that match the metadata<br />
you've specified.<br />
Persisting Objects to the Database<br />
Now that you have a mapped Product entity and corresponding product table, you're ready to<br />
persist data to the database. From inside a controller, this is pretty easy. Add the following<br />
method to the DefaultController of the bundle:<br />
1<br />
2<br />
3<br />
4<br />
// src/Acme/StoreBundle/Controller/DefaultController.php<br />
use Acme\StoreBundle\Entity\Product;<br />
use Symfony\Component\HttpFoundation\Response;<br />
// ...<br />
5<br />
6<br />
7<br />
8<br />
9<br />
10<br />
11<br />
public function createAction()<br />
{<br />
$product = new Product();<br />
$product->setName('A Foo Bar');<br />
$product->setPrice('19.99');<br />
$product->setDescription('Lorem ipsum dolor');<br />
12<br />
13<br />
14<br />
15<br />
$em = $this->getDoctrine()->getEntityManager();<br />
$em->persist($product);<br />
$em->flush();<br />
16<br />
87
Symfony2 – Franz Jordán 2011<br />
17<br />
return new Response('Created product id '.$product->getId());<br />
18<br />
}<br />
If you're following along with this example, you'll need to create a route that points to this action<br />
to see it in work.<br />
Let's walk through this example:<br />
lines 8-11 In this section, you instantiate and work with the $product object like any<br />
other, normal PHP object;<br />
line 13 This line fetches Doctrine's entity manager object, which is responsible for<br />
handling the process of persisting and fetching objects to and from the database;<br />
line 14 The persist() method tells Doctrine to "manage" the $product object. This does<br />
not actually cause a query to be made to the database (yet).<br />
line 15 When the flush() method is called, Doctrine looks through all of the objects that<br />
it's managing to see if they need to be persisted to the database. In this example,<br />
the $productobject has not been persisted yet, so the entity manager executes<br />
an INSERT query and a row is created in the product table.<br />
In fact, since Doctrine is aware of all your managed entities, when you call theflush() method, it<br />
calculates an overall changeset and executes the most efficient query/queries possible. For<br />
example, if you persist a total of 100 Product objects and then subsequently call flush(),<br />
Doctrine will create a single prepared statement and re-use it for each insert. This pattern is<br />
called Unit of Work, and it's used because it's fast and efficient.<br />
When creating or updating objects, the workflow is always the same. In the next section, you'll<br />
see how Doctrine is smart enough to automatically issue an UPDATE query if the record<br />
already exists in the database.<br />
Doctrine provides a library that allows you to programmatically load testing data into your<br />
project (i.e. "fixture data"). For information, see DoctrineFixturesBundle.<br />
Fetching Objects from the Database<br />
Fetching an object back out of the database is even easier. For example, suppose you've<br />
configured a route to display a specific Product based on its id value:<br />
public function showAction($id)<br />
{<br />
$product = $this->getDoctrine()<br />
->getRepository('AcmeStoreBundle:Product')<br />
->find($id);<br />
if (!$product) {<br />
}<br />
throw $this->createNotFoundException('No product found for id '.$id);<br />
}<br />
// do something, like pass the $product object into a template<br />
88
Symfony2 – Franz Jordán 2011<br />
When you query for a particular type of object, you always use what's known as its "repository".<br />
You can think of a repository as a PHP class whose only job is to help you fetch entities of a<br />
certain class. You can access the repository object for an entity class via:<br />
$repository = $this->getDoctrine()<br />
->getRepository('AcmeStoreBundle:Product');<br />
The AcmeStoreBundle:Product string is a shortcut you can use anywhere in Doctrine instead<br />
of the full class name of the entity (i.e.Acme\StoreBundle\Entity\Product). As long as your<br />
entity lives under the Entitynamespace of your bundle, this will work.<br />
Once you have your repository, you have access to all sorts of helpful methods:<br />
// query by the primary key (usually "id")<br />
$product = $repository->find($id);<br />
// dynamic method names to find based on a column value<br />
$product = $repository->findOneById($id);<br />
$product = $repository->findOneByName('foo');<br />
// find *all* products<br />
$products = $repository->findAll();<br />
// find a group of products based on an arbitrary column value<br />
$products = $repository->findByPrice(19.99);<br />
Of course, you can also issue complex queries, which you'll learn more about in theQuerying for<br />
Objects section.<br />
You can also take advantage of the useful findBy and findOneBy methods to easily fetch<br />
objects based on multiple conditions:<br />
// query for one product matching be name and price<br />
$product = $repository->findOneBy(array('name' => 'foo', 'price' => 19.99));<br />
// query for all products matching the name, ordered by price<br />
$product = $repository->findBy(<br />
array('name' => 'foo'),<br />
array('price' => 'ASC')<br />
);<br />
When you render any page, you can see how many queries were made in the bottom right corner<br />
of the web debug toolbar.<br />
89
Symfony2 – Franz Jordán 2011<br />
If you click the icon, the profiler will open, showing you the exact queries that were made.<br />
Updating an Object<br />
Once you've fetched an object from Doctrine, updating it is easy. Suppose you have a route that<br />
maps a product id to an update action in a controller:<br />
public function updateAction($id)<br />
{<br />
$em = $this->getDoctrine()->getEntityManager();<br />
$product = $em->getRepository('AcmeStoreBundle:Product')->find($id);<br />
if (!$product) {<br />
}<br />
throw $this->createNotFoundException('No product found for id '.$id);<br />
$product->setName('New product name!');<br />
$em->flush();<br />
}<br />
return $this->redirect($this->generateUrl('homepage'));<br />
Updating an object involves just three steps:<br />
1. fetching the object from Doctrine;<br />
2. modifying the object;<br />
3. calling flush() on the entity manager<br />
Notice that calling $em->persist($product) isn't necessary. Recall that this method simply tells<br />
Doctrine to manage or "watch" the $product object. In this case, since you fetched<br />
the $productobject from Doctrine, it's already managed.<br />
90
Symfony2 – Franz Jordán 2011<br />
Deleting an Object<br />
Deleting an object is very similar, but requires a call to the remove() method of the entity<br />
manager:<br />
$em->remove($product);<br />
$em->flush();<br />
As you might expect, the remove() method notifies Doctrine that you'd like to remove the given<br />
entity from the database. The actual DELETE query, however, isn't actually executed until<br />
the flush()method is called.<br />
Querying for Objects<br />
You've already seen how the repository object allows you to run basic queries without any work:<br />
$repository->find($id);<br />
$repository->findOneByName('Foo');<br />
Of course, Doctrine also allows you to write more complex queries using the Doctrine Query<br />
Language (DQL). DQL is similar to SQL except that you should imagine that you're querying for<br />
one or more objects of an entity class (e.g. Product) instead of querying for rows on a table<br />
(e.g.product).<br />
When querying in Doctrine, you have two options: writing pure Doctrine queries or using<br />
Doctrine's Query Builder.<br />
Querying for Objects with DQL<br />
Imaging that you want to query for products, but only return products that cost more<br />
than 19.99, ordered from cheapest to most expensive. From inside a controller, do the<br />
following:<br />
$em = $this->getDoctrine()->getEntityManager();<br />
$query = $em->createQuery(<br />
'SELECT p FROM AcmeStoreBundle:Product p WHERE p.price > :price ORDER BY p.price ASC'<br />
)->setParameter('price', '19.99');<br />
$products = $query->getResult();<br />
If you're comfortable with SQL, then DQL should feel very natural. The biggest difference is that<br />
you need to think in terms of "objects" instead of rows in a database. For this reason, you<br />
select fromAcmeStoreBundle:Product and then alias it as p.<br />
The getResult() method returns an array of results. If you're querying for just one object, you<br />
can use the getSingleResult() method instead:<br />
$product = $query->getSingleResult();<br />
The getSingleResult() method throws a Doctrine\ORM\NoResultExceptionexception if no<br />
results are returned and aDoctrine\ORM\NonUniqueResultException if more than one<br />
result is returned. If you use this method, you may need to wrap it in a try-catch block and<br />
ensure that only one result is returned (if you're querying on something that could feasibly<br />
return more than one result):<br />
91
Symfony2 – Franz Jordán 2011<br />
$query = $em->createQuery('SELECT ....')<br />
->setMaxResults(1);<br />
try {<br />
$product = $query->getSingleResult();<br />
} catch (\Doctrine\Orm\NoResultException $e) {<br />
}<br />
// ...<br />
$product = null;<br />
The DQL syntax is incredibly powerful, allowing you to easily join between entities (the topic<br />
ofrelations will be covered later), group, etc. For more information, see the official<br />
Doctrine Doctrine Query Language documentation.<br />
Setting Parameters<br />
Take note of the setParameter() method. When working with Doctrine, it's always a good idea<br />
to set any external values as "placeholders", which was done in the above query:<br />
... WHERE p.price > :price ...<br />
You can then set the value of the price placeholder by calling the setParameter()method:<br />
->setParameter('price', '19.99')<br />
Using parameters instead of placing values directly in the query string is done to prevent SQL<br />
injection attacks and should always be done. If you're using multiple parameters, you can set<br />
their values at once using the setParameters() method:<br />
->setParameters(array(<br />
'price' => '19.99',<br />
'name' => 'Foo',<br />
))<br />
Using Doctrine's Query Builder<br />
Instead of writing the queries directly, you can alternatively use Doctrine's QueryBuilder to do<br />
the same job using a nice, object-oriented interface. If you use an IDE, you can also take<br />
advantage of auto-completion as you type the method names. From inside a controller:<br />
$repository = $this->getDoctrine()<br />
->getRepository('AcmeStoreBundle:Product');<br />
$query = $repository->createQueryBuilder('p')<br />
->where('p.price > :price')<br />
->setParameter('price', '19.99')<br />
->orderBy('p.price', 'ASC')<br />
->getQuery();<br />
$products = $query->getResult();<br />
The QueryBuilder object contains every method necessary to build your query. By calling<br />
thegetQuery() method, the query builder returns a normal Query object, which is the same<br />
object you built directly in the previous section.<br />
For more information on Doctrine's Query Builder, consult Doctrine's Query<br />
Builder documentation.<br />
Custom Repository Classes<br />
In the previous sections, you began constructing and using more complex queries from inside a<br />
controller. In order to isolate, test and reuse these queries, it's a good idea to create a custom<br />
repository class for your entity and add methods with your query logic there.<br />
92
Symfony2 – Franz Jordán 2011<br />
To do this, add the name of the repository class to your mapping definition.<br />
// src/Acme/StoreBundle/Entity/Product.php<br />
namespace Acme\StoreBundle\Entity;<br />
use Doctrine\ORM\Mapping as ORM;<br />
/**<br />
* @ORM\Entity(repositoryClass="Acme\StoreBundle\Repository\ProductRepository")<br />
*/<br />
class Product<br />
{<br />
//...<br />
}<br />
Doctrine can generate the repository class for you by running the same command used earlier to<br />
generate the missing getter and setter methods:<br />
php app/console doctrine:generate:entities Acme<br />
Next, add a new method - findAllOrderedByName() - to the newly generated repository<br />
class. This method will query for all of the Product entities, ordered alphabetically.<br />
// src/Acme/StoreBundle/Repository/ProductRepository.php<br />
namespace Acme\StoreBundle\Repository;<br />
use Doctrine\ORM\EntityRepository;<br />
class ProductRepository extends EntityRepository<br />
{<br />
public function findAllOrderedByName()<br />
{<br />
return $this->getEntityManager()<br />
->createQuery('SELECT p FROM AcmeStoreBundle:Product p ORDER BY p.name ASC')<br />
->getResult();<br />
}<br />
}<br />
The entity manager can be accessed via $this->getEntityManager() from inside the repository.<br />
You can use this new method just like the default finder methods of the repository:<br />
$em = $this->getDoctrine()->getEntityManager();<br />
$products = $em->getRepository('AcmeStoreBundle:Product')<br />
->findAllOrderedByName();<br />
When using a custom repository class, you still have access to the default finder methods such<br />
as find() and findAll().<br />
Entity Relationships/Associations<br />
Suppose that the products in your application all belong to exactly one "category". In this case,<br />
you'll need a Category object and a way to relate a Product object to a Category object. Start<br />
by creating the Category entity. Since you know that you'll eventually need to persist the class<br />
through Doctrine, you can let Doctrine create the class for you.<br />
93
Symfony2 – Franz Jordán 2011<br />
php app/console doctrine:generate:entity --entity="AcmeStoreBundle:Category" --<br />
fields="name:string(255)"<br />
This task generates the Category entity for you, with an id field, a name field and the<br />
associated getter and setter functions.<br />
Relationship Mapping Metadata<br />
To relate the Category and Product entities, start by creating a products property on<br />
the Categoryclass:<br />
// src/Acme/StoreBundle/Entity/Category.php<br />
// ...<br />
use Doctrine\Common\Collections\ArrayCollection;<br />
class Category<br />
{<br />
// ...<br />
/**<br />
* @ORM\OneToMany(targetEntity="Product", mappedBy="category")<br />
*/<br />
protected $products;<br />
}<br />
public function __construct()<br />
{<br />
}<br />
$this->products = new ArrayCollection();<br />
First, since a Category object will relate to many Product objects, a products array property is<br />
added to hold those Product objects. Again, this isn't done because Doctrine needs it, but<br />
instead because it makes sense in the application for each Category to hold an array<br />
of Product objects.<br />
The code in the __construct() method is important because Doctrine requires<br />
the$products property to be an ArrayCollection object. This object looks and acts<br />
almost exactly like an array, but has some added flexibility. If this makes you uncomfortable,<br />
don't worry. Just imagine that it's an array and you'll be in good shape.<br />
Next, since each Product class can relate to exactly one Category object, you'll want to add<br />
a$category property to the Product class:<br />
// src/Acme/StoreBundle/Entity/Product.php<br />
// ...<br />
class Product<br />
{<br />
// ...<br />
}<br />
/**<br />
* @ORM\ManyToOne(targetEntity="Category", inversedBy="products")<br />
* @ORM\JoinColumn(name="category_id", referencedColumnName="id")<br />
*/<br />
protected $category;<br />
94
Symfony2 – Franz Jordán 2011<br />
Finally, now that you've added a new property to both the Category and Product classes, tell<br />
Doctrine to generate the missing getter and setter methods for you:<br />
php app/console doctrine:generate:entities Acme<br />
Ignore the Doctrine metadata for a moment. You now have two classes -<br />
Category and Product with a natural one-to-many relationship. The Category class holds an<br />
array of Product objects and theProduct object can hold one Category object. In other words -<br />
you've built your classes in a way that makes sense for your needs. The fact that the data needs<br />
to be persisted to a database is always secondary.<br />
Now, look at the metadata above the $category property on the Product class. The information<br />
here tells doctrine that the related class is Category and that it should store the id of the<br />
category record on a category_id field that lives on the product table. In other words, the<br />
related Category object will be stored on the $category property, but behind the scenes,<br />
Doctrine will persist this relationship by storing the category's id value on a category_id column<br />
of the product table.<br />
The metadata above the $products property of the Category object is less important, and<br />
simply tells Doctrine to look at the Product.category property to figure out how the<br />
relationship is mapped.<br />
Before you continue, be sure to tell Doctrine to add the new category table,<br />
andproduct.category_id column, and new foreign key:<br />
php app/console doctrine:schema:update --force<br />
95
Symfony2 – Franz Jordán 2011<br />
This task should only be really used during development. For a more robust method of<br />
systematically updating your production database, read about Doctrine migrations.<br />
Saving Related Entities<br />
Now, let's see the code in action. Imagine you're inside a controller:<br />
// ...<br />
use Acme\StoreBundle\Entity\Category;<br />
use Acme\StoreBundle\Entity\Product;<br />
use Symfony\Component\HttpFoundation\Response;<br />
// ...<br />
class DefaultController extends Controller<br />
{<br />
public function createProductAction()<br />
{<br />
$category = new Category();<br />
$category->setName('Main Products');<br />
$product = new Product();<br />
$product->setName('Foo');<br />
$product->setPrice(19.99);<br />
// relate this product to the category<br />
$product->setCategory($category);<br />
$em = $this->getDoctrine()->getEntityManager();<br />
$em->persist($category);<br />
$em->persist($product);<br />
$em->flush();<br />
}<br />
}<br />
return new Response(<br />
);<br />
'Created product id: '.$product->getId().' and category id: '.$category->getId()<br />
Now, a single row is added to both the category and product tables.<br />
The product.category_idcolumn for the new product is set to whatever the id is of the new<br />
category. Doctrine manages the persistence of this relationship for you.<br />
Fetching Related Objects<br />
When you need to fetch associated objects, your workflow looks just like it did before. First,<br />
fetch a$product object and then access its related Category:<br />
public function showAction($id)<br />
{<br />
$product = $this->getDoctrine()<br />
->getRepository('AcmeStoreBundle:Product')<br />
->find($id);<br />
$categoryName = $product->getCategory()->getName();<br />
96
Symfony2 – Franz Jordán 2011<br />
}<br />
// ...<br />
In this example, you first query for a Product object based on the product's id. This issues a<br />
query for jus the product data and hydrates the $product object with that data. Later, when you<br />
call$product->getCategory()->getName(), Doctrine silently makes a second query to find<br />
the Categorythat's related to this Product. It prepares the $category object and returns it to<br />
you.<br />
What's important is the fact that you have easy access to the product's related category, but the<br />
category data isn't actually retrieved until you ask for the category (i.e. it's "lazily loaded").<br />
You can also query in the other direction:<br />
public function showProductAction($id)<br />
{<br />
$category = $this->getDoctrine()<br />
->getRepository('AcmeStoreBundle:Category')<br />
->find($id);<br />
$products = $category->getProducts();<br />
}<br />
// ...<br />
In this case, the same things occurs: you first query out for a single Category object, and then<br />
Doctrine makes a second query to retrieve the related Product objects, but only once/if you ask<br />
for them (i.e. when you call ->getProducts()). The $products variable is an array of<br />
all Product objects that relate to the given Category object via their category_id value.<br />
97
Symfony2 – Franz Jordán 2011<br />
Relationships and Proxy Classes<br />
This "lazy loading" is possible because, when necessary, Doctrine returns a "proxy" object in<br />
place of the true object. Look again at the above example:<br />
$product = $this->getDoctrine()<br />
->getRepository('AcmeStoreBundle:Product')<br />
->find($id);<br />
$category = $product->getCategory();<br />
// prints "Proxies\AcmeStoreBundleEntityCategoryProxy"<br />
echo get_class($category);<br />
This proxy object extends the true Category object, and looks and acts exactly like it. The<br />
difference is that, by using a proxy object, Doctrine can delay querying for the<br />
real Category data until you actually need that data (e.g. until you call$category->getName()).<br />
The proxy classes are generated by Doctrine and stored in the cache directory. And though you'll<br />
probably never even notice that your $category object is actually a proxy object, it's important<br />
to keep in mind.<br />
In the next section, when you retrieve the product and category data all at once (via a join),<br />
Doctrine will return the true Category object, since nothing needs to be lazily loaded.<br />
Joining to Related Records<br />
In the above examples, two queries were made - one for the original object (e.g. a Category)<br />
and one for the related object(s) (e.g. the Product objects).<br />
Remember that you can see all of the queries made during a request via the web debug toolbar.<br />
Of course, if you know up front that you'll need to access both objects, you can avoid the second<br />
query by issuing a join in the original query. Add the following method to<br />
the ProductRepositoryclass:<br />
// src/Acme/StoreBundle/Repository/ProductRepository.php<br />
public function findOneByIdJoinedToCategory($id)<br />
{<br />
$query = $this->getEntityManager()<br />
->createQuery('<br />
SELECT p, c FROM AcmeStoreBundle:Product p<br />
JOIN p.category c<br />
WHERE p.id = :id'<br />
)->setParameter('id', $id);<br />
}<br />
try {<br />
return $query->getSingleResult();<br />
} catch (\Doctrine\ORM\NoResultException $e) {<br />
}<br />
return null;<br />
Now, you can use this method in your controller to query for a Product object and its<br />
relatedCategory with just one query:<br />
98
Symfony2 – Franz Jordán 2011<br />
public function showAction($id)<br />
{<br />
$product = $this->getDoctrine()<br />
->getRepository('AcmeStoreBundle:Product')<br />
->findOneByIdJoinedToCategory($id);<br />
$category = $product->getCategory();<br />
// ...<br />
}<br />
More Information on Associations<br />
This section has been an introduction to one common type of entity relationship, the one-tomany<br />
relationship. For more advanced details and examples of how to use other types of<br />
relations (e.g.one-to-one, many-to-many), see Doctrine's Association Mapping Documentation.<br />
If you're using annotations, you'll need to prepend all annotations<br />
with ORM\ (e.g.ORM\OneToMany), which is not reflected in Doctrine's documentation. You'll<br />
also need to include the use Doctrine\ORM\Mapping as ORM; statement,<br />
which importsthe ORM annotations prefix.<br />
Configuration<br />
Doctrine is highly configurable, though you probably won't ever need to worry about most of its<br />
options. To find out more about configuring Doctrine, see the Doctrine section of the reference<br />
manual.<br />
Lifecycle Callbacks<br />
Sometimes, you need to perform an action right before or after an entity is inserted, updated, or<br />
deleted. These types of actions are known as "lifecycle" callbacks, as they're callback methods<br />
that you need to execute during different stages of the lifecycle of an entity (e.g. the entity is<br />
inserted, updated, deleted, etc).<br />
If you're using annotations for your metadata, start by enabling the lifecycle callbacks. This is<br />
not necessary if you're using YAML or XML for your mapping:<br />
/**<br />
* @ORM\Entity()<br />
* @ORM\HasLifecycleCallbacks()<br />
*/<br />
class Product<br />
{<br />
}<br />
// ...<br />
Now, you can tell Doctrine to execute a method on any of the available lifecycle events. For<br />
example, suppose you want to set a created date column to the current date, only when the<br />
entity is first persisted (i.e. inserted):<br />
/**<br />
* @ORM\prePersist<br />
*/<br />
public function setCreatedValue()<br />
{<br />
}<br />
$this->created = new \DateTime();<br />
99
Symfony2 – Franz Jordán 2011<br />
The above example assumes that you've created and mapped a created property (not shown<br />
here).<br />
Now, right before the entity is first persisted, Doctrine will automatically call this method and<br />
thecreated field will be set to the current date.<br />
This can be repeated for any of the other lifecycle events, which include:<br />
preRemove<br />
postRemove<br />
prePersist<br />
postPersist<br />
preUpdate<br />
postUpdate<br />
postLoad<br />
loadClassMetadata<br />
For more information on what these lifecycle events mean and lifecycle callbacks in general, see<br />
Doctrine's Lifecycle Events documentation<br />
Lifecycle Callbacks and Event Listeners<br />
Notice that the setCreatedValue() method receives no arguments. This is always the case for<br />
lifecylce callbacks and is intentional: lifecycle callbacks should be simple methods that are<br />
concerned with internally transforming data in the entity (e.g. setting a created/updated field,<br />
generating a slug value).<br />
If you need to do some heavier lifting - like perform logging or send an email - you should<br />
register an external class as an event listener or subscriber and give it access to whatever<br />
resources you need. For more information, see Registering Event Listeners and Subscribers.<br />
Doctrine Extensions: Timestampable, Sluggable, etc.<br />
Doctrine is quite flexible, and a number of third-party extensions are available that allow you to<br />
easily perform repeated and common tasks on your entities. These include thing such<br />
as Sluggable,Timestampable, Loggable, Translatable, and Tree.<br />
For more information on how to find and use these extensions, see the cookbook article<br />
aboutusing common Doctrine extensions.<br />
Doctrine Field Types Reference<br />
Doctrine comes with a large number of field types available. Each of these maps a PHP data type<br />
to a specific column type in whatever database you're using. The following types are supported<br />
in Doctrine:<br />
Strings<br />
Numbers<br />
string (used for shorter strings)<br />
text (used for larger strings)<br />
integer<br />
100
Symfony2 – Franz Jordán 2011<br />
smallint<br />
bigint<br />
decimal<br />
float<br />
Dates and Times (use a DateTime object for these fields in PHP)<br />
date<br />
time<br />
datetime<br />
Other Types<br />
boolean<br />
object (serialized and stored in a CLOB field)<br />
array (serialized and stored in a CLOB field)<br />
For more information, see Doctrine's Mapping Types documentation.<br />
Field Options<br />
Each field can have a set of options applied to it. The available options include type (defaults<br />
tostring), name, length, unique and nullable. Take a few annotations examples:<br />
/**<br />
* A string field with length 255 that cannot be null<br />
* (reflecting the default values for the "type", "length" and *nullable* options)<br />
*<br />
* @ORM\Column()<br />
*/<br />
protected $name;<br />
/**<br />
* A string field of length 150 that persists to an "email_address" column<br />
* and has a unique index.<br />
*<br />
* @ORM\Column(name="email_address", unique="true", length="150")<br />
*/<br />
protected $email;<br />
There are a few more options not listed here. For more details, see Doctrine'sProperty Mapping<br />
documentation<br />
Console Commands<br />
The Doctrine2 ORM integration offers several console commands under<br />
the doctrine namespace. To view the command list you can run the console without any<br />
arguments:<br />
php app/console<br />
101
Symfony2 – Franz Jordán 2011<br />
A list of available command will print out, many of which start with the doctrine: prefix. You can<br />
find out more information about any of these commands (or any Symfony command) by running<br />
thehelp command. For example, to get details about the doctrine:database:create task, run:<br />
php app/console help doctrine:database:create<br />
Some notable or interesting tasks include:<br />
doctrine:ensure-production-settings - checks to see if the current environment is<br />
configured efficiently for production. This should always be run in the prod environment:<br />
• php app/console doctrine:ensure-production-settings --env=prod<br />
doctrine:mapping:import - allows Doctrine to introspect an existing database and<br />
create mapping information. For more information, see How to generate Entities from an<br />
Existing Database.<br />
doctrine:mapping:info - tells you all of the entities that Doctrine is aware of and<br />
whether or not there are any basic errors with the mapping.<br />
doctrine:query:dql and doctrine:query:sql - allow you to execute DQL or SQL<br />
queries directly from the command line.<br />
To be able to load data fixtures to your database, you will need to have<br />
theDoctrineFixturesBundle bundle installed. To learn how to do it, read the<br />
"DoctrineFixturesBundle" entry of the documentation.<br />
Summary<br />
With Doctrine, you can focus on your objects and how they're useful in your application and<br />
worry about database persistence second. This is because Doctrine allows you to use any PHP<br />
object to hold your data and relies on mapping metadata information to map an object's data to<br />
a particular database table.<br />
And even though Doctrine revolves around a simple concept, it's incredibly powerful, allowing<br />
you to create complex queries and subscribe to events that allow you to take different actions as<br />
objects go through their persistence lifecycle.<br />
For more information about Doctrine, see the Doctrine section of the cookbook, which includes<br />
the following articles:<br />
DoctrineFixturesBundle<br />
Doctrine Extensions: Timestampable: Sluggable, Translatable, etc.<br />
102