Manuel d'utilisation / User's manual - GYS
Manuel d'utilisation / User's manual - GYS
Manuel d'utilisation / User's manual - GYS
You also want an ePaper? Increase the reach of your titles
YUMPU automatically turns print PDFs into web optimized ePapers that Google loves.
EN<br />
The welding helmet LCD EXPERT 9.13 G complies with EEC directives 89/686 CEE. This confirmity is established in compliance with EN 175, EN 166, EN 168 and EN 379.<br />
This welding helmet is delivered ready for use. For your protection, please read carrefully these instructions and consult with a qualified instructor prior to operation.<br />
BEFORE WELDING<br />
-Check that the welding helmet is in good condition and headband adjustment.<br />
-Check whether the front cover lens, the front frame and filter are inserted and fixed in place. In case of anomalie, please proceed to its reconditionning.<br />
-Make sure that the 2 sensors (8) and the cell (7) are not obstructed by dust or debris.<br />
-Make sure that the protection films on both screens are removed.<br />
-Make sure that the red light (4) is off, otherwise change the batteries (4).<br />
-Make sure that the filter is working properly by pressing the «TEST» button (1), the screen must get a dark shade.<br />
-Check that the protection level matches your welding processes. Please refer to the following chart to help your choice (cf. welding process board)<br />
OPERATION<br />
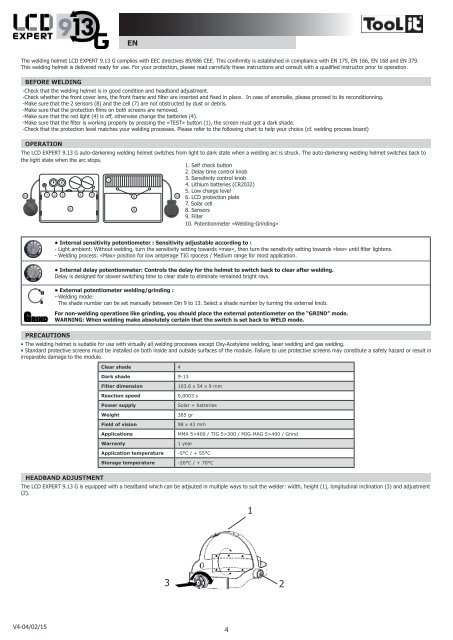
The LCD EXPERT 9.13 G auto-darkening welding helmet switches from light to dark state when a welding arc is struck. The auto-darkening welding helmet switches back to<br />
the light state when the arc stops.<br />
1. Self check button<br />
2. Delay time control knob<br />
7<br />
3. Sensitivity control knob<br />
10 1 2 3 4 5<br />
8<br />
10<br />
4. Lithium batteries (CR2032)<br />
5. Low charge level<br />
6. LCD protection plate<br />
7. Solar cell<br />
6<br />
9<br />
8. Sensors<br />
9. Filter<br />
10. Potentionmeter «Welding-Grinding»<br />
• Internal sensitivity potentiometer : Sensitivity adjustable according to :<br />
- Light ambient: Without welding, turn the sensitivity setting towards «max», then turn the sensitivity setting towards «low» until filter lightens.<br />
- Welding process: «Max» position for low amperage TIG rpocess / Medium range for most application.<br />
• Internal delay potentionmeter: Controls the delay for the helmet to switch back to clear after welding.<br />
Delay is designed for slower switching time to clear state to eliminate remained bright rays.<br />
• External potentiometer welding/grinding :<br />
--Welding mode:<br />
The shade number can be set <strong>manual</strong>ly between Din 9 to 13. Select a shade number by turning the external knob.<br />
For non-welding operations like grinding, you should place the external potentiometer on the “GRIND” mode.<br />
WARNING: When welding make absolutely certain that the switch is set back to WELD mode.<br />
PRECAUTIONS<br />
• The welding helmet is suitable for use with virtually all welding processes except Oxy-Acetylene welding, laser welding and gas welding.<br />
• Standard protective screens must be installed on both inside and outside surfaces of the module. Failure to use protective screens may constitute a safety hazard or result in<br />
irreparable damage to the module.<br />
Clear shade 4<br />
Dark shade 9-13<br />
Filter dimension<br />
Reaction speed<br />
Power supply<br />
Weight<br />
Field of vision<br />
Applications<br />
Warranty<br />
103.6 x 54 x 9 mm<br />
0,0003 s<br />
Solar + batteries<br />
385 gr<br />
98 x 43 mm<br />
MMA 5>400 / TIG 5>300 / MIG-MAG 5>400 / Grind<br />
1 year<br />
Application temperature -5°C / + 55°C<br />
Storage temperature -20°C / + 70°C<br />
HEADBAND ADJUSTMENT<br />
The LCD EXPERT 9.13 G is equipped with a headband which can be adjsuted in multiple ways to suit the welder: width, height (1), longitudinal inclination (3) and adjustment<br />
(2).<br />
1<br />
3 2<br />
V4-04/02/15<br />
4


