381QB0SB-A HD Radio/FM-RDS/AM Digital Stereo ... - Meijer
381QB0SB-A HD Radio/FM-RDS/AM Digital Stereo ... - Meijer
381QB0SB-A HD Radio/FM-RDS/AM Digital Stereo ... - Meijer

Create successful ePaper yourself
Turn your PDF publications into a flip-book with our unique Google optimized e-Paper software.
<strong>381QB0SB</strong>-A<br />
20070518_<strong>HD</strong>R-1_<strong>381QB0SB</strong>-A_GB_«Ê-±.p65 1<br />
2007/5/18, ¤U¤È 03:40<br />
<strong>HD</strong> <strong>Radio</strong>/<strong>FM</strong>-<strong>RDS</strong>/<strong>AM</strong><br />
<strong>Digital</strong> <strong>Stereo</strong> Receiver<br />
User Manual
<strong>HD</strong> <strong>Radio</strong> Technology Manufactured Under License From iBiquity <strong>Digital</strong> Corporation.<br />
iBiquity <strong>Digital</strong> and the <strong>HD</strong> <strong>Radio</strong> and <strong>HD</strong> logos are registered trademarks of iBiquity <strong>Digital</strong><br />
Corporation. <strong>HD</strong> <strong>Radio</strong>TM is a trademark of iBiquity <strong>Digital</strong> Corporation. U.S. and Foreign Patents.<br />
20070524_<strong>HD</strong>R-1_<strong>381QB0SB</strong>-A_GB.p65 4<br />
2007/5/24, ¤U¤È 03:19
Important Safety Instructions<br />
1. Read these instructions.<br />
2. Keep these instructions.<br />
3. Heed all warnings<br />
4. Follow all instructions.<br />
5. Do not use this apparatus near water.<br />
6. Clean only with dry cloth.<br />
7. Do not block any ventilation openings. Install in accordance with the<br />
manufacturer’s instructions.<br />
8. Do not install near any heat sources such as radiators, heat<br />
registers, stoves, or other apparatus (including amplifiers) that<br />
produce heat.<br />
9. Protect the power cord from being walked on or pinched particularly<br />
at plugs, convenience receptacles, and the point where they exit<br />
from the apparatus.<br />
10. Only use attachments/accessories specified by the manufacturer.<br />
11. Use only with the cart, stand, tripod, bracket or table specified by<br />
the manufacturer or sold with the apparatus. When a cart is used,<br />
use caution when moving the cart/apparatus combination to avoid<br />
injury from tip-over.<br />
12. Unplug this apparatus during lightning storms or when unused for<br />
long periods of time.<br />
13. Refer all servicing to qualified service personnel. Servicing is<br />
required when the apparatus has been damaged in any way,<br />
such as power-supply cord or plug is damaged, liquid has been<br />
spilled or objects have fallen into the apparatus, the apparatus has<br />
been exposed to rain or moisture, does not operate normally,<br />
or has been dropped.<br />
14. To reduce the Risk of Fire or Electric Shock. Do not expose this<br />
appliance to rain or moisture.<br />
15. The Shock Hazard marking and Associated Graphical Symbol is<br />
provided on the rear panel of unit.<br />
16. Apparatus shall not be exposed to dripping or splashing and no<br />
objects filled with liquids, shall not be placed on the apparatus.<br />
20070524_<strong>HD</strong>R-1_<strong>381QB0SB</strong>-A_GB.p65 5<br />
2007/5/24, ¤U¤È 03:19<br />
2
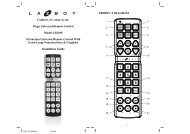
Unit Controls<br />
3<br />
(Front)<br />
1.<br />
2.<br />
LCD display<br />
Standby LED indicator<br />
3.<br />
4.<br />
Remote Control Sensor<br />
Power and Control knob<br />
20070524_<strong>HD</strong>R-1_<strong>381QB0SB</strong>-A_GB.p65 6<br />
2007/5/24, ¤U¤È 03:19
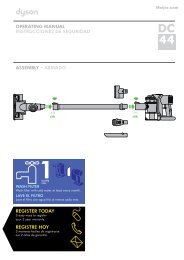
Unit Controls<br />
(Rear)<br />
5.<br />
6.<br />
7.<br />
<strong>FM</strong> Telescopic Antenna<br />
AC power cord socket<br />
Music and News selection switch<br />
8. Headphone socket<br />
9. Aux In socket<br />
10. External <strong>AM</strong> Loop antenna socket<br />
20070524_<strong>HD</strong>R-1_<strong>381QB0SB</strong>-A_GB.p65 7<br />
2007/5/24, ¤U¤È 03:20<br />
4
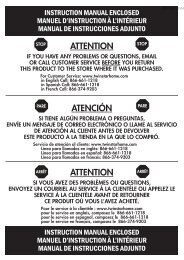
Remote Control<br />
5<br />
1.<br />
2.<br />
3.<br />
4.<br />
5.<br />
6.<br />
Power<br />
Information button<br />
ATS and Setup button<br />
Band selection<br />
Mute button<br />
Number buttons<br />
7. Audio Equalizer selection<br />
8. Last station recall<br />
9. <strong>HD</strong> <strong>Radio</strong> Seek button<br />
10. Tuning Control<br />
11. Volume Control<br />
12. Execution button<br />
20070524_<strong>HD</strong>R-1_<strong>381QB0SB</strong>-A_GB.p65 8<br />
2007/5/24, ¤U¤È 03:20
Accessories<br />
Detachable power Cord x 1<br />
<strong>FM</strong> Dipole Antenna x 1<br />
<strong>AM</strong> Loop antenna x 1<br />
Remote control unit x 1<br />
Instruction manual x 1<br />
Warranty card x 1<br />
20070524_<strong>HD</strong>R-1_<strong>381QB0SB</strong>-A_GB.p65 9<br />
2007/5/24, ¤U¤È 03:20<br />
6
Getting started<br />
First find a location for your new <strong>HD</strong> radio,<br />
1. The <strong>FM</strong> telescopic antenna is already installed. Dipole Antenna and<br />
installing tool are in cluded for better reseption.<br />
2. Connect the <strong>AM</strong> loop antenna into external <strong>AM</strong> loop antenna terminal<br />
on the back of the unit.<br />
3. Plug the AC power cord into the socket located on the back of the<br />
unit. Please ensure that the plug is pushed fully into the socket.<br />
Setting the clock<br />
Clock setting can be done when the receiver is on or in Standby Mode<br />
(power off).<br />
1. Press “Enter” or “Power /Control knob” button. The display should<br />
not read “Setup Clock Set”.<br />
2. Press “Enter” or “Power /Control knob” button again. Display should<br />
read “Clock Set” and the hour should begin blinking.<br />
3. Press “Tuning” Up/Down or rotate “Power /Control knob” to select<br />
Hour then press “Enter” or “Power /Control knob” button again to<br />
complete hour setting.<br />
4. Use same procedures to complete minute, <strong>AM</strong> or PM, date,<br />
month and year. Press “Enter” or “Power /Control knob” button<br />
to complete Clock Set.<br />
7<br />
4. Plug the other hand of the AC power cord into a wall socket and<br />
switch on the wall socket if needed. (NOTE: You may hear a loud<br />
“POP” when power is connected. Do not be alarmed.)<br />
Important:<br />
1. The <strong>AM</strong> loop antenna should be located at least 50 cm away<br />
from the receiver to avoid possible interference.<br />
2. Do not touch Power/Control knob on the radio while plug in<br />
AC power.<br />
20070524_<strong>HD</strong>R-1_<strong>381QB0SB</strong>-A_GB.p65 10<br />
2007/5/24, ¤U¤È 03:20
<strong>Radio</strong> Controls<br />
1. To turn the radio on press the “Power” button on the remote control<br />
or hold “Power /Control knob” on the unit for 2 seconds.<br />
2. To turn the radio off press the “Power” button on the remote control<br />
or hold “Power /Control knob” on the unit for 2 seconds. (NOTE: In<br />
standby mode, the tuner will display the time, dim the backlight<br />
(in 12 seconds) and standby LED will be on.<br />
3. To access or select the menu option press and release the<br />
Power/ Control knob on the unit or “Enter” button on the remote.<br />
4. To navigate through the menu options rotate the “Power/Control knob”<br />
or press “Tuning” Up/Down button.<br />
5. During normal operation (not in the menu tree) the “Power/Control<br />
knob” will control volume.<br />
Manual Tuning<br />
Using Remote:<br />
1. Press the Tuning rocker switch UP or DOWN on the remote control<br />
to select a radio station. Tuning step per press for <strong>AM</strong> is 10 kHz<br />
and 100 kHz for <strong>FM</strong> band.<br />
Using the Unit:<br />
1. Press “Power/Control knob” and cycle through the menu options by<br />
rotating the “Power/Control knob” until you are at “Tune” menu option.<br />
2. Press “Power/Control knob to select.<br />
3. Rotate “Power/Control knob” until you reach desired station<br />
frequency.<br />
Selecting the radio band/Auxiliary Input<br />
Using the remote, press the “BAND” button. (Note: When you<br />
switch from one band to another, the radio will return to the last<br />
tuned station used in the band.)<br />
Using the Unit:<br />
1. Press “Power/Control knob” and cycle through the menu options<br />
by rotating the “Power/Control knob” until you are at “Band”<br />
menu option.<br />
2. Press “Power/Control knob to select. Repeat until desired band<br />
is reached.<br />
Note:<br />
When AUX IN socket behind the unit is connected, Display will cycle<br />
through <strong>AM</strong> <strong>FM</strong> AUX IN <strong>AM</strong> …………<br />
20070524_<strong>HD</strong>R-1_<strong>381QB0SB</strong>-A_GB.p65 11<br />
2007/5/24, ¤U¤È 03:20<br />
8
Volume Control<br />
Using the Remote:<br />
1. Press “Volume” Up/Down button until you reach desired volume.<br />
Using the Unit:<br />
1. Rotate the “Power/Control knob” unit desired volume is reached.<br />
Mute<br />
Using the Remote:<br />
1. Press MUTE button on the remote control to mute the radio.<br />
Press the MUTE button again to turn on the volume.<br />
Using the Unit:<br />
1. Rotate “Power/Control knob” until volume is muted.<br />
Audio Equalizer (EQ)<br />
Using the Remote:<br />
1. Press the “EQ” button until desired EQ setting is reached.<br />
Using the Unit:<br />
1. Press “Power/Control knob” and cycle through the menu options by<br />
rotating the “Power/Control knob” until you are at “EQ” menu option.<br />
2. Press “Power/Control knob” to select.<br />
3. Rotate “Power/Control knob” until you reach desired preset<br />
EQ option.<br />
Custom “BASS” and “TREBLE” Settings<br />
Using the Remote:<br />
1. Press “EQ” button until “Bass” or “Treble” options are chosen.<br />
2. Press “Enter” button to select.<br />
3. Press “Tuning” Up/Down button until desired level is reached.<br />
4. Press “Enter” button to save setting.<br />
5. Repeat as necessary.<br />
9<br />
Using the Unit:<br />
1. Press “Power/Control knob” and cycle through the menu options by<br />
rotating the “Power/Control knob” until you are at “EQ” menu option.<br />
2. Press “Power/Control knob” to select.<br />
3. Rotate “Power/Control knob” until you reach “Bass” or “Treble”<br />
EQ option.<br />
4. Press “Power/Control knob” to select.<br />
5. Rotate “Power/Control knob” until desired levels are reached.<br />
6. Press “Power/Control knob” to select settings.<br />
7. Repeat as necessary.<br />
Music/News selection switch<br />
Music/News selection switch is located on the back of the unit. Switch<br />
Music/News selection to Music position when you wish to use “EQ”<br />
settings. Switch it to News position when you listen to news programs.<br />
Note:<br />
The EQ setting can’t be used when the Music/News selection is in<br />
News position.<br />
<strong>HD</strong> SEEK function<br />
Using the Remote:<br />
1. Press the “<strong>HD</strong> SEEK” Up/Down button to seek the next frequency<br />
broadcasting in a usable <strong>HD</strong> <strong>Radio</strong> signal.<br />
Using the Unit:<br />
1. Press “Power/Control knob” and cycle through the menu options<br />
by rotating the “Power/Control knob” until you are at “<strong>HD</strong> SEEK”<br />
menu option.<br />
2. Press “Power/Control knob” to select.<br />
3. Rotate “Power/Control knob” to select “Up” or “Down” direction.<br />
4. Press “Power/Control knob” to select.<br />
20070524_<strong>HD</strong>R-1_<strong>381QB0SB</strong>-A_GB.p65 12<br />
2007/5/24, ¤U¤È 03:20
Listening to <strong>HD</strong> <strong>Radio</strong><br />
When <strong>HD</strong> <strong>Radio</strong> station is found, display will show,<br />
1. Station call sign.<br />
2. The number of the multicasting program (1= main program).<br />
3. The total number of <strong>HD</strong> <strong>Radio</strong> program services and <strong>HD</strong> <strong>Radio</strong> mark.<br />
4. The preset number of this program.<br />
5. The radio band.<br />
Receiving & Tuning Multicast Stations<br />
When the radio is tuned to an <strong>HD</strong> compatible station and it determines<br />
that one or more Multicast station are available the station call letter<br />
will be followed by a number designator indicating the number of<br />
available Multicast stations.<br />
Using the Remote:<br />
1. Press “Tuning” Up/Down button to navigate through the multicast<br />
stations.<br />
Using the Unit:<br />
1. Press “Power/Control knob” and cycle through the menu options by<br />
rotating the “Power/Control knob” until you are at “Tune” menu option.<br />
2. Press “Power/Control knob” to select.<br />
3. Rotate “Power/Control knob” to navigate to the next multicast signal.<br />
NOTE:<br />
When navigating to a different frequency, wait for the <strong>HD</strong> signal to lock<br />
before navigating through the additional multicast signals. The lock will<br />
be achieved when the <strong>HD</strong> signal is no longer blinking and the station<br />
call letters will have a number following it, i.e. KROQ-1 2 <strong>HD</strong> <strong>FM</strong>.<br />
20070524_<strong>HD</strong>R-1_<strong>381QB0SB</strong>-A_GB.p65 13<br />
2007/5/24, ¤U¤È 03:20<br />
10
Display Modes (INFO)<br />
There are several display modes. Please refer to the <strong>HD</strong>R-1 Menu<br />
Structure Table for a complete listing and description of these<br />
display modes.<br />
Using the Remote:<br />
1. Press “Info” button.<br />
2. Continually press “Info” button or press “Tune” Up/Down button to<br />
navigate through available display modes.<br />
Using the Unit:<br />
1. Press “Power/Control knob” and cycle through the menu options by<br />
rotating the “Power/Control knob” until you are at “Info” menu option.<br />
2. Press “Power/Control knob” to select.<br />
3. Rotate “Power/Control knob” to navigate through the available<br />
display modes.<br />
4. Press “Power/Control knob” to select display mode.<br />
11<br />
20070524_<strong>HD</strong>R-1_<strong>381QB0SB</strong>-A_GB.p65 14<br />
2007/5/24, ¤U¤È 03:20
Advanced Information<br />
There are several Advanced Display modes. Please refer to the <strong>HD</strong>R-1<br />
Menu Structure Table for a complete listing and description of these<br />
display modes.<br />
Using the Remote:<br />
1. Press and hold “Info” button.<br />
2. Continually press “Info” button to navigate through available<br />
display modes.<br />
Using the Unit:<br />
1. Press “Power/Control knob” and cycle through the menu options<br />
by rotating the “Power/Control knob” until you are at “Ad. Info”<br />
menu option.<br />
2. Press “Power/Control knob” to select.<br />
3. Rotate “Power/Control knob” to navigate through the available<br />
display modes.<br />
4. Press “Power/Control knob” to select display mode.<br />
20070524_<strong>HD</strong>R-1_<strong>381QB0SB</strong>-A_GB.p65 15<br />
2007/5/24, ¤U¤È 03:20<br />
12
Hybrid Seek<br />
Using the Remote:<br />
1. Press the “SEEK” Up/Down button to seek the next frequency<br />
broadcasting in a usable radio signal.<br />
Using the Unit:<br />
1. Press “Power/Control knob” and cycle through the menu options<br />
by rotating the “Power/Control knob” until you are at “SEEK”<br />
menu option.<br />
2. Press “Power/Control knob” to select.<br />
3. Rotate “Power/Control knob” to select “Up” or “Down” direction.<br />
4. Press “Power/Control knob” to select.<br />
13<br />
20070524_<strong>HD</strong>R-1_<strong>381QB0SB</strong>-A_GB.p65 16<br />
2007/5/24, ¤U¤È 03:20
ATS – Auto Tuning System<br />
The ATS function will scan through the selected band frequency<br />
for all usable signals. It will create an easily navigated table for all<br />
detected signals.<br />
Using the Remote:<br />
1. Press and hold “ATS” button to activate menu.<br />
2. Press “Enter” button to activate frequency scanning.<br />
3. Allow radio to finish scanning. Once completed you can navigate<br />
through the available stations using the “Tune” Up/Down buttons.<br />
To navigate to the multicast stations using ATS function press the<br />
“Enter” button.<br />
4. To recall ATS table navigation press “ATS” button.<br />
Using the Unit:<br />
1. Press “Power/Control knob” and cycle through the menu options<br />
by rotating the “Power/Control knob” until you are at “SETUP”<br />
menu option.<br />
2. Press “Power/Control knob” to select.<br />
3. Rotate “Power/Control knob” to cycle through the menu options until<br />
you reach the “ATS SCAN” menu option.<br />
4. Press “Power/Control knob” to select.<br />
5. Allow radio to finish scanning. Once completed you can navigate<br />
through the available stations by rotating the “Power/Control knob”.<br />
To navigate to the multicast stations using ATS function press the<br />
“Enter” button.<br />
6. To recall the ATS Table press “Power/Control knob” and cycle<br />
through the menu options until you reach the “ATS Table’<br />
menu option.<br />
7. Press “Power/Control knob” to select.<br />
8. You can begin navigating as described above.<br />
NOTE:<br />
While using the ATS Table, the “Power/Control knob” will no longer<br />
control volume. You must wait until the unit returns to normal control<br />
function, indicated by displaying the previously selected display mode.<br />
20070524_<strong>HD</strong>R-1_<strong>381QB0SB</strong>-A_GB.p65 17<br />
2007/5/24, ¤U¤È 03:20<br />
14
Setting and Recalling Memory Presets<br />
Preset stations<br />
There are 10 preset stations each for <strong>AM</strong> and <strong>FM</strong>.<br />
Setting Memory Presets<br />
Using the Remote:<br />
1. Press “Band” button to select desired band.<br />
2. Hold corresponding numbered button for 2 seconds to store. i.e.<br />
to store 93.1 into memory position 2 press and hold the “#2” button<br />
on the remote.<br />
Using the Unit:<br />
1. Press “Power/Control knob” and cycle through the menu options<br />
by rotating the “Power/Control knob” until you are at “SET PRESET”<br />
menu option.<br />
2. Press “Power/Control knob” to select.<br />
3. Rotate “Power/Control knob” to cycle through the preset options until<br />
you reach the desired location.<br />
4. Press “Power/Control knob” to select.<br />
Recalling Memory Presets<br />
Using the Remote:<br />
1. Press corresponding numbered button to the memory location. i.e.<br />
to recall 93.1 stored in preset number 2 press and release the<br />
“#2” button.<br />
Using the Unit<br />
1. Press “Power/Control knob” and cycle through the menu options by<br />
rotating the “Power/Control knob” until you are at “GO-TO PRESET”<br />
menu option.<br />
2. Press “Power/Control knob” to select.<br />
3. Rotate “Power/Control knob” to cycle through the preset options until<br />
you reach the desired location.<br />
4. Press “Power/Control knob” to select.<br />
Note:<br />
If preset stations are full, display will appear Preset Full. Press another<br />
2 seconds will replace previous memory station. Display will show<br />
“P-X stored”. To give up the preset, simply release the number button<br />
when Preset Full appears, display will return to frequency status.<br />
15<br />
20070524_<strong>HD</strong>R-1_<strong>381QB0SB</strong>-A_GB.p65 18<br />
2007/5/24, ¤U¤È 03:20
Last Recall Station<br />
Using Remote:<br />
1. Press LAST RECALL button on the remote control to recall last<br />
listening station.<br />
Using the Unit:<br />
1. Press “Power/Control knob” and cycle through the menu options<br />
by rotating the “Power/Control knob” until you are at “RECALL”<br />
menu option.<br />
2. Press “Power/Control knob” to select.<br />
Setting Sleep timer<br />
This unit comes with an adjustable sleep timer. This function can only<br />
be activated when the unit is on.<br />
Using the Remote:<br />
1. Press and hold “ATS/Setup” button to activate menu.<br />
2. Continue to press “ATS” button or “Tune” Up/Down button to reach<br />
“SLEEP” menu option.<br />
3. Press “Enter” to select.<br />
4. Press “Tune” Up/Down button to set the desired sleep time.<br />
Using the Unit:<br />
1. Press “Power/Control knob” and cycle through the menu options<br />
by rotating the “Power/Control knob” until you are at “SETUP”<br />
menu option.<br />
2. Press “Power/Control knob” to select.<br />
3. Rotate the “Power/Control knob” until you are at “SLEEP”<br />
menu option.<br />
4. Press “Power/Control knob” to select.<br />
5. Rotate the “Power/Control knob” to set desired sleep time.<br />
6. Press “Power/Control knob” to save setting.<br />
20070524_<strong>HD</strong>R-1_<strong>381QB0SB</strong>-A_GB.p65 19<br />
2007/5/24, ¤U¤È 03:20<br />
16
Auto clock function<br />
If the <strong>FM</strong> station you are listening to providing <strong>RDS</strong> service and has<br />
Auto clock time setting feature ( CT ). You can set the clock to be Auto<br />
clock, the clock will be automatically adjusted by the station <strong>RDS</strong> – CT<br />
service.<br />
Note:<br />
Before you set the Auto clock function, please make sure the<br />
<strong>FM</strong> station you tune to providing auto clock time setting service.<br />
The Auto clock function can be set only when radio Power is on.<br />
1. Press ATS/SET UP button for more than 2 seconds until display<br />
appears SET UP and flashing ATS.<br />
2. Press and release ATS/SET UP button to get AUTO CLOCK.<br />
3. Press and release Execution button to confirm<br />
AUTO CLOCK setting.<br />
4. The clock time will be auto setting by the <strong>FM</strong> <strong>RDS</strong> station<br />
which supports Auto Clock setting ( CT ).<br />
17<br />
20070524_<strong>HD</strong>R-1_<strong>381QB0SB</strong>-A_GB.p65 20<br />
2007/5/24, ¤U¤È 03:20
Turning Alarms On/Off & Setting<br />
This unit features a dual alarm system that can sound either to a<br />
beeping tone or <strong>AM</strong>/<strong>FM</strong> or Auxiliary Audio. The easiest way to set<br />
the alarms is when the unit is off, and these instructions are designed<br />
using this option.<br />
Using the Remote:<br />
1. Press and hold “ATS/Setup” button to activate menu.<br />
2. Continue to press “ATS” button or “Tune” Up/Down button to reach<br />
desired alarm (Alarm-1 or Alarm-2).<br />
3. Press “Enter” to select.<br />
4. Press “Tune” Up/Down button to set the desired alarm setting<br />
(Beep, <strong>AM</strong>, <strong>FM</strong>, Auxiliary, OFF).<br />
5. If turning the alarm off, then press “Enter” button to save. Any other<br />
setting, continue to next step.<br />
6. Set appropriate time. Hour first, then Minutes, <strong>AM</strong>/PM then to<br />
frequency options (Daily, Weekdays, Once, Weekends.)<br />
7. Press “Enter” to save selections and proceed to next step.<br />
8. If using Beep Function proceed to step 13.<br />
9. If using <strong>AM</strong> set the appropriate frequency and continue to step 12.<br />
10. If using <strong>FM</strong>, set the appropriate frequency and multicast channel<br />
and continue to step 12.<br />
11. If using Auxiliary continue to next step.<br />
12. Set desired volume level.<br />
13. Press “Enter” to save settings.<br />
20070524_<strong>HD</strong>R-1_<strong>381QB0SB</strong>-A_GB.p65 21<br />
2007/5/24, ¤U¤È 03:20<br />
18
Using the Unit:<br />
1. Press “Power/Control knob” and cycle through the menu options<br />
by rotating the “Power/Control knob” until you are at desired alarm<br />
(Alarm-1 or Alarm 2).<br />
2. Press “Power/Control knob” to select.<br />
3. Rotate “Power/Control knob” to select the desired alarm setting<br />
(Beep, <strong>AM</strong>, <strong>FM</strong>, Auxiliary, OFF).<br />
4. If turning off, press “Power/Control knob” to save. For all others press<br />
“Power/Control knob” and proceed to next step.<br />
5. Set appropriate time. Hour first, then Minutes, <strong>AM</strong>/PM then to<br />
frequency options (Daily, Weekdays, Once, Weekends.)<br />
6. Press “Power/Control knob” to save selections and proceed to<br />
next step.<br />
7. If using Beep Function proceed to step 12.<br />
8. If using <strong>AM</strong> set the appropriate frequency and continue to step 12.<br />
9. If using <strong>FM</strong>, set the appropriate frequency and multicast channel<br />
and continue to step 12.<br />
10. If using Auxiliary continue to next step.<br />
11. Set desired volume level.<br />
12. Press “Power/Control knob” to save settings.<br />
19<br />
Note:<br />
Daily – wake up at set alarm time everyday.<br />
Weekdays – wake up only on Monday to Friday at set alarm time.<br />
Weekends – wake up only on Saturday and Sunday at set alarm time.<br />
Once – wake up only once at set alarm time.<br />
Note:<br />
Make sure to set correct clock time and date before setting alarm timer.<br />
The radio can judge which dates are weekends and weekdays only<br />
when the clock and dates are set correctly before alarm setting.<br />
Note:<br />
If you select alarm timer via “Beep” a repeating beep tone will sound.<br />
The alarm beep will increase in volume for 1 minute followed by<br />
1 minute of silence before repeating the cycle (HWS-Humane<br />
Wake System). The HWS alarm will sound for 30 minutes unless<br />
turned off by pressing Power/Standby button.<br />
20070524_<strong>HD</strong>R-1_<strong>381QB0SB</strong>-A_GB.p65 22<br />
2007/5/24, ¤U¤È 03:20
Snooze function<br />
The alarm will sound at the selected alarm time. Press any button<br />
except Power (Standby) button can be silence for 5 minutes interval<br />
until alarm is on again (Snooze). This sequence can be repeated<br />
during the alarm period.<br />
Display will appear Snooze and remaining time to next alarm on.<br />
Press Power button to cancel the Snooze.<br />
Display backlight brightness control<br />
1. Long press ATS/SET UP button until display appears SET UP and<br />
flashing ATS.<br />
2. Repeatedly press and release ATS/SET UP button to get Backlight.<br />
3. Press Execution button to enter backlight control mode.<br />
4. Press Tuning Up or Down button to adjust display brightness.<br />
5. Press Execution button again to complete setting.<br />
Canceling alarms<br />
The alarm will activate for 60 minutes (30 minutes for Beep alarm) until<br />
you press Power button to cancel it.<br />
20070524_<strong>HD</strong>R-1_<strong>381QB0SB</strong>-A_GB.p65 23<br />
2007/5/24, ¤U¤È 03:20<br />
20
Change Hour format<br />
You can change 12 hours time format into 24 hours format and<br />
vice versa.<br />
1. Long press ATS/SET UP button until display appears SET UP and<br />
flashing ATS.<br />
2. Repeatedly press and release ATS/SET UP button to get Hour Mode.<br />
3. Press Execution button to enter Hour mode adjustment.<br />
4. Press Tuning Up or Down button to get change required hour format.<br />
5. Press Execution button again to complete setting.<br />
System RESET<br />
System RESET feature will allow you to back to initial factory setting<br />
status of the radio.<br />
1. Long press ATS/SET UP button until display appears SET UP and<br />
flashing ATS.<br />
2. Repeatedly press and release ATS/SET UP button to get<br />
System Reset.<br />
3. Press Execution button to execute system reset.<br />
4. After the reset, the radio will clean all the memory/time/alarm etc.<br />
presets and back to initial factory setting status.<br />
21<br />
20070524_<strong>HD</strong>R-1_<strong>381QB0SB</strong>-A_GB.p65 24<br />
2007/5/24, ¤U¤È 03:20
RESET the radio<br />
If the radio fails to operate correctly i.e. display can’t change according<br />
to the operation. Unplug the AC power cord and wait for 5 seconds<br />
then re-plug. This is to reset the radio for troubleshooting the possible<br />
CPU power down. After RESET the radio, radio will be back to<br />
Standby mode (Power off)<br />
Headphone socket<br />
A 3.5 mm Headphone Socket located on the rear of the radio is<br />
provided for use with either headphones or an earpiece. Inserting a<br />
plug automatically mutes the internal speaker.<br />
Aux in socket<br />
1. Connect a stereo or mono audio source (i.e. iPod, MP3 or CD player)<br />
to the Aux IN socket on the rear of the radio.<br />
2. Switch the band to AUX IN.<br />
3. Select required volume level by pressing Volume Control on the<br />
remote control or rotary the Power/Control knob on the radio.<br />
4. Select required audio equalizer by pressing EQ button.<br />
Specifications<br />
Power Requirement:<br />
Mains AC 120 volts 60 Hz only<br />
Battery (remote control) 3.0V CR 2025 button type<br />
Frequency Coverage:<br />
<strong>FM</strong><br />
<strong>AM</strong><br />
<strong>HD</strong> <strong>FM</strong><br />
<strong>HD</strong> <strong>AM</strong><br />
87.50 – 108 MHz<br />
520 – 1710 kHz<br />
87.50 – 108 MHz<br />
520 – 1710 kHz<br />
Circuit Features:<br />
Loudspeaker<br />
Output Power<br />
Headphone socket<br />
Aux In socket<br />
Aerial System:<br />
<strong>FM</strong> Telescopic aerial<br />
<strong>AM</strong> Loop antenna<br />
Dimensions (WxHxD): 290x110x182 mm<br />
Weight: approx. 3 kgs.<br />
63 mm x 2<br />
5 Watts x 2<br />
3.5 mm dia.<br />
3.5 mm dia.<br />
20070524_<strong>HD</strong>R-1_<strong>381QB0SB</strong>-A_GB.p65 25<br />
2007/5/24, ¤U¤È 03:20<br />
22
Brief User Interface:<br />
NO Button<br />
0 any keys<br />
1<br />
2<br />
3<br />
4<br />
5<br />
6<br />
23<br />
Standby<br />
Power OFF<br />
Rotary Knob<br />
Rotary Knob<br />
Band<br />
ATS<br />
Info<br />
action<br />
click<br />
click<br />
click<br />
click<br />
click<br />
long 2s<br />
left<br />
right<br />
click<br />
click<br />
long 2s<br />
click<br />
click<br />
long 2s<br />
status<br />
Alarm ON<br />
Standby /<br />
Power ON<br />
Alarm ON /<br />
Snooze ON<br />
Standby<br />
Power ON<br />
Power ON<br />
Power ON<br />
Power ON<br />
Power ON<br />
Power OFF<br />
Power ON<br />
Power ON<br />
Power ON<br />
Power ON<br />
<strong>HD</strong>R1 function<br />
Snooze ON<br />
Power ON / Standby toggle<br />
Snooze OFF, Alarm OFF & Power OFF<br />
Power ON<br />
To go into frequency Tune mode to change frequency.<br />
Power OFF<br />
VOLUME<br />
VOLUME<br />
<strong>FM</strong> <strong>AM</strong> AUX IN<br />
Clock Set Alarm1 Alarm2 Backlight Hour Mode<br />
System Reset<br />
ATS Sleep Auto clock Set Clock Set Alarm1<br />
Alarm2 Backlight Hour Mode System Reset<br />
Recall ATS table ON / OFF<br />
RT PTY Frequency SSI Audio Mode Graphic EQ<br />
EQ Mode Time/Date Alarm1 Alarm2 Sleep<br />
BER Service mode Station ID UI Version SW Version<br />
HW Version<br />
20070524_<strong>HD</strong>R-1_<strong>381QB0SB</strong>-A_GB.p65 26<br />
2007/5/24, ¤U¤È 03:20<br />
Note<br />
except StandBy<br />
recall the last station<br />
on last band<br />
recall the last station<br />
on last band<br />
turn left / right<br />
use ENTER to execute<br />
use ENTER to execute<br />
Tune to<br />
change station.
7<br />
8<br />
9<br />
10<br />
13<br />
Preset 0~9<br />
Volume<br />
Mute<br />
Tune<br />
11 <strong>HD</strong> seek<br />
12 Execution<br />
EQ<br />
14 Last recall<br />
15 News SW<br />
click<br />
long 2s<br />
click<br />
long hold<br />
click<br />
click<br />
long 0.5 s<br />
click<br />
Click<br />
Click<br />
Click<br />
Click<br />
Power ON<br />
Power ON<br />
Power ON<br />
Power ON<br />
Power ON<br />
Power ON<br />
Power ON<br />
Power ON<br />
Power ON<br />
Power ON<br />
Power ON<br />
Power ON<br />
Power ON<br />
Note:<br />
1. Long 2s(.5s) = press key and hold up to 2 (0.5) seconds.<br />
2. Long hold = just press key and hold.<br />
3. BER = Error Bit Rate.<br />
4. SSI = Signal Strength Indicator.<br />
5. RT = <strong>Radio</strong> Text.<br />
6. PTY = Program Type.<br />
7. ATS = Auto Tuning System.<br />
Go to Preset 0~9<br />
Store Preset 0~9<br />
VOLUME<br />
VOLUME fast<br />
Toggle Mute ON / OFF<br />
Tune next frequency step.<br />
Auto seek and go to the next station.<br />
(include analog and <strong>HD</strong> stations)<br />
Auto seek and go to the next <strong>HD</strong> station.<br />
cycle through the multicasting programs<br />
Enter input<br />
On My Bass /<br />
Flat Classical Rock Jazz Pop My Bass My Treble Treble use ENTER &<br />
Tune to adjust<br />
To go back to the last station (program).<br />
swap Audio EQ to FLAT<br />
20070524_<strong>HD</strong>R-1_<strong>381QB0SB</strong>-A_GB.p65 27<br />
2007/5/24, ¤U¤È 03:20<br />
24