


You also want an ePaper? Increase the reach of your titles
YUMPU automatically turns print PDFs into web optimized ePapers that Google loves.
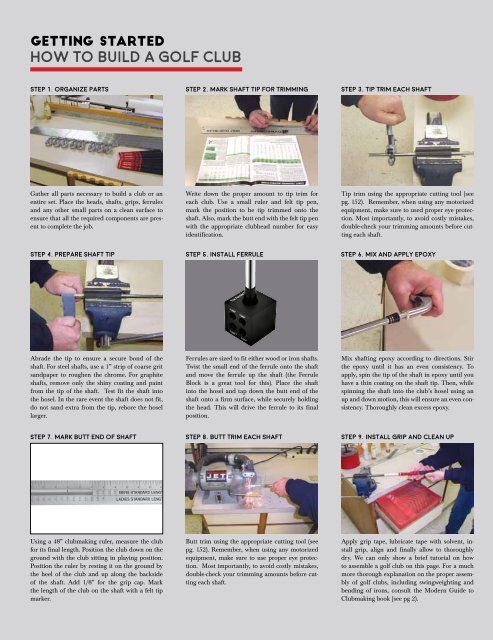
GETTING STARTED<br />
HOW TO BUILD A GOLF CLUB<br />
step 1. Organize parts<br />
step 2. Mark shaft tip for trimming<br />
step 3. Tip trim each shaft<br />
Gather all parts necessary to build a club or an<br />
entire set. Place the heads, shafts, grips, ferrules<br />
and any other small parts on a clean surface to<br />
ensure that all the required components are present<br />
to complete the job.<br />
Write down the proper amount to tip trim for<br />
each club. Use a small ruler and felt tip pen,<br />
mark the position to be tip trimmed onto the<br />
shaft. Also, mark the butt end with the felt tip pen<br />
with the appropriate clubhead number for easy<br />
identification.<br />
Tip trim using the appropriate cutting tool (see<br />
pg. 152). Remember, when using any motorized<br />
equipment, make sure to used proper eye protection.<br />
Most importantly, to avoid costly mistakes,<br />
double-check your trimming amounts before cutting<br />
each shaft.<br />
step 4. Prepare Shaft Tip<br />
step 5. Install ferrule<br />
step 6. Mix and apply epoxy<br />
Abrade the tip to ensure a secure bond of the<br />
shaft. For steel shafts, use a 1” strip of coarse grit<br />
sandpaper to roughen the chrome. For graphite<br />
shafts, remove only the shiny coating and paint<br />
from the tip of the shaft. Test fit the shaft into<br />
the hosel. In the rare event the shaft does not fit,<br />
do not sand extra from the tip, rebore the hosel<br />
larger.<br />
Ferrules are sized to fit either wood or iron shafts.<br />
Twist the small end of the ferrule onto the shaft<br />
and move the ferrule up the shaft (the Ferrule<br />
Block is a great tool for this). Place the shaft<br />
into the hosel and tap down the butt end of the<br />
shaft onto a firm surface, while securely holding<br />
the head. This will drive the ferrule to its final<br />
position.<br />
Mix shafting epoxy according to directions. Stir<br />
the epoxy until it has an even consistency. To<br />
apply, spin the tip of the shaft in epoxy until you<br />
have a thin coating on the shaft tip. Then, while<br />
spinning the shaft into the club’s hosel using an<br />
up and down motion, this will ensure an even consistency.<br />
Thoroughly clean excess epoxy.<br />
step 7. Mark butt end of shaft<br />
step 8. Butt trim each shaft<br />
step 9. Install grip and clean up<br />
Using a 48” clubmaking ruler, measure the club<br />
for its final length. Position the club down on the<br />
ground with the club sitting in playing position.<br />
Position the ruler by resting it on the ground by<br />
the heel of the club and up along the backside<br />
of the shaft. Add 1/8” for the grip cap. Mark<br />
the length of the club on the shaft with a felt tip<br />
marker.<br />
Butt trim using the appropriate cutting tool (see<br />
pg. 152). Remember, when using any motorized<br />
equipment, make sure to use proper eye protection.<br />
Most importantly, to avoid costly mistakes,<br />
double-check your trimming amounts before cutting<br />
each shaft.<br />
Apply grip tape, lubricate tape with solvent, install<br />
grip, align and finally allow to thoroughly<br />
dry. We can only show a brief tutorial on how<br />
to assemble a golf club on this page. For a much<br />
more thorough explanation on the proper assembly<br />
of golf clubs, including swingweighting and<br />
bending of irons, consult the Modern Guide to<br />
Clubmaking book (see pg 2).