Proto - Tethered Tools

You also want an ePaper? Increase the reach of your titles
YUMPU automatically turns print PDFs into web optimized ePapers that Google loves.
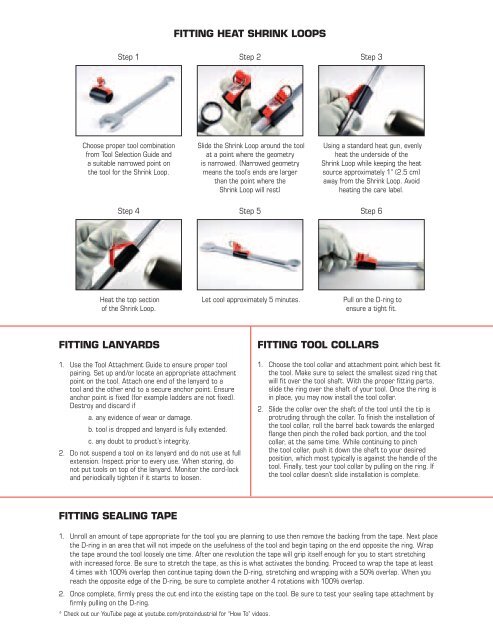
Fitting Heat Shrink Loops<br />
Step 1 Step 2 Step 3<br />
Choose proper tool combination<br />
from Tool Selection Guide and<br />
a suitable narrowed point on<br />
the tool for the Shrink Loop.<br />
Slide the Shrink Loop around the tool<br />
at a point where the geometry<br />
is narrowed. (Narrowed geometry<br />
means the tool’s ends are larger<br />
than the point where the<br />
Shrink Loop will rest)<br />
Using a standard heat gun, evenly<br />
heat the underside of the<br />
Shrink Loop while keeping the heat<br />
source approximately 1" (2.5 cm)<br />
away from the Shrink Loop. Avoid<br />
heating the care label.<br />
Step 4 Step 5 Step 6<br />
Heat the top section<br />
of the Shrink Loop.<br />
Let cool approximately 5 minutes. Pull on the D-ring to<br />
ensure a tight fit.<br />
Fitting lanyards<br />
Fitting tool collars<br />
1. Use the Tool Attachment Guide to ensure proper tool<br />
pairing. Set up and/or locate an appropriate attachment<br />
point on the tool. Attach one end of the lanyard to a<br />
tool and the other end to a secure anchor point. Ensure<br />
anchor point is fixed (for example ladders are not fixed).<br />
Destroy and discard if<br />
a. any evidence of wear or damage.<br />
b. tool is dropped and lanyard is fully extended.<br />
c. any doubt to product’s integrity.<br />
2. Do not suspend a tool on its lanyard and do not use at full<br />
extension. Inspect prior to every use. When storing, do<br />
not put tools on top of the lanyard. Monitor the cord-lock<br />
and periodically tighten if it starts to loosen.<br />
1. Choose the tool collar and attachment point which best fit<br />
the tool. Make sure to select the smallest sized ring that<br />
will fit over the tool shaft. With the proper fitting parts,<br />
slide the ring over the shaft of your tool. Once the ring is<br />
in place, you may now install the tool collar.<br />
2. Slide the collar over the shaft of the tool until the tip is<br />
protruding through the collar. To finish the installation of<br />
the tool collar, roll the barrel back towards the enlarged<br />
flange then pinch the rolled back portion, and the tool<br />
collar, at the same time. While continuing to pinch<br />
the tool collar, push it down the shaft to your desired<br />
position, which most typically is against the handle of the<br />
tool. Finally, test your tool collar by pulling on the ring. If<br />
the tool collar doesn’t slide installation is complete.<br />
Fitting sealing Tape<br />
1. Unroll an amount of tape appropriate for the tool you are planning to use then remove the backing from the tape. Next place<br />
the D-ring in an area that will not impede on the usefulness of the tool and begin taping on the end opposite the ring. Wrap<br />
the tape around the tool loosely one time. After one revolution the tape will grip itself enough for you to start stretching<br />
with increased force. Be sure to stretch the tape, as this is what activates the bonding. Proceed to wrap the tape at least<br />
4 times with 100% overlap then continue taping down the D-ring, stretching and wrapping with a 50% overlap. When you<br />
reach the opposite edge of the D-ring, be sure to complete another 4 rotations with 100% overlap.<br />
2. Once complete, firmly press the cut end into the existing tape on the tool. Be sure to test your sealing tape attachment by<br />
firmly pulling on the D-ring.<br />
* Check out our YouTube page at youtube.com/protoindustrial for “How To" videos.