

flying-squirrel-free-pattern-final2

Create successful ePaper yourself
Turn your PDF publications into a flip-book with our unique Google optimized e-Paper software.
Flying Squirrel Softie Pattern<br />
By Abby Glassenberg<br />
whileshenaps.com<br />
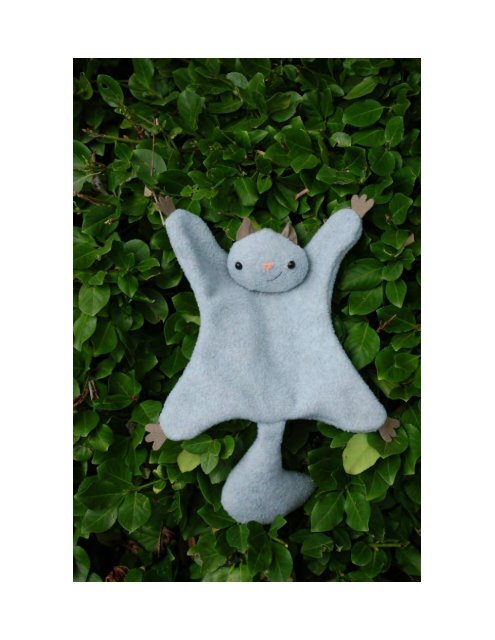
Flying <strong>squirrel</strong>s make excellent softies, mostly because they’re so cute! Here’s a simple<br />
<strong>pattern</strong> to make your own <strong>flying</strong> <strong>squirrel</strong>. You can sew him in about an hour and I think<br />
you’ll agree that this is one huggable <strong>squirrel</strong>.<br />
The finished <strong>squirrel</strong> is 13 inches long (from the tip of the ears to the tail).<br />
This is an original sewing <strong>pattern</strong> by Abby Glassenberg.<br />
Copyright 2016. All rights reserved. It is illegal to distribute this <strong>pattern</strong> electronically or in hard copy<br />
without permission.<br />
Have a question? Email me: mailto:abbyglassenberg@comcast.net<br />
2
3
First, gather some materials:<br />
1/4 yard of light gray fleece (you could also use flannel or a felted wool sweater)<br />
a small scrap of dark gray felt for the feet and ears<br />
a small scrap of pink felt for the nose<br />
a pair of 8mm safety eyes<br />
black embroidery floss, 12 inches<br />
fiberfill stuffing, 1 ounce<br />
coordinating all-purpose thread<br />
an embroidery needle<br />
a pair of small scissors<br />
chalk or a disappearing fabric marker<br />
Let’s get started! First, cut everything out.<br />
From light gray fleece cut:<br />
• 2 Bodies<br />
• 2 Heads<br />
• 2 Tails (reversing 1)<br />
From dark gray felt cut:<br />
• 4 Feet<br />
• 2 Ears<br />
From pink felt cut:<br />
• 1 Nose<br />
Transfer all of the markings to the <strong>pattern</strong> pieces using chalk or a disappearing fabric<br />
marker. Note that a 1/4 inch seam allowance has been added to all of the <strong>pattern</strong> pieces<br />
that require it. Cut on the solid lines and sew on the dotted lines.<br />
4
Now, we’ll sew the tail. Place the two tail pieces right sides together. Pin. Stitch around<br />
the tail, leaving the straight edge open as marked. Clip the curves and turn the tail right<br />
side out. Stuff the tail lightly, leaving the inch closest to the opening unstuffed.<br />
5
Next, prepare the face. Poke a small hole for each eye using the tip of a pair of small<br />
scissors. Insert the safety eyes and slide the washers on the backs of the posts until<br />
they’re secure.<br />
Whipstitch the nose in place. Stitch the mouth with black embroidery floss using<br />
backstitch.<br />
Flip one ear over so that you have two mirror image ears on your worktable. Fold each<br />
ear along the fold line and press. Place the ears on the face, folded side down, as<br />
marked, and pin in place.<br />
6
It’s time to sew and stuff the head! Place the two head pieces right sides together and<br />
pin well. Sew around the entire head, catching the raw edges of the ears in the seam.<br />
On the back of the head toward the bottom pinch one layer of fabric and cut a small slit.<br />
Clip the curves and turn the head right side out through the slit.<br />
7
Stuff the head firmly, being sure there are no hollow spots or lumps. Ladder stitch the<br />
hole closed.<br />
8
Now let’s sew up the body. Place the feet on the right side of one body piece, as<br />
marked. Pin in place. Place the tail on the body piece and pin. Now place the second<br />
body piece on top, right sides together, and pin well. Stitch around the body, leaving the<br />
opening at the neck as marked.<br />
Clip the curves and turn the body right side out. Ladder stitch the opening closed.<br />
9
We’re almost done! Place the head on the body, as marked. Pin from the back to hold it<br />
in place. Ladder stitch the head to the body, going down the marked curve and then<br />
across the neck portion of the body. You might want to stitch around twice just to be<br />
sure the head is secure stitched in place.<br />
That’s it! Give your <strong>flying</strong> <strong>squirrel</strong> a big hug!<br />
10
Visit me online: whileshenaps.com<br />
This is an original sewing <strong>pattern</strong> by Abby Glassenberg.<br />
Copyright 2016. All rights reserved. It is illegal to distribute this <strong>pattern</strong> electronically or<br />
in hard copy without permission.<br />
Have a question? Email me: mailto:abbyglassenberg@comcast.net<br />
11
Nose<br />
Cut 1 from felt<br />
Ear<br />
cut 2<br />
from<br />
felt<br />
fold<br />
Foot<br />
Cut 4 from<br />
felt<br />
Foot<br />
OPEN<br />
Ear<br />
Head<br />
Cut 2<br />
Ear<br />
Body<br />
Cut 2<br />
Place on Fold<br />
Flying Squirrel Pattern<br />
page 1 of 2<br />
Designed by Abby Glassenberg for Wild Olive<br />
Tail<br />
Foot
Flying Squirrel Pattern<br />
page 2 of 2<br />
Designed by Abby Glassenberg for Wild Olive<br />
OPEN<br />
Tail<br />
cut 1<br />
reverse 1