

Samsung U28D590D - Samsung UHD 28” Monitor with Metallic Easel Stand - LU28D590DS/ZA - User Manual (ENGLISH)
Samsung U28D590D - Samsung UHD 28” Monitor with Metallic Easel Stand - LU28D590DS/ZA - User Manual (ENGLISH)
Samsung U28D590D - Samsung UHD 28” Monitor with Metallic Easel Stand - LU28D590DS/ZA - User Manual (ENGLISH)

Create successful ePaper yourself
Turn your PDF publications into a flip-book with our unique Google optimized e-Paper software.
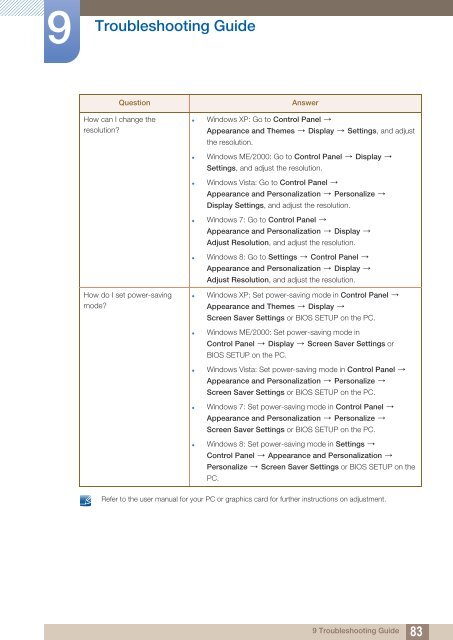
9<br />
Troubleshooting Guide<br />
Question<br />
How can I change the<br />
resolution?<br />
Answer<br />
• Windows XP: Go to Control Panel<br />
Appearance and Themes Display Settings, and adjust<br />
the resolution.<br />
• Windows ME/2000: Go to Control Panel Display<br />
Settings, and adjust the resolution.<br />
• Windows Vista: Go to Control Panel<br />
Appearance and Personalization Personalize<br />
Display Settings, and adjust the resolution.<br />
• Windows 7: Go to Control Panel<br />
Appearance and Personalization Display<br />
Adjust Resolution, and adjust the resolution.<br />
• Windows 8: Go to Settings Control Panel<br />
Appearance and Personalization Display<br />
Adjust Resolution, and adjust the resolution.<br />
How do I set power-saving<br />
mode?<br />
• Windows XP: Set power-saving mode in Control Panel<br />
Appearance and Themes Display<br />
Screen Saver Settings or BIOS SETUP on the PC.<br />
• Windows ME/2000: Set power-saving mode in<br />
Control Panel Display Screen Saver Settings or<br />
BIOS SETUP on the PC.<br />
• Windows Vista: Set power-saving mode in Control Panel<br />
Appearance and Personalization Personalize<br />
Screen Saver Settings or BIOS SETUP on the PC.<br />
• Windows 7: Set power-saving mode in Control Panel<br />
Appearance and Personalization Personalize<br />
Screen Saver Settings or BIOS SETUP on the PC.<br />
• Windows 8: Set power-saving mode in Settings<br />
Control Panel Appearance and Personalization<br />
Personalize Screen Saver Settings or BIOS SETUP on the<br />
PC.<br />
Refer to the user manual for your PC or graphics card for further instructions on adjustment.<br />
9 Troubleshooting Guide<br />
83


