Blue Robotics BlueROV2
BR-MTR-Feature-Dec2016
BR-MTR-Feature-Dec2016

You also want an ePaper? Increase the reach of your titles
YUMPU automatically turns print PDFs into web optimized ePapers that Google loves.
Tech File<br />
<strong>Blue</strong> <strong>Robotics</strong><br />
<strong>Blue</strong>ROV2<br />
By Paul Unterweiser<br />
The popularity and availability of aerial quad-copter drones<br />
have grown exponentially over the past few years. But, in<br />
large part because of the complexities that water penetration<br />
poses for electronics, underwater remotely operated vehicles<br />
(ROVs) have not experienced that same level of popularity.<br />
The technology required to fabricate the components for an<br />
ROV to explore beyond a few meters depth has been beyond<br />
the capabilities of all but a handful of companies who have<br />
mastered the skills. In many cases, those skills have been<br />
kept proprietary and the products have demanded high prices.<br />
Not long ago you needed well over $10,000 to consider buying<br />
even the smallest observation ROV. As mini ROVs have<br />
grown in capabilities, so have the prices to the point where a<br />
fully-capable mini ROV now costs in excess of $40,000. All<br />
that may soon change thanks to companies like <strong>Blue</strong> <strong>Robotics</strong><br />
and its newly released <strong>Blue</strong>ROV2.<br />
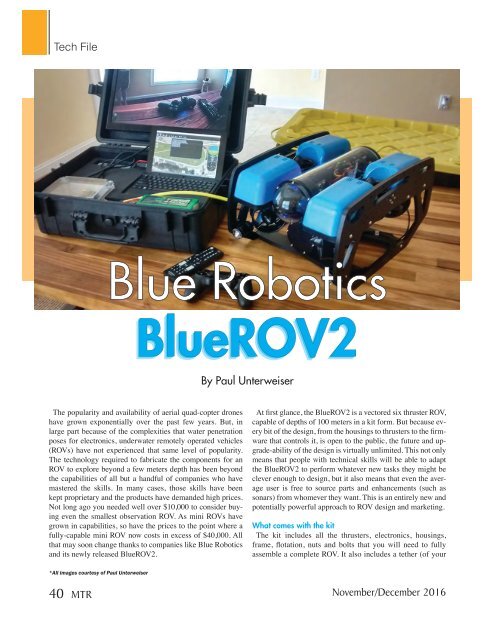
At first glance, the <strong>Blue</strong>ROV2 is a vectored six thruster ROV,<br />
capable of depths of 100 meters in a kit form. But because every<br />
bit of the design, from the housings to thrusters to the firmware<br />
that controls it, is open to the public, the future and upgrade-ability<br />
of the design is virtually unlimited. This not only<br />
means that people with technical skills will be able to adapt<br />
the <strong>Blue</strong>ROV2 to perform whatever new tasks they might be<br />
clever enough to design, but it also means that even the average<br />
user is free to source parts and enhancements (such as<br />
sonars) from whomever they want. This is an entirely new and<br />
potentially powerful approach to ROV design and marketing.<br />
What comes with the kit<br />
The kit includes all the thrusters, electronics, housings,<br />
frame, flotation, nuts and bolts that you will need to fully<br />
assemble a complete ROV. It also includes a tether (of your<br />
*All images courtesy of Paul Unterweiser<br />
40 MTR<br />
November/December 2016
choice of length) and a topside electronics<br />
board. What it does not include<br />
are a few basic tools you will need<br />
(such as screwdrivers and wire snips),<br />
batteries (14.8 VDC LiPo batteries are<br />
recommended), a laptop/ tablet to control<br />
the ROV, or a monitor to display the<br />
video. These are left to the builder to<br />
buy and assemble as they wish. Some<br />
steps of the construction, such as the<br />
waterproof housing penetrators, have<br />
already been potted to the cables, while<br />
other steps, such assembling the frame<br />
and connecting the wires to the various<br />
electronics, have been left for the<br />
builder to complete.<br />
and what components that are not inert<br />
are potted. Surprisingly, even though<br />
these thrusters are constantly exposed<br />
to salt and debris, long term testing<br />
has proven them to be pretty reliable.<br />
And considering the cost savings these<br />
thrusters afford, it would appear to be a<br />
viable approach.<br />
Kit options<br />
Besides various tether length options,<br />
you can also choose between the “stan-<br />
<strong>Blue</strong>ROV2 kit components<br />
Besides <strong>Blue</strong> <strong>Robotics</strong>’ novel approach<br />
to delivering this new product, some of<br />
the components which make up the kit<br />
are themselves equally novel. The motors<br />
in the thrusters, for example, are<br />
not sealed from water intrusion but instead<br />
are open so water can pass freely.<br />
The thruster’s construction is mostly<br />
from plastics and other inert materials,<br />
www.marinetechnologynews.com<br />
Ph: (714) 546-3478 | www.secoseals.com | sales@secoseals.com<br />
Marine Technology Reporter 41
Tech File<br />
dard” and “advanced” electronics packages. The standard<br />
package uses RS-422 serial communications for control and<br />
composite (NTSC / PAL) video. The advanced package uses a<br />
tiny, on-board computer (Raspberry Pi), and other electronics<br />
to send both HD video and ROV control via Ethernet and a<br />
single twisted pair. The standard electronics is similar to how<br />
most commercial ROVs are configured. The advanced electronics<br />
is something new, offering some exciting new capabilities<br />
along with a few additional risks. For this evaluation I<br />
built two kits, one with standard electronics and one with the<br />
advanced electronics.<br />
Building the kits<br />
The first kit I built was a “beta” version of the “Standard<br />
Electronics” kit and so my build was only slightly more complex<br />
than what a customer who receives a kit can expect. Assembling<br />
the kit primarily involved:<br />
1. Wiring the ROV side electronics - This step involved<br />
mounting two electronics boards to the panel and then<br />
connecting them, via screw terminal strips, to the<br />
electronic speed controllers (ESC) and thrusters;<br />
and then connecting the tether leads to the electronics<br />
in the same manner. If you have absolutely no<br />
42 MTR<br />
electronics or small tool experience at all, this might<br />
take you a bit longer, but it took me about an hour<br />
altogether. Most of that time was deciding how to best<br />
route the wires so everything would appear neat and<br />
easy to repair in the future.<br />
2. Assembling the frame - This was one of the easiest<br />
parts of the build. The frame is made of HDPE,<br />
anodized aluminum and connected with stainless<br />
screws. This took less than 30 minutes to complete.<br />
3. Change props and mount the thrusters - This was as<br />
easy as step 2. The only bit that was more time<br />
consuming was swapping the right-hand props in three<br />
thrusters to left-hand props. The thruster needs to be<br />
disassembled in order to do this, which is not an ideal<br />
situation, but performing this task offers two<br />
advantages: first, you end up with enough spare props<br />
so you have replacement for all six of them, and<br />
second, you are taught how to dis- and reassemble the<br />
thrusters, a skill worth having with any ROV.<br />
4. Mount the housings and route the external wires -<br />
This next to last step was very straightforward and did<br />
not take long at all to accomplish. The most difficult<br />
part (until <strong>Blue</strong> <strong>Robotics</strong> sent me a photo for guidance)<br />
November/December 2016
<strong>Blue</strong>ROV2 testing<br />
was deciding how to route the external wires. With a<br />
few photos for guidance (which are now included in<br />
the kit’s instructions) I finished the ROV end of the build.<br />
5. Design and assemble a topside control box - This last<br />
step is likely the most challenging part of building the<br />
kit, and your options range from simply mounting the<br />
topside electronics in a plastic box (which is what I<br />
did) to mounting it along with monitor, tablet and<br />
other electronics in a proper, waterproof pelican style<br />
case (what I plan on doing in the future). In my case,<br />
I spent roughly $400 on all the parts and batteries<br />
I needed to finish the build to the state seen in the photos.<br />
I built the second kit (with the “Advanced Electronics”) several<br />
months after the first. In that time I picked up several kit<br />
building tips from other builders and came up with a few of<br />
my own. Because this electronics package includes an additional<br />
component (the Raspberry Pi computer) building it was<br />
a little bit more involved and routing the wires neatly was a bit<br />
more challenging than the first kit. As for the software side, I<br />
ran into a few minor glitches but thanks to some help on <strong>Blue</strong><br />
<strong>Robotics</strong>’ support forums I was able to get things up and running<br />
relatively quickly.<br />
www.marinetechnologynews.com<br />
Building a topside box<br />
One of the bigger challenges to assembling this kit is designing<br />
a box to house the topside electronics. This is one area<br />
where it is completely up to you as to how complex or how<br />
simple you want to be. I wanted to use “off the shelf” components<br />
as much as possible and decided to use a simple, waterproof<br />
plastic (NEMA) electronics box and splash resistant<br />
bulkhead connectors. While I was at it, I also installed a USB<br />
to RS485 converter in the box for use with a sonar I will be<br />
installing later.<br />
Bench testing<br />
After assembling the ROV and building a simple topside<br />
control unit it was time to install the software and give everything<br />
a test. The software that the <strong>Blue</strong>ROV2 uses topside,<br />
“QGround Control” is an adaptation of aerial drone software.<br />
Likewise, the ROV end hardware it uses is also an adaptation<br />
called “ArduSub”. Although initially designed for flying<br />
craft, I later learned <strong>Blue</strong> <strong>Robotics</strong> modified version worked<br />
pretty well, plus because most of the software’s momentum is<br />
driven by the aerial drone community, it is constantly being<br />
improved. Another benefit of open source software is that I<br />
can use it with a wide variety of hardware platforms. The top-<br />
Marine Technology Reporter 43
Tech File<br />
side controller, for example, can be a Windows, Mac, Linux<br />
or even Android computer/tablet. I used a Windows tablet topside<br />
and updated the ArduSub firmware via a USB cable connected<br />
to the control electronics in the ROV. A few minutes<br />
following the instructions and the electronics were ready to<br />
operate. I closed up the housing, attached a battery and fired<br />
up the ROV and topside controls. Almost immediately, the<br />
ROV signaled a few chirps and beeps, telling me it had initialized<br />
and was ready to run.<br />
When the ROV is first powered up, the compass sensor and<br />
topside joysticks needed to be configured. Following the instructions<br />
was relatively straightforward. The next step, taken<br />
straight from the aerial drone world, was to “arm” the ROV<br />
by sliding an icon on the tablet’s screen. By arming the ROV,<br />
it was now ready to operate and the thrusters would respond<br />
to joystick commands. I tested the thrusters, lights and camera<br />
tilt, and all worked as expected. I picked up the ROV and<br />
turned it left and right, then tilted it in various directions while<br />
watching the attitude and compass displays on the topside tablet<br />
computer. Everything seemed to work.<br />
Before taking the ROV in the field, I also wanted to give it a<br />
test in freshwater. So I gave the water-tight housings a vacuum<br />
test, just to make sure they were sealed properly, then put the<br />
ROV in a water filled tub. Although the ROV appeared to be<br />
functioning correctly on the bench, it was not until I put it in<br />
the water that I learned that there were a few settings in the<br />
software that I had missed during set up. Some helpful guidance<br />
from <strong>Blue</strong> <strong>Robotics</strong> and I resolved the issues in short<br />
order. I repeated these tests several times until I felt confident<br />
that the housings were sealed and I had configured the software<br />
properly.<br />
In the field testing<br />
The conditions here in coastal North Carolina can be challenging<br />
for operating a ROV. Visibility is typically poor, the<br />
area has an abundance of snags and obstacles, and is notorious<br />
for strong currents. Not the worst conditions a ROV pilot will<br />
experience, but certainly not the best either. The day of the<br />
test was typical for here, 12 to 15 knots of side shore wind and<br />
about 1 knot of current from an outgoing tide.<br />
44 MTR<br />
November/December 2016
Tech File<br />
PROS<br />
» Unrivaled value<br />
» Very good durability<br />
» Good ease of use<br />
» Excellent expand-ability<br />
» Good serviceability<br />
» Excellent thruster power<br />
» Includes features typically found in higher end ROVs,<br />
such as vectored thrust and “fly by wire” mode<br />
» Streaming HD video (with the “Advanced Electronics Package”)<br />
CONS<br />
» It comes in kit form and requires assembly<br />
» The topside controls are up to the builder to design and fabricate<br />
» Some service procedures (such as replacing a prop)<br />
are more involved to complete than I would like<br />
» Runs on batteries, so time on station is not unlimited<br />
» Slight (200-250 ms) lag in HD video stream<br />
(with the “Advanced Electronics Package”)<br />
46 MTR<br />
November/December 2016
With an assistant to manage the tether, I powered up the ROV<br />
and topside controller, checked that everything was sealed<br />
properly, then put the ROV in the water. I could immediately<br />
see that the <strong>Blue</strong>ROV2 was considerably more buoyant than I<br />
would prefer. Although the kit comes with enough additional<br />
weight to make it neutrally buoyant, we decided to continue<br />
with the test as is. I gave the joysticks some quick commands,<br />
the thrusters shot water in the expected directions and<br />
the ROV lunged as directed. This ROV has power! I flew the<br />
<strong>Blue</strong>ROV2 on the surface with full power, dove to the bottom,<br />
watched the instrument displays, flew it sideways against<br />
the current and familiarized myself with the controls. At full<br />
power the ROV had no problem overcoming the current and<br />
responding to my directions. Once back on track, I reduced<br />
the thruster gain to 25% and repeated the exercise. Although<br />
it was not able to speed against the current, it had no trouble<br />
maintaining station.<br />
I should note that the <strong>Blue</strong>ROV2 I was testing was running<br />
on a version of software that used “fly by wire” (what <strong>Blue</strong><br />
<strong>Robotics</strong> calls “Stabilized mode”) by default. Although newer<br />
versions of the software includes other flight “modes”, I only<br />
tested fly by wire.<br />
I continued to test the <strong>Blue</strong>ROV2 at depths of zero to 5 meters<br />
and was thoroughly impressed with its performance. The<br />
ROV had more power than I was expecting, the fly-by-wire<br />
mode worked very well, the heading, attitude and depth sensors<br />
all worked as expected and overall the test was completely<br />
successful. What few issues I did run into were related to<br />
how I had configured my topside equipment. For example, I<br />
neglected to set the Windows tablet’s power mode to “always<br />
on” so it would go to sleep after 10 minutes of inactivity and<br />
disconnect from the ROV. Although a bit of a nuisance, it was<br />
no fault of the <strong>Blue</strong>ROV2 and minor issues such as these are<br />
to be expected as part of the learning curve when testing a<br />
newly completed kit.<br />
www.marinetechnologynews.com<br />
Conclusions<br />
Looking back at my experiences with the <strong>Blue</strong>ROV2 I have<br />
to say it is an amazing piece of equipment. For under $4,000<br />
you have nearly everything needed to assemble a very worthy<br />
ROV capable of a wide range of observation class tasks, from<br />
water tank to ship hull to fish farm inspections. The <strong>Blue</strong>ROV2<br />
can do it. This is no toy, the components are very well made<br />
and the ROV’s capabilities rival more well-known products<br />
which cost many times more. It is a kit and some skills are<br />
required to complete it. But if you are able to use a few simple<br />
hand tools, follow written instructions and install and configure<br />
computer software, you have all the skills required to build<br />
this kit. I would say the greatest challenges for the builder are<br />
the topside controller and dealing with the software/firmware,<br />
but even these tasks are not very difficult. And building the kit<br />
yields an additional benefit, that when it comes time to repair<br />
or maintain the ROV, you will already have all the skills and<br />
experience necessary to perform the tasks. I cannot think of<br />
a better way for students and budding ROV pilots to become<br />
familiar with the technology.<br />
About <strong>Blue</strong> <strong>Robotics</strong><br />
Motivated by a desire to build a better underwater thruster<br />
and armed with a degree in engineering, Rustom “Rusty”<br />
Jehangir came up with a novel design that turned into a very<br />
successful Kickstarter campaign. Now, just two years later,<br />
<strong>Blue</strong> <strong>Robotics</strong> has grown to a staff of nearly a dozen engineers<br />
and technicians working full time designing fresh new<br />
approaches to the challenges of ocean exploration.<br />
http://www.bluerobotics.com<br />
The Author<br />
Paul Unterweiser is a retired U.S. Navy officer, USCG licensed<br />
master, ROV pilot and, for the last 10 years, president<br />
of Marine Simulation, a software company located in North<br />
Carolina specializing in developing training simulators for<br />
ROV pilot schools and other marine industry applications.<br />
http://www.marinesimulation.com<br />
Marine Technology Reporter 47