Create successful ePaper yourself
Turn your PDF publications into a flip-book with our unique Google optimized e-Paper software.
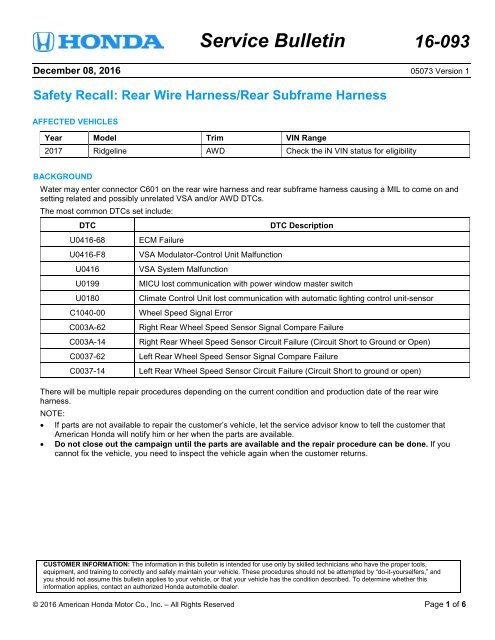
<strong>Service</strong> <strong>Bulletin</strong> 16-093<br />
December 08, 2016 05073 Version 1<br />
Safety Recall: Rear Wire Harness/Rear Subframe Harness<br />
AFFECTED VEHICLES<br />
Year Model Trim VIN Range<br />
2017 Ridgeline AWD Check the iN VIN status for eligibility<br />
BACKGROUND<br />
Water may enter connector C601 on the rear wire harness and rear subframe harness causing a MIL to come on and<br />
setting related and possibly unrelated VSA and/or AWD DTCs.<br />
The most common DTCs set include:<br />
DTC<br />
U0416-68 ECM Failure<br />
U0416-F8<br />
U0416<br />
U0199<br />
U0180<br />
VSA Modulator-Control Unit Malfunction<br />
VSA System Malfunction<br />
DTC Description<br />
MICU lost communication with power window master switch<br />
Climate Control Unit lost communication with automatic lighting control unit-sensor<br />
C1040-00 Wheel Speed Signal Error<br />
C003A-62<br />
C003A-14<br />
Right Rear Wheel Speed Sensor Signal Compare Failure<br />
Right Rear Wheel Speed Sensor Circuit Failure (Circuit Short to Ground or Open)<br />
C0037-62 Left Rear Wheel Speed Sensor Signal Compare Failure<br />
C0037-14 Left Rear Wheel Speed Sensor Circuit Failure (Circuit Short to ground or open)<br />
There will be multiple repair procedures depending on the current condition and production date of the rear wire<br />
harness.<br />
NOTE:<br />
• If parts are not available to repair the customer’s vehicle, let the service advisor know to tell the customer that<br />
American Honda will notify him or her when the parts are available.<br />
• Do not close out the campaign until the parts are available and the repair procedure can be done. If you<br />
cannot fix the vehicle, you need to inspect the vehicle again when the customer returns.<br />
CUSTOMER INFORMATION: The information in this bulletin is intended for use only by skilled technicians who have the proper tools,<br />
equipment, and training to correctly and safely maintain your vehicle. These procedures should not be attempted by “do-it-yourselfers,” and<br />
you should not assume this bulletin applies to your vehicle, or that your vehicle has the condition described. To determine whether this<br />
information applies, contact an authorized Honda automobile dealer.<br />
© 2016 American Honda Motor Co., Inc. – All Rights Reserved Page 1 of 6
CUSTOMER NOTIFICATION<br />
Owners of affected vehicles will be sent a notification of this campaign.<br />
Do an iN VIN status inquiry to make sure the vehicle is shown as eligible.<br />
Some vehicles affected by this campaign may be in your new or used vehicle inventory. Repair these vehicles before<br />
they are sold.<br />
Federal law requires that all affected new vehicles be repaired before sale. In addition, failure to repair a vehicle subject<br />
to a recall or campaign may subject your dealership to claims or lawsuits from the customer or anyone else harmed as a<br />
result of such failure. Furthermore, state law may provide American Honda with the right to seek indemnification in any<br />
such claim or lawsuit. To see if a vehicle in inventory is affected by this recall, do a VIN status inquiry before selling it.<br />
CORRECTIVE ACTION<br />
Inspect and determine which repair procedure is applicable. Replace or repair the rear wire harness and/or rear<br />
subframe harness according to inspection.<br />
NOTE: Not all repairs are currently available. You may have to tell the service advisor to ask the customer to return<br />
when parts are available.<br />
PARTS INFORMATION<br />
Part Name Part Number Quantity<br />
Rear Wire Harness<br />
RT, RTL, RTL-T, RTS, Sport<br />
Black, RTL-E<br />
32108-T6Z-A01<br />
32108-T6Z-A41<br />
Rear Subframe Harness (ALL AWD) 32114-TG7-A00 1<br />
Left and Right Upper Pillar Trim Clip 91561-TA5-A11 2<br />
WARRANTY CLAIM INFORMATION<br />
1<br />
Operation<br />
Number<br />
7371CF<br />
7371CF<br />
7371CG<br />
Description<br />
Inspect and do Repair<br />
Procedure B.<br />
(Trims: RT, RTL,<br />
RTL-T, RTS, Sport)<br />
Inspect and do Repair<br />
Procedure B.<br />
(Trims: Black, RTL-E)<br />
Inspect and do Repair<br />
Procedure C.<br />
Flat Rate<br />
Time<br />
Defect<br />
Code<br />
Symptom<br />
Code<br />
Template ID<br />
Failed Part<br />
Number<br />
7.7 hrs 6HN00 KD300 16-093B 32108-T6Z-A00<br />
7.7 hrs 6HN00 KD300 16-093C 32108-T6Z-A00<br />
2.6 hrs 6HN00 KD300 16-093D 32108-T6Z-A00<br />
Page 2 of 6
INSPECTION PROCEDURE<br />
1. Remove the driver’s side taillight. Refer to the service information.<br />
2. Check the date on the label on the rear wire harness.<br />
• If the harness date is before August 9, 2016 (08/09/2016), go to step 3.<br />
• If the harness date is on or after August 9, 2016 (08/09/2016), go to REPAIR PROCEDURE C.<br />
3. Disconnect connector C601 (rear wire harness/rear subframe harness), and inspect the interior of the connector<br />
and terminals on both the male and the female side for signs of water intrusion and/or corrosion.<br />
Is there water and/or corrosion inside the connector?<br />
Yes – Go to REPAIR PROCEDURE B.<br />
No – Go to REPAIR PROCEDURE A.<br />
Page 3 of 6
REPAIR PROCEDURE A<br />
Parts and Repair Procedure A will be posted in a revised version as soon they are available.<br />
NOTE:<br />
• If parts are not available to repair the customers vehicle, let the service advisor know to tell the customer that<br />
American Honda will notify him or her when the parts are available.<br />
• Do not close out the campaign until the parts are available and the repair procedure can be done. If you<br />
cannot fix the vehicle, you need to inspect it again when the customer returns.<br />
REPAIR PROCEDURE B<br />
1. Using the procedures from the service information, remove the following components:<br />
• Left inner fender panel<br />
• Tailgate trim<br />
• Left and right side bed panels<br />
• Front bed panel<br />
• Bed floor<br />
• Evaporative canister<br />
• Rear seats<br />
• Rear panel insulator<br />
• Rear Bumper<br />
2. Check the following components/connectors for any water or corrosion. Replace any affected component if there is<br />
any corrosion. If there is water but no corrosion, dry it out and reuse the component.<br />
NOTE: Check both male and female side of each connectors.<br />
• Differential oil pump motor connector<br />
• Left differential fluid pressure sensor connector<br />
• Right differential fluid pressure sensor connector<br />
• C313 (If there is corrosion found on the differential side of C313, the rear differential carrier assembly will need<br />
to be replaced.)<br />
3. Check the following components/connectors for any water or corrosion. Replace any affected component if there is<br />
any water or corrosion.<br />
NOTE: Check both male and female side of each connectors.<br />
• Left rear wheel speed sensor connector<br />
• Right rear wheel speed sensor connector<br />
Page 4 of 6
4. Replace the rear wire harness and the rear subframe harness.<br />
NOTE: Replace the harness in short sections to route it exactly as the original harness.<br />
5. Install the removed parts in reverse order.<br />
NOTE: Be sure to replace the clips on the left and right upper C-pillar trim.<br />
6. Clear any DTCs set.<br />
Page 5 of 6
REPAIR PROCEDURE C<br />
1. Disconnect connector C601 (rear wire harness/rear subframe harness), and inspect the interior of the connector<br />
and terminals on both the male and the female side for signs of water intrusion and/or corrosion.<br />
Is there water and/or corrosion inside the connector?<br />
Yes – Go to REPAIR PROCEDURE B.<br />
No – Go to step 2.<br />
2. Check the following components/connectors for any water or corrosion. Replace any affected component if there is<br />
any corrosion. If there is water but no corrosion, dry it out and reuse the component.<br />
NOTE: Check both male and female side of each connectors.<br />
• Differential oil pump motor connector<br />
• Left differential fluid pressure sensor connector<br />
• Right differential fluid pressure sensor connector<br />
• C313 (If there is corrosion found on the differential side of C313, the rear differential carrier assembly will need<br />
to be replaced.)<br />
3. Check the following components/connectors for any water or corrosion. Replace any affected component if there is<br />
any water or corrosion.<br />
NOTE: Check both male and female side of each connectors.<br />
• Left rear wheel speed sensor connector<br />
• Right rear wheel speed sensor connector<br />
4. Replace the rear subframe harness.<br />
5. Clear any DTCs set.<br />
END<br />
Page 6 of 6


