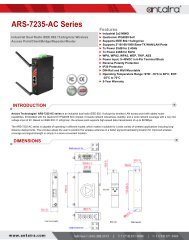
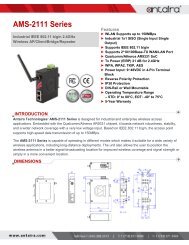
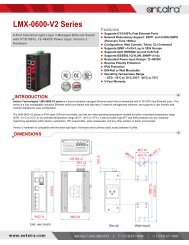
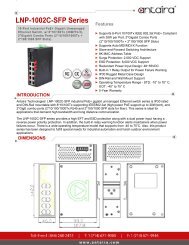
PowerOhm Products for Allen Bradley

You also want an ePaper? Increase the reach of your titles
YUMPU automatically turns print PDFs into web optimized ePapers that Google loves.
33<br />
PO Box 537 Katy, TX 77492<br />
Phone: (800) 838-4694<br />
Fax: (859)-384-8099<br />
Email: sales@powerohm.com<br />
VBR Operation<br />
CAUTION: Reference the PowerFlex Drive Manual and the Powerohm PowerFlex Braking<br />
Resistor Manual when selecting the proper resistance value. Do not select resistance<br />
values below the minimum values listed <strong>for</strong> the drive. Selecting a resistance value below<br />
the minimum will result in failure of the brake IGBT and/or drive.<br />
Step 1. Secure the VBR unit in place and plug in supplied power cord to a 120VAC source<br />
be<strong>for</strong>e connecting load leads to drive or braking module. Attach the supplied load lead<br />
cables to the drive by connecting the red lead to DC+ and the black lead to DC-. Warning:<br />
Drive power and DC bus must be OFF be<strong>for</strong>e connecting the loads leads.<br />
Step 2. Turn power selector switch to the ON position to activate the VBR unit. (Fig 1.)<br />
The selector switch should illuminate green and blowers should function when ON. Insure<br />
that there is a minimum clearance of 24 inches beyond the exhaust to any non-flammable<br />
surfaces.<br />
Step 3. If the drive has an existing braking resistor installed, it is important to not press the<br />
“Braking Enable” pushbutton. Enabling a selected resistor value may push the equivalent<br />
resistance below the minimum allowed. Note that the VBR can be used to analyze an<br />
existing braking resistor to determine if a more effective resistor could be used <strong>for</strong> the<br />
installation (skip to Step 5 if this is the case).<br />
Figure 1.<br />
Step 4. Select a desired resistance value and press “Braking Enable” to activate the<br />
resistive load. (Fig 2.) It is critical that the resistance value selected is greater than the<br />
minimum resistance value specified by the drive or braking module manufacturer. Selecting<br />
a resistance value lower than the minimum may cause permanent damage to the drive or<br />
braking module. The VBR is now ready to monitor your braking cycle.<br />
Step 5. Start and run the Drive at full load, through its entire motoring and braking cycles <strong>for</strong><br />
a minimum of 30 minutes. To prevent under sizing the resistor, be sure to operate at<br />
maximum load in combination with the most sever duty cycle. During the cycling of the<br />
Drive you will notice that “VBR Reading” will begin to register a readout from 1 to 135. (Fig<br />
3.)<br />
Figure 2.<br />
Figure 3.<br />
Step 6. It is important to run the Drive a minimum of 30 minutes so that the proper watt<br />
selection of the resistor is realized. At this time the “VBR Reading” should have reached its<br />
maximum value and you are you are ready to record the peak “VBR Reading.” Lift off the<br />
small cover below the digital readout to access the programming keys. Press the up arrow<br />
key, which is the second key from the left. This blinking number displayed is the peak<br />
readout that will be used in sizing your braking resistor.<br />
Step 7. With the resistance value you selected in Step 4 (or the value of an existing braking<br />
resistor) and the peak “VBR Reading” you recorded from Step 6, you can now properly<br />
select a fixed resistor <strong>for</strong> your application. Go to the VBR resistor selection chart to obtain<br />
the correct braking resistor part number.<br />
Step 8. The VBR unit must remain ON a minimum of 5 minutes after the drive is powered<br />
down to allow the unit to cool. Do not remove load leads until the Drive and DC bus have<br />
been powered down. Use caution when handling the VBR unit as the exhaust area surface<br />
may be HOT!