- Page 1 and 2: TEAMFLY Team-Fly ®
- Page 3 and 4: INTERMEDIATE/ADVANCED BEGINNER The
- Page 6 and 7: Hack Attacks Testing How to Conduct
- Page 8 and 9: Contents Acknowledgments xi Introdu
- Page 10 and 11: Contents vii Reporting 188 Network
- Page 12: Contents ix Using SAINT Remotely 41
- Page 16: About the Author John Chirillo bega
- Page 19 and 20: xvi Introduction This electronic wo
- Page 21 and 22: 2 Part I 6. Computer security requi
- Page 23 and 24: 4 Part I Remote Audit During a remo
- Page 25 and 26: 6 Part I Phase 3: Internet Security
- Page 27 and 28: 8 Part I Unleashing the Power of Wi
- Page 29 and 30: 10 Part I Network. Dual network int
- Page 31 and 32: 12 Chapter 1 Step 3. Location Selec
- Page 33 and 34: 14 Chapter 1 FAT OR NTFS? THAT IS T
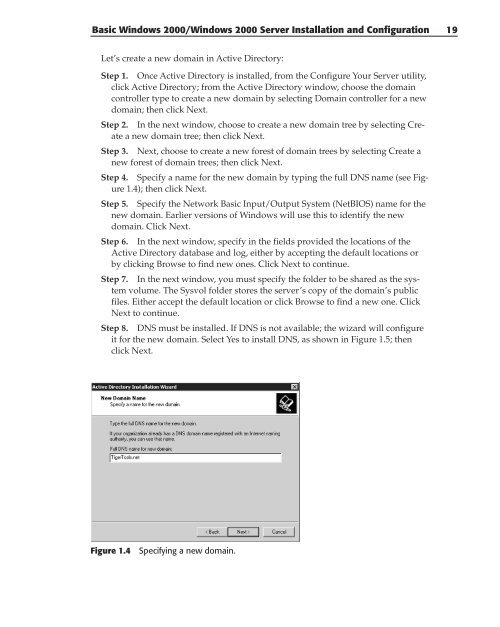
- Page 35 and 36: 16 Chapter 1 Figure 1.1 Windows 200
- Page 37: 18 Chapter 1 Figure 1.2 Active Dire
- Page 41 and 42: 22 Chapter 1 Figure 1.9 Active Dire
- Page 43 and 44: 24 Chapter 1 Figure 1.12 Selecting
- Page 45 and 46: 26 Chapter 1 Managing User and Comp
- Page 47 and 48: 28 Chapter 1 Figure 1.16 Editing a
- Page 49 and 50: 30 Chapter 1 Figure 1.18 Adding a c
- Page 51 and 52: 32 Chapter 1 Each security group an
- Page 53 and 54: 34 Chapter 1 Security groups in a m
- Page 55 and 56: 36 Chapter 1 Figure 1.21 Adding an
- Page 57 and 58: 38 Chapter 1 You can add or remove
- Page 59 and 60: 40 Chapter 1 Figure 1.24 Creating a
- Page 61 and 62: 42 Chapter 1 connections), click to
- Page 63 and 64: 44 Chapter 1 Figure 1.29 Configurin
- Page 65 and 66: 46 Chapter 1 Figure 1.31 Configurin
- Page 67 and 68: 48 Chapter 1 Figure 1.32 The DNS ma
- Page 69 and 70: 50 Chapter 1 Zone transfers are alw
- Page 71 and 72: 52 Chapter 1 Adding and Updating RR
- Page 73 and 74: 54 Chapter 2 Installing and Configu
- Page 75 and 76: 56 Chapter 2 Figure 2.3 Mouse Confi
- Page 77 and 78: 58 Chapter 2 Figure 2.6 Network Con
- Page 79 and 80: 60 Chapter 2 Figure 2.9 Authenticat
- Page 81 and 82: 62 Chapter 2 Step 15. The next scre
- Page 83 and 84: 64 Chapter 2 Installing and Configu
- Page 85 and 86: 66 Chapter 2 Step 11. From the foll
- Page 87 and 88: 68 Chapter 2 Initializing system Pl
- Page 90 and 91:
This chapter explains how to use yo
- Page 92 and 93:
Step 4. Click the Install button. T
- Page 94 and 95:
Consultant/System Integrator In-Hou
- Page 96 and 97:
HACKING main.o portlist.c INSTALL m
- Page 98 and 99:
[/usr/include] —infodir=DIR info
- Page 100 and 101:
Installing Netscape Start up your W
- Page 102 and 103:
owd path (~/bin/powerpc-apple-darwi
- Page 104 and 105:
nessus-plugins/scripts/xdmcp.nasl n
- Page 106 and 107:
Mac OS X Tiger Box Solutions 87 + r
- Page 108 and 109:
Mac OS X Tiger Box Solutions 89 gdc
- Page 110 and 111:
gcc: hydra4nessus.lo: No such file
- Page 112 and 113:
Our testing target system is a Wind
- Page 114 and 115:
Figure 4.2 NT uses option /OX to cr
- Page 116 and 117:
NOTE Both PDCs and BDCs, as well as
- Page 118 and 119:
Step 9. This step allows you to cre
- Page 120 and 121:
Installing and Configuring a Testin
- Page 122 and 123:
9. In the Update Count box, type th
- Page 124 and 125:
Installing and Configuring a Testin
- Page 126 and 127:
HINFO: Host information. Defined in
- Page 128 and 129:
2. Click New Zone. 3. Click Primary
- Page 130 and 131:
■■ World Wide Web creates a WWW
- Page 132 and 133:
Use the other elements in the Servi
- Page 134 and 135:
Installing and Configuring a Testin
- Page 136 and 137:
Installing and Configuring a Testin
- Page 138 and 139:
Installing and Configuring a Testin
- Page 140 and 141:
PART II Using Security Analysis Too
- Page 142 and 143:
Using Security Analysis Tools for Y
- Page 144 and 145:
Using Security Analysis Tools for Y
- Page 146 and 147:
Using Security Analysis Tools for Y
- Page 148 and 149:
Using Security Analysis Tools for Y
- Page 150 and 151:
Using Security Analysis Tools for Y
- Page 152:
Using Security Analysis Tools for Y
- Page 155 and 156:
136 Chapter 5 ■■ It has an easy
- Page 157 and 158:
138 Chapter 5 Figure 5.2 CIS main s
- Page 159 and 160:
140 Chapter 5 ■■ View files soj
- Page 161 and 162:
142 Chapter 5 ■■ VRFY command a
- Page 163 and 164:
144 Chapter 5 WINDOWS NT Groups ■
- Page 165 and 166:
146 Chapter 5 Vulnerability Scannin
- Page 167 and 168:
148 Chapter 5 CERBERUS INFORMATION
- Page 169 and 170:
150 Chapter 5 Group Information Gro
- Page 171 and 172:
152 Chapter 5 ---------------------
- Page 173 and 174:
154 Chapter 5 ---------------------
- Page 175 and 176:
156 Chapter 5 Setting: Installation
- Page 177 and 178:
158 Chapter 6 System Requirements F
- Page 179 and 180:
160 Chapter 6 Figure 6.2 Entering y
- Page 181 and 182:
162 Chapter 6 Figure 6.5 Entering y
- Page 183 and 184:
164 Chapter 6 Figure 6.9 Specifying
- Page 185 and 186:
166 Chapter 6 Module Options. Displ
- Page 187 and 188:
168 Chapter 6 ■■ Logon and Logo
- Page 189 and 190:
170 Chapter 6 Figure 6.16 Browser Z
- Page 191 and 192:
172 Chapter 6 ■■ VAX/VMS Defaul
- Page 193 and 194:
174 Chapter 6 Step 3. In the Module
- Page 195 and 196:
176 Chapter 6 Figure 6.21 Module de
- Page 197 and 198:
178 Chapter 6 to accept bad network
- Page 199 and 200:
180 Chapter 6 Figure 6.23 Advanced
- Page 201 and 202:
182 Chapter 6 Element. Creates an e
- Page 203 and 204:
184 Chapter 6 hexadecimal format. Y
- Page 205 and 206:
186 Chapter 6 a. Click the Folder i
- Page 207 and 208:
188 Chapter 6 Step 3. In the NetBIO
- Page 209 and 210:
190 Chapter 6 Figure 6.28 Viewing i
- Page 211 and 212:
192 Chapter 6 Step 3. From the Curr
- Page 213 and 214:
194 Chapter 6 Domain Name System an
- Page 215 and 216:
196 Chapter 6 The Threat Enabling s
- Page 217 and 218:
198 Chapter 6 Root Cause of Vulnera
- Page 219 and 220:
200 Chapter 7 Installation This sec
- Page 221 and 222:
202 Chapter 7 -r . Specifies the ho
- Page 223 and 224:
204 Chapter 7 SCAN POLICIES (Contin
- Page 225 and 226:
206 Chapter 7 Optionally, you can c
- Page 227 and 228:
208 Chapter 7 To edit our new scan
- Page 229 and 230:
210 Chapter 7 Step 2. Internet Scan
- Page 231 and 232:
212 Chapter 7 As an example, to run
- Page 233 and 234:
214 Chapter 7 Figure 7.12 Creating
- Page 235 and 236:
216 Chapter 7 H NT Help Overflow: W
- Page 237 and 238:
218 Chapter 7 H NtSpoofedLpcPort: W
- Page 239 and 240:
220 Chapter 7 M Critical Key Permis
- Page 241 and 242:
222 Chapter 7 M IgmpDos: Malformed
- Page 243 and 244:
224 Chapter 7 M MsNetbtOpenIpPorts:
- Page 245 and 246:
226 Chapter 7 M NTWinsupFix: WINS u
- Page 247 and 248:
228 Chapter 7 In Windows 2000, only
- Page 249 and 250:
230 Chapter 7 M IP Address {DNS Nam
- Page 251 and 252:
232 Chapter 8 ■■ Extensive repo
- Page 253 and 254:
234 Chapter 8 Step 2. The Software
- Page 255 and 256:
236 Chapter 8 Figure 8.1 STAT Scann
- Page 257 and 258:
238 Chapter 8 Remove. Removes a sel
- Page 259 and 260:
240 Chapter 8 Figure 8.6 Scanning o
- Page 261 and 262:
242 Chapter 8 CVE ID. This column a
- Page 263 and 264:
244 Chapter 8 Figure 8.9 Additional
- Page 265 and 266:
246 Chapter 8 Network Summary Repor
- Page 267 and 268:
248 Chapter 8 NT 4.0 Click on Start
- Page 269 and 270:
250 Chapter 8 Solution Enable Audit
- Page 271 and 272:
252 Chapter 8 45 Executive Summary
- Page 273 and 274:
254 Chapter 8 Did Risk ID Machine I
- Page 275 and 276:
256 Chapter 8 Low W562 JOHN AppEven
- Page 277 and 278:
258 Chapter 9 Utilizing portable li
- Page 279 and 280:
260 Chapter 9 Figure 9.3 Choose Des
- Page 281 and 282:
262 Chapter 9 Figure 9.6 Launching
- Page 283 and 284:
264 Chapter 9 Figure 9.10 Disk Spac
- Page 285 and 286:
266 Chapter 9 Figure 9.13 IP Stats
- Page 287 and 288:
268 Chapter 9 Figure 9.15 TCP Stats
- Page 289 and 290:
270 Chapter 9 Figure 9.17 Launching
- Page 291 and 292:
272 Chapter 9 An example DNS query
- Page 293 and 294:
274 Chapter 9 Figure 9.21 TigerSuit
- Page 295 and 296:
276 Chapter 9 Figure 9.24 Accessing
- Page 297 and 298:
278 Chapter 9 Figure 9.27 Launching
- Page 299 and 300:
280 Chapter 9 GET /doc HTTP/1.0 & v
- Page 301 and 302:
282 Chapter 9 Figure 9.28 Launching
- Page 303 and 304:
284 Chapter 9 addresses, connected
- Page 305 and 306:
286 Chapter 9 With TigerWipe active
- Page 307 and 308:
288 Chapter 9 listed for you in the
- Page 309 and 310:
290 Chapter 9 ■■ Stealth Activi
- Page 311 and 312:
292 Part III Chances are that durin
- Page 313 and 314:
294 Part III confused. Press q to q
- Page 315 and 316:
296 Part III tail filename Prints l
- Page 317 and 318:
298 Part III whereis command Prints
- Page 319 and 320:
300 Part III ar -x my_archive.a fil
- Page 321 and 322:
302 Part III The default prompt for
- Page 323 and 324:
304 Part III It’s actually a good
- Page 325 and 326:
306 Part III Setting and unsetting
- Page 327 and 328:
308 Part III COMMAND SUBSTITUTION F
- Page 329 and 330:
310 Part III COMMAND/SYNTAX WHAT IT
- Page 331 and 332:
312 Part III COMMAND/SYNTAX WHAT IT
- Page 334 and 335:
In a nutshell, hping/2 offers an IP
- Page 336 and 337:
60 bytes from xxx.yyy.zzz.jjj: flag
- Page 338 and 339:
As can be seen from the following l
- Page 340 and 341:
14:18:24.906546 130.92.6.97.622 > s
- Page 342 and 343:
14:18:31.873056 apollo.it.luc.edu.9
- Page 344 and 345:
14:18:53.056758 130.92.6.97.612 > s
- Page 346 and 347:
Complete this step by issuing the c
- Page 348 and 349:
NOTE Advanced users can optionally
- Page 350 and 351:
hping/2 331 -P --push set PUSH flag
- Page 352 and 353:
HPING www.microsoft.com (eth1 207.4
- Page 354 and 355:
This is where it gets interesting.
- Page 356 and 357:
a firewall used to hide a web serve
- Page 358 and 359:
CHAPTER 11 Nessus Security Scanner
- Page 360 and 361:
■■ Nmap, an excellent port scan
- Page 362 and 363:
Nessus Security Scanner 343 —incl
- Page 364 and 365:
checking for ranlib... ranlib check
- Page 366 and 367:
+ rm -f /usr/local/sbin/nessus-mkce
- Page 368 and 369:
Enter the rules for this user, and
- Page 370 and 371:
SYNOPSIS nessusd [ -v ] [ -h] [ -c
- Page 372 and 373:
which will be defined later in this
- Page 374 and 375:
For Mac OS X Users Before installin
- Page 376 and 377:
nessus -q List sessions : nes
- Page 378 and 379:
Figure 11.3 Configuring plugin pref
- Page 380 and 381:
Figure 11.5 Configuring a scanning
- Page 382 and 383:
Figure 11.7 Viewing a report tree.
- Page 384 and 385:
Information found on port unknown (
- Page 386 and 387:
Warning found on port netbios-ssn (
- Page 388 and 389:
Information found on port unknown (
- Page 390 and 391:
CHAPTER 12 Nmap Another useful scan
- Page 392 and 393:
Figure 12.1 Using Nmap to detect a
- Page 394 and 395:
Directory and file names: —prefix
- Page 396 and 397:
Step 6. Build and install the packa
- Page 398 and 399:
-DHAVE_CONFIG_H -DNMAP_VERSION=\”
- Page 400 and 401:
cwd /Users/tiger1 default_tcsh_init
- Page 402 and 403:
-sP ping scan. Find any reachable m
- Page 404 and 405:
(The 1534 ports scanned but not sho
- Page 406 and 407:
FIN|PSH|URG to a closed TCP port. M
- Page 408 and 409:
generally echo that MSS back to you
- Page 410 and 411:
Mixing It Up Nmap also supports a n
- Page 412 and 413:
SAINT Corporation describes its Sec
- Page 414 and 415:
esults/. Directories containing all
- Page 416 and 417:
checking for main in -lrpcsvc... ye
- Page 418 and 419:
-A descent proximity descent (defau
- Page 420 and 421:
IMail vulnerabilities (updated: 5/2
- Page 422 and 423:
ootkits rpc statd access rpc walld
- Page 424 and 425:
Figure 13.4 Primary target selectio
- Page 426 and 427:
Figure 13.8 Selecting Windows domai
- Page 428 and 429:
Type of Vulnerability. This method
- Page 430 and 431:
Using SAINT Remotely There may be s
- Page 432 and 433:
The Command-Line Interface The comm
- Page 434:
Minute. The minute of the hour (0 t
- Page 437 and 438:
418 Chapter 14 ARC’s explanation
- Page 439 and 440:
420 Chapter 14 —includedir=DIR C
- Page 441 and 442:
422 Chapter 14 bin/telnet.sara bin/
- Page 443 and 444:
424 Chapter 14 NOTE Look at the can
- Page 445 and 446:
426 Chapter 14 description of the p
- Page 447 and 448:
428 Chapter 14 -u. Specifies that S
- Page 449 and 450:
430 Chapter 14 Figure 14.3 Selectin
- Page 451 and 452:
432 Chapter 14 -U. Running from a t
- Page 453 and 454:
434 Chapter 14 SARA Scan Results of
- Page 455 and 456:
436 Chapter 14 ■■ Gopher server
- Page 457 and 458:
438 Chapter 14 Reading, or at least
- Page 460 and 461:
The purpose of this chapter is thre
- Page 462 and 463:
the server to “walk up and out”
- Page 464 and 465:
system to attack hundreds of remote
- Page 466 and 467:
Windows NT System Security Checklis
- Page 468 and 469:
Other � Miscellaneous: Other Thin
- Page 470 and 471:
• Improve Password Security Passw
- Page 472 and 473:
FTP, but not which directories on t
- Page 474 and 475:
Comparative Analysis 455 3. Army Co
- Page 476 and 477:
� “rhosts” files: Remotelogin
- Page 478 and 479:
• IMAPD/POPD buffer overflow vuln
- Page 480 and 481:
• Review your password policy to
- Page 482 and 483:
Comparative Analysis 463 • telnet
- Page 484 and 485:
• Ensure that export lists do not
- Page 486 and 487:
The banner should state: • Who ow
- Page 488 and 489:
Vulnerability Scanner Results and C
- Page 490 and 491:
Table 15.3 STAT Scanner WINDOWS NT
- Page 492 and 493:
Table 15.5 SAINT WINDOWS NT 4.0 X A
- Page 494 and 495:
Table 15.7 Scanner Evaluation Matri
- Page 496 and 497:
What’s Next? The best possible de
- Page 498 and 499:
This appendix continues the explana
- Page 500 and 501:
the foregoing resolutions. (It is m
- Page 502 and 503:
Additional KDE Keyboard Shortcuts
- Page 504 and 505:
Reboots immediately without syncing
- Page 506 and 507:
clock hwclock Two commands; use eit
- Page 508 and 509:
uname -a (Unix name with option all
- Page 510 and 511:
3 Full multiuser mode. 4 Unused. 5
- Page 512 and 513:
mc Launches the Midnight Commander
- Page 514 and 515:
lpq Shows the content of the printe
- Page 516 and 517:
mouseconf As root: Simple tool for
- Page 518 and 519:
lsmod (list modules). List currentl
- Page 520 and 521:
After configuring the options for t
- Page 522 and 523:
cfdisk /dev/hda As root: Hard drive
- Page 524 and 525:
Management of User Accounts and Fil
- Page 526 and 527:
kuser As root, in X terminal: Manag
- Page 528 and 529:
Network Administration Tools netcon
- Page 530 and 531:
etc/rc.d/init.d/network restart Res
- Page 532 and 533:
This appendix provides you with inf
- Page 534 and 535:
3. If your computer has Auto-Mount
- Page 536 and 537:
GNU General Public License Version
- Page 538 and 539:
c) If the modified program normally
- Page 540 and 541:
you, then the only way you could sa
- Page 542 and 543:
SYMBOLS * (asterisk), 411 @ (at sym
- Page 544 and 545:
checklist, system security Unix aud
- Page 546 and 547:
Domain Name Service (DNS) defined,
- Page 548 and 549:
quoting, 387 Route Redirect, 267 So
- Page 550 and 551:
.login file, 304, 305 logons anonym
- Page 552 and 553:
Windows NT, 99, 112, 118, 442, 451
- Page 554 and 555:
Security Auditor Research Assistant
- Page 556 and 557:
null flags, 331, 332 scanning, 371-
- Page 558 and 559:
virtual directory, 114, 115, 119 vi
- Page 560 and 561:
Wiley Publishing, Inc. End-User Lic