


Create successful ePaper yourself
Turn your PDF publications into a flip-book with our unique Google optimized e-Paper software.
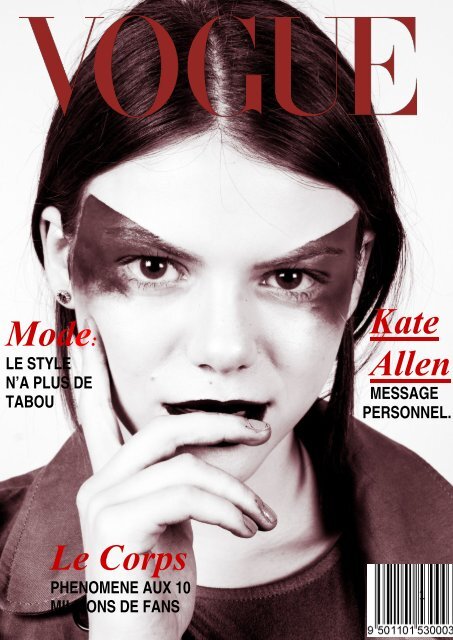
Mode:<br />
LE STYLE<br />
N’A PLUS DE<br />
TABOU<br />
Kate<br />
Allen<br />
MESSAGE<br />
PERSONNEL.<br />
Le Corps<br />
PHENOMENE AUX 10<br />
MILLIONS DE FANS<br />
1
Picasso inspired<br />
Collection<br />
THE<br />
ART OF<br />
MAKEUP<br />
Inspired by Picasso, I held a shoot where I used makeup to<br />
manipulate their face in the style of Picasso’s cubism.<br />
First of all, I set up the shoot, with a flash light and fill light.<br />
I then set the iso to what the asa says on the box of the film,<br />
which was 400. I then then changed the f-stop to f8. You do<br />
this by holding the av button and scrolling across. The<br />
shutter speed should was set to around 1/125. I never go<br />
above shutter speed 1/200 otherwise a black line will appear<br />
over my image. Once the camera is set, you then need to test<br />
the settings on a model to ensure that you are happy with the<br />
outcomes.<br />
However, I increased the f-stop to f11 because it was far too<br />
overexposed when I was practicing shooting.<br />
Once I was happy with the settings I copied them onto my<br />
analogue camera. When shooting I took images on both the<br />
digital and analogue camera so I know that if the film didn’t<br />
go right I still have the digital images that I can print onto<br />
acetate.<br />
“OH SO<br />
KATE” 2
“Every act of<br />
creation is first<br />
of all an act of<br />
destruction." -<br />
Pablo Picasso”<br />
Picasso's Early Life<br />
Picasso was born in Malaga, Spain, to Don Jose Ruiz y<br />
Blasco and Maria Picasso y Lopez. His baptized name<br />
is much longer than the Pablo Picasso, and in<br />
traditional Andalusian custom honoured several saints<br />
and relatives. His father was a painter and a professor<br />
of art, and was impressed by his son's drawing from an<br />
early age. His mother stated at one time that his first<br />
words were to ask for a pencil. At the age of seven<br />
Picasso begin receiving formal training from his father.<br />
Because of his traditional academic training, Ruiz<br />
believed training consisted of copying of masterworks<br />
and drawing the human form from live figure-models<br />
and plaster casts.<br />
In 1891 at ten years old, the family moved to A Coruna<br />
where School of Fine Arts hired Ruiz to be a professor.<br />
They spent four years there where Ruiz felt his son<br />
surpassed him as an artist at the age of 13 and<br />
reportedly vowed to give up painting. Though paintings<br />
by Ruiz still seem to have been generated years later,<br />
Picasso's father certainly felt humbled by his son's<br />
natural skill and technique.<br />
Picasso and his family were horrified when his seven<br />
year old sister died of diphtheria in 1895. They<br />
relocated to Barcelona and Ruiz began working at its<br />
School of Fine Arts. He persuaded officials there to let<br />
his son take an entrance exam for an advanced class<br />
and Picasso was admitted at the age of just 13. At the<br />
age of 16 he was sent to Spain's foremost art school in<br />
Madrid, the Royal Academy of San Fernando. Picasso<br />
disliked the formal instructions and decided to stop<br />
attending his classes soon after he arrived. He filled his<br />
days inside Madrid's Prado, which displayed paintings<br />
such as Francisco Goya and El Greco.<br />
The body of work Picasso created throughout his<br />
lifetime is enormous and spans from his early<br />
childhood years until his death, creating a more<br />
comprehensive record of his development than perhaps<br />
any other artist. When examining the records of his<br />
early work there is said to is a shift where the child-like<br />
quality of his drawings vanished, therefore being the<br />
official beginning of his career. That date is said to be<br />
1894, when Picasso was just 13. At the age of 14 he<br />
painted Portrait of Aunt Pepa, a striking depiction that<br />
has been referred to as one of the best portraits in<br />
Spanish history.<br />
His technique for realism, so ingrained by his father<br />
and his childhood studies, evolved with his introduction<br />
to symbolist influences. It led Picasso to develop his<br />
own take on modernism, and then to make his first trip<br />
to Paris, France. The poet Max Jacob, a Parisian<br />
friend, taught Picasso French. They shared an<br />
apartment where they experienced the true meaning of<br />
what it meant to be a "starving artist." They were cold<br />
and in poverty, burning their own work to keep the<br />
apartment where they experienced the true meaning of<br />
what it meant to be a "starving artist." They were cold<br />
and in poverty, burning their own work to keep the<br />
apartment warm.<br />
Picasso would predominately spend his working adult<br />
life in France. His work has been divided roughly by<br />
periods of time in which he would fully develop 3<br />
complex themes and feelings to create a unifying body<br />
of work.
“The Nick<br />
Knight set up”<br />
Nick Knight is among the world’s most influential and<br />
visionary photographers, and founder and director of<br />
award-winning fashion website SHOWstudio.com. As a<br />
fashion photographer, he has consistently challenged<br />
unusual ideas of beauty and is famous for his<br />
groundbreaking creative partnerships with leading<br />
designers including Yohji Yamamoto, John Galliano,<br />
Alexander McQueen. Advertising campaigns for the most<br />
prestigious clients such as Christian Dior, Lancôme,<br />
Swarovski, Tom Ford, Calvin Klein or Yves Saint Laurent<br />
as well as award-winning editorial for W, British Vogue,<br />
Paris Vogue, Dazed & Confused, Another, Another Man<br />
and I-D magazines have consistently kept Knight at the<br />
frontline of progressive image-making for the past three<br />
decades. He has directed award winning music videos for<br />
Bjork, Lady Gaga and Kanye West. His first book of<br />
photographs, Skinheads, was published in 1982, winning a<br />
DandAD award in 1996.<br />
He has since produced Nicknight, a twelve year<br />
retrospective, and Flora, a series of flower pictures, both<br />
published by Schirmer Mosel. His latest book entitled<br />
Nick Knight was published by Harper Collins in 2009<br />
.His work has been exhibited at such international art<br />
institutions as the Tate Modern, Victoria & Albert<br />
Museum, Saatchi Gallery, the Photographers'<br />
Gallery, Hayward Gallery and the Gagosian Gallery. In<br />
1993, he also produced a permanent installation, Plant<br />
Power, for the Natural History Museum in London. A<br />
long-standing commitment to experimenting with the<br />
latest technologies led to Knight launching his fashion<br />
website SHOWstudio in 2000, with an aim, in Knight's<br />
own words, of 'showing the entire creative process from<br />
conception to completion.' SHOWstudio has pioneered<br />
fashion film and is now recognised as the leading force<br />
behind this new medium, offering a unique platform to<br />
nurture and encourage fashion to engage with moving<br />
image in the digital age. Since its inception,<br />
SHOWstudio has worked with the world’s most soughtafter<br />
filmmakers, writers and influential cultural figures<br />
to create visionary online content, exploring every facet<br />
of fashion through moving image, illustration,<br />
photography and the written word. Knight lives with his<br />
wife and three children in London. He was awarded the<br />
OBE in 2010 for his services to the arts. He is an<br />
honorary professor of the University of the Arts London<br />
and was awarded an honorary PHD by the same<br />
university.<br />
4
High<br />
Key<br />
Setup<br />
High-key lighting is a style of lighting for film, television, or photography that aims to reduce the lighting ratio present<br />
in the scene. It is often used in sitcoms and comedies. High-key lighting is usually quite homogeneous and free from<br />
dark shadows. The terminology comes from the higher balance in the ratio between the key light and the fill light in a<br />
traditional three point lighting setup. In the 1950s and 1960s, high-key lighting was achieved through multiple light<br />
sources lighting a scene—usually using three fixtures per person (left, right, and central) —which resulted in a uniform<br />
lighting pattern with very little modeling. Nowadays, multiple hot light sources are substituted by much more efficient<br />
fluorescent soft lights which provide a similar effect. The advantage to high-key lighting is that it doesn't require<br />
adjustment for each scene which allows the production to complete the shooting in hours instead of days. The primary<br />
drawback is that high-key lighting fails to add meaning or drama by lighting certain parts more prominently than<br />
others. Shows with bigger budgets have moved away from high-key lighting by using lighting set-ups different from the<br />
standard three-point lighting. Part of the reason for this is the advent of new lighting fixtures which are easier to use<br />
and quicker to set up. Another reason is the growing sophistication of the audience for TV programs and the need to<br />
differentiate.<br />
Originally high key photography emerged as a solution for screens that could not correctly display high contrast ratios.<br />
Today capturing high key photos is a stylistic choice in photography.<br />
When capturing a high key photo, there are a number of factors you need to consider, especially if you are trying to<br />
achieve that classic studio look. For starters, you will have to make sure you have the right equipment for the job,<br />
including lighting and a backdrop. You could take advantage of outdoor lighting, but there’s only so much you can<br />
control when it comes to the weather. Finally, you will also have to consider camera settings and lighting set up to<br />
capture those images. Like high key photos, low key photos are also the product of lighting manipulation and contrast.<br />
Though the resources required for capturing low key shots are less extensive – one light source compared to the four<br />
required for high key photos for example – it takes just as much skill and patience to achieve.<br />
Deciding which style to choose for your photos all comes down to atmosphere as both are powerful tools for creating<br />
certain moods. With high key photography, multiple powerful sources of lighting are strategically positioned to<br />
eliminate harsh shadows from images, giving them a very light and optimistic feel. Components of the image with rich 5<br />
colours stand out and areas with lighter colour wash out, almost to a white. High key is an excellent choice for both<br />
colour and black and white photos.
Continuous lighting – camera settings<br />
The best shutter speed for flash is around 1/125.The higher the number such as 1/120 the faster the shutter opens and<br />
closes letting in less light. The lower the number such as 1/30 the shutter is open longer and lets in lighter. To avoid<br />
camera shake, I would avoid to go under 1/80.<br />
The best F stop for continuous lighting is f8. The smaller the number (f4.5) means that there is a much larger aperture<br />
(hole). This then means that there is lighter getting into the camera and so gives a shallow depth of field (blurring in<br />
parts of the image). A much larger number such as f22 causes less light to access the camera as there is a much smaller<br />
aperture. A good ISO to use is 400 for continuous lighting. The smaller the number such as 100 needs more light,<br />
however gives the image much more detail. The higher the number needs less light but gives poor image detail because<br />
of digital noise. Going above iso 800 can cause digital noise.<br />
FLASH LIGHTING<br />
For flash lighting I would keep the shutter speed around 1/125. I would avoid going over 1/250 as this will cause black<br />
bands to appear across the images. The best F stop for Flash lighting is f8. The smaller the number (f4.5) means that<br />
there is a much larger aperture (hole). This then means that there is lighter getting into the camera and so gives a<br />
shallow depth of field (blurring in parts of the image). A much larger number such as f22 causes less light to access the<br />
camera as there is a much smaller aperture. A good ISO to use is 100 for flash lighting. The smaller the number such as<br />
100 needs more light, however gives the image much more detail. The higher the number needs less light but gives poor<br />
image detail because of digital noise. Going above ISO 800 can cause digital noise.<br />
Natural Lighting<br />
This method is using the light outside,<br />
which is constantly changing, so you<br />
have to constantly change your<br />
settings.<br />
ISO: I tried to keep to keep it low,<br />
such as 200 or 400 for better detail.<br />
Shutter Speed – you cannot go below<br />
1/80 because it will cause camera<br />
shake. I used 1/180, and this was fine<br />
for what I was doing.<br />
F-stop – I used F7, 1-F8 for a good<br />
depth of field.<br />
Ambient Lighting<br />
This method of lighting is created<br />
using normal room lights which are<br />
not very bright or powerful. Using a<br />
tripod would be great help for this as<br />
it would help avoid camera shake. A<br />
low ISO (200) would give this image<br />
good detail, shutter speed ¼ which is<br />
a long shutter speed due to the lack of<br />
light. F stop- 7.1 to give a relatively<br />
big aperture.<br />
“You don’t take<br />
a photograph.<br />
You make it.” –<br />
Ansel Adams<br />
Types<br />
Of<br />
Lighting<br />
6
Rembrandt<br />
Lighting<br />
Rembrandt lighting is a lighting technique that is used in studio portrait<br />
photography. It can be achieved using one light and a reflector, or two<br />
lights, and is popular because it is capable of producing images which<br />
appear both natural and compelling with a minimum of equipment. It is<br />
named for the Dutch painter Rembrandt, who often used this type of<br />
lighting.<br />
Rembrandt Lighting is one of the 5 basic lighting setups used in studio<br />
portrait photography. There are two things that make up Rembrandt<br />
Lighting… A light on one half the face, and a triangle of light on the<br />
shadowed side of the face (called a chiaroscuro). If it’s ‘real’<br />
Rembrandt lighting, the triangle shadow should be no wider than the<br />
eye, and no longer than the nose. The thing that distinguishes<br />
Rembrandt Lighting from simple short lighting is the triangle of light.<br />
In the real world, when it comes to portrait photography, Rembrandt<br />
Lighting is often confused with Short Lighting and is used as loose<br />
shorthand for ‘using a single light source to light roughly half the face,<br />
while leaving the other half of the face in some level of shadow.’ This is<br />
because it can often be quite 'fiddly' to get the triangle of light just right<br />
on a subject.<br />
Rembrandt lighting at its most basic level is constructed with a single<br />
light source placed approximately 45 degrees offset from the subject<br />
and a bit higher than eye level, lighting the side of the face that is<br />
farthest from the camera.<br />
Chiaroscuro (Italian: "light-dark") in art is "an Italian term which<br />
literally means 'light-dark'. In paintings the description refers to clear<br />
tonal contrasts which are often used to suggest the volume and<br />
modelling of the subjects depicted", and this meaning has extended to<br />
other visual arts such as photography and cinema.<br />
Rembrandt was the greatest Dutch painter of his age and is one of the most important figures in European art. The many<br />
self-portraits he painted throughout his life provide us with a visual autobiography.<br />
Rembrandt van Rijn was born on 15 July 1606 in Leiden, the son of a mill owner. In 1621, he began training with a local<br />
painter and in 1624-1625 he was in Amsterdam, studying with Pieter Lastman who had been to Italy and now introduced<br />
Rembrandt to international trends.<br />
Rembrandt settled permanently in Amsterdam in 1631 and set up as a portrait painter. One of his first major public<br />
commissions was 'The Anatomy Lesson of Dr Tulp' (1632). In 1634, he married the well-connected Saskia van<br />
Uylenburgh. Rembrandt prospered, painting mythological and religious works as well as portraits, and the couple lived<br />
well.<br />
One of Rembrandt's most well-known paintings, 'The Night Watch', a group portrait of one of Amsterdam's militia<br />
companies, was completed in 1642. Saskia died in the same year, which coincided with difficulties in Rembrandt's<br />
business. This, coupled with his extravagance, resulted in him being declared bankrupt in 1656. His house and<br />
possessions were sold, including his own large collection of works of art.<br />
After Saskia's death, Rembrandt had an affair with his son's nurse, but they quarrelled and he later began a relationship<br />
with his housekeeper, Hendrickje Stoffels. She frequently modelled for him.<br />
Rembrandt continued to receive commissions and some of the great paintings from this period are 'The Syndics of the<br />
Clothmakers Guild' (1662) and 'The Jewish Bride' (c. 1666). Rembrandt was interested in drawing and etching as well as<br />
painting, and his etchings were internationally renowned during his lifetime.<br />
Throughout his career, he attracted pupils who also served as his assistants. Their work can sometimes be hard to<br />
distinguish from Rembrandt's own.<br />
7<br />
Rembrandt died on 4 October 1669.
17 November 2016 – 26 February 2017<br />
The Taylor Wessing Photographic Portrait Prize 2016 is the<br />
leading international competition, open to all, which<br />
celebrates and promotes the very best in contemporary<br />
portrait photography from around the world.<br />
It showcases talented young photographers, gifted amateurs<br />
and established professionals; the competition features a<br />
diverse range of images and tells the often fascinating stories<br />
behind the creation of the works, from formal commissioned<br />
portraits to more spontaneous and intimate moments<br />
capturing friends and family.<br />
The selected images, many of which will be on display for the<br />
first time, explore both traditional and contemporary<br />
approaches to the photographic portrait whilst capturing a<br />
range of characters, moods and locations. The exhibition of<br />
fifty-seven works features all of the prestigious prize winners<br />
including the winner of the £15,000 first prize.<br />
Although I enjoyed the exhibition, I did not feel that the prize<br />
winner was worthy and it wasn’t as spectacular as the 2015<br />
exhibition.<br />
Swiss-Italian photographer Claudio Rasano was born<br />
in 1970, Switzerland. The portrait, which is part of the<br />
series Similar Uniforms: We Refuse to Compare was<br />
taken in Johannesburg, South Africa and focuses on<br />
issues of preserving individuality in the context of<br />
school uniforms. The photograph was shot in<br />
daylight, outdoors and in front of a plain white paper<br />
background. The sitter for this particular print is of<br />
student Thembinkosi Fanwell Ngwenya.<br />
Rasano explains: “Children themselves have been<br />
known to rebel against uniforms, especially as they<br />
approach the awkward age characterised by the need<br />
to fit in and the desire to stand out, all at the same<br />
time. Some experts too have spoken against school<br />
uniforms on the grounds that they suppress<br />
individuality and diversity.”<br />
Rasano has exhibited at the oslo8 contemporary<br />
photography, 2014; Lens-Culture Exposure Awards,<br />
Photo London, 2015; Museum of African Design,<br />
Johannesburg 2015; Portrait Salon, London, 2015;<br />
Bohai Galerie, Hannover, Germany and Expo<br />
Milano, Milan, Italy among others. Rasano’s awards<br />
include the 2016 Shortlist for the Athens Photo<br />
Festival; 2015 Bieler Fototage; 2015 Leica Oskar<br />
Branack Prize and the Finalist 2015 Photography<br />
Masters Cup.<br />
Judges’ comments: “This year’s winner stood out for<br />
its simplicity and powerful directness, and was<br />
commended by the judges for its ability to create<br />
something beautiful out of the everyday.”<br />
Taylor Wessing<br />
Exhibition<br />
8
Camera Settings – digital camera<br />
For analogue photography we can use both<br />
digital and analogue cameras at the same time.<br />
Using the digital helps us make sure that the<br />
lighting is correct so we don’t waste film and time<br />
using the analogue cameras if the lighting is bad.<br />
The film used in the analogue camera can<br />
determine how well the images will come out. The<br />
lower the number on the box of the film (ASA)<br />
the better the image will come out. For example<br />
Analogue<br />
photography<br />
FP4 will come out better than HP5 because it has<br />
a lower ASA.<br />
On the digital camera you set the iso to what the<br />
asa says on the box of the film, i.e 100.you then<br />
need to change the f-stop to f8. You do this by<br />
holding the av button and scrolling across. The<br />
shutter speed should be set to around 1/125.<br />
Never go above shutter speed 1/200 otherwise a<br />
black line will appear over your image. Once the<br />
camera is set, you then need to test the settings on<br />
a model to ensure that you are happy with the<br />
outcomes.<br />
Camera Settings – analogue camera<br />
On the canon ae1 camera (analogue camera) you<br />
replicate the settings on the digital camera and so<br />
you set the ASA to the ASA that is displayed on<br />
the box of the film, using the ASA dial (100). The<br />
shutter speed to 1/125 and the F-stop to F8.<br />
However, some analogue cameras have a shutter<br />
speed threshold of 1/60. In this case the digital<br />
cameras shutter speed needs to also be changed to<br />
1/60. If this makes the image too bright then<br />
change the aperture to F9 or F11.<br />
Camera Settings – using the light metre<br />
Alternatively you can use a light meter. This finds<br />
out the aperture. To use it, you turn it on and set<br />
it to flash mode by pressing mode and turn toggle<br />
to the middle mode (flash). The top right displays<br />
ISO. Press ISO and move toggle to set the ISO to<br />
125. Then set the shutter speed to 1/60. You then<br />
need to turn the dial and the white ball pops out.<br />
Face the ball towards the lights next to the<br />
subject, ensuring that you are not bl9ocking any<br />
of the incoming light. This will then give you the<br />
f-stop that you require.<br />
How I processed my film; First of all, I needed to get the film out of<br />
the column (capsule). If the film is all the way in, then there are<br />
various techniques that you can use to get it out. You could crack the<br />
top open, which you would have to do in complete darkness or use<br />
tools to feed he film back out. There is also another method where<br />
you dampen film, put it into the slot in the capsule and hope that it<br />
sticks to the other film so that you can pull it out.<br />
Before beginning the process in the darkroom, I ensured that I had<br />
all of the equipment that I needed. This included, scissors, funnel, a<br />
column and a spool. In complete darkness I unwounded the film and<br />
fed it into the spool. I then winded the spool until the film run out. I<br />
then cut the film off. After that I double checked that the column was<br />
in the spool. I then put this in the container. On top of the spool, I<br />
placed the funnel.<br />
Chemicals:<br />
I could do this process in normal light however I did it in red light just<br />
to be safe.<br />
1. I poured the film developer into the container. Using the wall chart<br />
I saw that I had to develop the film for 165 seconds. For the first<br />
30 seconds I agitated the container, ensuring the lid was on tight. I<br />
agitated it by gently turning the container upside down and back<br />
the right way over and over again. In the second minute I agitated<br />
it for a further 10 seconds.<br />
2. Once the 165 seconds was up, I poured the developer back into the<br />
chemical container using a funnel.<br />
3. I then poured the stop into the container. I wanted to keep the stop<br />
in the container for 3 minutes. For the first 30 seconds I agitated<br />
the container and in the second and third minute I agitated for a<br />
further 10 seconds.<br />
4. Once the three minutes was up I poured it back into the chemical<br />
container’s<br />
5. Next I poured the film fix into the canister and for FP4 film I<br />
needed to leave this in for 7 minutes. I again agitated for 30<br />
seconds and in every minute I agitated for 10 seconds.<br />
6. Once the 7 minutes was up I poured the fix back into the chemical<br />
container.<br />
7. The film is now fully developed so I turned on the white lights. I<br />
took the whole canister over to the sink and let water run into it for<br />
5 minutes.<br />
8. I then emptied all the water and filled the container up with fresh<br />
water.<br />
9. I added a few drops of rinse aid to the canister and shake it<br />
slightly. I then left this for a further 5 minutes. This stops streaks<br />
from occurring on your images.<br />
In the darkroom there is a tall cabinet, I switched it on and pegged my<br />
film at the top and the bottom so it was pull tight. This cabinet is 9 a<br />
drying cabinet. I left my film in there for around half a day before I cut<br />
it into strips of 6 images so that I could put them in a neg bag.
“Film for me is a<br />
process of learning<br />
on the job.”<br />
– Michael Stuhlbarg<br />
10