
You also want an ePaper? Increase the reach of your titles
YUMPU automatically turns print PDFs into web optimized ePapers that Google loves.
ON/OFF POWER<br />
ETHERNET RANGE EXTENDER RESET<br />
ON/OFF POWER<br />
ETHERNET RANGE EXTENDER RESET<br />
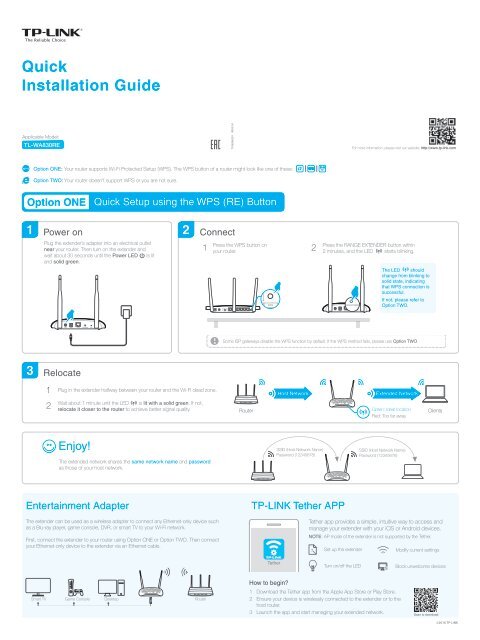
Quick<br />
Installation Guide<br />
Applicable Model:<br />
<strong>TL</strong>-<strong>WA830RE</strong><br />
7106506291 RE<strong>V3</strong>.0.1<br />
For more information, please visit our website: http://www.tp-link.com<br />
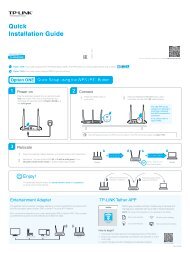
WPS Option ONE: Your router supports <strong>Wi</strong>-<strong>Fi</strong> Protected Setup (WPS). The WPS button of a router might look like one of these: .<br />
Option TWO: Your router doesn’t support WPS or you are not sure.<br />
Option ONE<br />
Quick Setup using the WPS (RE) Button<br />
Power on<br />
Connect<br />
Plug the extender’s adapter into an electrical outlet<br />
near your router. Then turn on the extender and<br />
wait about 30 seconds until the Power LED is lit<br />
and solid green.<br />
1<br />
Press the WPS button on<br />
your router.<br />
2<br />
Press the RANGE EXTENDER button within<br />
2 minutes, and the LED starts blinking.<br />
RANGE EXTENDER<br />
The LED should<br />
change from blinking to<br />
solid state, indicating<br />
that WPS connection is<br />
successful.<br />
If not, please refer to<br />
Option TWO.<br />
Some ISP gateways disable the WPS function by default. If the WPS method fails, please use Option TWO.<br />
Relocate<br />
1 Plug in the extender halfway between your router and the <strong>Wi</strong>-<strong>Fi</strong> dead zone. Red: Too far away<br />
Host Network<br />
Extended Network<br />
2<br />
Wait about 1 minute until the LED is lit with a solid green. If not,<br />
relocate it closer to the router to achieve better signal quality.<br />
Router<br />
Green: Ideal location<br />
Clients<br />
Enjoy!<br />
The extended network shares the same network name and password<br />
as those of your host network.<br />
SSID (Host Network Name)<br />
Password (12345678)<br />
SSID (Host Network Name)<br />
Password (12345678)<br />
Entertainment Adapter<br />
The extender can be used as a wireless adapter to connect any Ethernet-only device such<br />
as a Blu-ray player, game console, DVR, or smart TV to your <strong>Wi</strong>-<strong>Fi</strong> network.<br />
<strong>Fi</strong>rst, connect the extender to your router using Option ONE or Option TWO. Then connect<br />
your Ethernet-only device to the extender via an Ethernet cable.<br />
TP-LINK Tether APP<br />
Tether app provides a simple, intuitive way to access and<br />
manage your extender with your iOS or Android devices.<br />
NOTE: AP mode of the extender is not supported by the Tether.<br />
Set up the extender<br />
Modify current settings<br />
Tether<br />
Turn on/off the LED<br />
Block unwelcome devices<br />
Smart TV Game Console Desktop Router<br />
How to begin?<br />
1 Download the Tether app from the Apple App Store or Play Store.<br />
2 Ensure your device is wirelessly connected to the extender or to the<br />
host router.<br />
3 Launch the app and start managing your extended network.<br />
Scan to download<br />
©2016 TP-LINK
ON/OFF POWER<br />
ETHERNET RANGE EXTENDER RESET<br />
Option TWO<br />
Quick Setup using Web Browser<br />
Power on<br />
Plug the extender’s adapter into an electrical outlet near<br />
your router. Then turn on the extender and wait about 30<br />
seconds until the Power LED is lit and solid green.<br />
Connect to the extender<br />
via <strong>Wi</strong>reless<br />
10:31<br />
via Ethernet Cable<br />
Not connected<br />
Connection are available<br />
<strong>Wi</strong>reless Network Connection<br />
TP-LINK_<strong>Extender</strong>_XXXXXX<br />
or<br />
√<br />
Connect automatically<br />
Connect<br />
1. Unplug the Ethernet cable from your computer<br />
(if any).<br />
2. Click the <strong>Wi</strong>-<strong>Fi</strong> icon on the taskbar and<br />
connect to the extender’s network (e.g.<br />
TP-LINK_<strong>Extender</strong>_XXXXXX).<br />
1. Disable the <strong>Wi</strong>-<strong>Fi</strong> on your computer.<br />
2. Connect your computer to the extender via<br />
an Ethernet cable.<br />
Configure<br />
1 2 3<br />
Launch a web browser, type<br />
http://tplinkrepeater.net in the address bar and<br />
use admin (all lowercase) for both Username<br />
and Password to log in.<br />
Create a new username and password for secure<br />
management purpose, and then click Confirm.<br />
Select your router's 2.4GHz host networkenter<br />
the password, and then click Next.<br />
2.4GHz Host Network<br />
Summary<br />
http://tplinkrepeater.net<br />
Create a new username and password.<br />
<strong>Wi</strong>reless Settings<br />
admin<br />
New Username:<br />
Username<br />
Please select 2.4GHz host network.<br />
ID SSID<br />
Signal<br />
MAC Address<br />
Security<br />
admin<br />
New Password:<br />
1<br />
TP-LINK_Router<br />
00:0A:EB:130919<br />
Login<br />
Confirm Password:<br />
Low Middle High<br />
Host 2.4GHz Password:<br />
12345678<br />
Next<br />
2<br />
TP-LINK_1<br />
C04A:00D10F:22<br />
If the login window does not pop up,<br />
please refer to the FAQ > Q2.<br />
Confirm<br />
Back<br />
Other...<br />
Rescan<br />
Either keep the default SSID or customize it for the<br />
4 5<br />
2.4GHz extended network. Then click Next.<br />
Verify your wireless settings and click <strong>Fi</strong>nish.<br />
Then check the LED.<br />
2.4GHz Host Network<br />
<strong>Wi</strong>reless Settings<br />
Extended 2.4GHz SSID: Your network name<br />
Copy Host SSID<br />
Hide SSID broadcast<br />
Note: The extended 2.4GHz password is the same as your Host password.<br />
Summary<br />
The LED should turn<br />
on and stay solid,<br />
indicating successful<br />
connection.<br />
If not, please refer to<br />
FAQ > Q3.<br />
Back<br />
Next<br />
Relocate<br />
Flip this piece of paper, and refer to<br />
Step 3 of Option ONE.<br />
Enjoy!<br />
The extended network shares the same <strong>Wi</strong>-<strong>Fi</strong> password as that of your host network, but may have different network<br />
name if you have customized the name during the configuration.<br />
LED Explanation<br />
(RE)<br />
(Power)<br />
(Ethernet)<br />
(<strong>Wi</strong>reless)<br />
Blinking green: WPS connection is in process.<br />
Solid green: The extender is connected to the router, and is in a ideal location.<br />
Solid red: The extender is connected to the router, but too far away from the router.<br />
Off: No active connection.<br />
On/Off: The extender is on or off.<br />
Blinking: The extender is initializing.<br />
On/Off: A device or no device is connected to the Ethernet port.<br />
On/Off: The extender’s wireless function is on or off.<br />
Q1. What should I do if my router doesn’t have a WPS button?<br />
A: Please refer to Option TWO to set up the extender.<br />
Q2. What should I do if I cannot access the extender's web management page?<br />
A1: Make sure your computer is connected to the extended network.<br />
A2: Make sure your computer is set to obtain an IP address automatically.<br />
Q3. Why does the LED not change to solid state after I completed Option TWO?<br />
A1: You may have entered the incorrect <strong>Wi</strong>-<strong>Fi</strong> password of your host network during the<br />
configuration. Log into the extender's web management page http://tplinkrepeater.net<br />
to check the password and try again.<br />
A2: Reset the extender and go through the configuration again.<br />
Q4. How do I reset the extender?<br />
A: <strong>Wi</strong>th the extender powered on, use a pin to press the RESET button and all the LEDs<br />
should turn on momentarily. Then release the button.