
You also want an ePaper? Increase the reach of your titles
YUMPU automatically turns print PDFs into web optimized ePapers that Google loves.
<strong>AUTO</strong>MG<strong>EN</strong><br />
NEXT<br />
G<strong>EN</strong>ERATION<br />
<strong>AUTO</strong>MG<strong>EN</strong> 8<br />
www.irai.com
<strong>EN</strong>VIRONM<strong>EN</strong>T................................................................................................................................................. 13<br />
INSTALLATION ................................................................................................................................................. 15<br />
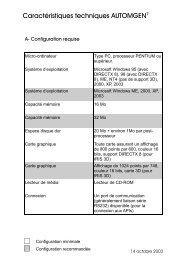
Configuration required .............................................................................................................................. 15<br />
Installation in a network ............................................................................................................................ 15<br />
NEW FEATURES OF <strong>AUTO</strong>MG<strong>EN</strong> 8 ................................................................................................................... 16<br />
Choice of “Beginner / Expert” mode......................................................................................................... 16<br />
Increased integration of the Grafcet 60848 standard................................................................................ 16<br />
Compatibility of files.................................................................................................................................. 16<br />
Physical engine integrated to IRIS3D........................................................................................................ 16<br />
Enhanced 3D object handling in IRIS3D................................................................................................... 16<br />
Improved links between <strong>AUTO</strong>MG<strong>EN</strong> and IRIS3D objects....................................................................... 16<br />
Textured IRIS3D objects ............................................................................................................................ 16<br />
Drag and drop from IRIS3D to <strong>AUTO</strong>MG<strong>EN</strong> sheets................................................................................. 17<br />
<strong>AUTO</strong>MSIM user-definable object ............................................................................................................ 17<br />
Drag and drop from <strong>AUTO</strong>MSIM to <strong>AUTO</strong>MG<strong>EN</strong> sheets ........................................................................ 17<br />
Improvements to the environment.............................................................................................................. 17<br />
<strong>EN</strong>VIRONM<strong>EN</strong>T ................................................................................................................................................. 18<br />
Start............................................................................................................................................................ 18<br />
General views ............................................................................................................................................ 19<br />
Selecting targets in expert mode ................................................................................................................ 21<br />
Selecting targets in beginner mode............................................................................................................ 21<br />
Palettes in expert mode.............................................................................................................................. 22<br />
Palettes in beginner mode.......................................................................................................................... 22<br />
Displaying or hiding the project window or message window .................................................................. 24<br />
Displaying the work space in full screen mode.......................................................................................... 24<br />
Keyboard shortcuts .................................................................................................................................... 24<br />
LIC<strong>EN</strong>SES.......................................................................................................................................................... 25<br />
Registering a license.................................................................................................................................. 25<br />
Sending a user code to <strong>IRAI</strong>....................................................................................................................... 26<br />
Sending a file by e-mail (the best solution)............................................................................................................ 26<br />
Copying the user code in an e-mail message ......................................................................................................... 27<br />
By fax (not recommended) .................................................................................................................................... 27<br />
By telephone (highly unadvisable)......................................................................................................................... 27<br />
Entering the validation/enable code .......................................................................................................... 27<br />
Validating by a e-mail received file....................................................................................................................... 27<br />
Validating for a code received in the text of an e-mail .......................................................................................... 27<br />
Validating for a code received by fax or telephone................................................................................................ 27<br />
Modifying a license.................................................................................................................................... 27<br />
Moving a license from one computer to another........................................................................................ 28<br />
Network licenses ........................................................................................................................................ 29<br />
Adding a network license....................................................................................................................................... 30<br />
Modifying a license ............................................................................................................................................... 30<br />
Connecting to client stations.................................................................................................................................. 30<br />
Additional information on installing <strong>AUTO</strong>MG<strong>EN</strong> in a network environment.......................................... 31<br />
General information............................................................................................................................................... 31<br />
Installing <strong>AUTO</strong>MG<strong>EN</strong> 8 on a file server............................................................................................................... 31<br />
Installing one or more <strong>AUTO</strong>MG<strong>EN</strong> 8 licenses on a network license manager...................................................... 31<br />
Installing the network license server as a service................................................................................................... 33<br />
Uninstallation ............................................................................................................................................ 34<br />
Errors......................................................................................................................................................... 34<br />
THE PROJECT .................................................................................................................................................... 35<br />
Files generated with <strong>AUTO</strong>MG<strong>EN</strong> 7 ........................................................................................................... 35<br />
Importing an application from an earlier version of <strong>AUTO</strong>MG<strong>EN</strong> (version 6 or earlier) ........................ 35<br />
Generating a free distribution executable file............................................................................................ 35<br />
Modifying project properties ..................................................................................................................... 36<br />
Modifying security options .................................................................................................................................... 36<br />
Advanced options .................................................................................................................................................. 36<br />
User interface......................................................................................................................................................... 36<br />
Model..................................................................................................................................................................... 36<br />
Automatic GO........................................................................................................................................................ 37<br />
THE BROWSER.................................................................................................................................................. 38
Sheets ......................................................................................................................................................... 39<br />
Adding a new sheet................................................................................................................................................ 39<br />
Importing old <strong>AUTO</strong>MG<strong>EN</strong> version sheets, importing CADEPA sheets ............................................................. 40<br />
Modifying the sheet compilation order.................................................................................................................. 40<br />
Deleting a sheet from the list ................................................................................................................................. 41<br />
Exporting a sheet to a « .GR7 » file....................................................................................................................... 41<br />
Copying, Cutting, Pasting a sheet .......................................................................................................................... 41<br />
Renaming a sheet................................................................................................................................................... 41<br />
Modifying sheet properties. ................................................................................................................................... 41<br />
Symbols ...................................................................................................................................................... 42<br />
Creating a symbol table ......................................................................................................................................... 42<br />
Importing a symbol table ....................................................................................................................................... 42<br />
Configuration............................................................................................................................................. 43<br />
Post-processors ...................................................................................................................................................... 43<br />
Compiler options.................................................................................................................................................... 43<br />
Documentation........................................................................................................................................... 43<br />
Generated files........................................................................................................................................... 44<br />
Generating the instruction list in pivot code .......................................................................................................... 44<br />
Generating the cross reference list ......................................................................................................................... 44<br />
Post-processors ...................................................................................................................................................... 44<br />
Settings....................................................................................................................................................... 44<br />
Viewing and modifying a variable or variable table .............................................................................................. 44<br />
IRIS objects................................................................................................................................................ 46<br />
Adding an IRIS 2D object...................................................................................................................................... 46<br />
Deleting an IRIS 2D object.................................................................................................................................... 47<br />
Displaying or hiding an IRIS 2D object................................................................................................................. 47<br />
Cutting, copying, pasting an IRIS 2D object.......................................................................................................... 47<br />
Adding a new IRIS 2D object on a console ........................................................................................................... 47<br />
Modifying the properties of an IRIS 2D object...................................................................................................... 47<br />
Setting an object model accessible on the assistant................................................................................................ 48<br />
Importing an IRIS 2D object in an earlier version of <strong>AUTO</strong>MG<strong>EN</strong> ..................................................................... 49<br />
Creating an IRIS 3D console ................................................................................................................................. 49<br />
Resources................................................................................................................................................... 50<br />
Adding a file to the resources ................................................................................................................................50<br />
Deleting a file from the resources .......................................................................................................................... 50<br />
Renaming a file in the resources ............................................................................................................................ 50<br />
Modifying a file in the resources ........................................................................................................................... 50<br />
Adding and converting 3D STUDIO files in the resources.................................................................................... 50<br />
External modules ....................................................................................................................................... 50<br />
DESIGNING PROGRAMS..................................................................................................................................... 52<br />
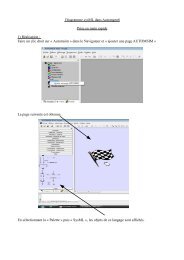
Designing with the assistant ...................................................................................................................... 52<br />
Designing with the shortcut menu.............................................................................................................. 53<br />
Designing with the pallet ........................................................................................................................... 53<br />
Enhancing and customizing the pallet.................................................................................................................... 53<br />
Designing with the keyboard keys.............................................................................................................. 53<br />
Delete block........................................................................................................................................................... 53<br />
Link blocks ............................................................................................................................................................ 53<br />
Grafcet blocks........................................................................................................................................................ 54<br />
Flowchart blocks.................................................................................................................................................... 56<br />
Ladder blocks......................................................................................................................................................... 56<br />
Action blocks......................................................................................................................................................... 57<br />
Test blocks............................................................................................................................................................. 58<br />
Organization chart blocks ...................................................................................................................................... 58<br />
Function block blocks............................................................................................................................................ 58<br />
Other blocks........................................................................................................................................................... 59<br />
Documenting program elements ................................................................................................................ 59<br />
Adding symbols .......................................................................................................................................... 60<br />
RUNNING AN APPLICATION............................................................................................................................... 62<br />
To run an application easily................................................................................................................................... 62<br />
To end the run........................................................................................................................................................ 62<br />
To compile only..................................................................................................................................................... 62<br />
To stop the compilation ......................................................................................................................................... 62<br />
To connect to a processor or install a PC ............................................................................................................... 62<br />
To disconnect a processor or uninstall a PC........................................................................................................... 62<br />
To put the target in RUN mode.............................................................................................................................. 62
To put the target in STOP mode ............................................................................................................................ 62<br />
To initialize the target ............................................................................................................................................ 62<br />
To run a program cycle on the target (generally not supported on processors)...................................................... 63<br />
To activate the dynamic display............................................................................................................................. 63<br />
THE COMPILER ................................................................................................................................................. 64<br />
Modifying compiler options ....................................................................................................................... 64<br />
Displaying compilation messages.............................................................................................................. 64<br />
Finding an error ........................................................................................................................................ 64<br />
RUNNING PROGRAMS ON A PC ......................................................................................................................... 66<br />
Configuring the number of variables ......................................................................................................... 66<br />
PC system variables................................................................................................................................... 67<br />
Modifying the run period ........................................................................................................................... 68<br />
Driving inputs/outputs ............................................................................................................................... 68<br />
IRIS 2D REFER<strong>EN</strong>CES ....................................................................................................................................... 70<br />
Modifying object display............................................................................................................................ 70<br />
Modifying object characteristics................................................................................................................ 71<br />
Removing an object ............................................................................................................................................... 71<br />
Dimensioning an object ......................................................................................................................................... 71<br />
Moving an object ................................................................................................................................................... 71<br />
Putting an object in « User » mode ...................................................................................................................... 71<br />
Putting an object in « Configuration » mode ....................................................................................................... 71<br />
Modifying the characteristics of an object ............................................................................................................. 71<br />
Block access to configuration for all objects ............................................................................................. 72<br />
Basic objects, preset objects ...................................................................................................................... 72<br />
List of basic objects.................................................................................................................................... 72<br />
« Console » object.................................................................................................................................................. 72<br />
The « Button and light » object............................................................................................................................. 72<br />
The« Object » object.............................................................................................................................................. 72<br />
The « Digital value » object................................................................................................................................... 72<br />
The « Screen, keyboard, message list » object....................................................................................................... 72<br />
The « Sound » object ............................................................................................................................................. 73<br />
The « Data archive » object ................................................................................................................................... 73<br />
The « Program » object.......................................................................................................................................... 73<br />
The « Dialogue box » object.................................................................................................................................. 73<br />
The « Analog value » object .................................................................................................................................. 73<br />
Practical experience .................................................................................................................................. 73<br />
Step 1 ..................................................................................................................................................................... 73<br />
Step 2 ..................................................................................................................................................................... 74<br />
Step 3 ..................................................................................................................................................................... 74<br />
Step 4 ..................................................................................................................................................................... 74<br />
Step 5 ..................................................................................................................................................................... 74<br />
Step 6 ..................................................................................................................................................................... 75<br />
Step 7 ..................................................................................................................................................................... 76<br />
Creating an autonomous supervision application ..................................................................................... 77<br />
Syntax for accessing the state of variables................................................................................................. 77<br />
Boolean state.......................................................................................................................................................... 77<br />
Numeric state......................................................................................................................................................... 78<br />
Modifying the state ................................................................................................................................................ 78<br />
Special orders......................................................................................................................................................... 78<br />
Interchanging objects............................................................................................................................................. 79<br />
Details of a « Console » object .................................................................................................................. 79<br />
« Aspect » tab ........................................................................................................................................................ 79<br />
« Bitmap » tab........................................................................................................................................................ 80<br />
« Links » tab .......................................................................................................................................................... 80<br />
« Options » tab....................................................................................................................................................... 81<br />
« Sisters » tab......................................................................................................................................................... 81<br />
« External » tab...................................................................................................................................................... 81<br />
Details of an « Illuminated Button » object ............................................................................................... 82<br />
« Aspect » tab ........................................................................................................................................................ 82<br />
« Links » tab .......................................................................................................................................................... 82<br />
« Options » tab....................................................................................................................................................... 83<br />
Details of a « Digital value » object .......................................................................................................... 85<br />
« Aspect » tab ........................................................................................................................................................ 85<br />
« Texts » tab........................................................................................................................................................... 86<br />
« Links » tab .......................................................................................................................................................... 86
Details of an « Analog value » object ........................................................................................................ 86<br />
« Aspect » tab ........................................................................................................................................................ 86<br />
« Links » tab .......................................................................................................................................................... 87<br />
« Limits» tab.......................................................................................................................................................... 87<br />
« Graduations » tab................................................................................................................................................ 88<br />
Details of « Screen, keyboard, message list » object ................................................................................. 89<br />
Links with the application...................................................................................................................................... 89<br />
Message classes ..................................................................................................................................................... 90<br />
« Aspect » tab ........................................................................................................................................................ 90<br />
This is used to set an object type. See chapter links with the application .............................................................. 90<br />
« Links » tab .......................................................................................................................................................... 91<br />
« List » tab ............................................................................................................................................................. 91<br />
« Options » tab....................................................................................................................................................... 92<br />
« Messages » tab.................................................................................................................................................... 93<br />
Details of « Data archive » object ............................................................................................................. 93<br />
« Aspect » tab ........................................................................................................................................................ 93<br />
« Data » tab............................................................................................................................................................ 93<br />
« Options » tab....................................................................................................................................................... 95<br />
« Tables » tab......................................................................................................................................................... 95<br />
« Graph» tab .......................................................................................................................................................... 96<br />
« Graduations » tab................................................................................................................................................ 97<br />
« Grid » tab ............................................................................................................................................................ 98<br />
Details of « Object » object...................................................................................................................... 100<br />
« Aspect » tab ...................................................................................................................................................... 100<br />
« Links » tab ........................................................................................................................................................ 101<br />
« Formats » tab .................................................................................................................................................... 102<br />
« Bitmap » tab...................................................................................................................................................... 102<br />
« Wmf » tab ......................................................................................................................................................... 103<br />
« Colors » tab....................................................................................................................................................... 103<br />
« Gauge » tab....................................................................................................................................................... 104<br />
« Sensor» tab........................................................................................................................................................ 104<br />
« Options » tab..................................................................................................................................................... 105<br />
Advanced techniques ........................................................................................................................................... 105<br />
Details of « Sound » object ...................................................................................................................... 106<br />
« Aspect » tab ...................................................................................................................................................... 106<br />
« Sounds » tab...................................................................................................................................................... 106<br />
Details of « Dialogue box » object........................................................................................................... 106<br />
« Aspect » tab ...................................................................................................................................................... 106<br />
« Links » tab............................................................................................................................................. 107<br />
« Messages » tab.................................................................................................................................................. 108<br />
Details of « Program » object.................................................................................................................. 108<br />
Run time distribution ........................................................................................................................................... 108<br />
Display................................................................................................................................................................. 108<br />
Syntax .................................................................................................................................................................. 109<br />
Stating variables................................................................................................................................................... 109<br />
Writing a program................................................................................................................................................ 109<br />
Constants ............................................................................................................................................................. 110<br />
Assignment .......................................................................................................................................................... 110<br />
Calculations ......................................................................................................................................................... 110<br />
Tests..................................................................................................................................................................... 111<br />
Loops ................................................................................................................................................................... 111<br />
Variable or variable table address........................................................................................................................ 112<br />
List of functions................................................................................................................................................... 112<br />
Error messages..................................................................................................................................................... 118<br />
« Aspect » tab ...................................................................................................................................................... 119<br />
« Program » tab.................................................................................................................................................... 120<br />
IRIS 2D EXAMPLES ........................................................................................................................................ 121<br />
Example of composed objects .................................................................................................................. 121<br />
Example of using the « Screen, keyboard, message list » object as a message list.................................. 124<br />
Example of using the « SCRE<strong>EN</strong> KEY » object as a terminal ................................................................. 125<br />
Example of an application composed of multiple pages .......................................................................... 126<br />
Example of using the «OBJECT » object................................................................................................. 126<br />
Example of using the «ARCHIVE» object................................................................................................ 131<br />
Example of using the «PROG » object..................................................................................................... 131<br />
Examples of supervision application 1 ................................................................................................... 131
Examples of supervision application 2 .................................................................................................... 132<br />
Example of operating part simulation 1.................................................................................................. 133<br />
Example of operating part simulation 2................................................................................................... 134<br />
IRIS 3D REFER<strong>EN</strong>CES ..................................................................................................................................... 135<br />
Tutorial .................................................................................................................................................... 136<br />
Creating an IRIS 3D console ................................................................................................................... 136<br />
Adding 3D files to the project .................................................................................................................. 137<br />
Configuring the objects............................................................................................................................ 138<br />
Adding objects to the 3D world................................................................................................................ 139<br />
Removing a 3D file from the resources.................................................................................................... 139<br />
Removing an object from a 3D world ...................................................................................................... 139<br />
Importing an “enhanced” object ............................................................................................................. 139<br />
Exporting an “Enhanced” object ............................................................................................................ 142<br />
Example of creating a 3D simulation based on enhanced objects........................................................... 143<br />
Applying a behavior to an object ............................................................................................................. 154<br />
Name of <strong>AUTO</strong>MG<strong>EN</strong> variables ........................................................................................................................ 155<br />
Adding a translation............................................................................................................................................. 156<br />
Adding a rotation ................................................................................................................................................. 159<br />
Adding a color change ......................................................................................................................................... 160<br />
Adding a link ....................................................................................................................................................... 161<br />
Adding another behavior...................................................................................................................................... 162<br />
Physical engine ........................................................................................................................................ 163<br />
IRIS 3D example ...................................................................................................................................... 165<br />
LANGUAGE....................................................................................................................................................... 167<br />
COMMON ELEM<strong>EN</strong>TS ...................................................................................................................................... 169<br />
Variables.................................................................................................................................................. 169<br />
Booleen variables................................................................................................................................................. 169<br />
Numeric variables................................................................................................................................................ 170<br />
Time delay ........................................................................................................................................................... 170<br />
Actions ..................................................................................................................................................... 172<br />
Assignment of a boolean variable........................................................................................................................ 172<br />
Complement assignment of a boolean variable.................................................................................................... 173<br />
Setting a boolean variable to one ......................................................................................................................... 174<br />
Resetting a boolean variable ................................................................................................................................ 175<br />
Inverting a boolean variable................................................................................................................................. 175<br />
Resetting a counter, a word or a long................................................................................................................... 176<br />
Incrementing a counter, a word or a long............................................................................................................. 177<br />
Decrementing a counter, word or long................................................................................................................. 177<br />
Time delays.......................................................................................................................................................... 178<br />
Interferences among the actions........................................................................................................................... 178<br />
IEC1131-3 standard actions................................................................................................................................. 179<br />
Multiple actions ................................................................................................................................................... 180<br />
Literal code .......................................................................................................................................................... 180<br />
Tests ......................................................................................................................................................... 180<br />
General form........................................................................................................................................................ 181<br />
Test modifier........................................................................................................................................................ 181<br />
Time delays.......................................................................................................................................................... 182<br />
Priority of boolean operators................................................................................................................................ 182<br />
Always true test ................................................................................................................................................... 182<br />
Numeric variable test ........................................................................................................................................... 182<br />
Transitions on multiple lines................................................................................................................................ 184<br />
Use of symbols ......................................................................................................................................... 184<br />
Symbol syntax ..................................................................................................................................................... 184<br />
Automatic symbols .............................................................................................................................................. 184<br />
Automatic symbol syntax .................................................................................................................................... 184<br />
How does the compiler manage the automatic symbols ?.................................................................................... 185<br />
Range of variable attribution................................................................................................................................ 185<br />
Fixed-address symbols......................................................................................................................................... 185<br />
Examples.................................................................................................................................................. 186<br />
Grafcet ..................................................................................................................................................... 188<br />
Simple Grafcet..................................................................................................................................................... 188<br />
Divergence and convergence in « And » ............................................................................................................ 191<br />
Divergence and convergence in « Or » ................................................................................................................ 193
Destination and source steps, destination and source transitions ......................................................................... 195<br />
Multiple actions, conditioned actions .................................................................................................................. 196<br />
Conditional actions, event-based actions ............................................................................................................. 197<br />
Actions on activation or deactivation of a step .................................................................................................... 197<br />
Actions on transition crossing.............................................................................................................................. 197<br />
Synchronization ................................................................................................................................................... 198<br />
Grafcet setting...................................................................................................................................................... 199<br />
Grafcet forcings (60848 standard) ....................................................................................................................... 206<br />
Macro-steps.......................................................................................................................................................... 207<br />
Encapsulating steps.............................................................................................................................................. 210<br />
Grafcet / Ladder and Grafcet / Flow chars links .................................................................................................. 212<br />
Counters............................................................................................................................................................... 213<br />
Gemma..................................................................................................................................................... 214<br />
Creating a Gemma ............................................................................................................................................... 216<br />
ontent of Gemma rectangles ................................................................................................................................ 216<br />
Obtaining a corresponding Grafcet ...................................................................................................................... 216<br />
Printing Gemma................................................................................................................................................... 217<br />
Exporting Gemma................................................................................................................................................ 217<br />
Example of Gemma ............................................................................................................................................. 217<br />
Ladder...................................................................................................................................................... 220<br />
Example of Ladder............................................................................................................................................... 221<br />
Flow chart................................................................................................................................................ 222<br />
Drawing flow charts............................................................................................................................................. 223<br />
Example of a flow chart....................................................................................................................................... 224<br />
Literal languages ..................................................................................................................................... 226<br />
How is a literal language used?............................................................................................................................ 226<br />
Setting a code box................................................................................................................................................ 227<br />
Low level literal language.................................................................................................................................... 228<br />
Macro-instruction................................................................................................................................................. 285<br />
Libraries............................................................................................................................................................... 286<br />
Pre-defined macro-instructions............................................................................................................................ 286<br />
Description of pre-defined macro-instructions..................................................................................................... 286<br />
Example of low level literal language.................................................................................................................. 288<br />
Extended literal language ........................................................................................................................ 291<br />
Writing boolean equations ................................................................................................................................... 292<br />
Writing numeric equations................................................................................................................................... 293<br />
IF...TH<strong>EN</strong>...ELSE...structure......................................................................................................................................... 294<br />
WHILE ... <strong>EN</strong>DWHILE structure........................................................................................................................ 295<br />
Example of a program in extended literal language............................................................................................. 295<br />
ST literal language................................................................................................................................... 296<br />
General Information............................................................................................................................................. 296<br />
Boolean equations................................................................................................................................................ 297<br />
Numeric equations ............................................................................................................................................... 298<br />
Programming structures....................................................................................................................................... 299<br />
Example of a program in extended literal language............................................................................................. 300<br />
Organization chart................................................................................................................................... 300<br />
Creating an organizational chart .......................................................................................................................... 301<br />
Rectangle content................................................................................................................................................. 302<br />
Illustration ............................................................................................................................................... 302<br />
Function blocks........................................................................................................................................ 304<br />
Creating a function block..................................................................................................................................... 305<br />
Drawing a block and creating a « .ZON » file ..................................................................................................... 305<br />
Creating an « .LIB » file ...................................................................................................................................... 307<br />
Simple example of a function block..................................................................................................................... 307<br />
Illustration............................................................................................................................................................ 308<br />
Supplementary syntax.......................................................................................................................................... 311<br />
Evolved function blocks ........................................................................................................................... 312<br />
Syntax .................................................................................................................................................................. 312<br />
Differentiating between new and old function blocks.......................................................................................... 312<br />
Example............................................................................................................................................................... 313<br />
Predefined function blocks....................................................................................................................... 313<br />
Conversion blocks................................................................................................................................................ 314<br />
Time delay blocks................................................................................................................................................ 314<br />
String blocks ........................................................................................................................................................ 314<br />
Word table blocks ................................................................................................................................................ 314<br />
Advanced techniques................................................................................................................................314
Compiler generated code ..................................................................................................................................... 314<br />
Optimizing generated code .................................................................................................................................. 315<br />
EXAMPLES...................................................................................................................................................... 317<br />
Regarding examples................................................................................................................................. 317<br />
Simple grafcet...................................................................................................................................................... 317<br />
Grafcet with an OR divergence............................................................................................................................ 318<br />
Grafcet with an AND divergence........................................................................................................................ 319<br />
Grafcet and synchronization ................................................................................................................................ 320<br />
Step setting .......................................................................................................................................................... 321<br />
Destination and source steps................................................................................................................................ 322<br />
Destination and source steps................................................................................................................................ 323<br />
Setting Grafcets ................................................................................................................................................... 324<br />
Memorizing Grafcets ........................................................................................................................................... 325<br />
Grafcet and macro-steps ...................................................................................................................................... 326<br />
Linked sheets ....................................................................................................................................................... 327<br />
Flow chart............................................................................................................................................................ 329<br />
Grafcet and Flow Chart........................................................................................................................................ 330<br />
Literal language box ............................................................................................................................................ 331<br />
Organizational chart............................................................................................................................................. 332<br />
Organizational chart............................................................................................................................................. 333<br />
Function block ..................................................................................................................................................... 334<br />
Function block ..................................................................................................................................................... 335<br />
Ladder.................................................................................................................................................................. 336<br />
Example developed on a train model................................................................................................................... 337<br />
Educational training manual for <strong>AUTO</strong>MG<strong>EN</strong> users.............................................................................. 343<br />
Distribution.............................................................................................................................................. 345<br />
Doctor R. in the home automation kingdom ............................................................................................ 345<br />
First example: « which came first the bulb or the switch … »................................................................. 346<br />
Solution 1: natural language of an electrician: ladder.......................................................................................... 347<br />
Solution 2: the sequential language of the automation specialist: Grafcet ........................................................... 347<br />
It's your turn to play … ............................................................................................................................ 349<br />
Second example: « time frames, time-switches and other time fun… » ................................................... 349<br />
Solution 1: simplicity........................................................................................................................................... 350<br />
Solution 2: improvement...................................................................................................................................... 351<br />
Third Example: « variation on the theme of coming and going… » ........................................................ 352<br />
Fourth example: « And the push button became intelligent … » ............................................................. 356<br />
The solutions … ....................................................................................................................................... 359<br />
« which came first the switch or the bulb … »..................................................................................................... 359<br />
« time delays, time switches and other time fun… » ........................................................................................... 359<br />
« variation on the theme of coming and going …».............................................................................................. 361<br />
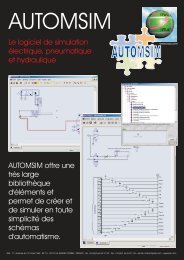
<strong>AUTO</strong>MSIM....................................................................................................................................................... 363<br />
INTRODUCTION............................................................................................................................................... 365<br />
INSTALLATION ............................................................................................................................................... 366<br />
Practical experience ................................................................................................................................366<br />
<strong>AUTO</strong>MG<strong>EN</strong>’S “BEGINNER” MODE............................................................................................................... 370<br />
USING <strong>AUTO</strong>MSIM ...................................................................................................................................... 371<br />
Organizing applications........................................................................................................................... 371<br />
Opening an existing application .............................................................................................................. 371<br />
Creating an <strong>AUTO</strong>MSIM sheet................................................................................................................ 371<br />
Adding an object onto an <strong>AUTO</strong>MSIM sheet........................................................................................... 372<br />
Using the palette ...................................................................................................................................... 374<br />
Selecting one or more objects. ................................................................................................................. 375<br />
Selecting one or more objects .................................................................................................................. 376<br />
Deleting one or more objects................................................................................................................... 376<br />
Changing the orientation of one or more objects .................................................................................... 376<br />
Copying/cutting one or more objects to the clipboard............................................................................. 376<br />
Pasting one or more objects from the clipboard...................................................................................... 377<br />
Modifying object properties..................................................................................................................... 377<br />
Exporting one or more objects................................................................................................................. 377<br />
ADVANCED FUNCTIONS.................................................................................................................................. 378<br />
Interactions between objects.................................................................................................................... 378<br />
Creating sensors associated with a cylinder............................................................................................ 378
Interactions between <strong>AUTO</strong>MSIM objects and the automaton program................................................. 380<br />
Interactions between <strong>AUTO</strong>MSIM objects and the IRIS 3D operational unit simulator ......................... 381<br />
Interactions between <strong>AUTO</strong>MSIM objects and the IRIS2D supervision objects ..................................... 382<br />
How can a link be made between an IRIS2D pushbutton or switch and an <strong>AUTO</strong>MSIM pushbutton or switch?382<br />
How can a link be made between an <strong>AUTO</strong>MSIM object and an IRIS2D indicator light? ................................. 383<br />
Drag and drop from an <strong>AUTO</strong>MSIM variable to an <strong>AUTO</strong>MG<strong>EN</strong> sheet................................................ 384<br />
User-definable objects ............................................................................................................................. 385<br />
Designs .................................................................................................................................................... 387<br />
List of design primitives ........................................................................................................................... 388<br />
Drawing primitive................................................................................................................................................ 388<br />
Attribute primitives.............................................................................................................................................. 390<br />
Other primitives................................................................................................................................................... 391<br />
Program................................................................................................................................................... 392<br />
List of programming primitives ........................................................................................................................... 393<br />
Connections ............................................................................................................................................. 395<br />
Example ................................................................................................................................................... 396<br />
POST-PROCESSORS........................................................................................................................................ 397<br />
G<strong>EN</strong>ERAL INFORMATION ................................................................................................................................399<br />
CONFIGURATION ............................................................................................................................................ 400<br />
Configuration files ................................................................................................................................... 400<br />
System ................................................................................................................................................................. 400<br />
Variable functions................................................................................................................................................ 400<br />
Start-up manufacturer code.................................................................................................................................. 400<br />
End manufacturer code ........................................................................................................................................ 400<br />
Configuration by default .......................................................................................................................... 400<br />
Modifying the default statements......................................................................................................................... 401<br />
Using the default statements. ............................................................................................................................... 401<br />
Displaying and modifying configuration elements................................................................................... 401<br />
System ...................................................................................................................................................... 401<br />
Hardware configuration ....................................................................................................................................... 401<br />
Software configuration......................................................................................................................................... 402<br />
Code generation options ...................................................................................................................................... 402<br />
Stating the variables............................................................................................................................................. 402<br />
Other elements..................................................................................................................................................... 402<br />
See the « System » element in text format. .......................................................................................................... 402<br />
Displaying system elements................................................................................................................................. 403<br />
Variable functions.................................................................................................................................... 403<br />
Single assignment ................................................................................................................................................ 404<br />
Linear assignment................................................................................................................................................ 404<br />
Automatic assignment.......................................................................................................................................... 404<br />
Types of <strong>AUTO</strong>MG<strong>EN</strong> elimination variables ..................................................................................................... 405<br />
Modifying a variable function element ................................................................................................................ 410<br />
Adding a variable function element ..................................................................................................................... 410<br />
Deleting a variable function element ................................................................................................................... 412<br />
Associating an <strong>AUTO</strong>MG<strong>EN</strong> bit to a target system bit ....................................................................................... 412<br />
Associating a table of <strong>AUTO</strong>MG<strong>EN</strong> words to a table of fixed target words ....................................................... 413<br />
Associating <strong>AUTO</strong>MG<strong>EN</strong> words to target analog inputs or outputs ................................................................... 414<br />
Associating a table of <strong>AUTO</strong>MG<strong>EN</strong> bits to a table of target bits ........................................................................ 414<br />
See the variable functions in text format.............................................................................................................. 415<br />
Start-up manufacturer code, end manufacturer code .............................................................................. 415<br />
Reference to an <strong>AUTO</strong>MG<strong>EN</strong> variable............................................................................................................... 415<br />
Referring to an <strong>AUTO</strong>MG<strong>EN</strong> application symbol .............................................................................................. 416<br />
Setting and referring to a label............................................................................................................................. 416<br />
Entering machine code in an application ................................................................................................ 416<br />
Selecting connection options.................................................................................................................... 416<br />
Selecting a connection mode.................................................................................................................... 417<br />
Setting communication module parameters ............................................................................................. 417<br />
POST-PROCESSOR PL7.................................................................................................................................... 418<br />
Communication module ........................................................................................................................... 418<br />
Generating an executable file .................................................................................................................. 419<br />
Direct generation of a binary file ......................................................................................................................... 419<br />
Generating an « .FEF » executable file................................................................................................................ 421<br />
Using interrupt tasks................................................................................................................................423
Specific examples..................................................................................................................................... 423<br />
Analog inputs/outputs .......................................................................................................................................... 424<br />
Fast counter TSX 37-10....................................................................................................................................... 424<br />
Fast counter TSX 37-10 used in counting............................................................................................................ 424<br />
Fast counter TSX 37-22....................................................................................................................................... 424<br />
ASI....................................................................................................................................................................... 424<br />
MAGELIS ........................................................................................................................................................... 424<br />
POST-PROCESSOR PL72.................................................................................................................................. 425<br />
Selecting processor type .......................................................................................................................... 425<br />
Specific syntax elements........................................................................................................................... 425<br />
Calling up PL72 function blocks ......................................................................................................................... 425<br />
Using a fast task................................................................................................................................................... 427<br />
Communication module ........................................................................................................................... 428<br />
Specific examples..................................................................................................................................... 428<br />
Analog inputs/outputs .......................................................................................................................................... 429<br />
Fast counter.......................................................................................................................................................... 430<br />
Text blocks and xbt.............................................................................................................................................. 430<br />
UNITELWAY text blocks ................................................................................................................................... 433<br />
TOR extension module ........................................................................................................................................ 435<br />
Conversion........................................................................................................................................................... 435<br />
Time/date............................................................................................................................................................. 435<br />
POST-PROCESSOR S7200 ................................................................................................................................436<br />
Selecting CPU type .................................................................................................................................. 436<br />
Communication module ........................................................................................................................... 436<br />
Specific example....................................................................................................................................... 436<br />
POST-PROCESSOR ABB .................................................................................................................................. 437<br />
Selecting processor type .......................................................................................................................... 437<br />
Processor AC31 ................................................................................................................................................... 437<br />
Processor CS31.................................................................................................................................................... 437<br />
Communication module ........................................................................................................................... 437<br />
Utility ....................................................................................................................................................... 437<br />
Specific examples..................................................................................................................................... 437<br />
Analog inputs/outputs .......................................................................................................................................... 438<br />
Interrupt ............................................................................................................................................................... 438<br />
POST-PROCESSOR GE-FANUC / ALSPA ....................................................................................................... 439<br />
Selecting processor type .......................................................................................................................... 439<br />
Communication module ........................................................................................................................... 439<br />
Utility ....................................................................................................................................................... 439<br />
POST-PROCESSOR STEP5 ............................................................................................................................... 440<br />
Communication module ........................................................................................................................... 440<br />
Application structure ............................................................................................................................... 440<br />
Selecting program blocks to use .......................................................................................................................... 443<br />
Selecting data blocks ........................................................................................................................................... 443<br />
Selecting processor type .......................................................................................................................... 444<br />
Associating code written on a sheet to a program block ......................................................................... 444<br />
Specific syntaxes ...................................................................................................................................... 444<br />
Setting blocks....................................................................................................................................................... 445<br />
POST-PROCESSOR TSX 07 .............................................................................................................................. 447<br />
Communication module ........................................................................................................................... 447<br />
POST-PROCESSOR PS3-PS4 ............................................................................................................................ 449<br />
Communication module ........................................................................................................................... 449<br />
POST-PROCESSOR PS4.................................................................................................................................... 450<br />
Module de communication....................................................................................................................... 450<br />
Transferring programs to MOELLER SUCOSOFT software .................................................................. 450<br />
Proceed as follows to import the file generated by <strong>AUTO</strong>MG<strong>EN</strong> in the MOELLER software then inject it in the<br />
processor.............................................................................................................................................................. 451<br />
POST-PROCESSOR RPX................................................................................................................................... 455<br />
Selecting processor type .......................................................................................................................... 455<br />
Communication module ........................................................................................................................... 455<br />
Utility ....................................................................................................................................................... 455<br />
POST-PROCESSOR PL71.................................................................................................................................. 456<br />
Selecting processor type .......................................................................................................................... 456<br />
Communication module ........................................................................................................................... 456
Fast counter task...................................................................................................................................... 456<br />
Specific examples..................................................................................................................................... 456<br />
Counting .............................................................................................................................................................. 457<br />
Fast counter.......................................................................................................................................................... 457<br />
POST-PROCESSOR PB...................................................................................................................................... 458<br />
Selecting processor type .......................................................................................................................... 458<br />
Communication module ........................................................................................................................... 458<br />
Specific syntaxes ...................................................................................................................................... 458<br />
POST-PROCESSOR SMC.................................................................................................................................. 460<br />
Selecting processor type .......................................................................................................................... 460<br />
Communication module ........................................................................................................................... 460<br />
Specific syntaxes ...................................................................................................................................... 460<br />
POST-PROCESSOR S7300 ................................................................................................................................461<br />
Communication module ........................................................................................................................... 461<br />
Specific syntaxes ...................................................................................................................................... 461<br />
Setting block variables......................................................................................................................................... 462<br />
Calling up blocks ................................................................................................................................................. 462<br />
Importing in SIEM<strong>EN</strong>S SIMATIC software ............................................................................................. 463<br />
Structure of generated code ..................................................................................................................... 465<br />
Selecting program blocks to use .......................................................................................................................... 469<br />
Associating code written on a sheet to a program block ......................................................................... 469<br />
Specific examples..................................................................................................................................... 469<br />
Calling up a STEP7 block.................................................................................................................................... 470<br />
Using an OB block............................................................................................................................................... 470<br />
POST-PROCESSOR OMRON............................................................................................................................ 471<br />
Select PLC model..................................................................................................................................... 471<br />
Communication module ........................................................................................................................... 471<br />
Transferring applications to the CX-PROGRAMMER software.............................................................. 471<br />
Specific syntax.......................................................................................................................................... 474<br />
Associating code written on a sheet to a program block ......................................................................... 474<br />
Specific example....................................................................................................................................... 474<br />
POST-PROCESSOR ALSPA.............................................................................................................................. 475<br />
Communication module ........................................................................................................................... 475<br />
POST-PROCESSOR ZELIO............................................................................................................................... 476<br />
Communication module ........................................................................................................................... 476<br />
POST-PROCESSOR FESTO .............................................................................................................................. 477<br />
Communication module ........................................................................................................................... 477<br />
Generating a binary file........................................................................................................................... 477<br />
Importation in a FESTO software workgroup ......................................................................................... 477<br />
POST-PROCESSOR ALL<strong>EN</strong>-BRADLEY ......................................................................................................... 479<br />
Communication module ........................................................................................................................... 479<br />
Transferring programs to ROCKWELL RS-Logix 500 Software............................................................. 479<br />
POST-PROCESSOR TWIDO ............................................................................................................................. 481<br />
Processor configuration selection............................................................................................................ 481<br />
Communication module ........................................................................................................................... 481<br />
POST-PROCESSOR MITSUBISHI.................................................................................................................... 482<br />
Selecting the type of processor................................................................................................................. 482<br />
Communication module ........................................................................................................................... 482<br />
Transferring programs to MITSUBISHI FX-WIN software.................................................................... 483<br />
Transferring programs to MITSUBISHI GX-DEVELOPPER software.................................................. 483<br />
POST-PROCESSOR MITSUBISHI-Q ............................................................................................................... 485<br />
Communication module ........................................................................................................................... 485<br />
Transferring programs to MITSUBISHI GX-DEVELOPPER software.................................................. 485<br />
POST-PROCESSOR GEM.................................................................................................................................. 486<br />
Communication module ........................................................................................................................... 486<br />
POST-PROCESSOR ZELIO 2 ............................................................................................................................ 487<br />
Initializing the automaton ........................................................................................................................ 487<br />
Configuring the module ........................................................................................................................... 487<br />
Communication module ........................................................................................................................... 487<br />
POST-PROCESSOR PANASONIC.................................................................................................................... 488<br />
Selecting the configuration of the automaton .......................................................................................... 488
Communication module ........................................................................................................................... 488
Environment
Installation<br />
Environment<br />
If you are installing <strong>AUTO</strong>MG<strong>EN</strong> from the <strong>AUTO</strong>MG<strong>EN</strong> CD-ROM, place<br />
it in your CD-ROM drive.<br />
The installation is launched automatically.<br />
If this does not occur, launch the “Setup.exe” executable which is in the<br />
CD-ROM root.<br />
Configuration required<br />
PC compatible computer, with:<br />
- WINDOWS 98 SE or WINDOWS ME or WINDOWS 2000 or<br />
WINDOWS XP or WINDOWS 2003 or WINDOWS VISTA operating<br />
system,<br />
- 256 MB memory (depending on the operating system: the operating<br />
system itself may require more memory),<br />
- graphics board with a resolution of at least 1024 x 768 in 65536 colors.<br />
Installation in a network<br />
<strong>AUTO</strong>MG<strong>EN</strong> can be installed in a network environment.<br />
Execute the installation procedure on the “server” PC (make sure you<br />
have all of the access rights when you carry out the procedure).<br />
To launch <strong>AUTO</strong>MG<strong>EN</strong>, on the client PCs, create a shortcut to the<br />
“autom8.exe” executable of the <strong>AUTO</strong>MG<strong>EN</strong> installation directory on the<br />
server PC.<br />
Refer to the chapter “additional information on installing <strong>AUTO</strong>MG<strong>EN</strong> in<br />
a network environment” for more information about installing<br />
<strong>AUTO</strong>MG<strong>EN</strong> and licenses in a network environment.<br />
<strong>AUTO</strong>MG<strong>EN</strong> 8 15 ©opyright 1988-2007 <strong>IRAI</strong>
New features of <strong>AUTO</strong>MG<strong>EN</strong> 8<br />
Environment<br />
Choice of “Beginner / Expert” mode<br />
“Beginner” mode allows beginners to use a “simplified” environment that<br />
is extremely easy to use.<br />
Increased integration of the Grafcet 60848 standard<br />
The new elements of this standard can now be accessed in the<br />
contextual program editing menus.<br />
Compatibility of files<br />
The files generated by all of the <strong>AUTO</strong>MG<strong>EN</strong> 8 versions can be re-read<br />
by all of the <strong>AUTO</strong>MG<strong>EN</strong> 8 versions.<br />
Physical engine integrated to IRIS3D<br />
The TOKAMAK motor is integrated to IRIS3D. This enables an extremely<br />
realistic simulation of the 3D operational units to be obtained.<br />
Enhanced 3D object handling in IRIS3D<br />
The saving and re-reading of objects and behaviors allows you to<br />
manage libraries of easily reusable objects. Predefined objects<br />
(cylinders, conveyor belts, etc) are proposed as standard. A 3D<br />
operational unit simulation application can now be created in just a<br />
couple of mouse clicks.<br />
Improved links between <strong>AUTO</strong>MG<strong>EN</strong> and IRIS3D objects<br />
Enhanced modes allow you to easily handle displacements of complex<br />
objects between <strong>AUTO</strong>MG<strong>EN</strong> and IRIS3D. An <strong>AUTO</strong>MG<strong>EN</strong> variable<br />
can, for example, give the speed of an object directly. Position reporting<br />
can also be simulated in the manner of an absolute encoder.<br />
Textured IRIS3D objects<br />
Textured objects now provide IRIS3D with extraordinarily realistic<br />
rendering.<br />
<strong>AUTO</strong>MG<strong>EN</strong> 8 16 ©opyright 1988-2007 <strong>IRAI</strong>
Environment<br />
Drag and drop from IRIS3D to <strong>AUTO</strong>MG<strong>EN</strong> sheets<br />
A right click on the IRIS3D objects allows you to access the list of<br />
variables and “drag” a reference over to a programming sheet.<br />
<strong>AUTO</strong>MSIM user-definable object<br />
<strong>AUTO</strong>MSIM users will appreciate the new user-definable object, which<br />
will allow you to create your own objects.<br />
(see the section of this manual devoted to <strong>AUTO</strong>MSIM)<br />
Drag and drop from <strong>AUTO</strong>MSIM to <strong>AUTO</strong>MG<strong>EN</strong> sheets<br />
A click on the <strong>AUTO</strong>MSIM objects allows you to “drag” a reference over<br />
to a programming sheet.<br />
Improvements to the environment<br />
Finally, numerous improvements to the environment, such as the<br />
magnifying glass in the design palette, the simplified palettes in<br />
“beginner” mode, or personalizing menus make <strong>AUTO</strong>MG<strong>EN</strong> even more<br />
user-friendly.<br />
<strong>AUTO</strong>MG<strong>EN</strong> 8 17 ©opyright 1988-2007 <strong>IRAI</strong>
Environment<br />
Environment<br />
Start<br />
When <strong>AUTO</strong>MG<strong>EN</strong> is launched, a choice of mode for the environment is<br />
proposed. “Beginner” modes make it possible to start using <strong>AUTO</strong>MG<strong>EN</strong><br />
in a “simplified” configuration, with a reduced number of options in the<br />
menus and simplified palettes. This mode is especially suited to people<br />
using <strong>AUTO</strong>MG<strong>EN</strong> for the first time. Expert mode offers all of the<br />
applications. You could create your own models (see “project models”).<br />
<strong>AUTO</strong>MG<strong>EN</strong> 8 18 ©opyright 1988-2007 <strong>IRAI</strong>
General views<br />
Browser<br />
Tabs<br />
<strong>AUTO</strong>MG<strong>EN</strong>’s main window in “Expert” mode<br />
Workspace<br />
Message<br />
window<br />
Environment<br />
The environment is fully customizable. The tool bars can be moved (by<br />
dragging their moving handle ) and parameterized (menu<br />
“Tools/Customize the environment”).<br />
The state of the environment is saved when you quit it. This state can<br />
also be saved in a project file (see the project options).<br />
<strong>AUTO</strong>MG<strong>EN</strong> 8 19 ©opyright 1988-2007 <strong>IRAI</strong><br />
Tool<br />
bars
Simplified<br />
palettes Workspace<br />
<strong>AUTO</strong>MG<strong>EN</strong>’s main window in “Beginner” mode<br />
Tool<br />
bars<br />
Environment<br />
<strong>AUTO</strong>MG<strong>EN</strong> 8 20 ©opyright 1988-2007 <strong>IRAI</strong>
Selecting targets in expert mode<br />
Environment<br />
At the bottom of the browser window there is a “Targets” tab, allowing<br />
access to the list of post-processors installed.<br />
Selecting targets in beginner mode<br />
The active target is indicated with a red tick. Access<br />
to targets displayed in grey is not authorized for the<br />
license installed (see the “Licenses” chapter for<br />
more details). To change the current target, doubleclick<br />
on the corresponding line. The targets shown in<br />
this list are the ones selected at installation time. If<br />
the target you want to use is not shown in this list,<br />
re-launch the <strong>AUTO</strong>MG<strong>EN</strong> installation and install it.<br />
In beginner mode, the following window is opened to allow the target to<br />
be selected each time a program is run.<br />
<strong>AUTO</strong>MG<strong>EN</strong> 8 21 ©opyright 1988-2007 <strong>IRAI</strong>
Environment<br />
Palettes in expert mode<br />
At the bottom of the browser window there is a “Palette” tab, allowing<br />
access to program design elements.<br />
Palettes in beginner mode<br />
The palette gives a set of elements that can be<br />
selected and placed on the sheets. To select an<br />
element, left-click with the mouse in the palette,<br />
expand the selection, release the mouse button,<br />
click in the area selected and move the area<br />
towards the sheet.<br />
The palette also contains the list of symbols for<br />
the project. You can grab them and drag them<br />
onto a test or an action on a sheet.<br />
A magnifying glass is automatically shown when<br />
the elements displayed are small.<br />
In beginner mode, the palette contains a reduced group of the simplest<br />
tools for designing programs. Left-click with the mouse over a category<br />
to “open up this category” like a tree structure.<br />
The palette in “beginner” mode<br />
“ ” elements allow access to sub-elements.<br />
<strong>AUTO</strong>MG<strong>EN</strong> 8 22 ©opyright 1988-2007 <strong>IRAI</strong>
The palette in “beginner” mode showing the “Grafcet” category open<br />
The “ ” element allows a category to be closed.<br />
Environment<br />
<strong>AUTO</strong>MG<strong>EN</strong> 8 23 ©opyright 1988-2007 <strong>IRAI</strong>
Environment<br />
Displaying or hiding the project window or message window<br />
Select the « Project » or « Messages » option from the « Window »<br />
menu.<br />
Displaying the work space in full screen mode<br />
Select the « Full screen » option from the « Display » menu. Click on<br />
to exit full screen mode.<br />
Keyboard shortcuts<br />
Keyboard shortcuts are written in the menus. « Masked » shortcuts can<br />
also be used:<br />
CTRL + ALT + F8 Save the project in executable<br />
format<br />
CTRL + ALT + F9 Save the project<br />
CTRL + ALT + F10 Access project properties<br />
CTRL + ALT + F11 Display or hide <strong>AUTO</strong>MG<strong>EN</strong><br />
window<br />
Parameters can be set for the entire<br />
environment, its state is saved when you<br />
close <strong>AUTO</strong>MG<strong>EN</strong>. Environment windows<br />
can be hidden. The « Windows » menu is<br />
used to display them again. The work space<br />
can be displayed in full screen mode. The<br />
tabs at the bottom of the browser window are<br />
used to access selection for the current postprocessor<br />
and the graphics palette.<br />
<strong>AUTO</strong>MG<strong>EN</strong> 8 24 ©opyright 1988-2007 <strong>IRAI</strong>
Environment<br />
Licenses<br />
A license establishes <strong>AUTO</strong>MG<strong>EN</strong> user rights. The following elements<br />
are established by license:<br />
- the number of all or none inputs/outputs that can be used,<br />
- post-processors that can be used,<br />
- the number of users (only for network licenses).<br />
Registering a license<br />
When you install <strong>AUTO</strong>MG<strong>EN</strong>, you can use it for free for a period of 40<br />
days.<br />
You must register your license within 40 days.<br />
To register your license, send <strong>IRAI</strong>:<br />
- the serial number printed on the label glued to the software box, or<br />
the reference of your delivery note or order form,<br />
- the user code provided with the software indicating the PC where<br />
you have installed the product.<br />
You will then receive an enable code (also called validation code).<br />
The « License » option in the <strong>AUTO</strong>MG<strong>EN</strong> « File » menu can be used to<br />
display the status of your license and obtain a user code (click on<br />
« Registering the license »).<br />
License status.<br />
<strong>AUTO</strong>MG<strong>EN</strong> 8 25 ©opyright 1988-2007 <strong>IRAI</strong>
A user code is valid for a period of 10 days.<br />
Environment<br />
So a maximum period of 10 days can pass from when you send a user<br />
code to <strong>IRAI</strong> and when you receive an enable code provided by <strong>IRAI</strong>.<br />
Sending a user code to <strong>IRAI</strong><br />
There are various methods you can use. Exchanging codes by e-mail is<br />
highly recommended as it limits the risk of error.<br />
A single error in the code will prevent the license from<br />
being registered.<br />
Sending a file by e-mail (the best solution)<br />
License registration dialogue box<br />
To generate a file containing your user code, click on « Save user code<br />
in a file ». You can then transmit the file with « .a8u » extension as an<br />
attachment and send it to the address contact@irai.com.<br />
<strong>AUTO</strong>MG<strong>EN</strong> 8 26 ©opyright 1988-2007 <strong>IRAI</strong>
Environment<br />
Copying the user code in an e-mail message<br />
By clicking on « Copy user code to clipboard », you can then paste the<br />
code in the body of the message and transmit it to the e-mail address<br />
contact@irai.com.<br />
By fax (not recommended)<br />
By clicking on « Copy user code to clipboard », you can then paste the<br />
code in a document and send it by fax to 00 33 4 66 54 91 33. If possible<br />
avoid writing the code by hand and print it using a font which<br />
differentiates between the letter « O » and the number zero.<br />
By telephone (highly unadvisable)<br />
By telephoning 00 33 4 66 54 91 30. Be sure to differentiate between the<br />
letter « O » and number zero. Be careful of consonants which are difficult<br />
to tell apart on the telephone (for example « S » and « F »).<br />
Entering the validation/enable code<br />
Validating by a e-mail received file<br />
If you have received an « .a8v » file by e-mail, save the file on your hard<br />
disk, click on « Read a validation code from a file » and select the file.<br />
Validating for a code received in the text of an e-mail<br />
Select the code in the message text (make sure you only select the code<br />
and do not add any spaces to the end). Click on « Paste a validation<br />
code from the clipboard ».<br />
Validating for a code received by fax or telephone<br />
Enter the code in the spaces under the title « Validation code ».<br />
Modifying a license<br />
Modification of a license Involves changing the elements authorized by<br />
the license (for example adding a post-processor).<br />
The license modification procedure is identical to registration.<br />
<strong>AUTO</strong>MG<strong>EN</strong> 8 27 ©opyright 1988-2007 <strong>IRAI</strong>
Environment<br />
Moving a license from one computer to another<br />
This procedure is more complex. The instructions below must be<br />
scrupulously followed to obtain good results. In the instructions below,<br />
« source » PC indicates the computer with the license and the « target »<br />
PC is the PC where the license needs to be moved.<br />
1- if it has not already been done, install <strong>AUTO</strong>MG<strong>EN</strong> on the target<br />
PC,<br />
2- generate an « .a8u » user code file on the target PC and move this<br />
file to the source PC (for example on a floppy disk),<br />
3- on the source PC, select the « Move the license to another place »<br />
option,<br />
Dialogue box for moving a license<br />
4- on the source PC, click on « Read a user code from a file » and<br />
select the « .a8u » file that came from the target PC,<br />
5- on the source PC, click on « Move the license »,<br />
6- on the source PC, click on « Save the validation code in a file »,<br />
recopy the generated « .a8v » file to the target PC,<br />
7- on the target PC, click on « Read a validation code from a file »<br />
and select the « .a8v » file that came from the source PC.<br />
<strong>AUTO</strong>MG<strong>EN</strong> 8 28 ©opyright 1988-2007 <strong>IRAI</strong>
Environment<br />
Network licenses<br />
The « akey8.exe » executable manages the network license. This<br />
executable must be launched from one of the network computers. The<br />
network must be able to be used with TCP IP protocol. When launched,<br />
the network license manager is hidden and only a icon appears in the<br />
WINDOWS keybar. To display the network license manager window,<br />
double click on the icon in the keybar.<br />
The network license manager<br />
Up to 16 different licenses can be managed by the network license<br />
manager. A network license is characterized by a number of users and a<br />
type of copyright (number of all or none inputs/outputs and useable postprocessors).<br />
For each license the number of possible user/s, number of<br />
connected user/s and list of connected users (using <strong>AUTO</strong>MG<strong>EN</strong>) is<br />
<strong>AUTO</strong>MG<strong>EN</strong> 8 29 ©opyright 1988-2007 <strong>IRAI</strong>
Environment<br />
displayed in a tree format attached to each license. Each license is<br />
associated to a port number (a numeric value starting from 5000 by<br />
default). The first port number used can be configured by clicking on<br />
« Parameters ».<br />
Adding a network license<br />
You can add a license by clicking on « Add a license ». The license<br />
registration principle is the same as for single license versions.<br />
Modifying a license<br />
Double click on the licenses to modify them. The license modification<br />
procedure is the identical to that used for single license versions.<br />
Connecting to client stations<br />
Click on « Connect to a network license » to connect a client station to a<br />
network license.<br />
Connecting to a network license<br />
The PC name (the one from the network) where the « akey7.exe » was<br />
launched must be provided as well as the port number corresponding to<br />
the desired license.<br />
You must register your license with <strong>IRAI</strong><br />
(contact@irai.com) by sending your user<br />
code by e-mail (« File/License » menu. The<br />
network license manager is used to manage<br />
multiple licenses on TCP IP network PC's.<br />
<strong>AUTO</strong>MG<strong>EN</strong> 8 30 ©opyright 1988-2007 <strong>IRAI</strong>
Environment<br />
Additional information on installing <strong>AUTO</strong>MG<strong>EN</strong> in a network<br />
environment<br />
General information<br />
8<br />
Two aspects of the <strong>AUTO</strong>MG<strong>EN</strong> installation have to be considered:<br />
installing files on the one hand and managing licenses on the other.<br />
These two aspects are completely separate: you can choose to install<br />
the files either on the hard disk of the client PCs or else on a file server<br />
and, completely independently of this, choose to install either a license<br />
locally on a PC or else a network license on a network license manager.<br />
Installing <strong>AUTO</strong>MG<strong>EN</strong> 8 on a file server<br />
Benefit: the <strong>AUTO</strong>MG<strong>EN</strong> 8 files are installed just once on a file server,<br />
and updates are simplified.<br />
Procedure on the file server: install <strong>AUTO</strong>MG<strong>EN</strong> 8 . Rights needed: readaccess<br />
is sufficient.<br />
Procedure on the client workstations: create a shortcut to the<br />
“autom8.exe” executable, which is in the <strong>AUTO</strong>MG<strong>EN</strong> 8 installation<br />
directory on the file server.<br />
8<br />
Installing one or more <strong>AUTO</strong>MG<strong>EN</strong> licenses on a network license<br />
manager<br />
Benefit: the licenses are no longer restricted to one PC but can be used<br />
by all of the PCs connected to the network (floating licenses).<br />
Principle: one or more licenses are installed on one of the network’s<br />
PCs. A license authorizes from 1 to n users. <strong>AUTO</strong>MG<strong>EN</strong> 8 may be<br />
launched on client PCs upto the maximum number of users. A license<br />
has the same features for all users in terms of the number of<br />
inputs/outputs that can be used and the types of post-processors that<br />
can be used. If several configurations (several types of licenses) are<br />
<strong>AUTO</strong>MG<strong>EN</strong> 8 31 ©opyright 1988-2007 <strong>IRAI</strong>
Environment<br />
needed, then as many licenses will be created as there are different<br />
types of configurations. When <strong>AUTO</strong>MG<strong>EN</strong> 8 is launched on the client<br />
PCs, a connection will be created to one or other of the licenses<br />
depending on the features that are wanted.<br />
Actual example: setting up a network of 4 16 I+16 O PL72 licenses, 4 16<br />
I+16 O PL7 licenses + 2 unlimited I/O PL7 licenses. For this: 3 licenses<br />
will be created on the network license manager: 1 license for 4 16 I+16 O<br />
PL72 users, 1 license for 4 16 I+16 O PL7 users, 1 license for 2 unlimited<br />
I/O PL7 users.<br />
Where to install the network license manager: on one of the network’s<br />
PCs (it does not have to be the server) which must be running all the<br />
time (whenever a user would like to use <strong>AUTO</strong>MG<strong>EN</strong> 8 ).<br />
Technical constraints: the network must support TCP/IP, the PC where<br />
the network license manager is located must be able to run a WINDOWS<br />
program (application or service).<br />
Installation on the network license manager: on the PC where the<br />
network licenses are going to be managed, install the main<br />
<strong>AUTO</strong>MG<strong>EN</strong> 8 module + the network license manager.<br />
Registering one or more licenses on the network license manager:<br />
launch the network license manager: (AKEY8.EXE executable, located in<br />
the <strong>AUTO</strong>MG<strong>EN</strong> 8 installation directory). When launched, the license<br />
manager sets up an icon in the bottom right of the WINDOWS task bar.<br />
Left-click once with the mouse to open the window.<br />
Click on “Add a license” to add a license.<br />
Click on “Save the user code in a file” to generate an .n8u file that you<br />
will e-mail to us at the address “contact@irai.com”: we will send back an<br />
.n8v file that you will connect up by clicking on the “Read a validation<br />
code from a file” button.<br />
The licenses installed in this way will then be shown in the network<br />
license manager with the serial number and characteristics of the license<br />
and the associated port number. It is this port number that will allow<br />
clients to connect to a specific license.<br />
<strong>AUTO</strong>MG<strong>EN</strong> 8 32 ©opyright 1988-2007 <strong>IRAI</strong>
Environment<br />
8<br />
Installation on the client workstations: launch <strong>AUTO</strong>MG<strong>EN</strong> , and in the<br />
“File / License” menu select “Connect to a network license”.<br />
Enter the name of the PC where the network license manager is running<br />
(or its IP address) and the port number (this number makes it possible to<br />
identify the license you want to connect to, if there is more than one).<br />
8<br />
It is also possible to add an argument in the <strong>AUTO</strong>MG<strong>EN</strong> launch<br />
shortcut in order to force connection to one network license.<br />
The argument is:<br />
/NETLIC<strong>EN</strong>SE=,<br />
Make sure that “NETLIC<strong>EN</strong>SE” is correctly spelled: S not C at the end.<br />
For example:<br />
/NETLIC<strong>EN</strong>SE=MYSERVER,5001<br />
Several launch shortcuts can be created in order to connect to different<br />
licenses.<br />
Possible problems: if you use a firewall, make sure access is authorized<br />
to the ports used by the network license manager (those displayed in the<br />
network license manager).<br />
Installing the network license manager as a service under WINDOWS<br />
NT, 2000, XP, 2003 and VISTA: see the following chapter.<br />
Displaying the status of the licenses remotely: to display the status of the<br />
network license manager on a different PC from the one on which the<br />
network license manager has been launched (or if the “service” version<br />
of the network license manager is being used), use the<br />
“spya8protnet.exe” utility, which is located in the <strong>AUTO</strong>MG<strong>EN</strong> 8<br />
installation directory.<br />
Installing the network license server as a service<br />
8<br />
The “NT Service” key server allows the <strong>AUTO</strong>MG<strong>EN</strong> network licenses<br />
to be managed on a WINDOWS NT4, 2000, 2003, XP or VISTA<br />
<strong>AUTO</strong>MG<strong>EN</strong> 8 33 ©opyright 1988-2007 <strong>IRAI</strong>
Environment<br />
workstation without opening a session. Unlike the AKEY8.EXE<br />
“executable” version, AKEY8NT.EXE does not allow either the<br />
protections or the connected users to be displayed.<br />
Before installing the key server as an “NT service”, you are<br />
recommended to make sure that the key server works properly with the<br />
“executable” version: AKEY8.EXE.<br />
Launch the “akey8nt –i” command line to install the NT key server<br />
service. The AKEY8NT.EXE executable is installed in the <strong>AUTO</strong>MG<strong>EN</strong><br />
installation directory.<br />
So that the service starts automatically:<br />
- under WINDOWS NT4: in the “Start/Parameters/Configuration<br />
Panel” menu, select the “Services” icon the “AKEY8” line, click on<br />
the start button and select the “Automatic” button.<br />
Reboot your PC so that the key server is activated.<br />
- under WINDOWS 2000, 2003, XP or VISTA: in the<br />
“Start/Parameters/Configuration Panel” menu, select the<br />
“Administrative Tools” icon then the “Services” icon. Right-click with<br />
the mouse on the “AKEY8” line and select “properties”. In the<br />
“Startup Type” option, select “Automatic”. In the “Recovery” tab,<br />
select “Restart the service” in the “First Failure” area.<br />
Uninstallation<br />
Launch the “akey8nt –u” command to uninstall the NT key server<br />
service.<br />
Errors<br />
After having uninstalled the AKEY8NT.EXE service, use AKEY8.EXE to<br />
determine the cause of any malfunctions.<br />
<strong>AUTO</strong>MG<strong>EN</strong> 8 34 ©opyright 1988-2007 <strong>IRAI</strong>
The project<br />
Environment<br />
<strong>AUTO</strong>MG<strong>EN</strong> 8 is strongly based on the idea of a project. A project groups<br />
together the elements that compose an application. The browser (see<br />
page Erreur ! Signet non défini.) displays all the project elements<br />
(sheets, symbols, configuration, IRIS objects etc.) in a tree format.<br />
8<br />
The new file format of <strong>AUTO</strong>MG<strong>EN</strong> (files with « .AGN » extension)<br />
includes all project elements.<br />
When you save an « .AGN » file you are assured of saving all the<br />
elements of an application. You can easily and effectively interchange<br />
applications created with <strong>AUTO</strong>MG<strong>EN</strong>.<br />
« .AGN » files are compacted with « ZIP » technology, they do not need<br />
to be compressed to be interchanged, their size is already optimized.<br />
All the files generated by <strong>AUTO</strong>MG<strong>EN</strong> 8 can be re-read with all of the<br />
versions of <strong>AUTO</strong>MG<strong>EN</strong> 8 : upward and downward compatibility.<br />
Files generated with <strong>AUTO</strong>MG<strong>EN</strong> 7<br />
The files created with <strong>AUTO</strong>MG<strong>EN</strong> can be opened directly in<br />
<strong>AUTO</strong>MG<strong>EN</strong> 8 .<br />
Importing an application from an earlier version of <strong>AUTO</strong>MG<strong>EN</strong><br />
(version 6 or earlier)<br />
You need to import all of the sheets (“.GR7” files) and any symbol file<br />
(“.SYM” file). To do this, use the import procedures described in the<br />
following chapters.<br />
Generating a free distribution executable file<br />
The « Generate an executable » command from the « File » menu<br />
is used to generate an executable starting from a project in<br />
progress (an « .EXE » file executable on a PC with WINDOWS).<br />
The <strong>AUTO</strong>MG<strong>EN</strong> « viewer » is automatically integrated with the<br />
generated executable (the executable user does not need<br />
<strong>AUTO</strong>MG<strong>EN</strong>). This viewer makes it possible to use the<br />
application without modifying it. You can easily distribute your<br />
<strong>AUTO</strong>MG<strong>EN</strong> 8 35 ©opyright 1988-2007 <strong>IRAI</strong><br />
7
Environment<br />
applications. The generated executable is not covered by<br />
copyright. This technique is normally used for producing a<br />
supervising application.<br />
Modifying project properties<br />
With the right side of the mouse click on the « Project» element on the<br />
browser and select « Properties » from the menu.<br />
Modifying security options<br />
You can restrict reading or modification access to a project by<br />
passwords.<br />
Advanced options<br />
« Save the environment aspect with the project »: if checked, the position<br />
of the windows and the aspect of the toolbars are saved in the « .AGN »<br />
file. When the project is opened, these elements are reproduced.<br />
« Hide the main window upon launching … »: if checked, the<br />
<strong>AUTO</strong>MG<strong>EN</strong> window is hidden when the project is opened. Only IRIS<br />
objects incorporated in the project will be displayed. This option is<br />
normally used to create « package » applications which only leave IRIS<br />
objects displayed. Use the [CTRL] + [F11] keys to redisplay the<br />
<strong>AUTO</strong>MG<strong>EN</strong> window.<br />
The other options are used to change the display of the <strong>AUTO</strong>MG<strong>EN</strong><br />
window when a project is opened.<br />
User interface<br />
« Block IRIS object configuration »: if checked, a user cannot modify<br />
IRIS object configuration.<br />
The other options are used to modify the behavior of the user interface.<br />
Model<br />
« This project is a document model »: if checked, when opened all the<br />
options and the documents it contains act as a model for the creation of<br />
a new project. This functionality is used to create standard configuration<br />
which can be uploaded when <strong>AUTO</strong>MG<strong>EN</strong> is launched (for example a<br />
default symbol file or a default processor configuration).<br />
Defining a mode<br />
To define a mode that can be used when launching <strong>AUTO</strong>MG<strong>EN</strong> (like<br />
the “Expert” and “Beginner” modes), save a project model in the<br />
<strong>AUTO</strong>MG<strong>EN</strong> 8 36 ©opyright 1988-2007 <strong>IRAI</strong>
Environment<br />
“models” sub-directory of the <strong>AUTO</strong>MG<strong>EN</strong> installation directory. An<br />
image can be linked to a model. To do this, create a “jpg” format file with<br />
the same name as the “.agn” file. This file must have the following<br />
dimensions: 120 pixels wide by 90 pixels high.<br />
Automatic GO<br />
«Automatic go at project launch »: if checked, the application is<br />
automatically run when a project is opened.<br />
The project is used to group together the<br />
elements of an <strong>AUTO</strong>MG<strong>EN</strong> application.<br />
Once regrouped, the elements form a<br />
compact file with « .AGN » extension. The<br />
project models are used to be able to easily<br />
manage different software configurations.<br />
Generation of executables makes it easy to<br />
distribute applications.<br />
<strong>AUTO</strong>MG<strong>EN</strong> 8 37 ©opyright 1988-2007 <strong>IRAI</strong>
The Browser<br />
Browser tree<br />
Environment<br />
A central element for application<br />
management, the browser is used for<br />
fast access to different application<br />
elements: sheets, symbols,<br />
configuration, printing, IRIS objects etc.<br />
The « + » and « - » icons are used to<br />
develop or retract project elements.<br />
Actions on the browser are effected by<br />
double clicking on the elements (opens<br />
the element) or by clicking with the right<br />
side of the mouse (adds a new element<br />
to a project, special action on an<br />
element etc.).<br />
Certain operations are effected by<br />
dragging and dropping the elements and<br />
moving them on the browser.<br />
The colors (generally called up at the<br />
bottom of documents in the work space)<br />
are used to identify families of elements.<br />
<strong>AUTO</strong>MG<strong>EN</strong> 8 38 ©opyright 1988-2007 <strong>IRAI</strong>
Environment<br />
Sheets<br />
A sheet is a page where a program or part of a program is designed.<br />
Using sheets is extremely simplified in <strong>AUTO</strong>MG<strong>EN</strong> 8 . The sheet<br />
chaining orders needed in the previous versions are no longer used. For<br />
multiple sheets to be compiled together, they only need to be in the<br />
project.<br />
The icons associated to the sheets are shown below:<br />
- normal sheet,<br />
- normal sheet (excluding compilation),<br />
- sheet containing a macro-step expansion,<br />
- sheet containing a function block program,<br />
- sheet containing a key,<br />
- sheet containing a key (excluding compilation).<br />
- sheet containing an encapsulation,<br />
Icons are marked with a cross indicating a closed sheet (not displayed in<br />
the work space). Double clicking on this type of icon opens (displays) the<br />
associated sheet.<br />
Adding a new sheet<br />
With the right side of the mouse click on the « Sheets » element on the<br />
browser then select « Add a new sheet ».<br />
Select the sheet size (XXL is the<br />
recommended format, the other<br />
formats are for older versions of<br />
<strong>AUTO</strong>MG<strong>EN</strong>, GEMMA is only<br />
used for creating GEMMA<br />
models).<br />
The sheet can be given any<br />
name, but each project sheet<br />
must have its own name.<br />
The comment area is up to your<br />
discretion for modifications or<br />
other information relative to each<br />
sheet.<br />
<strong>AUTO</strong>MG<strong>EN</strong> 8 39 ©opyright 1988-2007 <strong>IRAI</strong>
Environment<br />
Importing old <strong>AUTO</strong>MG<strong>EN</strong> version sheets, importing CADEPA sheets<br />
With the right side of the mouse click on the « Sheets » element on the<br />
browser then select « Add one or more existing sheets ».<br />
Selecting one or more sheets to import.<br />
From the « Type » list select « <strong>AUTO</strong>MG<strong>EN</strong> » or « CADEPA » for the<br />
sheet type to import then click on OK.<br />
There are some restrictions for importing<br />
CADEPA sheets:<br />
- the step numbers must be individual (the<br />
same step number cannot be used on<br />
multiple sheets),<br />
- references must be converted with links to<br />
CADEPA before being able to import<br />
them.<br />
By keeping the [CTRL] key pressed down, you can select multiple<br />
sheets.<br />
Modifying the sheet compilation order<br />
The sheets are compiled in the order they are listed in for the project. To<br />
modify this order, click on the sheet with the left side of the mouse on the<br />
browser and move it in the list.<br />
<strong>AUTO</strong>MG<strong>EN</strong> 8 40 ©opyright 1988-2007 <strong>IRAI</strong>
Environment<br />
Deleting a sheet from the list<br />
With the right side of the mouse click the sheet to be deleted on the<br />
browser and select « Delete » from the menu.<br />
Exporting a sheet to a « .GR7 » file<br />
With the right side of the mouse click the sheet to be deleted on the<br />
browser and select « Export » from the menu.<br />
Copying, Cutting, Pasting a sheet<br />
With the right side of the mouse click the sheet on the browser and<br />
select « Copy/cut » from the menu. To paste, with the right side of the<br />
mouse click on the « Sheet » element on the browser and select<br />
« Paste ».<br />
This option makes it possible to copy or transfer sheets from one project<br />
to another.<br />
Renaming a sheet<br />
See « Modifying properties » below.<br />
Modifying sheet properties.<br />
With the right side of the mouse click the sheet on the browser and<br />
select « Properties » from the menu.<br />
<strong>AUTO</strong>MG<strong>EN</strong> 8 41 ©opyright 1988-2007 <strong>IRAI</strong>
Environment<br />
You can modify the<br />
sheet name, the syntax<br />
used for literal<br />
language and variable<br />
names. The « Do not<br />
compile this sheet »<br />
option is used to<br />
exclude the sheet from<br />
the compilation. The<br />
« Display in GEMMA<br />
format» option is only<br />
available if the sheet<br />
format is GEMMA and<br />
is used to display and<br />
modify a sheet in<br />
GEMMA format. The<br />
« Block the of use<br />
inputs/outputs other<br />
than set symbols »<br />
option blocks the use of<br />
i, %i, o %q variables<br />
not attributed to<br />
symbols. Access to the<br />
sheet can be protected<br />
by a password. -The<br />
« comments » area is<br />
left to your discretion.<br />
Symbols<br />
The list of symbols provides the correspondence between « symbol »<br />
names and variable names. A project may only have one symbol table.<br />
Creating a symbol table<br />
With the right side of the mouse click on the « Symbols» element on the<br />
browser and select « Create a symbol table » from the menu.<br />
Importing a symbol table<br />
With the right side of the mouse click on the « Symbols» element on the<br />
browser and select « Import a symbol table » from the menu.<br />
<strong>AUTO</strong>MG<strong>EN</strong> 8 42 ©opyright 1988-2007 <strong>IRAI</strong>
Configuration<br />
Environment<br />
Post-processors<br />
This section contains all the post-processor configuration elements (see<br />
the post-processor manual for more information).<br />
Compiler options<br />
Double click on this element to modify the settings of compiler options.<br />
Documentation<br />
This is used to access the file printing function (double click on the<br />
« Print » element. You can print a complete file composed of an end<br />
paper, cross reference table, symbol list and sheets. The print setup<br />
function is used to display all these elements.<br />
<strong>AUTO</strong>MG<strong>EN</strong> 8 43 ©opyright 1988-2007 <strong>IRAI</strong>
Generated files<br />
Environment<br />
Generating the instruction list in pivot code<br />
By double clicking on « Pivot code » you generate a list in low level literal<br />
language (<strong>AUTO</strong>MG<strong>EN</strong> pivot code). Viewing of the generated code is<br />
normally reserved for specialists involved in understanding the<br />
translation methods used by the compiler.<br />
Generating the cross reference list<br />
Double clicking on the « Cross reference » element generates and<br />
displays the list of variables used in an application with any associated<br />
processor variables and the name of or sheet(s) where they are used.<br />
Post-processors<br />
The other elements concern the files generated by the post-processors:<br />
instruction lists are in processor language.<br />
Settings<br />
Contains the tools to display and modify the state of the variables.<br />
Viewing and modifying a variable or variable table<br />
With the right side of the mouse click on « Settings » and select<br />
« Monitoring » to open an element where you can see the state of a<br />
variable or variable table.<br />
Next variable Close<br />
Select a<br />
variable<br />
Previous<br />
variable<br />
A monitoring window.<br />
Modify the state<br />
of another<br />
variable<br />
Open the<br />
menu<br />
<strong>AUTO</strong>MG<strong>EN</strong> 8 44 ©opyright 1988-2007 <strong>IRAI</strong>
The monitoring window in « 10 variables table » mode.<br />
The monitoring window in “Variables Table” mode<br />
Click on these buttons<br />
to change the size of<br />
the information<br />
displayed in the table<br />
Environment<br />
Modify the<br />
variable state by<br />
clicking in this<br />
area<br />
Click on this button to display<br />
the expanded information<br />
(automaton symbols and<br />
names of variables)<br />
associated with each variable<br />
Re-size the window by<br />
dragging one of the<br />
edges in order to see<br />
more or fewer variables<br />
<strong>AUTO</strong>MG<strong>EN</strong> 8 45 ©opyright 1988-2007 <strong>IRAI</strong>
Environment<br />
IRIS objects<br />
IRIS 2D objects are used to create consoles, supervision applications<br />
and simulation applications of 2D operating parts. IRIS 3D is used to<br />
create simulation applications of 3D operating parts. Each IRIS 2D object<br />
appears in the project tree (see the chapters IRIS 2D references and<br />
IRIS 3D references for additional information).<br />
Adding an IRIS 2D object<br />
Click with the right side of the mouse on « Add an IRIS 2D object ». The<br />
object selection assistant is used to select it and set its parameters.<br />
Selection assistant for an IRIS 2D object<br />
<strong>AUTO</strong>MG<strong>EN</strong> 8 46 ©opyright 1988-2007 <strong>IRAI</strong>
Environment<br />
Deleting an IRIS 2D object<br />
With the right side of the mouse click on the IRIS object on the browser<br />
and select « Delete » from the menu.<br />
Displaying or hiding an IRIS 2D object<br />
With the right side of the mouse click on the IRIS object on the browser<br />
and select « Display/hide » from the menu.<br />
Cutting, copying, pasting an IRIS 2D object<br />
With the right side of the mouse click on the IRIS object on the browser<br />
and select « Copy » or « Cut » from the menu.<br />
To paste, with the right side of the mouse click on the « Sheet » element<br />
on the browser and select « Paste ».<br />
To paste an IRIS object on a console, select « Paste» from the console<br />
menu or click with the right side of the mouse on the console on the<br />
browser and select « Paste».<br />
Adding a new IRIS 2D object on a console<br />
Select « Add an object » from the console menu or click with the right<br />
side of the mouse on the console on the browser and select « Add an<br />
object on the console » from the menu (for more information on the<br />
console see the chapter « Console » object)<br />
Modifying the properties of an IRIS 2D object<br />
With the right side of the mouse click on the IRIS object on the browser<br />
and select « Properties ». For higher level objects (parent objects),<br />
special properties can be accessed:<br />
<strong>AUTO</strong>MG<strong>EN</strong> 8 47 ©opyright 1988-2007 <strong>IRAI</strong>
Properties of high level objects<br />
Environment<br />
Display establishes under which conditions the object is displayed or<br />
hidden. The reinstallation option is used to return an object to its initial<br />
state when dynamic display is launched (normally used for OP simulation<br />
applications).<br />
Setting an object model accessible on the assistant<br />
With the right side of the mouse click on the IRIS object on the browser<br />
and select « Save as model » from the menu.<br />
<strong>AUTO</strong>MG<strong>EN</strong> 8 48 ©opyright 1988-2007 <strong>IRAI</strong>
Selection of modifiable parameters for users of your models<br />
Environment<br />
You can select the list of parameters which remain accessible to the user<br />
on the assistant. By clicking on « Save », you save your object model.<br />
The storage directory for object models is « \i2d\lib ». You can use a sub-directory called « my objects » for<br />
saving your models.<br />
Importing an IRIS 2D object in an earlier version of <strong>AUTO</strong>MG<strong>EN</strong><br />
With the right side of the mouse click on the « IRIS» element on the<br />
browser and select « Import IRIS 2D objects ». Select one or more<br />
« .AOF » files.<br />
Creating an IRIS 3D console<br />
With the right side of the mouse click on the « IRIS » element on the<br />
browser and select « Add an IRIS 3D console » (see the chapter on IRIS<br />
3D for more information).<br />
<strong>AUTO</strong>MG<strong>EN</strong> 8 49 ©opyright 1988-2007 <strong>IRAI</strong>
Environment<br />
Resources<br />
This project element is used for adding all types of files to a project. Files<br />
which are added will become an integral part of the project and will be<br />
saved along with the other elements. To refer to a pseudo directory<br />
where the resources are, the key word « » can be used in the<br />
specific directory name in <strong>AUTO</strong>MG<strong>EN</strong>. For example IRIS objects can<br />
refer to bitmaps if they are included in the resources.<br />
Adding a file to the resources<br />
With the right side of the mouse click on the « Resources» element on<br />
the browser and select « Add » from the menu.<br />
Deleting a file from the resources<br />
With the right side of the mouse click the resource file on the browser<br />
and select « Delete ».<br />
Renaming a file in the resources<br />
With the right side of the mouse click the resource file on the browser<br />
and select « Rename ».<br />
Modifying a file in the resources<br />
With the right side of the mouse click the resource file on the browser<br />
and select « Modify ».<br />
Adding and converting 3D STUDIO files in the resources<br />
3D STUDIO files can be converted into .x files and added to the<br />
resources by clicking with the right side of the mouse on the<br />
« Resources » element on the browser and selecting « Import 3D files »<br />
(see the chapter IRIS 2D references and IRIS 3D references for more<br />
information).<br />
External modules<br />
These elements are reserved for executable modules developed by third<br />
parties and interfaced with <strong>AUTO</strong>MG<strong>EN</strong>.<br />
<strong>AUTO</strong>MG<strong>EN</strong> 8 50 ©opyright 1988-2007 <strong>IRAI</strong>
Environment<br />
The browser is used to display and manage<br />
all the project elements. By double clicking<br />
on the elements or by clicking with the right<br />
side of the mouse, you access the different<br />
functions applicable to each element.<br />
<strong>AUTO</strong>MG<strong>EN</strong> 8 51 ©opyright 1988-2007 <strong>IRAI</strong>
Designing programs<br />
Various tools are available for designing programs.<br />
Environment<br />
Designing with the assistant<br />
This is without doubt the simplest when starting with <strong>AUTO</strong>MG<strong>EN</strong>. With<br />
the right side of the mouse click on an open sheet in the work space and<br />
select « Assistant » from the menu. You will then be guided for making<br />
selections. When you have finished click on « OK » and put the design<br />
on the sheet by clicking with the left side of the mouse.<br />
The assistant<br />
<strong>AUTO</strong>MG<strong>EN</strong> 8 52 ©opyright 1988-2007 <strong>IRAI</strong>
Environment<br />
Designing with the shortcut menu<br />
Click with the right side of the mouse on an open sheet in the work<br />
space, the menu will propose a series of elements that you can put on<br />
the sheet. This is an instinctive and fast creation method.<br />
Designing with the pallet<br />
By selecting elements on the pallet you can quickly create programs<br />
starting from previously created elements.<br />
Enhancing and customizing the pallet<br />
« .GR7 » files are used to set the pallet, they are located in the directory<br />
« \pal ». You can delete, modify,<br />
rename or add files. To generate « .GR7 », files use the « Export »<br />
command by clicking with the right side of the mouse on a sheet on the<br />
browser. The names displayed on the pallet are « .GR7 » files. Relaunch<br />
<strong>AUTO</strong>MG<strong>EN</strong> for a new element to be displayed on the pallet.<br />
Designing with the keyboard keys<br />
Each key is associated to design blocks. The « Blocks » element also<br />
provides access to the blocks. The table below lists the blocks and their<br />
use.<br />
Delete block<br />
Aspect Associated key Generic name Comments Languages<br />
Link blocks<br />
[A] Delete Used to make a cell blank<br />
again<br />
Aspect Associated key Generic name Comments Languages<br />
[E] Vertical link Link from top to bottom<br />
or bottom to top<br />
[F] Horizontal link Link from right to left or<br />
left to right<br />
<strong>AUTO</strong>MG<strong>EN</strong> 8 53 ©opyright 1988-2007 <strong>IRAI</strong><br />
All<br />
All<br />
All
Grafcet blocks<br />
Environment<br />
[G] Upper left corner Link towards the bottom<br />
right or bottom left<br />
All<br />
[H] Upper right corner Link towards the bottom<br />
left or bottom right<br />
[I] Lower left corner Link from top to right or<br />
left to top<br />
All<br />
[J] Lower right corner Link from top to left or<br />
right to top<br />
[Z] Cross Crosses two links All<br />
Aspect Associated key Generic name Comments Languages<br />
.<br />
.<br />
.<br />
.<br />
[B] Step Normal step Grafcet<br />
[C] Initial step without Initial step without Grafcet<br />
activation<br />
activation<br />
[D] Initial step Initial step Grafcet<br />
Macro-step Only available in the<br />
shortcut menu<br />
[+] Encapsulating step An encapsulation must<br />
be linked<br />
[-] Initial encapsulating step An encapsulation must<br />
be linked<br />
All<br />
All<br />
Grafcet<br />
Grafcet<br />
Grafcet<br />
Initial state mark Défine intial state for an<br />
encapsulation<br />
Grafcet<br />
[T] Transition Transition Grafcet<br />
[$] Source transition Can replace the<br />
transition symbol<br />
[£] Exit transition Can replace the<br />
transition symbol<br />
Grafcet<br />
Grafcet<br />
<strong>AUTO</strong>MG<strong>EN</strong> 8 54 ©opyright 1988-2007 <strong>IRAI</strong>
.<br />
.<br />
Link for action on<br />
transition crossing<br />
Start of an action<br />
rectangle on transition<br />
crossing<br />
Use the following<br />
element to design the<br />
action rectangle<br />
Use the [X] and [Y]<br />
elements to end the<br />
rectangle<br />
Environment<br />
Grafcet<br />
Grafcet<br />
[K] Left limit of an « And » Compulsory to the left Grafcet<br />
divergence<br />
of an « And »<br />
divergences<br />
[L] Supplementary branch Do not use as a left or Grafcet<br />
of an « And » right limit of an « And »<br />
divergence or an<br />
« And » convergence<br />
divergence<br />
[M] Right limit of an Compulsory to the right Grafcet<br />
« And » divergence of an « And »<br />
divergence<br />
[N] Extension of an « And » If placed in the [K], [L], Grafcet<br />
divergence [M], [P] or [O],[P],[Q],<br />
[L] blocks<br />
[O] Left limit of an « And » Compulsory to the left Grafcet<br />
convergence<br />
of an « And »<br />
convergence<br />
[P] Supplementary branch Do not use as a left or Grafcet<br />
of an « And » right limit of an « And »<br />
convergence or an<br />
« And » divergence<br />
convergence<br />
[Q] Right limit of an Compulsory to the right Grafcet<br />
« And » convergence of an « And »<br />
convergence<br />
[R] « Or » divergence Do not use as a limit of<br />
an « Or » convergence<br />
Grafcet<br />
[S] « Or » convergence Do not use as a limit of<br />
an « Or » divergence<br />
Grafcet<br />
[U] Skip or repeat left step « Or » convergence or<br />
divergence<br />
Grafcet<br />
[V] Skip or repeat right step « Or » convergence or Grafcet<br />
<strong>AUTO</strong>MG<strong>EN</strong> 8 55 ©opyright 1988-2007 <strong>IRAI</strong>
[SPACE] on an<br />
[E] block<br />
Flowchart blocks<br />
divergence<br />
Environment<br />
Link towards the top For relooping and<br />
repeating steps<br />
Grafcet<br />
Aspect Associated<br />
key<br />
Generic name Comments Languages<br />
Ladder blocks<br />
[0] (zero) Flowchart assignment Separates the « test »<br />
from the « action »<br />
area<br />
Flowchart<br />
[1] « Not » function Complements the<br />
block input signal<br />
Flowchart<br />
[2] « And » function Combines the inputs in<br />
an « And » logic<br />
Flowchart<br />
[3] « Or » function Combines the inputs in<br />
an « Or » logic<br />
Flowchart<br />
[4] Block environment Enlarges an « And » or<br />
« Or » function block<br />
Flowchart<br />
[5] Bottom of block Ends an « And » or<br />
« Or » function block<br />
Flowchart<br />
Aspect Associated key Generic name Comments Languages<br />
[(] Start left coil Starts an action Ladder<br />
[)] Start right coil Ends an action Ladder<br />
[U] Left limit Ends the diagram Ladder<br />
[V] Right limit Starts the diagram Ladder<br />
[R] Connection « Or » function Ladder<br />
[S] Connection « Or » function Ladder<br />
<strong>AUTO</strong>MG<strong>EN</strong> 8 56 ©opyright 1988-2007 <strong>IRAI</strong>
Action blocks<br />
Environment<br />
Aspect Associated<br />
key<br />
Generic name Comments Languages<br />
.<br />
.<br />
.<br />
.<br />
.<br />
[W] Action rectangle left<br />
limit<br />
Starts an action Grafcet and Flowchart<br />
[X] Action rectangle<br />
environment<br />
Extends an action Grafcet and Flowchart<br />
[Y] Action rectangle<br />
right limit<br />
[.] Left side of a<br />
double action<br />
rectangle<br />
Ends an action Grafcet and Flowchart<br />
Starts a double action<br />
rectangle<br />
Grafcet and Flowchart<br />
[/] Middle of a double Prolongs a double Grafcet and Flowchart<br />
action rectangle action rectangle<br />
[%] Right side of a Ends a double action Grafcet and Flowchart<br />
double action<br />
rectangle<br />
rectangle<br />
[S] Divergence Action Used to vertically<br />
juxtapose action<br />
rectangles<br />
[V] Divergence Action Used to vertically<br />
juxtapose action<br />
rectangles<br />
Grafcet and Flowchart<br />
Grafcet and Flowchart<br />
[#] Action on Defines the type of Grafcet<br />
activation<br />
action<br />
[_] Action on Defines the type of Grafcet<br />
deactivation<br />
action<br />
[@] Event-driven Defines the type of Grafcet<br />
action<br />
action<br />
<strong>AUTO</strong>MG<strong>EN</strong> 8 57 ©opyright 1988-2007 <strong>IRAI</strong>
Test blocks<br />
Aspect Associated<br />
key<br />
Generic name Comments Languages<br />
Organization chart blocks<br />
Environment<br />
[7] Left limit of a test Starts a test Flowchart and ladder<br />
[6] Right limit of a test Ends a test Flowchart and ladder<br />
Aspect Associated<br />
key<br />
Generic name Comments Languages<br />
[] Right limit of a Adds an output to the Function block<br />
function block function block<br />
[?] Lower right corner of a Adds an output to the Function block<br />
function block function block<br />
<strong>AUTO</strong>MG<strong>EN</strong> 8 58 ©opyright 1988-2007 <strong>IRAI</strong>
Other blocks<br />
Environment<br />
Aspect Associated<br />
key<br />
Generic name Comments Languages<br />
.<br />
[*]<br />
Combination /<br />
transition link<br />
This block is a link<br />
between the Logical<br />
Diagrams or Ladder<br />
languages and the<br />
Grafcet language<br />
Grafcet /<br />
Flowchart /<br />
Ladder<br />
Documenting program elements<br />
To document program elements, click below with the left side of the<br />
mouse. To create comments, click on a blank space on the sheet. To<br />
validate modifications, push the [Enter] key or click outside the editing<br />
are with the left side of the mouse. To delete modifications, push the<br />
[Esc] key or click outside the editing area with the right side of the<br />
mouse.<br />
When editing tests and actions, a « … » button appears under the editing<br />
area. If you click on it you access an assistant for creating tests or<br />
actions.<br />
<strong>AUTO</strong>MG<strong>EN</strong> 8 59 ©opyright 1988-2007 <strong>IRAI</strong>
Test creation assistant<br />
Environment<br />
Adding symbols<br />
To create a symbol, click with the right side of the mouse on the symbol<br />
table in the work space and select « Add ». Or click the button on the<br />
toolbar. You can also launch program compiling containing unset<br />
symbols. You will be asked for variables corresponding to the symbols<br />
during the compilation.<br />
<strong>AUTO</strong>MG<strong>EN</strong> 8 60 ©opyright 1988-2007 <strong>IRAI</strong>
Attribution of symbols during compilation<br />
Environment<br />
To easily design a program, create a new<br />
sheet, then click with the right side of the<br />
mouse on the bottom of the sheet. Select<br />
« Assistant » from the menu, you will then<br />
be guided by it.<br />
<strong>AUTO</strong>MG<strong>EN</strong> 8 61 ©opyright 1988-2007 <strong>IRAI</strong>
Running an application<br />
To run an application easily<br />
Environment<br />
The button on the toolbar is the quickest way to see application run<br />
results. This pushbutton activates the following mechanisms:<br />
- compilation of the application if it is not updated (not already<br />
compiled after the last modifications),<br />
- installation of the run module (with downloading if the current target<br />
is a processor and following the connection options),<br />
- passage of the target to RUN,<br />
- activation of the dynamic display.<br />
To end the run<br />
Click on . On the processor target, the program continues to be run<br />
on the target. On the PC, the program is stopped.<br />
To compile only<br />
Click on .<br />
To stop the compilation<br />
Click on .<br />
To connect to a processor or install a PC<br />
Click on .<br />
To disconnect a processor or uninstall a PC<br />
Click on .<br />
To put the target in RUN mode<br />
Click on .<br />
To put the target in STOP mode<br />
Click on .<br />
To initialize the target<br />
Click on .<br />
<strong>AUTO</strong>MG<strong>EN</strong> 8 62 ©opyright 1988-2007 <strong>IRAI</strong>
Environment<br />
To run a program cycle on the target (generally not supported on<br />
processors)<br />
Click on .<br />
To activate the dynamic display<br />
Click on .<br />
To run an application, click on the « GO »<br />
button. To end the run, click again on the<br />
same button.<br />
<strong>AUTO</strong>MG<strong>EN</strong> 8 63 ©opyright 1988-2007 <strong>IRAI</strong>
The compiler<br />
Environment<br />
The compiler translates the sheets into a set of pivot language equations<br />
(these can be displayed by double clicking on the « Generated code /<br />
pivot language » element on the browser).<br />
The pivot language is then translated into a language which can be run<br />
by a post-processor (the current post-processor can be displayed and<br />
selected by double clicking on the « Targets » panel accessible by<br />
clicking on the « Targets » tab at the lower part of the window where the<br />
browser is.<br />
Modifying compiler options<br />
Double click on the element « Configuration / Compiler options».<br />
Displaying compilation messages<br />
The « Compilation » panel on the messages window contains the counts<br />
produced by the last compilation.<br />
Finding an error<br />
By double clicking on error messages, you can find the source.<br />
An error message and its source<br />
<strong>AUTO</strong>MG<strong>EN</strong> 8 64 ©opyright 1988-2007 <strong>IRAI</strong>
Environment<br />
If the message windows are hidden and if one or more errors are<br />
detected by the compiler, a dialogue box indicates the first error detected<br />
(to display the message windows: use the « Messages » command from<br />
the « Windows » menu).<br />
At the end of the compilation the<br />
« Compilation » window provides a list of<br />
any errors. By double clicking on the error<br />
messages, the site in the program that<br />
caused the error is displayed.<br />
<strong>AUTO</strong>MG<strong>EN</strong> 8 65 ©opyright 1988-2007 <strong>IRAI</strong>
Running programs on a PC<br />
The « run PC» target is an actual processor loaded in your PC.<br />
You can:<br />
- test your applications,<br />
- drive a virtual operating part created with IRIS 2D or 3D,<br />
- drive input/output cards connected to the PC.<br />
Environment<br />
Configuring the number of variables<br />
Double click on the « Configuration / Post-processors / Executor PC /<br />
Variables » element.<br />
Selecting the number of variables<br />
The space needed for the variables used in the application is<br />
automatically reserved by default. You can manually select the amount<br />
of memory to reserve for each type of variable. This may be necessary if<br />
an indexed addressing is used to access a variable table.<br />
<strong>AUTO</strong>MG<strong>EN</strong> 8 66 ©opyright 1988-2007 <strong>IRAI</strong>
Environment<br />
PC system variables<br />
Bits 0 to 99 and words 0 to 199 are system variables and can not be<br />
used as user variables in your applications. The two tables below provide<br />
details on the PC system variables.<br />
Bits Use<br />
0 active at first cycle, activation of initial Grafcet steps<br />
1 to 4 reserved for I/O drivers<br />
5 to 7 reserved for I/O driver errors<br />
8 error on watchdog overflow is equal to 1<br />
9 and error general PC fault<br />
10<br />
11 run mode 1=RUN, 0=STOP<br />
12 emergency stop pass to 1 in the event of an error or set to 1 to stop the program<br />
13 to reserved for drivers<br />
29<br />
30 bit associated to timer 1<br />
31 bit associated to timer 2<br />
32 bit associated to timer 3<br />
33 bit associated to timer 4<br />
34 bit associated to timer 5<br />
35 bit for repeating sector (pass to 1 on repeat sector, reset to zero is the job of the<br />
programmer)<br />
36 setting this bit to 1 causes reading of the clock in real time and transfer to System<br />
words 4, 5, 6, 7, 8, 51 and 52.<br />
37 setting this bit to 1 causes writing of System words 4, 5, 6, 7, 8, 51 and 52 in the<br />
real time clock.<br />
38 to<br />
55<br />
reserved<br />
56 division by zero<br />
57 to reserved for future versions<br />
67<br />
68 to<br />
99<br />
reserved for the stack of boolean processing<br />
Words Use<br />
0 reserved for the upper part of the multiplication result or the remainder of the<br />
division<br />
1 to 3 timers in milliseconds<br />
4 timer in 1/10 second<br />
5 timer in seconds<br />
6 timer in minutes<br />
7 timer in hours<br />
8 timer in days<br />
9 to 29 reserved for I/O drivers<br />
30 timer 1 counter<br />
<strong>AUTO</strong>MG<strong>EN</strong> 8 67 ©opyright 1988-2007 <strong>IRAI</strong>
31 timer 2 counter<br />
32 timer 3 counter<br />
33 timer 4 counter<br />
34 timer 5 counter<br />
35 timer 1 procedure<br />
36 timer 2 procedure<br />
37 timer 3 procedure<br />
38 timer 4 procedure<br />
39 timer 5 procedure<br />
40 lower part of clock reference<br />
41 upper part of clock reference<br />
42 to reserved for I/O drivers<br />
50<br />
51 timer in months<br />
52 timer in years<br />
Modifying the run period<br />
Double click on « Post-processors / Executor PC / Run ».<br />
Setting the run period<br />
Environment<br />
Driving inputs/outputs<br />
Double click on « Configuration / Post-processor / Executor PC / I/O<br />
Drivers ».<br />
<strong>AUTO</strong>MG<strong>EN</strong> 8 68 ©opyright 1988-2007 <strong>IRAI</strong>
Adding an I/O driver<br />
Select a driver from the list on the right and then click on « Add ».<br />
« Set parameters » is used to configure certain drivers.<br />
Environment<br />
The executor PC transforms your PC into a<br />
program processor, it can be used to drive<br />
inputs/outputs directly connected to your<br />
computer.<br />
<strong>AUTO</strong>MG<strong>EN</strong> 8 69 ©opyright 1988-2007 <strong>IRAI</strong>
IRIS 2D references<br />
Environment<br />
IRIS 2D objects are used to create supervision and simulation<br />
applications of 2D operating parts.<br />
The link between the objects and the automatically functioning<br />
applications is always created by interchanging the variable state.<br />
IRIS 2D objects are contained in WINDOWS windows.<br />
An IRIS 2D object<br />
IRIS 2D objects have two possible states: the « Configuration » mode<br />
(used to modify the object characteristics) and « Use » mode (for using<br />
an object). The « User » mode is also called « Employ » mode.<br />
Modifying object display<br />
The objects can be hidden or displayed. This property can be specified<br />
when opening an object or when changing the state of the dynamic<br />
display in the environment. Only higher level objects (not objects located<br />
on a console) can be displayed or hidden. Objects located on a console<br />
are displayed or hidden at the same time as the console.<br />
To dynamically modify the visibility of objects, click with the left side of<br />
the mouse on the objects on the browser and select « Display/Hide ».<br />
To modify the display properties, click with the left side of the mouse on<br />
the objects on the browser and select « Properties ».<br />
<strong>AUTO</strong>MG<strong>EN</strong> 8 70 ©opyright 1988-2007 <strong>IRAI</strong>
Display properties of an object.<br />
Modifying object characteristics<br />
Environment<br />
Removing an object<br />
Method 1: click the button on the surface of the object.<br />
Method 2: with the right side of the mouse click on the object on the<br />
browser and select « Delete » from the menu.<br />
Dimensioning an object<br />
By dragging the object from one of its edges you can enlarge or shrink it<br />
(you can also precisely modify the size of an object by accessing its<br />
properties, see below).<br />
Moving an object<br />
Drag the object by clicking with the left side of the mouse on the minibar<br />
located on the upper part of its surface.<br />
Putting an object in « User » mode<br />
Method 1: click on the button on the object with the left side of the<br />
mouse.<br />
Method 2: click with the right side of the mouse on the object.<br />
Putting an object in « Configuration » mode<br />
Click with the right side of the mouse on the object.<br />
Modifying the characteristics of an object<br />
Method 1: click on the button.<br />
Method 2: push down the [CTRL] key on the keyboard and click with the<br />
right side of the mouse on the object, then release the [CTRL] key.<br />
<strong>AUTO</strong>MG<strong>EN</strong> 8 71 ©opyright 1988-2007 <strong>IRAI</strong>
Environment<br />
Method 3: with the right side of the mouse click on the object on the<br />
browser and select « Properties » from the menu.<br />
Block access to configuration for all objects<br />
With the right side of the mouse click on « Project » on the browser,<br />
select « Properties » and check « Block IRIS 2D object configuration »<br />
on the « Advanced » tab.<br />
Basic objects, preset objects<br />
The basic objects set major functionality types. Preset objects are based<br />
on a basic type and a configuration to meet a specific need. For an<br />
example, an emergency pushbutton is an object derived from a basic<br />
object used to create pushbuttons and lights. To access preset objects,<br />
use the assistant by clicking with the right side of the mouse on the<br />
« IRIS » element on the browser and select « Adding an IRIS 2D<br />
object ».<br />
List of basic objects<br />
« Console » object<br />
The console object is the only object which can contain other objects on<br />
its surface. It is used to create command consoles and animation<br />
surfaces for virtual operating parts. This object has a pushbutton used<br />
to manage objects on its surface: add, move, delete etc.<br />
The « Button and light » object<br />
This is used to create pushbuttons and lights that interact with the<br />
processing application variables.<br />
The« Object » object<br />
This is a polymorphic element primarily used to simulate operating parts.<br />
The « Digital value » object<br />
This is used to display numeric values of the processing application in a<br />
number format.<br />
The « Screen, keyboard, message list » object<br />
This is used to display information on the processing application in a text<br />
format.<br />
<strong>AUTO</strong>MG<strong>EN</strong> 8 72 ©opyright 1988-2007 <strong>IRAI</strong>
Environment<br />
The « Sound » object<br />
This is used to produce output sounds when the variable state of the<br />
processing application changes.<br />
The « Data archive » object<br />
This is used to display processing application data in a table or chart<br />
format and save them in the computer memory or on the disk.<br />
The « Program » object<br />
This is used for processing run separately from the processing<br />
application.<br />
The « Dialogue box » object<br />
This is used to display messages in a pop-up window format regarding<br />
changes in the variable state of the processing application.<br />
The « Analog value » object<br />
This is used to display processing application numeric variables in an<br />
analog numeric format (bars, dials etc.).<br />
Practical experience<br />
In this chapter you will be able to quickly create your first IRIS 2D<br />
application. We are going to create a console, put a pushbutton on it and<br />
link the object variables to the processing application.<br />
Step 1<br />
Creating a minimal application with <strong>AUTO</strong>MG<strong>EN</strong> see chapter Designing<br />
programs.<br />
This is a Grafcet with one step as shown below.<br />
0<br />
<strong>AUTO</strong>MG<strong>EN</strong> 8 73 ©opyright 1988-2007 <strong>IRAI</strong>
Environment<br />
Step 2<br />
Launch the run of the <strong>AUTO</strong>MG<strong>EN</strong> application (click on the « Go »<br />
button on the toolbar).<br />
Step 3<br />
With the right side of the mouse click on the « IRIS » element on the<br />
browser and then select « Add an IRIS 2D object » from the menu. In the<br />
« Basic objects » category, double click on « Console ».<br />
At this point the object will appear on the screen in this format:<br />
Step 4<br />
To add a pushbutton to the console click on the console icon (menu<br />
access) and select the « Add an object » option. In the « Basic objects »<br />
category, double click on « illuminated button ».<br />
The object will then appear on the console:<br />
Step 5<br />
Now we are going to associate the pushbutton to a processing<br />
application output, for example %Q4. Click the pushbutton icon (not<br />
the console icon). The pushbutton properties dialogue box will open:<br />
<strong>AUTO</strong>MG<strong>EN</strong> 8 74 ©opyright 1988-2007 <strong>IRAI</strong>
Environment<br />
Click the « Links » tab (upper part of the dialogue window). In the<br />
« Action when button is pressed » section enter « %Q4=1 ». In the<br />
« Action when button is released » section enter « %Q4=0 ». Then click<br />
on « OK » on the pushbutton on the lower part of the dialogue window.<br />
Actions on the pushbutton will drive processing application output 4. You<br />
can open a « Monitoring » window from the « Set-up » menu by clicking<br />
with the right side of the mouse on the browser. You display the state of<br />
output 4 when you click then release the pushbutton.<br />
Step 6<br />
We are going to associate a light to the « Illuminated Button » object, this<br />
light will be associated to a processing application input (for example 12).<br />
Click the pushbutton icon again. In the « Aspect » tab click on the<br />
« Pushbutton and light » radio button. Click on the « Links » tab and<br />
enter « %i2 » in the « Light state » section. Click on the « OK »<br />
pushbutton in the lower part of the property dialogue window. You can<br />
keep the state of variable « %i2 » modified (with a « Monitoring » window<br />
or by modifying the state of the physical input, if it exists).<br />
<strong>AUTO</strong>MG<strong>EN</strong> 8 75 ©opyright 1988-2007 <strong>IRAI</strong>
Environment<br />
Step 7<br />
We are going to duplicate the « Illuminated Button » on the console in<br />
order to obtain a second pushbutton whose properties we will modify.<br />
Click on the pushbutton with the left side of the mouse while pressing<br />
down the [SHIFT] key. Black squares will appear around the selected<br />
object. Click on the console icon and select the « Copy » option.<br />
Click on the console icon and select the « Paste » option. Now there<br />
are two overlapping « Illuminated Button» objects. Drag the upper one (it<br />
is the only accessible one) by its upper bar and move it away from the<br />
other pushbutton. The object which has been duplicated has the same<br />
properties as the first. Now you can set the parameters for the second<br />
object, for example, so it is linked to output 5 and input 3.<br />
You can also customize the aspect of the pushbuttons by using the<br />
aspect tab for the two objects. You can modify the size of the objects by<br />
dragging their edges.<br />
The three objects on the screen (console and two pushbuttons) are in<br />
« Configuration » mode, this means that they have a mini bar on the<br />
upper part of their surface, icons and edges for modifying their<br />
dimensions. The objects have another mode called « Employ », in this<br />
mode their aspect is permanent: the upper bar, icon and edges for<br />
modifying the dimensions no longer exist. To tilt an object, click on it with<br />
the right side of the mouse.<br />
At this point you will have created an object that looks like this:<br />
<strong>AUTO</strong>MG<strong>EN</strong> 8 76 ©opyright 1988-2007 <strong>IRAI</strong>
Environment<br />
Creating an autonomous supervision application<br />
To create an autonomous supervision application (without developing a<br />
processing application with <strong>AUTO</strong>MG<strong>EN</strong>) follow the procedure below:<br />
- create correspondences for the <strong>AUTO</strong>MG<strong>EN</strong> variables and the<br />
processor variables by double clicking on the « Configuration /<br />
Post-processor / / Variable<br />
correspondence » element (see the post-processor manual for<br />
more information).<br />
- compile the application by clicking on the button on the toolbar<br />
(this validates the variable correspondence).<br />
- configure the connection mode on « Only connect » by double<br />
clicking on « Configuration / Post-processor / / Connection option ».<br />
Comments:<br />
- the « Automatic go » project option is used to obtain an application<br />
which automatically connects to the target to be started.<br />
- the « Generate an executable » on the « File » menu is used to<br />
obtain an autonomous supervision application which is zipped and<br />
not covered by copyright in the format of a single executable file.<br />
Syntax for accessing the state of variables<br />
You can use variable names in <strong>AUTO</strong>MG<strong>EN</strong> , IEC 1131-3 or a symbol<br />
syntax. The « … » pushbuttons located near the drag areas in the object<br />
are used to access the assistant for selecting a variable name.<br />
Boolean state<br />
This syntax is used in the object « states » section.<br />
To test the state of a boolean variable, use the variable name, for<br />
example: « i0 », « %q0 », « gate open ».<br />
To test the complement state of a boolean variable, add a character « / »<br />
in front of the variable name, for example: « /i4 », « /%M100 », « /high<br />
level ».<br />
To test the equality of a numeric variable with a constant, use the name<br />
of the numeric variable followed by « = », « < », « > » and a constant, for<br />
example: « %MW200=4 », « speed>2 ».<br />
<strong>AUTO</strong>MG<strong>EN</strong> 8 77 ©opyright 1988-2007 <strong>IRAI</strong>
Environment<br />
The complement state is used for creating « if different », « if less than or<br />
equal to» and « if greater than or equal to » tests, for example:<br />
« /%MW201
« EXIT »: exits the environment,<br />
« UCEXIT »: exits the environment without asking for confirmation,<br />
Environment<br />
« OP<strong>EN</strong>AOF() »: displays an object. « » designates an<br />
object by its title and identifier number (configured in object properties)<br />
with the « #identifier » syntax.<br />
« CHAINAOF() »: displays an object and hides the current<br />
object. « » designates an object by its title and identifier number<br />
(configured in object properties) with the « #identifier » syntax.<br />
Interchanging objects<br />
« PAR<strong>EN</strong>TPARAM(parameter {+n} {-n}) »<br />
This is used for a sister object to access a parent console parameter.<br />
The parameter must be set in the parent console « Links / Data for sister<br />
objects » section. See the chapter « Console » object SISTERPARAM(<br />
identifier , parameter)<br />
When used for the OBJECT object, this syntax makes it possible to read<br />
an object's value. See the « Object » object.<br />
SETPARAM( identifier , parameter , value)<br />
Used to modify the object parameter.<br />
To access the list of parameters that can be modified, click with the right<br />
side of the mouse on « Illuminated Button» while editing the action areas<br />
of an object, then select the « Parameters » command.<br />
Details of a « Console » object<br />
« Aspect » tab<br />
Window<br />
This is used to set the aspect of the console window: presence of edges,<br />
a title bar (in this case a title can be given) presence of close and reduce<br />
icons. If you check « Display help messages » you set-up a message<br />
area at the bottom of the window, the size of this area is automatically<br />
established based on the selected font (see below). If this area is not set,<br />
messages from the sisters will be displayed on the parent console of the<br />
console and on the bottom of the <strong>AUTO</strong>MG<strong>EN</strong> environment window (if<br />
the object does not have a parent).<br />
<strong>AUTO</strong>MG<strong>EN</strong> 8 79 ©opyright 1988-2007 <strong>IRAI</strong>
Environment<br />
Console background<br />
This establishes the console background: color (see below), transparent<br />
(accessible only if the console is the sister of another console), bitmap<br />
(the background is set by a « .BMP » file, for example created with<br />
PAINTBRUSH).<br />
Colors<br />
This is used to select the color for the console background (if a colored<br />
background is selected - see above), the background and the characters<br />
of the help message display area (if this area is valid - see above).<br />
Fonts for the help area<br />
This establishes the font used for displaying help messages at the<br />
bottom of the console.<br />
Object size<br />
This establishes object dimensions in number of dots. These values can<br />
be modified to precisely set the size of an object.<br />
Texts<br />
Help text and bubble text.<br />
« Bitmap » tab<br />
Bitmap<br />
If the console background contains a bitmap (see « Aspect » tab) the<br />
editing area must contain a complete access name to a « .BMP » file (16<br />
color, 256 color and 24 bits formats are supported).<br />
The « SCAN » and « EDITOR » pushbuttons are respectively used to<br />
search for a « .BMP » file and edit a file with WINDOWS PAINTBRUSH<br />
software.<br />
« Links » tab<br />
Data for sister objects<br />
This editing area is used to set parameters that sister objects can access<br />
with the key word « PAR<strong>EN</strong>TPARAM ». One setting per line must be<br />
written. Each setting must comply with the following syntax:<br />
« PARAMETER=VALUE ».<br />
<strong>AUTO</strong>MG<strong>EN</strong> 8 80 ©opyright 1988-2007 <strong>IRAI</strong>
« Options » tab<br />
Environment<br />
Grid<br />
This is used to set a grid (invisible) for positioning objects. Only the<br />
« Move» command on the console integrated menu uses the grid. Grid<br />
values are expressed in number of pixels. Values 0 and 1 cancel the grid<br />
effect. This function must be used to perfectly align objects.<br />
Resetting sisters<br />
If you check « Continue to reset sisters ... » you establish that the sister<br />
must continue to be updated when the console is changed to an icon.<br />
This option is used, when it is not selected, to increase system<br />
performance when a console changed to an icon only contains visual<br />
elements.<br />
« Sisters » tab<br />
Sisters<br />
This section contains the list of console sister objects. The « Properties »<br />
pushbutton is used to directly open the properties dialogue box for the<br />
sister selected from the list. The « Destroy » pushbutton eliminates the<br />
selected object. The « Positions » editing areas are used to set object<br />
positions.<br />
« External » tab<br />
Executable name<br />
Name of an executable file operating on the console.<br />
Parameters<br />
Parameters provided on the command line for the executable.<br />
<strong>AUTO</strong>MG<strong>EN</strong> 8 81 ©opyright 1988-2007 <strong>IRAI</strong>
Details of an « Illuminated Button » object<br />
« Aspect » tab<br />
Environment<br />
Object type<br />
This is used to select the object type: pushbutton, light or pushbutton<br />
integrated with a light.<br />
Colors<br />
This is used to select the object color. If the object is a pushbutton, the<br />
« Background off » setting represents the color of the pushbutton. If the<br />
object is a light or a pushbutton integrated with a light the « Background<br />
on » setting establishes the color of the background when the light is on<br />
and « Background off » when the light is off. If the object aspect is<br />
established by a bitmap only the character color can be set.<br />
Object size<br />
This establishes object dimensions in number of dots. These values can<br />
be modified to precisely set the size of an object. This is necessary if the<br />
object aspect is established by a bitmap.<br />
Font<br />
This is used to select character font and size. The font file used must be<br />
present on the PC where the program is run.<br />
Text<br />
This is used to specify the text displayed on the object, its position, its<br />
print direction as well as the help text displayed when the button is<br />
pressed and a bubble text which is displayed when the cursor is placed<br />
on the object.<br />
« Links » tab<br />
Action when<br />
This is used to set the actions to be effected when the button is pressed<br />
and when it is released.<br />
An action can be setting the state of a variable, for example:<br />
O0=1, m200=4, _depart cycle_=3<br />
Or a preset key word<br />
Configuration example where the input 10 reflects the pushbutton state<br />
(i10 to 0 if the button is released, i10 to 1 if the button is pressed):<br />
<strong>AUTO</strong>MG<strong>EN</strong> 8 82 ©opyright 1988-2007 <strong>IRAI</strong>
Action when the button is pressed: i10=1<br />
Action when the button is released: i10=0<br />
Environment<br />
Light state<br />
Establishes the light state. This section must contain the name of a<br />
variable which drives the light: 0 = light off, 1 = light on.<br />
For example:<br />
b31, o4, _light init_, m200=50, m400
Environment<br />
The « Resize the image » option is used to extend the bitmap over the<br />
entire surface of the object.<br />
The bitmap file contains the four possible object aspects: button released<br />
light off, button pressed light off, button released light on, button pressed<br />
light on.<br />
Even if the file is a pushbutton without a light or a light there are always<br />
four aspects of which only two are used.<br />
The bitmap file is divided horizontally in four.<br />
Example:<br />
The « Different aspect if the cursor is on the object… » option is used to<br />
display a different image when the cursor passes over the object.<br />
If this option is checked, the bitmap file contains 8 aspects, four<br />
supplementary aspects are added to the right of the bitmap to contain<br />
the design of the object when the cursor is on the object.<br />
<strong>AUTO</strong>MG<strong>EN</strong> 8 84 ©opyright 1988-2007 <strong>IRAI</strong>
Example:<br />
Environment<br />
Sounds<br />
If WAV files are selected, the object can produce sounds if the object is<br />
pressed, released or if the cursor is on the object.<br />
Details of a « Digital value » object<br />
« Aspect » tab<br />
Format<br />
This is used to set the type of display:<br />
• Always display the sign: display the '+' sign for positively signed<br />
values,<br />
• Signed value: sets the signed or unsigned mode for 16 or 32 bit<br />
integers (only base 10),<br />
• Display all digits: display the 0 at the beginning of the value if<br />
necessary.<br />
Base<br />
• Establishes the display base for 16 and 32 bit integers.<br />
Colors<br />
This is used to select the background colors of the object (if it is not<br />
transparent) and the characters.<br />
Font<br />
This is used to select character font and size. The font file used must be<br />
present on the PC where the program is run.<br />
<strong>AUTO</strong>MG<strong>EN</strong> 8 85 ©opyright 1988-2007 <strong>IRAI</strong>
Number of digits<br />
Sets the length of the integer and decimal parts.<br />
Environment<br />
Background<br />
This is used to select either a colored or transparent (if the object is only<br />
placed on one console) background.<br />
Object size<br />
This establishes object dimensions in number of dots. These values can<br />
be modified to precisely set the size of an object.<br />
« Texts » tab<br />
Bubble Text<br />
Text displayed in a bubble when the user puts the cursor on the object.<br />
Text displayed before and after the value<br />
This is used to display information to the left and right of a numeric value.<br />
« Links » tab<br />
Variable or symbol<br />
This designates the variable to display. To access a time delay counter<br />
or procedure the following syntax must be used:<br />
• for the counter: COUNT (time delay), example: COUNT(t3),<br />
• for the procedure: PRED(TIME DELAY), EXAMPLE: PRED(t7),<br />
The Variable state can be modified<br />
If this is checked then the user can modify the variable state by clicking<br />
on the object.<br />
Details of an « Analog value » object<br />
« Aspect » tab<br />
Objects<br />
This is used to set the type of display.<br />
Print direction<br />
This establishes print direction: horizontal or vertical.<br />
<strong>AUTO</strong>MG<strong>EN</strong> 8 86 ©opyright 1988-2007 <strong>IRAI</strong>
Environment<br />
Colors<br />
This is used to select the background colors of the object (if it is not<br />
transparent) and the object.<br />
Background<br />
This is used to select either a colored or transparent (if the object is only<br />
placed on one console) background.<br />
Object size<br />
This establishes object dimensions in number of dots. These values can<br />
be modified to precisely set the size of an object.<br />
Texts<br />
Bubble text.<br />
« Links » tab<br />
Variable or symbol<br />
This designates the variable linked to an object (a word or a counter).<br />
User action …<br />
This establishes if a variable can be modified by the user.<br />
« Limits» tab<br />
Minimum, maximum<br />
Minimum and maximum values.<br />
Start angle, end angle<br />
To display the type of dial which establishes the start angle and end<br />
angle. The values are expressed in degrees:<br />
<strong>AUTO</strong>MG<strong>EN</strong> 8 87 ©opyright 1988-2007 <strong>IRAI</strong>
« Graduations » tab<br />
Using the graduations<br />
This validates or invalidates the use of graduations<br />
Environment<br />
Start value, end value<br />
Values displayed for the graduations, these values can be signed and/or<br />
floating point numbers.<br />
No small graduations, no large graduations<br />
No graduations (two levels) related to start and end values. These values<br />
can be floating point numbers.<br />
Font<br />
This establishes the characters used for the graduations.<br />
Area N°1, area N°2 and area N°3<br />
This is used to establish colored areas. « Start value » and « End value »<br />
set each area. The color for each area is specified by three components<br />
of red, green and blue between 0 and 255.<br />
Colors<br />
This establishes the character and graduation color. Again here the<br />
colors are expressed by their three components: red, green and blue.<br />
<strong>AUTO</strong>MG<strong>EN</strong> 8 88 ©opyright 1988-2007 <strong>IRAI</strong>
Details of « Screen, keyboard, message list » object<br />
Environment<br />
Links with the application<br />
The link between the object and the application is made using word<br />
tables.<br />
To send data to a type of object (with or without the keyboard) the data<br />
must be placed starting from the second word of the reception table plus<br />
the length of the data in the first word in the table (maximum length is<br />
255). Each word contains a datum.<br />
The data can be: an ASCII character, a number of a preset message +<br />
8000 hexa, or a special command: 100 hexa deletes the window, 200<br />
hexa displays the date, 300 hexa displays the time, 400 displays the<br />
message number.<br />
When the object has reread the available data in a table it resets the first<br />
word to 0 to indicate that the operation has been effected.<br />
The principle is the same for « with keyboard » objects: the first word of<br />
the transmission table contains the number of characters entered on the<br />
keyboard, the following words contain the characters (one per word). The<br />
application must reset the first word to 0 when it has used the data.<br />
The interchange table for the « Message box, alarm list » object has a<br />
fixed length of 10 words. As is true for the « Screen » type the first word<br />
starts the message display. If it is different than 0 it designates a<br />
message number to be displayed. Only registered messages can be<br />
displayed. The first word can also take an ffff hexa value to clear the<br />
message box.<br />
Description of 10 words used for interchanges with the « Message box »:<br />
Word 0 represents the first word on the table, Word 1 the second, etc.<br />
Word 0: message number to be displayed if 0 is no messages or ffff hexa<br />
to clear all messages,<br />
Word 1: class number for the message (see chapter message classes<br />
for a more detailed explanation).<br />
<strong>AUTO</strong>MG<strong>EN</strong> 8 89 ©opyright 1988-2007 <strong>IRAI</strong>
Environment<br />
The following words establish the date and time and can displayed for<br />
each message. A value equal to ffff hexa asks the object to use the<br />
current computer date and time (this does not include milliseconds).<br />
Word 2: day<br />
Word 3: month<br />
Word 4: year<br />
Word 5: hours<br />
Word 6: minutes<br />
Word 7: seconds<br />
Word 8: milliseconds<br />
Word 9: reserved (put 0)<br />
Message classes<br />
Message classes are used to classify messages into families which<br />
share the following characteristics: background color, character color and<br />
an icon.<br />
there are two preset classes:<br />
• the information message class: blue characters on a white<br />
background, icon , it bears the number -1,<br />
• the alarm message class: white characters on a red background, icon<br />
, it bears the number -2.<br />
Other classes can be set by the user.<br />
A bubble text can be associated with the object.<br />
« Aspect » tab<br />
Object type<br />
This is used to set an object type. See chapter links with the application<br />
Colors<br />
This is used to select the background colors of the object and the<br />
characters.<br />
Font<br />
This is used to select the character font used for displaying texts.<br />
Object size<br />
This establishes object dimensions in number of dots. These values can<br />
be modified to precisely set the size of an object.<br />
<strong>AUTO</strong>MG<strong>EN</strong> 8 90 ©opyright 1988-2007 <strong>IRAI</strong>
Texts<br />
Bubble text.<br />
« Links » tab<br />
Environment<br />
Reception, transmission<br />
This sets the first variables of the reception and transmission tables.<br />
These areas can contain a variable name or symbol.<br />
« List » tab<br />
These sections do not regard « Message box » objects.<br />
Icons<br />
If this is checked an icon is displayed before the messages.<br />
Classes<br />
If this is checked a message class number is displayed<br />
Days, Months, Years, Hours, Minutes, Seconds, 1/1000 seconds<br />
If these are checked each one of these elements is displayed.<br />
Messages<br />
If this is checked a message is displayed.<br />
Numbers<br />
If this is checked a message display number is displayed.<br />
Message classes<br />
This editing area is used to establish new message classes. Each line<br />
sets a class. The following must appear in order and be separated by<br />
commas on each line: the background color three components red,<br />
green and blue), the character color (three components red, green and<br />
blue), the class name, the bitmap file name for the icon associated to the<br />
class.<br />
For example:<br />
255,0,0,0,0,0,ALARM,alarm.bmp<br />
Means:<br />
Red background color, black character color, ALARM class name, file<br />
containing icon: « alarm.bmp ».<br />
<strong>AUTO</strong>MG<strong>EN</strong> 8 91 ©opyright 1988-2007 <strong>IRAI</strong>
« Options » tab<br />
Environment<br />
Displaying character hexadecimal codes<br />
This option is used to display hexadecimal code for each character in<br />
place of its ASCII representation. It is used for « Screen ... » type objects<br />
and is normally used for starting up programs.<br />
Horizontal, vertical scroll bar<br />
Displays or hides scroll bars.<br />
Converting OEM characters to ANSI<br />
If this is checked, the characters from the processing application are<br />
automatically converted from OEM characters (MS-DOS) to ANSI<br />
characters (WINDOWS). The reverse conversion is applied to characters<br />
which drive the object for the processing application.<br />
Duplicating messages to ...<br />
This section can receive a file or peripheral name (for example, « LPT1 »<br />
for the printer) It is possible to specify multiple files and/or peripherals by<br />
separating them with a comma. The displays will be automatically<br />
duplicated: Printing « edge of the water ».<br />
Associating a message storage file ...<br />
This is used for setting a file which will be associated to the object and<br />
used for storing information. If this file exists then the messages will be<br />
saved (according to the number set in the « number of memorized lines»<br />
section, when the number is reached the oldest data is deleted. When<br />
the object is open, and if a storage file exists since its last use, then the<br />
data contained in the file is transferred to the object.<br />
Write the old message to ...<br />
This is used to set a file or a peripheral which receives old messages<br />
(the messages which are eliminated from the storage file to make room).<br />
Number of memorized lines ...<br />
This establishes the message storage file capacity in number of lines.<br />
The value 0 attributes the maximum space that can be used (not a fixed<br />
limit).<br />
<strong>AUTO</strong>MG<strong>EN</strong> 8 92 ©opyright 1988-2007 <strong>IRAI</strong>
« Messages » tab<br />
Environment<br />
Preset messages<br />
This editing box is used to document preset messages (one per line).<br />
Details of « Data archive » object<br />
« Aspect » tab<br />
Objects<br />
This is used to set the type of display.<br />
The object can be represented in table format (figure 1.1) or graph<br />
format (figure 1.2).<br />
(figure 1.1) (figure 1.2)<br />
Colors<br />
This is used to select the font color when the object is in a table format<br />
as well as color for marking values on the graph.<br />
Object size<br />
This establishes object dimensions in number of dots. These values can<br />
be modified to precisely set the size of an object.<br />
Text<br />
A bubble text associated with the object.<br />
« Data » tab<br />
First variable to read<br />
This is used to select the first variable to be archived.<br />
<strong>AUTO</strong>MG<strong>EN</strong> 8 93 ©opyright 1988-2007 <strong>IRAI</strong>
Environment<br />
Number of variables to read<br />
This indicates to the ARCHIVE object the consecutive number of<br />
variables to the « First variable to read » that it must archive.<br />
Number of memorized registrations<br />
This is used to size memory database.<br />
A registration represents an acquisition of « n » variables (« n » is the<br />
number of variables to read).<br />
Periodic reading<br />
Variable acquisition will be done at fixed intervals of ARCHIVE object<br />
running.<br />
Start reading<br />
Variable acquisition will be effected when the « Control word » has given<br />
the order.<br />
Period<br />
This is used to establish the time between two acquisitions. The time is<br />
in Day(s)/Hour(s)/Minute(s)/Second(s)/Millisecond(s) format:<br />
J for days<br />
H for hours<br />
M for minutes<br />
S for seconds<br />
MS for milliseconds<br />
E.g.: 2J<br />
E.g.: 2H10M15S<br />
Control<br />
This is used to set a variable (a word) that controls the ARCHIVE object.<br />
From the value taken in the count, its contents is reset by the ARCHIVE<br />
object.<br />
Value Action<br />
0 Nothing<br />
1 Start an acquisition (Reading started)<br />
2 Freeze the acquisitions<br />
3 Restart archiving (after freezing)<br />
4 Clear the memory database<br />
5 Destroy the archive file<br />
6 Activate « Save last acquisitions » mode<br />
<strong>AUTO</strong>MG<strong>EN</strong> 8 94 ©opyright 1988-2007 <strong>IRAI</strong>
7 Cancel « Save last acquisitions » mode<br />
« Options » tab<br />
Environment<br />
Use the image file<br />
The image file is used:<br />
At the end of using the ARCHIVE object, to save the database present in<br />
the memory.<br />
When the ARCHIVE object is launched, to reconstruct the database<br />
present in the memory during the last use.<br />
Using the archive file<br />
Each acquisition is saved in the file in standard database format.<br />
Displaying<br />
Acquisition date: This is used to display the acquisition date of a<br />
registration.<br />
Acquisition time: This is used to display the acquisition time of a<br />
registration.<br />
Hours, minutes, seconds, milliseconds: This is used to configure the<br />
acquisition time display.<br />
The time display is effected downstream from the display of acquisitions<br />
for the TABLE object (figure 3.1) or under the grid when it is set for the<br />
GRAPH object (figure 3.2)<br />
(figure 3.1) (figure 3.2)<br />
« Tables » tab<br />
Font<br />
This is used to select a font for displaying the column name, times and<br />
acquisition value.<br />
<strong>AUTO</strong>MG<strong>EN</strong> 8 95 ©opyright 1988-2007 <strong>IRAI</strong>
Environment<br />
Column name<br />
This is used to set the column name for the TABLE object as well as the<br />
display format for these columns (figure 4.1)<br />
syntax: name, format<br />
format * Display<br />
no format specified Signed, decimal, visible<br />
h Hexadecimal<br />
d Decimal<br />
ns Not signed<br />
s Signed<br />
nv Not visible<br />
v Visible<br />
* The different options can be combined, for example:<br />
Format Display<br />
d,ns,v Decimal without sign visible<br />
(figure 4.1)<br />
« Graph» tab<br />
Minimum, maximum value<br />
This is used to select the minimum and maximum values for displaying<br />
graphs.<br />
Only values included between the minimum and maximum values will be<br />
displayed on the screen.<br />
<strong>AUTO</strong>MG<strong>EN</strong> 8 96 ©opyright 1988-2007 <strong>IRAI</strong>
Environment<br />
Display<br />
This is used to set the display time.<br />
This is communicated to the ARCHIVE object in the<br />
day(s)/Hour(s)/Minute(s)/Second(s)/Millisecond(s) format:<br />
J for days<br />
H for hours<br />
M for minutes<br />
S for seconds<br />
MS for milliseconds<br />
E.g.: Display 2H30M10S<br />
E.g.: Display 100MS<br />
Plotting values on the graph<br />
This is used to make a mark on the graph for each acquisition (figure<br />
5.1)<br />
Displaying time<br />
This is used to display the date and time of an acquisition of one or more<br />
variables on the grid if it is open. Colors and fonts can be set for the time<br />
display.<br />
Outline colors<br />
This is used to set a color for each graph. The first graph has the color of<br />
the first line, the second graph has the color of the second line etc.<br />
Colors are in Red, Green, Blue format.<br />
E.g.: 255,0,0 red outline<br />
If a color is not set on a line, the graph corresponding to this line will not<br />
be outlined.<br />
(figure 5.1)<br />
« Graduations » tab<br />
Using the graduations<br />
This validates or invalidates the use of graduations (figure 6.1).<br />
<strong>AUTO</strong>MG<strong>EN</strong> 8 97 ©opyright 1988-2007 <strong>IRAI</strong>
Environment<br />
Start value, end value<br />
Values displayed for the graduations, these values can be signed and/or<br />
floating point numbers.<br />
No small graduations, no large graduations<br />
No graduations (two levels) related to start and end values. These values<br />
can be floating point numbers.<br />
Font<br />
Establishes the characters used for the graduations.<br />
Area N°1, area N°2 and area N°3<br />
This is used to establish colored areas. "Start value" and "End value" set<br />
each area. The color for each area is set by three components of red,<br />
green and blue between 0 and 255.<br />
Colors<br />
This establishes the character and graduation color. Again here the<br />
colors are expressed by their three components: red, green and blue.<br />
(figure 6.1)<br />
« Grid » tab<br />
Displaying the grid<br />
This validates or invalidate grid display.<br />
Not for ordinates<br />
This sets the vertical pitch of the grid.<br />
Not for abscissas<br />
This sets the horizontal pitch of the grid. The pitch is in<br />
Day(s)/Hour(s)/Minute(s)/Second(s)/Millisecond(s) format:<br />
J for days<br />
<strong>AUTO</strong>MG<strong>EN</strong> 8 98 ©opyright 1988-2007 <strong>IRAI</strong>
H for hours<br />
M for minutes<br />
S for seconds<br />
MS for milliseconds<br />
E.g.: 1J<br />
E.g.: 2H30M15S<br />
Color<br />
This is used to set a color for each grid.<br />
The color is in Red, Green, Blue format<br />
E.g.: 255,0,0 Red outline<br />
Environment<br />
<strong>AUTO</strong>MG<strong>EN</strong> 8 99 ©opyright 1988-2007 <strong>IRAI</strong>
Details of « Object » object<br />
« Aspect » tab<br />
Type<br />
This is used to set one of the object type aspects:<br />
Environment<br />
• « n bitmap aspects »: the object aspect is provided by a bitmap file<br />
which can contain various aspects, see the chapter « Bitmap » tab<br />
• « n bitmap colors »: the object aspect is provided by a bitmap file, the<br />
color is controlled by a processing application variable that replaces<br />
the blank pixels of the bitmap. The other bitmap pixels must be black.<br />
The processing application variable provides a color number, the<br />
colors are set in the « Colors » tab.<br />
• « gauge bitmap »: the object is a gauge with a format set by a bitmap.<br />
The blank bitmap pixels set the format. The other pixels must be black.<br />
The minimum, maximum and print direction are set in the « Gauge »<br />
tab.<br />
• « n format colors »: a rectangle, a rectangle with rounded edges or an<br />
ellipse. The color is managed in the same manner as « n bitmap<br />
colors ».<br />
• « gauge formats »: the object is a rectangular gauge. The principle is<br />
the same as for a « gauge bitmap »<br />
Colors<br />
This is used to select the character color for the text displayed on the<br />
object.<br />
Font<br />
This establishes the font used for displaying text on the object.<br />
Object size<br />
This establishes object dimensions in number of dots. These values can<br />
be modified to precisely set the size of an object.<br />
Texts<br />
Help text and bubble text.<br />
<strong>AUTO</strong>MG<strong>EN</strong> 8 100 ©opyright 1988-2007 <strong>IRAI</strong>
Environment<br />
The text displayed on the object: the position and print direction can be<br />
modified.<br />
« Links » tab<br />
Clicked object, not clicked object<br />
This sets the actions to be effected when the user clicks on the object<br />
and when the user stops clicking the object.<br />
An action can be setting the state of a variable, for example:<br />
O0=1, m200=4, _depart cycle_=3<br />
Or a preset key word.<br />
A configuration example where the input i10 reflects the clicked state of<br />
an object (i10 to 0 if the object is not clicked, i10 to 1 if the object is<br />
clicked):<br />
Clicked object: i10=1<br />
Not clicked object: i10=0<br />
Permanently connect with ..<br />
This area can receive the identifier of a sister object. If this object exists<br />
then the position of the object is modeled on it. The identifier of an object<br />
is an integer value between 1 and 32767. It is specified in the<br />
« Identifier» editing area of the « Links » section.<br />
Aspect/Color/Filling<br />
This area of the dialogue box contains 8 editing areas which can be used<br />
to set different types of object behavior based on the processing<br />
application variables.<br />
No matter what their behavior they will always have a position which<br />
depending on the type of object will design:<br />
• an aspect contained on a bitmap for the « n bitmap aspects » type<br />
• a color number for « n bitmap colors » or « n format colors »<br />
• filling for the « gauge bitmap » or « gauge format » types.<br />
The « Position » area can contain a numeric variable name (C or M). The<br />
areas « + Position » and « - Position » can contain a name of boolean<br />
variables.<br />
<strong>AUTO</strong>MG<strong>EN</strong> 8 101 ©opyright 1988-2007 <strong>IRAI</strong>
Two types of operation are possible:<br />
Environment<br />
• if the « + Position » and « - Position » areas are documented then the<br />
boolean variables contained in them will drive the position: they add or<br />
delete the value specified in the speed area. If the « Position » area is<br />
documented then the current position is written in the variable which<br />
contains the name.<br />
• if the « + Position » and « - Position » areas are blank then the value<br />
containing the variable where the name is written in the « Position »<br />
area will be read as the object position.<br />
The position can vary between the values set in the « Min » and « Max »<br />
areas.<br />
Sensors can be added (boolean variable names) which will be true for<br />
the minimum and maximum position (position equal to minimum or<br />
maximum).<br />
Horizontal movement, vertical movement<br />
These dialogue box areas each contain 8 editing areas respectively used<br />
to set the horizontal and vertical position of the object. The principle is<br />
identical to that described above.<br />
« Formats » tab<br />
Formats<br />
For « n format colors » this section is used to select a rectangle, a<br />
rectangle with rounded corners or an ellipse.<br />
« Bitmap » tab<br />
File name<br />
For « n bitmap aspects, n bitmap colors and gauge bitmap » this editing<br />
area must contain a complete access name to a « .BMP » file. These<br />
files can be created with PAINTBRUSH or another graphics editing<br />
program able to create « .BMP » files.<br />
The « Scan » and « Edit » pushbuttons are respectively used to search<br />
for « .BMP » files and to edit (launch of PAINTBRUSH) « .BMP » file if its<br />
name is in the editing area.<br />
Number of aspects<br />
This editing area must contain the number of aspects (images) contained<br />
in a « .BMP » file. This option is used for « n bitmap aspects ». The<br />
different object aspects must be designed one under the other. The<br />
highest aspect is the number 0.<br />
<strong>AUTO</strong>MG<strong>EN</strong> 8 102 ©opyright 1988-2007 <strong>IRAI</strong>
« Wmf » tab<br />
Environment<br />
File name<br />
For « Meta files » this editing area must contain a complete access name<br />
to a « .EMF » file.<br />
Example of a « .BMP » file with 4 aspects:<br />
The bitmap has transparent areas ...<br />
This option is used to create an object with certain transparent areas (the<br />
background of the parent console will be displayed). The transparent<br />
areas are set by pixels of the same color, a color established by the<br />
three components, red, green and blue. To set these components use<br />
the three scroll bars. The color must be precisely set: exactly the same<br />
proportion of red, green and blue as the color of the pixels in the<br />
transparent areas.<br />
« Colors » tab<br />
Colors<br />
This area is used for « n bitmap colors » and « n format colors » Each<br />
line contains the setting for a color. The syntax used for each line is:<br />
proportion of red (between 0 and 255), proportion of green (between 0<br />
and 255) and proportion of blue (between 0 and 255). The first line<br />
designates color number 0, the second line number 1, etc.<br />
This area is used for « gauge bitmap » and « gauge format ». The first<br />
line (color 0) and the second (color 1) establishes the two colors of the<br />
gauge (active and inactive part).<br />
<strong>AUTO</strong>MG<strong>EN</strong> 8 103 ©opyright 1988-2007 <strong>IRAI</strong>
« Gauge » tab<br />
Environment<br />
Gauge<br />
This section is used for « gauge bitmap » and « gauge format ». The<br />
« Minimum value » and « Maximum value » establish the limits for the<br />
gauge drive variable.<br />
Gauge print direction<br />
This establishes one of the four possible directions for the gauge.<br />
« Sensor» tab<br />
The OBJECT object can be used as a sensor. The sensor is associated<br />
with a boolean variable where the result is true if the sensor is in contact<br />
with one or more of the preset colors (see below), otherwise it is false.<br />
Detection position<br />
This is used to set the side of the object which must be detected.<br />
Detection is effected on the two edges of the selected side.<br />
Example for a detection from below:<br />
Detected colors<br />
A sensor is capable of detecting up to three different colors. If one of<br />
these three colors is at the test points then the boolean variable<br />
associated to the sensor (see chapter « Links » tab) is positioned at 1,<br />
otherwise it is positioned at 0.<br />
The three editing areas can contain a color setting in the format of three<br />
values between 0 and 255 which respectively correspond to the<br />
percentages of red, green and blue. The percentages of these three<br />
colors must exactly correspond to the colors of the object to be detected<br />
in order for the sensor to work.<br />
<strong>AUTO</strong>MG<strong>EN</strong> 8 104 ©opyright 1988-2007 <strong>IRAI</strong>
« Options » tab<br />
Key<br />
Set a key used to simulate a click on an object.<br />
Different syntaxes can be used to set the key code:<br />
• a simple character: For example A, Z, 2,<br />
• the $ character is followed by hexadecimal key code,<br />
• the name of a function key, for example F5.<br />
Environment<br />
For combinations of keys « CTRL+ » or « SHIFT+ » must be added to<br />
the beginning<br />
For example: « CTRL+F4 » or « SHIFT+Z ».<br />
The TAB key is used to access this object<br />
If this is not checked then the TAB key cannot be used to activate the<br />
object.<br />
Advanced techniques<br />
Dynamic object linking<br />
This possibility is used to momentarily link one object to another. The « +<br />
Position » and « - Position » parameters which manage the horizontal<br />
and vertical position are used in a special way for linking one object to<br />
another. These two parameters must contain the name of a numeric<br />
variable (M). The « + Position » variable must contain the f000 value<br />
(hexadecimal) and the « - Position » the identifier of the object to be<br />
connected. The « + Position » variable is reset once the connection has<br />
been made. To cancel the object connection the value f001<br />
(hexadecimal) must be put in the « + Position » variable. See chapter:<br />
Example of operating part simulation 1<br />
Interchanging parameters between two objects<br />
A object can access the parameters of a sister object by using the key<br />
word « SISTERPARAM ».<br />
The syntax is:<br />
SISTERPARAM(identifier of the sister object, parameter)<br />
« parameter » can assume the following values:<br />
STATE object state: Aspect/Color/Filling value<br />
STATE same as above but with negative value<br />
POSX position on horizontal axis<br />
POSX same as above but with negative value<br />
POSY position on y axis<br />
<strong>AUTO</strong>MG<strong>EN</strong> 8 105 ©opyright 1988-2007 <strong>IRAI</strong>
POSY same as above but with negative value<br />
POSX+STATE position on horizontal axis plus state<br />
POSX+STATE position on horizontal axis minus state<br />
POSY+STATE position on vertical axis plus state<br />
POSY+STATE position on vertical axis minus state<br />
Details of « Sound » object<br />
« Aspect » tab<br />
Environment<br />
Object size<br />
This establishes object dimensions in number of dots. These values can<br />
be modified to precisely set the size of an object.<br />
« Sounds » tab<br />
Name of sound files<br />
Complete access name to « .WAV » files.<br />
Associated variables<br />
The boolean variable associated to each sound.<br />
Details of « Dialogue box » object<br />
« Aspect » tab<br />
Type of box<br />
This is used to select the various controls present in the dialogue box:<br />
only one OK button, two buttons OK and CANCEL, or two buttons YES<br />
and NO.<br />
Icons<br />
This is used to select the icon that will appear in the dialogue box. There<br />
are four different icons, but it is possible not to display any of them. It is<br />
also important to note that a special system is associated to each icon.<br />
See the section on the BEEP option for more information on the subject.<br />
Object size<br />
This establishes object dimensions in number of dots. These values can<br />
be modified to precisely set the size of an object.<br />
<strong>AUTO</strong>MG<strong>EN</strong> 8 106 ©opyright 1988-2007 <strong>IRAI</strong>
Environment<br />
Beep<br />
This is used to specify if the dialogue box display must be accompanied<br />
by a sound warning.<br />
Title<br />
This is used to specify the title of the dialogue box.<br />
Message type<br />
There are two possibilities. A preset message is a message present in<br />
the processing application user variables. The other possibility is to<br />
specify a message list in this case the displayed message is a function of<br />
the monitored variable state.<br />
« Links » tab<br />
Variable name<br />
This specifies the name of the variable to monitor. Boolean or numeric<br />
variables can be entered.<br />
For example:<br />
m200, i0<br />
If the variable is boolean, then message no. 1 on the list will be displayed<br />
when the state of that variable passes to 1.<br />
For a numeric variable, if the « Message list » configuration option is<br />
checked, then the dialogue box will be displayed when the value is<br />
between 1 and the number of messages memorized on the list.<br />
For example, if the list contains 8 messages, then it will not display<br />
anything when the variable assumes negative values or those over 8. On<br />
the other hand, when the value is between 1 - 8, then the appropriate<br />
message is displayed.<br />
If the « Preset message » option is activated, then the dialogue box will<br />
display a message of the length contained in the variable, and situated in<br />
the processing application variables based on that variable.<br />
For example. if m200=4, this means that a message 4 characters long is<br />
situated in the 4 variables following m200, or rather m201, m202. m203,<br />
m204.<br />
<strong>AUTO</strong>MG<strong>EN</strong> 8 107 ©opyright 1988-2007 <strong>IRAI</strong>
Environment<br />
Dialogue box return code<br />
With a boolean variable, no matter what action the user effects, it<br />
contents will go to 0. For a numeric variable, there are different return<br />
codes:<br />
Press on an OK button: the variable assumes the value 8000 (hexa)<br />
Press on an CANCEL button: the variable assumes the value 8001<br />
(hexa)<br />
Press on an YES button: the variable assumes the value 8002 (hexa)<br />
Press on an NO button: the variable assumes the value 8003 (hexa)<br />
Comment: Activation of a dialogue box is based on a rising edge, this<br />
means passage from 0 to 1 for a boolean variable, and passage from a<br />
value outside the message list range to a value included in it, for a<br />
numeric variable.<br />
Identifier<br />
This is used to refer to an object in relation to the other objects.<br />
« Messages » tab<br />
Message list<br />
Enter the different preset messages in this area.<br />
Details of « Program » object<br />
Run time distribution<br />
IRIS objects are run by turns. The run time distribution is managed in a<br />
straightforward manner by the object manager. two priority levels are<br />
possible for « PROG » objects: if Priority run » is checked on the<br />
« Program » tab, then the whole program is run while the object is<br />
present. Otherwise, only one line is run before the object yields. There<br />
are exceptions to this rule: access functions to the processing variables<br />
(« READVAR » and « WRITEVAR ») may cause yielding, the YIELD<br />
function sets a yield. In priority run mode, this function must be used<br />
inside a loop in order not to block running of other objects.<br />
Display<br />
The object surface can be used for displaying information. The<br />
« PRINT » function is used to display information.<br />
<strong>AUTO</strong>MG<strong>EN</strong> 8 108 ©opyright 1988-2007 <strong>IRAI</strong>
Environment<br />
Syntax<br />
The character « ; » (semicolon) is used as a separator. Comments can<br />
be written between the chains « (* » and « *) ». There is no difference<br />
between upper and lower case letters for key words and function names,<br />
on the other hand, for variable names there is a difference.<br />
Stating variables<br />
The variables used in a program must be stated before the program<br />
between the key words « BEGINVAR; » and « <strong>EN</strong>DVAR; ».<br />
The following types of variables can be used:<br />
INT 16 bit signed integer<br />
UINT 16 bit unsigned integer<br />
LONG 32 bit signed integer<br />
ULONG 32 bit unsigned integer<br />
STRING string of characters<br />
FLOAT float<br />
The general syntax of a statement is:<br />
;<br />
The general syntax for stating a variable table is:<br />
[];<br />
For example:<br />
BEGINVAR;<br />
INT counter; (* a 16 bit signed integer *)<br />
STRING string; (*a string*)<br />
(*a table of 100 32 bit unsigned integers*)<br />
ULONG table[100];<br />
<strong>EN</strong>DVAR;<br />
Writing a program<br />
The program must be written between the two key words « BEGIN; »<br />
and « <strong>EN</strong>D; »<br />
Example:<br />
<strong>AUTO</strong>MG<strong>EN</strong> 8 109 ©opyright 1988-2007 <strong>IRAI</strong>
BEGIN;<br />
print "Good morning !";<br />
<strong>EN</strong>D;<br />
Constants<br />
Environment<br />
� 16 bit integer: a decimal number between -32768 and 32727 where<br />
"S" follows a hexadecimal number between 0 and FFFF. Example: 12,<br />
-4, $abcd<br />
� 32 bit integer: a decimal number between -2147483648 and<br />
214743648 where "L" or "S" follows a hexadecimal number between 0<br />
and FFFFFFFF followed by "L". Example: 10000L, -200000L,<br />
$12345678L<br />
� string of characters: quotation mark characters followed by a string<br />
followed by quotation mark characters. Controls characters can be<br />
entered in a string. « \ n » replaces an LF character (ASCII code 10),<br />
« \r » a CR character (ASCII code 13). Example: "Abcdef", "" (zero<br />
string), "Follow\r\n"<br />
- float: a decimal number followed by the character "R", the characters "."<br />
are used to divide the integer part from the decimal part. Example: 3.14r,<br />
-100.4r<br />
Assignment<br />
The string «:= » indicates an assignment.<br />
Example:<br />
counter:=4;<br />
var:="ABCDEF";<br />
Calculations<br />
Calculation operators are evaluated from left to right. Parentheses can<br />
be used to specify a calculation priority.<br />
List of calculation operators:<br />
� + addition (chaining for strings)<br />
� - subtraction<br />
� * multiplication<br />
<strong>AUTO</strong>MG<strong>EN</strong> 8 110 ©opyright 1988-2007 <strong>IRAI</strong>
� / division<br />
� > shift to the right<br />
� ^ raise by a power<br />
� binary "and" AND<br />
� binary "or" OR<br />
� binary "exclusive or" XOR<br />
Examples:<br />
result:=var1*(var2+var3);<br />
result:=result
Example:<br />
count:=0;<br />
WHILE count
Environment<br />
HVAL<br />
Provides the value of a string expressed in hexadecimal number format.<br />
Example:<br />
vuint=hval("abcd"); (* vuint will contain abcd hexa *)<br />
ASC<br />
Provides the ASCII code of the first character of a string.<br />
Example:<br />
vuint:=asc("ABCD"); (* vuint will contain 65: ascii code of ‘A’ *)<br />
CHR<br />
Provides a string composed of one character where the ASCII code is<br />
changed into a parameter.<br />
Example:<br />
vstring:=chr(65); (*vstring will contain string "A" *)<br />
STRING<br />
Provides a string composed of n characters. The first subject is the<br />
number of characters, the second the character.<br />
Example:<br />
vstring:=string(100," ");<br />
(* vstring will contain a string composed of 100 spaces *)<br />
STR<br />
Converts an integer numeric value into a string representing the value in<br />
decimals.<br />
Example:<br />
vstring:=str(100); (* vstring will contain the string "100" *)<br />
HEX<br />
Converts an integer numeric value into a string representing the value in<br />
hexadecimals.<br />
Example:<br />
vstring:=str(100); (* vstring will contain the string "64" *)<br />
LEFT<br />
Provides the left part of a string. The first subject is the string, the second<br />
the number of characters to extract.<br />
Example:<br />
vstring:=left("abcdef",2); (* vstring will contain"ab" *)<br />
<strong>AUTO</strong>MG<strong>EN</strong> 8 113 ©opyright 1988-2007 <strong>IRAI</strong>
Environment<br />
RIGHT<br />
Provides the right part of a string. The first subject is the string, the<br />
second the number of characters to extract.<br />
Example:<br />
vstring:=right("abcdef",2); (* vstring will contain "ef" *)<br />
MID<br />
Provides part of a string. The first subject is the string, the second the<br />
position where the extraction begins, the third the number of characters<br />
to extract.<br />
Example:<br />
vstring:=mid("abcdef",1,2); (* vstring will contain "bc" *)<br />
L<strong>EN</strong><br />
Provides the length of a string.<br />
Example:<br />
vuint:=len("123"); (* vuint will contain 3 *)<br />
COS<br />
Provides the cosine of a real value expressed in radians.<br />
Example:<br />
vfloat:=cos(3.14r); (* vfloat will contain the cosine of 3.14 *)<br />
SIN<br />
Provides the sine of a real value expressed in radians.<br />
Example:<br />
vfloat:=sin(3.14r); (* vfloat will contain the sine of 3.14 *)<br />
TAN<br />
Provides the tangent of a real value expressed in radians.<br />
Example:<br />
vfloat:=tan(3.14r); (* vfloat will contain the tangent of 3.14 *)<br />
ATN<br />
Provides the tangent arc of a real value.<br />
Example:<br />
vfloat:=atn(0.5r); (* vfloat will contain the tangent arc of 0.5 *)<br />
EXP<br />
Provides the exponential of a real value.<br />
Example:<br />
vfloat:=exp(1r); (* vfloat will contain the exponential of 1 *)<br />
LOG<br />
Provides the logarithm of a real value.<br />
<strong>AUTO</strong>MG<strong>EN</strong> 8 114 ©opyright 1988-2007 <strong>IRAI</strong>
Example:<br />
vfloat:=log(1r); (* vfloat will contain the logarithm of 1 *)<br />
LOG10<br />
Provides the base 10 logarithm of a real value.<br />
Example:<br />
vfloat:=log10(1r);<br />
(* vfloat will contain the base 10 logarithm of 1 *)<br />
SQRT<br />
Provides the square root of a real value.<br />
Example:<br />
vfloat:=sqrt(2); (* vloat will contain the square root of 2 *)<br />
DATE<br />
Provides a string representing the date.<br />
Example:<br />
print "The date is:",date(),"\n";<br />
TIME<br />
Provides a string representing the time.<br />
Example:<br />
print "The time is:",time(),"\n";<br />
RND<br />
Provides a random number.<br />
Example:<br />
print rnd();<br />
Environment<br />
OP<strong>EN</strong><br />
Opens a file. The first subject is the file name, the second the access<br />
mode, which can be: « r+b » opening in reading and writing, « w+b »<br />
opening in writing (if the file exists it is destroyed. The function provides a<br />
long which identifies the file. If the opening fails, the value provided is 0.<br />
Example:<br />
vulong:=open("new","w+b");<br />
CLOSE<br />
Closes a file. The subject is the file identifier provided by the OP<strong>EN</strong><br />
function.<br />
Example:<br />
close(vulong);<br />
<strong>AUTO</strong>MG<strong>EN</strong> 8 115 ©opyright 1988-2007 <strong>IRAI</strong>
Environment<br />
WRITE<br />
Writes data in a file. The first subject is the file identifier provided by the<br />
OP<strong>EN</strong> function. The second subject is a variable address, the third the<br />
number of bytes to be written. The function provides the number of bytes<br />
actually written.<br />
Example:<br />
vuint:=write(vulong,&buff,5);<br />
READ<br />
Reads data in a file. The first subject is the file identifier provided by the<br />
OP<strong>EN</strong> function. The second subject is a variable address, the third the<br />
number of bytes to be read. The function provides the number of bytes<br />
actually read.<br />
Example:<br />
vuint:=read(vulong,&buff,5);<br />
SEEK<br />
Moves a file pointer. The first subject is the file identifier provided by the<br />
OP<strong>EN</strong> function, the second the position.<br />
Example:<br />
seek(vulong,0l);<br />
GOTO<br />
Effects a jump to a label in the subject. The subject is a string.<br />
Example:<br />
goto "end"<br />
...<br />
end:;<br />
CALL<br />
Effects a jump to a subprogram. The subject is a string containing the<br />
subprogram label.<br />
Example:<br />
BEGIN;<br />
(* main program *)<br />
call "sp"<br />
<strong>EN</strong>D;<br />
BEGIN;<br />
(* subprogram *)<br />
sp:<br />
print "In the subprogram\n";<br />
return;<br />
<strong>EN</strong>D;<br />
<strong>AUTO</strong>MG<strong>EN</strong> 8 116 ©opyright 1988-2007 <strong>IRAI</strong>
RETURN<br />
Indicates the end of a subprogram.<br />
Environment<br />
READVAR<br />
Reads one or more variables of the processing application. The first<br />
subject is the processing variable name (variable or symbol name). The<br />
second subject is the variable or 32 bit (longs or floats) variable table<br />
address The third subject is the number of variables to be read. If the<br />
function is executed with no errors, the value of 0 is provided.<br />
Example:<br />
readvar("i0",&buff,16); (* read 16 integers starting from i0 *)<br />
WRITEVAR<br />
Writes one or more variables of the processing application. The first<br />
subject is the processing variable name (variable or symbol name). The<br />
second subject is the variable or 32 bit (longs or floats) variable table<br />
address. The third subject is the number of variables to be written. If the<br />
function is executed with no errors, the value of 0 is provided.<br />
Example:<br />
writevar("o0",&buff,16);<br />
(* write 16 outputs starting from o0 *)<br />
CMD<br />
Executes a command. The subject is a string which specifies the<br />
command to be executed. This function makes it possible to use preset<br />
IRIS commands. For more information see the chapter Special orders . If<br />
the command is executed with no errors, the value of 0 is provided.<br />
Example:<br />
cmd("run");<br />
<strong>AUTO</strong>MG<strong>EN</strong> 8 117 ©opyright 1988-2007 <strong>IRAI</strong>
Environment<br />
YIELD<br />
Yields control. This function is used so as not to monopolize the<br />
execution when the object is run in priority mode.<br />
Example:<br />
WHILE 1<br />
DO<br />
...<br />
<strong>EN</strong>DWHILE;<br />
yield();<br />
DLL<br />
Calls up a DLL. The first subject is the DLL file name. The second is the<br />
function name. The third is a pointer on a 32 bit variable which will<br />
receive the function return code. The other subjects are passed to the<br />
function.<br />
Example:<br />
dll "user","messagebeep",&vulong,-1;<br />
Error messages<br />
« separator ‘;’ missing »a semicolon is missing<br />
« syntax error » syntax error detected<br />
« variable set more than once » a variable set more than once<br />
« not enough memory » the program run has saturated<br />
the available memory<br />
« variable not set » a variable used in the program<br />
has not been set<br />
« constant too big » a constant is too big<br />
« program too complex » an expression is too complex,<br />
it must be broken down<br />
« incompatible variable or constant<br />
type » a variable or constant is not<br />
the expected type<br />
<strong>AUTO</strong>MG<strong>EN</strong> 8 118 ©opyright 1988-2007 <strong>IRAI</strong>
Environment<br />
« ’)’ missing » A closing parenthesis is missing<br />
« <strong>EN</strong>DIF missing » The key word <strong>EN</strong>DIF is missing<br />
« ’<strong>EN</strong>DWHILE’ missing » The key word <strong>EN</strong>DWHILE is<br />
missing<br />
« label cannot be found » a goto or subprogram label cannot<br />
be found<br />
« ’)’ missing » the closing square bracket is<br />
missing<br />
« element number outside limit » a table element outside of the<br />
limits has been used<br />
« too many overlapping ‘CALL’ » too many overlapping subprograms<br />
have been used<br />
«‘RETURN’ found without ‘CALL’ » RETURN found outside a<br />
subprogram<br />
« variable size too small » the size of a variable is insufficient<br />
« DLL file cannot be found » the DLL file cannot be found<br />
« function cannot be found in DLL » the function cannot be found in the<br />
DLL file<br />
« division by zero» a division by 0 has been<br />
produced»<br />
« mathematical error » a mathematical function has<br />
caused an error<br />
« Aspect » tab<br />
Colors<br />
This is used to select the object background and character color.<br />
<strong>AUTO</strong>MG<strong>EN</strong> 8 119 ©opyright 1988-2007 <strong>IRAI</strong>
Environment<br />
Object size<br />
This establishes object dimensions in number of dots. These values can<br />
be modified to precisely set the size of an object.<br />
Text<br />
This is used to specify a bubble text which is displayed when the cursor<br />
is on the object.<br />
« Program » tab<br />
Program<br />
This editing area contains the program.<br />
Run<br />
If this is checked than the program is run.<br />
Priority run<br />
If this is checked than the program is run more rapidly.<br />
Run at start-up<br />
If this is checked then the program is run when the object is opened. This<br />
option is used to save an object with the « Run » option not checked by<br />
requesting a run when the object is loaded.<br />
Go to the error<br />
If an error has been detected when a program is running, then the<br />
pushbutton is used to place the cursor in the place that caused the error.<br />
<strong>AUTO</strong>MG<strong>EN</strong> 8 120 ©opyright 1988-2007 <strong>IRAI</strong>
IRIS 2D examples<br />
Environment<br />
The examples file names refer to the « Examples » subdirectory of the<br />
directory where <strong>AUTO</strong>MG<strong>EN</strong> is installed.<br />
Example of composed objects<br />
This example is used to let you understand how to create a « Decimal<br />
keyboard » object composed of keys. « 0 » to « 9 » plus a key [<strong>EN</strong>TER]<br />
for validating.<br />
You will create a « Console » object, then starting from the console<br />
menu you will create an « Illuminated Button » object. We are going to<br />
set parameters for this object then we will duplicate it to obtain other<br />
keys. Then we will adjust the duplicated key properties to customize<br />
them: text display on the key and action We will then have a keyboard<br />
with a uniform key aspect.<br />
Link with the application will be effected by using a word.<br />
When a key is pressed it will write its code (0 to 9 or 13 for the validation<br />
key) in that word.<br />
To specify that word we can give its name in the action section of the<br />
properties for each object. The problem is that when we reuse the<br />
« Decimal keyboard » object and if we want to use another word, it is<br />
necessary to modify the properties of the 11 « Illuminated button »<br />
objects.<br />
To get around this problem we are going to use the possibility that sister<br />
objects have of accessing a parameter set in the properties of the parent<br />
console. The « Links » tab of the console property window is used to set<br />
the parameter. Only write on one line in the editing area.<br />
« KEYBOARD=M200 ». This line means that the keyboard parameter is<br />
equal to M200.<br />
The keyboard keys refer to the « KEYBOARD » parameter and not<br />
directly to word M200. To change the word used, just change the<br />
parameter setting in the console properties.<br />
Going back to the aspect of our keyboard...<br />
<strong>AUTO</strong>MG<strong>EN</strong> 8 121 ©opyright 1988-2007 <strong>IRAI</strong>
Environment<br />
In order for the aspect of the keyboard to be satisfactory we are going to<br />
set a grid to align the keys. In the console properties window and the<br />
« Options » tab write the value « 10 » in the two « Grids » sections This<br />
way the function moved from the console menu will use a 10 pixel grid.<br />
We are also going to set the dimensions for the first key. We can directly<br />
modify the dimensions of the key by dragging it by its edges, but for<br />
greater precision we are going to modify the dimensions form the<br />
« Object size in pixels » section of the « Illuminated Button » object<br />
window property tab.<br />
For example, enter « 30 » for the width and height.<br />
At this point you can also customize the style of the key. the color and<br />
font used for marking etc.<br />
We are going to place this first key to the upper left of the keyboard (this<br />
is an arbitrary choice). The keyboard we are going to create will look like<br />
the numberpad of a computer keyboard. We are then going to mark this<br />
key with the text « 7 » in the « Text » section of the « Aspect » tab.<br />
We are also going to set parameters for the functional aspect of the key:<br />
in the « Action when the button is pressed » section of the « Links » tab<br />
we are going to write: « PAR<strong>EN</strong>TPARAM(KEYBOARD)=7 ». This means<br />
that when the pushbutton is pressed the word designated for the<br />
« KEYBOARD » parameter of the parent console will receive the value 7.<br />
Delete whatever is in the « Action when the pushbutton is released'»<br />
section.<br />
We can also assign a computer keyboard key to the « Illuminated<br />
Button » object. Then it will be possible to use the keyboard with the<br />
mouse or computer keyboard. To assign a key to the « Illuminated<br />
Button », object use the « Key » section of the « Options » tab. For<br />
example, enter « 7 » to associate computer keyboard key « 7 » to the<br />
object.<br />
<strong>AUTO</strong>MG<strong>EN</strong> 8 122 ©opyright 1988-2007 <strong>IRAI</strong>
Then place key « 7 » at the upper left of the keyboard, like this:<br />
Environment<br />
To move this key, select the object ((SHIFT) key pressed, then click with<br />
the left side of the mouse on the object), then use the « Move » function<br />
from the console menu. This function is the only one which uses the grid<br />
instead of moving by dragging the bar of sister objects.<br />
To create other keys, duplicate the existing key:<br />
• select the first key,<br />
• select « Copy » from the console menu, then « Paste »<br />
• move the previously pasted key,<br />
• set parameters for the new key: (text, links and computer keyboard<br />
key).<br />
When you have finished the above row (keys « 7 », « 8 » and « 9 ») you<br />
can then select all three keys together and duplicate them.<br />
You can create a validation key (wider for filling the surface of the<br />
keyboard).<br />
To finish, resize the console and put the objects in « Employ » mode.<br />
<strong>AUTO</strong>MG<strong>EN</strong> 8 123 ©opyright 1988-2007 <strong>IRAI</strong>
The final result should look like this:<br />
� « Examples\IRIS2D\keyboard.agn »<br />
Environment<br />
Example of using the « Screen, keyboard, message list » object<br />
as a message list<br />
Instructions:<br />
• the object must display four different messages based on the state<br />
of four inputs (i0 to i3),<br />
• for input 0: an information message « Start cycle »,<br />
• for input 1: an information message « End cycle »,<br />
• for input 2: an error message « Error 1 »,<br />
• for input 3: an error message « Error 2 ».<br />
• the messages must be displayed when the rising edge of the inputs<br />
appears,<br />
• a record of 50 messages will be kept in the object and saved on<br />
the disk,<br />
• the messages will be duplicated by a printer connected on<br />
« LPT1: »,<br />
• a pushbutton must be used to delete the messages.<br />
<strong>AUTO</strong>MG<strong>EN</strong> 8 124 ©opyright 1988-2007 <strong>IRAI</strong>
Solution:<br />
� « Examples\IRIS2D\screen keyboard 1.agn »<br />
Variation:<br />
Environment<br />
Pressing on the pushbutton « Delete the messages » causes the « Do<br />
you want to delete messages » dialogue box to open with a choice of<br />
YES or NO.<br />
Solution:<br />
� « Examples\IRIS2D\Screen keyboard 2.agn »<br />
Example of using the « SCRE<strong>EN</strong> KEY » object as a terminal<br />
Instructions:<br />
Display a message « Enter a value », requires that a decimal value be<br />
typed on the keyboard (two characters) then displays that value<br />
multiplied by two after the « Result: » text.<br />
Solution:<br />
� « Examples\IRIS2D\terminal 1.agn »<br />
<strong>AUTO</strong>MG<strong>EN</strong> 8 125 ©opyright 1988-2007 <strong>IRAI</strong>
Environment<br />
Variation:<br />
The displayed messages are stored in the object and no longer in the<br />
processing application.<br />
Solution:<br />
� « Examples\IRIS2D\terminal 2.agn »<br />
Example of an application composed of multiple pages<br />
This example will let you understand how to create an application<br />
composed of multiple elements: in this case a menu is used to access<br />
two different pages.<br />
� « Examples\IRIS2D\menu.agn »<br />
Example of using the «OBJECT » object<br />
Simulation of a jack.<br />
Instructions:<br />
• jack driven by two o0 outputs (extract the jack) and o1 (retract the<br />
jack).<br />
• two limit inputs i0 (jack retracted) and i1 (jack extracted.<br />
Three objects will be used:<br />
• a « Console » object acting as support,<br />
• an « Object » for the jack body,<br />
• an « Object » for the jack shaft.<br />
<strong>AUTO</strong>MG<strong>EN</strong> 8 126 ©opyright 1988-2007 <strong>IRAI</strong>
Solution:<br />
Environment<br />
The jack body is an OBJECT object which remains static, only its aspect<br />
is configured:<br />
The jack shaft is an OBJECT object configured as follows:<br />
<strong>AUTO</strong>MG<strong>EN</strong> 8 127 ©opyright 1988-2007 <strong>IRAI</strong>
� « Examples\Process Simulation\2D\tutorial1.agn »<br />
Variation:<br />
Environment<br />
An intermediate position needs to be added on the jack. We are going to<br />
use two supplementary objects for this: a piece attached to the jack shaft<br />
which will activate a sensor and a sensor.<br />
<strong>AUTO</strong>MG<strong>EN</strong> 8 128 ©opyright 1988-2007 <strong>IRAI</strong>
Environment<br />
To connect the piece activating the sensor to the jack shaft, the jack<br />
shaft needs to be associated to an identifier: in the « Identifier » section<br />
of the « Links » tab write « 100 ». To connect the piece to the shaft, in<br />
the « Horizontal movement, Position» section of the « Links » tab write:<br />
« SISTERPARAM(100,STATE) ». This connects the piece with the jack<br />
shaft state.<br />
The object used as a sensor is set with parameters as follows:<br />
<strong>AUTO</strong>MG<strong>EN</strong> 8 129 ©opyright 1988-2007 <strong>IRAI</strong>
The result is as follows:<br />
� « Examples\Process Simulation\2D\tutorial2.agn »<br />
Environment<br />
Second variation:<br />
A vertical jack attached to the horizontal jack shaft is added. This jack is<br />
activated by one output (O2=1 to extract the jack, O2=0 to retract it). Two<br />
limits are associated to i3 and i4.<br />
The result is as follows:<br />
� « Examples\Process Simulation\2D\tutorial3.agn »<br />
Two OBJECT objects are added: one for the body of the jack and one for<br />
the shaft.<br />
<strong>AUTO</strong>MG<strong>EN</strong> 8 130 ©opyright 1988-2007 <strong>IRAI</strong>
Example of using the «ARCHIVE» object<br />
Environment<br />
Instructions:<br />
• archive the state of 3 words of the processing application (m31 to<br />
m33) every second.<br />
• the state of 4 words will be displayed on a graph left on display for<br />
10 seconds of acquisition.<br />
• 1000 values will be memorized in the object.<br />
• the acquisitions will be archived in a text format « data.txt » file.<br />
Solution:<br />
� « Examples\IRIS2D\archiving »<br />
Example of using the «PROG » object<br />
Instructions:<br />
• pressing on a pushbutton must cause the inversion of the output<br />
states O0 to O99.<br />
Solution:<br />
� « Examples\IRIS2D\program.agn »<br />
Examples of supervision application 1<br />
The following example illustrates the creation of a supervision<br />
application. The supervision application displays the state of gates and<br />
<strong>AUTO</strong>MG<strong>EN</strong> 8 131 ©opyright 1988-2007 <strong>IRAI</strong>
Environment<br />
the level of tanks. The user's actions on the gates will invert the gate<br />
state (open or closed). The RUN/STOP state of the application will also<br />
be displayed and two pushbuttons will be used to go from RUN to STOP.<br />
The result is as follows:<br />
� « Examples\IRIS2D\supervision 1 »<br />
OBJECT objects will be used to represent the gates. A bitmap file is<br />
created to represent the gates: open state (green) and closed state (red):<br />
Examples of supervision application 2<br />
This example illustrates the use of a more evolved OBJECT object. The<br />
application displays the state of a gate which can be:<br />
• gate open (commanded opening and open gate sensor true):<br />
green,<br />
• gate closed (commanded close and closed gate sensor true): red,<br />
• gate opening in progress (commanded opening and open gate<br />
sensor false): blue,<br />
• gate closing in progress (commanded closing and closed gate<br />
sensor false): purple.<br />
The user can invert the gate state by clicking on it.<br />
<strong>AUTO</strong>MG<strong>EN</strong> 8 132 ©opyright 1988-2007 <strong>IRAI</strong>
The processing application manages the gate state.<br />
� « Examples\IRIS2D\supervision 2.agn »<br />
Example of operating part simulation 1<br />
Simulation of a manipulator arm<br />
� « Examples\Process Simulation\2D\manipulator arm.agn »<br />
Environment<br />
<strong>AUTO</strong>MG<strong>EN</strong> 8 133 ©opyright 1988-2007 <strong>IRAI</strong>
Example of operating part simulation 2<br />
Simulation of an elevator<br />
� « Examples\Process Simulation\2D\elevator.agn »<br />
Environment<br />
IRIS 2D objects are used to create<br />
supervision and simulation applications of 2D<br />
operating parts.<br />
<strong>AUTO</strong>MG<strong>EN</strong> 8 134 ©opyright 1988-2007 <strong>IRAI</strong>
IRIS 3D references<br />
Environment<br />
IRIS 3D allows you to create simulation applications for 3D operational<br />
units. The TOKAMAK engine is integrated to IRIS3D to enable a realistic<br />
physical simulation: gravity, interactions between objects.<br />
IRIS 3D is used to animate 3D objects using standard model makers: 3D<br />
STUDIO, SOLIDWORKS, SOLIDCONCEPTER, etc …<br />
The native format of the files processed by IRIS 3D is « .X » files set by<br />
Microsoft's DIRECTX 8.<br />
A « .3DS » to « .X » converter is integrated into the environment.<br />
The CROSSROADS program provided on the <strong>AUTO</strong>MG<strong>EN</strong> installation<br />
CD-ROM or downloaded from www.irai.com is used to convert a<br />
significant number of 3D files to « .3DS » format.<br />
IRIS 3D is in a window format enclosed in the IRIS 2D console. 3D<br />
objects are animated on the console.<br />
Each 3D file represents an object in IRIS 3D. The elements in an<br />
operating part must have their own movement and must be represented<br />
by separated files. For example, for a jack composed of a body and a<br />
shaft, files must be created for the jack body and for the jack shaft.<br />
To create animation of objects in a 3D world, one or more behaviors can<br />
be applied to each of the objects. A behavior is composed of an object<br />
modification (moving, changing color etc.) and a link with the processing<br />
application variables to condition this modification. For example: extract<br />
the jack shaft if the output for the processing application is true.<br />
<strong>AUTO</strong>MG<strong>EN</strong> 8 135 ©opyright 1988-2007 <strong>IRAI</strong>
Environment<br />
Tutorial<br />
The “examples\process simulation\3d\tutorial 2” sub-directory in the<br />
<strong>AUTO</strong>MG<strong>EN</strong> installation directory has a WORD file that contains a<br />
tutorial devoted to creating 3D operational units.<br />
The list of objects is shown in the list. The objects linked to an object are<br />
shown as sub-elements if the “Tree structure display” checkbox is<br />
checked.<br />
Creating an IRIS 3D console<br />
With the right side of the mouse click on the « Iris » element on the<br />
browser and then select « Add an IRIS 3D console ».<br />
Creating an IRIS 3D console<br />
<strong>AUTO</strong>MG<strong>EN</strong> 8 136 ©opyright 1988-2007 <strong>IRAI</strong>
Environment<br />
Adding 3D files to the project<br />
With the right side of the mouse click on the « Resources» element on<br />
the browser and select « Import one or more 3D files » from the menu.<br />
Select one or more « .3DS » files. (if your files are not in « .3DS » format,<br />
use « CROSSROAD » to convert them).<br />
The IRIS 3D console<br />
<strong>AUTO</strong>MG<strong>EN</strong> 8 137 ©opyright 1988-2007 <strong>IRAI</strong>
Environment<br />
Configuring the objects<br />
Select « Open the configuration window » from the « Options » menu on<br />
the IRIS 3D window.<br />
The IRIS 3D configuration window<br />
<strong>AUTO</strong>MG<strong>EN</strong> 8 138 ©opyright 1988-2007 <strong>IRAI</strong>
Adding objects to the 3D world<br />
Environment<br />
By clicking on the element you access the list of 3D<br />
objects present in the resources. For example:<br />
By selecting an object on that list and clicking on « Add » you add the<br />
selected object to the 3D world. By clicking on « Add all » you add all the<br />
objects on the list to the 3D world. The objects you have added will<br />
appear on the list in the configuration window.<br />
Removing a 3D file from the resources<br />
With the right side of the mouse click the 3D file on the browser and<br />
select « Delete ». The object needs to be deleted from the 3D world.<br />
Removing an object from a 3D world<br />
Click with the right button of the mouse on the object in the IRIS 3D<br />
configuration window and select « Delete from the menu. »<br />
Importing an “enhanced” object<br />
Click on the “Import” button. A browser allows you to select the object to<br />
be imported.<br />
<strong>AUTO</strong>MG<strong>EN</strong> 8 139 ©opyright 1988-2007 <strong>IRAI</strong>
The browser for selecting “enhanced” objects<br />
Environment<br />
Once the object has been selected, click on “Open”. A parameter window<br />
then allows you to define the variables that will be associated with the<br />
object.<br />
<strong>AUTO</strong>MG<strong>EN</strong> 8 140 ©opyright 1988-2007 <strong>IRAI</strong>
The window for defining the object’s parameters<br />
Environment<br />
In this example (for the cylinder), the cylinder’s piloting variable and the<br />
two ends of stroke are to be parameterized. The object is then shown in<br />
the 3D world and in the list of objects.<br />
The object’s position and orientation can be modified.<br />
<strong>AUTO</strong>MG<strong>EN</strong> 8 141 ©opyright 1988-2007 <strong>IRAI</strong>
Exporting an “Enhanced” object<br />
Environment<br />
To export an object, right-click with the mouse on the object and select<br />
“Export”. The linked objects and all of the behaviors are saved.<br />
After entering a name for the file, a dialogue box allows you to assign a<br />
name to each variable used in the behaviors and to define whether this<br />
parameter can be modified or not when it is re-read.<br />
<strong>AUTO</strong>MG<strong>EN</strong> 8 142 ©opyright 1988-2007 <strong>IRAI</strong>
Environment<br />
Example of creating a 3D simulation based on enhanced<br />
objects<br />
Let’s create a simulation in a couple of clicks for an operational unit: a<br />
part destacker.<br />
<strong>AUTO</strong>MG<strong>EN</strong> 8 143 ©opyright 1988-2007 <strong>IRAI</strong>
Environment<br />
<strong>AUTO</strong>MG<strong>EN</strong> 8 144 ©opyright 1988-2007 <strong>IRAI</strong>
Environment<br />
<strong>AUTO</strong>MG<strong>EN</strong> 8 145 ©opyright 1988-2007 <strong>IRAI</strong>
Environment<br />
<strong>AUTO</strong>MG<strong>EN</strong> 8 146 ©opyright 1988-2007 <strong>IRAI</strong>
Environment<br />
The pre-defined objects are located in the “i3d” sub-directory of the<br />
<strong>AUTO</strong>MG<strong>EN</strong> installation directory.<br />
<strong>AUTO</strong>MG<strong>EN</strong> 8 147 ©opyright 1988-2007 <strong>IRAI</strong>
The object is shown in IRIS3D:<br />
Environment<br />
<strong>AUTO</strong>MG<strong>EN</strong> 8 148 ©opyright 1988-2007 <strong>IRAI</strong>
Environment<br />
<strong>AUTO</strong>MG<strong>EN</strong> 8 149 ©opyright 1988-2007 <strong>IRAI</strong>
Environment<br />
This lets us see how to access simplified palettes from “Expert” mode.<br />
With the palette, design a Grafcet with two steps. A right click on the<br />
sheet lets you access the link drawing application to loop back the<br />
Grafcet.<br />
<strong>AUTO</strong>MG<strong>EN</strong> 8 150 ©opyright 1988-2007 <strong>IRAI</strong>
Environment<br />
A right click on the cube store allows you to access the list of variables.<br />
<strong>AUTO</strong>MG<strong>EN</strong> 8 151 ©opyright 1988-2007 <strong>IRAI</strong>
Environment<br />
<strong>AUTO</strong>MG<strong>EN</strong> 8 152 ©opyright 1988-2007 <strong>IRAI</strong>
Move the cursor over the action rectangle and left-click.<br />
Environment<br />
Repeat this operation to place the “cylinder extended” element on the<br />
first transition and “cylinder retracted” on the second.<br />
<strong>AUTO</strong>MG<strong>EN</strong> 8 153 ©opyright 1988-2007 <strong>IRAI</strong>
This is the final result:<br />
Environment<br />
You can now click on the “GO” button in the tool bar to launch the<br />
application.<br />
This complete example is in the “examples\Process<br />
simulation\3D\physical engine” sub-directory with the name<br />
“destacker.agn”.<br />
Applying a behavior to an object<br />
Click with the right button of the mouse on the object in the IRIS 3D<br />
configuration window and select « Add … » from the menu. ».<br />
<strong>AUTO</strong>MG<strong>EN</strong> 8 154 ©opyright 1988-2007 <strong>IRAI</strong>
Environment<br />
Name of <strong>AUTO</strong>MG<strong>EN</strong> variables<br />
The name of <strong>AUTO</strong>MG<strong>EN</strong> variables used in the behaviors are limited to<br />
the following syntaxes:<br />
Access to boolean variables<br />
On: output « n », for example O8, O10,<br />
/On: complement of the output « n », for example /O1, /O15,<br />
In: input « n », for example 10,14,<br />
/In: complement of the input « n », for example /I4, /I56,<br />
Bn: bit « n », for example B100, B200,<br />
/Bn: complement of bit « n », for example /B800, /B100,<br />
The access to bits B is limited to a table of linear bits, a command #B<br />
must be used to reserve bits (see the language manual),<br />
Access to numeric variables<br />
Mn: word « n », for example: M200, M300<br />
Fn: float « n », for example: F200,F400<br />
<strong>AUTO</strong>MG<strong>EN</strong> 8 155 ©opyright 1988-2007 <strong>IRAI</strong>
Adding a translation<br />
Properties of a translation<br />
Environment<br />
Name<br />
The first area is used to enter a generic name for the translation. This<br />
name appears in the list of the IRIS 3D configuration window, it is only<br />
used for comments and can be left blank.<br />
Axis<br />
Establishes the dimension to be applied to the translation.<br />
Type<br />
- without driving: no translation, this is used to make a translation<br />
inoperable without needing to delete it (to run tests for example)/<br />
- bistable driving: two boolean variables: the translation is driven by<br />
two boolean variables: the first drives the translation in one<br />
<strong>AUTO</strong>MG<strong>EN</strong> 8 156 ©opyright 1988-2007 <strong>IRAI</strong>
Environment<br />
direction (from min to max), the second in the other direction (from<br />
max to min).<br />
State of the first State of the Object<br />
variable<br />
second variable<br />
0 0 Immobile<br />
1 0 Translation of min to<br />
max<br />
0 1 Translation of max to<br />
min<br />
1 1 Immobile<br />
- monostable driving: a boolean variable drives the translation if the<br />
variable is true<br />
Variable state Object<br />
1 Translation of min to max<br />
0 Translation of max to min<br />
- numeric driving: the position of the object on the designated axis is<br />
equal to the specified numeric variable.<br />
- The “…” button allows an “enhanced” mode to be defined for this<br />
type of link:<br />
<strong>AUTO</strong>MG<strong>EN</strong> 8 157 ©opyright 1988-2007 <strong>IRAI</strong>
A<br />
Environment<br />
The content of the numeric variable defines the object’s position.<br />
If it is a word the position will be set at the value divided by 100;<br />
if it is a long, it will be set at the value divided by 10000; if it is a<br />
floating-point, it will be set at the value contained in the floatingpoint.<br />
Min and max define the limits for these values.<br />
B<br />
The content of the variable defines the position between the min<br />
and max values. 0 = min position, 10000 = max position.<br />
C<br />
The content of the variable gives a speed of displacement<br />
ranging from -10000 to 10000.<br />
D<br />
The content of the variable gives a position to be reached as a<br />
percentage of the stroke between min and max: 0 = min<br />
position, 100 = max position. The acceleration and deceleration<br />
are calculated automatically. The “percentage of movement<br />
used...” parameter defines the length of the acceleration and<br />
deceleration phases.<br />
E<br />
Allows a variable to be defined that will receive the position of<br />
the object constantly. The variable can be a word, a long, a<br />
floating-point or an input (in this case, this input and the next 16<br />
inputs receive the position like an absolute encoder linked on<br />
the inputs). The “value in gray code” checkbox allows this value<br />
to be obtained like a gray encoder.<br />
The “examples\Process simulation\3D\numerical pilotings” subdirectory<br />
contains examples of these different modes.<br />
- <strong>AUTO</strong>MSIM: the object’s position on the designated axis is given<br />
by the content of a variable managed by an <strong>AUTO</strong>MSIM object.<br />
The “…” button allows an enhanced mode to be defined for this<br />
type of link:<br />
<strong>AUTO</strong>MG<strong>EN</strong> 8 158 ©opyright 1988-2007 <strong>IRAI</strong>
F<br />
Environment<br />
The variable associated to an <strong>AUTO</strong>MSIM object defines the<br />
position between min and max.<br />
G<br />
The variable associated to an <strong>AUTO</strong>MSIM “motor” object modifies<br />
the position according to the coefficient (it makes it possible to<br />
define the relationship between the rotation speed of the<br />
<strong>AUTO</strong>MSIM motor and the speed with which the position varies).<br />
The “examples\Process simulation\3D\automsim piloting” subdirectory<br />
contains examples illustrating both these modes.<br />
Amplitude and origin<br />
The « Min » and « Max » areas establish the amplitude and origin of the<br />
translation.<br />
Speed<br />
The stroke time establishes the speed for going from the min point to<br />
max point (it is identical to the return speed).<br />
Detection<br />
This is used to set the sensors for the translations. The min and max<br />
sensors manage the limits, the other 4 possible sensors can be used to<br />
create intermediate positions.<br />
Adding a rotation<br />
The parameters are completely similar to the translations see chapter<br />
Adding a translation. The angles are expressed in radians.<br />
<strong>AUTO</strong>MG<strong>EN</strong> 8 159 ©opyright 1988-2007 <strong>IRAI</strong>
Environment<br />
The object rotation center must be set for each object in the IRIS 3D<br />
configuration window.<br />
Adding a color change<br />
Color change<br />
Driveing of a color using a variable must refer to a boolean variable.<br />
The “The same as object...” checkbox allows you to apply the same color<br />
as another object.<br />
Controlling a color by a variable must reference a Boolean variable.<br />
Color control can also be performed with an <strong>AUTO</strong>MSIM variable<br />
(associated to an <strong>AUTO</strong>MSIM indicator object, for example).<br />
If the “do nothing if false” box is checked, no color is applied if the<br />
variable’s status is false. This makes it possible to associate several<br />
changes of color to a single object if more than 2 colors are needed.<br />
The pull-down lists allow a texture to be selected instead of a color. To<br />
have a texture shown in a pull-down list, place the (“.bmp” or “.jpg” file) in<br />
the <strong>AUTO</strong>MG<strong>EN</strong> project resources.<br />
<strong>AUTO</strong>MG<strong>EN</strong> 8 160 ©opyright 1988-2007 <strong>IRAI</strong>
Environment<br />
Multiple textures<br />
It is possible to associate several textures that will be applied<br />
automatically. To do this, associate several “Color modification” type<br />
behaviors to a single object and document the “Time for multiple texture<br />
mode” area with the time at the end of which the texture will be applied<br />
automatically. The pre-defined “Conveyor Belt” object uses this<br />
technique.<br />
Adding a link<br />
A link forces an object that this behavior is applied to, to follow the<br />
movements of another object.<br />
Links between objects<br />
The link condition can be a boolean variable. The link is unconditional<br />
(object always linked) if the condition is left blank.<br />
<strong>AUTO</strong>MG<strong>EN</strong> 8 161 ©opyright 1988-2007 <strong>IRAI</strong>
Environment<br />
Adding another behavior<br />
This is used to use a sound associated to a condition, or to change a<br />
boolean variable to 1 when the user clicks with the right or left side of the<br />
mouse on the object the behavior is applied to.<br />
Other behaviors<br />
The elements of the “Sound” group make it possible to play a sound<br />
associated to a condition.<br />
The elements of the “User actions” group allow a Boolean variable to be<br />
set to 1 when the user clicks with the right or left mouse button on the<br />
object that the behavior applies to. The “A right-click on the object<br />
anchors the camera” checkbox makes it possible to lock the camera<br />
(which defines the display point of view in the IRIS 3D window) on the<br />
object that the behavior applies to.<br />
The elements of the “Collision” group make it possible to define a<br />
collision test:<br />
- either with one object in particular,<br />
<strong>AUTO</strong>MG<strong>EN</strong> 8 162 ©opyright 1988-2007 <strong>IRAI</strong>
Environment<br />
- or with objects having a particular color (a choice of 2 colors is<br />
possible).<br />
The “Variable” area can be documented with the name of a Boolean<br />
variable that will be set to true if the collision test is true.<br />
The “The object in collision becomes linked with the object if” checkbox<br />
makes it possible to link the object that comes into collision with the<br />
object to which the behavior is applied. A variable can condition this link.<br />
This technique makes it possible to easily handle the simulation of a<br />
clamp or suction cup.<br />
The vector allows you to give a speed to an object that comes into<br />
collision with the object to which the behavior is applied. The pre-defined<br />
“Conveyor Belt” object uses this technique.<br />
Physical engine<br />
The physical engine makes it possible to handle gravity and the<br />
interactions between objects so as to obtain a very realistic simulation.<br />
For objects subject to gravity, only block, sphere or capsule shapes are<br />
handled by the physical engine.<br />
For each object you can define the type of handling used by the physical<br />
engine:<br />
“Not used”: the object is not handled by the physical engine: it is not<br />
subject to gravity and does not interact with the other objects.<br />
“Fixed”: an object handled by the physical engine that does not change<br />
position but which interacts with the other objects: the housing of a<br />
machine, for example.<br />
“Use gravity”: a moving object handled by the physical engine, subject to<br />
gravity and interacting with the other objects: a box moving on a<br />
conveyor belt, for example. For this type of object, the mass, coefficients<br />
<strong>AUTO</strong>MG<strong>EN</strong> 8 163 ©opyright 1988-2007 <strong>IRAI</strong>
Environment<br />
of friction and restitution and the primary shape of the object (block,<br />
sphere or capsule) have to be defined.<br />
“Moving object”: a moving object handled by the physical engine, which<br />
is not subject to gravity and which interacts with the other objects: a<br />
cylinder rod pushing objects, for example For this type of object, the<br />
coefficients of friction and restitution and the primary shape of the object<br />
(block, sphere or capsule) have to be defined.<br />
The “Apply physics” button allows the physical engine to be launched.<br />
The “Automatic execution” checkbox automatically launches the physical<br />
engine when the <strong>AUTO</strong>MG<strong>EN</strong> PC executor is installed.<br />
The “examples\Process simulation\3D\physical engine” sub-directory<br />
contains examples illustrating the physical engine being used.<br />
<strong>AUTO</strong>MG<strong>EN</strong> 8 164 ©opyright 1988-2007 <strong>IRAI</strong>
IRIS 3D example<br />
� « Examples\Simulation PO\3D\Scharder.agn »<br />
Environment<br />
<strong>AUTO</strong>MG<strong>EN</strong> 8 165 ©opyright 1988-2007 <strong>IRAI</strong>
Environment<br />
IRIS 3D is used to design simulation<br />
applications of 3D operating parts. The<br />
objects must be created in a standard model<br />
maker and imported in the <strong>AUTO</strong>MG<strong>EN</strong><br />
project resources. Behaviors are then<br />
applied to the objects to create 3D<br />
animations.<br />
<strong>AUTO</strong>MG<strong>EN</strong> 8 166 ©opyright 1988-2007 <strong>IRAI</strong>
Language<br />
<strong>AUTO</strong>MG<strong>EN</strong> 8 167 ©opyright 1988-2007 <strong>IRAI</strong>
Language<br />
Common elements<br />
This chapter describes the common elements for all the languages<br />
used in <strong>AUTO</strong>MG<strong>EN</strong>.<br />
Variables<br />
The following types of variables are present:<br />
� boolean type: the variable may have a true (1) or false (0) value.<br />
� numeric type: the variable may have a numeric value, different from the<br />
existing types: 16 bits variables, 32 bits and floating point.<br />
� time delay type: structured type, it is a combination of a boolean and numeric<br />
type.<br />
Starting from version 6 the variable name syntax may be <strong>AUTO</strong>MG<strong>EN</strong>'s or the<br />
syntax of IEC standard 1131-3.<br />
Booleen variables<br />
The following table provides a complete list of the Booleen variables<br />
used<br />
Type Syntax Syntax Comments<br />
<strong>AUTO</strong>MG<strong>EN</strong> IEC 1131-3<br />
Input I0 %I0 May or may not correspond to physical input<br />
to I9999 to %I9999 (depending on the I/O configuration of the<br />
target).<br />
Output O0 %Q0 May or may not correspond to physical output<br />
to O9999 to %Q9999 (depending on the I/O configuration of the<br />
target).<br />
System Bits U0 %M0 For information on the system bits see the<br />
to U99 to %M99<br />
manual on the environment.<br />
User bits U100 %M100 Internal bits for general use.<br />
to U9999 to %M9999<br />
<strong>AUTO</strong>MG<strong>EN</strong> 8 169 ©opyright 1988-2007 <strong>IRAI</strong>
Language<br />
Grafcet X0 %X0 Grafcet step bits<br />
Steps to X9999 to %X9999<br />
Word bits M0#0 %MW0:X0 Word bits: the number of bits is<br />
to M9999#15 à %MW9999:X15 expressed in decimals and is<br />
included between 0 (lower weight<br />
bits) and 15 (higher weight bits).<br />
Numeric variables<br />
The following table provides a complete list of the numeric variables.<br />
Type Syntax IEC Syntax Comments<br />
<strong>AUTO</strong>MG<strong>EN</strong><br />
1131-3<br />
Counter C0 %C0 16 bit counter, can be initialized,<br />
to C9999 to %C9999 increased, decreased and tested with<br />
boolean languages without using<br />
System M0 %MW0<br />
literal language.<br />
For information on the system words<br />
Words to M199 to %MW199 see the manual on the environment.<br />
User words M200 %MW200 16 bit words for general use.<br />
to M9999 to %MW9999<br />
Long L100 %MD100 Integer value of 32 bits<br />
integer to L4998 to %MD4998<br />
Float F100 %MF100 Real value of 32 bits (format IEEE).<br />
to F4998 to %MF4998<br />
Time delay<br />
Time delay is a combined type which groups two boolean variables<br />
(launch state, end state) and two numeric variables on 32 bits<br />
(procedure and counter).<br />
<strong>AUTO</strong>MG<strong>EN</strong> 8 170 ©opyright 1988-2007 <strong>IRAI</strong>
The following model shows a time chart of time delay functionality:<br />
launch state<br />
end state<br />
count value<br />
1<br />
0<br />
1<br />
0<br />
0<br />
Language<br />
A time delay procedure value is between 0 ms and 4294967295 ms (a<br />
little over 49 days)<br />
The time delay procedure can be modified by the program, see<br />
chapter Erreur ! Source du renvoi introuvable. (instruction STA).<br />
The time delay counter can be read by the program, see chapter<br />
Erreur ! Source du renvoi introuvable. (instruction LDA).<br />
<strong>AUTO</strong>MG<strong>EN</strong> 8 171 ©opyright 1988-2007 <strong>IRAI</strong>
Actions<br />
Actions are used in:<br />
� Grafcet language action rectangles,<br />
� flow chart language action rectangles,<br />
� ladder language coils.<br />
Language<br />
Assignment of a boolean variable<br />
The « Assignment » action syntax is:<br />
«boolean variable»<br />
Operation:<br />
� if the action rectangle or coil command is in a true state then the variable is put<br />
at 1 (true state),<br />
� if the action rectangle or coil command is in a false state then the variable is<br />
put at 1 (false state).<br />
Truth table:<br />
Command Variable state (result)<br />
0 0<br />
1 1<br />
Example:<br />
If step 10 is active then O0 takes the value of 1, if not O0 takes the<br />
value 0.<br />
<strong>AUTO</strong>MG<strong>EN</strong> 8 172 ©opyright 1988-2007 <strong>IRAI</strong><br />
Action<br />
Action<br />
Action
Language<br />
Various « Assignment » actions can be used for the same variable in<br />
one program. In this case, the different commands are combined in<br />
« Or » logic.<br />
Example:<br />
State of X10 State of State of<br />
X50 O5<br />
0 0 0<br />
1 0 1<br />
0 1 1<br />
1 1 1<br />
Complement assignment of a boolean variable<br />
The « Complement assignment » action syntax is:<br />
«N boolean variable»<br />
Operation:<br />
� if the action rectangle or coil command is in a true state then the variable is<br />
reset (false state),<br />
� if the action rectangle or coil command is in a false state then the variable is<br />
set at 1 (true state).<br />
Truth table:<br />
Command Variable state (result)<br />
0 1<br />
1 0<br />
Example:<br />
If step 20 is active, then U100 takes the value 0, if not U100 takes the<br />
value 1.<br />
<strong>AUTO</strong>MG<strong>EN</strong> 8 173 ©opyright 1988-2007 <strong>IRAI</strong>
Language<br />
Various « Complement assignment » actions can be used for the<br />
same variable in one program. In this case, the different commands<br />
are combined in « Or » logic.<br />
Example:<br />
State of State of X110 State of<br />
X100<br />
O20<br />
0 0 1<br />
1 0 0<br />
0 1 0<br />
1 1 0<br />
Setting a boolean variable to one<br />
The « Set to one » syntax is:<br />
«S boolean variable»<br />
Operation:<br />
� if the action rectangle or coil command is in a true state then the variable is set<br />
to 1 (true state),<br />
� if the action rectangle or coil command is in a false state then the state of the<br />
variable is not modified.<br />
Truth table:<br />
Command Variable state (result)<br />
0 unchanged<br />
1 1<br />
Example:<br />
If step 5000 is active then O2 takes the value of 1, if not O2 keeps the<br />
same state.<br />
<strong>AUTO</strong>MG<strong>EN</strong> 8 174 ©opyright 1988-2007 <strong>IRAI</strong>
Language<br />
Resetting a boolean variable<br />
The « Reset» action syntax is:<br />
«R boolean variable»<br />
Operation:<br />
� if the action rectangle or coil command is in a true state then the variable is<br />
reset (false state),<br />
� if the action rectangle or coil command is in a false state then the variable state<br />
is not modified.<br />
Truth table:<br />
Command Variable state (result)<br />
0 unchanged<br />
1 0<br />
Example:<br />
If step 6000 is active then O3 takes the value of 0, if not O3 keeps the<br />
same state.<br />
Inverting a boolean variable<br />
The « Inversion » action syntax is:<br />
«I boolean variable»<br />
Operation:<br />
� if the action rectangle or coil command is in a true state then the variable state<br />
is inverted for each execution cycle,<br />
� if the action rectangle or coil command is in a false state then variable state is<br />
not modified.<br />
<strong>AUTO</strong>MG<strong>EN</strong> 8 175 ©opyright 1988-2007 <strong>IRAI</strong>
Truth table:<br />
Command Variable state (result)<br />
0 unchanged<br />
1 inverted<br />
Example:<br />
Language<br />
If step 7000 is active then the state of O4 is inverted, if not O4 keeps<br />
the same state.<br />
Resetting a counter, a word or a long<br />
The « Reset a counter, word or long» syntax is:<br />
«R counter or word»<br />
Operation:<br />
� if the action rectangle or coil command is in a true state then the counter, word<br />
or long is reset,<br />
� if the action rectangle or coil command is in a false state then the counter, word<br />
or long is not modified.<br />
Truth table:<br />
Command Value of counter, word or long<br />
(result)<br />
0 unchanged<br />
1 0<br />
Example:<br />
If step 100 is active then counter 25 is reset, if not C25 keeps the<br />
same value.<br />
<strong>AUTO</strong>MG<strong>EN</strong> 8 176 ©opyright 1988-2007 <strong>IRAI</strong>
Language<br />
Incrementing a counter, a word or a long<br />
The «Increment a counter » action syntax is:<br />
«+ counter, word or long»<br />
Operation:<br />
� if the action rectangle or coil command is in a true state then the counter, word<br />
or long is incremented for each execution cycle,<br />
� if the action rectangle or coil command is in a false state then the counter, word<br />
or long is not modified.<br />
Truth table:<br />
Command Counter, word or long<br />
value (result)<br />
0 Unchanged<br />
1 current value +1<br />
Example:<br />
If step 100 is active then counter 25 is incremented, if not then C25<br />
keeps the same value.<br />
Decrementing a counter, word or long<br />
The « Decrement a counter » action syntax is:<br />
«- counter, word or long»<br />
Operation:<br />
� if the action rectangle or coil command is in a true state then the counter, word<br />
or long is decremented for each execution cycle,<br />
� if the action rectangle or coil command is in a false state then the counter, word<br />
or long is not modified..<br />
Truth table:<br />
Command Value or counter, word or long<br />
(result)<br />
0 unchanged<br />
1 current value -1<br />
<strong>AUTO</strong>MG<strong>EN</strong> 8 177 ©opyright 1988-2007 <strong>IRAI</strong>
Example:<br />
Language<br />
If step 100 is active then counter 25 is decreased, if not C25 keeps the<br />
same value.<br />
Time delays<br />
Time delays are considered as boolean variables and can be used<br />
with « Assignment », « Complement assignment », « Set to one »,<br />
« Reset », and « Invert ». The time delay order can be written after the<br />
action. The syntax is::<br />
« time delay(duration) »<br />
By default the duration is expressed in tenths of seconds. The letter<br />
« S » at the end of the duration indicates that it is expressed in<br />
seconds.<br />
Examples:<br />
Step 10 launches a time delay of 2 seconds which remains active as<br />
long as the step is. Step 20 sets a time delay of 6 seconds which<br />
remains active while step 20 is deactivated.<br />
The same time delay can be used by different places with the same<br />
procedure and at different instants. In this case the time delay<br />
procedure must only be indicated once.<br />
Note: other syntaxes exist for time delays. See chapter Erreur !<br />
Source du renvoi introuvable.<br />
Interferences among the actions<br />
Certain types of actions cannot be used at the same time on a<br />
variable. The table below shows the combinations which cannot be<br />
used:<br />
Assignment Complement<br />
assignment<br />
Set to one Reset Inversion<br />
Assignment YES NO NO NO NO<br />
Complement<br />
assignment<br />
NO YES NO NO NO<br />
Set to one NO NO YES YES YES<br />
Reset NO NO YES YES YES<br />
<strong>AUTO</strong>MG<strong>EN</strong> 8 178 ©opyright 1988-2007 <strong>IRAI</strong>
Language<br />
Inversion NO NO YES YES YES<br />
IEC1131-3 standard actions<br />
The table below provides the IEC 1131-3 standard actions which can<br />
be used with <strong>AUTO</strong>MG<strong>EN</strong> V>=6 based on the <strong>AUTO</strong>MG<strong>EN</strong>. V5<br />
standard syntax.<br />
Name<br />
Not<br />
memorized<br />
Not<br />
memorized<br />
Complement<br />
not<br />
memorized<br />
Reset<br />
<strong>AUTO</strong>MG<strong>EN</strong> <strong>AUTO</strong>MG<strong>EN</strong> <strong>AUTO</strong>MG<strong>EN</strong><br />
V>=6 V5<br />
V>=6<br />
Syntax Syntax Example<br />
No value No value<br />
N1 No value<br />
N0 N<br />
R R<br />
Set to 1 S S<br />
Limited in<br />
time<br />
LTn/durati<br />
on<br />
Time delay DTn/durat<br />
ion<br />
Pulse on<br />
rising edge<br />
Pulse on<br />
falling edge<br />
Nonexistent <br />
Nonexistent<br />
P1 Nonexistent<br />
P0 Nonexistent<br />
Memorized SDTn/dur<br />
and time<br />
delay<br />
ation<br />
Time delay DSTn/dur<br />
and<br />
memorized<br />
ation<br />
Nonexistent <br />
Nonexistent<br />
Equivalent<br />
example<br />
<strong>AUTO</strong>MG<strong>EN</strong> V5<br />
<strong>AUTO</strong>MG<strong>EN</strong> 8 179 ©opyright 1988-2007 <strong>IRAI</strong>
Memorized<br />
limited in time<br />
SLTn/dur<br />
ation<br />
Nonexistent<br />
Language<br />
Multiple actions<br />
Within the same action rectangle or coil, multiple actions can be<br />
written by separating them with « , » (comma).<br />
Example:<br />
Multiple action rectangles (Grafcet and flow chart) or coils (ladder) can<br />
be combined. See the chapters on the relative languages for more<br />
information.<br />
Literal code<br />
Literal code can be entered in an action rectangle or coil.<br />
The syntax is:<br />
« { literal code } »<br />
Multiple lines of literal language can be written in braces. A « , »<br />
(comma) is also used here to separate them.<br />
Example:<br />
For more information see the chapters « Low level literal language »,<br />
«Extended literal language » and «ST literal language».<br />
Tests<br />
Tests are used in:<br />
� Grafcet language transitions,<br />
� conditions based on Grafcet language action,<br />
<strong>AUTO</strong>MG<strong>EN</strong> 8 180 ©opyright 1988-2007 <strong>IRAI</strong><br />
Test<br />
Test<br />
Test
� flow chart language tests,<br />
� ladder language tests.<br />
Language<br />
General form<br />
A test is a boolean equation composed of one or n variables separated<br />
by the operators « + » (or) or « . » (and).<br />
Example of a test:<br />
i0 (test input 0)<br />
i0+i2 (test input 0 « or » input 2)<br />
i10.i11 (test input 10 « and » input 11)<br />
Test modifier<br />
By default if only the name of one variable is specified, the test is<br />
« equal to one» (true). Modifiers make it possible to test the<br />
complement state, the rising edge and the falling edge.<br />
� the character « / » placed before a variable tests the complement state,<br />
� the character « u » or the character « � * » placed before a variable tests the<br />
rising edge<br />
� the character « d » or the character « � ** » placed before a variable tests the<br />
falling edge<br />
Text modifiers can be applied to one variable or to an expression<br />
between parentheses.<br />
Examples:<br />
� i0<br />
/i1<br />
/(i2+i3)<br />
�(i2+(i4./i5))<br />
* To obtain this character when editing a test press the [�] key.<br />
** To obtain this character when editing a test press the [�] key.<br />
<strong>AUTO</strong>MG<strong>EN</strong> 8 181 ©opyright 1988-2007 <strong>IRAI</strong><br />
Test<br />
Test
Language<br />
Time delays<br />
Four syntaxes are available for time delays.<br />
In the first the time delay is activated in the action and the time delay is<br />
simply mentioned in a test to check the end state:<br />
For the others, everything is written in the test. The general form is:<br />
« time delay /launch variable / duration »<br />
or<br />
« duration / launch variable / time delay »<br />
or<br />
« duration / launch variable »<br />
In this case, a time delay is automatically attributed. The attribution<br />
range is that of the automatic symbols.<br />
By default the duration is expressed in tenths of seconds.<br />
The duration can be expressed in days, hours, minutes, seconds,<br />
milliseconds with the operators « d », « h », « m », « s » and « ms ».<br />
For example: 1d30s = 1 day and 30 seconds.<br />
Example using the second syntax:<br />
Example using the normalized syntax:<br />
Priority of boolean operators<br />
By default the boolean operator «. » (AND) has a greater priority than<br />
the operator «+» (OR). Parentheses can be used to set a different<br />
priority.<br />
Examples:<br />
i0.(i1+i2)<br />
((i0+i1).i2)+i5<br />
Always true test<br />
The syntax of an always true test is:<br />
« » (no value) or « =1 »<br />
Numeric variable test<br />
Numeric variable tests must use the following syntax:<br />
<strong>AUTO</strong>MG<strong>EN</strong> 8 182 ©opyright 1988-2007 <strong>IRAI</strong>
« numeric variable » « test type » « constant or numeric variable »<br />
The test type can be:<br />
� « = » equal,<br />
� « ! » or « » different,<br />
� « < » less than (not signed),<br />
� « > » greater than (not signed),<br />
� « > » greater than (signed),<br />
� « = » greater than or equal to (not signed),<br />
� « = » greater than or equal to (signed).<br />
Language<br />
A float can only appear with another float or a real constant.<br />
A long can only appear with another long or a long constant.<br />
A word or a counter can only appear with a word, a counter or a 16 bit<br />
constant.<br />
Real constants must be followed by the letter « R ».<br />
Long constants (32 bits) must be followed by the letter « L ».<br />
16 or 32 bit integer constants are written in decimal by default. They<br />
can be written in hexadecimal (suffix « $ » or « 16# ») or in binary<br />
(suffix « % » or « 2# »).<br />
Numeric variable tests are used in equations like boolean variable<br />
tests. They can be used with test modifiers as long as they are in<br />
parentheses.<br />
Examples:<br />
m200=100<br />
%mw1000=16#abcd<br />
c10>20.c10
(m200=4)<br />
�(m200=100)<br />
/(l200=100000+l200=-100000)<br />
Language<br />
Transitions on multiple lines<br />
Transition text can be extended to multiple lines. The end of a<br />
transition line must be an operator « . » or « + ». A combination of key<br />
[CTRL] + [�] and [CTRL] + [�] makes it possible to move the cursor<br />
from one line to another.<br />
Use of symbols<br />
Symbols make it possible to associate a text to a variable.<br />
Symbols can be used with all the languages.<br />
A symbol must be associated to one and only one variable.<br />
Symbol syntax<br />
The symbols are composed of:<br />
� an optional character « _ » (low dash, generally associated with key [8] on the<br />
keyboard) which indicates the beginning of the symbol,<br />
� the name of the symbol,<br />
� an optional character « _ » (low dash) which indicates the end of the symbol.<br />
The characters « _ » enclosing the symbol names are optional. They<br />
must be used if the symbol starts with a digit or an operator (+,-,<br />
etc…).<br />
Automatic symbols<br />
It can be a nuisance to have to set the attribution in each symbol and a<br />
variable, particularly if the precise attribution of a variable number is<br />
not very important. Automatic symbols are a solution to this problem,<br />
they are used to let the compiler automatically generate the attribution<br />
of a symbol to a variable number. The type of variable to use is<br />
provided in the name of the symbol.<br />
Automatic symbol syntax<br />
The syntax of automatic symbols is as follows:<br />
_« symbol name » %« variable type »_<br />
« variable type » can be:<br />
I , O or Q, U or M, T, C, M or MW, L or MD, F or MF.<br />
It is possible to reserve multiple variables for a symbol. This is useful<br />
for setting tables. In this case the syntax is:<br />
_« symbol name » %« variable »« length »_<br />
<strong>AUTO</strong>MG<strong>EN</strong> 8 184 ©opyright 1988-2007 <strong>IRAI</strong>
«length » represents the number of variables to be reserved.<br />
Language<br />
How does the compiler manage the automatic symbols ?<br />
When starting to compile an application, the compiler cancels all the<br />
automatic symbols located in the « .SYM » file of the application. Each<br />
time the compiler finds an automatic symbol it creates a unique<br />
attribution for the symbol based of the variable type specified in the<br />
symbol name. The symbol that is then generated is written in the<br />
« .SYM » file. If the same automatic symbol is present more than once<br />
in an application, it refers to the same variable.<br />
Range of variable attribution<br />
By default, an attribution range is set for each type of variable:<br />
Type Start End<br />
I or %I 0 9999<br />
O or %Q 0 9999<br />
U or %M 100 9999<br />
T or %T 0 9999<br />
C or %C 0 9999<br />
M or 200 9999<br />
%MW<br />
L or %MD 100 4998<br />
F or %MF 100 4998<br />
The attribution range can be changed for each type of variable by<br />
using the compilation command #SR« type »=« start », « end »<br />
« type » designates the type of variable, start and end and the new<br />
limits to be used.<br />
This command modifies the attribution of automatic variables for the<br />
entire sheet where it is written and up to the next « #SR » command.<br />
Fixed-address symbols<br />
The syntax of the automatic symbols is:<br />
_« symbol name » %« variable name »_<br />
For example:<br />
open valve%%q3<br />
Designates a symbol that will be linked to the variable %Q3.<br />
<strong>AUTO</strong>MG<strong>EN</strong> 8 185 ©opyright 1988-2007 <strong>IRAI</strong>
Language<br />
Examples<br />
To better illustrate this manual we have developed some functional<br />
examples with a model of a train as in the diagram below<br />
S1I<br />
S1D<br />
1 MAQUETTE AT-850<br />
4<br />
voie 1<br />
voie 2<br />
voie 6<br />
voie 5<br />
voie 4<br />
voie 7<br />
voie 8<br />
2<br />
S2A<br />
T2A<br />
S2B<br />
T2B<br />
S7I<br />
T7I<br />
T1I<br />
S6I<br />
T6I S6D<br />
T6D<br />
S3I<br />
T3I<br />
S7D<br />
T7D<br />
5<br />
voie 3<br />
We have used I/O cards on a PC to pilot this model. The symbols set by the<br />
constructor of the model have been saved.<br />
<strong>AUTO</strong>MG<strong>EN</strong> 8 186 ©opyright 1988-2007 <strong>IRAI</strong><br />
S5I<br />
T5I<br />
S8I<br />
T8I<br />
T1D<br />
S5D<br />
T5D<br />
S8D<br />
T8D<br />
S3D<br />
T3D<br />
S4A<br />
T4A<br />
S4B<br />
T4B<br />
3
The following symbol file was created:<br />
Language<br />
<strong>AUTO</strong>MG<strong>EN</strong> 8 187 ©opyright 1988-2007 <strong>IRAI</strong>
Grafcet<br />
<strong>AUTO</strong>MG<strong>EN</strong> supports the following elements:<br />
� divergences and convergences in « And» and in « Or »,<br />
� destination and source steps,<br />
� destination and source transitions,<br />
� synchronization,<br />
� setting Grafcets,<br />
� memorization of Grafcets,<br />
� fixing,<br />
� macro-steps.<br />
Language<br />
Simple Grafcet<br />
Grafcet line writing involves combined steps and transitions.<br />
The example below illustrates a Grafcet line:<br />
Conditions:<br />
The locomotive needs to leave on track 1 towards the right, up to the<br />
end of the track. It returns in the opposite direction to the other end<br />
and starts again.<br />
<strong>AUTO</strong>MG<strong>EN</strong> 8 188 ©opyright 1988-2007 <strong>IRAI</strong>
Solution 1:<br />
0 AV1<br />
t1d<br />
1 AV1 , DV1<br />
t1i<br />
� examples\grafcet\simple1.agn<br />
Solution 2:<br />
0 S AV1 ,R DV1<br />
t1d<br />
1 S AV1 ,S DV1<br />
t1i<br />
� example\grafcet\simple2.agn<br />
Aller<br />
Retour<br />
Language<br />
The difference between the two solutions is that the first example uses<br />
« Assignment » actions and the second uses « Set to one » and<br />
«Reset ».<br />
We change the conditions by setting a delay of 10 seconds when the<br />
locomotive arrives to the right of track 1 and a delay of 4 seconds<br />
when the locomotive arrives to the left of track 1.<br />
<strong>AUTO</strong>MG<strong>EN</strong> 8 189 ©opyright 1988-2007 <strong>IRAI</strong>
Solution 1:<br />
0 AV1<br />
t1d<br />
10 T0(10S)<br />
t0<br />
20 AV1 , DV1<br />
t1i<br />
30 T1(4S)<br />
t1<br />
� example\grafcet\simple3.agn<br />
Solution 2:<br />
0 AV1<br />
10<br />
t1d<br />
10s/x10<br />
20 AV1 , DV1<br />
30<br />
t1i<br />
4s/x30<br />
� example\grafcet\simple4.agn<br />
Aller<br />
Retour<br />
Aller<br />
Retour<br />
Language<br />
<strong>AUTO</strong>MG<strong>EN</strong> 8 190 ©opyright 1988-2007 <strong>IRAI</strong>
Language<br />
The difference between example 3 and 4 is in the choice of syntax<br />
used to set the time delays. In terms of operation the result is identical.<br />
Divergence and convergence in « And »<br />
Divergences in « And » can have n points. It is important to observe<br />
the use of the function blocks:<br />
Must be a [K]<br />
block and not an<br />
[L] block<br />
Must be an [O]<br />
block and not a<br />
[P] block<br />
Must be an [M]<br />
block and not an<br />
[L] block<br />
Must be a [Q]<br />
block and not a<br />
[P] block<br />
A description of the use of divergences and convergences in « And »<br />
follows.<br />
Conditions:<br />
We are going to use two locomotives: the first makes round trip<br />
journeys on track 1, the second on track 3. The two locomotives are<br />
synchronized (they wait at the end of the track).<br />
<strong>AUTO</strong>MG<strong>EN</strong> 8 191 ©opyright 1988-2007 <strong>IRAI</strong>
Solution 1:<br />
40<br />
=1<br />
0 AV1 50 AV3<br />
t1d t3i<br />
10 60<br />
=1<br />
20 AV1 , DV1 70 AV3 , DV3<br />
t1i t3d<br />
30 80<br />
� example\grafcet\divergence et 1.agn<br />
=1<br />
Language<br />
<strong>AUTO</strong>MG<strong>EN</strong> 8 192 ©opyright 1988-2007 <strong>IRAI</strong>
Solution 2:<br />
t1d t3i<br />
0 AV1 10 AV3<br />
t1d . t3i<br />
t1i t3d<br />
20 AV1 , DV1 30 AV3 , DV3<br />
t1i . t3d<br />
Language<br />
� example\grafcet\divergence and 2.agn<br />
The two solutions are equivalent in terms of operation. The second is a<br />
more compact version which uses conditioned actions.<br />
Divergence and convergence in « Or »<br />
Divergences in « Or » can have n points. It is important to observe the<br />
use of the function blocks:<br />
or<br />
or<br />
<strong>AUTO</strong>MG<strong>EN</strong> 8 193 ©opyright 1988-2007 <strong>IRAI</strong>
Language<br />
Divergences in « Or » must connect on descending links. For example:<br />
incorrect, the right drawing is:<br />
If the width of the page prevents you from writing a large number of<br />
divergences you can use the following type of structure:<br />
The following is an example to illustrate the use of divergences and<br />
convergences in « Or »:<br />
Conditions:<br />
Let's look at the conditions for the first example in the chapter:<br />
roundtrip of a locomotive on track 1.<br />
<strong>AUTO</strong>MG<strong>EN</strong> 8 194 ©opyright 1988-2007 <strong>IRAI</strong>
Solution:<br />
0 AV1<br />
� t1d � t1i<br />
1 S DV1 2 R DV1<br />
=1 =1<br />
� example\grafcet\divergence or.agn<br />
Language<br />
This Grafcet could be restated in a step using conditioned actions as in<br />
this example:<br />
� t1d � t1i<br />
0 AV1 S DV1 R DV1<br />
� example\grafcet\conditional action.agn<br />
Destination and source steps, destination and source transitions<br />
The principles are illustrated in the examples below:<br />
Conditions:<br />
Let's look at the second example in this chapter: round trip of a<br />
locomotive on track 1 with a delay at the end of the track.<br />
Solution:<br />
<strong>AUTO</strong>MG<strong>EN</strong> 8 195 ©opyright 1988-2007 <strong>IRAI</strong>
0 S AV1<br />
� t1d � t1i<br />
10 R AV1 30 R AV1<br />
t0/x10/10s t1/x30/4s<br />
20 S AV1 S DV1 40 S AV1 R DV1<br />
=1 =1<br />
� example\grafcet\destination and source steps.agn<br />
Language<br />
Multiple actions, conditioned actions<br />
We have already used multiple and conditioned actions in this chapter.<br />
The two principles are described in detail below.<br />
As described in the chapter dedicated to the compiler, multiple actions<br />
can be written in the same rectangle, by entering the character « , »<br />
(comma) as a separator.<br />
When a condition is added to an action rectangle, all of the actions<br />
which continue in the rectangle are conditioned.<br />
Multiple actions rectangles can be associated to a step.<br />
another possibility:<br />
Each of the rectangles can receive a different condition:<br />
<strong>AUTO</strong>MG<strong>EN</strong> 8 196 ©opyright 1988-2007 <strong>IRAI</strong>
Language<br />
Conditional actions, event-based actions<br />
To design a conditional or event-based action, place the cursor over<br />
the action rectangle, right-click with the mouse and select “Conditional<br />
action” or event-based action from the menu. To document the<br />
condition on action, click on the element or or .<br />
The IF (condition) syntax allows a condition on action to be written in<br />
the action rectangle.<br />
For example:<br />
0 S%Q5 IF(%I4)<br />
.<br />
Actions on activation or deactivation of a step<br />
.and<br />
actions contained in a rectangle have to be performed once at the<br />
activation or deactivation of the step respectively. For example:<br />
The . symbols make it possible to specify that the<br />
20 + %C5<br />
.<br />
Increment counter 5 once at the activation of step 20.<br />
Actions on transition crossing<br />
The . and . symbols make it possible to define actions on<br />
transition crossing. For example:<br />
<strong>AUTO</strong>MG<strong>EN</strong> 8 197 ©opyright 1988-2007 <strong>IRAI</strong>
10<br />
20<br />
%i0<br />
%Q0:=1<br />
Language<br />
.<br />
%Q0 will be activated on crossing the transition between steps 10 and<br />
20.<br />
Synchronization<br />
Let's return to a previous example to illustrate Grafcets<br />
synchronization.<br />
Conditions:<br />
Round trip of two locomotives on tracks 1 and 3 with a delay at the end<br />
of the track.<br />
This example was used with a divergence in « And ».<br />
Solution 1:<br />
10 AV1 100 AV3<br />
t1d t3i<br />
20 110<br />
x110 x20<br />
30 AV1 , DV1 120 AV3 , DV3<br />
t1i t3d<br />
40 130<br />
x130 x40<br />
� example\grafcet\synchro1.agn<br />
<strong>AUTO</strong>MG<strong>EN</strong> 8 198 ©opyright 1988-2007 <strong>IRAI</strong>
Solution 2:<br />
10 SX100,SX140<br />
20<br />
=1<br />
x110.x150<br />
30 SX120,SX160<br />
40<br />
=1<br />
x130.x170<br />
100 AV1 120 AV1 , DV1 140 AV3 160 AV3 , DV3<br />
t1d t1i t3i t3d<br />
110 130 150 170<br />
x30 x10 x30 x10<br />
� example\grafcet\synchro2.agn<br />
Language<br />
The second is an excellent example of how to complicate the simplest<br />
things for teaching purposes.<br />
Grafcet setting<br />
The compiler regroups the steps based on the links established within<br />
them. To draw a Grafcet, just refer to one of the steps making up that<br />
Grafcet.<br />
It is also possible to draw all of the Grafcets present on a sheet by<br />
mentioning the name of the sheet.<br />
<strong>AUTO</strong>MG<strong>EN</strong> 8 199 ©opyright 1988-2007 <strong>IRAI</strong>
For example:<br />
Language<br />
To draw a Grafcet we use Grafcet 200, Grafcet 201 or Grafcet 202.<br />
Thus the Grafcet of all the steps becomes a structured type variable.<br />
made up of n steps, each of these steps, being either active or idle.<br />
As we have seen, <strong>AUTO</strong>MG<strong>EN</strong> divides the steps into independent<br />
groups. These groups can be regrouped, making it possible to<br />
consider them as a single Grafcet. To regroup multiple Grafcets, the<br />
compilation command « #G:g1,g2 » (command to be included in a<br />
comment) must be used. This command regroups the Grafcets g1 and<br />
g2. Remember that the designation of a Grafcet is affected by<br />
mentioning the number of one of its steps.<br />
Here is an example:<br />
#G:105,200<br />
this compilation command regroups the two Grafcets:<br />
Note:multiple « #G » commands can be used to regroup more than<br />
two Grafcets.<br />
We are now going to describe the useable setting orders. They are<br />
simply written inside the action rectangles as normal assignments.<br />
They also support the operator S(set to one), R(reset), N(complement<br />
assignment) and I(Inversion) as well as conditional actions.<br />
Grafcet setting according to a list of active steps<br />
Syntax:<br />
« F:{} »<br />
or<br />
« F/:{} »<br />
<strong>AUTO</strong>MG<strong>EN</strong> 8 200 ©opyright 1988-2007 <strong>IRAI</strong>
Language<br />
The Grafcet/s thus designated will be set to the state established for<br />
the list of active steps if they are within braces. If multiple steps need<br />
to be active they need to be separated with a « , » (comma). If the<br />
Grafcet/s need to be set to an idle state (not active step) then no step<br />
should be present within the braces.<br />
The number of steps may be preceded by an « X ». It is also possible<br />
to associate a symbol to the name of a step.<br />
Examples:<br />
« F10:{0} »<br />
set all the steps of Grafcet 10 to 0 except step 0 which will be set to 1.<br />
« F0:{4,8,9,15} »<br />
sets all the steps of Grafcet 0 to 0 except steps 4,8,9 and 15 which will<br />
be set to 1.<br />
« F/normal run:{} »<br />
sets all the Grafcets on the « normal run » sheet to an idle state.<br />
Memorization of a Grafcet state<br />
Current state of a Grafcet:<br />
Syntax:<br />
« G: »<br />
or<br />
« G/: »<br />
This command memorizes the state of one or more Grafcets in a<br />
series of bits. It is necessary to reserve a storage space for the state of<br />
the Grafcet/s (one bit per step). These storage bits must be<br />
consecutive. You must use the #B command to reserve a linear bit<br />
space.<br />
The step number designating the Grafcet can be preceded by an «<br />
X » . It is also possible to associate a symbol to a step name. The bit<br />
number can be preceded by « U » or « B ». A symbol can be<br />
associated to the first bit of the state storage area.<br />
Particular Grafcet state:<br />
Syntax:<br />
« G: {list of active steps} »<br />
or<br />
« G/: {list of active steps} »<br />
This command memorizes the state set for the list of active steps<br />
applied to the specified Grafcets starting with the indicated bit. Also<br />
here it is necessary to reserve a sufficient number of bits. If an idle<br />
situation needs to be memorized then no steps should appear<br />
between the braces.<br />
<strong>AUTO</strong>MG<strong>EN</strong> 8 201 ©opyright 1988-2007 <strong>IRAI</strong>
Language<br />
The step number can be preceded by an « X » . It is also possible to<br />
associate a symbol to a step name. The bit number can be preceded<br />
by « U » or « B ». A symbol can be associated to the first bit of the<br />
state storage area.<br />
Examples:<br />
« G0:100 »<br />
memorizes the current state of Grafcet 0 starting from U100.<br />
« G0:U200 »<br />
memorizes the idle state of Grafcet 0 starting from U200.<br />
« G10:150{1,2} »<br />
memorizes the state of Grafcet 10, in which only steps 1 and 2 are<br />
active, starting from U150.<br />
« G/PRODUCTION:_SAVE PRODUCTION STATE_ »<br />
memorizes the state of the Grafcets on the « PRODUCTION »<br />
spreadsheet in the_SAVE PRODUCTION STATE_ variable.<br />
Setting a Grafcet from a memorized state<br />
Syntax:<br />
« F: »<br />
or<br />
« F/: »<br />
Sets the Grafcet/s with a memorized state to start from the specified<br />
bit.<br />
The step number designated by the Grafcet can be preceded by an «<br />
X » . It is also possible to associate a symbol to a step name. The bit<br />
number can be preceded by « U » or « B ». A symbol can be<br />
associated to the first bit of the state storage area.<br />
Example:<br />
« G0:100 »<br />
memorizes the current state of Grafcet 0<br />
« F0:100 »<br />
and resets that state<br />
Fixing a Grafcet<br />
Syntax:<br />
« F »<br />
or<br />
« F/ »<br />
Fixes a Grafcet/s: no evolution of these is permitted.<br />
Example:<br />
« F100 »<br />
<strong>AUTO</strong>MG<strong>EN</strong> 8 202 ©opyright 1988-2007 <strong>IRAI</strong>
fixes Grafcet 100<br />
« F/production »<br />
fixes the Grafcets on the « production » sheet<br />
An illustration of setting is shown in the example below.<br />
Language<br />
Conditions:<br />
Let's look at a previous example: the round trip of two locomotives on<br />
tracks 1 and 3 (this time with no delay between the locomotives) and<br />
let's add an emergency stop. When the emergency stop is detected all<br />
the outputs are cleared. When the emergency stop disappears the<br />
program should start where it stopped.<br />
<strong>AUTO</strong>MG<strong>EN</strong> 8 203 ©opyright 1988-2007 <strong>IRAI</strong>
Solution 1:<br />
Language<br />
#B104 réserve 4 bits pour la mémorisation de l'état des Grafcets<br />
locomotive 1 locomotive 2<br />
10 AV1 30 AV3<br />
t1d t3i<br />
20 AV1 , DV1 40 AV3 , DV3<br />
t1i t3d<br />
gestion de l'arrêt d'urgence<br />
1000<br />
arret urgence<br />
1010 G10:100,G30:102<br />
=1<br />
1020 F10:{},F30:{}<br />
arret urgence<br />
1030 F10:100,F30:102<br />
=1<br />
� example\grafcet\force1.agn<br />
Note the use of command #B104 which makes it possible to reserve<br />
four consecutive bits (U100 to U103) to memorize the state of the two<br />
Grafcets. « _emergency stop_ » was associated to a bit (U1000). Its<br />
<strong>AUTO</strong>MG<strong>EN</strong> 8 204 ©opyright 1988-2007 <strong>IRAI</strong>
Language<br />
state can thus be modified starting from the environment by clicking<br />
below when the dynamic display is active.<br />
Solution 2:<br />
#B104 réserve 4 bits pour la mémorisation de l'état des Grafcets<br />
locomotive 1 locomotive 2<br />
#G:10,30<br />
10 AV1 30 AV3<br />
t1d t3i<br />
20 AV1 , DV1 40 AV3 , DV3<br />
t1i t3d<br />
gestion de l'arrêt d'urgence<br />
1000<br />
arret urgence<br />
1010 G10:100<br />
=1<br />
1020 F10:{}<br />
1030 F10:100<br />
=1<br />
arret urgence<br />
� example\grafcet\force2.agn<br />
<strong>AUTO</strong>MG<strong>EN</strong> 8 205 ©opyright 1988-2007 <strong>IRAI</strong>
Language<br />
This second solution shows the use of the compilation command<br />
« #G » which makes it possible to regroup the Grafcets with setting<br />
command.<br />
Grafcet forcings (60848 standard)<br />
This standard defines the forcing orders in double action rectangles.<br />
Forcing actions are executed when the associated condition, step or<br />
logical diagram, is true. Conditions can be added on the double action<br />
rectangles: condition on action, event-based action, action on<br />
activation or deactivation.<br />
Forcing a Grafcet according to a list of active steps<br />
The syntax is:<br />
G{}<br />
The step(s) included in the list are forced to true, the other to false. An<br />
empty list of steps causes all the steps to be forced to false.<br />
Example:<br />
G10{20,30}<br />
.<br />
Here 10 represents the Grafcet to be forced: Grafcet containing step<br />
10.<br />
Another example:<br />
Gfolio à forcer{100,200,300}<br />
.<br />
Force all of the Grafcets on the sheet named “sheet to be forced”, with<br />
steps 100, 200 and 300 being set to true and the others set to 0.<br />
Forcing a Grafcet to its initial state<br />
The syntax is:<br />
G{INIT}<br />
The Grafcet(s) are forced to their initial state<br />
Example:<br />
G10{INIT}<br />
Freezing a Grafcet<br />
The syntax is:<br />
G{*}<br />
Example:<br />
G10{*}<br />
.<br />
.<br />
<strong>AUTO</strong>MG<strong>EN</strong> 8 206 ©opyright 1988-2007 <strong>IRAI</strong>
Language<br />
Macro-steps<br />
<strong>AUTO</strong>MG<strong>EN</strong> implements macro-steps.<br />
Additional information is given below:<br />
A macro-step MS is the single representation of single group of steps<br />
and transitions called « MS expansion».<br />
A macro-step obeys the following rules:<br />
� an MS expansion involves a special step called input step and a special step<br />
called output step.<br />
� the input step has the following property: complete clearing of a transition<br />
upstream from the macro-step, it activates the input step of its expansion.<br />
� the output step has the following property: it is involved in the validation of<br />
transitions downstream from the macro-step.<br />
� if outside the transitions upstream and downstream from the MS, there is no<br />
input structural connection, on one side with a step or transition of the MS<br />
expansion and on the other side, a step or a transition is not part of MS.<br />
The use of a macro-step with <strong>AUTO</strong>MG<strong>EN</strong> is set as follows:<br />
� the expansion of a macro-step is a Grafcet if it is on a distinct sheet,<br />
� the input step of the macro-step expansion must bear the number 0 or the<br />
reference Exxx, (with xxx = any number),<br />
� the output step of a macro-step expansion must bear the number 9999 or the<br />
reference Sxxx, with xxx = any number,<br />
� aside from these two requirements, a macro-step expansion can be any<br />
Grafcet and as such can contain macro-steps.<br />
0.0.0.1. How can a macro-step be set ?<br />
The symbol must be used. To obtain this symbol, click on an<br />
empty space on the sheet and select « Add …/Macro-step » from the<br />
menu. To open the menu click on the bottom of the sheet with the right<br />
side of the mouse.<br />
To set a macro-step expansion, create a sheet, designate the<br />
expansion and assign the sheet properties (by clicking with the right<br />
side of the mouse on the name of the sheet in the browser). Record<br />
the type of sheet on «Macro-step expansion » and the number of the<br />
macro-step.<br />
<strong>AUTO</strong>MG<strong>EN</strong> 8 207 ©opyright 1988-2007 <strong>IRAI</strong>
Language<br />
In run mode it is possible to display a macro-step expansion. To do so<br />
place the cursor on the macro-step and click on the left side of the<br />
mouse.<br />
Notes:<br />
� user steps and bits used in a macro-step expansion are local, this means that<br />
they have no connection with the steps and bits of other Grafcets. All the other<br />
types of variables do not have this characteristic: they are common for all<br />
levels.<br />
� if an area of bits needs to be used in an overall method it is necessary to state<br />
this using the command « #B ».<br />
� assignment of non-local variables for different levels or different expansions is<br />
not managed by the system. In other words, it is necessary to use the<br />
assignments « S » « R » or « I » to ensure that the system operates correctly..<br />
Let's use one of our previous examples to illustrate the use of macrosteps:<br />
a round trip voyage of a train on track 1 with a delay at the end<br />
of the track. We have broken down the legs of the trip into two<br />
separate macro-steps.<br />
<strong>AUTO</strong>MG<strong>EN</strong> 8 208 ©opyright 1988-2007 <strong>IRAI</strong>
Solution:<br />
macro-étape aller voie 1<br />
E1<br />
10 S AV1 ,R DV1<br />
t1d<br />
20 R AV1<br />
S1<br />
t0/x20/10s<br />
macro-étape retour voie 1<br />
E2<br />
10 S AV1 ,S DV1<br />
t1i<br />
20 R AV1<br />
S2<br />
t1/x20/4s<br />
Language<br />
<strong>AUTO</strong>MG<strong>EN</strong> 8 209 ©opyright 1988-2007 <strong>IRAI</strong>
0<br />
M1<br />
M2<br />
=1<br />
=1<br />
=1<br />
� example\grafcet\macro steps.agn<br />
Language<br />
Encapsulating steps<br />
Introduced in standard 60848, encapsulating steps are an evolution of<br />
the ideas proposed in macro-steps.<br />
Using encapsulating steps under <strong>AUTO</strong>MG<strong>EN</strong> is defined as follows:<br />
� the encapsulation is located in a separate sheet.<br />
How do you define an encapsulating step?<br />
The . or . symbol have to be used. To place this symbol,<br />
right-click with the mouse on an empty part of the sheet and select<br />
“Plus.../Encapsulating step” in the contextual menu.<br />
How do you define an encapsulation?<br />
To define the encapsulation, create a sheet, design the encapsulation<br />
and modify the properties of the sheet (by right-clicking with the mouse<br />
on the name of the sheet in the browser). Set the sheet type to<br />
“Encapsulation” as well as the encapsulating step number.<br />
The . symbol allows the initial state to be defined for an<br />
encapsulation.<br />
<strong>AUTO</strong>MG<strong>EN</strong> 8 210 ©opyright 1988-2007 <strong>IRAI</strong>
Language<br />
An encapsulation can be viewed in execution mode. To do this, you<br />
need to place the cursor over the encapsulating step and left-click with<br />
the mouse.<br />
Notes:<br />
� The User bits and steps used in an encapsulation are local, i.e. they are not<br />
related to the bits and steps of other Grafcet levels. This is not the case for all<br />
the other types of variable: they are common to all the levels. You can, for<br />
example, use word bits as global variables.<br />
� The encapsulated steps can be embedded.<br />
� The Xn/Xm or %Xn/%Xm syntax allows you to reference step m contained in<br />
the encapsulation associated to step n.<br />
Example :<br />
0<br />
1<br />
2<br />
i0<br />
i1<br />
i2<br />
. main program<br />
<strong>AUTO</strong>MG<strong>EN</strong> 8 211 ©opyright 1988-2007 <strong>IRAI</strong>
0 o0<br />
i10<br />
10 o1<br />
i11<br />
20 o2<br />
i12<br />
� examples\grafcet\encapsulation 2.agn<br />
Grafcet / Ladder and Grafcet / Flow chars links<br />
Links<br />
can be defined with Grafcet step variables:<br />
.<br />
0 %x1 %i2 %Q5<br />
1<br />
%i0<br />
%i1<br />
Language<br />
<strong>AUTO</strong>MG<strong>EN</strong> 8 212 ©opyright 1988-2007 <strong>IRAI</strong><br />
.
Language<br />
GRAFCET++: the .block can be used to wire a transition like a<br />
ladder circuit. The Grafcet steps can be wired as the start of a contact.<br />
Grafcet / ladder example:<br />
%i0<br />
%i1<br />
� examples\grafcet\grafcet++2.agn<br />
Grafcet / flow chart example:<br />
dcy<br />
0 %i2 %Q0<br />
10 %i3 %Q1<br />
clignotant 05seconde<br />
& voyant init<br />
auto &<br />
ouvrir vanne<br />
niveau haut<br />
� examples\grafcet\grafcet++.agn<br />
niveau sécurité<br />
Counters<br />
We are going to use an example to describe the use of counters.<br />
Conditions:<br />
A locomotive must make 10 round trip journeys on track 1, stop for<br />
fifteen seconds and start again.<br />
<strong>AUTO</strong>MG<strong>EN</strong> 8 213 ©opyright 1988-2007 <strong>IRAI</strong><br />
.<br />
.
Solution:<br />
0 RC0<br />
=1<br />
1 AV1<br />
t1d<br />
2 AV1 , DV1<br />
t1i<br />
3 +C0<br />
c0
P.C. HORS<br />
<strong>EN</strong>ERGIE<br />
PZ A6 <br />
_AV1_,_DV1_<br />
_t1i_<br />
ramÞne la locomotive Ó<br />
gauche<br />
P.C. HORS<br />
<strong>EN</strong>ERGIE<br />
=1<br />
remise en route arrêt mise en ou hors serv ice<br />
f onctionnement normal<br />
A5 <br />
rien pour l'instant<br />
/_arret urgence_<br />
A7 <br />
D2 <br />
D1 <br />
F6 <br />
essais et vérif ications<br />
Language<br />
<strong>AUTO</strong>MG<strong>EN</strong> 8 215 ©opyright 1988-2007 <strong>IRAI</strong>
Language<br />
Creating a Gemma<br />
To create gemma proceed as follows:<br />
� click on « Sheet » on the browser with the right side of the mouse and select<br />
the command « Add a new sheet»,<br />
� from the list of sizes select « Gemma »,<br />
� click on « OK »,<br />
� use the right side of the mouse to click on the sheet name created on the<br />
browser,<br />
� select properties « Proprieties » from the menu,<br />
� check « Display Gemma form ».<br />
The window will contain a Gemma where all the links are gray. To<br />
validate a rectangle or a connection click on it with the right side of the<br />
mouse.<br />
To edit the contents of a rectangle or the type of connection click on it<br />
with the left side of the mouse.<br />
The contents of Gemma rectangles will be placed in the Grafcet action<br />
rectangles. The type of connection will be placed in the Grafcet<br />
transitions.<br />
ontent of Gemma rectangles<br />
Gemma rectangles can receive any action used by Grafcet. Because<br />
this involves setting a structure for managing run and stop modes, it is<br />
a good idea to use the lowest level setting orders for Grafcet, see<br />
chapter Erreur ! Source du renvoi introuvable..<br />
Obtaining a corresponding Grafcet<br />
Check "Display Gemma form" again in sheet properties to call up a<br />
Grafcet representation. It is always possible to call up a Gemma<br />
representation because the Grafcet structure has not been changed.<br />
The transitions, the action rectangle contents and comments can be<br />
edited with automatic updating of Gemma.<br />
Deleting blank spaces in Grafcet<br />
It is possible that the obtained Grafcet occupies more space than<br />
necessary on the page. The command « Change page layout » from<br />
the « Tools » menu makes it possible to eliminate all the unused<br />
spaces.<br />
<strong>AUTO</strong>MG<strong>EN</strong> 8 216 ©opyright 1988-2007 <strong>IRAI</strong>
Language<br />
Printing Gemma<br />
When editing is in Gemma mode use the « Print » command to print<br />
the Gemma.<br />
Exporting Gemma<br />
Use the « Copy to EMF format » in the « Editing » menu to export a<br />
Gemma to a vectorial form.<br />
Example of Gemma<br />
A description of how to use Gemma is below..<br />
Conditions:<br />
Imagine a panel with the following pushbuttons: « start cycle », « end<br />
cycle » and « emergency stop » a light « INIT ».<br />
The main program will consist of a locomotive making round trip journeys<br />
on track 1.<br />
<strong>AUTO</strong>MG<strong>EN</strong> 8 217 ©opyright 1988-2007 <strong>IRAI</strong>
Solution:<br />
PZ<br />
P.C. HORS<br />
<strong>EN</strong>ERGIE<br />
P.C. HORS<br />
<strong>EN</strong>ERGIE<br />
remise en route arrêt mise en ou hors serv ice<br />
f onctionnement normal<br />
A6 <br />
_AV1_,_DV1_<br />
ramÞne la locomotive Ó<br />
gauche<br />
=1<br />
A5 <br />
rien pour l'instant<br />
/_arret urgence_<br />
A7 <br />
D2 <br />
D1 <br />
F6 <br />
essais et v érif ications<br />
<strong>AUTO</strong>MG<strong>EN</strong> 8 218 ©opyright 1988-2007 <strong>IRAI</strong>
Arrêt dans état initial<br />
0 VOYANT INIT<br />
� depart cycle<br />
Lancement du Grafcet de produ ctio<br />
1 DEPART<br />
fin de cycle 5 F GFN :{}<br />
Arrêt du Grafcet de productio n<br />
2 FIN arret urgence<br />
22 F5:(5)<br />
fin de cycle obtenu<br />
arret urgence<br />
(editing with Grafcet form)<br />
6<br />
Language<br />
RAZ du Grafcet de production<br />
rien pour l'instant<br />
=1<br />
ramène la locomotive à gauche<br />
7 AV1 , DV1<br />
<strong>AUTO</strong>MG<strong>EN</strong> 8 219 ©opyright 1988-2007 <strong>IRAI</strong><br />
t1i
� depart<br />
100 AV1<br />
t1d<br />
110 AV1 , DV1<br />
t1i . fin t1i . fin<br />
� example\gemma\gemma.agn<br />
120 FIN DE CYCLE OBT<strong>EN</strong>U<br />
fin de cycle obtenu<br />
Language<br />
Ladder<br />
Ladder language, also called contact model, is for graphically<br />
describing boolean equations. To create a logical function « And » it is<br />
necessary to write contacts in series. To write an « Or » function it is<br />
necessary to write contacts in parallel.<br />
« And » function<br />
« Or » function<br />
The content of contacts must comply with the syntax established for<br />
the tests which is explained in the «Common elements» chapter of this<br />
manual.<br />
The content of the coils must comply with the syntax established for<br />
the actions which is also explained in the «Common elements »<br />
chapter of this manual.<br />
<strong>AUTO</strong>MG<strong>EN</strong> 8 220 ©opyright 1988-2007 <strong>IRAI</strong>
Example of Ladder<br />
Let's start with the simplest example.<br />
Conditions:<br />
Round trip of a locomotive on track 1.<br />
Solution 1:<br />
AV1<br />
� t1i R DV1<br />
� t1d S DV1<br />
� Example\ladder\ladder1.agn<br />
Solution 2:<br />
AV1<br />
t1i dv1 DV1<br />
t1d<br />
� Example\ladder\ladder2.agn<br />
Language<br />
The second solution is identical from an operational point of view. It is<br />
used to display the use of a self-controlled variable.<br />
Let's make our example more complex.<br />
Conditions:<br />
The locomotive must stop for 10 seconds to the right of track 1 and 4<br />
seconds to the left.<br />
<strong>AUTO</strong>MG<strong>EN</strong> 8 221 ©opyright 1988-2007 <strong>IRAI</strong>
Solution:<br />
t0<br />
t1<br />
t1d T0(10S)<br />
S DV1<br />
t1i T1(4S)<br />
R DV1<br />
t1i t1d AV1<br />
� Example\ladder\ladder3.agn<br />
Language<br />
A final example, even a little more complicated<br />
Conditions:<br />
Again a locomotive which makes round trips on track 1. For each 10<br />
round trips it must stop for 15 seconds.<br />
Solution:<br />
b0 RC0<br />
t0<br />
t1d dv1 +C0<br />
S DV1<br />
t1i R DV1<br />
c0
� it uses action rectangles to the right of the action block.<br />
Language<br />
Flow chart language is used for graphically writing boolean equations.<br />
The test content must comply with the syntax established in the «<br />
Common elements » chapter in this manual.<br />
The content of action rectangles must comply with the syntax for<br />
actions, also described in the « Common elements » chapter of this<br />
manual.<br />
« Test » Area<br />
Drawing flow charts<br />
Affection block<br />
for separating<br />
the test area<br />
from the action<br />
area<br />
« Action » area<br />
Number of input of functions « And » and « Or »<br />
The « And » and « Or » functions are respectively composed of a<br />
block (key [2]) or a block (key [3]), and possible blocks<br />
(key [4]) for adding inputs to blocks and finally block (key [5]).<br />
The functions « And » and « Or » thus involve a minimum of two<br />
inputs..<br />
Chaining the functions<br />
The functions can be chained.<br />
<strong>AUTO</strong>MG<strong>EN</strong> 8 223 ©opyright 1988-2007 <strong>IRAI</strong>
Language<br />
Multiple actions<br />
Multiple action rectangles can be associated to a flow chart after the<br />
assignment block..<br />
or<br />
Example of a flow chart<br />
Let's start with the simplest example:<br />
Conditions:<br />
Roundtrip of a locomotive on track 1.<br />
Solution 1:<br />
=1 AV1<br />
� t1d S DV1<br />
� t1i R DV1<br />
� Example\flow chart\logigramme1.agn<br />
Solution 2:<br />
=1 AV1<br />
t1d DV1<br />
dv1 &<br />
t1i O<br />
� Example\flow chart\logigramme2.agn<br />
The second solution is identical from an operational point of view. It is<br />
used to display the use of a self-controlled variable.<br />
Let's make the example more complex.<br />
Conditions:<br />
<strong>AUTO</strong>MG<strong>EN</strong> 8 224 ©opyright 1988-2007 <strong>IRAI</strong>
Language<br />
The locomotive must stop for 10 seconds to the right of track 1 and 4<br />
seconds to the left.<br />
Solution:<br />
t1d T0(10S)<br />
S DV1<br />
t1i T1(4S)<br />
R DV1<br />
t0 AV1<br />
t1<br />
� Example\flow chart\logigramme3.agn<br />
Note the reuse of the «And» block in the lower part of the example<br />
towards the inputs « _t1d_ » and « _t1i_ ». This prevents having to<br />
write the two tests a second time.<br />
A final example a bit more complicated.<br />
Conditions:<br />
Again a locomotive which makes round trips on track 1. Each 10 round<br />
trips it must stop for 15 seconds.<br />
<strong>AUTO</strong>MG<strong>EN</strong> 8 225 ©opyright 1988-2007 <strong>IRAI</strong><br />
O &<br />
O
Solution:<br />
b0 RC0<br />
t0<br />
t1d & +C0<br />
dv1 O S DV1<br />
t1i R DV1<br />
c0
Language<br />
Code box associated with a step or flow chart<br />
A code box associated with an action is for being able to write lines of<br />
literal language on an application page.<br />
Examples:<br />
The code used above is scanned as long as the action is true.<br />
It is possible to use the action rectangles and code boxes together.<br />
Example:<br />
Literal code in an action rectangle or coil<br />
The characters « { » and « } » are used to directly enter instructions in<br />
literal language into an action rectangle (Grafcet and flow chart<br />
languages). The character« , » (comma) is used as a separator if<br />
multiple instructions are present in « { » and « } ».<br />
This type of entry can be used with conditional orders.<br />
Examples:<br />
Setting a code box<br />
To create a code box, follow the steps below:<br />
� click on an empty space on the sheet with the right side of the mouse,<br />
<strong>AUTO</strong>MG<strong>EN</strong> 8 227 ©opyright 1988-2007 <strong>IRAI</strong>
� select « Add … / Code box » from the menu,<br />
� click on the edge of the code box to edit its contents.<br />
To exit the code box after editing click on [Enter] or click outside it.<br />
Language<br />
Low level literal language<br />
This chapter describes the use of low level literal language. This<br />
language is an intermediate code between the evolved languages of<br />
Grafcet, flow chart, ladder, organizational chart, function block,<br />
extended literal, ST literal and executable languages. It is also know<br />
as pivot code. Post-processors translate low level literal language into<br />
executable code for the PC, automate or microprocessor card.<br />
Literal language can also be used for an application in order to effect<br />
various boolean, numeric or algebraic operations.<br />
Low level literal language is an assembler type language. It uses the<br />
idea of an accumulator for numeric treatment.<br />
Extended literal language and ST literal language described in the<br />
following chapters, offer a simplified and higher level alternative for<br />
writing programs in literal language.<br />
The general syntax for a line of low level literal language is:<br />
«action » [[ [« Test »] « Test » ]...]<br />
The actions and tests of low level literal language are represented by<br />
mnemonics formed of three letters. An instruction is always followed<br />
by an expression: variable, constant etc.<br />
A line is composed of a single action and possibly a test. If a line only<br />
includes an action, then the instruction is always executed.<br />
Variables<br />
The variables used are the same as those described in the « Common<br />
elements » chapter.<br />
Accumulators<br />
Some instructions use an accumulator. The accumulators are internal<br />
registers which execute the final program and make it possible to<br />
temporarily store values.<br />
There are three accumulators: a 16 bit accumulator known as AAA, a<br />
32 bit accumulator known as AAL and a float accumulator known as<br />
AAF.<br />
Flags<br />
Flags are boolean variables which are positioned based on the result<br />
of numeric operations.<br />
There are four permanent flags to test the result of a calculation.<br />
These four indicators are:<br />
<strong>AUTO</strong>MG<strong>EN</strong> 8 228 ©opyright 1988-2007 <strong>IRAI</strong>
Language<br />
� carry indicator C:it indicates if an operations has generated a carry figure (1) or<br />
not (0),<br />
� zero indicator Z:it indicates if an operations has generated a nil result (1) or not<br />
nil (0),<br />
� sign indicator S: it indicates if an operation has generated a negative result (1)<br />
or positive one (0),<br />
� overflow indicator O: it indicates if an operation has generated an overflow (1).<br />
Addressing modes<br />
Low level literal language has 5 addressing modes. An addressing<br />
mode is a characteristic associated to each literal language instruction.<br />
Addressing modes used appear below:<br />
TYPE SYNTAX EXAMPLE<br />
Immediate 16 bits {constant} 100<br />
Immediate 32 bits {constant}L 100000L<br />
Immediate float {constant}R 3.14R<br />
Absolute {variable} {variable reference} O540<br />
16 bit accumulator AAA AAA<br />
32 bit accumulator AAL AAL<br />
Float accumulator AAF AAF<br />
Indirect {variable}{(word reference)} O(220)<br />
Label :{label name}: :loop<br />
Thus an instruction has two characteristics: the type of variable and<br />
the addressing mode. Certain instructions support or do not support<br />
certain addressing modes and certain variable types. For example, an<br />
instruction may only apply to two words and not to other types of<br />
variables.<br />
Note: Variables X and U can not be associated to an indirect address<br />
due to the non-linear nature of their assignments. If it is necessary to<br />
access a U variable table then a command #B must be used to make a<br />
table of linear bits.<br />
Tests<br />
Tests that can be associated to instructions are composed of a<br />
mnemonic, a type of test and a variable.<br />
Test mnemonics are used to set combination tests on multiple<br />
variables (and, or). If a test is composed of a single variable, an AND<br />
operator needs to be associated to it.<br />
<strong>AUTO</strong>MG<strong>EN</strong> 8 229 ©opyright 1988-2007 <strong>IRAI</strong>
Language<br />
There are only three test mnemonics:<br />
AND and<br />
ORR or<br />
EOR end or<br />
Here are some examples of equivalencies in boolean equations and<br />
low level literal language:<br />
o0=i1 : and i1<br />
o0=i1.i2 : and i1 and i2<br />
o0=i1+i2 : orr i1 eor i2<br />
o0=i1+i2+i3+i4 : orr i1 orr i2 orr i3 eor i4<br />
o0=(i1+i2).(i3+i4) : orr i1 eor i2 orr i3 eor i4<br />
o0=i1.(i2+i3+i4) : and i1 orr i2 orr i3 eor i4<br />
o0=(i1.i2)+(i3.i4) ; impossible to translate directly,<br />
; intermediate variables<br />
; must be used:<br />
equ u100 and i1 and i2<br />
equ u101 and i3 and i4<br />
equ o0 orr u100 eor u101<br />
Test modifiers make it possible to test things other than the truth of a<br />
variable:<br />
� / no<br />
� # rising edge<br />
� * falling edge<br />
� @ immediate state<br />
Notes:<br />
� boolean variables are updated after each execution cycle. In other words, if a<br />
binary variable is positioned at a state during a cycle, then its new state will be<br />
detected during the following cycle. The text modifier @ makes it possible to<br />
obtain the real state of a boolean variable without waiting for the following<br />
cycle.<br />
� test modifiers cannot be used with numeric tests.<br />
<strong>AUTO</strong>MG<strong>EN</strong> 8 230 ©opyright 1988-2007 <strong>IRAI</strong>
Examples:<br />
set o100<br />
equ o0 and @o100 ; true test of the first cycle<br />
equ o1 and o100 ; true test at the second cycle<br />
Language<br />
Only two addressing modes are available for tests: absolute and<br />
indirect<br />
A test for counters, words, longs and floating points is available:<br />
Syntax:<br />
« {variable} {=, !, , >} {constant or variable} »<br />
= equal,<br />
! different,<br />
< less than not signed,<br />
> greater than not signed,<br />
> greater than signed,<br />
By default, constants are written in decimals. The suffixes « $ » and<br />
« % » are used for writing in hexadecimal or binary. The quotation<br />
marks are for writing in ASCII.<br />
32 bit constants must be followed by the letter « L ».<br />
Real constants must be followed by the letter « R ».<br />
A word or a counter can be compared to a word, a counter of a 16 bit<br />
constant..<br />
A long can be compared to a long or a 32 bit constant.<br />
A float can be compared to a float or a real constant.<br />
Examples:<br />
and c0>100 and m225=10<br />
orr m200=m201 eor m202=m203 and f100=f101 and f200
Language<br />
Numbering base<br />
The values (variable references or constants) can be written in<br />
decimal, hexadecimal, binary or ASCII.<br />
The following syntax must be applied for 16 bit constants:<br />
� decimal:possibly the character « - » plus 1 to 5 digits « 0123456789 »,<br />
� hexadecimal: the prefix « $ » or « 16# » followed by 1 to 4 digits<br />
« 0123456789ABCDEF »,<br />
� binary: the prefix « % » or « 2# » followed by 1 to 16 digits « 01 »,<br />
� ASCII: the character « " » followed by 1 or 2 characters followed by « " ».<br />
The following syntax must be applied for 32 bit constants:<br />
� Decimal: possibly the character « - » plus 1 to 10 digits « 0123456789 »,<br />
� Hexadecimal: the prefix « $ » or « 16# » followed by 1 to 8 digits<br />
« 0123456789ABCDEF »,<br />
� Binary: the prefix « % » or « 2# » followed by 1 to 32 digits « 01 »,<br />
� ASCII: the character « " » followed by 1 to 4 characters followed by « " ».<br />
The following syntax must be applied for real constants:<br />
[-] i [[.d] Esx]<br />
i is the whole part<br />
of a decimal part<br />
s possible sign of an exponent<br />
x possible exponent<br />
Presettings<br />
A presetting is used to fix the value of a variable before starting the<br />
application.<br />
The variables T or %T, M or %MW, L or %MD and F or %F can be<br />
preset.<br />
The syntax is as follows:<br />
« $(variable)=constant{,constant{,constant...}} »<br />
For time delays the variable must be written in decimal and be<br />
included between 0 and 65535.<br />
For words the following syntax must be used:<br />
� Decimal: possibly the character « - » plus 1 to 5 digits « 0123456789 »,<br />
<strong>AUTO</strong>MG<strong>EN</strong> 8 232 ©opyright 1988-2007 <strong>IRAI</strong>
Language<br />
� Hexadecimal: the prefix « $ » or « 16# » followed by 1 to 4 digits<br />
« 0123456789ABCDEF »,<br />
� Binary: the prefix « % » or « 2# » followed by 1 to 16 digits « 01 »,<br />
� ASCII: (two characters per word) the character « " » followed by n<br />
characters followed by « " »,<br />
� ASCII: (one character per word) the character « ’ » followed by n<br />
characters followed by « ’ ».<br />
For longs the following syntax must be used:<br />
� Decimal: possible the character « - » plus 1 to 10 digits « 0123456789 »,<br />
� Hexadecimal: the prefix « $ » or « 16# » followed by 1 to 8 digits<br />
« 0123456789ABCDEF »,<br />
� Binary: the character « % » or « 2# » followed by 1 to 32 digits « 01 »,<br />
� ASCII: (four characters per long) the character « " » followed by n characters<br />
followed by « " »,<br />
� ASCII: (one character per long) the character « ’ » followed by n characters<br />
followed by « ’ »<br />
For floats the value must be written in the following form:<br />
[-] i [[.d] Esx]<br />
i is the whole part<br />
d a possible decimal part<br />
s a possible exponent sign<br />
x a possible exponent<br />
Examples:<br />
$t25=100<br />
fixes the time delay order 25 at 10 s<br />
$MW200=100,200,300,400<br />
places the values 100,200,300,400 in the words 200, 201, 202, 203<br />
$m200="ABCDEF"<br />
places the string « ABCDEF » starting from m200 (« AB » in m200,<br />
« CD » in m201, « EF » in m202)<br />
$m200=‘ABCDEF’<br />
places the string « ABCDEF » starting from m200, each word receives<br />
a character<br />
<strong>AUTO</strong>MG<strong>EN</strong> 8 233 ©opyright 1988-2007 <strong>IRAI</strong>
$f1000=3.14<br />
places the value 3,14 in f1000<br />
$%mf100=5.1E-15<br />
places the value 5,1 * 10 exponent -15 in %mf100<br />
$l200=16#12345678<br />
places the value 12345678 (hexa) in the long l200<br />
It is easier to write text in the presettings.<br />
Example:<br />
$m200=" Stop the gate N°10 "<br />
Language<br />
Places the message starting from word 200 by placing two characters<br />
in each word.<br />
$m400=‘ Motor fault ‘<br />
Places the message starting from word 400 by placing a character in<br />
the byte of lower weights of each word, the byte of higher weights<br />
contains 0.<br />
The syntax « $...= » is used to continue a table of presettings after the<br />
previous one.<br />
For example:<br />
#$m200=1,2,3,4,5<br />
#$...=6,7,8,9<br />
Place the variables 1 to 9 in the words m200 à m208.<br />
Presettings can be written in the same manner as low level literal<br />
language or in a command on a sheet. In this case, the presetting<br />
starts with the character « # ».<br />
Example of a presetting written in a code box:<br />
Example of a presetting written in a command:<br />
<strong>AUTO</strong>MG<strong>EN</strong> 8 234 ©opyright 1988-2007 <strong>IRAI</strong>
Language<br />
Indirect addressing<br />
Indirect addressing is used to effect an operation on a variable with an<br />
index..<br />
These are M variables (words) which are used as an index<br />
Syntax:<br />
« variable ( index ) »<br />
Example:<br />
lda 10 ; load 10 in the accumulator<br />
sta m200 ; enter in the word 200<br />
set o(200) ; set to one the output indicated by the word 200 (o10)<br />
Address of a variable<br />
The character « ? » is used to specify the address of a variable.<br />
Example:<br />
lda ?o10 ; enters the value 10 in the accumulator<br />
This syntax is primarily of interest if symbols are used.<br />
Example:<br />
lda ?_gate_ ; enters the variable number in the accumulator<br />
; associated to symbol « _gate_ »<br />
This syntax can also be used in presettings to create variable address<br />
tables..<br />
Example:<br />
$m200=?_gate1_,?_gate2_,?_gate3_<br />
Jumps and labels<br />
Jumps must be referred to a label. Label syntax is:<br />
«:label name: »<br />
Example:<br />
jmp:next:<br />
...<br />
:next:<br />
Function list by type<br />
Boolean functions<br />
SET set to one<br />
RES reset<br />
INV inversion<br />
EQU equivalence<br />
<strong>AUTO</strong>MG<strong>EN</strong> 8 235 ©opyright 1988-2007 <strong>IRAI</strong>
NEQ non-equivalence<br />
Loading and storage functions on integers and floats<br />
LDA load<br />
STA storage<br />
Arithmetic functions on integers and floats<br />
ADA addition<br />
SBA subtraction<br />
MLA multiplication<br />
DVA division<br />
CPA comparison<br />
Arithmetic functions on floats<br />
ABS absolute value<br />
SQR square root<br />
Access functions for PC input/output ports<br />
AIN access input<br />
AOU access output<br />
Access functions for PC memory<br />
ATM input address memory<br />
MTA output address memory<br />
Binary functions on integers<br />
ANA and bit to bit<br />
ORA or bit to bit<br />
XRA exclusive or bit to bit<br />
TSA test bit to bit<br />
SET set all bits to one<br />
RES reset all bits<br />
RRA shift to the right<br />
RLA shift to the left<br />
Other functions on integers<br />
INC incrementation<br />
DEC decrementation<br />
Conversion functions<br />
ATB integers to booleans<br />
BTA booleans to integers<br />
FTI float to integer<br />
Language<br />
<strong>AUTO</strong>MG<strong>EN</strong> 8 236 ©opyright 1988-2007 <strong>IRAI</strong>
ITF integer to float<br />
LTI 32 bit integer to 16 bit integer<br />
ITL 16 bit integer to 32 bit integer<br />
Trigonometric functions<br />
SIN sine<br />
COS cosine<br />
TAN tangent<br />
ASI arc sine<br />
ACO arc cosine<br />
ATA arc tangent<br />
Connection functions<br />
JMP jump<br />
JSR jump to sub routine<br />
RET return from sub routine<br />
Test functions<br />
RFZ zero result flag<br />
RFS sign flag<br />
RFO overflow flag<br />
RFC carry flag<br />
Asynchronous access functions to inputs outputs<br />
RIN read inputs<br />
WOU write outputs<br />
Information contained in the function list<br />
The following are provided for each instruction:<br />
� Name: mnemonic.<br />
� Function: a description of the function created by the instruction.<br />
� Variables: the types of variables used with the instruction<br />
� Addressing: the types of addressing used<br />
� Also see: the other instructions related to the mnemonic.<br />
� Example: a example of the use.<br />
Language<br />
The post-processors which generate construction language are<br />
subject to certain limitations. See the information on these postprocessors<br />
for details on these limitations.<br />
<strong>AUTO</strong>MG<strong>EN</strong> 8 237 ©opyright 1988-2007 <strong>IRAI</strong>
AABBSS<br />
Name : ABS - abs accumulator<br />
Function : calculate the absolute value of the floating accumulator<br />
Variables : none<br />
Addressing : accumulator<br />
Also see : SQR<br />
Example :<br />
lda f200<br />
abs aaf<br />
sta f201<br />
; leaves f201 in the absolute value of f200<br />
Language<br />
<strong>AUTO</strong>MG<strong>EN</strong> 8 238 ©opyright 1988-2007 <strong>IRAI</strong>
AACCOO<br />
Name : ACO – accumulator arc cosine<br />
Function : calculate the arc cosine value of the floating-point<br />
accumulator<br />
Variables : none<br />
Addressing : accumulator<br />
Also see : COS, SIN, TAN, ASI, ATA<br />
Example: :<br />
lda f200<br />
aco aaf<br />
sta f201<br />
; leave the value of the arc cosine of f200 in f201<br />
Language<br />
<strong>AUTO</strong>MG<strong>EN</strong> 8 239 ©opyright 1988-2007 <strong>IRAI</strong>
AADDAA<br />
Name : ADA - adds accumulator<br />
Function : adds a value to the accumulator<br />
Variables : M or %MW, L or %MD, F or %MF<br />
Addressing : absolute, indirect, immediate<br />
Also see : SBA<br />
Example :<br />
ada 200<br />
; adds 200 to the 16 bit accumulator<br />
ada f124<br />
; adds the content of f124 to the float accumulator<br />
ada l200<br />
; adds the content of l200 to the 32 bit accumulator<br />
ada 200L<br />
; adds 200 to the 32 bit accumulator<br />
ada 3.14R<br />
; adds 3.14 to the float accumulator<br />
Language<br />
<strong>AUTO</strong>MG<strong>EN</strong> 8 240 ©opyright 1988-2007 <strong>IRAI</strong>
AAIINN<br />
Name : AIN - accumulator input<br />
Function : reads an input port (8 bits) and stores in<br />
Variables : M or %MW<br />
the lower part of the 16 bit accumulator ;<br />
Language<br />
reads a 16 bit input port and stores in the 16 bit accumulator<br />
(in this case the port address must be written in the form of a<br />
32 bit constant)<br />
only useable with PC compiler<br />
Addressing : indirect, immediate<br />
Also see : AOU<br />
Example :<br />
ain $3f8<br />
; reads port $3f8 (8 bits)<br />
ain $3f8l<br />
; reads port $3f8 (16 bits)<br />
<strong>AUTO</strong>MG<strong>EN</strong> 8 241 ©opyright 1988-2007 <strong>IRAI</strong>
AANNAA<br />
Name : ANA - and accumulator<br />
Function : effects an AND logic in the 16 bit accumulator<br />
and a word or a constant or the 32 bit accumulator and<br />
a long or a constant<br />
Variables : M or %MW, L or %MD<br />
Addressing : absolute, indirect, immediate<br />
Also see : ORA, XRA<br />
Example :<br />
ana %1111111100000000<br />
; masks the 8 bits of lower weight of<br />
; the 16 bit accumulator<br />
ana $ffff0000L<br />
Language<br />
; masks the 16 bits of lower weight of the 32 bit accumulator<br />
<strong>AUTO</strong>MG<strong>EN</strong> 8 242 ©opyright 1988-2007 <strong>IRAI</strong>
AAOOUU<br />
Name : AOU - accumulator output<br />
Language<br />
Function : transfers the lower part (8 bits) of the 16 bit accumulator<br />
on an output port ;<br />
Variables : M or %MW<br />
transfers the 16 bits of the 16 bit accumulator<br />
on an output port (in this case the port address must be<br />
written in the form of a 32 bit constant)<br />
only useable with PC compiler<br />
Addressing : indirect, immediate<br />
Also see : AIN<br />
Example :<br />
lda "A"<br />
aou $3f8<br />
; places the character« A » on output port $3f8<br />
lda $3f8<br />
sta m200<br />
lda "z"<br />
aou m(200)<br />
; places character « z » on output port $3f8<br />
lda $1234<br />
aou $300l<br />
; places the 16 bit value 1234 on output port $300<br />
<strong>AUTO</strong>MG<strong>EN</strong> 8 243 ©opyright 1988-2007 <strong>IRAI</strong>
AASS<br />
II<br />
Name : ASI – accumulator arc sine<br />
Language<br />
Function : calculate the arc sine value of the floating-point accumulator<br />
Variables : none<br />
Addressing : accumulator<br />
Also see : COS, SIN, TAN, ACO, ATA<br />
Example: :<br />
lda f200<br />
asi aaf<br />
sta f201<br />
; leave the value of the arc sine of f200 in f201<br />
<strong>AUTO</strong>MG<strong>EN</strong> 8 244 ©opyright 1988-2007 <strong>IRAI</strong>
AATTAA<br />
Name : ATA – accumulator arc tangent<br />
Function : calculate the arc tangent value of the floating-point<br />
accumulator<br />
Variables : none<br />
Addressing : accumulator<br />
Also see : COS, SIN, TAN, ACO, ASI<br />
Example: :<br />
lda f200<br />
ata aaf<br />
sta f201<br />
; leave the value of the arc tangent of f200 in f201<br />
Language<br />
<strong>AUTO</strong>MG<strong>EN</strong> 8 245 ©opyright 1988-2007 <strong>IRAI</strong>
AATTBB<br />
Name : ATB - accumulator to bit<br />
Function : transfers the 16 bits of the 16 bit accumulator<br />
towards the subsequent 16 boolean variables ; the<br />
the lower weight bit correspond to the first<br />
boolean variable<br />
*<br />
Variables : I or %I, O or %Q, B or %M, T or %T, U<br />
Addressing : absolute<br />
Also see : BTA<br />
Example :<br />
lda m200<br />
atb o0<br />
; recopies the 16 bits of m200 in variables<br />
; o0 to o15<br />
Language<br />
* Note: to be able to use the U bits with this function it is necessary to create a linear table of bits<br />
using command #B.<br />
<strong>AUTO</strong>MG<strong>EN</strong> 8 246 ©opyright 1988-2007 <strong>IRAI</strong>
AATTMM<br />
Name : ATM - accumulator to memory<br />
Function : transfers the 16 bit accumulator to a memory<br />
Variables : M or %MW<br />
address; the word or specified constant<br />
defines the memory address offset<br />
to reach, the word m0 must be loaded with the<br />
segment value of the memory address to reach<br />
only useable with PC compiler<br />
Addressing : indirect, immediate<br />
Also see : MTA<br />
Example :<br />
lda $b800<br />
sta m0<br />
lda 64258<br />
atm $10<br />
; places the value 64258 at address $b800:$0010<br />
Language<br />
<strong>AUTO</strong>MG<strong>EN</strong> 8 247 ©opyright 1988-2007 <strong>IRAI</strong>
BBTTAA<br />
Name : BTA - bit to accumulator<br />
Function : transfers the subsequent 16 boolean variables<br />
towards the 16 bits of the 16 bit accumulator ;<br />
the lower weight bit corresponds to the first<br />
boolean variable<br />
*<br />
Variables : I or %I, O or %Q, B or %M, T or %T, U<br />
Addressing : absolute<br />
Also see : ATB<br />
Example :<br />
bta i0<br />
sta m200<br />
; recopies the 16 inputs i0 to i15 in the word m200<br />
Language<br />
* Note: to be able to use the U bits with this function it is necessary to create a linear table of bits<br />
using command #B.<br />
<strong>AUTO</strong>MG<strong>EN</strong> 8 248 ©opyright 1988-2007 <strong>IRAI</strong>
CCOOSS<br />
Name : COS – accumulator cosine<br />
Language<br />
Function : calculate the cosine value of the floating-point accumulator<br />
Variables : none<br />
Addressing : accumulator<br />
Also see : SIN, TAN, ACO, ASI, ATA<br />
Example: :<br />
lda f200<br />
cos aaf<br />
sta f201<br />
; leave the value of the cosine of f200 in f201<br />
<strong>AUTO</strong>MG<strong>EN</strong> 8 249 ©opyright 1988-2007 <strong>IRAI</strong>
CCPPAA<br />
Name : CPA - compares accumulator<br />
Function : compares a value at the 16 bit or 32 bit or floating<br />
accumulator, effects the same operation as SBA<br />
but without changing the content of the accumulator<br />
Variables : M or %MW, L or %MD, F or %MF<br />
Addressing : absolute, indirect, immediate<br />
Also see : SBA<br />
Example :<br />
lda m200<br />
cpa 4<br />
rfz o0<br />
; sets o0 to 1 if m200 is equal to 4, otherwise o0<br />
; is reset to 0<br />
lda f200<br />
cpa f201<br />
rfz o1<br />
; sets o1 to 1 if f200 is equal to f201, otherwise o1<br />
; is reset to 0<br />
Language<br />
<strong>AUTO</strong>MG<strong>EN</strong> 8 250 ©opyright 1988-2007 <strong>IRAI</strong>
DDEECC<br />
Name : DEC – decrement<br />
Language<br />
Function : decrements a word, a counter, a long, the 16 bit or 32 bit<br />
accumulator<br />
Variables : M or %MW, C or %C, L or %MD<br />
Addressing : absolute, indirect, accumulator<br />
Also see : INC<br />
Example :<br />
dec m200<br />
; decrements m200<br />
dec aal<br />
; decrements the 32 bit accumulator<br />
dec m200<br />
dec m201 and m200=-1<br />
; decrements a 32 bit value composed of<br />
; m200 (lower weights)<br />
; et m201 (higher weights)<br />
<strong>AUTO</strong>MG<strong>EN</strong> 8 251 ©opyright 1988-2007 <strong>IRAI</strong>
DDVVAA<br />
Name : DVA - divides accumulator<br />
Function : division of the 16 bit accumulator by a word or<br />
a constant; division of the float accumulator by<br />
a float or a constant; division of the 32 bit<br />
by a long or a constant, for the 16 bit accumulator<br />
the remainder is placed in word m0, if the division<br />
is by 0<br />
system bit 56 passes to 1<br />
Variables : M or %MW, L or %MD, F or %MF<br />
Addressing : absolute, indirect, immediate<br />
Also see : MLA<br />
Example :<br />
lda m200<br />
dva 10<br />
sta m201<br />
; m201 is equal to m200 divided by 10, m0 contains the<br />
; remainder<br />
lda l200<br />
dva $10000L<br />
sta l201<br />
Language<br />
<strong>AUTO</strong>MG<strong>EN</strong> 8 252 ©opyright 1988-2007 <strong>IRAI</strong>
EEQQUU<br />
Name : EQU - equal<br />
Function : sets a variable to 1 if the test is true,<br />
if not the variable is set to<br />
0<br />
Variables : I or %I, O or %Q, B or %M, T or %T, X or %X, U<br />
Addressing : absolute, indirect (except for X variables)<br />
Also see : NEQ, SET, RES, INV<br />
Example :<br />
equ o0 and i10<br />
; sets the output of o0 to the same state as input i10<br />
lda 10<br />
sta m200<br />
equ o(200) and i0<br />
; sets o10 to the same state as input i0<br />
$t0=100<br />
equ t0 and i0<br />
equ o0 and t0<br />
; sets o0 to the state of i0 with an activation delay<br />
; of 10 seconds<br />
Language<br />
<strong>AUTO</strong>MG<strong>EN</strong> 8 253 ©opyright 1988-2007 <strong>IRAI</strong>
FFTT<br />
II<br />
Name : FTI - float to integer<br />
Function : transfers the float accumulator to the 16 bit accumulator<br />
Variables : none<br />
Addressing : accumulator<br />
Also see : ITF<br />
Example :<br />
lda f200<br />
fti aaa<br />
sta m1000<br />
; leaves the integer part of f200 in m1000<br />
Language<br />
<strong>AUTO</strong>MG<strong>EN</strong> 8 254 ©opyright 1988-2007 <strong>IRAI</strong>
IINNCC<br />
Name : INC - increment<br />
Function : increments a word, a counter, a long the 16 or 32 bit<br />
accumulator<br />
Variables : M or %MW, C or %C, L or %MD<br />
Addressing : absolute, indirect, accumulator<br />
Also see : DEC<br />
Example :<br />
inc m200<br />
; adds 1 to m200<br />
inc m200<br />
inc m201 and m201=0<br />
; increments a value on 32 bits, m200<br />
; represents the<br />
; lower weights, and m201 the higher weights<br />
inc l200<br />
; increments long l200<br />
Language<br />
<strong>AUTO</strong>MG<strong>EN</strong> 8 255 ©opyright 1988-2007 <strong>IRAI</strong>
IINNVV<br />
Name : INV - inverse<br />
Function : inverts the state of a boolean variable or inverts<br />
all the bits of a word, a long or the 16 bit or 32 bit<br />
accumulator<br />
Variables : I or %I, O or %Q, B or %M, T or %T, X or %X, U,<br />
M or %MW, L or %MD<br />
Addressing : absolute, indirect, accumulator<br />
Also see : EQU, NEQ, SET, RES<br />
Example :<br />
inv o0<br />
; inverts the state of output 0<br />
inv aaa<br />
; inverts all the bits of the 16 bit accumulator<br />
inv m200 and i0<br />
; inverts all m200 bits if i0 is at state 1<br />
Language<br />
<strong>AUTO</strong>MG<strong>EN</strong> 8 256 ©opyright 1988-2007 <strong>IRAI</strong>
IITTFF<br />
Name : ITF - integer to float<br />
Function : transfers the 16 bit accumulator to the float accumulator<br />
Variables : none<br />
Addressing : accumulator<br />
Also see : FTI<br />
Example :<br />
lda 1000<br />
itf aaa<br />
sta f200<br />
; leaves the constant 1000 in f200<br />
Language<br />
<strong>AUTO</strong>MG<strong>EN</strong> 8 257 ©opyright 1988-2007 <strong>IRAI</strong>
IITTLL<br />
Name : ITL - integer to long<br />
Language<br />
Function : transfers the 16 bit accumulator to the 32 bit accumulator<br />
Variables : none<br />
Addressing : accumulator<br />
Also see : LTI<br />
Example :<br />
lda 1000<br />
itl aaa<br />
sta f200<br />
; leaves the constant 1000 in l200<br />
<strong>AUTO</strong>MG<strong>EN</strong> 8 258 ©opyright 1988-2007 <strong>IRAI</strong>
JJMMPP<br />
Name : JMP - jump<br />
Function : jump to a label<br />
Variables : label<br />
Addressing : label<br />
Also see : JSR<br />
Example :<br />
jmp:end of program:<br />
; unconditional connection to end of<br />
; program label:<br />
jmp:string: and i0<br />
set o0<br />
set o1<br />
:string:<br />
; conditional connection to a label:string:<br />
; following the state of i0<br />
Language<br />
<strong>AUTO</strong>MG<strong>EN</strong> 8 259 ©opyright 1988-2007 <strong>IRAI</strong>
JJSSRR<br />
Name : JSR - jump sub routine<br />
Function : effects a connection to a sub routine<br />
Variables : label<br />
Addressing : label<br />
Also see : RET<br />
Example :<br />
:square:<br />
:end:<br />
lda m200<br />
jsr:square:<br />
sta m201<br />
jmp end:<br />
sta m53<br />
mla m53<br />
sta m53<br />
ret m53<br />
; the sub routine « square » raises the content<br />
; of the accumulator to the square<br />
Language<br />
<strong>AUTO</strong>MG<strong>EN</strong> 8 260 ©opyright 1988-2007 <strong>IRAI</strong>
LLDDAA<br />
Name : LDA - load accumulator<br />
Function : loads a constant, word or counter in the 16 bit<br />
accumulator; loads a long or constant in the 32<br />
bit accumulator; loads a float or a constant in the<br />
float accumulator; loads a counter or a time delay<br />
in the 16 bit accumulator<br />
Variables : M or %MW, C or %C, L or %MD, F or %MF, T or %T<br />
Addressing : absolute, indirect, immediate<br />
Also see : STA<br />
Example :<br />
lda 200<br />
; loads the constant 200 in the 16 bit accumulator<br />
lda 0.01R<br />
; loads the real constant 0.01 in the float accumulator<br />
lda t10<br />
; loads the counter of time delay 10 in the<br />
; accumulator<br />
Language<br />
<strong>AUTO</strong>MG<strong>EN</strong> 8 261 ©opyright 1988-2007 <strong>IRAI</strong>
LLTTII<br />
Name : LTI - long to integer<br />
Function : transfers the 32 bit accumulator to the 16 bit<br />
Variables : none<br />
accumulator<br />
Addressing : accumulator<br />
Also see : ITL<br />
Example :<br />
lda l200<br />
lti aaa<br />
sta m1000<br />
; leaves the 16 bits of lower weight of l200 in m1000<br />
Language<br />
<strong>AUTO</strong>MG<strong>EN</strong> 8 262 ©opyright 1988-2007 <strong>IRAI</strong>
MMLLAA<br />
Name : MLA - multiples accumulator<br />
Language<br />
Function : multiplies the 16 bit accumulator by a word or a constant;<br />
multiplies the 32 bit accumulator by a long or a constant;<br />
multiplies the float accumulator by a float or a constant;<br />
for the 16 bit accumulator the 16 bits of higher weight<br />
result of the multiplication will be transferred in<br />
m0<br />
Variables : M or %MW, L or %MD, F or %MF<br />
Addressing : absolute, indirect, immediate<br />
Also see : DVA<br />
Example :<br />
lda m200<br />
mla 10<br />
sta m201<br />
; multiplies m200 by 10, m201 is loaded with the<br />
; 16 bits of lower weight, and m0 with the 16 bits of<br />
; higher weight<br />
<strong>AUTO</strong>MG<strong>EN</strong> 8 263 ©opyright 1988-2007 <strong>IRAI</strong>
MMTTAA<br />
Name : MTA - memory to accumulator<br />
Function : transfers the contents of a memory address to the<br />
16 bit accumulator, the specified word or constant<br />
Language<br />
defines the offset of the memory address to reach; the word<br />
m0 must be loaded with the segment value of the memory<br />
address to be reached; only useable with a PC compiler<br />
Variables : M or %MW<br />
Addressing : indirect, immediate<br />
Also see : ATM<br />
Example :<br />
lda $b800<br />
sta m0<br />
mta $10<br />
; places the value contained at address $b800:$0010<br />
; in the 16 bit accumulator<br />
<strong>AUTO</strong>MG<strong>EN</strong> 8 264 ©opyright 1988-2007 <strong>IRAI</strong>
NNEEQQ<br />
Name : NEQ - not equal<br />
Function : sets a variable to 0 if the test is true,<br />
if not the variable is set to 1<br />
Variables : I or %I, O or %Q, B or %M, T or %T, X or %X, U<br />
Addressing : absolute, indirect (except for X variables)<br />
Also see : EQU, SET, RES, INV<br />
Example :<br />
neq o0 and i00<br />
; sets the output of o0 to a complement state of input<br />
; i10<br />
lda 10<br />
sta m200<br />
neq o(200) and i0<br />
; sets o10 to a complement state of input i0<br />
$t0=100<br />
neq t0 and i0<br />
neq o0 and t0<br />
; sets o0 to the state of i0 with a deactivation<br />
; delay of 10 seconds<br />
Language<br />
<strong>AUTO</strong>MG<strong>EN</strong> 8 265 ©opyright 1988-2007 <strong>IRAI</strong>
OORRAA<br />
Name : ORA - or accumulator<br />
Function : effects an OR logic on the 16 bit accumulator<br />
and a word or a constant, or on the 32 bit accumulator<br />
and a long or a constant<br />
Variables : M or %M, L or %MD<br />
Addressing : absolute, indirect, immediate<br />
Also see : ANA, XRA<br />
Example :<br />
ora %1111111100000000<br />
; sets the 8 bits of lower weight of<br />
; the 16 bit accumulator to 1<br />
ora $ffff0000L<br />
Language<br />
; sets the 16 bits of higher weight of the 32 bit accumulator<br />
; to 1<br />
<strong>AUTO</strong>MG<strong>EN</strong> 8 266 ©opyright 1988-2007 <strong>IRAI</strong>
RREESS<br />
Name : RES - reset<br />
Function : sets a boolean variable, a word<br />
a counter, a long, the 16 bit accumulator<br />
or the 32 bit accumulator to 0<br />
Variables : I or %I, O or %Q, B or %M, T or %T, X or %X, U,<br />
M or %MW, C or %C, L or %MD<br />
Addressing : absolute, indirect (except for X variables), accumulator<br />
Also see : NEQ, SET, EQU, INV<br />
Example :<br />
res o0<br />
; sets the output of o0 to 0<br />
lda 10<br />
sta m200<br />
res o(200) and i0<br />
; sets o10 to 0 if input i0 is at 1<br />
res c0<br />
; sets counter 0 to 0<br />
Language<br />
<strong>AUTO</strong>MG<strong>EN</strong> 8 267 ©opyright 1988-2007 <strong>IRAI</strong>
RREETT<br />
Name : RET - return<br />
Function : indicates the return of a sub routine and<br />
places a word or a constant in the 16 bit<br />
accumulator; or places a long or a constant in<br />
the 32 bit accumulator; or places a float or a<br />
constant in the float accumulator<br />
Variables : M or %MW, L or %MD, F or %MF<br />
Addressing : absolute, indirect, immediate<br />
Also see : JSR<br />
Example :<br />
ret 0<br />
; returns to a sub routine by placing 0 in<br />
; the 16 bit accumulator<br />
ret f200<br />
; returns to a sub routine by placing the content of<br />
; f200 in the float accumulator<br />
Language<br />
<strong>AUTO</strong>MG<strong>EN</strong> 8 268 ©opyright 1988-2007 <strong>IRAI</strong>
RRFFCC<br />
Name : RFC - read flag: carry<br />
Function : transfers the carry indicator in a<br />
boolean variable<br />
Variables : I or %I, O or %Q, B or %M, T or %T, X or %X, U<br />
Addressing : absolute<br />
Also see : RFZ, RFS, RFO<br />
Example :<br />
rfc o0<br />
; transfers the carry indicator to o0<br />
lda m200<br />
ada m300<br />
sta m400<br />
rfc b99<br />
lda m201<br />
ada m301<br />
sta m401<br />
inc m401 and b99<br />
; effects an addition on 32 bits<br />
; (m400,401)=(m200,201)+(m300,301)<br />
; m200, m300 and m400 are lower weights<br />
; m201, m301 and m401 are higher weights<br />
Language<br />
<strong>AUTO</strong>MG<strong>EN</strong> 8 269 ©opyright 1988-2007 <strong>IRAI</strong>
RRFFOO<br />
Name : RFO - read flag: overflow<br />
Function : transfers the contents of the overflow indicator in<br />
a boolean variable<br />
Variables : I or %I, O or %Q, B or %M, T or %T, X or %X, U<br />
Addressing : absolute<br />
Also see : RFZ, RFS, RFC<br />
Example :<br />
rfo o0<br />
; transfers the overflow indicator to o0<br />
Language<br />
<strong>AUTO</strong>MG<strong>EN</strong> 8 270 ©opyright 1988-2007 <strong>IRAI</strong>
RRFFSS<br />
Name : RFS - read flag: sign<br />
Function : transfers the sign indicator in a<br />
boolean variable<br />
Variables : I or %I, O or %Q, B or %M, T or %T, X or %X, U<br />
Addressing : absolute<br />
Also see : RFZ, RFC, RFO<br />
Example :<br />
rfs o0<br />
; transfers the sign indicator to o0<br />
Language<br />
<strong>AUTO</strong>MG<strong>EN</strong> 8 271 ©opyright 1988-2007 <strong>IRAI</strong>
RRFFZZ<br />
Name : RFZ - read flag: zero<br />
Function : transfers the content of a zero result indicator<br />
in a boolean variable<br />
Variables : I or %I, O or %Q, B or %M, T or %T, X or %X, U<br />
Addressing : absolute<br />
Also see : RFC, RFS, RFO<br />
Example :<br />
rfz o0<br />
; transfers the zero result indicator to o0<br />
lda m200<br />
cpa m201<br />
rfz o0<br />
; position o0 at 1 if m200 is equal to m201<br />
; or 0 if not<br />
Language<br />
<strong>AUTO</strong>MG<strong>EN</strong> 8 272 ©opyright 1988-2007 <strong>IRAI</strong>
RRIINN<br />
Name : RIN - read input<br />
Function : effects a reading of physical input. This function is only<br />
Variables : none<br />
Addressing : immediate<br />
Also see : WOU<br />
Language<br />
implemented on Z targets and varies following the target.<br />
See the documentation related to each executor<br />
for more information..<br />
<strong>AUTO</strong>MG<strong>EN</strong> 8 273 ©opyright 1988-2007 <strong>IRAI</strong>
RRLLAA<br />
Name : RLA - rotate left accumulator<br />
Function : effects a left rotation of the bits of the<br />
Language<br />
16 bit or 32 bit accumulator; the bits evacuated to the left<br />
enter on the right, the subject of this function is a constant<br />
which sets the number of shifts to be made, the size of the<br />
subject (16 or 32 bits) determines which of the<br />
accumulators will undergo rotation<br />
Variables : none<br />
Addressing : immediate<br />
Also see : RRA<br />
Example<br />
accumulator<br />
:<br />
ana $f000<br />
; separates the digit of higher weight of the 16 bit<br />
rla 4<br />
; and brings it to the right<br />
rla 8L<br />
; effects 8 rotations to the left of the bits of the 32 bit<br />
; accumulator<br />
<strong>AUTO</strong>MG<strong>EN</strong> 8 274 ©opyright 1988-2007 <strong>IRAI</strong>
RRRRAA<br />
Name : RRA - rotate right accumulator<br />
Function : effects a right rotation of the bits of the<br />
Variables : none<br />
Language<br />
16 bit or 32 bit accumulator; the bits evacuated to the right<br />
enter on the left, the subject of this function is a constant which sets<br />
the number of shifts to be made, the size of the subject (16 or 32<br />
bits) determines which of the accumulators will undergo rotation<br />
Addressing : immediate<br />
Also see : RLA<br />
Example :<br />
ana $f000<br />
; separates the digit of higher weight of the 16 bit<br />
rra 12<br />
; and brings it to the right<br />
rra 1L<br />
; effects a rotation of the bits of the 32 bit accumulator<br />
; to a position towards the right<br />
<strong>AUTO</strong>MG<strong>EN</strong> 8 275 ©opyright 1988-2007 <strong>IRAI</strong>
SSBBAA<br />
Name : SBA - subtracts accumulator<br />
Function : removes the content of a word or constant from<br />
Language<br />
the 16 bit accumulator; removes the content of a long or a<br />
constant from the 32 bit accumulator; removes the content<br />
of a float or constant from the float accumulator<br />
Variables : M or %MW, L or %MD, F or %MF<br />
Addressing : absolute, indirect, immediate<br />
Also see : ADA<br />
Example :<br />
sba 200<br />
; removes 200 from the 16 bit accumulator<br />
sba f(421)<br />
; removes the float content if the number is contained<br />
; in word 421 from the float accumulator<br />
<strong>AUTO</strong>MG<strong>EN</strong> 8 276 ©opyright 1988-2007 <strong>IRAI</strong>
SSEETT<br />
Name : SET - set<br />
Function : sets a boolean variable to 1; sets all the bits of a word,<br />
a counter, a long, the 16 bit or the 32 bit<br />
accumulator to 1<br />
Variables : I or %I, O or %Q, B or %M, T or %T, X or %X, U,<br />
M or %MW, C or %C, L or %MD<br />
Addressing : absolute, indirect (except for X variables), accumulator<br />
Also see : NEQ, RES, EQU, INV<br />
Example :<br />
set o0<br />
; sets the output of o0 to 1<br />
lda 10<br />
sta m200<br />
set o(200) and i0<br />
; sets o10 to 1 if input i0 is at 1<br />
set m200<br />
; sets m200 to the value -1<br />
set aal<br />
; sets all the bits of the 32 bit accumulator to 1<br />
Language<br />
<strong>AUTO</strong>MG<strong>EN</strong> 8 277 ©opyright 1988-2007 <strong>IRAI</strong>
SSIINN<br />
Name : SIN – accumulator sine<br />
Language<br />
Function : calculate the sine value of the floating-point accumulator<br />
Variables : none<br />
Addressing : accumulator<br />
Also see : COS, TAN, ACO, ASI, ATA<br />
Example: :<br />
lda f200<br />
sin aaf<br />
sta f201<br />
; leave the value of the sine of f200 in f201<br />
<strong>AUTO</strong>MG<strong>EN</strong> 8 278 ©opyright 1988-2007 <strong>IRAI</strong>
SSQQRR<br />
Name : SQR - square root<br />
Function : calculates the square root of the float accumulator<br />
Variables : none<br />
Addressing : accumulator<br />
Also see : ABS<br />
Example :<br />
lda 9<br />
itf aaa<br />
sqr aaf<br />
fti aaa<br />
sta m200<br />
; leaves value 3 in m200<br />
Language<br />
<strong>AUTO</strong>MG<strong>EN</strong> 8 279 ©opyright 1988-2007 <strong>IRAI</strong>
SSTTAA<br />
Name : STA - store accumulator<br />
Function : stores the 16 bit accumulator in a counter or a word;<br />
stores the 32 bit accumulator in a long; stores the<br />
Language<br />
float accumulator in a float, stores the 16 bit accumulator<br />
in a time delay order<br />
Variables : M or %MW, C or %C, L or %MD, F or %MF, T or %T<br />
Addressing : absolute, indirect<br />
Also see : LDA<br />
Example :<br />
sta m200<br />
; transfers the content of the 16 bit accumulator<br />
; to word 200<br />
sta f200<br />
; transfers the content of the float accumulator<br />
; to float 200<br />
sta l200<br />
; transfers the 32 bit accumulator to long l200<br />
<strong>AUTO</strong>MG<strong>EN</strong> 8 280 ©opyright 1988-2007 <strong>IRAI</strong>
TTAANN<br />
Name : TAN – accumulator tangent<br />
Language<br />
Function : calculate the tangent value of the floating-point accumulator<br />
Variables : none<br />
Addressing : accumulator<br />
Also see : COS, SIN, ACO, ASI, ATA<br />
Example: :<br />
lda f200<br />
tan aaf<br />
sta f201<br />
; leave the value of the tangent of f200 in f201<br />
<strong>AUTO</strong>MG<strong>EN</strong> 8 281 ©opyright 1988-2007 <strong>IRAI</strong>
TTSSAA<br />
Name : TSA - test accumulator<br />
Function : effects AND logic on the 16 bit accumulator and a word<br />
Language<br />
or a constant, effects AND logic on the 32 bit accumulator<br />
and a long or a constant, operates in a similar manner to ANA<br />
instruction but without changing the accumulator content<br />
Variables : M or %MW, L or %MD<br />
Addressing : absolute, indirect, immediate<br />
Also see : ANA<br />
Example :<br />
tsa %10<br />
rfz b99<br />
jmp:follow: and b99<br />
; connection to label:follow: if bit 1<br />
; of the 16 bit accumulator is at 0<br />
<strong>AUTO</strong>MG<strong>EN</strong> 8 282 ©opyright 1988-2007 <strong>IRAI</strong>
WWOOUU<br />
Name : WOU - write output<br />
Language<br />
Function : effects a writing of the physical outputs. This function is<br />
Variables : none<br />
only implemented on Z targets (and varies following the<br />
target) See the documentation related to each executor for<br />
more information<br />
Addressing : immediate<br />
Also see : RIN<br />
<strong>AUTO</strong>MG<strong>EN</strong> 8 283 ©opyright 1988-2007 <strong>IRAI</strong>
XXRRAA<br />
Name : XRA - xor accumulator<br />
Language<br />
Function : effects an EXCLUSIVE OR on the 16 bit accumulator and<br />
a word or a constant, effects an EXCLUSIVE OR on the 32<br />
bit accumulator and a long or a constant<br />
Variables : M or %MW, L or %MD<br />
Addressing : absolute, indirect, immediate<br />
Also see : ORA, ANA,<br />
Example :<br />
xra %1111111100000000<br />
; inverts the 8 bits of higher weight of the 16 bit accumulator<br />
xra 1L<br />
; inverts the lower weight bit of the 32 bit accumulator<br />
<strong>AUTO</strong>MG<strong>EN</strong> 8 284 ©opyright 1988-2007 <strong>IRAI</strong>
Language<br />
Macro-instruction<br />
Macro-instructions are new literal language instructions which hold a<br />
set of basic instructions.<br />
Call up syntax for a macro-instruction:<br />
*<br />
« % {parameters ...} »<br />
Statement syntax for a macro-instruction:<br />
#MACRO<br />
<br />
#<strong>EN</strong>DM<br />
This statement is found in a file with the name of the macro-instruction<br />
and the extension « .M ».<br />
The file M can be placed in a sub-directory « lib » of the <strong>AUTO</strong>MG<strong>EN</strong><br />
installation directory or in project resources.<br />
Ten parameters can be passed to the macro-instruction. When called<br />
up these parameters are placed on the same line as the macroinstruction<br />
and are separated by a space<br />
The syntax « {?n} » in the macro-instruction program refers to the n<br />
parameter.<br />
Example:<br />
We are going to create a « square » macro-instruction which raises the<br />
first parameter of the macro-instruction to its square and puts the<br />
results in the second parameter.<br />
Call up of the macro-instruction:<br />
lda 3<br />
sta m200<br />
%square m200 m201<br />
; m201 will contain 9 here<br />
« SQUARE.M » file:<br />
#MACRO<br />
lda {?0}<br />
mla {?0}<br />
sta {?1}<br />
#<strong>EN</strong>DM<br />
* The name of the macro-instruction can be a complete access path to the file « .M », it can contain<br />
a read and directory designation.<br />
<strong>AUTO</strong>MG<strong>EN</strong> 8 285 ©opyright 1988-2007 <strong>IRAI</strong>
Language<br />
Libraries<br />
A library is used to define the resources which will be compiled one<br />
time in an application, no matter how many times those resources are<br />
called up.<br />
Syntax for defining a library:<br />
#LIBRARY <br />
<br />
#<strong>EN</strong>DL<br />
is the function name which will be called up for a<br />
jsr: instruction:<br />
The first time the library code is called up by the compiler its code is<br />
compiled. The following times, the call up is simply directed to the<br />
existing routine..<br />
This mechanism is especially suited to the use of function blocks and<br />
macro-instructions to limit the generation of codes in the event that<br />
there is multiple use of the same program resources.<br />
Words m120 to m129 are reserved for libraries and can be used for<br />
passing parameters.<br />
Pre-defined macro-instructions<br />
Inversion macro-instructions are in the sub-directory « LIB » of the<br />
<strong>AUTO</strong>MG<strong>EN</strong> installation directory.<br />
Functional block equivalents are also present.<br />
Description of pre-defined macro-instructions<br />
Conversions<br />
%ASCTOBIN <br />
Effecting a hexadecimal ASCII conversion (first two parameters) to<br />
binary (third parameter), by exiting the accumulator containing $FFFF<br />
if the first two parameters are not valid ASCII numbers, otherwise 0. All<br />
the parameters are 16 bit words.<br />
%BCDTOBIN <br />
Effecting a BCD conversion to binary. In the output of the<br />
accumulator containing $FFFF if the first parameter is not a valid bcd<br />
number, otherwise 0. The two parameters are 16 bit words.<br />
%BINTOASC <br />
Effecting a binary conversion (first parameter) to hexadecimal ASCII<br />
(second and third parameters). All parameters are 16 bit words.<br />
%BINTOBCD <br />
<strong>AUTO</strong>MG<strong>EN</strong> 8 286 ©opyright 1988-2007 <strong>IRAI</strong>
Language<br />
Effecting a BCD (first parameter) conversion to binary (second<br />
parameter). In the accumulator containing $FFFF if the binary number<br />
can be converted in BCD, otherwise 0.<br />
%GRAYTOB <br />
Effecting a Gray code conversion (first parameter) to binary (second<br />
parameter).<br />
Treatment on word tables<br />
%COPY <br />
Copy a table of source words to a table of destination words. The<br />
length is given by the number of words.<br />
%COMP <br />
Compares two tables of words. The result is a binary variable which<br />
takes the value 1 if all the elements in table 1 are identical to those in<br />
table 2.<br />
%FILL <br />
Fills a word table with a value.<br />
Treatment on strings<br />
The coding of strings is as follows: one character per word, one word<br />
containing the value 0 indicates the end of the chain. In macroinstructions<br />
the strings are passed in parameters by designating by the<br />
first word they are composed of.<br />
%STRCPY <br />
Copies a string to another.<br />
%STRCAT <br />
Adds the source string to the end of the destination string.<br />
%STRCMP <br />
Compares to strings. The result is a boolean variable which passes to<br />
1 if the two strings are identical.<br />
%STRL<strong>EN</strong> <br />
Places the length of the string in the result word.<br />
%STRUPR <br />
Transforms all the characters of the string into capital letters.<br />
%STRLWR <br />
<strong>AUTO</strong>MG<strong>EN</strong> 8 287 ©opyright 1988-2007 <strong>IRAI</strong>
Transforms all the characters of the string into lower case letters.<br />
Language<br />
Example:<br />
Conversion of m200 (binary) to m202, m203 in 4 digits (ASCII bcd)<br />
%bintobcd m200 m201<br />
%bintoasc m201 m202 m203<br />
Example of low level literal language<br />
Conditions: let's start with the simplest example: round trip of a<br />
locomotive on track 1.<br />
Solution:<br />
0 set _av1_<br />
set _dv1_ and _t1d_<br />
res _dv1_ and _t1i_<br />
� Example\lit\low level literal1.agn<br />
A more evolved example.<br />
Conditions:<br />
The locomotive must make a 10 second delay at the right end of the<br />
track and a 4 second delay at the left end.<br />
Solution:<br />
<strong>AUTO</strong>MG<strong>EN</strong> 8 288 ©opyright 1988-2007 <strong>IRAI</strong>
0 $t0=100,40<br />
equ u100 and _t1i_ and _t1d_<br />
equ u101 orr t0 eor t1<br />
equ _av1_ orr u100 eor u101<br />
set _dv1_ and _t1d_<br />
equ t0 and _t1d_<br />
res _dv1_ and _t1i_<br />
equ t1 and _t1i_<br />
� Example\lit\low level literal 2.agn<br />
Language<br />
<strong>AUTO</strong>MG<strong>EN</strong> 8 289 ©opyright 1988-2007 <strong>IRAI</strong>
Another example:<br />
Conditions: Make all of the model lights flash:<br />
Solution:<br />
0 ; table contenant l'adresse de tous les feux<br />
$_table_=123,?_s1d_,?_s1i_,?_s2a_,?_s2b_<br />
$...=?_s3d_,?_s3i_,?_s4a_,?_s4b_<br />
$...=?_s5i_,?_s5d_,?_s6d_,?_s6i_<br />
$...=?_s7i_,?_s7d_,?_s8d_,?_s8i_<br />
$...=-1<br />
; initialise l'index sur le debut de la table<br />
lda ?_table_<br />
sta _index_<br />
:boucle:<br />
; la valeur -1 marque la fin de la table<br />
jmp :fin: and m(_index_)=-1<br />
; inverser la sortie<br />
lda m(_index_)<br />
sta _index2_<br />
inv o(_index2_)<br />
inc _index_<br />
jmp :boucle:<br />
:fin:<br />
� Example\lit\low level literal 3.agn<br />
Language<br />
This example shows the use of presettings. They are used here to<br />
create a variable address table. The table contains the addresses of all<br />
the outputs which pilot the model lights.<br />
For each execution cycle, the state of all the lights is inverted.<br />
A problem occurs, all the lights flash very quickly and it is hard to see<br />
much.<br />
Let's modify our example.<br />
Conditions:<br />
The state of all the lights must remain inverted every ten seconds one<br />
by one.<br />
<strong>AUTO</strong>MG<strong>EN</strong> 8 290 ©opyright 1988-2007 <strong>IRAI</strong>
Solution:<br />
10 ; table contenant l'adresse de tous les feux<br />
$_table_=123,?_s1d_,?_s1i_,?_s2a_,?_s2b_<br />
$...=?_s3d_,?_s3i_,?_s4a_,?_s4b_<br />
$...=?_s5i_,?_s5d_,?_s6d_,?_s6i_<br />
$...=?_s7i_,?_s7d_,?_s8d_,?_s8i_<br />
$...=-1<br />
$_index_=?_table_<br />
20<br />
:boucle:<br />
; la valeur -1 marque la fin de la table<br />
jmp :fin de table: and m(_index_)=-1<br />
; inverser la sortie<br />
lda m(_index_)<br />
=1<br />
sta _index2_<br />
inv o(_index2_)<br />
inc _index_<br />
jmp :fin:<br />
:fin de table:<br />
lda ?_table_<br />
sta _index_<br />
:fin:<br />
t0/x20/1<br />
� Example\lit\low level literal 4.agn<br />
Language<br />
Extended literal language<br />
Extended literal language is a subset of low level literal language. It is<br />
used for writing boolean and numeric equations more simply and<br />
concisely.<br />
It is still possible to write structures like IF ... TH<strong>EN</strong> ... ELSE and<br />
WHILE ... <strong>EN</strong>DWHILE (loop).<br />
Use of extended literal language is subject to the same rules as low<br />
level literal language, it uses the same syntax for variables,<br />
mnemonics, the test types (fronts, complement state, immediate state)<br />
and addressing modes.<br />
<strong>AUTO</strong>MG<strong>EN</strong> 8 291 ©opyright 1988-2007 <strong>IRAI</strong>
Language<br />
It is possible to mix low level literal language with extended literal<br />
language.<br />
When the compiler of literal language detects a line written in extended<br />
literal language, it decomposes it into low level literal language<br />
instructions, then compiles it.<br />
Writing boolean equations<br />
General syntax:<br />
« bool. variable=(assignment type) (bool. variable 2 operator 1 bool. variable<br />
3... operator n -1 bool. variable n ) »<br />
The type of assignment must be indicated if it is other than<br />
« Assignment »<br />
It can be:<br />
� « (/) »: complement assignment,<br />
� « (0) »: reset,<br />
� « (1) »:set to one.<br />
The operators can be:<br />
� « . »: and,<br />
� « + »: or.<br />
The equations can contain various levels of parentheses to indicate<br />
the evaluation order. By default, the equations are evaluated from the<br />
left towards the right.<br />
Examples and equivalencies with low level literal language<br />
o0=(i0) equ o0 and i0<br />
o0=(i0.i1) equ o0 and i0 and i1<br />
o0=(i0+i1) equ o0 orr i0 eor i1<br />
o0=(1) set o0<br />
o0=(0) res o0<br />
o0=(1)(i0) set o0 and i0<br />
o0=(0)(i0) res o0 and i0<br />
o0=(1)(i0.i1) set o0 and i0 and i1<br />
o0=(0)(i0+i1) res o0 orr o0 eor i1<br />
o0=(/)(i0) neq o0 and i0<br />
o0=(/)(i0.i1) neq o0 and i0 and i1<br />
o0=(/i0) equ o0 and /i0<br />
o0=(/i0./i1) equ o0 and /i0 and /i1<br />
o0=(c0=10) equ o0 and c0=10<br />
o0=(m200200) equ o0 orr m200200<br />
<strong>AUTO</strong>MG<strong>EN</strong> 8 292 ©opyright 1988-2007 <strong>IRAI</strong>
Language<br />
Writing numeric equations<br />
General equations for integers:<br />
« num. variable 1=[num. variable 2 operator 1 ... operator n-1 num. variable n] »<br />
The equations can contain various levels of braces for indicating the<br />
evaluation order. By default, the equations are evaluated from left to<br />
right. Operators for 16 and 32 bit integers can be:<br />
« + »: addition (equivalent to instruction ADA),<br />
« - »: subtraction (equivalent to instruction SBA),<br />
« * »: multiplication (equivalent to instruction MLA),<br />
« / »: division (equivalent to instruction DVA),<br />
« < »: shift to left (equivalent to instruction RLA),<br />
« > »: shift to right (equivalent to instruction RRA),<br />
« & »: « And » binary (equivalent to instruction ANA),<br />
*<br />
« | » : « Or » binary (equivalent to instruction ORA),<br />
« ^ »: « Exclusive or » binary (equivalent to instruction XRA).<br />
Operators for floats can be:<br />
� « + »: addition (equivalent to instruction ADA),<br />
� « - »: subtraction (equivalent to instruction SBA),<br />
� « * »: multiplication (equivalent to instruction MLA),<br />
� « / »: division (equivalent to instruction DVA).<br />
It is possible to indicate the constant in float equations. If this is<br />
necessary use the presettings on floats.<br />
Equations on floats can call up the « SQR » and « ABS » functions<br />
Note: depending on the complexity the compiler may use intermediate<br />
variables. These variables are the words m53 to m59 for 16 bit<br />
integers, the longs l53 to l59 for 32 bit integers and the floats f53 à f59.<br />
Examples and equivalencies with low level literal language<br />
M200=[10] lda 10<br />
sta m200<br />
M200=[m201] lda m201<br />
sta m200<br />
M200=[m201+100] lda m201<br />
ada 100<br />
sta m200<br />
M200=[m200+m201-m202] lda m200<br />
ada m201<br />
* This character is normally associated to the [ALT] + [6] keys on keyboards<br />
<strong>AUTO</strong>MG<strong>EN</strong> 8 293 ©opyright 1988-2007 <strong>IRAI</strong>
sba m202<br />
sta m200<br />
M200=[m200&$ff00] lda m200<br />
ana $ff00<br />
sta m200<br />
F200=[f201] lda f201<br />
sta f200<br />
F200=[f201+f202] lda f201<br />
ada f202<br />
sta f200<br />
F200=[sqr[f201]] lda f201<br />
sqr aaa<br />
sta f200<br />
F200=[sqr[abs[f201*100R]]] lda f201<br />
mla 100R<br />
abs aaa<br />
sqr aaa<br />
sta f200<br />
L200=[l201+$12345678L] lda l201<br />
IF...TH<strong>EN</strong>...ELSE...structure<br />
General syntax:<br />
IF(test)<br />
TH<strong>EN</strong><br />
action if true test<br />
<strong>EN</strong>DIF<br />
ELSE<br />
action if false test<br />
<strong>EN</strong>DIF<br />
ada $12345678L<br />
sta l200<br />
Language<br />
The test must comply with the syntax described in the chapter<br />
dedicated to boolean equations.<br />
Only if an action tests true or tests false can it appear.<br />
It is possible to connect multiple structures of this type.<br />
System bits u90 to u99 are used as temporary variables for managing<br />
this type of structure.<br />
Examples:<br />
IF(i0)<br />
TH<strong>EN</strong><br />
inc m200 ; increments word 200 if i0<br />
<strong>EN</strong>DIF<br />
<strong>AUTO</strong>MG<strong>EN</strong> 8 294 ©opyright 1988-2007 <strong>IRAI</strong>
IF(i1+i2)<br />
TH<strong>EN</strong><br />
m200=[m200+10] ; adds 10 to word 200 if the or i2<br />
<strong>EN</strong>DIF<br />
ELSE<br />
res m200 ; else effect m200<br />
<strong>EN</strong>DIF<br />
WHILE ... <strong>EN</strong>DWHILE structure<br />
General syntax:<br />
WHILE(test)<br />
<strong>EN</strong>DWHILE<br />
action is repeated as long as the test is true<br />
Language<br />
The test must comply with the syntax described in the chapter<br />
dedicated to boolean equations.<br />
It is possible to connect multiple structures of this type.<br />
System bits u90 to u99 are used as temporary variables for managing<br />
this type of structure.<br />
Examples:<br />
m200=[0]<br />
WHILE(m200
Solution:<br />
0 _av1_=(1)<br />
_dv1_=(1)(_t1d_)<br />
_dv1_=(0)(_t1i_)<br />
� dv1 _temps aller_=[m32]<br />
� dv1 $_longueur_=300 ; en mm<br />
$_mille_=1000;<br />
$_dixdansh_=36000;<br />
$_dix_=10;<br />
_temps mis_=[m32-_temps aller_]<br />
IF(_temps mis_
Language<br />
Commands are used to establish the sections in ST literal language<br />
« #BEGIN_ST » indicates the beginning of an ST language section.<br />
« #<strong>EN</strong>D_ST » indicates the end of an ST language section.<br />
Example:<br />
m200=[50] ; extended literal language<br />
#BEGIN_ST<br />
m201:=4; (* ST language *)<br />
#<strong>EN</strong>D_ST<br />
It is also possible to choose to use ST language for an entire sheet.<br />
This selection is made in the properties dialogue box on each sheet.<br />
On a sheet where ST language is the default language it is possible to<br />
enter low level and extended literal language by using the commands<br />
« #<strong>EN</strong>D_ST » and « #BEGIN_ST ».<br />
Comments for ST language must start with « (* » and end with « *) ».<br />
ST language instructions end with the character « ; ». Multiple<br />
instructions can be written on the same line.<br />
Example:<br />
o0:=1; m200:=m200+1;<br />
Boolean equations<br />
The general syntax is:<br />
variable:= boolean equation;<br />
Boolean equations can be composed of a constant, a variable or<br />
multiple variables separated by operators.<br />
Constants can be: 0, 1, FALSE or TRUE.<br />
Examples:<br />
o0:=1;<br />
o1:=FALSE;<br />
The operators used to separate multiple variables are: + (or), . (and),<br />
OR or AND.<br />
« And » has priority over« Or ».<br />
<strong>AUTO</strong>MG<strong>EN</strong> 8 297 ©opyright 1988-2007 <strong>IRAI</strong>
Example:<br />
o0:=i0+i1.i2+i3;<br />
Will be treated as:<br />
o0:=i0+(i1.i2)+i3;<br />
Parentheses can be used in the equations to indicate priorities.<br />
Example:<br />
o0:=(i0+i1).(i2+i3);<br />
Numeric tests can be used.<br />
Example:<br />
o0:=m200>5.m200
Example:<br />
m200:=(m202-m204)*m203;<br />
Programming structures<br />
IF TH<strong>EN</strong> ELSE test<br />
Syntax:<br />
IF condition TH<strong>EN</strong> action <strong>EN</strong>DIF;<br />
and<br />
IF condition TH<strong>EN</strong> action ELSE action <strong>EN</strong>DIF;<br />
Example:<br />
if i0<br />
endif ;<br />
then o0:=TRUE;<br />
else<br />
o0:=FALSE;<br />
if i1 then m200:=4; endif;<br />
WHILE loop<br />
Syntax:<br />
WHILE condition DO action <strong>EN</strong>DWHILE;<br />
Example:<br />
while m200
FOR TO loop<br />
Syntax:<br />
FOR variable:=start value TO end value DO action <strong>EN</strong>DFOR;<br />
or<br />
FOR variable:=start value TO end value BY no DO action <strong>EN</strong>DFOR;<br />
Example:<br />
for m200:=0 to 100 by 2<br />
do<br />
m201:=m202*m201;<br />
endfor;<br />
Exiting a loop<br />
The key word « EXIT » is used to exit a loop.<br />
Example:<br />
while i0<br />
endwhile;<br />
m200:=m200+1;<br />
if m200>1000 then exit; endif;<br />
Example of a program in extended literal language<br />
Let's go back to our example in the previous chapter<br />
Solution:<br />
0 _av1_:=TRUE;<br />
if _t1d_ then _dv1_:=TRUE; endif;<br />
if _t1i_ then _dv1_:=FALSE; endif;<br />
� Example\lit\ST literal 1.agn<br />
Language<br />
Organization chart<br />
<strong>AUTO</strong>MG<strong>EN</strong> implements a « organization chart » type program.<br />
Literal languages must be used with this type of program. See the<br />
previous chapters to learn how to use these languages.<br />
<strong>AUTO</strong>MG<strong>EN</strong> 8 300 ©opyright 1988-2007 <strong>IRAI</strong>
Language<br />
The basis of programming with an organizational chart form is the<br />
graphic representation of an algorithmic treatment.<br />
Unlike Grafcet language, programming in the organizational chart form<br />
generates a code which will be executed one time per search cycle.<br />
This means that it is not possible to remain in an organizational chart<br />
rectangle it is mandatory for the execution to exit the organizational<br />
chart to continue to execute the rest of the program..<br />
This is a very important point and must not be forgotten when this<br />
language is selected.<br />
Only rectangles can be drawn. The contents of a rectangle and its<br />
connections determine if the rectangle is an action or a test.<br />
Creating an organizational chart<br />
The rectangles are drawn by selecting the command « Add … / Code<br />
box» from the menu (click on the right side of the mouse on the bottom<br />
of the sheet to open the menu).<br />
It is necessary to place a block (key [
A test rectangle:<br />
Language<br />
The branches of the organizational chart must always end with a<br />
rectangle without an output that could remain empty.<br />
Rectangle content<br />
Action rectangle content<br />
Action rectangles can contain any kind of literal language instructions.<br />
Test rectangle content<br />
Test rectangles must contain a test that complies with the test syntax<br />
of the IF...TH<strong>EN</strong>...ELSE... type structure of extended literal language.<br />
For example:<br />
IF (i0)<br />
It is possible to write actions before this test in the test rectangle.<br />
This can be used to make certain calculations before the test<br />
For example, if we want to test if the word 200 is equal to the word 201<br />
plus 4:<br />
m202=[m201+4]<br />
IF(m200=m202)<br />
Illustration<br />
Our first, now typical, example, is to make a locomotive make round<br />
trips on track 1 of the model.<br />
<strong>AUTO</strong>MG<strong>EN</strong> 8 302 ©opyright 1988-2007 <strong>IRAI</strong>
Solution:<br />
set _av1_<br />
if(_t1d_)<br />
set _dv1_ if(_t1i_)<br />
res _dv1_<br />
� Example\ Ornagization chart\ Ornagization chart 1.agn<br />
Language<br />
Second example<br />
Conditions:<br />
Make all the model light flash. The light change states every second.<br />
<strong>AUTO</strong>MG<strong>EN</strong> 8 303 ©opyright 1988-2007 <strong>IRAI</strong>
Solution:<br />
$t0=10<br />
t0=( t0)<br />
_index%m_=[?_s1d_]<br />
inv o(_index%m_) and t0<br />
inc _index%m_<br />
_calcul%m_=[?_s8i_+1]<br />
IF(_index%m_=_calcul%m_)<br />
� Example\ Ornagization chart\ Ornagization chart 2.agn<br />
Note the use of automatic symbols in this example.<br />
Function blocks<br />
<strong>AUTO</strong>MG<strong>EN</strong> implements the use of function blocks.<br />
Language<br />
<strong>AUTO</strong>MG<strong>EN</strong> 8 304 ©opyright 1988-2007 <strong>IRAI</strong>
Language<br />
This modular programming method is used to associate a set of<br />
instructions written in literal language to a graphic element .<br />
Function blocks are defined by the programmer. Their number is not<br />
limited. It is possible to create sets of function blocks to allow a<br />
modular and standardize concept of applications.<br />
Function blocks are used within flow chart or ladder type models, they<br />
have n boolean inputs and n boolean outputs. If the block is going to<br />
treat variables which are not boolean, then they will be mentioned in<br />
the drawing of the function block. The inside of the block can receive<br />
parameters: constant or variable.<br />
Block boolean<br />
inputs<br />
(maximum 16)<br />
Block<br />
parameters<br />
(maximum 16)<br />
Block boolean<br />
outputs<br />
(maximum 16)<br />
Creating a function block<br />
A function block is composed of two separate files. One file has<br />
« .ZON » extension which contains the drawing of the function block<br />
and a file with « .LIB » extension which contains a series of<br />
instructions written in literal language which establish the functionality<br />
of the function block.<br />
The « .ZON » and « .LIB » files must bear the name of the function<br />
block. For example, if we decide to create a function block<br />
« MEMORY », we need to create the files « MEMORY.ZON » (to draw<br />
the block) and « MEMORY.LIB » (for the functionality of the block).<br />
Drawing a block and creating a « .ZON » file<br />
The envelop of a function block is composed of a code box to which<br />
blocks dedicated for the function block are added.<br />
To draw a function block follow the steps below:<br />
� use the assistant (recommended)<br />
Or:<br />
� draw a code box (use the command « Add …/Code box » from the menu):<br />
<strong>AUTO</strong>MG<strong>EN</strong> 8 305 ©opyright 1988-2007 <strong>IRAI</strong>
� place a block (key [8]) on the upper right corner of the code box:<br />
� place a block (key [9]) on the upper right corner of the code box:<br />
Language<br />
� delete the line at the top of the block (key [A] is used to place blank blocks):<br />
� click with the left side of the mouse on the upper left corner of the functional<br />
block, then enter the name of the functional block which must not be more than<br />
8 characters (the « .ZON » and « .LIB » files must bear this name), then press<br />
[<strong>EN</strong>TER].<br />
<strong>AUTO</strong>MG<strong>EN</strong> 8 306 ©opyright 1988-2007 <strong>IRAI</strong>
Language<br />
� if additional boolean inputs are necessary, a block must be used (key [;])<br />
or (key [:]), the added inputs must be located right below the first input, no<br />
free space should be left,<br />
� if additional boolean outputs are needed a block must be added (key [>])<br />
or (key [?]), the added outputs must be located right below the first<br />
output, no free space should be left,<br />
� the interior of the block can contain comments or parameters, the parameters<br />
are written between braces « {...} ». Everything not written between braces is<br />
ignored by the compiler. It is interesting to indicate the use of boolean inputs<br />
and outputs inside the block.<br />
� when the block is finished, the command « Select » must be used from the<br />
« Edit » menu to select the drawing of the functional block, then save it in the<br />
« .ZON » file with the « Copy to» command from the « Edit » menu.<br />
Creating an « .LIB » file<br />
The « .LIB » file is a text file containing instructions in literal language<br />
(low level or extended). These instructions establish the functionality of<br />
the function block.<br />
A special syntax is used to refer to block boolean inputs, block boolean<br />
outputs and block parameters.<br />
To refer to a block boolean input, use the syntax« {Ix} » where x is the<br />
number of the boolean input expressed in hexadecimal (0 to f).<br />
To refer to a block boolean output, use the syntax« {Ox} » where x is<br />
the number of the boolean output expressed in hexadecimal (0 to f).<br />
To refer to a block parameter use the syntax « {?x} » where x is the<br />
number of the parameter in hexadecimal (0 to f).<br />
The .LIB can be placed in the « lib » sub-directory of the <strong>AUTO</strong>MG<strong>EN</strong><br />
installation directory or in the project resources.<br />
Simple example of a function block<br />
We are going to create a « MEMORY » function block which contains<br />
two boolean inputs (set to one and reset) and a boolean output<br />
(memory state).<br />
The block drawing contained in the « MEMORY.ZON » file is:<br />
Block functionality contained in the « MEMORY.LIB » file is:<br />
{O0}=(1)({I0})<br />
<strong>AUTO</strong>MG<strong>EN</strong> 8 307 ©opyright 1988-2007 <strong>IRAI</strong>
{O0}=(0)({I1})<br />
The block can then be used in the following way:<br />
or<br />
Language<br />
To use a function block in an application, select the command «Paste<br />
from » from the « Edit » menu and select the « .ZON » file<br />
corresponding to the function block used.<br />
Illustration<br />
Let's go back to our typical example.<br />
Conditions:<br />
Round trip of a locomotive on track 1 of the model.<br />
Solution:<br />
ALLERRET<br />
t1d capteur droit alimentation AV1<br />
t1i capteur gauche direction DV1<br />
� Example\fb\fb 1.agn<br />
BF aller/retour<br />
; bloc fonctionnel ALLERRET<br />
; aller retour d’une locomotive sur une voie<br />
; les entrées booléennes sont les fins de course<br />
; les sorties booléennes sont l’alimentation de la voie (0) et la direction<br />
(1)<br />
; toujours alimenter la voie<br />
set {O0}<br />
; piloter la direction en fonction des fins de course<br />
<strong>AUTO</strong>MG<strong>EN</strong> 8 308 ©opyright 1988-2007 <strong>IRAI</strong>
{O1}=(1)({I0})<br />
{O1}=(0)({I1})<br />
To illustrate the use of function blocks, let's complete our example.<br />
Conditions:<br />
Round trip of two locomotives on tracks 1 and 3.<br />
Solution:<br />
ALLERRET<br />
t1d capteur droit alimentation AV1<br />
t1i capteur gauche direction DV1<br />
BF aller/retour<br />
ALLERRET<br />
t3d capteur droit alimentation AV3<br />
t3i capteur gauche direction N DV3<br />
� Example\ fb\fb 2.agn<br />
BF aller/retour<br />
Language<br />
This example shows that with the same function block it is easy to<br />
make different modules of an operative party function in the identical<br />
manner.<br />
Let's complete our example to illustrate the use of parameters<br />
Conditions:<br />
The two locomotives must make a delay at the end of the track. For<br />
locomotive 1: 10 seconds on the right and 4 seconds on the left, for<br />
locomotive 2: 20 seconds on the right and 8 seconds on the left.<br />
<strong>AUTO</strong>MG<strong>EN</strong> 8 309 ©opyright 1988-2007 <strong>IRAI</strong>
Solution:<br />
ARATT<br />
t1d capteur droit alimentation AV1<br />
t1i capteur gauche direction DV1<br />
temporisation 1 {t0}<br />
attente a droite : {100}<br />
temporisation 2 {t1}<br />
attente a gauche : {40}<br />
BF aller/retour avec attente<br />
ARATT<br />
t3d capteur droit alimentation AV3<br />
t3i capteur gauche direction N DV3<br />
temporisation 1 {t2}<br />
attente a droite : {200}<br />
temporisation 2 {t3}<br />
attente a gauche : {80}<br />
BF aller/retour avec attente<br />
Language<br />
<strong>AUTO</strong>MG<strong>EN</strong> 8 310 ©opyright 1988-2007 <strong>IRAI</strong>
Language<br />
; bloc fonctionnel ARATT<br />
; aller retour d'une locomotive sur une voie avec attente<br />
; les entrées booléennes sont les fins de course<br />
; les sorties booléennes sont l'alimentation de la voie (0) et la<br />
direction (1)<br />
; les paramètres sont:<br />
; 0: première temporisation<br />
; 1: durée de la première temporisation<br />
; 2: deuxième temporisation<br />
; 3: durée de la deuxième temporisation<br />
; prédisposition des deux temporisations<br />
${?0}={?1}<br />
${?2}={?3}<br />
; alimenter la voie si pas les fins de course ou si tempo. terminées<br />
set {O0}<br />
res {O0} orr {I0} eor {I1}<br />
set {O0} orr {?0} eor {?2}<br />
; gestion des temporisations<br />
{?0}=({I0})<br />
{?2}=({I1})<br />
; piloter la direction en fonction des fins de course<br />
{O1}=(1)({I0})<br />
{O1}=(0)({I1})<br />
� Example\ fb\fb 3.agn<br />
Supplementary syntax<br />
Supplementary syntax is used to make a calculation on the reference<br />
variable numbers in the « .LIB » file.<br />
The syntax « ~+n » added after a reference to a variable or a<br />
parameter, adds n.<br />
The syntax « ~-n » added after a reference to a variable or a<br />
parameter subtracts n.<br />
The syntax « ~*n » added after a reference to a variable or parameter,<br />
multiplies by n.<br />
It is possible to write many of these commands, one after the other,<br />
they are evaluated from left to right.<br />
This mechanism is useful when a function block parameter needs to<br />
be used to refer to a table of variables.<br />
Examples:<br />
{?0}~+1<br />
referring to the following element the first parameter, for example if the<br />
first parameter is m200 this syntax refers to m201.<br />
M{?2}~*100~+200<br />
referring to the third parameter multiplied by 100 plus 200, for example<br />
if the third parameter is 1 that syntax refers to M 1*100 + 200 thus<br />
M300.<br />
<strong>AUTO</strong>MG<strong>EN</strong> 8 311 ©opyright 1988-2007 <strong>IRAI</strong>
Language<br />
Evolved function blocks<br />
This functionality is used to create very powerful function blocks with<br />
greater ease than the function blocks managed by files written in literal<br />
language. This programming method uses a functional analysis<br />
approach.<br />
It does not matter which sheet or set of sheets become a function<br />
block (sometimes called encapsulating a program).<br />
The sheet or sheet which describe the functionality of a function block<br />
can access variables which are outside the function block: block<br />
boolean inputs, boolean outputs and parameters.<br />
Principles for use and more importantly the use of external variables is<br />
identical to the old function blocks.<br />
Syntax<br />
To refer a variable outside a function block it is necessary to use a<br />
mnemonic included in the following text: {In} to refer the boolean input<br />
n, {On} to refer the boolean output n, {?n} to refer parameter n. The<br />
mnemonic must start with a letter.<br />
Differentiating between new and old function blocks<br />
The file name written on the function block drawing indicates if it is an<br />
old (managed by an LIB file) or new function block (managed by a<br />
GR7 sheet). The name of an old function block does not have an<br />
extension, for a new one the extension GR 7 must be added. The<br />
sheet containing the code which manages the functionality of the<br />
function block must be entered in the list of project sheets. In the sheet<br />
properties « Function Block » must be selected.<br />
<strong>AUTO</strong>MG<strong>EN</strong> 8 312 ©opyright 1988-2007 <strong>IRAI</strong>
Example<br />
Contents of VERINB sheet:<br />
BF vérin bistable<br />
10<br />
Language<br />
cde ouverture{i0} . ouvert{i2} cde fermeture{i1} . ferme{i3} . cde ouverture{i0}<br />
20 OUVRIR{O0} 30 FERMER{O1}<br />
ouvert{i2} ferme{i3}<br />
Call up a function block<br />
40<br />
duree{?0} /x40/ tempo{?1}<br />
VERINB.GR7<br />
u100 CDE O O O0<br />
u101 CDE F F O1<br />
i1 O<br />
i0 F<br />
Durée<br />
{10s}<br />
Temporisation<br />
{T0}<br />
VERIN BISTABLE<br />
� Example\fb\Fb with sfc inside.agn<br />
Predefined function blocks<br />
Conversion function blocks are located in the sub-directory « \LIB » of<br />
the directory where <strong>AUTO</strong>MG<strong>EN</strong> is installed.<br />
The equivalents in macro-instructions are also present.<br />
<strong>AUTO</strong>MG<strong>EN</strong> 8 313 ©opyright 1988-2007 <strong>IRAI</strong>
Language<br />
To insert a function blocks and its parameters in an application select<br />
« Pre-set function block » from the « Assistant / Function block» dialog<br />
box.<br />
Conversion blocks<br />
ASCTOBIN: converts ASCII to binary<br />
BCDTOBIN: converts BCD to binary<br />
BINTOASC: converts binary to ASCII<br />
BINTOBCD: converts binary to BCD<br />
GRAYTOB: converts gray code to binary<br />
16BINTOM: transfers 16 boolean variables to a word<br />
MTO16 BIN: transfers a word to 16 boolean variables<br />
Time delay blocks<br />
TEMPO: upstream time delay<br />
PULSOR: parallel output<br />
PULSE: time delay pulse<br />
String blocks<br />
STRCMP: comparison<br />
STRCAT: concatenation<br />
STRCPY: copy<br />
STRL<strong>EN</strong>: calculate the length<br />
STRUPR: set in lower case<br />
STRLWR: set in upper case<br />
Word table blocks<br />
COMP: comparison<br />
COPY: copy<br />
FILL: fill<br />
Advanced techniques<br />
Compiler generated code<br />
This chapter deal with the form of code generated by compilation of<br />
such or that type of program.<br />
The utility « CODELIST.EXE » is used to translate « in clear » a file of<br />
intermediate code « .EQU » (also called pivot language).<br />
We are going to do the following: load and compile the first<br />
programming example in the « Grafcet » chapter: « simple1.agn » from<br />
the directory « Example\grafcet »:<br />
<strong>AUTO</strong>MG<strong>EN</strong> 8 314 ©opyright 1988-2007 <strong>IRAI</strong>
0 AV1<br />
t1d<br />
1 AV1 , DV1<br />
t1i<br />
Language<br />
Double click on « Generated files/Pivot code » in the browser.<br />
You will obtain the following list of instructions:<br />
:00000000: RES x0 AND i0<br />
:00000002: SET x0 AND b0<br />
:00000004: SET x0 AND x1 AND i1<br />
:00000007: RES x1 AND i1<br />
:00000009: SET x1 AND x0 AND i0<br />
; Le code qui suit a été généré par la compilation<br />
de: 'affectations (actions Grafcet, logigrammes et<br />
ladder)'<br />
:0000000C: EQU o0 ORR @x0 EOR @x1<br />
:0000000F: EQU o23 AND @x1<br />
This represents the translation of a « simple1.agn » application into<br />
low level literal language<br />
The comments indicate where the portions of code came from, this is<br />
useful if an application is composed of multiple sheets.<br />
Obtaining this list of instructions may be useful for answering<br />
questions regarding code generated for some program form or the use<br />
of some language.<br />
In certain cases « critiques », for which it is important to know<br />
information such as « how many cycles does it take before this action<br />
becomes true ? » a step by step way and an in-depth examination of<br />
generated code will prove to be indispensable.<br />
Optimizing generated code<br />
Various levels of optimization are possible.<br />
Optimizing compiler generated code<br />
The compiler optimization option is used to greatly reduce the size of<br />
generated code. This command requires that the compiler manage<br />
fewer lines of low level literal language, consequently increasing<br />
compiling time.<br />
<strong>AUTO</strong>MG<strong>EN</strong> 8 315 ©opyright 1988-2007 <strong>IRAI</strong>
Language<br />
Depending on the post-processors used, this option involves an<br />
improvement in the size of the code and/or the execution time. It is<br />
advisable to carry out some tests to determine if this command is of<br />
interest or not depending on the nature of the program and the type of<br />
target used.<br />
Normally, it is useful with post-processors for Z targets.<br />
Optimizing post-processor generated code<br />
Each post-processor may possess options for optimizing generated<br />
code. For post-processors which generate construction code, see the<br />
corresponding information.<br />
Optimizing cycle time: reducing the number of time delays on Z<br />
targets<br />
For Z targets, the number of stated time delays directly affects the<br />
cycle time. Try to state the minimum time delays based on the<br />
application requirements.<br />
Optimizing cycle time: canceling scanning of certain parts of the<br />
program<br />
Only targets which accept JSR and RET instruction support this<br />
technique.<br />
Special compilation commands are used to validate or « invalidate »<br />
scanning of certain parts of the program.<br />
They are the sheets which define the portions of applications.<br />
If an application is broken down into four sheets than each one can be<br />
separately « validated » or « invalidate ».<br />
A command « #C(condition) » placed on the sheet conditions the<br />
searching of the sheet up to a sheet containing a « #R » command.<br />
This condition must use the syntax established for the tests.<br />
Example:<br />
If a sheet contains the two commands:<br />
#C(m200=4)<br />
#R<br />
Then everything that it contains will not be executed except word 200<br />
containing 4.<br />
<strong>AUTO</strong>MG<strong>EN</strong> 8 316 ©opyright 1988-2007 <strong>IRAI</strong>
Examples<br />
Language<br />
Regarding examples<br />
This part contains a series of examples providing an illustration of the<br />
different programming possibilities offered by <strong>AUTO</strong>MG<strong>EN</strong>.<br />
All of these examples are located in the « example » sub-directory in the<br />
directory where <strong>AUTO</strong>MG<strong>EN</strong> is installed.<br />
This section contains the most complete and complex examples<br />
developed for a train model. The description of this model is located at<br />
the beginning of the language reference manual.<br />
Simple grafcet<br />
The first example is a simple line Grafcet<br />
100<br />
i0<br />
110 T0(100)<br />
t0<br />
120 O0,O1,O2<br />
i0<br />
� Example\grafcet\sample1.agn<br />
� the transition in step 100 and step 110 is made up of a test on input 0,<br />
� step 110 activates the time delay 0 for a duration of 10 seconds, this time<br />
delay is used as a transition between step 110 and step 120,<br />
� step 120 activates outputs 0, 1 and 2,<br />
� the complement of input 0 will be the transition between step 120 and 100.<br />
<strong>AUTO</strong>MG<strong>EN</strong> 8 317 ©opyright 1988-2007 <strong>IRAI</strong>
Grafcet with an OR divergence<br />
100 O0<br />
i0 i1 i2 i3<br />
110 O1 120 O2 130 O3 140 O4<br />
i4 i5 i6 i7<br />
111 O5 131 O6<br />
112 O7<br />
i8 i9<br />
i10<br />
� Example\grafcet\sample2.agn<br />
Language<br />
This example shows the use of « Or » divergences and convergences.<br />
The number of branches is not limited by the size of the sheet. It is a<br />
non-exclusive « Or » by standard. For example, if inputs 1 and 2 are<br />
active, then steps 120 and 130 will be set to one.<br />
<strong>AUTO</strong>MG<strong>EN</strong> 8 318 ©opyright 1988-2007 <strong>IRAI</strong>
Grafcet with an AND divergence<br />
110 O0 130 O1 160 SO2 190 O3<br />
i1 i2<br />
120 140 170 O4<br />
� Example\grafcet\sample3.agn<br />
i2 i4<br />
150 O5 180 RO2<br />
100<br />
i0<br />
i7<br />
Language<br />
This example shows the use of « And» divergences and convergences.<br />
The number of branches is not limited by the size of the sheet.. Also note<br />
the following points<br />
� a step may not lead to an action (case of steps 100, 120, and 140),<br />
� orders « S » and « R » were used with output o2 (steps 160 and 180),<br />
� the transition between step 160 and 170 is left blank, so it is always true, the<br />
syntax « =1 » could also have been used.<br />
<strong>AUTO</strong>MG<strong>EN</strong> 8 319 ©opyright 1988-2007 <strong>IRAI</strong>
Grafcet and synchronization<br />
0 100<br />
i0 �x1<br />
i10 i14<br />
1 110 O0 O4<br />
�x110 i1 i11<br />
� Example\grafcet\sample4.agn<br />
O1<br />
O2<br />
O3<br />
i12<br />
i13<br />
Language<br />
This example shows the possibilities <strong>AUTO</strong>MG<strong>EN</strong> offers for<br />
synchronizing multiple Grafcets. The transition between step 100 and<br />
110 « �x1 » means « wait for a rising edge on 1 ». The<br />
transition« �x110 » means « wait for a falling edge on step 110 ». The<br />
step by step execution of this program shows the exact evolution of the<br />
variables and their front at each cycle. This makes it possible to<br />
understand exactly what happens during the execution. We can also see<br />
the use of multiple actions associated to step 110, which are individually<br />
conditioned here.<br />
<strong>AUTO</strong>MG<strong>EN</strong> 8 320 ©opyright 1988-2007 <strong>IRAI</strong>
Step setting<br />
10 RC0<br />
i0 100<br />
20 SX100 �i4<br />
110 +C0<br />
30 i1<br />
x120 120<br />
� Example\grafcet\sample5.agn<br />
Language<br />
In this example an order « S » (set to one) has been used to set a step.<br />
<strong>AUTO</strong>MG<strong>EN</strong> also authorizes setting of a Grafcet integer (see examples<br />
8 and 9). Again in this example, the step by step execution lets us<br />
understand the exact evolution of the program over time. We can also<br />
see:<br />
� use of an non-looped Grafcet (100, 110, 120),<br />
� use of the order « RC0 » (reset by counter 0),<br />
� use of the order « +C0 » (incremented by counter 0),conditioned by the<br />
rising edge of input 4, due to incrementation by the counter, so it is<br />
necessary that step 100 be active and that a rising edge is detected on input 4.<br />
<strong>AUTO</strong>MG<strong>EN</strong> 8 321 ©opyright 1988-2007 <strong>IRAI</strong>
Destination and source steps<br />
100 O0<br />
�i0.i1<br />
�i0<br />
110 O1<br />
�i0<br />
120 O2<br />
�i0<br />
130 O3<br />
�i0<br />
� Example\grafcet\sample6.agn<br />
Language<br />
We have already seen similar forms, where the first step is activated by<br />
another Grafcet. Here activation of step 100 is realized by the transition<br />
« �i0 . i1 » (rising edge of input 0 and input 1). This example represents<br />
a shift register. « i1 » is information to memorize in the register and « i0 »<br />
is the clock which makes the shift progress. Example 7 is a variation<br />
which uses a time delay as a clock.<br />
<strong>AUTO</strong>MG<strong>EN</strong> 8 322 ©opyright 1988-2007 <strong>IRAI</strong>
Destination and source steps<br />
100 O0<br />
�t0.i1<br />
�t0<br />
110 O1<br />
�t0<br />
120 O2<br />
�t0 t0<br />
130 O3 1000 T0(10)<br />
�t0<br />
� Example\grafcet\sample7.agn<br />
Language<br />
Here again is the structure of the shift register used in example 6. This<br />
time the shift information is generated by a time delay (t0). « �t0 »<br />
represent the rising edge of the time delay, this information is true during<br />
a cycle when the time delay has finished. Step 1000 manages the launch<br />
of the time delay. The action of this step can be summed up as:<br />
« activate the count if it is not finished, otherwise reset the time delay».<br />
The functionality diagram of the time delays of this manual will help you<br />
to understand the functionality of this program.<br />
<strong>AUTO</strong>MG<strong>EN</strong> 8 323 ©opyright 1988-2007 <strong>IRAI</strong>
Setting Grafcets<br />
0 100 VOYANT INIT<br />
Language<br />
arret urgence � bp depart de cycle<br />
1 F100:{} 110 MOTEUR<br />
arret urgence bp fin de cycle<br />
2 F100:{100}<br />
� Example\grafcet\sample8.agn<br />
This example illustrates the use of a Grafcet set command. The order<br />
« F100:{} » means « reset all the Grafcet steps where one of the steps<br />
bears the number 100 ». Order « F100:{100} » is identical but sets step<br />
100 to 1. We have used symbols for this example:<br />
<strong>AUTO</strong>MG<strong>EN</strong> 8 324 ©opyright 1988-2007 <strong>IRAI</strong>
Memorizing Grafcets<br />
#B200<br />
0 100 VOYANT INIT<br />
Language<br />
arret urgence � bp depart de cycle<br />
1 G100:100 110 MOTEUR<br />
2 F100:()<br />
arret urgence<br />
3 F100:100<br />
� Example\grafcet\sample9.agn<br />
bp fin de cycle<br />
This example is a variation of the previous program. The order<br />
« G100:100 » of step 1 memorizes the Grafcet production state before it<br />
is reset. When it starts again the production Grafcet will be put back in<br />
the state or the state it was in before the break, with order « F100:100 ».<br />
The Grafcet production state is memorized starting from bit 100 (this is<br />
the second parameter of orders « F » and « G » which indicates this<br />
site), command « #B200 » reserves bits u100 to u199 for this type of<br />
use. We can see that a « #B102 » command would have been sufficient<br />
here because the production Grafcet only needed two bits to be<br />
memorized (one bit per step).<br />
<strong>AUTO</strong>MG<strong>EN</strong> 8 325 ©opyright 1988-2007 <strong>IRAI</strong>
Grafcet and macro-steps<br />
E<br />
0 O0<br />
1<br />
i0<br />
i1<br />
2 O1<br />
3<br />
i2<br />
i3<br />
10 SO10<br />
i10<br />
20 RO10<br />
S<br />
� Example\grafcet\sample11.agn<br />
Language<br />
This example illustrate the use of macro-steps. The «Macro-step 1 » and<br />
« Macro-step 3 » sheets represent the expansion of macro-steps with the<br />
<strong>AUTO</strong>MG<strong>EN</strong> 8 326 ©opyright 1988-2007 <strong>IRAI</strong>
Language<br />
input and output steps. Steps 1 and 3 of the «Main program » sheet are<br />
defined as macro-steps. Access to macro-step expansion display can be<br />
done by clicking the left side of the mouse on the macro-steps.<br />
Linked sheets<br />
0 O0<br />
i0<br />
1 O1<br />
i1<br />
2 O2<br />
i2<br />
3 SUITE<br />
continue<br />
<strong>AUTO</strong>MG<strong>EN</strong> 8 327 ©opyright 1988-2007 <strong>IRAI</strong>
4 O3<br />
5 O4<br />
i3<br />
6 O5<br />
i4<br />
suite<br />
7 CONTINUE<br />
� Example\grafcet\sample12.agn<br />
Language<br />
In this example two sheets have been used to write a program. The<br />
symbols « _NEXT_ » and « _CONTINUE_ » have been stated as bits<br />
(see the symbol file) and are used to make a link between the two<br />
Grafcets (this is another synchronization technique that can be used with<br />
<strong>AUTO</strong>MG<strong>EN</strong>).<br />
<strong>AUTO</strong>MG<strong>EN</strong> 8 328 ©opyright 1988-2007 <strong>IRAI</strong>
Flow chart<br />
i0 O O0<br />
i1<br />
i2 & O<br />
i3<br />
i4<br />
i5<br />
i6 &<br />
i7<br />
i8<br />
i9<br />
i10<br />
� Example\logigramme\sample14.agn<br />
Language<br />
The flow chart example shows the use of different blocks: the<br />
assignment block associated to key [0] to the left of the action rectangle<br />
the « no » block associated with key [1] which complements a signal and<br />
the test fixing blocks and « And» and « Or » functions.<br />
<strong>AUTO</strong>MG<strong>EN</strong> 8 329 ©opyright 1988-2007 <strong>IRAI</strong>
Grafcet and Flow Chart<br />
0<br />
1<br />
� bp depart de cycle<br />
fin de cycle<br />
bp manuel MOTEUR<br />
étape 1 &<br />
sécurité 1 O<br />
sécutité 2 O<br />
� Example\logigramme\exempl15.agn<br />
Language<br />
In this example a Grafcet and a Flow Chart are used together. The<br />
symbol « _step1_ » used in the flow chart is associated to variable<br />
« x1 ».<br />
This type of programming clearly displays activation conditions of an<br />
output.<br />
<strong>AUTO</strong>MG<strong>EN</strong> 8 330 ©opyright 1988-2007 <strong>IRAI</strong>
Literal language box<br />
0 SO0<br />
1<br />
m200=[0] ; m200 est utilisé comme index<br />
res _flag une entrée est à un_<br />
WHILE( _flag une entrée est à un_.m200
Organizational chart<br />
IF(_bp validation_)<br />
bta _entrée roue codeuse_ ; fin<br />
ana %0000000000000111<br />
sta _valeur roue codeuse_<br />
� Example\organigramme\sample18.agn<br />
Language<br />
This example shows the use of an organizational chart for effecting an<br />
algorithmic and numeric treatment. Here three inputs from a code wheel<br />
is read and stored in a word if a validation input is active.<br />
<strong>AUTO</strong>MG<strong>EN</strong> 8 332 ©opyright 1988-2007 <strong>IRAI</strong>
Organizational chart<br />
m200=[10]<br />
o(200)=(1)<br />
m200=[m200+1]<br />
IF(m200=30)<br />
; Fin de la<br />
; boucle<br />
� Example\organigramme\sample19.agn<br />
Language<br />
This second example of an organizational chart creates a loop structure<br />
which is used to set a series of outputs (o10 to o29) with an indirect<br />
addressing(« o(200) »).<br />
<strong>AUTO</strong>MG<strong>EN</strong> 8 333 ©opyright 1988-2007 <strong>IRAI</strong>
Function block<br />
i16 RO0<br />
i17 & SO0<br />
COMPTAGE<br />
i0 R.A.Z.<br />
i1 COMPTAGE<br />
VAL. INIT<br />
{100}<br />
BORNE MAX<br />
{110}<br />
VARIABLE<br />
{m200}<br />
� Example\bf\sample20.agn<br />
; Gestion de l'entrée de RAZ<br />
IF({I0})<br />
TH<strong>EN</strong><br />
{?2}=[{?0}]<br />
<strong>EN</strong>DIF<br />
; Gestion de l'entrée de comptage<br />
IF(#{I1})<br />
TH<strong>EN</strong><br />
{?2}=[{?2}+1]<br />
<strong>EN</strong>DIF<br />
; Teste la borne maxi<br />
IF({?2}={?1})<br />
TH<strong>EN</strong><br />
{O0}=(1)<br />
{?2}=[{?0}]<br />
<strong>EN</strong>DIF<br />
ELSE<br />
{O0}=(0)<br />
<strong>EN</strong>DIF<br />
count lib (included in project resources)<br />
Language<br />
<strong>AUTO</strong>MG<strong>EN</strong> 8 334 ©opyright 1988-2007 <strong>IRAI</strong>
Language<br />
This example illustrates the use of a function block. The functions of<br />
the« COUNT » block that we have defined here are as follows:<br />
� the count will start from an init value and will finish at a maximum limit value<br />
� while the count value waits for the maximum limit it will be set the initial<br />
value and the block output will pass to one during a program cycle.,<br />
� the block will have a RAZ boolean input and a count input on the rising<br />
edge.<br />
Function block<br />
i0<br />
i1<br />
i2<br />
i3<br />
OU_EXCLU OU_EXCLU<br />
=1 =1<br />
OU_EXCLU<br />
=1<br />
OU_EXCLU OU_EXCLU<br />
i4 O0<br />
=1 =1<br />
i5<br />
� Example\bf\sample21.agn<br />
; Ou exclusif<br />
neq {o0} orr /{i0} eor {i1} orr {i0} eor /{i1}<br />
ou_exclu.lib (included in the project resources)<br />
This second example of a function block shows the multiple use of the<br />
same block. The « EXCLUSIVE_OR » block creates an exclusive or<br />
between the two boolean inputs This example uses 5 blocks to create an<br />
exclusive or among 6 inputs (i0 à i5). The « EXCLUSIVE_OR.LIB » listed<br />
below supports the functionality of the block. The exclusive or boolean<br />
equation is as follows: « (i0./i1)+(/i0.i1) ».<br />
The equivalent form used here makes it possible to code the equation on<br />
a single line of low level literal language without using intermediate<br />
variables.<br />
<strong>AUTO</strong>MG<strong>EN</strong> 8 335 ©opyright 1988-2007 <strong>IRAI</strong>
Ladder<br />
i0 i7 O0<br />
i1 i8<br />
i2 i9<br />
i3 i10 O1<br />
i4 i11 O2<br />
i5 i12 O3<br />
i6 i13 O4<br />
� Example\laddersample22.agn<br />
This example illustrates the use of ladder programming.<br />
Language<br />
<strong>AUTO</strong>MG<strong>EN</strong> 8 336 ©opyright 1988-2007 <strong>IRAI</strong>
Example developed on a train model<br />
Language<br />
<strong>AUTO</strong>MG<strong>EN</strong> 8 337 ©opyright 1988-2007 <strong>IRAI</strong>
Language<br />
<strong>AUTO</strong>MG<strong>EN</strong> 8 338 ©opyright 1988-2007 <strong>IRAI</strong>
Language<br />
<strong>AUTO</strong>MG<strong>EN</strong> 8 339 ©opyright 1988-2007 <strong>IRAI</strong>
Language<br />
<strong>AUTO</strong>MG<strong>EN</strong> 8 340 ©opyright 1988-2007 <strong>IRAI</strong>
Language<br />
<strong>AUTO</strong>MG<strong>EN</strong> 8 341 ©opyright 1988-2007 <strong>IRAI</strong>
Language<br />
<strong>AUTO</strong>MG<strong>EN</strong> 8 342 ©opyright 1988-2007 <strong>IRAI</strong>
The adventures of Doctor R.<br />
Educational training manual for <strong>AUTO</strong>MG<strong>EN</strong> users<br />
Language<br />
<strong>AUTO</strong>MG<strong>EN</strong> 8 343 ©opyright 1988-2007 <strong>IRAI</strong>
Distribution<br />
Language<br />
Doctor R. ………………………………………………… Mister R.<br />
Doctor R. in the home automation kingdom<br />
We are going to look at different example which can be directly applied<br />
in a home automation project. From an initial easy manner, these<br />
examples can be used to learn the different aspects that are the basis<br />
of automatisms and <strong>AUTO</strong>MG<strong>EN</strong> and IRIS training<br />
<strong>AUTO</strong>MG<strong>EN</strong> 8 345 ©opyright 1988-2007 <strong>IRAI</strong>
Language<br />
This symbol will be used in the following for partial command (for example a<br />
programmable robot.<br />
Is it necessary to explain that this<br />
represents an bulb,<br />
a push button<br />
and a switch ?<br />
First example: « which came first the bulb or the switch … »<br />
A simple switch and a simple bulb: the switch is wired on input i0, the<br />
bulb on output o0. If the switch is closed then the bulb lights up, if the<br />
switch is open the bulb goes off. Hard to make it any simpler.<br />
<strong>AUTO</strong>MG<strong>EN</strong> 8 346 ©opyright 1988-2007 <strong>IRAI</strong>
Solution 1: natural language of an electrician: ladder<br />
Language<br />
The ladder is the most direct transcription of a wiring diagram. The<br />
contact receives the name of the input where the switch is wired, the<br />
coil the name of the output where the bulb is wired.<br />
Solution 2: the sequential language of the automation specialist:<br />
Grafcet<br />
Grafcet is based on the idea of state. For our problem we could say<br />
that there are two states: the on state and the off state. Each step<br />
represents a state: here step 0 represents the off state and step 1 the<br />
on state. The condition which makes the off state go to the on state<br />
still needs to be determined: here the off switch (see i0) then the<br />
condition the causes the change from the on state to the off state: here<br />
the open switch (see / i0). The conditions are written to the right of the<br />
element marked transition. The rectangle associated to step 1 called<br />
action rectangle contains the name of output O0 (the output where our<br />
bulb is wired). So, the state of the bulb is always the same as that for<br />
step 1.<br />
<strong>AUTO</strong>MG<strong>EN</strong> 8 347 ©opyright 1988-2007 <strong>IRAI</strong>
Language<br />
The happy owners of IRIS can use two BPVOYANT objects to<br />
simulate this first example.<br />
Couldn't they at least<br />
have spared us the<br />
advertising?<br />
<strong>AUTO</strong>MG<strong>EN</strong> 8 348 ©opyright 1988-2007 <strong>IRAI</strong>
It's your turn to play …<br />
Language<br />
Switch 1 lights bulb 1, switch 2 bulb 2. A Grafcet solution is proposed at the end of<br />
this<br />
document.<br />
Second example: « time frames, time-switches and other time<br />
fun… »<br />
<strong>AUTO</strong>MG<strong>EN</strong> 8 349 ©opyright 1988-2007 <strong>IRAI</strong>
Language<br />
As<br />
you certainly deduce, the idea of a time frame is used when a<br />
program, in one way or another,<br />
must carry out actions taking into<br />
account data relative to time. For example, waiting for a certain<br />
amount<br />
of time before carrying out an action or carrying out an action<br />
within<br />
a certain amount of time.<br />
Our second example is as follows: a hallway is equipped with a bulb<br />
and two push button. Pressing one of the push buttons lights the bulb<br />
for two minutes (after this gives Dr. R. plenty of time to cross the<br />
hallway).<br />
Solution 1: simplicity<br />
<strong>AUTO</strong>MG<strong>EN</strong> 8 <strong>AUTO</strong>MG<strong>EN</strong> 350 ©opyright 1988-2007 <strong>IRAI</strong><br />
8 350 ©opyright 1988-2007 <strong>IRAI</strong>
Solution 2: improvement<br />
Language<br />
A problem is posed by this solution, solution, if the push button is pressed while<br />
th<br />
e bulb is lit, the time delay is not reset. Earlier Dr. R thought he had<br />
reset the time time switch and found himself in the dark dark last week.<br />
0<br />
1 O0<br />
↑(i0+i1)<br />
t0/x1/120s ↑(i0+i1)<br />
2<br />
=1<br />
And if you want to to try your hand at at writing a real real program …<br />
<strong>AUTO</strong>MG<strong>EN</strong> 8 <strong>AUTO</strong>MG<strong>EN</strong> 351 ©opyright 1988-2007 <strong>IRAI</strong><br />
8 351 ©opyright 1988-2007 <strong>IRAI</strong>
Language<br />
Intelligent management of lighting a hallway: a bulb is placed at<br />
each end. When a switch<br />
is pressed: the two bulbs light, then the<br />
bulb<br />
that is at the end near<br />
the pressed switch goes off at the end of<br />
30 seconds and then the other at the end of one minute.<br />
Third Example: « variation on the theme of coming and<br />
going… »<br />
Remember<br />
the ingenious principle of coming and going: two switches<br />
make<br />
it possible to turn on or turn off the same bulb.<br />
<strong>AUTO</strong>MG<strong>EN</strong> 8 352 ©opyright 1988-2007 <strong>IRAI</strong>
Here is a flow chart solution:<br />
i0<br />
i1<br />
O & O0<br />
O &<br />
Purists will have recognized the exclusive or boolean equation.<br />
Language<br />
Things become really interesting if you want to keep the coming and<br />
going properties with a number of switches greater than 2.<br />
<strong>AUTO</strong>MG<strong>EN</strong> 8 353 ©opyright 1988-2007 <strong>IRAI</strong>
A solution using <strong>AUTO</strong>MG<strong>EN</strong> literal language.<br />
bta i0<br />
sta m203 ; le mot m203 contiendra l'état de 16 entrées<br />
m200=[0] ; ce mot contiendra le nombre d'interrupteurs<br />
; allumés<br />
m201=[4] ; compteur pour quatre interrupteurs<br />
m202=[1] ; pour tester les bits de m203<br />
while (m201>0)<br />
m204=[m202&m203]<br />
if(m204>0)<br />
then<br />
inc m200<br />
endif<br />
dec m201<br />
m202=[m202
A cleverer one:<br />
0<br />
1 IO0<br />
↑i0+ ↓i0+<br />
↑i1+<br />
↓i1+<br />
↑i2+<br />
↓i2+<br />
↑i3+<br />
↓i3<br />
=1<br />
Language<br />
« IO0 » means « invert the state of output 0 ».<br />
Try this:<br />
A big room with 6 switches and 10 bulbs. Each switch can be used to<br />
more or less light the room (clearly passing from a state where<br />
everything is off to a state where one bulb is on, then two etc …).<br />
<strong>AUTO</strong>MG<strong>EN</strong> 8 355 ©opyright 1988-2007 <strong>IRAI</strong>
Language<br />
Fourth example: « And the push button became<br />
intelligent … »<br />
In all the previous examples, the push buttons carried out only one<br />
function.<br />
And so the person who used them only had two choices: to<br />
press<br />
them or not to press them in order to obtain a function (turning<br />
on<br />
or off). Image a « better performing » push button able to receive<br />
two<br />
types of pressure: a short pressure (arbitrarily less than one<br />
second)<br />
or a long pressure (arbitrarily at least a second).<br />
For this example four push buttons and four bulbs. By default, in<br />
normal use each push button is associated to a bulb. A short press on<br />
a push button turns on or off the associated bulb. Each push button<br />
must allow piloting one bulb or all of the bulbs. The table below<br />
describes this functionality.<br />
Type of action on push button Result<br />
One short press The associated bulb changes state<br />
One long press and one short one Bulb 1 changes state<br />
One long press and two short ones Bulb 2 changes state<br />
One long press and three short ones Bulb 3 changes state<br />
One long press and four short ones Bulb 4 changes state<br />
Two long presses and a short one All the bulbs go out<br />
Tow long presses and two short ones All the bulbs go on<br />
<strong>AUTO</strong>MG<strong>EN</strong> 8 356 ©opyright 1988-2007 <strong>IRAI</strong>
i0 M200#0<br />
i1./i0 M200#1<br />
i2./i0./i1 M200#2<br />
i3./i0./i1./i2 M200#3<br />
Attendre qu'un bouton poussoir soit enfoncé<br />
0 {M201=[M200]}<br />
10<br />
m2000<br />
m200=0 t0/x10/1s.m2000<br />
Relâché rapidement Toujours enfoncé au bout d'une seconde<br />
Language<br />
40 RM210,RM211<br />
Inverser l'état de l'ampoule associée RAZ compteur nombre d'appuis longs et nombre d'appuis courts<br />
30 {BTA O0,XRA M201,ATB O0} m200=0<br />
Attendre que le bp soit relâchée<br />
=1<br />
50 {M201=[M200]}<br />
m200=0.t2/x50/1s m2000<br />
Suivant le nombre de pressions ...<br />
m210=1.m211=0<br />
60<br />
100 IO0 m200=0 t1/x60/1s.m2000<br />
Relâché rapidement Toujours enfoncé au bout d'une seconde<br />
=1<br />
m210=2.m211=0 70 +M210 80 +M211<br />
IO1 =1 =1<br />
m210=3.m211=0 90<br />
IO2 m200=0<br />
Attendre que le bp soit relâché<br />
IO3<br />
m210=4.m211=0<br />
m210=1.m211=1<br />
RO0,RO1,RO2,RO3<br />
m210=2.m211=1<br />
SO0,SO1,SO2,SO3<br />
<strong>AUTO</strong>MG<strong>EN</strong> 8 <strong>AUTO</strong>MG<strong>EN</strong> 357 ©opyright 1988-2007 <strong>IRAI</strong><br />
8 357 ©opyright 1988-2007 <strong>IRAI</strong>
Language<br />
This ends our educational training manual. We hope that it has<br />
allowed<br />
you to discover the possibilities of <strong>AUTO</strong>MG<strong>EN</strong>.<br />
We<br />
have one last exercise for you.<br />
Automate<br />
your aunt Hortense's apartment bearing in mind her<br />
excessive<br />
fondness for nickel-plated switches.<br />
<strong>AUTO</strong>MG<strong>EN</strong> 8 358 ©opyright 1988-2007 <strong>IRAI</strong>
The solutions …<br />
« which came first the switch or the bulb … »<br />
Language<br />
Just write two identical Grafcets. Each one is separately occupied by a<br />
switch and a bulb.<br />
« time delays, time switches and other time fun… »<br />
0<br />
↑i0 ↑i1<br />
10 O0,O1 50 O0,O1<br />
t0/x10/30s t2/x50/30s<br />
30 O1 70 O0<br />
t1/x30/30s t3/x70/30s<br />
A simple version with<br />
no time switch reset management.<br />
<strong>AUTO</strong>MG<strong>EN</strong> 8 359 ©opyright 1988-2007 <strong>IRAI</strong>
0<br />
Resetting<br />
the time switch makes the program very complex.<br />
0<br />
↑i0 ↑i1<br />
10 O0,O1 50 O0,O1<br />
↑i1 ↑i0 t0/x10/30s t2/x50/30s ↑i1 ↑i0<br />
20 30 O1 70 O0 60<br />
=1 =1<br />
↑i1 ↑i0 t1/x30/30s t3/x70/30s ↑i1 ↑i0<br />
↑i0 ↑i1<br />
10 O0,O1 50 O0,O1<br />
40 80<br />
t0/x10/30s t2/x50/30s<br />
30 O1 70 O0<br />
t1/x30/30s t3/x70/30s<br />
=1 =1<br />
Language<br />
↑i0 x10 RT0<br />
x30 F0:{10}<br />
The third solution uses Grafcet, ladder<br />
language and Grafcet settings.<br />
The<br />
program remains readable.<br />
x50<br />
x70<br />
↑i1 x50 RT2<br />
x10 F0:{50}<br />
<strong>AUTO</strong>MG<strong>EN</strong> 8 360 ©opyright 1988-2007 <strong>IRAI</strong><br />
x30<br />
x70
« variation on the theme of coming and going …»<br />
0 {BTA I0,ANA %11111,STA M200}<br />
Language<br />
m200m201 o0 o1 o2 o3<br />
1 {LDA M200,STA M201} SO0 SO1 SO2 SO3 SO4<br />
=1 o4 o5 o6 o7 o8<br />
SO5 SO6 SO7 SO8 SO9<br />
o9<br />
RO0,RO1,RO2,RO3,RO4,RO5,RO6,RO7,RO8,RO9<br />
<strong>AUTO</strong>MG<strong>EN</strong> 8 361 ©opyright 1988-2007 <strong>IRAI</strong>
<strong>AUTO</strong>MSIM<br />
<strong>AUTO</strong>MG<strong>EN</strong> 8 363 ©opyright 1988-2007 <strong>IRAI</strong>
Introduction<br />
<strong>AUTO</strong>MSIM<br />
<strong>AUTO</strong>MSIM is a pneumatic / electrical / hydraulic simulation module.<br />
It can be used independently or in addition to the<br />
<strong>AUTO</strong>MG<strong>EN</strong> 8 applications:<br />
SCADA and 3D<br />
process<br />
simulation<br />
<strong>AUTO</strong>MATION<br />
application<br />
Electrical,<br />
pneumatic and<br />
hydraulic<br />
simualtion<br />
<strong>AUTO</strong>MG<strong>EN</strong> 8 365 ©opyright 1988-2007 <strong>IRAI</strong>
<strong>AUTO</strong>MSIM<br />
Installation<br />
To install <strong>AUTO</strong>MSIM, install <strong>AUTO</strong>MG<strong>EN</strong>. In options, be sure that<br />
« <strong>AUTO</strong>MSIM » is checked.<br />
Practical experience<br />
Let us do a simple example: cylinder + directional valve<br />
Click with the right side of the mouse on « <strong>AUTO</strong>MSIM »<br />
Select “Add an <strong>AUTO</strong>MSIM page”<br />
<strong>AUTO</strong>MG<strong>EN</strong> 8 366 ©opyright 1988-2007 <strong>IRAI</strong>
<strong>AUTO</strong>MSIM<br />
Click with the right side of the mouse on the <strong>AUTO</strong>MSIM sheet (right<br />
part) then select “Add an object”<br />
Select “double acting cylinder”, and then click on “Open”.<br />
Repeat the steps above then add a 4/2 directional valve with<br />
monostable hand control, a pressure source and a pneumatic exhaust.<br />
<strong>AUTO</strong>MG<strong>EN</strong> 8 367 ©opyright 1988-2007 <strong>IRAI</strong>
You should obtain the following:<br />
<strong>AUTO</strong>MSIM<br />
Create connections between the different components: Move the<br />
cursor over the connections (light blue circles), press the left button of<br />
the mouse then release it, move the cursor of the mouse to the<br />
connection where the link must be connected, press the left button of<br />
the mouse then release it.<br />
Repeat the above step for each connection until the following result is<br />
achieved:<br />
Click on the “GO” button on the toolbar.<br />
<strong>AUTO</strong>MG<strong>EN</strong> 8 368 ©opyright 1988-2007 <strong>IRAI</strong>
<strong>AUTO</strong>MSIM<br />
The cylinder shaft will come out. To make it go back in, click on the<br />
manual control of the distributor.<br />
While it is running, you can make changes, add objects, move them,<br />
etc…<br />
With <strong>AUTO</strong>MSIM, it is not necessary to stop simulation!<br />
To end the simulation, click again on “GO”.<br />
<strong>AUTO</strong>MG<strong>EN</strong> 8 369 ©opyright 1988-2007 <strong>IRAI</strong>
<strong>AUTO</strong>MG<strong>EN</strong>’s “beginner” mode<br />
<strong>AUTO</strong>MSIM<br />
<strong>AUTO</strong>MG<strong>EN</strong>’s “Beginner” mode allows you to use simplified palettes<br />
for <strong>AUTO</strong>MSIM. The “Beginner, automaton, electricity and pneumatic”<br />
mode allows you to use an environment where a programmable<br />
automaton is already “pre-wired”:<br />
In order to reference the automaton’s inputs and outputs, the %In<br />
(where n=the number of the input) or %Qn (where n=the number of the<br />
output) can be used. It is also possible to “drag” the name of an input<br />
or output by clicking on its name on the <strong>AUTO</strong>MSIM diagram and<br />
moving the cursor to a transition or action rectangle of the<br />
<strong>AUTO</strong>MG<strong>EN</strong> sheet. Programming can thus be done just using the<br />
mouse.<br />
<strong>AUTO</strong>MG<strong>EN</strong> 8 370 ©opyright 1988-2007 <strong>IRAI</strong>
Using <strong>AUTO</strong>MSIM<br />
Organizing applications<br />
<strong>AUTO</strong>MSIM<br />
<strong>AUTO</strong>MSIM applications are written on one or more sheets that<br />
appear in the tree structure of <strong>AUTO</strong>MG<strong>EN</strong>. The objects are then<br />
placed on the sheet(s): an object = a component such as a cylinder or<br />
an electrical contact.<br />
Opening an existing application<br />
The subdirectory « Examples / automsim » of the installation directory<br />
of <strong>AUTO</strong>MG<strong>EN</strong> contains examples done with <strong>AUTO</strong>MSIM.<br />
Creating an <strong>AUTO</strong>MSIM sheet<br />
To add an <strong>AUTO</strong>SIM sheet in the tree structure of a project, click with<br />
the right button of the mouse on the “<strong>AUTO</strong>MSIM” component in the<br />
tree structure, then select “Add an <strong>AUTO</strong>MSIM page”.<br />
An <strong>AUTO</strong>MSIM sheet is then created.<br />
<strong>AUTO</strong>MG<strong>EN</strong> 8 371 ©opyright 1988-2007 <strong>IRAI</strong>
Adding an object onto an <strong>AUTO</strong>MSIM sheet<br />
<strong>AUTO</strong>MSIM<br />
Click with the right button of the mouse on the <strong>AUTO</strong>MSIM sheet (<br />
shown below on the right) and select “Add an object”.<br />
The selection assistant for an object then appears:<br />
<strong>AUTO</strong>MG<strong>EN</strong> 8 372 ©opyright 1988-2007 <strong>IRAI</strong>
<strong>AUTO</strong>MSIM<br />
The assistant shows a preview of the object in the bottom of the<br />
window. To add the object onto the <strong>AUTO</strong>MSIM sheet, click on “Open<br />
the object”.<br />
Then move the mouse to place the object on the <strong>AUTO</strong>MSIM sheet,<br />
press the left button of the mouse and release it to leave the object.<br />
You will obtain the following result:<br />
<strong>AUTO</strong>MG<strong>EN</strong> 8 373 ©opyright 1988-2007 <strong>IRAI</strong>
Using the palette<br />
<strong>AUTO</strong>MSIM<br />
1- Click on the object(s) in the palette (they appear as selected):<br />
framed by black squares).<br />
<strong>AUTO</strong>MG<strong>EN</strong> 8 374 ©opyright 1988-2007 <strong>IRAI</strong>
<strong>AUTO</strong>MSIM<br />
2- Click on the selected object(s), keep the button pressed and<br />
drag the object onto the sheet.<br />
Selecting one or more objects.<br />
To select an object, move the cursor of the mouse over the object,<br />
press the left button of the mouse and release it. Black squares appear<br />
around the objects when they are selected:<br />
To deselect an object, repeat the same step.<br />
<strong>AUTO</strong>MG<strong>EN</strong> 8 375 ©opyright 1988-2007 <strong>IRAI</strong>
<strong>AUTO</strong>MSIM<br />
To select several objects: keep the SHIFT key of the keyboard<br />
pressed and select several objects following the method described<br />
above.<br />
To select several objects that are in the same area: press the left<br />
button of the mouse, move the cursor of the mouse – a selection<br />
rectangle emerges – release the left button of the mouse when the<br />
selection rectangle is of the desired size.<br />
To select an object that is under another object (several objects can be<br />
superimposed), click several times with the left button of the mouse on<br />
the objects covering each other: at each click, the selection moves<br />
from one object to the other.<br />
Selecting one or more objects<br />
Move the cursor over one or more selected objects – the cursor of the<br />
mouse takes on the appearance of four direction arrows – press the<br />
left button of the mouse, move the objects by moving the mouse,<br />
release the left button of the mouse when the desired position for the<br />
objects is reached.<br />
Deleting one or more objects<br />
Move the cursor over one or several selected objects, press then<br />
release the right button of the mouse and select “Delete”.<br />
Changing the orientation of one or more objects<br />
Move the cursor over one or more selected objects, press then release<br />
the right button of the mouse and select the desired setting in the<br />
“Rotation” menu.<br />
Copying/cutting one or more objects to the clipboard<br />
Move the cursor over one or more selected objects, press then release<br />
the right button of the mouse and select “Copy” or “Paste”.<br />
<strong>AUTO</strong>MG<strong>EN</strong> 8 376 ©opyright 1988-2007 <strong>IRAI</strong>
Pasting one or more objects from the clipboard<br />
<strong>AUTO</strong>MSIM<br />
Press then release the right button of the mouse over an empty area of<br />
the <strong>AUTO</strong>MSIM sheet and select “Paste” in the menu.<br />
Modifying object properties.<br />
Move the cursor over one or more selected objects, press then release<br />
the right button of the mouse and select “Properties”.<br />
Example of the properties of a directional valve:<br />
Exporting one or more objects<br />
Move the cursor over one or more selected objects, press then release<br />
the right button of the mouse and select “Export”.<br />
The objects are exported to files with the extension .ASO.<br />
By exporting to the subdirectory “automsim/lib” of the installation<br />
directory of <strong>AUTO</strong>MG<strong>EN</strong>, the new objects created appear in the<br />
<strong>AUTO</strong>MSIM assistant. The name of the file is the name shown in the<br />
assistant. If the name must contain the character ‘/’, substitute this<br />
character with ‘@’ in the file name.<br />
<strong>AUTO</strong>MG<strong>EN</strong> 8 377 ©opyright 1988-2007 <strong>IRAI</strong>
Advanced functions<br />
<strong>AUTO</strong>MSIM<br />
Interactions between objects<br />
Interactions between <strong>AUTO</strong>MSIM objects are realized either by visual<br />
links defined on the sheets (a pneumatic or electrical line connecting<br />
two objects, for example) or by a symbol. A symbol is a generic name,<br />
for example “mini sensor”. A symbol may have any name whatsoever<br />
except for key words reserved for the names of <strong>AUTO</strong>MG<strong>EN</strong> variables<br />
(see the <strong>AUTO</strong>MG<strong>EN</strong> language reference manual) and symbols used<br />
in the <strong>AUTO</strong>MG<strong>EN</strong> symbol table.<br />
Creating sensors associated with a cylinder<br />
The mini and maxi end stops of a cylinder can be configured in the<br />
properties of the cylinder. Example:<br />
References for the symbols used can be found in the electrical<br />
contacts<br />
<strong>AUTO</strong>MG<strong>EN</strong> 8 378 ©opyright 1988-2007 <strong>IRAI</strong>
For example:<br />
<strong>AUTO</strong>MSIM<br />
The sensors can also be positioned directly on the <strong>AUTO</strong>MSIM sheet.<br />
For example:<br />
The gray circle associated with the sensor objects must coincide with<br />
the gray dot located on the piston or the cylinder shaft so that the<br />
sensor is activated.<br />
<strong>AUTO</strong>MG<strong>EN</strong> 8 379 ©opyright 1988-2007 <strong>IRAI</strong>
<strong>AUTO</strong>MSIM<br />
Interactions between <strong>AUTO</strong>MSIM objects and the automaton<br />
program<br />
As seen above, the symbols used in the <strong>AUTO</strong>MSIM objects allow<br />
information to be exchanged between the objects. Where you want to<br />
communicate solely between <strong>AUTO</strong>MSIM objects, these symbols<br />
cannot be the names of either <strong>AUTO</strong>MG<strong>EN</strong> variables or <strong>AUTO</strong>MG<strong>EN</strong><br />
symbols. If you use the name of an <strong>AUTO</strong>MG<strong>EN</strong> variable or an<br />
<strong>AUTO</strong>MG<strong>EN</strong> symbol, these <strong>AUTO</strong>MG<strong>EN</strong> objects reference the<br />
<strong>AUTO</strong>MG<strong>EN</strong> variables and may therefore, depending on the actual<br />
situation, read or write to the automaton application’s variables.<br />
Example:<br />
<strong>AUTO</strong>MG<strong>EN</strong> 8 380 ©opyright 1988-2007 <strong>IRAI</strong>
<strong>AUTO</strong>MSIM<br />
Interactions between <strong>AUTO</strong>MSIM objects and the IRIS 3D<br />
operational unit simulator<br />
In the IRIS 3D “Translations” and “Rotations” behaviors, the<br />
“<strong>AUTO</strong>MSIM” type allows you to reference the position of an<br />
<strong>AUTO</strong>MSIM cylinder object (see the example complet2.agn).<br />
<strong>AUTO</strong>MG<strong>EN</strong> 8 381 ©opyright 1988-2007 <strong>IRAI</strong>
<strong>AUTO</strong>MSIM<br />
Interactions between <strong>AUTO</strong>MSIM objects and the IRIS2D<br />
supervision objects<br />
How can a link be made between an IRIS2D pushbutton or switch and<br />
an <strong>AUTO</strong>MSIM pushbutton or switch?<br />
<strong>AUTO</strong>MG<strong>EN</strong> 8 382 ©opyright 1988-2007 <strong>IRAI</strong>
<strong>AUTO</strong>MSIM<br />
How can a link be made between an <strong>AUTO</strong>MSIM object and an<br />
IRIS2D indicator light?<br />
Comments: note that the <strong>AUTO</strong>MSIM variables are considered as<br />
numerical variables. It is therefore necessary to write “su=1”<br />
<strong>AUTO</strong>MG<strong>EN</strong> 8 383 ©opyright 1988-2007 <strong>IRAI</strong>
<strong>AUTO</strong>MSIM<br />
Drag and drop from an <strong>AUTO</strong>MSIM variable to an<br />
<strong>AUTO</strong>MG<strong>EN</strong> sheet<br />
This application is used, for example, in “Beginner” mode in order to<br />
be able to “drag” the name of inputs or outputs from the automaton to<br />
the <strong>AUTO</strong>MG<strong>EN</strong> sheet.<br />
To use this application, use a “Design”-type <strong>AUTO</strong>MSIM object and<br />
document the “Drag and drop” section with the text that could be<br />
“dragged” from the <strong>AUTO</strong>MSIM sheet to the <strong>AUTO</strong>MG<strong>EN</strong> sheet.<br />
<strong>AUTO</strong>MG<strong>EN</strong> 8 384 ©opyright 1988-2007 <strong>IRAI</strong>
User-definable objects<br />
<strong>AUTO</strong>MSIM<br />
The user-definable object will allow you to create your own simulation<br />
objects.<br />
To create such an object, open the following object:<br />
<strong>AUTO</strong>MG<strong>EN</strong> 8 385 ©opyright 1988-2007 <strong>IRAI</strong>
<strong>AUTO</strong>MSIM<br />
The object is shown as a grey square as long as it has not been<br />
parameterized:<br />
To access the object definition, open the object’s properties (select the<br />
object, right-click over it then “Properties”) and click on “Define the<br />
object”.<br />
<strong>AUTO</strong>MG<strong>EN</strong> 8 386 ©opyright 1988-2007 <strong>IRAI</strong>
<strong>AUTO</strong>MSIM<br />
The “Object width” and “Object height” areas allow you to define the<br />
dimensions of the object.<br />
The “Designs”, “Program” and “Connections” areas allow you to define<br />
the object’s design (its appearance), its behavior and the connections<br />
respectively.<br />
Designs<br />
This area allows you to define the design of the object with the help of<br />
the design primitive. The “Insert”, “Delete” and “Modify” buttons allow<br />
you respectively to add or delete a primitive or to modify the<br />
parameters associated with a primitive. The design primitives use this<br />
system of co-ordinates:<br />
0/0<br />
Object Horizontal axis<br />
Vertical<br />
axis<br />
Each primitive can receive one or more parameters.<br />
Note that the design primitives only define objects without rotation; the<br />
design with rotation is automatically generated by <strong>AUTO</strong>MSIM. The<br />
<strong>AUTO</strong>MG<strong>EN</strong> 8 387 ©opyright 1988-2007 <strong>IRAI</strong>
<strong>AUTO</strong>MSIM<br />
same is true for the scale: primitives design at scale 1; <strong>AUTO</strong>MSIM<br />
handles scaling according to the zoom selected by the user.<br />
By clicking on “Insert”, a dialogue box allows you to select a design<br />
primitive.<br />
List of design primitives<br />
Drawing primitive<br />
These primitives produce a drawing.<br />
MOVE<br />
Moves the pen (without drawing).<br />
Parameters:<br />
- horizontal position,<br />
- vertical position.<br />
LINE<br />
Draws a line from the pen’s current position to the position indicated.<br />
Parameters:<br />
- horizontal position,<br />
- vertical position.<br />
RECT<br />
Draws a rectangle.<br />
Parameters:<br />
- horizontal position of the top left corner,<br />
- vertical position of the top left corner,<br />
- horizontal position of the bottom right corner,<br />
- vertical position of the bottom right corner.<br />
ELLI<br />
Draws an ellipse.<br />
<strong>AUTO</strong>MG<strong>EN</strong> 8 388 ©opyright 1988-2007 <strong>IRAI</strong>
<strong>AUTO</strong>MSIM<br />
Parameters:<br />
- horizontal position of the top left corner of the rectangle<br />
containing the ellipse,<br />
- vertical position of the top left corner of the rectangle containing<br />
the ellipse,<br />
- horizontal position of the bottom right corner of the rectangle<br />
containing the ellipse,<br />
- vertical position of the bottom right corner of the rectangle<br />
containing the ellipse.<br />
RREC<br />
Draws a rectangle with rounded corners.<br />
Parameters:<br />
- horizontal position of the top left corner,<br />
- vertical position of the top left corner,<br />
- horizontal position of the bottom right corner,<br />
- vertical position of the bottom right corner,<br />
- horizontal rounded corner radius,<br />
- vertical rounded corner radius,<br />
TRIA<br />
Draws a triangle.<br />
Parameters:<br />
- horizontal position of point 1,<br />
- vertical position of point 1,<br />
- horizontal position of point 2,<br />
- vertical position of point 2,<br />
- horizontal position of point 3,<br />
- vertical position of point 3.<br />
CHOR<br />
Draws a chord (intersection of an ellipse and a straight line).<br />
Parameters:<br />
- horizontal position of the top left corner of the rectangle<br />
containing the ellipse,<br />
- vertical position of the top left corner of the rectangle containing<br />
the ellipse,<br />
- horizontal position of the bottom right corner of the rectangle<br />
containing the ellipse,<br />
<strong>AUTO</strong>MG<strong>EN</strong> 8 389 ©opyright 1988-2007 <strong>IRAI</strong>
<strong>AUTO</strong>MSIM<br />
- vertical position of the bottom right corner of the rectangle<br />
containing the ellipse,<br />
- horizontal position of the start of the line,<br />
- vertical position of the start of the line,<br />
- horizontal position of the end of the line,<br />
- vertical position of the end of the line.<br />
ARCE<br />
Draws an arc of an ellipse (the part of an ellipse cut by a straight line).<br />
Parameters:<br />
- horizontal position of the top left corner of the rectangle<br />
containing the ellipse,<br />
- vertical position of the top left corner of the rectangle containing<br />
the ellipse,<br />
- horizontal position of the bottom right corner of the rectangle<br />
containing the ellipse,<br />
- vertical position of the bottom right corner of the rectangle<br />
containing the ellipse,<br />
- horizontal position of the start of the line,<br />
- vertical position of the start of the line,<br />
- horizontal position of the end of the line,<br />
- vertical position of the end of the line.<br />
TEXT<br />
Draws a text box.<br />
Parameters:<br />
- horizontal position,<br />
- vertical position,<br />
- text.<br />
Attribute primitives<br />
These primitives modify the layout of the drawing primitives (the line or<br />
fill color, for example).<br />
BRUS<br />
Modifies the fill color for figures or the background color for text boxes.<br />
Parameter:<br />
- color.<br />
<strong>AUTO</strong>MG<strong>EN</strong> 8 390 ©opyright 1988-2007 <strong>IRAI</strong>
P<strong>EN</strong>C<br />
Modifies the color of lines or text.<br />
Parameter:<br />
- color.<br />
FONT<br />
Modifies the font of the text.<br />
Other primitives<br />
JUMP<br />
Unconditional jump.<br />
Parameter:<br />
- label.<br />
JPIF<br />
Conditional jump.<br />
Parameters:<br />
- label,<br />
- element 1,<br />
- type of comparison,<br />
- element 2.<br />
(See the programming primitives below for more information).<br />
<strong>AUTO</strong>MSIM<br />
DISP<br />
Displays the state of a variable. Can be used for debugging an object<br />
by displaying the value of a variable associated with the object.<br />
<strong>AUTO</strong>MG<strong>EN</strong> 8 391 ©opyright 1988-2007 <strong>IRAI</strong>
Parameters:<br />
- variable,<br />
- horizontal position,<br />
- vertical position.<br />
Program<br />
<strong>AUTO</strong>MSIM<br />
This area allows you to define the program governing the object’s<br />
working. Each object has variables:<br />
128 32-bit integer variables,<br />
128 32-bit floating-point variables.<br />
And also for each connection:<br />
- a floating-point value on input,<br />
- a floating-point value on output,<br />
- an associated writing mode that can have the following values:<br />
o 0: no writing has been done,<br />
o 1: the “floating-point value on output” has been written,<br />
o 2: a connection has been realized with the connection<br />
whose number is in “floating-point value on output”,<br />
o 3: locking (pneumatic or hydraulic plug).<br />
The following internal integer variables are special:<br />
125: contains 0 if dynamic visualization is active, 1 if not (useful in<br />
order to have a different design for dynamic visualization and<br />
otherwise).<br />
126: contains a value representing a user event: 0=no event, 1=left<br />
mouse button released, 2=left mouse button pressed, 3=right mouse<br />
button released, 4=right mouse button pressed.<br />
127: contains the elapsed time in ms between 2 operations of the<br />
program.<br />
<strong>AUTO</strong>MG<strong>EN</strong> 8 392 ©opyright 1988-2007 <strong>IRAI</strong>
List of programming primitives<br />
MOVV<br />
Copies a constant or a variable into a variable.<br />
Parameters:<br />
- destination variable,<br />
- source variable or constant.<br />
<strong>AUTO</strong>MSIM<br />
ADDV<br />
Adds a constant or variable to a constant or variable and places the<br />
result in a variable.<br />
Parameters:<br />
- destination variable,<br />
- source 1 variable or constant,<br />
- source 2 variable or constant.<br />
SUBV<br />
Subtracts a constant or variable from a constant or variable and places<br />
the result in a variable.<br />
Parameters:<br />
- destination variable,<br />
- source 1 variable or constant,<br />
- source 2 variable or constant.<br />
MULV<br />
Multiplies a constant or variable by a constant or variable and places<br />
the result in a variable.<br />
Parameters:<br />
- destination variable,<br />
- source 1 variable or constant,<br />
- source 2 variable or constant.<br />
<strong>AUTO</strong>MG<strong>EN</strong> 8 393 ©opyright 1988-2007 <strong>IRAI</strong>
<strong>AUTO</strong>MSIM<br />
DIVV<br />
Divides a constant or variable by a constant or variable and places the<br />
result in a variable.<br />
Parameters:<br />
- destination variable,<br />
- source 1 variable or constant,<br />
- source 2 variable or constant.<br />
ORRV<br />
Carries out a bit-by-bit OR between a constant or variable and a<br />
constant or variable and places the result in a variable.<br />
Parameters:<br />
- destination variable,<br />
- source 1 variable or constant,<br />
- source 2 variable or constant.<br />
ANDV<br />
Carries out a bit-by-bit AND between a constant or variable and a<br />
constant or variable and places the result in a variable.<br />
Parameters:<br />
- destination variable,<br />
- source 1 variable or constant,<br />
- source 2 variable or constant.<br />
XORV<br />
Carries out a bit-by-bit exclusive OR between a constant or variable<br />
and a constant or variable and places the result in a variable.<br />
Parameters:<br />
- destination variable,<br />
- source 1 variable or constant,<br />
- source 2 variable or constant.<br />
JUMP<br />
Unconditional jump.<br />
Parameter:<br />
- label.<br />
<strong>AUTO</strong>MG<strong>EN</strong> 8 394 ©opyright 1988-2007 <strong>IRAI</strong>
JPIF<br />
Conditional jump.<br />
Parameters:<br />
- label,<br />
- element 1,<br />
- type of comparison,<br />
- element 2.<br />
<strong>AUTO</strong>MSIM<br />
Connections<br />
Makes it possible to create the object’s connection points. By clicking<br />
on “Insert”, the following dialogue box is opened:<br />
For each connection, define the position and the technology. The<br />
number shown against each connection must be used to access the<br />
value in the object’s programming.<br />
<strong>AUTO</strong>MG<strong>EN</strong> 8 395 ©opyright 1988-2007 <strong>IRAI</strong>
<strong>AUTO</strong>MSIM<br />
Example<br />
The “Examples\automsim” sub-directory of the <strong>AUTO</strong>MG<strong>EN</strong><br />
installation directory contains an example illustrating use of the userdefinable<br />
object: a contact:<br />
<strong>AUTO</strong>MG<strong>EN</strong> 8 396 ©opyright 1988-2007 <strong>IRAI</strong>
POST-<br />
PROCESSORS<br />
<strong>AUTO</strong>MG<strong>EN</strong> 8 397 ©opyright 1988-2007 <strong>IRAI</strong>
General Information<br />
POST-PROCESSORS<br />
Post-processors are software modules used to translate pivot code files<br />
generated by the <strong>AUTO</strong>MG<strong>EN</strong> compiler into executable files on a target<br />
as well as ensuring dynamic connection of the target.<br />
The word « Target» is a generic reference for a programmable system<br />
capable of executing an application.<br />
An <strong>AUTO</strong>MG<strong>EN</strong> post-processor is used to program a type or type set of<br />
targets (generally a family of processors sharing the same language can<br />
be programmed with the same post-processor in <strong>AUTO</strong>MG<strong>EN</strong>).<br />
The first part of this manual contains basic information that is common to<br />
all post-processors. Specific information regarding applications for each<br />
post-processor is described further on.<br />
<strong>AUTO</strong>MG<strong>EN</strong> 8 399 ©opyright 1988-2007 <strong>IRAI</strong>
Configuration<br />
Please carefully read the explanations in this chapter.<br />
POST-PROCESSORS<br />
Configuration files<br />
Four configuration elements are used for each post-processor. Each is<br />
used for a specific purpose.<br />
System<br />
This contains the hardware configuration of the target, software<br />
configuration, options for modifying the way the post-processor<br />
generates the code as well as reserved variable statements (for using<br />
inside the post-processor). Generally, depending on the target, you will<br />
modify the hardware configuration contained in that element (for example<br />
the type of UC or a configuration of the type of input/output cards)<br />
Variable functions<br />
Mastering variable functions is one of the fundamental elements for<br />
mastering the use of post-processors.<br />
When the post-processor translates a <strong>AUTO</strong>MG<strong>EN</strong> pivot language file<br />
into a specific target language, it must attribute <strong>AUTO</strong>MG<strong>EN</strong> variables to<br />
the target variables.<br />
This element contains the exact description of variable attribution. By<br />
modifying this element you have total control over the use of the target<br />
variable space.<br />
Start-up manufacturer code<br />
This element contains the machine language for the target which will be<br />
placed at the beginning of the executable code generated by the postprocessor<br />
(executed at the beginning of the cycle).<br />
End manufacturer code<br />
This element contains the machine language for the target which will be<br />
placed at the end of the executable code generated by the postprocessor<br />
(executed at the end of the cycle).<br />
Configuration by default<br />
When a project is created, the default configuration elements are<br />
duplicated in the project. Modifications to the project configuration<br />
elements will not affect the default statements.<br />
<strong>AUTO</strong>MG<strong>EN</strong> 8 400 ©opyright 1988-2007 <strong>IRAI</strong>
POST-PROCESSORS<br />
Modifying the default statements<br />
Use the right side of the mouse to click on the element « Configuration /<br />
Post-processor / / … » and select « Set as default<br />
configuration». The project configuration will then be set by default<br />
(canceling of the default configuration).<br />
Be careful, this operation is irreversible. The<br />
configuration element can only be restored if the postprocessor<br />
is reinstalled.<br />
Using the default statements.<br />
Use the right side of the mouse to click on the element « Configuration /<br />
Post-processor / / … » and select « Using default<br />
configuration». The project configuration in progress is cancelled by the<br />
default configuration.<br />
Displaying and modifying configuration elements<br />
Access the configuration files by double clicking on the « Configuration /<br />
Post-processors / / … » element. A window will open that<br />
can be used to display and modify the configuration element.<br />
System<br />
This configuration element is specific for each post-processor<br />
Hardware configuration<br />
This area (optional) is modified to establish the hardware configuration of<br />
a target (for example, type of CPU, input/output cards)<br />
<strong>AUTO</strong>MG<strong>EN</strong> 8 401 ©opyright 1988-2007 <strong>IRAI</strong>
POST-PROCESSORS<br />
Software configuration<br />
This area (optional) is modified to establish the characteristics of an<br />
application configuration (for example, the value of a watchdog).<br />
Code generation options<br />
This area contains the settings for the translation method that the postprocessor<br />
must use (only for specialists). The number of options may<br />
differ from one post-processor to another. The list below shows the<br />
options which all post-processors have in common:<br />
« Optimize generated code »<br />
Generally set on « Yes».. A « No » setting is used for an easier analysis<br />
of generated code.<br />
« Do not generate the code of Grafcet steps »<br />
Set to « No ». by default. If set to « Yes», in the « End machine code »<br />
you must write the instructions used to recopy the immediate states of<br />
boolean variables transferred to the past states (see chapterManaging<br />
<strong>AUTO</strong>MG<strong>EN</strong> boolean variables)<br />
« Do not generate the evolution code of user bits »<br />
Identical to the previous option but applied to <strong>AUTO</strong>MG<strong>EN</strong> user bits<br />
(« U » variables).<br />
Stating the variables<br />
These are statements of variables used internally by the post-processor.<br />
Only specialists can modify these variables.<br />
Other elements<br />
There may be other specific elements for each post-processor.<br />
See the « System » element in text format.<br />
By clicking on the icon in the toolbar, you go from tree mode to<br />
« text » mode (format of old <strong>AUTO</strong>MG<strong>EN</strong> versions). In « Text » format<br />
you can copy and paste information into the configuration files.<br />
Modification to « text » mode must be made by<br />
specialists, inopportune modifications can lead to<br />
compiling errors which are difficult for an inexperienced<br />
person to find.<br />
<strong>AUTO</strong>MG<strong>EN</strong> 8 402 ©opyright 1988-2007 <strong>IRAI</strong>
POST-PROCESSORS<br />
Displaying system elements<br />
By double clicking on « Configuration / Post-processors / <br />
/ System » the following window opens.<br />
Example of system configuration<br />
Variable functions<br />
Mastering variable functions is one of the fundamental elements for<br />
mastering the use of post-processors.<br />
When the post-processor translates a <strong>AUTO</strong>MG<strong>EN</strong> pivot language file<br />
into a specific target language, it must attribute <strong>AUTO</strong>MG<strong>EN</strong> variables to<br />
the target variables.<br />
For example, if you use the <strong>AUTO</strong>MG<strong>EN</strong> word 200 in your application<br />
(called M200 or %MW200 in <strong>AUTO</strong>MG<strong>EN</strong>) this word must exist in the<br />
target memory and thus must have a name for that target.<br />
<strong>AUTO</strong>MG<strong>EN</strong> proposes three types of statements for variable functions.<br />
- single assignment;<br />
- linear assignment<br />
<strong>AUTO</strong>MG<strong>EN</strong> 8 403 ©opyright 1988-2007 <strong>IRAI</strong>
- automatic assignment<br />
POST-PROCESSORS<br />
Variable functions for a project will be composed of « n » assignments<br />
each one using one of the three types.<br />
Single assignment<br />
This is used to associate an <strong>AUTO</strong>MG<strong>EN</strong> variable to a target variable. It<br />
is the simplest of the statements<br />
It can only be used if a single statement is necessary.<br />
This statement uses two pieces of information. the name of the<br />
<strong>AUTO</strong>MG<strong>EN</strong> variable and the name of the target variable.<br />
« Associate this <strong>AUTO</strong>MG<strong>EN</strong> variable to that target variable », to effect a<br />
single assignment..<br />
Linear assignment<br />
This form is more evolved than a single assignment.<br />
It is used to associate a series of consecutive <strong>AUTO</strong>MG<strong>EN</strong> variables<br />
(multiple variables of the same type where the numbers are in order) to a<br />
series of consecutive target variables.<br />
The assignment is normally used for:<br />
- stating input/output variables;<br />
- stating bit or word tables which must have a fixed address (for<br />
example, for a link with an operator control panel).<br />
This statement uses three pieces of information: the name of the first<br />
<strong>AUTO</strong>MG<strong>EN</strong> variable, the name of the first target variable and the<br />
dimension of the table in number of variables.<br />
« Associate this <strong>AUTO</strong>MG<strong>EN</strong> variable table in order to that target<br />
variable table », to effect a linear assignment.<br />
Automatic assignment<br />
This is the most complex and powerful type of statement. It is used to<br />
associate one or more types of <strong>AUTO</strong>MG<strong>EN</strong> variables to a range of<br />
target variables.<br />
<strong>AUTO</strong>MG<strong>EN</strong> 8 404 ©opyright 1988-2007 <strong>IRAI</strong>
POST-PROCESSORS<br />
This assignment gives the compiler the task of finding an assignment for<br />
each variable in the generated code (as long as it corresponds to one of<br />
the types) of the statement.<br />
This type of statement is normally used for all <strong>AUTO</strong>MG<strong>EN</strong> application<br />
variables where the address of the variable associated in the target does<br />
not need a precisely fixed address.<br />
This statement uses three pieces of information:<br />
- the type of <strong>AUTO</strong>MG<strong>EN</strong> variables (see the chapter Types of<br />
<strong>AUTO</strong>MG<strong>EN</strong> elimination variables),<br />
- the name of the first variable of the target range,<br />
- the number of the last variable (included) of the target range.<br />
Automatic assignment is not used for a post-processor if another<br />
statement has not been found for a variable. For example, if a linear<br />
assignment command sets an attribution for the words 200 to<br />
<strong>AUTO</strong>MG<strong>EN</strong> 210, the post-processor will not use automatic assignment<br />
to try and allocate these words.<br />
If multiple automatic assignments exist for the same type of <strong>AUTO</strong>MG<strong>EN</strong><br />
variable, the post-processor will use the first range of target variables<br />
until saturation, then the second until saturation, then the third etc.<br />
If a variable has not been allocated at the end of using all the automatic<br />
assignments, the compiler generates an error message indicating that<br />
the variable has not been set.<br />
« When you find one of these types of variables, use a variable of the<br />
target in that area», to effect an automatic assignment.<br />
Types of <strong>AUTO</strong>MG<strong>EN</strong> elimination variables<br />
These are used to state variable functions, they are a subset (because<br />
more than one target variable may be needed to allocate an<br />
<strong>AUTO</strong>MG<strong>EN</strong> variable) of <strong>AUTO</strong>MG<strong>EN</strong> variable types.<br />
Managing <strong>AUTO</strong>MG<strong>EN</strong> boolean variables<br />
One of the basic principles of boolean language translation for the<br />
<strong>AUTO</strong>MG<strong>EN</strong> compiler is to be able to access two states for the same<br />
boolean variable.<br />
<strong>AUTO</strong>MG<strong>EN</strong> 8 405 ©opyright 1988-2007 <strong>IRAI</strong>
POST-PROCESSORS<br />
This concept refers to the idea of « execution cycle » : an entity<br />
representing the action created by the target, consisting in reading the<br />
application instructions in a linear mode (from the beginning to the end)<br />
and accomplishing the processing they correspond to.<br />
These two states are set as follows:<br />
1- The immediate state of the variable: the state written for the last<br />
instruction executed by the target transfers that variable either by<br />
default to the state of the variable at the end of the last execution<br />
cycle, or if it is the first execution cycle by default to the initialization<br />
state of the variable.<br />
2- The past state of the variable: the state of the variable at the end of<br />
the last execution cycle.<br />
Comments: the two states are only valid for the main application task.<br />
Only the immediate state has meaning for asynchronous tasks.<br />
The code generated by the <strong>AUTO</strong>MG<strong>EN</strong> compiler assumes the<br />
following:<br />
- assignment of a boolean variable is effected on its immediate state;<br />
- testing of a boolean variable is effected on its past state.<br />
These two rules are used to ensure a consistent evolution of boolean<br />
applications and to observe the evolution rules of programs generated by<br />
a Grafcet language description.<br />
The code generated by the post-processor manages recopying of the<br />
variable immediate states to variable past states at cycle end.<br />
When a boolean variable is used in <strong>AUTO</strong>MG<strong>EN</strong> two boolean variables<br />
are used on the target.<br />
There are three exceptions:<br />
1- for an all or none input, if no edge test is used, only the past state<br />
(« bi ») is used (economy of a boolean variable).<br />
2- for an all or none output, if no edge test is used, only the immediate<br />
state (« o ») is used.<br />
<strong>AUTO</strong>MG<strong>EN</strong> 8 406 ©opyright 1988-2007 <strong>IRAI</strong>
POST-PROCESSORS<br />
(this explains why only the « bi » and « o » variables are found in<br />
variable attribution commands).<br />
3- for the ZELIO post-processor, which effects time management of<br />
the variables (almost identical to <strong>AUTO</strong>MG<strong>EN</strong>'s) only immediate<br />
states are used in ZELIO programming language.<br />
Standard element syntax<br />
« » refers to the immediate state of a<br />
boolean variable or a numeric variable..<br />
« b » refers to the past state of a boolean<br />
variable.<br />
Special edge syntaxes<br />
« u » refers to the « rising edge » state of<br />
a boolean variable.<br />
« d » refers to the « falling edge » state of<br />
a boolean variable.<br />
Special time delay syntaxes<br />
« time » refers to a time delay number.<br />
« tproc » refers to a time delay procedure..<br />
« tcount » refers to a time delay time counter.<br />
Other special syntaxes<br />
(only for specialists)<br />
« ac » refers to the 16 bit accumulator.<br />
« al » refers to the 32 bit accumulator.<br />
« af » refers to the float accumulator.<br />
« cf » refers to the carry flag.<br />
<strong>AUTO</strong>MG<strong>EN</strong> 8 407 ©opyright 1988-2007 <strong>IRAI</strong>
« zf » refers to the zero result flag<br />
« sf » refers to the negative result flag.<br />
POST-PROCESSORS<br />
« of » refers to the overflow flag.<br />
Displaying the variable function elements<br />
By double clicking on « Configuration / Post-processors / <br />
/ Variable function » the following window opens.<br />
Example of variable functions<br />
Comment: in the event that the same post-processor can generate code<br />
for multiple types of target (for example multiple types of processor<br />
CPU's) the different elements can be conditioned for all of the target<br />
types or for one particular target type. If the elements are conditioned,<br />
they are associated to « Only for xxx » lines. See the examples below.<br />
<strong>AUTO</strong>MG<strong>EN</strong> 8 408 ©opyright 1988-2007 <strong>IRAI</strong>
POST-PROCESSORS<br />
By clicking on the elements « + » on the tree you open the branches, « -<br />
» closes them.<br />
<strong>AUTO</strong>MG<strong>EN</strong> 8 409 ©opyright 1988-2007 <strong>IRAI</strong>
Modifying a variable function element<br />
You can modify the elements by double clicking on them.<br />
Example of a configuration dialogue box for a linear assignment.<br />
POST-PROCESSORS<br />
Adding a variable function element<br />
To add a new assignment, click with the right side of the mouse on the<br />
« Assignment … » elements of the tree and select « Add » from the<br />
menu.<br />
If multiple target types are managed by the post-processor, the following<br />
dialogue box is used to establish if the new assignment is only for one<br />
type in particular or all the types.<br />
<strong>AUTO</strong>MG<strong>EN</strong> 8 410 ©opyright 1988-2007 <strong>IRAI</strong>
Single assignment<br />
Linear assignment<br />
POST-PROCESSORS<br />
<strong>AUTO</strong>MG<strong>EN</strong> 8 411 ©opyright 1988-2007 <strong>IRAI</strong>
Automatic assignment<br />
POST-PROCESSORS<br />
Note that <strong>AUTO</strong>MG<strong>EN</strong> variables must always be separated using the<br />
« & » character.<br />
Deleting a variable function element<br />
With the right side of the mouse, click on the variable function element<br />
and select « Delete » from the menu.<br />
Associating an <strong>AUTO</strong>MG<strong>EN</strong> bit to a target system bit<br />
Two statements are necessary, the two state variables of a bit « U »<br />
(« u » and « bu ») must be associated to a target system bit. You must<br />
create two single assignments, for example:<br />
Be careful, when you assign the <strong>AUTO</strong>MG<strong>EN</strong> u and bu variable to the<br />
same target system bit, you eliminate the possibility of creating a rising<br />
<strong>AUTO</strong>MG<strong>EN</strong> 8 412 ©opyright 1988-2007 <strong>IRAI</strong>
POST-PROCESSORS<br />
or falling edge test in the application. You can get around this problem by<br />
using the syntax « ↑(u) » or « ↓(u) » (where « » represents<br />
the bit number) in the application (this syntax generates an intermediate<br />
bit where the edge will be correctly evaluated).<br />
Associating a table of <strong>AUTO</strong>MG<strong>EN</strong> words to a table of fixed target words<br />
Only a single linear statement is necessary for this, for example:<br />
The target words that are allocated must be free from<br />
other assignments or the same target variables may<br />
be assigned twice to different <strong>AUTO</strong>MG<strong>EN</strong> variables.<br />
<strong>AUTO</strong>MG<strong>EN</strong> 8 413 ©opyright 1988-2007 <strong>IRAI</strong>
POST-PROCESSORS<br />
Associating <strong>AUTO</strong>MG<strong>EN</strong> words to target analog inputs or outputs<br />
Use linear statements, for example:<br />
Associating a table of <strong>AUTO</strong>MG<strong>EN</strong> bits to a table of target bits<br />
Two linear assignments are necessary, for example: For example:<br />
This example (the immediate states and past states are associated to<br />
the same target variables) does not allow using the edge tests on<br />
<strong>AUTO</strong>MG<strong>EN</strong> bits u100 to u109.<br />
Two solutions are possible for getting around this problem:<br />
- use the syntax « ↑(u) » or « ↓(u) » (where « »<br />
represents the bit number) in the application,<br />
- associate the immediate and past state bits to two tables of<br />
different bits in the target. In this case, external access to the<br />
application which can be created on these bits (for example by a<br />
dialogue terminal or supervision software) must comply with the<br />
<strong>AUTO</strong>MG<strong>EN</strong> philosophy: for reading access for past states, writing<br />
<strong>AUTO</strong>MG<strong>EN</strong> 8 414 ©opyright 1988-2007 <strong>IRAI</strong>
POST-PROCESSORS<br />
access for immediate states (reading access for immediate states<br />
is possible in practice).<br />
The allocated target bits must be cleaned of any other<br />
assignments or they may assign the same target<br />
variables twice to different <strong>AUTO</strong>MG<strong>EN</strong> variables.<br />
See the variable functions in text format<br />
When you click on the icon on the toolbar, you go from « tree » mode<br />
to « text » mode (format of older <strong>AUTO</strong>MG<strong>EN</strong> versions). In « Text »<br />
format you can copy and paste information into the configuration files..<br />
Modification to « text » mode must be made by<br />
specialists, inopportune modifications can lead to<br />
compiling errors which are difficult for an inexperienced<br />
person to find.<br />
Start-up manufacturer code, end manufacturer code<br />
These configuration elements contain machine code for each target in<br />
text format.<br />
The syntax to be used in these sections is similar to low level languages<br />
that can be used on each target. Observation of the code generated in<br />
pass 1 for each post-processor allows you to display the syntax to be<br />
used.<br />
Reference to an <strong>AUTO</strong>MG<strong>EN</strong> variable<br />
Use the syntax « __ » to refer to an<br />
<strong>AUTO</strong>MG<strong>EN</strong> variable (remember to add the character « b » at the<br />
beginning of the variable to access the past state of a boolean variable.<br />
For example « _bu100_ »).<br />
<strong>AUTO</strong>MG<strong>EN</strong> 8 415 ©opyright 1988-2007 <strong>IRAI</strong>
POST-PROCESSORS<br />
Referring to an <strong>AUTO</strong>MG<strong>EN</strong> application symbol<br />
Syntax:<br />
_|symbol name|_<br />
The character « | » is normally associated to key 6 on the keyboard.<br />
Setting and referring to a label<br />
« @ » indicates a jump destination,<br />
« __ » refers to a label.<br />
Entering machine code in an application<br />
The key words « #BEGIN_MACHINE_CODE » and<br />
« #<strong>EN</strong>D_MACHINE_CODE » are used to enter machine codes in an<br />
<strong>AUTO</strong>MG<strong>EN</strong> code box.<br />
These two commands must be placed at the beginning of a line, no other<br />
characters should be placed on the same line.<br />
The lines within these two commands establish an area called « Machine<br />
language section ».<br />
The syntax to be used in a machine language section is the same as that<br />
used in the « Begin machine code » and « End machine code »<br />
elements.<br />
Selecting connection options<br />
Double click on the element « Configuration / Post-processor / / Connection options».<br />
<strong>AUTO</strong>MG<strong>EN</strong> 8 416 ©opyright 1988-2007 <strong>IRAI</strong>
POST-PROCESSORS<br />
Selecting a connection mode<br />
The number of connection modes is based on the post-processor. The<br />
« Only connected » mode is normally used to create a supervising<br />
application.<br />
This dialogue box opens automatically when connection to a target is<br />
requested. If you check « Do not open … », it will no longer open<br />
automatically. To open it again, push the [Shift] key or launch the<br />
connection command or the « Go » command.<br />
Setting communication module parameters<br />
Double click on the element « Configuration / Post-processor / /Communication module».<br />
Example of setting communication module parameters<br />
The current configuration can be set as a default configuration (for new<br />
projects) or default reset.<br />
A connection test can be created.<br />
<strong>AUTO</strong>MG<strong>EN</strong> 8 417 ©opyright 1988-2007 <strong>IRAI</strong>
Post-processor PL7<br />
POST-PROCESSORS<br />
This post-processor is used to program the processors MODICON<br />
TELEMECANIQUE SCHNEIDER TSX 37, (TSX MICRO) and TSX 57<br />
(TSX PREMIUM).<br />
Communication module<br />
The UNITELWAY SCHNEIDER driver must be installed<br />
on the computer (locally) to be able to communicate<br />
with processors SCHNEIDER TSX 37 and TSX 57.<br />
Drivers adapted to one or more versions of WINDOWS<br />
are on the CD-ROM and can be downloaded from the<br />
<strong>IRAI</strong> site. www.irai.com.<br />
The communication module uses the driver conceived for SCHNEIDER<br />
<strong>AUTO</strong>MATION. Click on « Setting parameters and testing … » to directly<br />
access SCHNEIDER communication driver menus.<br />
Setting communication module parameters<br />
UNITELWAY communication module properties<br />
<strong>AUTO</strong>MG<strong>EN</strong> 8 418 ©opyright 1988-2007 <strong>IRAI</strong>
POST-PROCESSORS<br />
Generating an executable file<br />
The post-processor can generate a binary file which can be directly<br />
downloaded in the processor (only available on TSX 37, not available on<br />
TSX 57) or a file which can be imported in the SCHNEIDER tools<br />
(available for TSX 37 and TSX 57). The first solution is preferable (saves<br />
time, easier to use).<br />
The mode selection is made in the post-processor software<br />
configuration.<br />
Direct generation of a binary file<br />
This mode is highly recommended for TSX 37.<br />
It has the following restrictions:<br />
- sub-program instruction cannot be used;<br />
- it does not support specific instructions (for example<br />
communication or PID).<br />
If your application must use very specific elements, use one of the<br />
importation methods described above.<br />
Selecting automatic generation of a binary file.<br />
Processor configuration file<br />
For the basic versions of TSX 37-05 and TSX 37-08 (with only one<br />
input/output card), files 3705.stx and 3708.stx are provided in the<br />
<strong>AUTO</strong>MG<strong>EN</strong> installation directory.<br />
If a configuration file is not created, the processor TOR<br />
outputs will not be activated.<br />
<strong>AUTO</strong>MG<strong>EN</strong> 8 419 ©opyright 1988-2007 <strong>IRAI</strong>
POST-PROCESSORS<br />
Once the file is created or downloaded (see above), give an access path<br />
to the file in the following configuration element:<br />
File name containing the configuration<br />
There are four possible methods for obtaining a configuration file:<br />
Use the integrated setup utility<br />
Double click on “PLC hardware setup file” and answer “Yes” to “Create a<br />
new configuration file”. Then, use the setup utility for creating the<br />
configuration file. The created file will be automatically added to the<br />
resources of the project,<br />
Download the configuration file from the <strong>IRAI</strong> site<br />
1- double click on “PLC hardware setup file” and answer “Yes” to<br />
“Create a new configuration file”. Then, use the setup utility for<br />
creating the configuration file. The created file will be automatically<br />
added to the resources of the project,<br />
2- download a file corresponding to the configuration of your<br />
processor from the <strong>IRAI</strong> site: www.irai.com, « Download /<br />
<strong>AUTO</strong>MG<strong>EN</strong> / configuration files for TSX 37 processor » section<br />
(recommended if the configuration file is present on the site),<br />
3- recopy the downloaded file without unzipping it (« .STX » files are<br />
zipped files) into the <strong>AUTO</strong>MG<strong>EN</strong> installation directory or put it into<br />
<strong>AUTO</strong>MG<strong>EN</strong> project resources.<br />
If you unzip the « .STX » file the post-processor will not be<br />
able to use it.<br />
<strong>AUTO</strong>MG<strong>EN</strong> 8 420 ©opyright 1988-2007 <strong>IRAI</strong>
Creating a file with the SCHNEIDER programming tools<br />
POST-PROCESSORS<br />
SCHNEIDER (PL7MICRO, PL7JUNIOR or PL7PRO) software tools can<br />
be used.. Files created with other versions may not work, in this case,<br />
the processor goes into error mode when the application is downloaded<br />
(« ERR » light goes on on the processor).<br />
To create an « .STX » file :<br />
1- launch one of the SCHNEIDER tools, create an application<br />
following the rules below:<br />
o select your processor's type of CPU and always select the<br />
1.0 version of the CPU;<br />
o select the input/output card/s on your processor and if<br />
necessary set their parameters;<br />
2- save the file created in the <strong>AUTO</strong>MG<strong>EN</strong> installation directory or<br />
enter it into <strong>AUTO</strong>MG<strong>EN</strong> project resources.<br />
Send an e-mail to <strong>IRAI</strong> to obtain the configuration file<br />
1- send an e-mail to <strong>IRAI</strong> requesting a configuration file, the following<br />
information needs to be provided:<br />
o the type of CPU TSX 37-05, 37-08, 37-10, 37-21 or 3722,<br />
o the position and exact type of input/output cards (DMZ …)<br />
2- when you receive the file, recopy it into the <strong>AUTO</strong>MG<strong>EN</strong><br />
installation directory (without unzipping it) or put it into<br />
<strong>AUTO</strong>MG<strong>EN</strong> project resources.<br />
Generating an « .FEF » executable file<br />
In this mode, importation in the SCHNEIDER programming tools (PL7<br />
MICRO (TSX 37), PL7 JUNIOR (TSX 37 or TSX 57) or PL7 PRO (TSX<br />
37 or TSX 57) can be automatic or manual.<br />
Manual importation<br />
Selecting manual importation mode<br />
You must select a file name which will be exported for <strong>AUTO</strong>MG<strong>EN</strong>:<br />
<strong>AUTO</strong>MG<strong>EN</strong> 8 421 ©opyright 1988-2007 <strong>IRAI</strong>
Selecting a file for exporting to SCHNEIDER software workgroup<br />
Procedure:<br />
POST-PROCESSORS<br />
1- Compile the application in <strong>AUTO</strong>MG<strong>EN</strong> using the « Compile »<br />
command from the « Program » menu or clicking on the button<br />
on the toolbar,<br />
2- Launch a SCHNEIDER software workgroup, create a new project<br />
and use the « Import an application» command from the « File »<br />
menu,<br />
3- When the importation process is finished, transfer the application to<br />
the processor.<br />
4- To obtain a dynamic display in <strong>AUTO</strong>MG<strong>EN</strong>, click the « Go »<br />
button on the toolbar and select the « Only connect» connection<br />
mode.<br />
Automatic importation<br />
The SCHNEIDER software tool will be launched automatically. Only a<br />
limited number of SCHNEIDER software can be used. The type and<br />
version of SCHNEIDER software must be set in the software<br />
configuration.<br />
Selecting the type and version of SCHNEIDER software<br />
Operation of the automatic importation procedure with other<br />
SCHNEIDER software versions is not guaranteed.<br />
<strong>AUTO</strong>MG<strong>EN</strong> 8 422 ©opyright 1988-2007 <strong>IRAI</strong>
POST-PROCESSORS<br />
Procedure to be effected only once.<br />
1- Launch a SCHNEIDER programming tool and create a new<br />
application.<br />
2- Configure the application: the type of processor, input/output cards<br />
etc.<br />
3- Save the file you have created;<br />
4- Give the complete access path to that file in the « hardware<br />
configuration» section of the « System» element, for example:<br />
Create an application for each execution:<br />
Launch the SCHNEIDER software tool (if you have not already done so);<br />
Click the « GO » button on the <strong>AUTO</strong>MG<strong>EN</strong> toolbar.<br />
Using interrupt tasks<br />
When setting a task type sheet, you can enter <strong>AUTO</strong>MG<strong>EN</strong> low level<br />
language or machine language for a processor task. The table below<br />
provides the correspondence in the number of tasks and the type of<br />
interrupr task of the processor.<br />
Task number<br />
(<strong>AUTO</strong>MG<strong>EN</strong><br />
sheet)<br />
Processor TSX 37<br />
task type<br />
0 Fast task Fast task<br />
1 EVT1 EVT0<br />
2 EVT2 EVT1<br />
3 EVT3 EVT2<br />
etc…<br />
Processor TSX 57 task type<br />
Specific examples<br />
These examples are in the directory « /Examples/Post-processors/PL7 ».The files have the same<br />
names as the titles of the following chapters.<br />
<strong>AUTO</strong>MG<strong>EN</strong> 8 423 ©opyright 1988-2007 <strong>IRAI</strong>
Analog inputs/outputs<br />
This example illustrates the use of analog inputs/outputs.<br />
Stating analog inputs/outputs on processor TSX 37-22<br />
POST-PROCESSORS<br />
Fast counter TSX 37-10<br />
This example illustrates the use of a fast counter on a TSX 37-10<br />
processor.<br />
Fast counter TSX 37-10 used in counting<br />
This example illustrates the use of a fast counter on a TSX 37-10<br />
processor in counting mode.<br />
Fast counter TSX 37-22<br />
This example illustrates the use of a fast counter on a TSX 37-22<br />
processor.<br />
ASI<br />
Example of using ASI inputs/outputs<br />
MAGELIS<br />
Example of using a MAGELIS terminal<br />
<strong>AUTO</strong>MG<strong>EN</strong> 8 424 ©opyright 1988-2007 <strong>IRAI</strong>
Post-processor PL72<br />
POST-PROCESSORS<br />
This post-processor is used to program TELEMECANIQUE SCHNEIDER<br />
TSX 17-20 (with PL72 cartridge), TSX 27, TSX 47 and TSX 47-20<br />
processors.<br />
Selecting processor type<br />
Use the « Configuration / Post-processor / PL72 / System / Hardware<br />
configuration» browser element to select the type of processor.<br />
Specific syntax elements<br />
Calling up PL72 function blocks<br />
The following syntaxes are used to call up time delay, text and fast<br />
counter (TSX 17-20) blocks in a text format used in the « Begin machine<br />
code », « End machine code » elements and sections in machine<br />
language.<br />
Time delay block<br />
x.Tn=y<br />
PL72 equivalent:<br />
<strong>AUTO</strong>MG<strong>EN</strong> 8 425 ©opyright 1988-2007 <strong>IRAI</strong>
Text block<br />
a+b+c+d.TXTn=x:y<br />
PL72 equivalent:<br />
Fast counter block<br />
a+b+c+d.FC=x:y:z<br />
PL72 equivalent:<br />
WEEK type time/date block (only on TSX 17-20)<br />
a.H,W (days), (start time), (end time)=x :y :z<br />
POST-PROCESSORS<br />
<strong>AUTO</strong>MG<strong>EN</strong> 8 426 ©opyright 1988-2007 <strong>IRAI</strong>
POST-PROCESSORS<br />
« days » represents the days of the week, this is an encoded value on 7<br />
bits, each bit represents a day of the week. The day is active if the bit<br />
1.b0 corresponds to Sunday and b6 to Saturday. For example, to<br />
1 3<br />
validate Monday and Wednesday the value 2 + 2 must be written: 2 + 8<br />
= 10. To validate the seven days of the week: the value is 127.<br />
« start time » and « end time » are expressed as HH:MM: hours and<br />
minutes:<br />
YEAR type time/date block (only on TSX 17-20)<br />
a.H,Y,(start date),(end date)=x :y :z<br />
« start date » and « end date » are expressed as DD:MM: day and<br />
month.<br />
PL72 equivalent:<br />
Using a fast task<br />
A« Task » type sheet bearing the number « 1 » is used to associate<br />
literal code or PL72 code written on the sheet to the fast task. The sheet<br />
must not contain anything other than low level literal code or PL72 code<br />
written in an organizational chart rectangle.<br />
<strong>AUTO</strong>MG<strong>EN</strong> 8 427 ©opyright 1988-2007 <strong>IRAI</strong>
Communication module<br />
Setting communication module parameters<br />
POST-PROCESSORS<br />
If you connect the PC on the processor console outlet, you must select<br />
« Console outlet».<br />
Do not check « Always attempt 19200 baud connection » unless your<br />
processor is a recent TSX 17-20 (this option is used for a faster dialogue<br />
between the PC and processor).<br />
The « UNITELWAY » mode is used to connect the PC to a UNITELWAY<br />
coupler. In this case, the speed must correspond to the coupler<br />
configuration.<br />
If you check « Always attempt 19200 baud<br />
connection » and your TSX 17-20 does not support<br />
19200 baud communication the connection will fail.<br />
If the mode does not correspond with the connection<br />
(for example, UNITELWAY mode selected and a<br />
connection on the console processor) the connection will fail.<br />
Specific examples<br />
These examples are in the directory « /Examples/Post-processors/PL72 ».The files have the same<br />
names as the titles of the following chapters.<br />
<strong>AUTO</strong>MG<strong>EN</strong> 8 428 ©opyright 1988-2007 <strong>IRAI</strong>
POST-PROCESSORS<br />
Analog inputs/outputs<br />
To use the analog outputs on a TSX 17-20 processor you must:<br />
- state the analog input/output blocks in the « System » element of<br />
the configuration .<br />
- associate one or more <strong>AUTO</strong>MG<strong>EN</strong> variables to the<br />
TELEMECANIQUE input/output words (IW and OW).<br />
Example:<br />
- processor TSX 17-20 using a block of 4 analog inputs (code 27) in<br />
position 1 and a block of 2 analog outputs (code 21) in position 2:<br />
- the program will simply recopy the state of the first analog input on<br />
the first analog output. it will also compare the second analog input<br />
with the value 500 (arbitrary value) and position two boolean<br />
outputs: O0 if the input is less than 500 and O1 if the input is<br />
greater than or equal to 500.<br />
Statement of two extension modules<br />
Assigning variables<br />
These two statements associate the <strong>AUTO</strong>MG<strong>EN</strong> words M200 to M203<br />
to processor variables IW1,0 to IW1,3 as well as <strong>AUTO</strong>MG<strong>EN</strong> variables<br />
M204 and M205 to processor variables OW2,0 and OW2,1.<br />
<strong>AUTO</strong>MG<strong>EN</strong> 8 429 ©opyright 1988-2007 <strong>IRAI</strong>
Fast counter<br />
POST-PROCESSORS<br />
The goal is to count 200 pulses on the fast counter. The current value of<br />
the fast counter will be recopied in <strong>AUTO</strong>MG<strong>EN</strong> word M200. Output O5<br />
will be activated by an interrupt task at the end of the count.<br />
Setting fast counter parameters<br />
Text blocks and xbt<br />
The goal is to dialogue with an XBT connected on the console port of<br />
processor TSX 17-20.<br />
Inputs I0 to I3 start displaying messages number 0 to number 3<br />
registered in the XBT.<br />
Text block TXT1 will be used to dialogue on the console port.<br />
The message format to send to the XBT for displaying a message is as<br />
follows:<br />
ESC V xxx LF CR<br />
xxx represents the number of the message encoded in three character<br />
decimals.<br />
<strong>AUTO</strong>MG<strong>EN</strong> 8 430 ©opyright 1988-2007 <strong>IRAI</strong>
Allocation of a word table for exchanges<br />
POST-PROCESSORS<br />
<strong>AUTO</strong>MG<strong>EN</strong> 8 431 ©opyright 1988-2007 <strong>IRAI</strong>
Setting text block parameters<br />
POST-PROCESSORS<br />
<strong>AUTO</strong>MG<strong>EN</strong> 8 432 ©opyright 1988-2007 <strong>IRAI</strong>
POST-PROCESSORS<br />
UNITELWAY text blocks<br />
The goal is to use a UNITELWAY coupler to acquire a table of 3 words<br />
on a target processor. The UNITELWAY coupler is installed as a first<br />
extension, it will be configured as the master to use two slaves.<br />
Processor Iu will be slave number 1.<br />
Configuration of an UNITELWAY coupler<br />
<strong>AUTO</strong>MG<strong>EN</strong> 8 433 ©opyright 1988-2007 <strong>IRAI</strong>
Setting parameters for two text blocks<br />
POST-PROCESSORS<br />
<strong>AUTO</strong>MG<strong>EN</strong> 8 434 ©opyright 1988-2007 <strong>IRAI</strong>
Attribution of a word table for exchanges<br />
POST-PROCESSORS<br />
TOR extension module<br />
This example illustrates the configuration of a TOR extension module.<br />
We are using a basic module equipped with 16 inputs and 12 outputs<br />
and an extension module equipped with 10 inputs and 8 outputs.<br />
Setting the extension module<br />
Assigning variables<br />
Conversion<br />
Shows how to call up the PL72 language conversion functions.<br />
Time/date<br />
Example of using a time/date function block.<br />
<strong>AUTO</strong>MG<strong>EN</strong> 8 435 ©opyright 1988-2007 <strong>IRAI</strong>
Post-processor S7200<br />
POST-PROCESSORS<br />
This post-processor is used to program SIEM<strong>EN</strong>S S7200 (all 2xx CPU's)<br />
processors .<br />
Selecting CPU type<br />
Use the « Configuration / Post-processor / STEP7 (S7200) / System /<br />
Hardware configuration» browser element to select the type of CPU.<br />
Communication module<br />
Setting communication module parameters<br />
Be sure to set the slave number so it corresponds with the processor<br />
configuration.<br />
Specific example<br />
This example is in the directory « /Examples/Post-processors/S7200 ».The file has the same<br />
name as the title of the following chapter.<br />
Interrupt task<br />
Example of calling up an interrupt task<br />
<strong>AUTO</strong>MG<strong>EN</strong> 8 436 ©opyright 1988-2007 <strong>IRAI</strong>
Post-processor ABB<br />
POST-PROCESSORS<br />
This post-processor is used to program ABB CS31 and AC31 processors<br />
.<br />
Selecting processor type<br />
Use the « Configuration / Post-processor / ABB / System / Hardware<br />
configuration» browser element to select the type of processor.<br />
Processor AC31<br />
Processor CS31<br />
Communication module<br />
Setting communication module parameters<br />
Utility<br />
The « Configuration / Post-processor / ABB / Terminal emulator »<br />
browser element is used to access a terminal emulator for dialoguing<br />
with the processor.<br />
Specific examples<br />
These examples are in the directory « /Examples/Post-processors/ABB ». The files have the same<br />
names as the following chapters:<br />
<strong>AUTO</strong>MG<strong>EN</strong> 8 437 ©opyright 1988-2007 <strong>IRAI</strong>
POST-PROCESSORS<br />
Analog inputs/outputs<br />
The example illustrates the use of an analog extension module on<br />
processor AC31.<br />
Interrupt<br />
The example illustrates the use of interrupt tasks on processor AC31.<br />
<strong>AUTO</strong>MG<strong>EN</strong> 8 438 ©opyright 1988-2007 <strong>IRAI</strong>
POST-PROCESSORS<br />
Post-processor GE-FANUC / ALSPA<br />
This post-processor is used to program GE-FANUC 90 MICRO and 9030<br />
or ALSPA 8005 and 8035 processors.<br />
Selecting processor type<br />
Use the « Configuration / Post-processor / GE-FANUC / System /<br />
Hardware configuration» browser element to select the type of<br />
processor.<br />
Select standard for CPU's other than 350, 351 or VERSAMAX.<br />
Communication module<br />
Setting communication module parameters<br />
Utility<br />
The « Configuration / Post-processor / GE-FANUC / Hardware<br />
configuration & diagnostic » browser element is used to access a<br />
configuration and diagnostic utility.<br />
<strong>AUTO</strong>MG<strong>EN</strong> 8 439 ©opyright 1988-2007 <strong>IRAI</strong>
Post-processor STEP5<br />
Communication module<br />
Setting communication module parameters<br />
POST-PROCESSORS<br />
Application structure<br />
SIEM<strong>EN</strong>S STEP5 language is organized in program and data blocks.<br />
<strong>AUTO</strong>MG<strong>EN</strong> applications translated by the STEP5 post-processor are<br />
broken down into multiple blocks. By default, the post-processor uses the<br />
following blocks<br />
- OB1 organization block this block calls up all the blocks that must<br />
be cyclically processed.<br />
- OB20, OB21, OB22 : blocks executed when the processor starts.<br />
These blocks set a bit to activate the initial Grafcet steps.<br />
The PB blocks are used to process pre-settings, to manage the evolution<br />
of boolean variables and time delays.<br />
The FB or FX blocks are used for the code issued by the application and<br />
for the code written in the « .SRT » and « .<strong>EN</strong>D » files. An FB or FX file<br />
is created for each application sheet.<br />
In addition, the sheets can be directly associated to a block of codes or<br />
data.<br />
If the volume of generated code is too much for a block (for example,<br />
code issued from a sheet containing a voluminous program), the postprocessor<br />
automatically uses a new block.<br />
<strong>AUTO</strong>MG<strong>EN</strong> 8 440 ©opyright 1988-2007 <strong>IRAI</strong>
POST-PROCESSORS<br />
By default, the post-processor uses the blocks PB1 to PB255 and FB1 to<br />
FB239 when needed.<br />
These values can be modified, (see the chapter Selecting program<br />
blocks to use).<br />
<strong>AUTO</strong>MG<strong>EN</strong> 8 441 ©opyright 1988-2007 <strong>IRAI</strong>
POST-PROCESSORS<br />
The figure below illustrates the structure of code generated by the<br />
SIEM<strong>EN</strong>S post-processor.<br />
<strong>AUTO</strong>MG<strong>EN</strong> 8 442 ©opyright 1988-2007 <strong>IRAI</strong>
POST-PROCESSORS<br />
Selecting program blocks to use<br />
Blocks PB1 to PB 255 and FB 1 to FB 239 are used by default. Three<br />
configuration elements are used to select other blocks.<br />
Selecting data blocks<br />
Block DB 3 is used by default for numeric variables. This command is<br />
used to select another block.<br />
Changing the data block involves two other modifications.<br />
- in the begin machine code, it is necessary to create corresponding data<br />
blocks,<br />
- it is necessary to select the data block in the dialogue module<br />
parameter settings.<br />
<strong>AUTO</strong>MG<strong>EN</strong> 8 443 ©opyright 1988-2007 <strong>IRAI</strong>
Selecting processor type<br />
POST-PROCESSORS<br />
Associating code written on a sheet to a program block<br />
When writing low level literal code or machine code on an organizational<br />
chart on a « Task » type sheet, associate the code to a STEP5 block.<br />
The task number determines the block type and number.<br />
The generated code for that sheet must take into account the block type<br />
and the instructions used in that block type (the set of instructions for<br />
blocks OB and PB is limited).<br />
The table below provides the correspondence between the value « n »<br />
and the block.<br />
Task number STEP5 block<br />
0 to 255 OB 0 to OB 255<br />
256 to 511 PB 0 to PB 255<br />
512 to 767 FB 0 to FB 255<br />
768 to 1023 FX 0 to FX 255<br />
1024 to 1279 DB 0 to DB 255<br />
1280 to 1535 DX 0 to DX 255<br />
Specific syntaxes<br />
<strong>AUTO</strong>MG<strong>EN</strong> 8 444 ©opyright 1988-2007 <strong>IRAI</strong>
POST-PROCESSORS<br />
Setting blocks<br />
The command « $BLOCK » is used to set the<br />
beginning of a program or data block.<br />
The block type can be « OB », « FB », « FX », « PB » for the code or<br />
« DB », « DX » for the data..<br />
The block number is a value between 0 and 255. Blocks « FX » and<br />
« DX » can only be used on processors 135U and 155U. The command<br />
« BE » indicates the end of a block.<br />
Example:<br />
$BLOCK DB1<br />
...<br />
$BE<br />
$BLOCK OB1<br />
...<br />
$BE<br />
the commands « KH= », « KY= », « KC= », « KM= » and « KF= » add<br />
constants to the data blocks DB.<br />
« KH= » adds a 16 bit constant expressed in hexadecimal.<br />
« KY= » adds a 16 bit constant expressed in the form of two values.<br />
between 0 and 255 separated by a comma.<br />
« KC= » adds a series of characters surrounded by the characters<br />
« ’ » (apostrophe).<br />
« KM= » adds a 16 bit constant expressed in binary.<br />
« KF= » adds a 16 bit constant expressed in signed decimal.<br />
Example:<br />
$BLOCK DB4<br />
KH= 1234<br />
KY=100.5<br />
KC= ‘This is a text’<br />
KM=11111111 00000000<br />
KF=-200<br />
$BE<br />
Blocks FB and FX<br />
SIEM<strong>EN</strong>S language blocks FB and FX can have parameters.<br />
<strong>AUTO</strong>MG<strong>EN</strong> 8 445 ©opyright 1988-2007 <strong>IRAI</strong>
Call up<br />
POST-PROCESSORS<br />
If the parameters need to go to a functional block, use the following<br />
syntax:<br />
- call up needs to be followed by the character « * »,<br />
- the following line must contain a jump instruction « SPA » to the<br />
line beyond the parameters;<br />
- the following lines must contain the parameters preceded by the<br />
mnemonic « U » for bits or « L » for words. The constants must be<br />
written in the form « Kx=value» (x is the type of constant, see the<br />
chapter Setting blocks).<br />
Example of calling up a functional block without parameters:<br />
SPA FB 5<br />
Examples of calling up a functional block with parameters:<br />
SPA FB 242*<br />
SPA=_label_<br />
L MW10 ; first parameter<br />
L MW12 ; second parameter<br />
U M0.0 ; third parameter<br />
L MW14 ; fourth parameter<br />
L MW16 ; fifth parameter<br />
@label<br />
SPA FB200*<br />
SPA=_label2_<br />
KY=0,4 ; Example of a constant parameter<br />
@label2<br />
Writing<br />
In blocks FB and FX mnemonics must be used ending with the character<br />
'=' followed by a parameter number (1=first parameter).<br />
Example of a two parameters function block (first parameter recopied in<br />
the second):<br />
$BLOCK FB 100<br />
L=1<br />
T=2<br />
$BE<br />
<strong>AUTO</strong>MG<strong>EN</strong> 8 446 ©opyright 1988-2007 <strong>IRAI</strong>
Post-processor TSX 07<br />
POST-PROCESSORS<br />
This post-processor is used to program the processors MODICON<br />
TELEMECANIQUE SCHNEIDER TSX 07.<br />
Communication module<br />
The UNITELWAY SCHNEIDER driver must be<br />
installed on the computer (locally) to be able to<br />
communicate with processors SCHNEIDER<br />
TSX 07. Drivers adapted to one or more<br />
versions of WINDOWS are on the CD-ROM<br />
and can be downloaded from the <strong>IRAI</strong> site:<br />
www.irai.com. Be careful, some versions of<br />
WINDOWS are incompatible with certain types<br />
of TSX 07 processors (TSX 0720 … and TSX<br />
0721…are incompatible with WINDOWS ME,<br />
WINDOWS 2000 or WINDOWS XP).<br />
The communication module uses the driver conceived for SCHNEIDER<br />
<strong>AUTO</strong>MATION. Click on « Setting parameters and testing … » to directly<br />
access SCHNEIDER communication driver menus.<br />
Setting communication module parameters<br />
<strong>AUTO</strong>MG<strong>EN</strong> 8 447 ©opyright 1988-2007 <strong>IRAI</strong>
UNITELWAY communication module properties<br />
POST-PROCESSORS<br />
<strong>AUTO</strong>MG<strong>EN</strong> 8 448 ©opyright 1988-2007 <strong>IRAI</strong>
POST-PROCESSORS<br />
Post-processor PS3-PS4<br />
This post-processor is used to program KLOCKNER-MOELLER PS3 and<br />
PS4 processors..<br />
Communication module<br />
Setting communication module parameters<br />
<strong>AUTO</strong>MG<strong>EN</strong> 8 449 ©opyright 1988-2007 <strong>IRAI</strong>
POST-PROCESSORS<br />
Post-processor PS4<br />
This post-processor is used to program MOELLER PS4-200, PS4-300<br />
and PS416 processors. MOELLER SUCOSOFT S40 V5 or higher<br />
software must be used (the demo version of this software can be used).<br />
Module de communication<br />
Setting communication module parameters<br />
Transferring programs to MOELLER SUCOSOFT software<br />
In the element below you create a file used for exchange between<br />
<strong>AUTO</strong>MG<strong>EN</strong> and SUCOSOFT. This file will be generated after<br />
compilation in <strong>AUTO</strong>MG<strong>EN</strong>.<br />
<strong>AUTO</strong>MG<strong>EN</strong> 8 450 ©opyright 1988-2007 <strong>IRAI</strong>
POST-PROCESSORS<br />
Proceed as follows to import the file generated by <strong>AUTO</strong>MG<strong>EN</strong> in the<br />
MOELLER software then inject it in the processor.<br />
- launch SUCOSOFT,<br />
- create a new project,<br />
- with the right side of the mouse click on the topology configuration<br />
in SUCOSOFT and select the option « Export/Import / Import<br />
IEC/<strong>EN</strong> 61131-3 sources»,<br />
- enter the name of the file exported by <strong>AUTO</strong>MG<strong>EN</strong>,<br />
- double click on « _MAIN » which appears on the list,<br />
<strong>AUTO</strong>MG<strong>EN</strong> 8 451 ©opyright 1988-2007 <strong>IRAI</strong>
- in the « Special », menu select « Code generation »,<br />
- answer « Yes » to :<br />
- then « OK » at :<br />
POST-PROCESSORS<br />
- in the« Generation » menu, select « Program parameter settings<br />
… »,<br />
<strong>AUTO</strong>MG<strong>EN</strong> 8 452 ©opyright 1988-2007 <strong>IRAI</strong>
POST-PROCESSORS<br />
- Select an appropriate size to store all the internal variables (%M) of<br />
your application,<br />
- In the «Generation » menu, select « Generate program code »,<br />
- If there are no compilation errors, you can transfer the application<br />
to the processor. In the « Tools » menu, select « Test and start »,<br />
- In the « Device » menu, select « Transfer/File Manager »,<br />
- Click on transfer,<br />
<strong>AUTO</strong>MG<strong>EN</strong> 8 453 ©opyright 1988-2007 <strong>IRAI</strong>
POST-PROCESSORS<br />
- At the end of the transfer disconnect from the SUCOSOFT<br />
software to be able to connect <strong>AUTO</strong>MG<strong>EN</strong> to the processor and<br />
activate the dynamic tuning mode.<br />
<strong>AUTO</strong>MG<strong>EN</strong> 8 454 ©opyright 1988-2007 <strong>IRAI</strong>
POST-PROCESSORS<br />
Post-processor RPX<br />
This post-processor is used to program CROUZET RPX processors. .<br />
Selecting processor type<br />
Use the « Configuration / Post-processor / RPX / System / Hardware<br />
configuration» browser element to select the type of processor.<br />
Communication module<br />
Setting communication module parameters<br />
Utility<br />
The « Configuration / Post-processor / RPX / Terminal emulator »<br />
browser element is used to access a terminal emulator for configuring<br />
processor communication couplers.<br />
<strong>AUTO</strong>MG<strong>EN</strong> 8 455 ©opyright 1988-2007 <strong>IRAI</strong>
POST-PROCESSORS<br />
Post-processor PL71<br />
This post-processor is used to program the processors SCHNEIDER<br />
TSX 17-10 and TSK 17-20 (without PL72 cartridge).<br />
Selecting processor type<br />
Use the « Configuration / Post-processor / PL71 / System / Hardware<br />
configuration» browser element to select the type of processor.<br />
Communication module<br />
Setting communication module parameters<br />
(For more information, please See the configuration of the<br />
Communication module PL72)<br />
Fast counter task<br />
A task type sheet bearing the number 1 will be associated to the<br />
processor fast counter task.<br />
Specific examples<br />
These examples are in the directory « /Examples/Post-processors/PL71 ».The files have the same<br />
names as the titles of the following chapters.<br />
<strong>AUTO</strong>MG<strong>EN</strong> 8 456 ©opyright 1988-2007 <strong>IRAI</strong>
POST-PROCESSORS<br />
Counting<br />
Since increments and decrements of PL71 counters are limited (only on<br />
the rising edge) in relation to <strong>AUTO</strong>MG<strong>EN</strong> and TSX processor<br />
possibilities it is necessary to use machine language code if you want to<br />
use them (see the example contents).<br />
Fast counter<br />
The goal is to count 200 pulses on the fast counter. Output O5 will be<br />
activated by a interrupt task at the end of the count.<br />
<strong>AUTO</strong>MG<strong>EN</strong> 8 457 ©opyright 1988-2007 <strong>IRAI</strong>
POST-PROCESSORS<br />
Post-processor PB<br />
This post-processor is used to program SCHNEIDER APRIL PB<br />
processors.<br />
Selecting processor type<br />
Use the « Configuration / Post-processor / PB / System / Hardware<br />
configuration» browser element to select the type of processor.<br />
Communication module<br />
Setting communication module parameters<br />
Specific syntaxes<br />
The command « $ORG=xxxx » is used to set the beginning of the<br />
assembly address, the starting assembly address is set at 0C30;<br />
Example:<br />
$ORG=1C30<br />
The command « $TOP=xxx » sets the maximum address for the page<br />
jump. It sets the three digits of address lower weight, below these a page<br />
jump is automatically generated by the assembler.<br />
The command « $CONST=xxxx,yyyy » sets the begin and end address<br />
for constant storage. The constants are stored in a table outside the<br />
program.<br />
<strong>AUTO</strong>MG<strong>EN</strong> 8 458 ©opyright 1988-2007 <strong>IRAI</strong>
POST-PROCESSORS<br />
The command « WORD xxxx » enters the value xxxx (four hexadecimal<br />
digits) in the program.<br />
The command « ADR xxxx » enters the address of variable xxxx (four<br />
hexadecimal digits) in the program.<br />
The syntax #nnnn is used to refer to a constant value.<br />
For example:<br />
apl #1234 ; puts constant 1234 (hexadecimal) in the accumulator.<br />
<strong>AUTO</strong>MG<strong>EN</strong> 8 459 ©opyright 1988-2007 <strong>IRAI</strong>
POST-PROCESSORS<br />
Post-processor SMC<br />
This post-processor is used to program SCHNEIDER APRIL SMC<br />
processors .<br />
Selecting processor type<br />
Use the « Configuration / Post-processor / SMC/ System / Hardware<br />
configuration» browser element to select the type of processor.<br />
Communication module<br />
Setting communication module parameters<br />
Specific syntaxes<br />
The command « $SEQ » indicates the beginning of a boolean area.<br />
The command « $CAL » starts a calculation area.<br />
The command « $PRD » starts a variable presetting area.<br />
Boolean variables can be used which are bistable or monostable<br />
regardless of the SMC language conventions. The character « ! » before<br />
the sign « = » sets the variable to bistable (set to one or reset), the<br />
character « ? » before the sign « = » sets the variable to monostable<br />
(assignment or complement assignment).<br />
The syntax « SS.cccccccc » is used to write a security sequence<br />
(necessary on processors SMC 25 and 600), « cccccccc » represents a<br />
program name with a maximum of 8 characters.<br />
<strong>AUTO</strong>MG<strong>EN</strong> 8 460 ©opyright 1988-2007 <strong>IRAI</strong>
POST-PROCESSORS<br />
Post-processor S7300<br />
This post-processor is used to program SIEM<strong>EN</strong>S S7300 processors.<br />
Communication module<br />
Setting communication module parameters<br />
The slave number must correspond with that set as a parameter for the<br />
processor.<br />
Specific syntaxes<br />
The command « $BLOCK » is used to set the<br />
beginning of a program or data block.<br />
The block type can be « OB », « FB », « FC », « SFC » « SFB » for the<br />
code or « DB » for the data. The block number is a value between 0 and<br />
65535. The command «$<strong>EN</strong>DBLOCK » indicates the end of a block.<br />
Example:<br />
$BLOCK DB1<br />
...<br />
$<strong>EN</strong>DBLOCK<br />
$BLOCK OB1<br />
...<br />
$<strong>EN</strong>DBLOCK<br />
The following syntax is used to state the variables for a block:<br />
For an input variable:<br />
<strong>AUTO</strong>MG<strong>EN</strong> 8 461 ©opyright 1988-2007 <strong>IRAI</strong>
$VAR-type nature {:=initialization}<br />
or<br />
$VAR-symbol nature : (type=initialization)<br />
« nature » can be:<br />
- « - «IN » for an input variable,<br />
- « OUT » for an output variable,<br />
- « - «INOUT » for an input/output variable,<br />
- « TEMP » for a temporary variable;<br />
- « STAT » for a static variable.<br />
POST-PROCESSORS<br />
« type » can be one of the STEP 7 language variable types: BOOL, INT,<br />
WORD, STRUCT, <strong>EN</strong>DSTRUCT, etc …<br />
« symbol » is used to associate a mnemonic with a variable.<br />
« initialization » is optional and sets the default value of a variable.<br />
The DB blocks only authorize static variables.<br />
The OB blocks only authorize temporary variables.<br />
The FC and SFC blocks do not authorize static variables.<br />
As in SIEM<strong>EN</strong>S software, variable statements must appear in the<br />
following order: input, output, input/output, static and temporary.<br />
Setting block variables<br />
The syntax « £D block statement » is used to set a statement associated<br />
to a particular block. When the block is generated by the compiler, then<br />
the statement is used.<br />
Calling up blocks<br />
The syntax « CALL block name {instance DB} ( parameter list) » is used<br />
to call up an FC, FB, SFC or SFB block.<br />
<strong>AUTO</strong>MG<strong>EN</strong> 8 462 ©opyright 1988-2007 <strong>IRAI</strong>
Example:<br />
$BLOCK FC1<br />
$VAR-IN input1 :BOOL :=FALSE ;<br />
$VAR-IN input2 :BOOL :=FALSE ;<br />
$VAR-OUT output :BOOL ;<br />
u_input1_<br />
u_input2_<br />
=_output_<br />
$<strong>EN</strong>DBLOCK<br />
$BLOCK OB1<br />
CALL FC1(_input1_ :=e0.0,_input2_ :=e0.1,_output_ :=a0.0)<br />
$<strong>EN</strong>DBLOCK<br />
POST-PROCESSORS<br />
Importing in SIEM<strong>EN</strong>S SIMATIC software<br />
Use the process below to import the code generated by <strong>AUTO</strong>MG<strong>EN</strong> in<br />
the SIEM<strong>EN</strong>S SIMATIC software :<br />
1- In the « System » part of the S7300 post-processor configuration,<br />
select SIMATIC in the following element<br />
2- Compile the application,<br />
3- In <strong>AUTO</strong>MG<strong>EN</strong>, open the element « Generated code / Postprocessor<br />
S7300 / Step 2 », select all the lines then the command<br />
« Copy » in the « Edit » menu.<br />
<strong>AUTO</strong>MG<strong>EN</strong> 8 463 ©opyright 1988-2007 <strong>IRAI</strong>
POST-PROCESSORS<br />
4- In the SIMATIC software, create a « Source LIST » type element.<br />
5- In SIMATIC, paste the code in the window containing the source<br />
LIST using the « Paste » command in the « Edit » menu,<br />
<strong>AUTO</strong>MG<strong>EN</strong> 8 464 ©opyright 1988-2007 <strong>IRAI</strong>
6- In SIMATIC, compile the source by clicking on.<br />
At this point the importation is completed.<br />
POST-PROCESSORS<br />
Structure of generated code<br />
SIEM<strong>EN</strong>S STEP7 language is organized in program and data blocks.<br />
<strong>AUTO</strong>MG<strong>EN</strong> applications translated by the STEP7 post-processor are<br />
broken down into multiple blocks. By default, the post-processor uses the<br />
following blocks:<br />
- OB1 organization block: this block calls up all the blocks that must<br />
be cyclically processed,<br />
- OB100 : blocks executed when the processor starts. This block sets a<br />
bit to activate the initial Grafcet steps.<br />
The FB blocks are used to process pre-settings, to manage the evolution<br />
of boolean variables and time delays.<br />
The FC blocks are used for the code issued by the application and for<br />
the begin and end machine code.<br />
An FB block is created for each application sheet.<br />
<strong>AUTO</strong>MG<strong>EN</strong> 8 465 ©opyright 1988-2007 <strong>IRAI</strong>
POST-PROCESSORS<br />
In addition, the sheets can be directly associated to a block (see<br />
chapterAssociating code written on a sheet to a program block)..<br />
By default, the post-processor uses the blocks FB1 to FB255 and FC1 to<br />
FC239 when needed.<br />
These values can be modified in the « System » element of the<br />
configuration.<br />
<strong>AUTO</strong>MG<strong>EN</strong> 8 466 ©opyright 1988-2007 <strong>IRAI</strong>
POST-PROCESSORS<br />
The figure below illustrates the structure of code generated by the<br />
SIEM<strong>EN</strong>S post-processor:<br />
Start file .SRT<br />
End file .<strong>EN</strong>D<br />
Block OB1<br />
Block FC<br />
Presettings Block FB<br />
Application<br />
sheets<br />
Evol. of boolean<br />
variables<br />
Evol. of time<br />
variables.<br />
n blocks FC<br />
Block FB<br />
Block FB<br />
Block FC<br />
<strong>AUTO</strong>MG<strong>EN</strong> 8 467 ©opyright 1988-2007 <strong>IRAI</strong>
POST-PROCESSORS<br />
<strong>AUTO</strong>MG<strong>EN</strong> 8 468 ©opyright 1988-2007 <strong>IRAI</strong>
POST-PROCESSORS<br />
Selecting program blocks to use<br />
Blocks FC1 to FC 239 and FB 1 to FB 255 are used by default. Two<br />
configuration elements are used to select other blocks.<br />
Associating code written on a sheet to a program block<br />
When writing low level literal code or machine code on an organizational<br />
chart on a « Task » type sheet, associate the code to a STEP7 block.<br />
The task number determines the block type and number.<br />
The generated code for that sheet must take into account the block type<br />
and the instructions used in that block type (The set of instructions for<br />
blocks OB and PB is limited).<br />
The table below provides the correspondence between the task number<br />
and the STEP7 block.<br />
Task number STEP7 block<br />
0 to 255 OB 0 to OB 255<br />
256 to 511 FC 0 to FC 255<br />
512 to 767 FB 0 to FB 255<br />
Specific examples<br />
These examples are in the directory « /Examples/Post-processors/S7300 ».The files have the same<br />
names as the titles of the following chapters.<br />
<strong>AUTO</strong>MG<strong>EN</strong> 8 469 ©opyright 1988-2007 <strong>IRAI</strong>
Calling up a STEP7 block<br />
Example of calling up STEP7 function blocks<br />
POST-PROCESSORS<br />
Using an OB block<br />
Example of an association of code written on a sheet to an OB block.<br />
<strong>AUTO</strong>MG<strong>EN</strong> 8 470 ©opyright 1988-2007 <strong>IRAI</strong>
Post-processor OMRON<br />
This post-processor is used to program OMRON processors .<br />
POST-PROCESSORS<br />
Select PLC model<br />
Tht item « Configuration / Post-processor / OMRON / System /<br />
Hardware configuration » must be used to select PLC model.<br />
Communication module<br />
Setting communication module parameters<br />
Transferring applications to the CX-PROGRAMMER software<br />
- at the end of compiling in <strong>AUTO</strong>MG<strong>EN</strong>, double click on the<br />
« Generated files / OMRON / step 2 » element,<br />
<strong>AUTO</strong>MG<strong>EN</strong> 8 471 ©opyright 1988-2007 <strong>IRAI</strong>
- select all the lines,<br />
- select the « Copy » command in the « Edit » menu<br />
POST-PROCESSORS<br />
- in CX-PROGRAMMER, create a new application, display the<br />
program area in mnemonics format,<br />
<strong>AUTO</strong>MG<strong>EN</strong> 8 472 ©opyright 1988-2007 <strong>IRAI</strong>
- select the program area and then paste the lines,<br />
POST-PROCESSORS<br />
You can upload the application in the processor starting from CX-<br />
PROGRAMMER then return to <strong>AUTO</strong>MG<strong>EN</strong> to tune the program in<br />
connected mode (remember to disconnect CX-PROGRAMMER from the<br />
processor to be able to communicate from <strong>AUTO</strong>MG<strong>EN</strong>).<br />
<strong>AUTO</strong>MG<strong>EN</strong> 8 473 ©opyright 1988-2007 <strong>IRAI</strong>
Specific syntax<br />
The following syntax is used to set the value of a data word.<br />
POST-PROCESSORS<br />
$DMn=value<br />
« n » is the word number;<br />
« value » is a 16 bit value expressed by default in decimal or<br />
hexadecimal if preceded by the character 'H'.<br />
Example:<br />
$DM10=50<br />
$DM100=HA000<br />
Associating code written on a sheet to a program block<br />
When writing low level literal code or machine code on an organizational<br />
chart on a « Task » type sheet, associate the code to a interrupt task.<br />
The task number is equivalent to the stop number.<br />
Specific example<br />
This example is in the directory « /Examples/Post-processors/S7200 ».The file has the same<br />
name as the title of the following chapter.<br />
Interrupt task<br />
Example of calling up a interrupt task<br />
<strong>AUTO</strong>MG<strong>EN</strong> 8 474 ©opyright 1988-2007 <strong>IRAI</strong>
POST-PROCESSORS<br />
Post-processor ALSPA<br />
This post-processor is used to program CEGELEC ALSPA C50 and<br />
C100 processors.<br />
Communication module<br />
Setting communication module parameters<br />
<strong>AUTO</strong>MG<strong>EN</strong> 8 475 ©opyright 1988-2007 <strong>IRAI</strong>
POST-PROCESSORS<br />
Post-processor ZELIO<br />
This post-processor is used to program SECHNEIDER ZELIO modules.<br />
Communication module<br />
Setting communication module parameters<br />
<strong>AUTO</strong>MG<strong>EN</strong> 8 476 ©opyright 1988-2007 <strong>IRAI</strong>
POST-PROCESSORS<br />
Post-processor FESTO<br />
This post-processor is used to program FPC 101, FPC 103 and FEC<br />
FESTO processors .<br />
Communication module<br />
Setting communication module parameters<br />
Generating a binary file<br />
Binary files can be directly generated and downloaded in FPC 101 and<br />
FPC 103 processors. The FST FESTO software workgroup in DOS or<br />
WINDOWS is necessary for FEC processors.<br />
Selecting a CPU type (direct generation of a binary file)<br />
Importation in a FESTO software workgroup<br />
Generation of an AWL file compatible with FESTO workgroups<br />
If you use the FST FESTO software workgroup in DOS, create the AWL<br />
file in this software.<br />
If you use the FST FESTO software in WINDOWS, open the generated<br />
file in <strong>AUTO</strong>MG<strong>EN</strong> by double clicking on « Generated files / FESTO /<br />
Pass 2 », select all the files, use the command « Copy » in the « Edit »<br />
menu and then the command « Paste » in the FESTO software to<br />
retrieve the generated code.<br />
<strong>AUTO</strong>MG<strong>EN</strong> 8 477 ©opyright 1988-2007 <strong>IRAI</strong>
POST-PROCESSORS<br />
Transfer the program to the processor with the FESTO software.<br />
Then you can connect to <strong>AUTO</strong>MG<strong>EN</strong> (after you have disconnected the<br />
FESTO software) by using the « Only connect ».connection mode.<br />
<strong>AUTO</strong>MG<strong>EN</strong> 8 478 ©opyright 1988-2007 <strong>IRAI</strong>
POST-PROCESSORS<br />
Post-processor ALL<strong>EN</strong>-BRADLEY<br />
This post-processor is used to program ROCKWELL SLC processors.<br />
ROCKWELL RSLogix 500 V5 software or higher is required.<br />
Communication module<br />
The RSLogix 500 STARTER version cannot be used<br />
to import files generated by <strong>AUTO</strong>MG<strong>EN</strong>.<br />
Setting communication module parameters<br />
Transferring programs to ROCKWELL RS-Logix 500 Software<br />
In the element below you create a file used for exchange between<br />
<strong>AUTO</strong>MG<strong>EN</strong> and RSLogix 500. This file will be generated after<br />
compilation in <strong>AUTO</strong>MG<strong>EN</strong><br />
<strong>AUTO</strong>MG<strong>EN</strong> 8 479 ©opyright 1988-2007 <strong>IRAI</strong>
POST-PROCESSORS<br />
Generating an .SLC file compatible with RSLogix 500<br />
Launch RSLogix500, then open the .SLC file generated by <strong>AUTO</strong>MG<strong>EN</strong>.<br />
Transfer the program to the processor using the RSLogix 500 software.<br />
After disconnecting the RSLogix 500 software from the processor, you<br />
can tune it from <strong>AUTO</strong>MG<strong>EN</strong> in connected mode.<br />
<strong>AUTO</strong>MG<strong>EN</strong> 8 480 ©opyright 1988-2007 <strong>IRAI</strong>
POST-PROCESSORS<br />
Post-processor TWIDO<br />
This post-processor is used to program SCHNEIDER TWIDO<br />
processors.<br />
Processor configuration selection<br />
The « Configuration / Post-processor / TWIDO / System / Hardware<br />
configuration » element on the browser is used to select the type of<br />
processor.<br />
The « .TWD » file is a configuration file which must be generated with the<br />
SCHNEIDER TWIDOSOFT software workgroup. The sub-directory<br />
« TWIDO » in the <strong>AUTO</strong>MG<strong>EN</strong> installation directory contains the<br />
configuration files for various types of TWIDO processors.<br />
Communication module<br />
<strong>AUTO</strong>MG<strong>EN</strong> 8 481 ©opyright 1988-2007 <strong>IRAI</strong>
POST-PROCESSORS<br />
Post-processor MITSUBISHI<br />
This post-processor is used to program FX series MITSUBISHI<br />
processors. The code generated by <strong>AUTO</strong>MG<strong>EN</strong> can be directly sent to<br />
FX series MITSUBISHI processors or imported in MITSUBISHI FX-WIN<br />
or GX-DEVELOPPER software.<br />
Selecting the type of processor<br />
« Configuration / Post-processor / MITSUBISHI / System / Hardware<br />
configuration» on the browser is used to select the type of PLC.<br />
Communication module<br />
Setting the communication module<br />
<strong>AUTO</strong>MG<strong>EN</strong> 8 482 ©opyright 1988-2007 <strong>IRAI</strong>
POST-PROCESSORS<br />
Transferring programs to MITSUBISHI FX-WIN software<br />
Select FXWIN in the element below.<br />
The English version of FXWIN must be used.<br />
Importation has been validated for the 3.20 version of<br />
FX-WIN.<br />
After compilation in <strong>AUTO</strong>MG<strong>EN</strong>, create a project in FX-WIN. Open the<br />
program in editing, instruction list and select « Enter » in the « Edit »<br />
menu.<br />
Transferring programs to MITSUBISHI GX-DEVELOPPER<br />
software<br />
Select GXDEVELOPPER in the element below.<br />
<strong>AUTO</strong>MG<strong>EN</strong> 8 483 ©opyright 1988-2007 <strong>IRAI</strong>
POST-PROCESSORS<br />
Launch the executable « A7TOGX.EXE » in the <strong>AUTO</strong>MG<strong>EN</strong> installation<br />
directory. After launching it, an icon « A7 → GX » appears in the<br />
WINDOWS icon bar.<br />
After compiling <strong>AUTO</strong>MG<strong>EN</strong>, create a project in GX-DEVELOPPER.<br />
Open the program in editing, instruction list. Press the two SHIFT keys or<br />
the LEFT SHIFT key and the F11 key at the same time for one second.<br />
The program will be transferred to GX-DEVELOPPER.<br />
To uninstall « A7TOGX » click on the icon with the right side of the<br />
mouse. You can leave « A7TOGX » installed as long as it is necessary,<br />
so you do not need to install and uninstall it every time you want to<br />
import an application in GX-DEVELOPPER.<br />
<strong>AUTO</strong>MG<strong>EN</strong> 8 484 ©opyright 1988-2007 <strong>IRAI</strong>
POST-PROCESSORS<br />
Post-processor MITSUBISHI-Q<br />
This post-processor is used to program Q series MITSUBISHI<br />
processors. The code generated by <strong>AUTO</strong>MG<strong>EN</strong> must be imported in<br />
MITSUBISHI GX-DEVELOPPER software.<br />
Communication module<br />
Setting the communication module<br />
Transferring programs to MITSUBISHI GX-DEVELOPPER<br />
software<br />
Launch the executable « A7TOGX.EXE » in the <strong>AUTO</strong>MG<strong>EN</strong> installation<br />
directory. After launching it, an icon « A7 → GX » appears in the<br />
WINDOWS icon bar.<br />
After compiling <strong>AUTO</strong>MG<strong>EN</strong>, create a project in GX-DEVELOPPER.<br />
Open the program in editing, instruction list. Press the two SHIFT keys or<br />
the LEFT SHIFT key and the F11 key at the same time for one second.<br />
The program will be transferred to GX-DEVELOPPER.<br />
To uninstall « A7TOGX » click on the icon with the right side of the<br />
mouse. You can leave « A7TOGX » installed as long as it is necessary,<br />
so you do not need to install and uninstall it every time you want to<br />
import an application in GX-DEVELOPPER.<br />
<strong>AUTO</strong>MG<strong>EN</strong> 8 485 ©opyright 1988-2007 <strong>IRAI</strong>
Post-processor GEM<br />
This post-processor is used to program GEM PLCs.<br />
Communication module<br />
Setting the communication module<br />
POST-PROCESSORS<br />
For setting the communication module parameters, launch the<br />
ESPLINK.EXE file into the <strong>AUTO</strong>MG<strong>EN</strong> installation directory and select<br />
the “Edit / Setup Comms ...” menu.<br />
<strong>AUTO</strong>MG<strong>EN</strong> 8 486 ©opyright 1988-2007 <strong>IRAI</strong>
POST-PROCESSORS<br />
Post-processor ZELIO 2<br />
This post-processor allows the SCHNEIDER ZELIO 2 modules to be<br />
programmed.<br />
Initializing the automaton<br />
Before it can be used with <strong>AUTO</strong>MG<strong>EN</strong>, the LD firmware must be<br />
downloaded into the ZELIO 2 automaton with the ZELIOSOFT software<br />
from SCHNEIDER.<br />
Configuring the module<br />
The automaton must be configured with the ZELIOSOFT software from<br />
SCHNEIDER and downloaded into the automaton with the same<br />
software before downloading the application with <strong>AUTO</strong>MG<strong>EN</strong>.<br />
Communication module<br />
Parameterizing the communication module<br />
<strong>AUTO</strong>MG<strong>EN</strong> 8 487 ©opyright 1988-2007 <strong>IRAI</strong>
POST-PROCESSORS<br />
Post-processor PANASONIC<br />
This post-processor allows the PANASONIC automatons to be<br />
programmed. PANASONIC’s FP WIN Pro 5 software must be installed<br />
on the PC in order to be able to compile and transfer the program<br />
generated by <strong>AUTO</strong>MG<strong>EN</strong> to the automatons.<br />
PANASONIC’s FP WIN Pro 5 software must be launched before you can<br />
launch a compilation or an execution for a PANASONIC automaton with<br />
<strong>AUTO</strong>MG<strong>EN</strong>.<br />
Selecting the configuration of the automaton<br />
The browser’s “Configuration / Post-processor / PANASONIC / System /<br />
Equipment configuration” element allows the type of automaton to be<br />
selected.<br />
The “.asc” file is a configuration file that must be generated with<br />
PANASONIC’s FP WIN Pro 5 software workshop by using the “Export a<br />
project” application of this software’s “Project” menu.<br />
Communication module<br />
<strong>AUTO</strong>MG<strong>EN</strong> 8 488 ©opyright 1988-2007 <strong>IRAI</strong>