
Create successful ePaper yourself
Turn your PDF publications into a flip-book with our unique Google optimized e-Paper software.
oller must be newly adjusted.<br />
Caution! Danger of injury!<br />
Adjustments of the sanding belt while the machine is runnin<br />
is open may only be performed by qualified personnel (in a<br />
§ 41 adjustment).<br />
Contents<br />
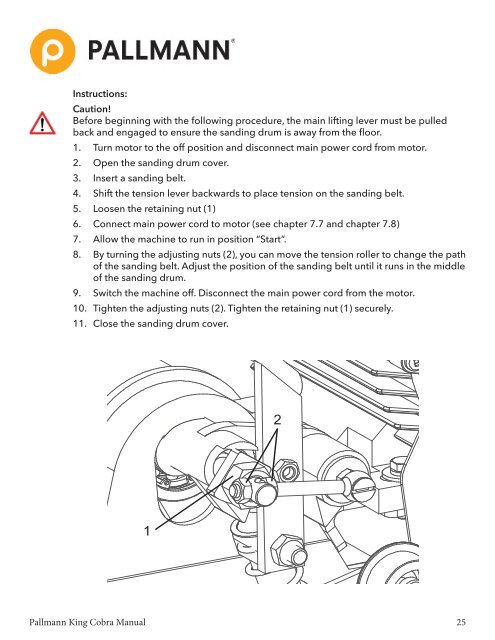
Instructions:<br />
Caution!<br />
Caution!<br />
Before beginning with the following fatal procedure, the main lifting lever must be pulled<br />
1 Introduction..................................................................................................................................................................... back and engaged to ensure the sanding drum is away from the floor. 4<br />
2 Scope 1. of delivery Turn ............................................................................................................................................................ motor to the off position and disconnect main power cord from motor. 5<br />
3<br />
3.1<br />
Machine 2. specifications Open<br />
Instructions:<br />
the COBRA sanding CLASSIC drum ................................................................................................................... cover.<br />
Important 3. components Insert ...................................................................................................................................................... a sanding belt.<br />
6<br />
6<br />
3.2 Technical data .................................................................................................................................................................. 7<br />
4. Shift the tension lever backwards to place tension on the sanding belt.<br />
3.3 Safety and machine Caution!<br />
protection facilities............................................................................................................................ 7<br />
5. Loosen the retaining nut (1)<br />
4<br />
5<br />
Proper use .......................................................................................................................................................................<br />
6. Connect main power cord to motor (see chapter 7.7 and chapter 7.8)<br />
Assembly 7. of Allow the machine............................................................................................................................................... the to run position “Start”.<br />
7<br />
8<br />
5.1<br />
5.2<br />
Installing 8. the guide By turning tube ................................................................................................................................................... the adjusting nuts (2), you can move the tension roller to change 8 the path<br />
Installing the motor of the ........................................................................................................................................................... sanding belt. Adjust the position of the sanding belt until it runs in 8the middle<br />
of the sanding mains drum.<br />
6 Disassembling for transport .........................................................................................................................................<br />
power.<br />
9<br />
6.1 Removing 9. the Switch guide 2. tube Open the ................................................................................................................................................ machine the off. sanding Disconnect drum the main cover. power cord from the motor. 9<br />
6.2<br />
7<br />
Removing 10. the Tighten motor..........................................................................................................................................................<br />
3. Insert the adjusting a sanding nuts (2). Tighten belt. the retaining nut (1) securely.<br />
Operating 11. the Close COBRA the CLASSIC sanding .................................................................................................................................. drum cover.<br />
10<br />
11<br />
7.1 Protective clothing and equipment .................................................................................................................................. 11<br />
7.2 Fitting the dust bag ........................................................................................................................................................ 11<br />
7.3 Safety instructions regarding dust .................................................................................................................................... 12<br />
7.4 Disposing of sanding dust ............................................................................................................................................... 12<br />
7.5 Replacing the sanding belt .............................................................................................................................................. 13<br />
7.6 Adjusting the sanding pressure ....................................................................................................................................... 14<br />
7.7 Safety instructions for electric cable and connectors ...................................................................................................... 14<br />
7.8 Connecting the COBRA CLASSIC to the mains power .................................................................................................. 15<br />
7.9 Remarks about sanding parquet and plank floors .......................................................................................................... 16<br />
7.10 <strong>Sanding</strong> with the COBRA CLASSIC ...............................................................................................................................<br />
2<br />
19<br />
Wear safety goggles and avoid loose clothing before maki<br />
Before beginning with the following procedure, the main li<br />
backwards to remove the sanding drum from the floor.<br />
1. Make sure that the motor is in the off position and the mach<br />
4. Shift the tension lever backwards to place tension on the sa<br />
8 Maintenance ................................................................................................................................................................... 24<br />
8.1 Changing the sanding drum ............................................................................................................................................ 24<br />
8.2 Adjusting the running wheels .......................................................................................................................................... 26<br />
8.3 Adjusting the castor wheels ............................................................................................................................................ 27<br />
8.4 Adjusting the tension roller ............................................................................................................................................... 28<br />
8.5 Changing the belt.............................................................................................................................................................. 29<br />
8.6 Checking dust extraction ................................................................................................................................................. 30<br />
8.7 Switching off and storing the machine ............................................................................................................................ 30<br />
1<br />
9 Declaration of conformity .............................................................................................................................................. 31<br />
10 Warranty........................................................................................................................................................................... 32<br />
5. Loosen the retaining nut (1).<br />
Pallmann <strong>King</strong> <strong>Cobra</strong> <strong>Manual</strong> 25