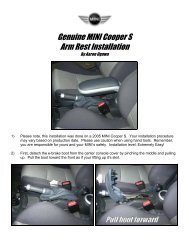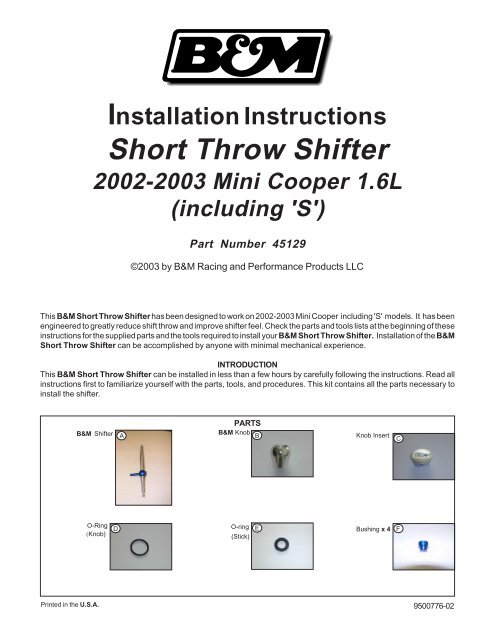
Installation Instructions Short Throw Shifter 2002-2003 Mini Cooper ...
Installation Instructions Short Throw Shifter 2002-2003 Mini Cooper ...
Installation Instructions Short Throw Shifter 2002-2003 Mini Cooper ...

You also want an ePaper? Increase the reach of your titles
YUMPU automatically turns print PDFs into web optimized ePapers that Google loves.
<strong>Installation</strong> <strong>Instructions</strong><br />
<strong>Short</strong> <strong>Throw</strong> <strong>Shifter</strong><br />
<strong>2002</strong>-<strong>2003</strong> <strong>Mini</strong> <strong>Cooper</strong> 1.6L<br />
(including 'S')<br />
Part Number 45129<br />
©<strong>2003</strong> by B&M Racing and Performance Products LLC<br />
This B&M <strong>Short</strong> <strong>Throw</strong> <strong>Shifter</strong> has been designed to work on <strong>2002</strong>-<strong>2003</strong> <strong>Mini</strong> <strong>Cooper</strong> including 'S' models. It has been<br />
engineered to greatly reduce shift throw and improve shifter feel. Check the parts and tools lists at the beginning of these<br />
instructions for the supplied parts and the tools required to install your B&M <strong>Short</strong> <strong>Throw</strong> <strong>Shifter</strong>. <strong>Installation</strong> of the B&M<br />
<strong>Short</strong> <strong>Throw</strong> <strong>Shifter</strong> can be accomplished by anyone with minimal mechanical experience.<br />
INTRODUCTION<br />
This B&M <strong>Short</strong> <strong>Throw</strong> <strong>Shifter</strong> can be installed in less than a few hours by carefully following the instructions. Read all<br />
instructions first to familiarize yourself with the parts, tools, and procedures. This kit contains all the parts necessary to<br />
install the shifter.<br />
Printed in the U.S.A.<br />
B&M <strong>Shifter</strong> A<br />
PARTS<br />
B&M Knob B<br />
O-Ring<br />
(Knob) D O-ring<br />
(Stick)<br />
Knob Insert C<br />
E Bushing x4<br />
F<br />
9500776-02
Pivot Cup G<br />
Grease J<br />
DISASSEMBLY<br />
STEP 1. Park vehicle on a level area and allow time to let<br />
cool. Carefully raise and support vehicle.<br />
TOOLS:Floor Jack, Jack Stands x4<br />
Hex Screw x4 H<br />
TOOLS<br />
Torx Drive (T-40) Screwdriver<br />
(flat head x2)<br />
Jack Stands x4 Wrench<br />
(10,12,13,14mm)<br />
Extension<br />
Hex Wrench (6mm)<br />
Socket<br />
(10,12,13,14mm)<br />
Tie Wrap<br />
Ratchet<br />
Pliers &/or<br />
Channel locks<br />
I<br />
Jack
STEP 2. Remove O2 sensor wire from the wire hanger.<br />
Note: Entire O2 sensor does NOT need to be removed!<br />
STEP 3. Unbolt the (6) exhaust support plate bolts.<br />
Maneuver the (2) rubber exhaust hangers and lower<br />
the exhaust support plate. Remove the (2) rubber<br />
exhaust hangers from the rear hangers near the<br />
muffler.<br />
TOOLS: Socket (10mm) , Ratchet, and Extension.<br />
STEP 4. Unbolt center exhaust flange (2) bolts for easy<br />
access to the shifter. Remove the front and<br />
rear heat shields.<br />
OPTIONAL: Rear exhaust may be dropped and<br />
hung.<br />
TOOLS:14mm Wrench, 14mm Socket, 10mm Socket,<br />
Ratchet<br />
STEP 5. Un-clip and remove the lower shifter base plate with<br />
a flat head screwdriver. Pull down and remove the<br />
fore-aft cable.<br />
TOOL: Flat head screwdriver
STEP 6. Pry the left-right cable off with a flat head<br />
screwdriver.<br />
TOOL: Flat head screwdriver<br />
STEP 7. Remove the cable clips and detach both cables<br />
from shifter housing with channel lock pliers.<br />
TOOL: Channel lock pliers<br />
STEP 8. Remove knob by pulling up. Excessive force may<br />
be required. BE CAREFUL!<br />
Note: There are two prongs inside the knob that may be<br />
pryed apart with a flathead screwdriver to ease the<br />
removal.<br />
STEP 9. Remove shifter bezel by pulling up carefully. Cut<br />
off the tie strap to remove shift boot from the<br />
shifter stick.<br />
a
STEP 10. Pry the 3 tabs on the shifter cup using 2 small Flat<br />
head Screwdrivers simultaneously.<br />
TOOLS:(2) small flat head screwdrivers.<br />
STEP 11. Pull up and remove the pivot retainer.<br />
STEP 12. Maneuver the shifter stick and pivot arm in<br />
opposing directions. Pull up on the shifter stick to<br />
remove.<br />
STEP 13. Remove the (4) screws and lower the shifter base<br />
from the bottom of the car.<br />
TOOLS: Flat head screwdriver and Torx driver (T-40)
STEP 14. Remove stud/bushings (4) assembly from the<br />
shifter base.<br />
STEP 15.<br />
*OPTIONAL: For best performance, use the B&M solid bush<br />
ings. However, vibration may occur. Detach the<br />
rubber bushings from the shifter base gasket.<br />
Place the rubber gasket back onto theshifter base.<br />
NOTE: The rubber bushings will be replaced with the B&M<br />
solid bushings when bolting the shifter base back<br />
into the car. Keep the old rubber bushings.<br />
ASSEMBLY<br />
STEP 16. Slide the new B&M O-ring (stick) E from the<br />
bottom of the B&M <strong>Shifter</strong> A to the groove right<br />
below the pivot ball.<br />
STEP 17. Remove the (2) foam spacers from the stock<br />
<strong>Mini</strong> <strong>Cooper</strong> stick and re-install them on the B&M<br />
shifter A .<br />
E<br />
A<br />
A
STEP 18. Lubricate the pivot ball on all areas of movement<br />
with the Grease J and insert B&M <strong>Shifter</strong> A into<br />
the shifter base.<br />
STEP 19. Install B&M Pivot Cup G to pivot ball of the B&M<br />
Stick A by pressing down on a hard table/surface.<br />
STEP 20. Re-install the shifter base assembly and gasket<br />
from the bottom of the car using the (4) B&M<br />
bushings F and (4) Hex screws H .<br />
TOOL: Hex Wrench (6mm)<br />
STEP 21. Re-install the (2) shifter cable clips by pressing<br />
them up.<br />
A<br />
A<br />
A<br />
G<br />
F<br />
H<br />
J
STEP 22. Re-install the original pivot retainer into the shifter<br />
base by aligning the 3 tabs and locking them in.<br />
NOTE: Install the pivot retainer before re-attaching the<br />
shifter cables.<br />
STEP 23. Re-install shifter cables to the pivot balls using<br />
pliers. Press the bottom shifter plate back onto the<br />
shifter base.<br />
TOOL: Pliers<br />
STEP 24. Re-install front and rear exhaust heat shields. Reconnect<br />
the exhaust and tighten exhaust flange (2)<br />
bolts securely. Insert 02 sensor wire back to its<br />
original secure position.<br />
TOOLS:14mm Wrench, 14mm Socket, 10mm Socket,<br />
Ratchet<br />
STEP 25. Re-attach the (2) rubber exhaust hangers and the<br />
exhaust support plate. Bolt the (6) exhaust support<br />
plate bolts. Also, re-attach the (2) rear exhaust<br />
hangers located right before the muffler.<br />
TOOLS: Socket (10mm) , Ratchet, and Extension.
STEP 26. Re-attach shift boot with a tie-strap I .<br />
STEP 27. Install the stock knob by pressing down firmly<br />
(B&M Knob B is optional). Press down the shift<br />
boot bezel into the shifter console.<br />
OPTIONAL: Stock OEM Knob may be used.<br />
STEP 28. Install O-Ring (Knob) D onto Knob Insert C .<br />
STEP 29. Align and press Knob Insert C into B&M knob B .<br />
D<br />
C<br />
I<br />
B<br />
C<br />
B
STEP 30. Test movement of shifter into all gears. DO NOT<br />
operate vehicle until all gears can be fully engaged<br />
smoothly.<br />
STEP 31. Carefully raise vehicle, remove (4) Jack Stands,<br />
and lower vehicle.<br />
TOOLS:Floor Jack, Jack Stands (4)<br />
STEP 32. Be Safe and Enjoy!