


Create successful ePaper yourself
Turn your PDF publications into a flip-book with our unique Google optimized e-Paper software.
.equella.ecollege.com/file/5e651ec8-89f7-44f0-95d4-d1b272ff2a8b/1/<strong>BIS</strong><strong>261</strong>_W6_<strong>iLab</strong>.html#top">Back to Top<br />
Based on your final list of classes from Step 4, draw a domain model class diagram showing the classes involved in<br />
the Rent a Game use case. Your diagram should include at least five classes, at least two attributes for each class,<br />
and class relationships with multiplicities. To create this diagram:<br />
1. If necessary, log in to the Citrix <strong>iLab</strong>, open the Microsoft Applications folder, launch Microsoft Visio, and open<br />
the LastName_W6_<strong>iLab</strong>.vsd file that you created in Step 2;<br />
2. Right-click on the sheet tab labeled Use Case-1 at the bottom of the window, and select Insert Page, as<br />
shown:<br />
.equella.ecollege.com/file/5e651ec8-89f7-44f0-95d4-d1b272ff2a8b/1/images--w6_ilab_08.gif"><br />
1. In the Page Setup dialog, enter Class Diagram-2 in the Name box as shown:<br />
.equella.ecollege.com/file/5e651ec8-89f7-44f0-95d4-d1b272ff2a8b/1/images--w6_ilab_09.gif"><br />
Click OK to close the dialog.<br />
1. Using the drop-down list in the toolbar, set the zoom level to 100%.<br />
2. In the Shapes toolbox, click the UML Static Structure heading to expand it.<br />
3. For each class that you identified in Step 4, drag a class symbol from the Shapes toolbox onto the diagram.<br />
After dropping each class onto the diagram, while the class is still selected, type the name of the class. The<br />
class name should appear in the top third of the class symbol. Click outside of the class shape to deselect it.<br />
4. Right-click on each class and select Properties. In the UML Class Properties dialog, under Categories on the<br />
left, select Attributes. In the Attributes grid on the right, click in the first blank cell in the Attribute column, enter<br />
the name of an attribute, and press Enter. You should enter at least two attributes for each<br />
class..equella.ecollege.com/file/5e651ec8-89f7-44f0-95d4-d1b272ff2a8b/1/images--w6_ilab_10.gif"><br />
Click OK to close the dialog after entering your attributes. You should see the attributes displayed in the middle third of<br />
the class symbol, as shown: .equella.ecollege.com/file/5e651ec8-89f7-44f0-95d4-d1b272ff2a8b/1/images--<br />
w6_ilab_11.gif"><br />
1. For each relationship between two classes, drag a binary association line from the Shapes toolbox onto the<br />
diagram. Connect the endpoints of the binary association line to the related classes in the same way that you<br />
connected the endpoints of the Communicates lines to actors and use cases in Step 2.<br />
2. To remove the end labels from the binary association lines, right-click on the binary association line and select<br />
Shape Display Options. In the UML Shape Display Options dialog, under End options, uncheck the boxes for<br />
First end name and Second end name. Ensure that the box for End multiplicities is checked. Near the bottom<br />
of the dialog, check the box for Apply to subsequently dropped UML shapes . . . Click OK.<br />
.equella.ecollege.com/file/5e651ec8-89f7-44f0-95d4-d1b272ff2a8b/1/images--w6_ilab_12.gif"><br />
1. To designate multiplicities for each relationship, right-click on the binary association line and select Properties.<br />
In the UML Association Properties dialog, select Association under Categories on the left. In the Association<br />
Ends grid on the right, click on each cell in the Multiplicity column and use the drop-down list to select the<br />
desired multiplicity, as shown: .equella.ecollege.com/file/5e651ec8-89f7-44f0-95d4-d1b272ff2a8b/1/images--<br />
w6_ilab_13.gif"><br />
After setting the multiplicity for each end, click OK to close the dialog.<br />
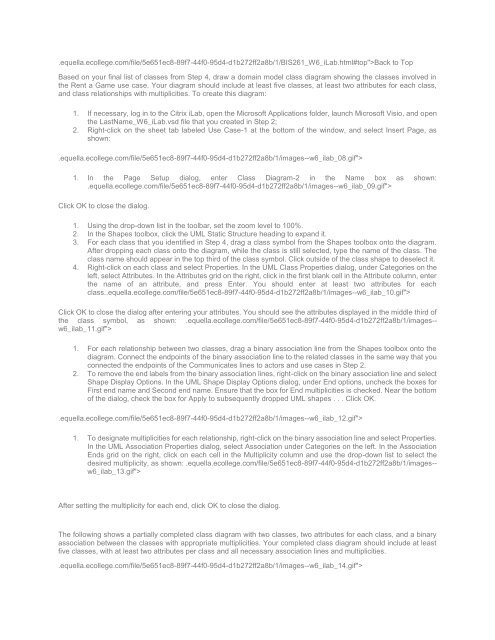
The following shows a partially completed class diagram with two classes, two attributes for each class, and a binary<br />
association between the classes with appropriate multiplicities. Your completed class diagram should include at least<br />
five classes, with at least two attributes per class and all necessary association lines and multiplicities.<br />
.equella.ecollege.com/file/5e651ec8-89f7-44f0-95d4-d1b272ff2a8b/1/images--w6_ilab_14.gif">


