
Create successful ePaper yourself
Turn your PDF publications into a flip-book with our unique Google optimized e-Paper software.
Draft Version - Draft Version - Draft Version - Draft Version - Draft Version<br />
Description of <strong>Mini</strong>-<strong>Panel</strong><br />
The mini-panel is primarily intended to make it easy to build control panels for yards,<br />
towns, interlockings and other layout applications. A secondary use of the panel is to<br />
provide rudimentary automation of trains or control of signals. For more complex<br />
automation or signal operation the Macro-panel has more comprehensive<br />
implementation of these secondary features and more memory for command storage.<br />
The mini panel has 30 inputs that can be connected to pushbuttons, toggle switches,<br />
block detectors, etc. for the purpose of issuing accessory, macro or locomotive control<br />
commands. A thirty-first input is provided to act as a panel reset. Activation of an<br />
input can initiate sending a string of DCC commands through the track to turnouts,<br />
locomotives, signals or other DCC controlled devices. Inputs are activated by<br />
connecting them to the mini panel “GROUND”. This makes the mini panel compatible<br />
with all pushbutton/toggle switches and most block detectors.<br />
The mini-panel communicates with the command station via the cab bus and uses one<br />
cab bus address.<br />
Setup (programming) of the mini-panel is accomplished by plugging a ProCab or NCE<br />
USB adapter into the “setup” jack. If USB is used the mini-panel memory is accessed<br />
via binary CV read and write commands (page or direct mode). USB jumpers should<br />
be set for PowerCab v1.28 or ALL SYS. CV7 and CV8 return the manufacturer<br />
number and version of the <strong>Mini</strong> <strong>Panel</strong> as with a decoder when used with the USB<br />
interface.<br />
Installation Notes:<br />
The mini panel runs off Cab Bus power (nominal 12V DC) and draws about 90mA of<br />
current, slightly less than a ProCab. NOTE: When used with the PowerCab use the<br />
mini panel default address of 3.<br />
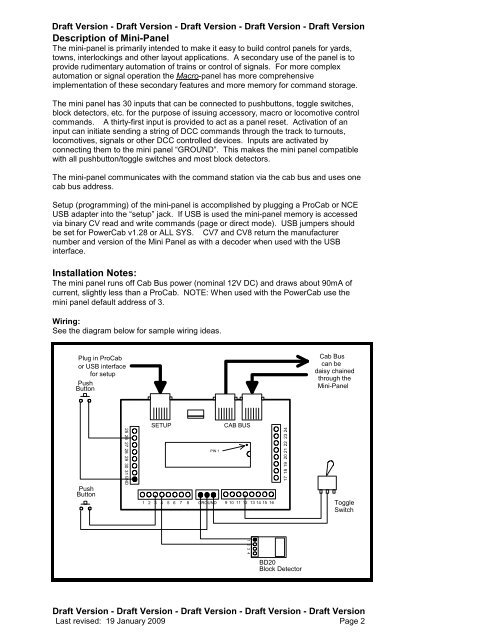
Wiring:<br />
See the diagram below for sample wiring ideas.<br />
Plug in ProCab<br />
or USB interface<br />
for setup<br />
Push<br />
Button<br />
Push<br />
Button<br />
25 26 27 28 29 30 31 GND<br />
SETUP CAB BUS<br />
PIN 1<br />
1 2 3 4 5 6 7 8 GROUND 9 10 11 12 13 14 15 16<br />
1 2 3 4<br />
17 18 19 20 21 22 23 24<br />
BD20<br />
Block Detector<br />
Cab Bus<br />
can be<br />
daisy chained<br />
through the<br />
<strong>Mini</strong>-<strong>Panel</strong><br />
Toggle<br />
Switch<br />
Draft Version - Draft Version - Draft Version - Draft Version - Draft Version<br />
Last revised: 19 January 2009 Page 2