
Create successful ePaper yourself
Turn your PDF publications into a flip-book with our unique Google optimized e-Paper software.
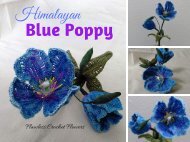
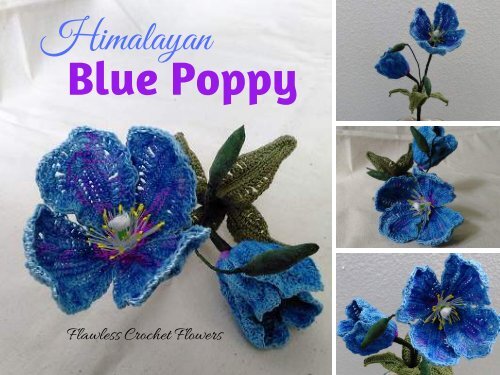
<strong>Himalayan</strong><br />
<strong>Blue</strong> <strong>Poppy</strong><br />
Flawless Crochet Flowers
Lebron, the owner of Flawless Crochet Flowers<br />
Leticia<br />
the copyright holder and designer of this pattern. By<br />
is<br />
means do you have the right to reproduce, distribute<br />
no<br />
sell, or transmit this pattern in any form whether<br />
copies,<br />
or recorded without the consent of Leticia<br />
written<br />
This includes photocopying.<br />
Lebron.<br />
do have rights over any flowers that you have made<br />
You<br />
my patterns. You can use your flowers for personal<br />
from<br />
commercial use as long as it is not in mass<br />
or<br />
and you credit me as the designer by<br />
production<br />
you're not sure whether or not you are violating my<br />
If<br />
please contact me before proceeding.<br />
policies,<br />
remember that you are NOT allowed to share<br />
Please<br />
pattern.<br />
this<br />
Copyright Policy<br />
sharing a link to my website.<br />
1
you have any questions or concerns, you can use<br />
If<br />
of the links below to reach out to me. I'll be<br />
any<br />
flower group:<br />
FB<br />
https://www.facebook.com/groups/flawlesscroch<br />
personal page:<br />
My<br />
https://www.facebook.com/LebronLeticia<br />
Contact Info<br />
happy to help!<br />
Facebook:<br />
etflowers/<br />
Email: flawlesscrochetflowers@gmail.com<br />
You can also find me on<br />
2
grandis, known as the <strong>Blue</strong> poppy, was thought to be the the<br />
Meconopsis<br />
flower of Bhutan. However, in 2017, after three years of study<br />
national<br />
by the National Biodiversity Centre, Bhutan, and the <strong>Blue</strong> <strong>Poppy</strong><br />
conducted<br />
in Japan, it was found that the national flower of Bhutan was<br />
Society<br />
as Meconopsis grandis. According to wiki, Meconopsis grandis is<br />
misidentified<br />
found in Bhutan and the earlier <strong>Blue</strong> <strong>Poppy</strong> was named based on<br />
not<br />
Poppies have a reputation of being difficult to grow, but these plants can<br />
<strong>Blue</strong><br />
grown successfully if you follow a few basic guidelines.<br />
be<br />
to Meconopsis.ca, Meconopses belong to the poppy family<br />
According<br />
but they are not true poppies (papaver), which are mainly<br />
(papaveraceae),<br />
to North America and Europe. The name meconopsis comes from Greek,<br />
native<br />
means “poppy-like.” (The word papaver is Latin and was the name given to<br />
and<br />
poppy in ancient Rome. It is thought to represent the sound of poppy seeds<br />
the<br />
chewed!)<br />
being<br />
<strong>Himalayan</strong> <strong>Poppy</strong><br />
specimens collected in 1933.<br />
3<br />
<strong>Blue</strong> poppies are used to help with pains, heart disease, diarrhea, and coughs.
Light <strong>Blue</strong> Aunt Lydia's #10 thread<br />
*<br />
Green Aunt Lydia's #10 thread<br />
*<br />
White Aunt Lydia's #10 thread<br />
*<br />
Green Floral Tape<br />
*<br />
White Floral Tape<br />
*<br />
22 gauge wires<br />
*<br />
18 gauge wires<br />
*<br />
US 5 (1.7mm) Susan Bates crochet<br />
*<br />
Scissors and Pliers/ tweezers<br />
*<br />
Paper Towel<br />
*<br />
Yellow paint<br />
*<br />
Royal blue, bright purple and lime<br />
*<br />
chalks<br />
green<br />
Glue/Glue Gun<br />
*<br />
Modge Podge<br />
*<br />
Flat paint brush<br />
*<br />
Ch(s) - Chain(s)<br />
*<br />
Sl st - Slip Stitch<br />
*<br />
Sc- Single Crochet<br />
*<br />
Hdc- Half Double Crochet<br />
*<br />
DC- Double Crochet<br />
*<br />
Tr- Treble Crochet or Triple<br />
*<br />
Materials<br />
* Markers (optional)<br />
Easy Level<br />
This Pattern Uses US Terminology<br />
hook<br />
Abbreviations<br />
Additional Materials<br />
Crochet<br />
4<br />
* Fabric Stiffener
- yarn over, pull through the loop<br />
Chain<br />
the hook.<br />
on<br />
stitch- insert hook into stitch, yarn<br />
Slip<br />
pull through both loops on hook.<br />
over,<br />
crochet- insert hook into stitch,<br />
Single<br />
over, pull through stitch, yarn over,<br />
yarn<br />
crochet- yarn over, insert<br />
Half-double<br />
into stitch, yarn over, pull through<br />
hook<br />
yarn over, pull through all 3 loops<br />
stitch,<br />
hook. on<br />
yarn over , insert hook<br />
Double-crochetstitch,<br />
yarn over, pull through stitch,<br />
into<br />
over, pull through first two loops on<br />
yarn<br />
yarn over, pull through last two<br />
hook,<br />
crochet or triple crochet- yarn<br />
Treble<br />
two times, insert hook into stitch,<br />
over<br />
over, pull through stitch, yarn over,<br />
yarn<br />
through first 2 loops on hook, yarn<br />
pull<br />
pull through next two loops on hook,<br />
over,<br />
over, pull through the last two loops<br />
yarn<br />
Double Crochet Two<br />
Hdc2tog--Half<br />
Together--<br />
over hook, insert hook into stitch (st),<br />
Yarn<br />
up a loop, you should have 3 loops<br />
pull<br />
hook. Yarn over hook, insert hook into<br />
on<br />
st, pull up a loop, 5 loops on hook.<br />
next<br />
over hook, pull through all 5 loops<br />
Yarn<br />
hook on<br />
Stitch Guide<br />
on the hook.<br />
pull through both loops on hook.<br />
5<br />
loops on the hook.
US/UK Conversions<br />
Single crochet<br />
Double crochet<br />
Half double crochet<br />
Half treble<br />
crochet<br />
Double crochet<br />
Treble crochet<br />
Treble crochet<br />
Double treble<br />
crochet<br />
Double treble crochet<br />
Triple treble<br />
crochet<br />
Gauge<br />
Tension<br />
Skip<br />
Miss<br />
6
1 stamen per flower<br />
Make<br />
measurement 1/2" long<br />
Final<br />
1- Sc in the second ch from the hook, sc in<br />
Row<br />
of the next 13 chs across. Ch 1, and fasten<br />
each<br />
will now make fringes to create the<br />
We<br />
stamens.<br />
2- Let's begin to add fringes! Add 2<br />
Step<br />
of thread in each st.<br />
pieces<br />
Creating The Stamens<br />
With white thread, Ch 15<br />
off the thread.<br />
Step 1- Cut 28-30 pieces of 4" white thread.<br />
7
3- Lay the stamen piece on a flat surface.<br />
Step<br />
an old brush to add modge podge to your<br />
Use<br />
Do not add any glue to the foundation<br />
fringes.<br />
row.<br />
4- Brush the fringes in a downward<br />
Step<br />
making sure that the strands are<br />
direction<br />
Creating The Stamens<br />
separated.<br />
Step 5- Leave to dry completely!<br />
8
1- With white floral tape, wrap the first 2<br />
Step<br />
of an 11" (18 gauge) wire... going down and<br />
1/2"<br />
2- Roll a tiny piece of paper towel into a<br />
Step<br />
Add glue to the bottom of the paper towel<br />
ball.<br />
Creating The Stigma<br />
Make 1 stigma per flower<br />
up the stem 5 times.<br />
and place it on top of the stem.<br />
9
1- Fold a 4" x 4" (toilet paper<br />
Step<br />
in half twice.<br />
square)<br />
2- Make a loop at the tip of a<br />
Step<br />
18 gauge wire. Cover the loop with<br />
9"<br />
folded paper towel and wrap it<br />
the<br />
green floral tape.<br />
with<br />
the entire paper towel<br />
Cover<br />
a point at the top.<br />
creating<br />
the flower buds on an angle<br />
Bend<br />
seen in the last image.<br />
as<br />
Creating The Flower Buds<br />
Make at least 2 flower buds.<br />
10
4 petals per flower<br />
Make<br />
measures 2 1/2" x 2"<br />
Petal<br />
1- sc in the second ch from the hook, sc in<br />
Rnd<br />
of the next 17 chs across, make 3 sc into<br />
each<br />
the opposite side, sc in each of the next 18<br />
On<br />
Sl st in the first st on the opposite side to<br />
chs.<br />
Making The Petals<br />
With light blue thread, ch 20<br />
the last ch.<br />
join.<br />
Add a 14" (24 gauge) wire with a sl st.<br />
11
2- Sc in each of the next 18 sts, bend the<br />
Rnd<br />
down evenly.<br />
wire<br />
a sc in each of the last 20 sts. Sl st in the<br />
Make<br />
st on the opposite side. Ch 1<br />
first<br />
Making The Petals<br />
12
3- Sc in each of the next 2 sts, hdc in the<br />
Rnd<br />
2 sts, dc in the next 5 sts, tr in each of the<br />
next<br />
18 sts, dc in the next 5 sts, hdc in the next<br />
next<br />
sts, sc in the next 3 sts, Ch 1.<br />
2<br />
st in the first working st on the opposite side.<br />
Sl<br />
1. Ch<br />
Making The Petals<br />
13
4- Sc in each of the next 2 sts, hdc in the<br />
Rnd<br />
st, dc in the next 5 sts, (2 tr in the next st,<br />
next<br />
dc in the next st) work in parenthesis 4 times.<br />
2<br />
in the next st, sl st in the next st.<br />
Sc<br />
the opposite side, sc in the next st, (2dc in<br />
On<br />
next st, 2 tr in the next st) work in<br />
the<br />
4 times. Dc in the next 5 sts, hdc in<br />
parenthesis<br />
next st, sc in each of the last 3 sts.<br />
the<br />
st in the first st on the opposite side, Ch 1,<br />
Sl<br />
off the thread.<br />
fasten<br />
Finishing The Petals<br />
14
1- Lay petals flat and spray with fabric<br />
Step<br />
stiffener.<br />
2- Pinch around the edges to manipulate<br />
Step<br />
ruffles on rnd 4 of the petal.<br />
the<br />
Preparing The Petals<br />
Curve the petals upward into a chair position.<br />
Repeat for all petals.<br />
15
as many leaves as you'd like and place<br />
Make<br />
going down the stem.<br />
them<br />
1- sc in the second ch from the hook, sc in<br />
Rnd<br />
of the next 28 chs across. Ch 3.<br />
each<br />
down the opposite side of chs, sc in<br />
Going<br />
of the next 29 chs across. Sl st in the first<br />
each<br />
on the opposite side to join. (Add 14"- 18"<br />
st<br />
with a sl st).<br />
wire<br />
Making The Leaf<br />
Leaf Measures 3 1/2" x 1 1/4"<br />
With Green thread, Ch 30<br />
16
2- Crocheting over the wire, sc in the the<br />
Rnd<br />
st, hdc in the next st, dc in each of the next<br />
first<br />
sts, tr in the next 3 sts, Quad in each of the<br />
5<br />
7 sts, tr in the next 3 sts, dc in the next 3<br />
next<br />
hdc in the next st, sc in each of the next 4<br />
sts,<br />
(Bend the wire down evenly).<br />
sts.<br />
all of the following in the Ch-3 space [sc,<br />
Make<br />
4, (sl st in the second ch from the hook, sl<br />
ch<br />
Making The Leaf<br />
st in the next ch, sc in the last ch), sc]<br />
17
down the opposite side, sc in the next 4<br />
Going<br />
hdc in the next st, dc in the next 3 sts, tr in<br />
sts,<br />
next 3 sts, Quad in each of the next 7 sts, tr<br />
the<br />
the next 3 sts, dc in the next 5 sts, hdc in the<br />
in<br />
st in the first st on opposite side, ch 1, fasten<br />
Sl<br />
the thread. Do not weave in end. Wrap the<br />
off<br />
with green floral tape including the loose<br />
stem<br />
end.<br />
Finishing The Leaf<br />
next st, sc in the last 2 sts.<br />
18
note that this is optional. You can also use eyeliner/makeup<br />
Please<br />
a great alternative to chalk as many other members do.<br />
as<br />
applying chalk to my flowers, I use a metal strainer to transform the<br />
When<br />
into a powder. I pretty much rub the chalk onto the wire strainer over<br />
chalk<br />
piece of writing paper, and then pour the chalk into a small container<br />
a<br />
later use.<br />
for<br />
I would do next is take a paint brush, and brush the powdered chalk<br />
What<br />
little at a time) onto the areas that I want to add a pop of color. I<br />
(a<br />
do this over a piece of writing paper with a paper towel<br />
would<br />
just in case the excess is enough to go right back into the<br />
underneath...<br />
highly recommend doing this outside or next to an open window for<br />
I<br />
ventilation.<br />
good<br />
Creating Chalk Dust<br />
container, while the paper towel saves for cleaning up.<br />
19
1- The stamen piece should be<br />
Step<br />
dried by now. Roll the stamen<br />
completely<br />
2-Dip the tip of the fringes into yellow<br />
Step<br />
Make sure the tip of all strands are<br />
paint.<br />
3- Open out the piece and place it on<br />
Step<br />
edge where the stamens are not touched.<br />
an<br />
Coloring The Stamens<br />
piece, and cut the fringes to 1/2" in length.<br />
emerged into the paint.<br />
Let dry completely... about 10 minutes.<br />
20
1- Using a flat brush, color the blue<br />
Step<br />
lightly with royal blue chalk or marker.<br />
petals<br />
2-Color the very bottom of each petal<br />
Step<br />
purple chalk/marker. In random areas,<br />
with<br />
lightly add touches of purple on the<br />
very<br />
(Don't add too much purple in these<br />
petals.<br />
3- Color 2" of the stigma, starting under<br />
Step<br />
ball with green chalk or marker.<br />
the<br />
Coloring The Flower Pieces<br />
Do this on both front and back.<br />
areas).<br />
21
1- Once the paint have dried, separate<br />
Step<br />
stamens and add glue along the row.<br />
the<br />
2-Tightly wrap the stamen around the<br />
Step<br />
stigma.<br />
Preparing The Center<br />
Adding The Stamens<br />
Wrap the stem with green floral tape.<br />
22
1- Place two petals across from each<br />
Step<br />
Wrap them in place with with green<br />
other.<br />
2-Place the other two petals across<br />
Step<br />
each other in between the open spaces.<br />
from<br />
sure to place the petals under the sides of<br />
Be<br />
previous petals overlapping them.<br />
the<br />
Assembling The Flower<br />
Adding The Petals<br />
floral tape.<br />
23
will make the flower by following the<br />
You<br />
You will then bring the petals<br />
pattern.<br />
gives the flower the appearance as<br />
This<br />
it is opening.<br />
though<br />
the bud with the flower using floral<br />
Wrap<br />
to create a spray.<br />
tape<br />
Creating The Closed Bloom<br />
Making the closed bloom is very simple.<br />
upward, cupping it in the palm of your hands.<br />
24
can add as many leaves as you'd like. For<br />
You<br />
pattern, I've added only 4 leaves.<br />
this<br />
placed all 4 leaves around the poppy spray<br />
I<br />
the flower, the closed bloom and<br />
including<br />
Adding The Leaves<br />
the bud.<br />
25
the bottom of both the full bloom and<br />
Color<br />
closed bloom with purple chalk or marker.<br />
the<br />
The Finishing Touch!<br />
26
All Done!!!<br />
27
Lebron, the founder of Flawless Crochet Flowers is the designer and copyright<br />
Leticia<br />
of this pattern. You are not allowed to do any of the following:<br />
owner<br />
Reproduce<br />
-<br />
Sell -<br />
are also not allowed to transmit this pattern in any form whether written, recorded or<br />
You<br />
without the consent of Leticia Lebron.<br />
photocopying<br />
can use the flowers created from this pattern for personal or commercial use as long as<br />
You<br />
is not being sold in mass production, and you credit me as the designer by leaving a link to<br />
it<br />
All Rights Reserved!!!<br />
- Distribute copies<br />
Translating this pattern into other languages violates this policy!<br />
my shop.<br />
Leticia Lebron<br />
Happy Flower Making!<br />
28