Installation &Operation Instructions For R410A (MAH ... - ComfortStar
Installation &Operation Instructions For R410A (MAH ... - ComfortStar
Installation &Operation Instructions For R410A (MAH ... - ComfortStar

Create successful ePaper yourself
Turn your PDF publications into a flip-book with our unique Google optimized e-Paper software.
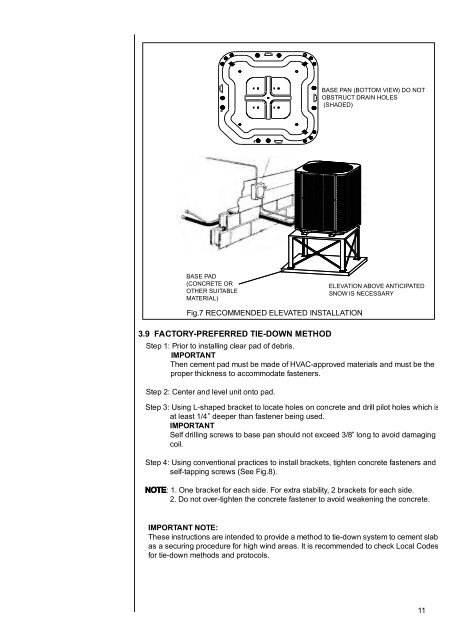
BASE PAD<br />
(CONCRETE OR<br />
OTHER SUITABLE<br />
MATERIAL)<br />
Fig.7 RECOMMENDED ELEVATED INSTALLATION<br />
3.9 FACTORY-PREFERRED TIE-DOWN METHOD<br />
Step 1: Prior to installing clear pad of debris.<br />
IMPORTANT<br />
Then cement pad must be made of HVAC-approved materials and must be the<br />
proper thickness to accommodate fasteners.<br />
Step 2: Center and level unit onto pad.<br />
BASE PAN (BOTTOM VIEW) DO NOT<br />
OBSTRUCT DRAIN HOLES<br />
(SHADED)<br />
ELEVATION ABOVE ANTICIPATED<br />
SNOW IS NECESSARY<br />
Step 3: Using L-shaped bracket to locate holes on concrete and drill pilot holes which is<br />
at least 1/4” deeper than fastener being used.<br />
IMPORTANT<br />
Self drilling screws to base pan should not exceed 3/8” long to avoid damaging<br />
coil.<br />
Step 4: Using conventional practices to install brackets, tighten concrete fasteners and<br />
self-tapping screws (See Fig.8).<br />
NOTE: 1. One bracket for each side. <strong>For</strong> extra stability, 2 brackets for each side.<br />
2. Do not over-tighten the concrete fastener to avoid weakening the concrete.<br />
IMPORTANT NOTE:<br />
These instructions are intended to provide a method to tie-down system to cement slab<br />
as a securing procedure for high wind areas. It is recommended to check Local Codes<br />
for tie-down methods and protocols.<br />
11