

Furuno Marine Radar Experiments

Create successful ePaper yourself
Turn your PDF publications into a flip-book with our unique Google optimized e-Paper software.
1/8/2017 <strong>Furuno</strong> <strong>Marine</strong> <strong>Radar</strong> <strong>Experiments</strong><br />
<strong>Furuno</strong> <strong>Marine</strong> <strong>Radar</strong> <strong>Experiments</strong><br />
Overview<br />
Here are some experiments and operational notes for a <strong>Furuno</strong> Model FR360 Mark II marine radar<br />
from 1984. One major modification was replacing the stock slotted (horizontal) waveguide antenna<br />
system with one which gives a larger vertical beamwidth. This will allow the radar to better "see"<br />
objects above the horizon (i.e., airplanes). This is fairly easy to do and can be done using an old<br />
DirecTV satellite dish and a few pieces of surplus WR90 hardware.<br />
The first part of this project will just be a general overview. Upcoming articles will cover the radar's<br />
operation in a little more detail, plus there will be some fun radar experiments like jamming or<br />
homebrew radar stealth ideas. I don't have an operator's manual for this particular <strong>Furuno</strong> radar, but<br />
here are a few of the parameters I was able to measure or gather from other sources.<br />
This radar operates at around 9.41 GHz (+/ 30 MHz) with a peak RF output power of approximately<br />
4 kW from its Toshiba 9M302/E3513 Xband pulse magnetron. The output frequency will shift<br />
slightly over time and when switched between long or short pulses.<br />
The local oscillator and mixer module produces a receive IF frequency of around 40 MHz. The<br />
receiver circuit uses a µPC595C video IF detector, along with a M5186P video amplifier, to produce<br />
the final "blip" on the radar's display. I wasn't able to find datasheets for these ICs.<br />
The radar has a Pulse Repetition Frequency (PRF) of approximately 3,360 Hz (short) and 840 Hz<br />
(long). I believe the pulselength of the long pulse is 0.5 µS and the short pulse is 0.08 µS. The<br />
maximum (displayed) target range is 36 nautical miles and the minimum range is probably a few<br />
hundred feet.<br />
The display unit CRT uses a standard raster scan (planposition indication). The electron beam of the<br />
CRT sweeps from the center of the display towards the edge, then back to the center. In addition,<br />
this beam is mechanically rotated around the center of the display. This beam rotating motor is<br />
synchronized to the spinning of the antenna rotation motor.<br />
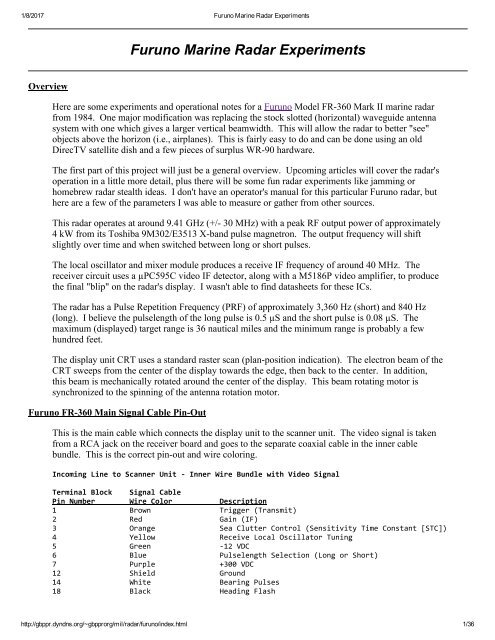
<strong>Furuno</strong> FR360 Main Signal Cable PinOut<br />
This is the main cable which connects the display unit to the scanner unit. The video signal is taken<br />
from a RCA jack on the receiver board and goes to the separate coaxial cable in the inner cable<br />
bundle. This is the correct pinout and wire coloring.<br />
Incoming Line to Scanner Unit ‐ Inner Wire Bundle with Video Signal<br />
Terminal Block Signal Cable<br />
Pin Number Wire Color Description<br />
1 Brown Trigger (Transmit)<br />
2 Red Gain (IF)<br />
3 Orange Sea Clutter Control (Sensitivity Time Constant [STC])<br />
4 Yellow Receive Local Oscillator Tuning<br />
5 Green ‐12 VDC<br />
6 Blue Pulselength Selection (Long or Short)<br />
7 Purple +300 VDC<br />
12 Shield Ground<br />
14 White Bearing Pulses<br />
18 Black Heading Flash<br />
http://gbppr.dyndns.org/~gbpprorg/mil/radar/furuno/index.html 1/36
1/8/2017 <strong>Furuno</strong> <strong>Marine</strong> <strong>Radar</strong> <strong>Experiments</strong><br />
Incoming Line to Scanner Unit ‐ Main Wire Bundle<br />
Terminal Block Signal Cable<br />
Pin Number Wire Color Description<br />
8 & 10 Yellow/Black Magnetron Heater Hot (+) with 1 µF to Ground<br />
9 & 11 White/Brown Magnetron Heater Cold (‐) with 1 µF to Ground<br />
12 Red Ground<br />
13 Orange Ground<br />
15 Green +12 VDC<br />
16 Blue Motor (+12V)<br />
17 Purple Motor (‐12V)<br />
20 Black (to Lid) Ground<br />
Stock <strong>Furuno</strong> FR360 main signal cable which connects the scanner unit to the display unit.<br />
Note the two wire bundles and the coaxial cable for the video output. The system uses a common<br />
ground between the two shields.<br />
These signal cables are outrageously priced new, but there is really no reason why you can't make<br />
your own.<br />
Just be sure all the wires are well shielded and share a common ground. The video signal can be run<br />
via an external piece of RG6 coax.<br />
Pictures & Construction Notes<br />
http://gbppr.dyndns.org/~gbpprorg/mil/radar/furuno/index.html 2/36
1/8/2017 <strong>Furuno</strong> <strong>Marine</strong> <strong>Radar</strong> <strong>Experiments</strong><br />
<strong>Furuno</strong> Model FR360 Mark II scanner unit wiring as I receive it.<br />
Note several wires not properly connected, so use these initial pictures for reference only!<br />
The system shares a common ground with the signal cable's shield. There are a few ground "jumper"<br />
wires, which makes the cabling look messy.<br />
Pin 1 on the terminal block is on the upperright. Pin 10 is on the lowerright. Pin 11 is on the<br />
lowerleft. Pin 20 is on the upperleft. Pin 19 was unused.<br />
http://gbppr.dyndns.org/~gbpprorg/mil/radar/furuno/index.html 3/36
1/8/2017 <strong>Furuno</strong> <strong>Marine</strong> <strong>Radar</strong> <strong>Experiments</strong><br />
Alternate view.<br />
There are two 1 µF/250V nonpolarized capacitors to ground (those gray things) across the<br />
magnetron's heater (filament) connections.<br />
The signal cable come up through the bottom of the scanner unit. The signal cable contains two wire<br />
bundles and a coaxial cable with a RCA plug for the video signal. The two cable bundles share a<br />
common ground via the shield.<br />
http://gbppr.dyndns.org/~gbpprorg/mil/radar/furuno/index.html 4/36
1/8/2017 <strong>Furuno</strong> <strong>Marine</strong> <strong>Radar</strong> <strong>Experiments</strong><br />
Terminal block pins 1 through 10.<br />
Incoming signals from the signal cable are on the bottom connections of the terminal block.<br />
http://gbppr.dyndns.org/~gbpprorg/mil/radar/furuno/index.html 5/36
1/8/2017 <strong>Furuno</strong> <strong>Marine</strong> <strong>Radar</strong> <strong>Experiments</strong><br />
Terminal block pins 11 through 20.<br />
Pins 12, 13, and 20 are a common ground.<br />
Incoming signals from the signal cable are on the bottom connections of the terminal block.<br />
http://gbppr.dyndns.org/~gbpprorg/mil/radar/furuno/index.html 6/36
1/8/2017 <strong>Furuno</strong> <strong>Marine</strong> <strong>Radar</strong> <strong>Experiments</strong><br />
Wire connections to the cover of the scanner unit.<br />
The large black wire is a common ground which connects to pin 20 on the terminal block.<br />
http://gbppr.dyndns.org/~gbpprorg/mil/radar/furuno/index.html 7/36
1/8/2017 <strong>Furuno</strong> <strong>Marine</strong> <strong>Radar</strong> <strong>Experiments</strong><br />
View of the Toshiba 9M302/E3513 Xband pulse magnetron.<br />
This magnetron's output frequency is around 9.41 GHz. It uses a standard WR90 flange and is<br />
connected to port 1 on the output circulator.<br />
The PulseForming Network (PFN) is on circuit board to the lowerright. The relay switches<br />
between long and short pulses.<br />
The pulse transformer is off to the farright, labeled RT30721. This converts the +300 VDC on the<br />
PFN into an approximate 3.7 kV pulse for the magnetron.<br />
http://gbppr.dyndns.org/~gbpprorg/mil/radar/furuno/index.html 8/36
1/8/2017 <strong>Furuno</strong> <strong>Marine</strong> <strong>Radar</strong> <strong>Experiments</strong><br />
Closeup picture of the pulse magnetron, pulseforming network, and the pulse transformer.<br />
http://gbppr.dyndns.org/~gbpprorg/mil/radar/furuno/index.html 9/36
1/8/2017 <strong>Furuno</strong> <strong>Marine</strong> <strong>Radar</strong> <strong>Experiments</strong><br />
Alternate view of the pulseforming network and the pulse transformer.<br />
The GREEN wire on the magnetron is for the heater (filament) and the YELLOW wire is heater and<br />
cathode.<br />
http://gbppr.dyndns.org/~gbpprorg/mil/radar/furuno/index.html 10/36
1/8/2017 <strong>Furuno</strong> <strong>Marine</strong> <strong>Radar</strong> <strong>Experiments</strong><br />
View of the local oscillator and mixer assembly, labeled RU3684.<br />
I don't have a schematic for this module, but it contains a variable local oscillator to produce a final<br />
IF frequency of around 40 MHz. This module has a +5 VDC to +35 VDC tuning voltage to<br />
compensate for slight frequency changes to the magnetron as it ages.<br />
This local oscillator module has a "monitor" output, but I'm not sure what that is used for.<br />
A passive diode limiter, labeled SLX5B(S), precedes this module to protect it from being damaged<br />
by the high power magnetron pulses which get past the output circulator.<br />
The output circulator is labeled FCX62. Its port 3 goes to the receive circuits and port 2 is<br />
connected to the main antenna output.<br />
http://gbppr.dyndns.org/~gbpprorg/mil/radar/furuno/index.html 11/36
1/8/2017 <strong>Furuno</strong> <strong>Marine</strong> <strong>Radar</strong> <strong>Experiments</strong><br />
Overview of the antenna mount rotation motor.<br />
This motor operates off +/ 12 VDC (a total of 24 volts) and spins at around 24 rpm.<br />
An optocoupler provides a bearing pulse signal to step the display rotation motor and a magnetic reed<br />
switch provides the heading flash signal.<br />
http://gbppr.dyndns.org/~gbpprorg/mil/radar/furuno/index.html 12/36
1/8/2017 <strong>Furuno</strong> <strong>Marine</strong> <strong>Radar</strong> <strong>Experiments</strong><br />
Antenna mounting plate from the stock <strong>Furuno</strong> antenna system.<br />
The brass probe is a 1/4 wavelength antenna and will stay stationary as the mounting plate rotates<br />
around it.<br />
The antenna as I received it was smashed, so I ripped it apart before taking a picture of it, but this is<br />
the only part you'll need from the stock antenna.<br />
http://gbppr.dyndns.org/~gbpprorg/mil/radar/furuno/index.html 13/36
1/8/2017 <strong>Furuno</strong> <strong>Marine</strong> <strong>Radar</strong> <strong>Experiments</strong><br />
Closeup of the brass antenna probe.<br />
The tube surrounding this probe is about 0.5inches in diameter.<br />
The brass probe is essentially a center conductor in a piece of hardline coax.<br />
http://gbppr.dyndns.org/~gbpprorg/mil/radar/furuno/index.html 14/36
1/8/2017 <strong>Furuno</strong> <strong>Marine</strong> <strong>Radar</strong> <strong>Experiments</strong><br />
Bottom of the rotating antenna plate.<br />
The WR90 flanges interlock and will stay stationary while the plate rotates around it.<br />
http://gbppr.dyndns.org/~gbpprorg/mil/radar/furuno/index.html 15/36
1/8/2017 <strong>Furuno</strong> <strong>Marine</strong> <strong>Radar</strong> <strong>Experiments</strong><br />
A surplus Waveline Type 564 2 watt, 50 ohm termination load with a WR90 flange.<br />
We'll use this to couple the output from the 1/4 wavelength brass probe antenna into something more<br />
usable.<br />
The ferrite load will need to be removed.<br />
http://gbppr.dyndns.org/~gbpprorg/mil/radar/furuno/index.html 16/36
1/8/2017 <strong>Furuno</strong> <strong>Marine</strong> <strong>Radar</strong> <strong>Experiments</strong><br />
Drilling the coupling hole for the 1/4 wavelength brass probe.<br />
Drill a 1/2inch diameter hole 11 millimeters from the closed end of the waveguide.<br />
Because this waveguide will need to rotate around the 1/4 wavelength brass probe, and the little<br />
flange which surrounds it, slightly widen the drilled hole using a deburring tool.<br />
You want the waveguide to spin freely around that round flange but still be fairly RF tight.<br />
http://gbppr.dyndns.org/~gbpprorg/mil/radar/furuno/index.html 17/36
1/8/2017 <strong>Furuno</strong> <strong>Marine</strong> <strong>Radar</strong> <strong>Experiments</strong><br />
Example of how this new waveguide piece should fit around the 1/4 wavelength brass probe antenna.<br />
http://gbppr.dyndns.org/~gbpprorg/mil/radar/furuno/index.html 18/36
1/8/2017 <strong>Furuno</strong> <strong>Marine</strong> <strong>Radar</strong> <strong>Experiments</strong><br />
To secure the waveguide to the rotating plate, we'll use a 1inch copper pipe hanger clamp and some<br />
3/8"16 hardware.<br />
http://gbppr.dyndns.org/~gbpprorg/mil/radar/furuno/index.html 19/36
1/8/2017 <strong>Furuno</strong> <strong>Marine</strong> <strong>Radar</strong> <strong>Experiments</strong><br />
Secure the waveguide as shown using the 1inch copper pipe hanger clamp. Be sure it is level.<br />
The hole for the main 3/8"16 bolt should be countersunk.<br />
I added two extra #1024 Kep nuts on the 1inch copper pipe clamp. This is a fairly critical<br />
connection, and will be under a bit of stress, so take your time and do a good job. Secure the 3/8"16<br />
hardware with a few drops of Loctite.<br />
Also add a bit of grease along the area where the waveguide rotates around the probe hardware.<br />
http://gbppr.dyndns.org/~gbpprorg/mil/radar/furuno/index.html 20/36
1/8/2017 <strong>Furuno</strong> <strong>Marine</strong> <strong>Radar</strong> <strong>Experiments</strong><br />
Complete view showing the 1/4 wavelength brass probe antenna inside the new waveguide.<br />
I added a #632 brass screw to cover the hole in the waveguide originally used to mount the ferrite<br />
load.<br />
The output RF polarization will be vertical.<br />
http://gbppr.dyndns.org/~gbpprorg/mil/radar/furuno/index.html 21/36
1/8/2017 <strong>Furuno</strong> <strong>Marine</strong> <strong>Radar</strong> <strong>Experiments</strong><br />
I mounted the scanner unit of the radar to large piece of scrap plastic.<br />
This makes working on the radar much easier when then hinged cover is opened up.<br />
http://gbppr.dyndns.org/~gbpprorg/mil/radar/furuno/index.html 22/36
1/8/2017 <strong>Furuno</strong> <strong>Marine</strong> <strong>Radar</strong> <strong>Experiments</strong><br />
Internal view of the scanner unit showing the correct internal wiring..<br />
http://gbppr.dyndns.org/~gbpprorg/mil/radar/furuno/index.html 23/36
1/8/2017 <strong>Furuno</strong> <strong>Marine</strong> <strong>Radar</strong> <strong>Experiments</strong><br />
To mount the new parabolic dish antenna, make a simple aluminum frame using some 1inch square<br />
tube and bar stock.<br />
The two square tubes are 12inches in length and are attached to the rotating plate with 3/8"16<br />
hardware.<br />
Some black foam washers were added to help cover up the bearing assembly in the rotating plate.<br />
http://gbppr.dyndns.org/~gbpprorg/mil/radar/furuno/index.html 24/36
1/8/2017 <strong>Furuno</strong> <strong>Marine</strong> <strong>Radar</strong> <strong>Experiments</strong><br />
To save weight, the support structure for the new parabolic dish antenna will be made from 1inch<br />
diameter PVC pipe.<br />
Bolt two 1inch PVC end caps to the center of the support bars as shown above. Secure them using a<br />
fender washer inside the end cap and some 1/4"20 hardware.<br />
http://gbppr.dyndns.org/~gbpprorg/mil/radar/furuno/index.html 25/36
1/8/2017 <strong>Furuno</strong> <strong>Marine</strong> <strong>Radar</strong> <strong>Experiments</strong><br />
Support structure for the new parabolic dish antenna made from standard 1inch diameter PVC pipe.<br />
The two support legs on the sides are 12inches long.<br />
The two little horizontal legs are 4.25inches long.<br />
There is a 1inch to 1.25inch PVC adapter on the tee connector (and a short little vertical riser) as<br />
the DirecTV dish mounting hardware needs a 1.25inch diameter mounting pipe for proper<br />
attachment.<br />
http://gbppr.dyndns.org/~gbpprorg/mil/radar/furuno/index.html 26/36
1/8/2017 <strong>Furuno</strong> <strong>Marine</strong> <strong>Radar</strong> <strong>Experiments</strong><br />
Test setup showing the DirecTV dish mounting hardware attached to the short piece of 1.25inch<br />
PVC pipe.<br />
Try to keep the overall rotating structure weight as low as possible, but make sure the parabolic dish<br />
doesn't have any "wobble" as it rotates.<br />
http://gbppr.dyndns.org/~gbpprorg/mil/radar/furuno/index.html 27/36
1/8/2017 <strong>Furuno</strong> <strong>Marine</strong> <strong>Radar</strong> <strong>Experiments</strong><br />
A handy option is to make a quick disconnect for the main signal cable.<br />
This was made from a scrap piece of PC board which already had a nice edge connector.<br />
A BNC jack was added for the video output signal from the scanner unit.<br />
http://gbppr.dyndns.org/~gbpprorg/mil/radar/furuno/index.html 28/36
1/8/2017 <strong>Furuno</strong> <strong>Marine</strong> <strong>Radar</strong> <strong>Experiments</strong><br />
A fourfoot piece of CG179A/U flexible waveguide with WR90 flanges connects the output from<br />
the new wavguide section we just made to the feed horn antenna.<br />
The horn antenna is from the 10 GHz Gunnplexer used in a Solfan motion alarm.<br />
The small f/D ratio (approximately 0.3) of DirecTV dishes means that the feed horn (and focal<br />
distance) can be quite critical, but use whatever you can find (or make) and then fiddle with it<br />
afterwards.<br />
http://gbppr.dyndns.org/~gbpprorg/mil/radar/furuno/index.html 29/36
1/8/2017 <strong>Furuno</strong> <strong>Marine</strong> <strong>Radar</strong> <strong>Experiments</strong><br />
Constructing an usable feed horn mounting assembly.<br />
This probably the hardest part of this project and can be quite critical.<br />
We'll be using an old DirecTV lownoise block converter cut in half to provide the proper angle for<br />
the feed horn. An aluminum plate will need to be added to the dish's feed arm to extend the length a<br />
bit.<br />
A piece of aluminum angle will provide the final mounting bracket for the flexible waveguide and<br />
feed horn at the proper focal point for the dish.<br />
Try to eye everything up ahead of time so you know what it is all suppose to look like.<br />
http://gbppr.dyndns.org/~gbpprorg/mil/radar/furuno/index.html 30/36
1/8/2017 <strong>Furuno</strong> <strong>Marine</strong> <strong>Radar</strong> <strong>Experiments</strong><br />
Overview of the modified DirecTV feed arm and feed horn mounting hardware.<br />
The flexible waveguide is secured using a ground clamp attached to the little piece of aluminum<br />
angle stock.<br />
The was all done empirically, but will work if you take your time and are careful during<br />
construction. The final focal point should be just inside the feed horn.<br />
http://gbppr.dyndns.org/~gbpprorg/mil/radar/furuno/index.html 31/36
1/8/2017 <strong>Furuno</strong> <strong>Marine</strong> <strong>Radar</strong> <strong>Experiments</strong><br />
Alternate view with a better showing of the cut down DirecTV lownoise block converter.<br />
Rear view showing the aluminum angle stock and the ground clamp attachment.<br />
http://gbppr.dyndns.org/~gbpprorg/mil/radar/furuno/index.html 32/36
1/8/2017 <strong>Furuno</strong> <strong>Marine</strong> <strong>Radar</strong> <strong>Experiments</strong><br />
Experimental GBPPR tactical battlefield and air surveillance radar in operation.<br />
You may need to fiddle with the elevation angle a bit during operation for better coverage of the area<br />
you want to monitor. The offset feed kinds messes with you...<br />
The flexible waveguide is a little too long, so it's secured to the dish feed arm using some tape.<br />
A piece of polystyrene should be placed over the feed horn to weatherproof it a bit.<br />
You can't legally use marine radar frequencies on land, but Obama can't legally be president so it all<br />
works out...<br />
http://gbppr.dyndns.org/~gbpprorg/mil/radar/furuno/index.html 33/36
1/8/2017 <strong>Furuno</strong> <strong>Marine</strong> <strong>Radar</strong> <strong>Experiments</strong><br />
As the magnetron ages, its output frequency will shift a little.<br />
To compensate for this, there is an adjustment for tweaking the main local oscillator tuning<br />
frequency. This is the potentiometer shown above and is located inside the display unit. It can be<br />
adjusted between +5V and +35V. The main tuning knob on the display unit is mostly for use as fine<br />
tune control.<br />
http://gbppr.dyndns.org/~gbpprorg/mil/radar/furuno/index.html 34/36
1/8/2017 <strong>Furuno</strong> <strong>Marine</strong> <strong>Radar</strong> <strong>Experiments</strong><br />
Example of a DirecTV SlimLine dish.<br />
Dishes of these "orange peel" style are ideal for radar use as they have a narrow horizontal<br />
beamwidth and larger vertical beamwidth.<br />
Audio & Video<br />
Notes & Links<br />
Video of the Rotating Waveguide Assembly (YouTube)<br />
<strong>Furuno</strong> <strong>Radar</strong> XBand vs. SBand Rain Performance (YouTube)<br />
Higher resolution pictures and the original project article are available in GBPPR 'Zine Issue<br />
#83<br />
<strong>Furuno</strong> Model FR602D <strong>Marine</strong> <strong>Radar</strong> Operator's Manual Includes schematic. (1.8M PDF)<br />
<strong>Furuno</strong> Model FR604 <strong>Marine</strong> <strong>Radar</strong> Operator's Manual Includes schematic. (2.0M PDF)<br />
<strong>Furuno</strong> Model FCR902 <strong>Marine</strong> <strong>Radar</strong> Operator's Manual Includes schematic. (2.1M PDF)<br />
<strong>Furuno</strong> Model FR240/FR360 Schematics Complete schematic diagrams for <strong>Furuno</strong> FR240<br />
and FR360 Xband marine radars. (2.3M PDF)<br />
Partial UPC595 Video IF Detector Pinout<br />
http://gbppr.dyndns.org/~gbpprorg/mil/radar/furuno/index.html 35/36
1/8/2017 <strong>Furuno</strong> <strong>Marine</strong> <strong>Radar</strong> <strong>Experiments</strong><br />
Marconi MG5251 XBand Pulse Magnetron Similar to the 9M302/E3513. (130k PDF)<br />
JRC NJT1946A XBand <strong>Marine</strong> <strong>Radar</strong> FrontEnd Includes local oscillator and mixer block<br />
diagrams. (229k PDF)<br />
JRC NJT1947A XBand <strong>Marine</strong> <strong>Radar</strong> FrontEnd (66k PDF)<br />
JRC <strong>Marine</strong> Magnetrons<br />
Return to GBPPR Homebrew <strong>Radar</strong> <strong>Experiments</strong><br />
http://gbppr.dyndns.org/~gbpprorg/mil/radar/furuno/index.html 36/36