
You also want an ePaper? Increase the reach of your titles
YUMPU automatically turns print PDFs into web optimized ePapers that Google loves.
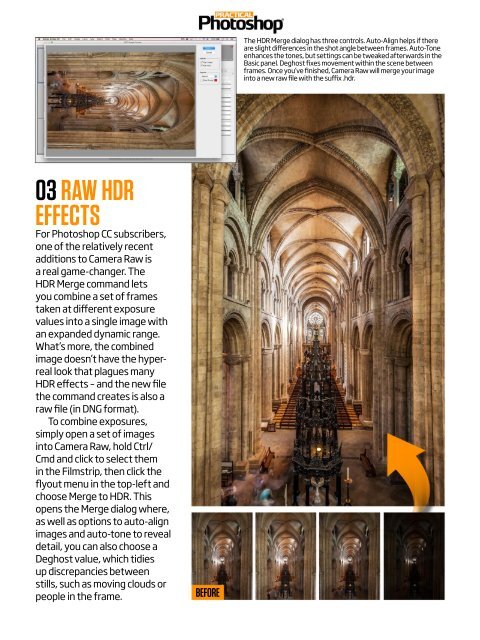
The HDR Merge dialog has three controls. Auto-Align helps if there<br />
are slight differences in the shot angle between frames. Auto-Tone<br />
enhances the tones, but settings can be tweaked afterwards in the<br />
Basic panel. Deghost fixes movement within the scene between<br />
frames. Once you’ve finished, Camera Raw will merge your image<br />
into a new raw file with the suffix .hdr.<br />
03 RAW HDR<br />
EFFECTS<br />
For <strong>Photoshop</strong> CC subscribers,<br />
one of the relatively recent<br />
additions to Camera Raw is<br />
a real game-changer. The<br />
HDR Merge command lets<br />
you combine a set of frames<br />
taken at different exposure<br />
values into a single image with<br />
an expanded dynamic range.<br />
What’s more, the combined<br />
image doesn’t have the hyperreal<br />
look that plagues many<br />
HDR effects – and the new file<br />
the command creates is also a<br />
raw file (in DNG format).<br />
To combine exposures,<br />
simply open a set of images<br />
into Camera Raw, hold Ctrl/<br />
Cmd and click to select them<br />
in the Filmstrip, then click the<br />
flyout menu in the top-left and<br />
choose Merge to HDR. This<br />
opens the Merge dialog where,<br />
as well as options to auto-align<br />
images and auto-tone to reveal<br />
detail, you can also choose a<br />
Deghost value, which tidies<br />
up discrepancies between<br />
stills, such as moving clouds or<br />
people in the frame.<br />
BEFORE