

final report of internship EWB Rwanda Mukindo water project by Ntambara Sylvestre Owen Berbason
this report shows a brief and summarised details of the project done at Gisagara in Mukindo sector and it is entitled as MUKINDO WATER PROJECT and it was implemented by EWB Rwanda an partnership with EWB Quebec and it where i did my intership and more of this documenyt is all about the solar power for provision of electric energy to pump the water from down upto hill.
this report shows a brief and summarised details of the project done at Gisagara in Mukindo sector and it is entitled as MUKINDO WATER PROJECT and it was implemented by EWB Rwanda an partnership with EWB Quebec and it where i did my intership and more of this documenyt is all about the solar power for provision of electric energy to pump the water from down upto hill.

You also want an ePaper? Increase the reach of your titles
YUMPU automatically turns print PDFs into web optimized ePapers that Google loves.
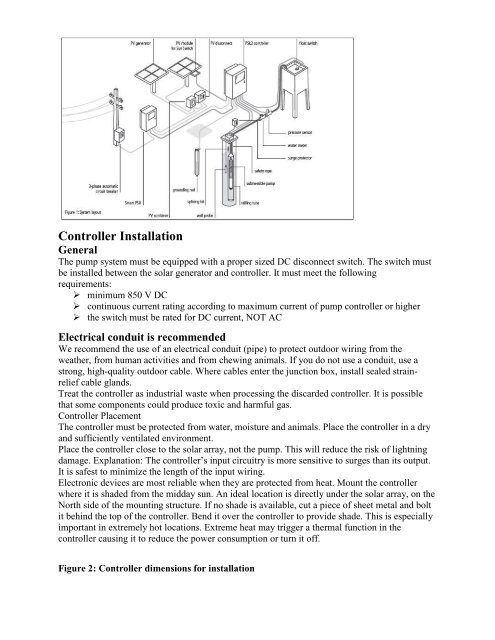
Controller Installation<br />
General<br />
The pump system must be equipped with a proper sized DC disconnect switch. The switch must<br />
be installed between the solar generator and controller. It must meet the following<br />
requirements:<br />
‣ minimum 850 V DC<br />
‣ continuous current rating according to maximum current <strong>of</strong> pump controller or higher<br />
‣ the switch must be rated for DC current, NOT AC<br />
Electrical conduit is recommended<br />
We recommend the use <strong>of</strong> an electrical conduit (pipe) to protect outdoor wiring from the<br />
weather, from human activities and from chewing animals. If you do not use a conduit, use a<br />
strong, high-quality outdoor cable. Where cables enter the junction box, install sealed strainrelief<br />
cable glands.<br />
Treat the controller as industrial waste when processing the discarded controller. It is possible<br />
that some components could produce toxic and harmful gas.<br />
Controller Placement<br />
The controller must be protected from <strong>water</strong>, moisture and animals. Place the controller in a dry<br />
and sufficiently ventilated environment.<br />
Place the controller close to the solar array, not the pump. This will reduce the risk <strong>of</strong> lightning<br />
damage. Explanation: The controller’s input circuitry is more sensitive to surges than its output.<br />
It is safest to minimize the length <strong>of</strong> the input wiring.<br />
Electronic devices are most reliable when they are protected from heat. Mount the controller<br />
where it is shaded from the midday sun. An ideal location is directly under the solar array, on the<br />
North side <strong>of</strong> the mounting structure. If no shade is available, cut a piece <strong>of</strong> sheet metal and bolt<br />
it behind the top <strong>of</strong> the controller. Bend it over the controller to provide shade. This is especially<br />
important in extremely hot locations. Extreme heat may trigger a thermal function in the<br />
controller causing it to reduce the power consumption or turn it <strong>of</strong>f.<br />
Figure 2: Controller dimensions for installation