Sport Climbing Basics - VDiff Climbing
This e-book will teach you how to: - Use assisted-braking belay devices - Lead sport climbs - Set up top ropes - Clean sport anchors - Abseil safely (including using a prusik knot) - Use advanced belay techniques - Climb with better technique - Assess bolt quality Plus much more. Further information: * Perfect for those who want to start sport climbing. * 200+ accurately drawn, full-colour illustrations and photos. * 115 information-packed pages. * Easy to print or view on your mobile. Take it to the crag; when in doubt, whip it out! * New for December 2017
This e-book will teach you how to:
- Use assisted-braking belay devices
- Lead sport climbs
- Set up top ropes
- Clean sport anchors
- Abseil safely (including using a prusik knot)
- Use advanced belay techniques
- Climb with better technique
- Assess bolt quality
Plus much more.
Further information:
* Perfect for those who want to start sport climbing.
* 200+ accurately drawn, full-colour illustrations and photos.
* 115 information-packed pages.
* Easy to print or view on your mobile. Take it to the crag; when in doubt, whip it out!
* New for December 2017

Create successful ePaper yourself
Turn your PDF publications into a flip-book with our unique Google optimized e-Paper software.
<strong>Sport</strong> <strong>Climbing</strong> <strong>Basics</strong><br />
First Edition. December 2017<br />
£ Donation Only
Contents<br />
Introduction 6<br />
Belaying 14<br />
Leading 27<br />
Anchors 36<br />
Descending 65<br />
Technique 80<br />
Knots 98<br />
Next Steps 105<br />
Learn more: www.vdiffclimbing.com<br />
5
<strong>Sport</strong> <strong>Climbing</strong> <strong>Basics</strong>:<br />
Anchors<br />
Climb: Julian Heath on The Spider, Cheedale, England. Photographer: Chris Fox (see more here)
Anchors Part 1: What To Do at the Top<br />
Many climbs have bolted anchors at the<br />
top. This is the standard for sport climbs<br />
worldwide, but is also common at many<br />
North American trad climbing venues.<br />
These bolted anchors will usually be<br />
equipped with mallions (quick links) or<br />
lowering rings, sometimes connected with<br />
chains. You won’t be able to simply clip<br />
your rope through this type of anchor like<br />
you would at the gym. Instead, you’ll need<br />
untie from the rope and thread it through.<br />
After that, you can either abseil, or have<br />
your partner lower you down.<br />
It’s important to learn how to do this in the<br />
correct order. If you thread an anchor<br />
incorrectly, you could drop your rope and<br />
beeeeeee<br />
be ‘stranded’ at the anchor, or even<br />
become completely detached from the<br />
bolts.<br />
Lower, Abseil or Walk Off?<br />
This depends on the type of anchor, how it<br />
is positioned and what you plan to do after<br />
the climb.<br />
Lowering from a sport anchor is quicker<br />
than abseiling. It’s also much easier to<br />
retrieve gear on your way down when<br />
lowering.<br />
However, abseiling puts much less wear on<br />
the rings. This could be the best option if<br />
the rings are already showing signs of<br />
wear.<br />
If the next climber is going to top rope the<br />
route, you should make an anchor from<br />
yyyyy<br />
Learn more: www.vdiffclimbing.com<br />
your own gear and lower down from that.<br />
If you are the last person to climb the<br />
route, you’ll need to ‘clean’ all your gear<br />
from the anchor before you descend.<br />
For anchors which are in a poor position<br />
for lowering or abseiling (e.g: far back<br />
across a ledge), it is much better to belay<br />
your partner from the top of the climb. You<br />
can then walk off.<br />
Each of these scenarios requires a<br />
different anchor setup. These are<br />
described on the following pages.<br />
37
Anchors Part 4: Cleaning a <strong>Sport</strong> Anchor<br />
Cleaning a sport anchor means removing<br />
all of your gear from it. Three of the main<br />
ways to do this are described on the<br />
following pages.<br />
Which you choose depends on the type of<br />
anchor and whether you plan to lower or<br />
abseil.<br />
Method 1 – Feed a Bight of Rope Through<br />
You will remain ‘on belay’ during this whole<br />
setup.<br />
You Will Need<br />
* Two spare quickdraws<br />
* One screwgate carabiner<br />
Best Situation To Use This Method<br />
- When you are the last person to lead the<br />
route<br />
- When the anchor has a central point<br />
which is big enough to feed a bight of rope<br />
through<br />
Step 1<br />
Clip your rope through a quickdraw on one<br />
of the anchor bolts.<br />
Step 2<br />
Clip another quickdraw into the other<br />
anchor bolt and clip it directly to your belay<br />
loop. Rest your weight on this quickdraw.<br />
Learn more: www.vdiffclimbing.com<br />
43
Step 3<br />
Pull up a little slack and push a bight of the<br />
rope through the main anchor point as<br />
shown.<br />
Step 4<br />
Tie a figure-8 on the bight (see page 102)<br />
and clip this to your belay loop with a<br />
screwgate carabiner.<br />
Step 5<br />
Untie from the end of the rope.<br />
<strong>VDiff</strong> – <strong>Sport</strong> <strong>Climbing</strong> <strong>Basics</strong> > Anchors 44
Step 6<br />
Pull the end of the rope through the main<br />
anchor point.<br />
Step 7<br />
Remove the quickdraw which isn’t holding<br />
your weight. Ask your belayer to take you<br />
tight.<br />
Step 8<br />
Rest your weight on the rope, then remove<br />
the other quickdraw. You are now ready to<br />
lower.<br />
Learn more: www.vdiffclimbing.com<br />
45
Descending Part 2: Lowering<br />
Lowering is faster than abseiling. It is the<br />
most common form of descent whether<br />
you have cleaned the anchor or not.<br />
Best Situations To Lower<br />
- If someone else will climb after you.<br />
- If you need to remove the quickdraws.<br />
- If you need to set ‘directionals’ on your<br />
descent.<br />
Removing Quickdraws<br />
If you have cleaned the anchor, but your<br />
quickdraws are still in the route, you’ll need<br />
to retrieve them on your way down.<br />
This is easy on a straight-lined, vertical<br />
route. Simply lower down and unclip them<br />
from the bolt and the rope.<br />
The belayer will need to stop lowering you<br />
at each bolt so you have time to do this.<br />
On overhanging or traversing routes it can<br />
be more difficult. To make it easier, clip one<br />
end of a quickdraw to your belay loop and<br />
the other end to the rope. This ‘lowering<br />
quickdraw’ keeps you in the same line as<br />
the route while you descend.<br />
On your descent, unclip the lead<br />
quickdraws from the rope and then from<br />
the bolts.<br />
Learn more: www.vdiffclimbing.com<br />
67
Be careful when removing the last<br />
quickdraw. If you remove it in the same<br />
way as the others, you’ll swing out from the<br />
rock and pull your belayer with you.<br />
If it is a safe swing (i.e: you wouldn’t hit<br />
anything or anyone) unclip your lowering<br />
quickdraw from the rope and attach it<br />
directly to the bolt. Then allow your weight<br />
to hang on this quickdraw.<br />
Remove the other quickdraw from the bolt<br />
and the rope.<br />
Give your belayer time to take in the extra<br />
slack which is created.<br />
Next, remove the last quickdraw from the<br />
bolt. To make this easier, use holds on the<br />
rock to pull yourself in. Be ready to swing<br />
out!<br />
If it isn’t a safe swing, one option is to<br />
lower to the ground, and then ‘boulder’ up<br />
to retrieve it. This works best if you have a<br />
bouldering pad and the first bolt isn’t very<br />
high.<br />
Another option is for the belayer to be<br />
anchored to the ground. In this case, you<br />
can keep your lowering quickdraw attached<br />
until you’re on the ground.<br />
<strong>VDiff</strong> – <strong>Sport</strong> <strong>Climbing</strong> <strong>Basics</strong> > Descending 68
Clipping into Quickdraws<br />
If you have top roped an overhanging or<br />
traversing route, and someone else wants<br />
to top rope after you, you’ll need to clip the<br />
rope to some of the quickdraws on your<br />
way down as ‘directionals’. These<br />
directionals stop the next climber from<br />
swinging wildly across the rock if they fall.<br />
Simply clip your rope into the quickdraws<br />
as you lower. Depending on the route, you<br />
may need to clip them all, or just a couple.<br />
Pulling the Rope Down<br />
Untie any knots from the rope before you<br />
pull it down.<br />
Shout 'rope' before it falls. This is so that<br />
everyone around you is expecting it – a<br />
falling rope in the head hurts!<br />
Make sure to pull the rope through so that<br />
the falling end drops down through the<br />
clipped quickdraws (if you are leaving them<br />
in). This will slow it down and make it safer.<br />
Rope!<br />
Learn more: www.vdiffclimbing.com<br />
69
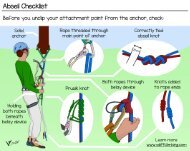
Abseiling - Check the System<br />
Before you unclip your attachment point<br />
from the anchor, check:<br />
Solid<br />
anchor<br />
Rope threaded<br />
through main<br />
point of anchor<br />
Both ropes<br />
through<br />
belay device<br />
Prusik knot<br />
Holding<br />
both ropes<br />
beneath<br />
belay device<br />
Knots<br />
added<br />
to rope<br />
ends<br />
Learn more: www.vdiffclimbing.com<br />
73
Technique Part 4: Rock Steepness<br />
Slab <strong>Climbing</strong><br />
<strong>Climbing</strong> slabs (rock which is less than<br />
vertical) requires less strength and more<br />
balance than steeper angles of rock.<br />
Your body should remain in the same<br />
upright position as when you’re walking.<br />
With gravity forcing the weight onto your<br />
shoes, you have more friction on the rock.<br />
Essentially, you will hold onto features for<br />
balance while pushing up with your legs.<br />
Friction slabs are generally devoid of any<br />
positive features to crimp or edge on. To<br />
climb a friction slab, you must rely on the<br />
ssssss<br />
surface contact beneath your palms and<br />
feet.<br />
Small steps are generally more efficient.<br />
High steps tend to disrupt the delicate<br />
balance needed to stop you from sliding<br />
off.<br />
On sustained slab climbs, where most of<br />
your weight is on your feet, it’s common to<br />
get ‘calf pump’ or ‘disco leg’. Make use of<br />
any good footholds by standing with your<br />
heel on the hold and your leg straight, so<br />
that your center of gravity is over your heel.<br />
Climb: Patrick Deacon on The Marmolada, Italy. Photographer: James Rushforth (see more here)
Vertical Rock<br />
It is invariably more strenuous on the arms<br />
to climb a vertical rock than it is to climb a<br />
slab of the same grade.<br />
It’s much more efficient to keep the weight<br />
off your arms as much as you can. This is<br />
done by pushing your hips and chest close<br />
to the wall and by using the minimum<br />
amount of energy to complete each move<br />
as possible.<br />
Remember that your feet provide the<br />
upwards thrust, while your hands primarily<br />
pull you into the rock.<br />
Keep your hips perpendicular to the rock<br />
by standing on the inside edge of one foot<br />
and the outside edge of another. This is<br />
kkkkkkk<br />
known as back-stepping. It allows you to<br />
use footholds on either side of your body<br />
with either foot.<br />
Take advantage of any rests. Opposing<br />
your feet against each other across a<br />
corner (stemming) allows you to keep the<br />
weight off your arms.<br />
If you can’t get a two-hands rest, then<br />
alternately shake out your arms when you<br />
find a good handhold.<br />
It’s often better to do a series of small<br />
moves, instead of a long one. Being<br />
stretched out tends to disrupt your balance<br />
and often makes the next move more<br />
strenuous.<br />
Climb: Lynne Hempton on Mondviole, Frea, Italy. Photographer: James Rushforth (see more here)
Overhanging Routes<br />
To climb efficiently on overhanging rock,<br />
you need to keep your hips close to the<br />
rock and your arms straight whenever<br />
possible. Bent arms will tire out much<br />
faster.<br />
One way to do this is to use the dropknee.<br />
Place the outside edge of your shoe on a<br />
hold and twist your knee downward. Be<br />
careful though, dropknees put a lot of<br />
tension on the ligaments in your knee.<br />
As with other angles of rock, it is more<br />
efficient to pull yourself into the rock with<br />
your arms and push yourself up with your<br />
legs.<br />
This is much more physically demanding<br />
on steep routes, but even the poorest<br />
footholds will help ease the strain on your<br />
arms and give you something to push from.<br />
Climb: Jason Piper on Into the Blue, Mt Ettalong, Australia. Photographer: Chris Fox (see more here)
Technique Part 5: Summary<br />
<strong>Climbing</strong> is like a dance. The aim is to<br />
choreograph these different types of holds<br />
and moves into one fluid movement.<br />
It is much more efficient and enjoyable to<br />
move up fluidly, methodically and in<br />
balance. Frantic, jerky movements are<br />
clumsy and will tire you out faster.<br />
Once this becomes second nature, you will<br />
nnnnn<br />
soon begin to develop your own style and<br />
move on to more advanced techniques.<br />
After climbing each route, review the<br />
techniques that you used. Ask yourself<br />
what worked, what didn’t and what you<br />
could do to climb the route more efficiently.<br />
Practise makes perfect!<br />
Climb: Martin McKenna on Artemisia, Italy. Photographer: James Rushforth (see more here)
Bolt Quality<br />
Bolts are either adhesive or mechanical.<br />
Adhesive bolts are glued into the hole with<br />
specially formulated epoxy.<br />
Mechanical bolts work either by expansion<br />
or compression, though expansion bolts are<br />
most common on sport routes. The bolt is<br />
placed into a drilled hole and tightened. This<br />
expands the rear part of the bolt into the<br />
hole.<br />
Both types of bolt are incredibly strong. A<br />
new, well-placed bolt will not break or fall<br />
out in a normal sport climbing situation.<br />
However, there are no qualifications needed<br />
to bolt a route, and there are no regulations<br />
on what type of bolt must be used.<br />
Don’t trust bolts that are:<br />
- Rusty or corroded<br />
- Smaller than 3/8 inch (approx 10mm) in<br />
diameter<br />
- Loose (e.g: the hanger can spin around)<br />
- In bad rock<br />
- Have an obviously homemade hanger<br />
The same goes for anchor chains or<br />
lowering rings. It is your responsibility as a<br />
climber to inspect every bolt and anchor<br />
that you clip.<br />
If you come across a badly bolted route or<br />
a worn out anchor, it is often safer to<br />
downclimb to the ground instead of<br />
lowering.<br />
Photographer: Chris Fox (see more here)
Get the Full Version<br />
The full version of this e-book is available<br />
on a pay-what-you-want pricing system,<br />
starting at £0.<br />
You can download it for free, or show your<br />
support with a small donation.<br />
Get your copy here:<br />
https://gumroad.com/l/<strong>VDiff</strong>-<strong>Sport</strong><br />
Learn How To:<br />
- Use assisted-braking belay devices<br />
- Lead sport climbs<br />
- Set up top ropes<br />
- Clean sport anchors<br />
- Abseil safely (including using a prusik<br />
knot)<br />
- Use advanced belay techniques<br />
- Climb with better technique<br />
- Assess bolt quality<br />
Plus much more.<br />
Further Information:<br />
* Perfect for those who want to start sport<br />
climbing.<br />
* 200+ accurately drawn, full-colour<br />
illustrations and photos.<br />
* 115 information-packed pages.<br />
* Easy to print or view on your mobile.<br />
Take it to the crag; when in doubt, whip it<br />
out!<br />
* New for December 2017