Version 1.0 01/06/2011 - Nova Paragliding
Version 1.0 01/06/2011 - Nova Paragliding
Version 1.0 01/06/2011 - Nova Paragliding

Create successful ePaper yourself
Turn your PDF publications into a flip-book with our unique Google optimized e-Paper software.
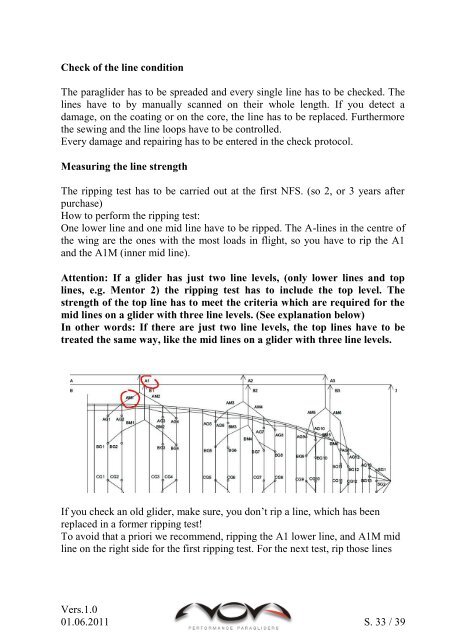
Check of the line condition<br />
The paraglider has to be spreaded and every single line has to be checked. The<br />
lines have to by manually scanned on their whole length. If you detect a<br />
damage, on the coating or on the core, the line has to be replaced. Furthermore<br />
the sewing and the line loops have to be controlled.<br />
Every damage and repairing has to be entered in the check protocol.<br />
Measuring the line strength<br />
The ripping test has to be carried out at the first NFS. (so 2, or 3 years after<br />
purchase)<br />
How to perform the ripping test:<br />
One lower line and one mid line have to be ripped. The A-lines in the centre of<br />
the wing are the ones with the most loads in flight, so you have to rip the A1<br />
and the A1M (inner mid line).<br />
Attention: If a glider has just two line levels, (only lower lines and top<br />
lines, e.g. Mentor 2) the ripping test has to include the top level. The<br />
strength of the top line has to meet the criteria which are required for the<br />
mid lines on a glider with three line levels. (See explanation below)<br />
In other words: If there are just two line levels, the top lines have to be<br />
treated the same way, like the mid lines on a glider with three line levels.<br />
If you check an old glider, make sure, you don’t rip a line, which has been<br />
replaced in a former ripping test!<br />
To avoid that a priori we recommend, ripping the A1 lower line, and A1M mid<br />
line on the right side for the first ripping test. For the next test, rip those lines<br />
Vers.<strong>1.0</strong><br />
0<strong>1.0</strong>6.2<strong>01</strong>1 S. 33 / 39