
You also want an ePaper? Increase the reach of your titles
YUMPU automatically turns print PDFs into web optimized ePapers that Google loves.
www.pinell.no<br />
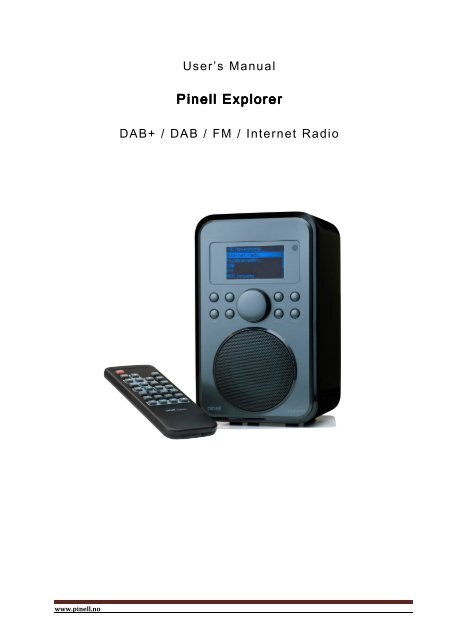
User’s Manual<br />
<strong>Pinell</strong> <strong>Pinell</strong> <strong>Pinell</strong> <strong>Explorer</strong><br />
<strong>Explorer</strong><br />
DAB+ / DAB / FM / Internet Radio
Contents<br />
Contents 2<br />
Safety Information ................................................................................................................................................. 3<br />
The Contents of the Package 4<br />
Internet Radio Quick Start Guide 5<br />
This is what you need before you can begin to use your Internet Radio ................................................................ 6<br />
Overview of controls (a) ........................................................................................................................................ 7<br />
Remote Control Overview ..................................................................................................................................... 8<br />
Overview of outputs/inputs (b) .............................................................................................................................. 9<br />
Setup guide .......................................................................................................................................................... 10<br />
Accessing wireless networks and using the Internet Radio .................................................................................. 13<br />
Connecting to a network by means of cable ........................................................................................................ 17<br />
Changing to wireless network ............................................................................................................................. 19<br />
Choosing a station via Podcasts ........................................................................................................................... 20<br />
Obtaining an access code..................................................................................................................................... 21<br />
Adding a station to “My favourites” .................................................................................................................... 22<br />
Add a station to “My Added Stations” ................................................................................................................ 23<br />
Changing station information .............................................................................................................................. 24<br />
Music Player mode .............................................................................................................................................. 25<br />
DAB mode .......................................................................................................................................................... 26<br />
Manual tuning: .................................................................................................................................................... 27<br />
Dynamic Range Control (DRC) value ................................................................................................................. 28<br />
FM mode ............................................................................................................................................................. 29<br />
Specifying preset stations .................................................................................................................................... 30<br />
Selecting a preset station ..................................................................................................................................... 30<br />
AUX IN mode ..................................................................................................................................................... 31<br />
Sleep function...................................................................................................................................................... 32<br />
Setting the clock .................................................................................................................................................. 33<br />
Daylight saving time ........................................................................................................................................... 34<br />
Setting the alarm.................................................................................................................................................. 35<br />
General use 38<br />
Returning to the main menu ................................................................................................................................ 38<br />
Adjusting the volume .......................................................................................................................................... 38<br />
Scrolling through station information .................................................................................................................. 38<br />
System settings 39<br />
Equaliser ............................................................................................................................................................. 39<br />
Network setup ..................................................................................................................................................... 40<br />
Language ............................................................................................................................................................. 40<br />
Resetting to factory default settings..................................................................................................................... 41<br />
Software updates ................................................................................................................................................. 42<br />
Running the setup wizard .................................................................................................................................... 43<br />
Software version and Radio ID............................................................................................................................ 43<br />
Appendices 44<br />
Step 1: Setting up media sharing in Windows Media Player (WMP) 11 ............................................................. 44<br />
Step 2: Playing music from Media Player using the Internet radio ...................................................................... 46<br />
WPS encrypted networks .................................................................................................................................... 46<br />
Charging batteries ............................................................................................................................................... 46<br />
Use of rechargeable batteries ............................................................................................................................... 47<br />
Fault-finding ........................................................................................................................................................ 47<br />
Frequently Asked Questions ................................................................................................................................ 48<br />
Specifications 50<br />
www.pinell.no Page 2
Safety Information<br />
CE safety instructions<br />
UL safety instructions<br />
The lightning flash with arrowhead symbol,<br />
within an equilateral triangle is intended to alert<br />
the user to the presence of uninsulated<br />
"dangerous voltage" within the product's<br />
enclosure that may constitute a risk of electric<br />
shock.<br />
WARNING: TO REDUCE THE RISK OF<br />
ELECTRIC SHOCK, DO NOT EXPOSE<br />
THIS APPLIANCE TO RAIN OR<br />
MOISTURE.<br />
IMPORTANT SAFETY INSTRUCTIONS<br />
To reduce the risk of electrical shock, fire, etc.<br />
1. Read these instructions.<br />
2. Keep these instructions.<br />
3. Heed all warnings.<br />
4. Follow all instructions.<br />
5. Do not use this product near water.<br />
6. Clean with a dry cloth. To remove stubborn<br />
marks, use a soft cloth with a mild cleaning<br />
agent and water. Dry the apparatus<br />
immediately afterwards. Do not use coarse<br />
cloths, thinners, alcohol or other chemical<br />
solvents, as this may damage surfaces or erase<br />
labelling.<br />
7. Do not block any ventilation openings.<br />
Ventilation openings should never be covered<br />
by such objects as newspapers, table cloths,<br />
curtains, etc.<br />
8. Do not install near any heat sources such as<br />
radiators, heaters, stoves, or other apparatus<br />
that produces heat.<br />
WARNING<br />
INCORRECT BATTERY<br />
INSTALLATION CAN LEAD TO<br />
DANGER OF EXPLOSION<br />
ONLY REPLACE BATTERIES WITH<br />
BATTERIES OF THE SAME BRAND AND<br />
SIZE<br />
9. If the accompanying electrical plug does not fit your power<br />
outlet, you should obtain help from an electrician or purchase<br />
an adapter.<br />
10. Protect the power cord from being walked on or pinched<br />
particularly at plugs, power outlets, and the point where it<br />
exits from the apparatus. If the power cord is damaged, it<br />
should be repaired by an electrician.<br />
11. Only use attachments / accessories specified by the<br />
manufacturer.<br />
12. When moving the apparatus, be careful to avoid damage.<br />
13. Unplug this apparatus during lightning storms or when unused<br />
for long periods of time.<br />
14. Refer all servicing to qualified service personnel. Servicing is<br />
required when the apparatus has been damaged in any way,<br />
such as when a power supply cord or plug is damaged, liquid<br />
has been spilled or objects have fallen into the apparatus, the<br />
apparatus has been exposed to rain or moisture, does not<br />
operate normally, or has been dropped.<br />
15. Do not expose the apparatus to dripping or spraying liquids, or<br />
place containers filled with water, such as vases, on the<br />
apparatus.<br />
16. The mains switch or mains plug is used as a disconnect device<br />
and shall always remain readily operable during operation.<br />
17. Refer to the Rating Labels on the back of the radio for<br />
information about the input power and other safety<br />
information.<br />
Batteries:<br />
Always remove batteries from the battery holder when<br />
discharged or if the apparatus is not to be used for a long<br />
www.pinell.no Page 3<br />
period.<br />
Do not attempt to charge non-rechargeable batteries. Never<br />
attempt to open or short-circuit batteries as this may cause<br />
explosion. Fluids leaking from batteries may cause skin<br />
irritation. If fluid contacts bare skin, rinse with plenty of<br />
water; if you get it in your eyes, rinse thoroughly for 10<br />
minutes and contact a doctor.
The Contents of the Package<br />
Main unit with<br />
Remote Control<br />
User’s Manual<br />
www.pinell.no Page 4
Internet Radio Quick Start Guide<br />
Welcome<br />
Thank you for choosing the <strong>Pinell</strong> <strong>Explorer</strong>. Your radio will provide you with many hours<br />
of listening pleasure with simple access to thousands of internet radio stations all over the<br />
world, as well as a range of possibilities for music streaming. Wherever you live in the<br />
world, you will be able to listen to domestic and foreign radio stations. You may also<br />
select genres such as classical music, jazz, and so on. Your <strong>Pinell</strong> will give you the radio<br />
stations you prefer.<br />
Register your product at http://www.pinell.no.<br />
We will then send you up-to-date information about the development of your product (software<br />
updates etc.) and other exciting news from <strong>Pinell</strong>.<br />
The radio’s manual contains tips and advice for use and how to solve any problems which may<br />
arise. We also recommend you to visit www.pinell.no for updates and news.<br />
User manuals in other languages (Norwegian, Danish, Swedish and Finnish) are<br />
available at www.pinelldigital.com<br />
The information in this manual may be revised without warning. The manual is protected<br />
by copyright laws. It is illegal to copy or reproduce any part of this manual without the<br />
consent of TT Micro AS.<br />
This product must not be disposed of with ordinary waste. The product may contain<br />
materials which can impact the environment and should be delivered to a facility for<br />
collection of electronic waste.<br />
Copyright© 2009<br />
WEEE Symbol<br />
Electrical and electronic equipment may contain materials and substances which<br />
may be present environmental and health hazards if waste originating in such<br />
equipment is not correctly handled. Equipment labelled with the WEEE symbol<br />
must not be treated as household waste, but must be delivered as toxic waste to<br />
the local municipality’s recycling or environmental facility.<br />
(WEEE = Waste Electrical and Electronic Equipment)<br />
THE SYMBOL INDICATES THAT THE EQUIPMENT COMPLIES WITH EUROPEAN<br />
SAFETY AND ELECTROMAGNETIC DIRECTIVES<br />
www.pinell.no Page 5
This is what you need before you can begin to use<br />
your Internet Radio<br />
LAN settings:<br />
• Ensure that your network is in order and that you have access to the network settings.<br />
• If you need to enter the MAC address in your router, this can be found at:<br />
Main menu � System settings � Network � View settings � MAC address<br />
Wireless LAN settings:<br />
A broadband Internet connection must be available.<br />
• You need a wireless (Wi-Fi) access point to the broadband connection, preferably via a router.<br />
• If the wireless network is configured to use Wired Equivalent Privacy (WEP) or Wi-Fi Protected<br />
Access (WPA) data encryption, you must know the WEP or WPA code if the Internet radio is to<br />
communicate with the network.<br />
• If the wireless network is configured for reliable stations, you must specify the MAC address of the<br />
radio in the wireless access point. The MAC address of the radio can be found at:<br />
Main menu � System settings � Network � View settings � MAC address<br />
Ensure that the wireless access point is switched on and connected to the broadband network, or that<br />
the LAN cable is correctly connected, before proceeding. To ensure that this part of the system<br />
functions, you are recommended to read the instructions accompanying the wireless access point or<br />
LAN connection device.<br />
www.pinell.no Page 6
Overview of controls (a)<br />
Radio viewed from the front<br />
Button Internet DAB + FM Media Player AUX IN<br />
Power<br />
Press to switch radio on or off<br />
When the alarm sounds, press this button to switch it off.<br />
SOURCE<br />
PRESET<br />
FORWARD<br />
BACK<br />
Press to switch between Internet Radio, Media Player (Music Player), DAB (DAB+), FM and<br />
AUX IN mode.<br />
� NB: for use only in Media Player and AUX IN modes.<br />
Press to play the previous track, press to play/pause, press to go to the next<br />
track.<br />
� NB: for use only in Internet Radio, DAB+ and FM modes. See Page 31 for more<br />
information.<br />
Press and hold to store preset stations. Press to load a stored station.<br />
Press to go forward in the menu system.<br />
Press to go backwards in the menu system.<br />
a. Rotate to scroll through options, press to confirm selection.<br />
b. Press to go to the main menu or change options.<br />
c. When the alarm sounds, press to postpone the alarm for 5 to 30 minutes.<br />
d. Rotate to adjust the volume<br />
www.pinell.no Page 7
Remote Control Overview<br />
www.pinell.no Page 8
Overview of outputs/inputs (b)<br />
Radio viewed from the back<br />
Headphone<br />
jack:<br />
AUX IN<br />
jack:<br />
a. The radio is equipped with a 3.5 mm headphone jack.<br />
b. When headphones are connected, the internal speaker is automatically muted.<br />
a. Used to connect an external audio unit.<br />
www.pinell.no Page 9
Setup guide<br />
Step 1 – Switch on<br />
1. Plug in the power adapter and check that the LED lamp is illuminated.<br />
2. When in use, the radio can be switched off by pressing the STANDBY/ON button. The first time you<br />
switch on, the Setup Wizard will be displayed.<br />
Step 2 – Setup guide<br />
Continue the setup by pressing SELECT to confirm “YES” and rotate the knob to select 12/24 hour<br />
format. Press to confirm. Here you can choose whether the clock display will have 12 or 24 hour<br />
format.<br />
Press SELECT to confirm “Update from network”. The radio will now automatically obtain the date and<br />
time of day.<br />
Rotate the knob or use the arrow keys to highlight your time zone. Press to confirm.<br />
www.pinell.no Page 10
Rotate the knob or use the arrow keys to highlight Daylight saving. Press to confirm.<br />
Rotate the knob or use the arrow keys to highlight the desired WLAN region. Press to confirm.<br />
Rotate the knob or use the arrow keys to select SSID. Press to confirm. The radio stores this in its<br />
memory. The SSID is the name of your local network (LAN).<br />
� NB: In some cases the radio may find more than one network. Rotate the knob or use the arrow keys to select<br />
the one you prefer, and press to confirm.<br />
If the network has not been configured to request a password (WEP/WPA) the radio will connect to the<br />
network and display:<br />
If a WEP or WPA key (password) is required, you will be asked to enter this using the following display:<br />
www.pinell.no Page 11
Rotate the knob or use the arrow keys to scroll through the alphanumeric characters and press the knob<br />
to select each character.<br />
� NB: WEP/WPA passwords are case-sensitive, in other words, they distinguish between small and capital<br />
letters..<br />
If you select an incorrect character when entering the password, select “ ” to<br />
delete this character.<br />
� NB: a.> is an abbreviation of “Backspace”.<br />
Press Select to exit.<br />
b.> To select , or : with the arrow pointing to “ ”, rotate the knob or use<br />
the arrow keys to move in an anti-clockwise direction. You will see these options:<br />
c.> Select to return to the previous display.<br />
d.> After selecting the last character in the password, rotate the knob or use the arrow keys to highlight<br />
. Press to confirm.<br />
e.> The radio stores the WEP/WPA key you have specified so that you don’t need to provide it again.<br />
The setting has now been entered.<br />
NB: If you are using an encrypted WPS network, refer to Page 51.<br />
www.pinell.no Page 12
Accessing wireless networks and using the Internet<br />
Radio<br />
1. After completing the Setup Wizard, press SELECT to enter Internet Radio mode.<br />
� NB: You can also press SOURCE repeatedly until Internet Radio is displayed.<br />
Later, the display will show:<br />
2. With the arrow pointing to Station list, press SELECT to confirm.<br />
If the radio shows:<br />
when you attempt to connect to the network, you should:<br />
a. Check<br />
b. Move<br />
c. Check<br />
www.pinell.no Page<br />
that the router is functioning correctly. the radio to a place where the signal is stronger. that you have provided the correct password.<br />
13
Local stations<br />
� NB: Check that the radio is connected to the network.<br />
1. With the arrow pointing to Station list, press SELECT to confirm.<br />
2. Rotate the knob or use the arrow keys to highlight Local Norway, and press to confirm.<br />
� NB: “Local Norway” may be replaced by something else, depending on where you are. You may for<br />
example see “Local UK” or “Local US”. It is easy to find your local station.<br />
3. Rotate the knob or use the arrow keys to find your favourite, press to confirm and proceed to the<br />
desired programme.<br />
www.pinell.no Page 14
Selecting a station<br />
� NB: Check that the radio is connected to the network.<br />
1. With the arrow pointing to Station list, press SELECT to confirm.<br />
2. Rotate the knob or use the arrow keys to highlight Stations. Press to confirm.<br />
3. There are five alternative ways of selecting a station as shown above.<br />
� “LOCATION” enables you to choose from the radio stations available in each of the countries you select<br />
from the list.<br />
a. With the arrow pointing to Location, press SELECT to confirm.<br />
b. Rotate the knob or use the arrow keys to highlight the region you want. Press to confirm.<br />
c. Use the same method to select country and station. The radio will begin to play.<br />
www.pinell.no Page 15
� “GENRE” enables you to select radio stations according to content, for example classic rock, sport, news,<br />
etc.<br />
a. Rotate the knob or use the arrow keys to highlight Genre. Press to confirm.<br />
b. Rotate the knob or use the arrow keys to select your favourite content. Press to confirm.<br />
c. Rotate the knob or use the arrow keys to select the desired station. Press to confirm.<br />
� NB: a. Some radio stations broadcast 24 hours a day, while others do not.<br />
If the radio station is not broadcasting, an error message may be displayed. In that case, return to<br />
the station overview to select a different station.<br />
b. If the station has content which can be selected, a list will be displayed of previously broadcast<br />
programmes (podcasts).<br />
www.pinell.no Page 16
Connecting to a network by means of cable<br />
Step 1 – Select LAN settings<br />
� NB: a. Ensure that the LAN cable is connected to the LAN port.<br />
1. Press MENU, or rotate the knob or use the arrow keys to highlight Main Menu. Press to confirm.<br />
2. Rotate the knob or use the arrow keys to highlight System settings. Press to confirm.<br />
3. Rotate the knob or use the arrow keys to highlight Network. Press to confirm.<br />
4. Rotate the knob or use the arrow keys to highlight Manual settings. Press to confirm.<br />
5. With the arrow pointing to Wired, press SELECT to confirm.<br />
6. With the arrow pointing to DHCP enable, press SELECT to confirm.<br />
www.pinell.no Page 17
Later, the display will show:<br />
The LAN setting has now been entered.<br />
Step 2 – Enter Internet Radio mode from another mode<br />
1. Press MENU or rotate the knob or use the arrow keys to highlight Main Menu. Press to confirm.<br />
2. With the arrow pointing to Internet radio, press SELECT to confirm, or press SOURCE repeatedly<br />
until Internet Radio is displayed.<br />
or<br />
Continue with the above-mentioned steps. After a few seconds, the following will be displayed:<br />
If this happens, proceed as follows:<br />
a. Check that the router is functioning correctly.<br />
b. Check that the LAN cable is connected properly and is not damaged.<br />
c. Check the cable port.<br />
or<br />
www.pinell.no Page 18
Changing to wireless network<br />
� NB: For this procedure to apply, you must either reset to the factory settings or follow the steps below:<br />
1. Refer to “Select LAN settings” on Page 19 and rotate the knob or use the arrow keys to highlight<br />
Wireless. Press to confirm.<br />
2. With the arrow pointing to DHCP enable, press SELECT to confirm and go through the wireless<br />
network configuration step by step.<br />
☺ The wireless setup is now complete.<br />
www.pinell.no Page 19
Choosing a station via Podcasts<br />
1. Once the radio is connected to the network and Internet Radio has been selected, select the station<br />
list and rotate the knob or use the arrow keys to highlight Podcasts.<br />
2. Press SELECT to confirm and then find your favourite.<br />
3. Press SELECT to confirm and then select the preferred programme step by step.<br />
www.pinell.no Page 20
Obtaining an access code<br />
An access code is required to register the radio on the web page: www.wifiradio-frontier.com. Here you<br />
can create lists of favourites, register your own channels, and so on, which you can later play on your<br />
radio.<br />
1. Once the radio is connected to the network and Internet Radio has been selected, press Back to<br />
return to the menu system. Rotate the knob or use the arrow keys to highlight Help. Press to<br />
confirm.<br />
� NB: At this stage you will also be able to refer to the Frequently Asked Questions (FAQ).<br />
2. With the arrow pointing to Get access code, press SELECT to obtain the access code.<br />
www.pinell.no Page 21
Adding a station to “My favourites”<br />
☺ 1. Go to the web page: http://www.wifiradio-frontier.com<br />
☺ 2. Click on “Register here”.<br />
☺ 3. Create an account. You need an access code to complete this. See Page 23.<br />
NB: If you want to log in as a member, you must remember your registered e-mail address and password.<br />
☺ 4. You may now take advantage of the various additional functions and services offered by<br />
the Frontier Internet Radio Portal.<br />
If you already have an account and want to add a radio, log in to your account and go to My preferences ><br />
Add another Wi-Fi radio.<br />
Once the radio has been registered in the portal you can use your favourite lists and functions.<br />
☺ 5. To play My favourites you must go through two steps:<br />
a. With the arrow pointing to My favourites, press SELECT to confirm.<br />
b. Rotate the knob or use the arrow keys to highlight your favourite radio station, and<br />
press the knob.<br />
NB: The stations in My favourites are displayed in the subdirectory under “My favourites”. They will not be deleted<br />
even if you restore to the factory default settings.<br />
www.pinell.no Page 22
Add a station to “My Added Stations”<br />
☺ 1. Go to the web page: http://www.wifiradio-frontier.com<br />
☺ 2. Log in as a member (after registering on the previous page).<br />
☺ 3. You will now have access the various additional functions and services offered by the<br />
Frontier Internet Radio Portal. Here you can register channels which broadcast on the<br />
Internet but which are not included in the radio’s menu system. It is important to use the<br />
channel’s streaming address and not the WWW address.<br />
☺ 4. To play My added stations you must go through two steps:<br />
a. With the arrow pointing to My added stations, press SELECT to confirm.<br />
b. Rotate the knob or use the arrow keys to highlight your favourite station and press to<br />
confirm.<br />
NB: The stations you have added are displayed in the My added stations subdirectory. They will not be deleted even<br />
if you restore to the factory default settings.<br />
www.pinell.no Page 23
Changing station information<br />
By repeatedly pressing INFO on the remote control you can see the information shown on the second<br />
line of the display while listening to a programme.<br />
• Description of station<br />
This information scrolls across the display and is provided by<br />
the Internet radio station. Here, music titles or details of the<br />
programme being played are displayed.<br />
• Station location<br />
This is a description of the type of programme, provided<br />
either by the Internet radio station or the broadcaster.<br />
• Station reliability<br />
This shows the degree of reliability of the station you are<br />
listening to.<br />
• Signal information for the station<br />
This shows the digital bit rate and signal mode.<br />
• Station playback buffer<br />
This shows the level of the playback buffer for the station in<br />
question.<br />
• Station date<br />
This shows the exact date provided by the broadcaster.<br />
www.pinell.no Page 24
Music Player mode<br />
� NB: Before using this mode you are recommended to read the Attachments, from Page 48 onwards.<br />
A. PLAYING SHARED MEDIA<br />
1. Press SOURCE repeatedly until Music player is displayed.<br />
� NB: You may also go to Main menu and rotate the knob or use the arrow keys to highlight Music player.<br />
Press to confirm.<br />
2. With the arrow pointing to Shared media, press SELECT to confirm. Select the music step by step.<br />
3. Press to play the previous track, press to play/pause, press to go to the next track.<br />
B. Repeat mode<br />
1. When the music player menu is being displayed, rotate the knob or use the arrow keys to highlight<br />
Repeat play: Off. Press to toggle between “Off” and “On”.<br />
C. Shuffle mode (random playback order)<br />
When the music player menu is being displayed, rotate the knob or use the arrow keys to highlight<br />
Shuffle play: Off. Press to toggle between “Off” and “On”.<br />
www.pinell.no Page 25
DAB mode<br />
Getting started<br />
1. Press SOURCE repeatedly until DAB Radio is displayed. The first time this is done, a complete<br />
scan is performed, storing the station list in the memory.<br />
� NB: a. You may also press MENU, and rotate the knob or use the arrow keys to highlight DAB. Press to enter.<br />
b. When using the radio, you may perform a complete scan to update the station list by selecting Full<br />
scan in the DAB menu.<br />
2. When the scan is complete, the DAB+ and DAB stations are displayed in alphanumeric order. The<br />
first station in the list will be played.<br />
� NB: If no DAB+ or DAB signals are found in your area, you may need to relocate the radio.<br />
Changing to another DAB station<br />
1. Repeat Step 2 above. You can return at any time by pressing BACK.<br />
3. With the arrow pointing to Station list, press SELECT to confirm.<br />
4. Rotate the knob or use the arrow keys to scroll through the list of stations and press to confirm.<br />
� NB: If no DAB signals are found in your area, you may need to relocate the radio.<br />
Dynamic Label Segment (DLS):<br />
This is text information provided by the DAB station, which scrolls across the display. The<br />
information may include music titles or details of the programme provided by the broadcaster.<br />
www.pinell.no Page 26
Manual tuning:<br />
1. When the DAB menu is being displayed, select Manual tune to select a channel manually.<br />
2. Rotate the knob or use the arrow keys to scroll through the channels and press to select the desired<br />
channel.<br />
� NB: If there are several stations corresponding to this channel and frequency, after a few seconds a tuning<br />
meter will be displayed, showing the signal strength and name.<br />
3. Press SELECT again to exit this mode.<br />
Prune invalid: (remove channels not broadcasting or operating)<br />
1. In the DAB menu, select Prune invalid to remove channel which are not broadcasting or operating.<br />
2. Rotate the knob or use the arrow keys to highlight YES, and press to confirm.<br />
www.pinell.no Page 27
Dynamic Range Control (DRC) value<br />
You may specify the level of compression of stations to eliminate differences in the dynamic range or<br />
volume levels between radio stations.<br />
� NB: a. DRC off indicates that no compression is being applied.<br />
b. DRC low indicates a low level of compression.<br />
c. DRC high indicates maximum compression.<br />
1. In the DAB menu, select DRC to set the desired level of compression.<br />
2. Rotate the knob or use the arrow keys to highlight the desired level. Press to confirm.<br />
How to change the order of stations<br />
1. In the DAB menu, select Station order. Press to confirm.<br />
� NB: There are three options: Alphanumeric, Ensemble and Valid. The # after the standard setting indicates the<br />
option in use.<br />
STATION ORDER DESCRIPTION<br />
Alphanumeric Displays all stations in alphanumeric order.<br />
Ensemble Lists active stations (stations broadcasting at this moment) followed by inactive stations.<br />
Valid Removes inactive stations from the list.<br />
2. Rotate the knob or use the arrow keys to highlight the desired option. Press to confirm.<br />
www.pinell.no Page 28
FM mode<br />
A. GENERAL USE<br />
1. Press SOURCE repeatedly until FM Radio is displayed.<br />
The first time this is done, the radio goes to the beginning of the FM waveband (87.50 MHz).<br />
In later use, the station you last listened to is selected.<br />
� NB: You may also go to Main menu and rotate the knob or use the arrow keys to highlight FM. Press to<br />
confirm.<br />
3. Rotate the knob or use the arrow keys to raise or lower the frequency in steps of 0.05 MHz.<br />
4. To search automatically, press the up or down arrow key on the remote control.<br />
� NB: a. To use “auto-search” to locate the next active station, repeat Step 3.<br />
b. The frequency is displayed, changing until it stops at the next station.<br />
c. When the end of the waveband is reached, searching is repeated from the beginning.<br />
B. SCAN SETTING<br />
1. In FM mode you may at any stage press BACK or MENU to enter setting mode.<br />
2. With the arrow pointing to Scan setting, press SELECT to confirm.<br />
3. Rotate the knob or use the arrow keys to highlight YES or NO. Press to confirm.<br />
www.pinell.no Page 29
C. AUDIO SETTINGS<br />
In FM mode you may at any stage press BACK or MENU to enter setting mode.<br />
With the arrow pointing to Audio setting, press SELECT to confirm.<br />
Rotate the knob or use the arrow keys to highlight YES or NO and press to confirm. Here you may set the<br />
radio to play in mono, which improves the sound quality in the case of weak signals.<br />
Specifying preset stations<br />
The radio can store eight Internet, eight DAB+ and eight FM stations. The remote control must be used<br />
to store stations on preset values 5 to 8.<br />
To store a desired station:<br />
1. Find the station you wish to store under one of the buttons. Press and hold the button until you<br />
see the text “preset stored”.<br />
Selecting a preset station<br />
To select a stored station:<br />
1. Press SOURCE to enter relative mode.<br />
2. Press the numbered button under which you stored the preset channel.<br />
www.pinell.no Page 30
AUX IN mode<br />
1. Press SOURCE repeatedly until AUX in is displayed.<br />
� NB: You may also go to Main MENU and rotate the knob or use the arrow keys to highlight AUX in.<br />
Press to confirm.<br />
2. Using a cable, the radio may be transformed into a high quality speaker system.<br />
3. Connect one end of the audio cable to the headphone or “auxiliary out” jack on the source unit and<br />
the other end to the AUX IN jack on the back of the radio.<br />
The radio display shows:<br />
4. Adjust the volume on both the source unit and the radio to achieve optimal volume level.<br />
� NB: AUX IN provides a quick and easy way to connect an MP3 player or other external audio source.<br />
www.pinell.no Page 31
Sleep function<br />
This function switches off the radio automatically.<br />
1. The function may be activated from Main menu � Sleep. Press SELECT to confirm.<br />
2. Rotate the knob or use the arrow keys to set the sleep time to between 0 and 60 minutes.<br />
3. Stop rotating when the desired time is shown.<br />
� NB: a. The time may be set in steps of 15 minutes.<br />
b. In this setting, the display shows the sleep icon and how many minutes remain to the end of the set<br />
time.<br />
4. When the set time has expired, the radio switches itself to standby mode.<br />
5. Press STANDBY/ON to continue listening to the radio.<br />
www.pinell.no Page 32
Setting the clock<br />
To set the time and date manually<br />
1. This may be activated from MAIN MENU � System settings � Time/Date. Press SELECT to<br />
confirm.<br />
2. With the arrow pointing to Set Time/Date press SELECT and rotate the knob to set the date.<br />
3. Set the month, year, hours and minutes in the same way. The setting is now completed.<br />
You may also use “Auto update”<br />
� NB: Select Auto update. Check that the radio is connected to the Internet. It will then obtain the date and<br />
time automatically.<br />
1. Rotate the knob or use the arrow keys to highlight Auto update. Press to confirm.<br />
www.pinell.no Page 33
2. You can select either Update from DAB or Update from Network. Press SELECT to confirm. The<br />
setting is now completed.<br />
� Specify time format<br />
1. Rotate the knob or use the arrow keys to highlight Set format. Press to confirm.<br />
2. Rotate the knob or use the arrow keys to highlight the desired format and press to confirm.<br />
� Setting time zone<br />
1. Rotate the knob or use the arrow keys to highlight Set time zone. Press to confirm.<br />
2. Rotate the knob or use the arrow keys to highlight your local time zone. Press to confirm.<br />
The clock is now set.<br />
Daylight saving time<br />
1. This is activated from MENU � System settings � Time/Date � Daylight savings. Press SELECT<br />
to confirm.<br />
2. Rotate the knob or use the arrow keys to highlight ON. Press to confirm.<br />
www.pinell.no Page 34
Setting the alarm<br />
� NB: Make sure you have set the clock correctly before setting the alarm.<br />
1. It may be activated from MAIN MENU � Alarms. Press SELECT to confirm.<br />
2. Rotate the knob or use the arrow keys to highlight the desired alarm and press to confirm.<br />
3. With the arrow pointing to Enable: Off, press SELECT to confirm.<br />
4. Rotate the knob or use the arrow keys to highlight the desired alarm frequency. Press to confirm.<br />
5. Rotate the knob or use the arrow keys to highlight Time: 00:00. Press to confirm.<br />
6. Rotate the knob or use the arrow keys to change the hours. Press to confirm.<br />
7. Use the same method to set the minutes. Press to confirm.<br />
www.pinell.no Page 35
8. Rotate the knob or use the arrow keys to highlight Source: Internet radio. Press to confirm and<br />
turn the knob to the desired alarm mode.<br />
� NB: Rotate the knob or use the arrow keys to highlight Preset: Last listened until you hear the desired alarm.<br />
9. Press SELECT to confirm and then turn the knob to Volume: 12. Press to confirm.<br />
10. Rotate the knob or use the arrow keys to set the desired volume. Press to confirm.<br />
11. Finally, rotate the knob to highlight Save. Press to confirm.<br />
The display shows Alarm Saved for three seconds. The alarm icon is displayed.<br />
To check the alarm status, press STANDBY/ON to enter standby mode.<br />
www.pinell.no Page 36
• Turning off the alarm<br />
When the alarm sounds, you may either press STANDBY/ON to turn it off, or<br />
• Using the snooze function<br />
Press SELECT to postpone the alarm. Press the button several times to select the SNOOZE time: 5,<br />
10, 15 or 30 minutes.<br />
� NB: a. When the snooze function is in use, the related alarm icon will flash and indicate how much time has<br />
passed. At this stage you may also press STANDBY/ON to turn off the alarm.<br />
b When the SNOOZE time has expired, the alarm will begin to sound again.<br />
• Cancelling an alarm<br />
Follow these steps:<br />
a. Select the desired alarm: ALARM 1 or ALARM 2 and press SELECT to enter setting mode.<br />
b. With the arrow pointing to Enable: Daily (or another frequency), press SELECT.<br />
c. Rotate the knob or use the arrow keys to select Off, and press to confirm.<br />
d. Rotate the knob or use the arrow keys to highlight Save, and press to confirm.<br />
If necessary, reset to the factory default settings.<br />
www.pinell.no Page 37
General use<br />
Returning to the main menu<br />
� Press MENU on the remote control or rotate the knob or use the arrow keys to highlight Main menu.<br />
� You may also return to Main menu at any time by repeatedly pressing BACK.<br />
Adjusting the volume<br />
� Adjust the volume by rotating .<br />
� The radio will remember the previously used volume level.<br />
� Or use VOL up or VOL down on the remote control.<br />
Scrolling through station information<br />
� Information is displayed on the second line of the display while you listen to a programme.<br />
� To see more information, press INFO several times.<br />
� NB: This function does not work in AUX IN mode.<br />
www.pinell.no Page 38
System settings<br />
Equaliser<br />
� NB: To adjust the sound quality, use the procedure below.<br />
1. Press MENU or rotate the knob or use the arrow keys to highlight Main Menu. Press to confirm.<br />
2. Rotate the knob or use the arrow keys to highlight System settings. Press to confirm.<br />
3. Rotate the knob or use the arrow keys to highlight Equaliser. Press to confirm.<br />
4. Rotate the knob or use the arrow keys to highlight the desired option. The setting is now completed.<br />
www.pinell.no Page 39
Network setup<br />
� NB: Use this if you want to:<br />
� Obtain access to a different router --------- Internet Wizard<br />
� Obtain a MAC address, WLAN region, IP address, etc. ---------- View settings<br />
� Relocate to a different region ---------- Wlan region<br />
� Change the way the radio is connected: wireless or by cable ---------- Manual settings<br />
1. This may be activated from Main menu � System settings � Network. Press SELECT to confirm.<br />
2. Rotate the knob or use the arrow keys to highlight the desired option and press to confirm.<br />
Language<br />
1. This may be activated from Main menu � System settings � Language. Press SELECT to<br />
confirm.<br />
2. Rotate the knob or use the arrow keys to highlight the desired option and press to confirm.<br />
www.pinell.no Page 40
Resetting to factory default settings<br />
� NB: Performing this will clear the radio’s memory, all WEP/WPA codes and any other user settings.<br />
1. This may be activated from Main menu � System settings � Factory reset.<br />
2. Press SELECT to confirm and then turn the knob to highlight YES.<br />
3. Press SELECT to confirm.<br />
� NB: If you do not wish to proceed, you may rotate the knob or use the arrow keys to highlight NO<br />
at Step 2, and then press the knob to cancel.<br />
www.pinell.no Page 41
Software updates<br />
1. This may be activated from Main menu � System settings � Software update. Press SELECT<br />
to confirm.<br />
2. With the arrow pointing to Auto-check setting, press SELECT to confirm.<br />
3. Rotate the knob or use the arrow keys to highlight YES. Press to confirm and the display will<br />
appear as in Step 2 above.<br />
4. Rotate the knob or use the arrow keys to highlight Check now. Press to confirm.<br />
The following display appears:<br />
www.pinell.no Page 42
� NB: Software updates may take several minutes. Do not switch off the radio until updating is complete. Doing<br />
so may result in damage to the radio.<br />
Running the setup wizard<br />
1. This may be activated from Main menu � System settings � Setup wizard. Press SELECT to<br />
confirm.<br />
2. Follow the steps to run the wizard.<br />
Software version and Radio ID<br />
1. This may be activated from Main menu � System settings � Info.<br />
2. Press SELECT to confirm.<br />
You may be asked for this information when you request technical support.<br />
www.pinell.no Page 43
Appendices<br />
Step 1: Setting up media sharing in Windows Media<br />
Player (WMP) 11<br />
� NB: After downloading and installing Windows Media Player 11 for Windows XP and connecting the radio to the<br />
network, you must set up media sharing in order to share music with the radio.<br />
The following steps describe how to set up media sharing in Windows Media Player 11.<br />
1. Check that your PC is connected to the network.<br />
2. Check that the radio is switched on and connected to the same network.<br />
3. In WMP, place the audio files and folders you want to share with the <strong>Pinell</strong> <strong>Explorer</strong> in the Media<br />
Library (Library > Add to Library…).<br />
4. In WMP, activate media sharing (Library > Media sharing…).<br />
www.pinell.no Page 44
The radio will be shown as “Unknown Device”. Check that the radio has access to the shared medium<br />
by highlighting it and clicking on “Allow”. You may also give the shared medium a name in Settings…<br />
Click on OK to close the dialogue boxes.<br />
The PC will now be ready to stream music to the radio.<br />
* If the device is not displayed in the device list, go through the following steps:<br />
a. From the “Media Player” menu on the Internet radio, select “UPnP Servers” and a list of available<br />
computers will be displayed.<br />
b. Select the desired computer.<br />
The device will now be displayed in the list. If you want to check that this is your radio, right-click on<br />
the device and select “Properties”. The MAC address of the radio will be displayed.<br />
www.pinell.no Page 45
Step 2: Playing music from Media Player using the<br />
Internet radio<br />
After installing and configuring the radio and Windows Media Player 11, you can play music via a wireless<br />
network.<br />
The following steps describe how to play music with the radio.<br />
1. Select “Shared Media” on the “Media Player” menu.<br />
2. Select the computer from which you wish to play music.<br />
3. Use the buttons to scroll through the following categories: All Music, Genre, All Artists, Contributing<br />
Artists, Album Artists, Composers, Albums, Playlists, Folders or Star Ratings, and press SELECT to<br />
confirm.<br />
4. Select the tracks you wish to play and press SELECT. Enjoy the music!<br />
WPS encrypted networks<br />
WPS encrypted networks are identified by names beginning with “[WPS]”.<br />
Go to MENU > SYSTEM SETTING > NETWORK and select PBC WLAN Setup. The radio will ask you to<br />
press the “connect to” button on the router. It will then scan until it finds the network and connect.<br />
For more information about setting up a WPS encrypted network, refer to the manual for the WPS router.<br />
Charging batteries<br />
It’s very important when charging batteries, that these are properly inserted into the radio, with<br />
correct polarity, if not then the batteries can be damaged or they can damage the radio battery<br />
compartment.<br />
Full charge usually takes 8-10 hours, and battery time time is between 6-8 hours dependent of<br />
volume and features.<br />
Wireless network uses more power then DAB and FM. DAB gives the best battery time.<br />
www.pinell.no Page 46
Use of rechargeable batteries<br />
When using rechargeable batteries, its important to set the internal switch in the battery<br />
compartment to Charge On and the switch on the back of the radio to Battery on. This switch is<br />
used to cut the battery circuit from the radio to save battery, when used in battey mod.<br />
Fault-finding<br />
If you have problems with your Internet radio, you may find it useful to refer to the Help section of our web<br />
site: www.pinell.no.<br />
You will also find useful tips and advice at www.wifiRadio-frontier.com.<br />
If you experience difficulty in connecting the radio to a wireless network, the following steps may help to<br />
find a solution:<br />
1. Check that a PC with wireless access has access to the Internet via the same network.<br />
2. Check that a DHCP server is available, or that you have configured a static IP address for the radio. To<br />
configure a static IP address for the radio, go to “System settings > Network > Manual settings ><br />
Wireless”, and select “DHCP disable”.<br />
3. Check that the access point does not restrict connections to the MAC address in question. You may<br />
view the radio’s MAC address via “System settings > Network > View settings > MAC address”.<br />
4. If you are using an encrypted network, check that you have provided the correct code or password for<br />
the radio. Remember that codes in alphabetic format are case sensitive. If the radio shows “Wireless<br />
error” followed by a five-digit number when you try to connect to an encrypted network, check that you<br />
have used the correct password for the network. If the problem persists, you may need to check the<br />
network configuration.<br />
5. If the radio is able to connect to the network but cannot play certain stations, the explanation may be:<br />
a. The station is not broadcasting at the moment (remember that it may be in a different time zone).<br />
b. The limit for the number of people who can listen to the station simultaneously has been reached.<br />
c. The station is no longer broadcasting.<br />
www.pinell.no Page 47
d. The link stored in the radio is out of date.<br />
e. The Internet connection with the server (which may be located in a different country) is slow.<br />
Try using a PC to play programmes from the broadcaster’s web site.<br />
6. If it is possible to play the station via a PC, you may use the form on http://www.wifiRadio-frontier.com<br />
to notify us so that we can update the station information used by the radio.<br />
Frequently Asked Questions<br />
Question: Answer:<br />
What do I need to start using the<br />
radio?<br />
Press the “SOURCE” button to obtain access to<br />
the Internet radio mode.<br />
Then follow the instructions on the screen to<br />
select either GENRE or LOCATION.<br />
Important: You need ADSL broadband access to<br />
use the Internet radio mode. You also need a<br />
wireless router/access point for wireless<br />
connection.<br />
The radio supports WEP, WPA and WPA2<br />
encryption.<br />
How do I connect the radio? When you switch on the radio for the first time it<br />
will ask you to scan for a network. Scanning will<br />
result in a list of available networks from which<br />
you may select the network you wish to use.<br />
If the selected network is not password protected,<br />
you will obtain immediate access.<br />
If the network is password protected you will be<br />
asked to provide the password (WEP key) for the<br />
network.<br />
What if the WEP key is not accepted? Remember to distinguish between capital letters<br />
and small letters.<br />
What if the radio will not connect to<br />
the network?<br />
If you have difficulty connecting to the network:<br />
Check that you are using the correct WEP key or<br />
password and remember that this is casesensitive.<br />
Check that the router is connected to<br />
the Internet. The simplest way to check this is to<br />
www.pinell.no Page 48
Does the radio function without<br />
Internet access?<br />
What if I have mobile broadband<br />
access?<br />
I can view my music list in the radio’s<br />
album list but cannot play it.<br />
Does my radio have a memory so that I<br />
can store my favourite stations?<br />
Why do I get an error message when I<br />
register the Radio ID on<br />
http:/wifiradio-frontier.com?<br />
I have provided the IP address, etc.<br />
manually but am unable to get access.<br />
have a PC connected to the same network. If you<br />
have access to the Internet with the PC, the<br />
router must be connected.<br />
Check that your Wi-Fi network permits other<br />
devices to have access. Then switch on the radio<br />
and try again.<br />
The radio will receive FM and DAB broadcasts<br />
using an antenna, but needs Internet access for<br />
the Internet radio functions to work.<br />
You can use a router with a USB port for mobile<br />
broadband. A mobile USB card is usually plugged<br />
into a PC. If it is plugged into the router instead of<br />
the PC, you will have mobile broadband access via<br />
the mobile network. The radio will operate with<br />
this setup.<br />
Check that the medium you are trying to access is<br />
not copy protected. Our radio will not play Apple<br />
files or copy protected files.<br />
You can store eight Internet radio stations, eight<br />
DAB stations and eight FM stations.<br />
This is because it is not the Radio ID which is<br />
required, but the access code. To obtain the<br />
access code, start playing a web radio station and<br />
press MENU. Rotate the knob or use the arrow<br />
keys and highlight Station List. Rotate the knob or<br />
use the arrow keys and highlight HELP. Select GET<br />
ACCESS CODE. This is the code you must provide<br />
at http:/wifiradio-frontier.com<br />
Sometimes it is necessary to disconnect the<br />
power supply from the radio after setting<br />
manually. Switch the radio off and on again.<br />
www.pinell.no Page 49
I use an Apple Mac. How can I stream<br />
music from a Mac to the radio?<br />
Is the radio compatible with Windows<br />
PCs and Apple Macs?<br />
iTunes does not have a streaming function, but<br />
you can install third-party software (such as<br />
Twonky Media) which reads iTunes files and<br />
streams them on a network.<br />
You must have UPnP server software, for<br />
example Windows Media Player, to stream<br />
music.<br />
My firewall prevents access. Check that the following ports are open: UDP-<br />
TCP-ports 80 and 123; DNS port 53.<br />
Windows shares ports 135-139 and 445.<br />
Windows Media Player is variable: non-<br />
Microsoft firewalls may need configuration for<br />
UPnP.<br />
I cannot play a particular radio station. The station is not broadcasting, is overloaded or<br />
has insufficient bandwidth.<br />
The station is broadcasting with an unknown<br />
codec.<br />
The link is out of date.<br />
Specifications<br />
Technical<br />
information<br />
Specifications: DAB+, DAB, FM and internet radio<br />
Audio Output: 5W rms<br />
Speaker: 8 ohm<br />
Headphone Jack: 32 ohm<br />
Frequency Ranges:<br />
LCD Display: High resolution display<br />
Power Supply:<br />
Try other stations, try listening on the Internet<br />
portal’s web site, try again later.<br />
Explanation<br />
FM: 87.5 – 108Mhz DAB+, DAB: 174 – 240MHz<br />
Radio: 2412~2472MHz<br />
AC Power Input: 100-230V AC, 50-6 0Hz<br />
Dimension: BxHxD 115mm x 190mm x 114mm, Weight 1.5kg<br />
www.pinell.no Page 50
www.pinell.no Page 51