

Web_Designer_UK__May_2018

Create successful ePaper yourself
Turn your PDF publications into a flip-book with our unique Google optimized e-Paper software.
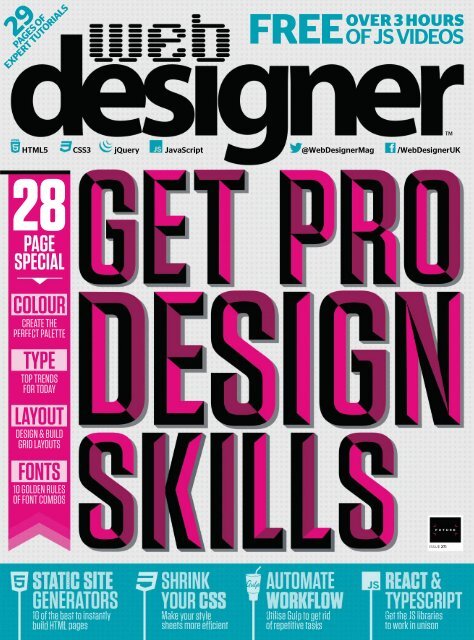
29<br />
PAGES OF<br />
EXPERT TUTORIALS<br />
FREE<br />
OVER 3 HOURS<br />
OF JS VIDEOS<br />
HTML5<br />
CSS3<br />
jQuery<br />
JavaScript<br />
@<strong>Web</strong><strong>Designer</strong>Mag<br />
/<strong>Web</strong><strong>Designer</strong><strong>UK</strong><br />
28<br />
PAGE<br />
SPECIAL<br />
COLOUR<br />
CREATETHE<br />
PERFECTPALETTE<br />
TYPE<br />
TOPTRENDS<br />
FORTODAY<br />
LAYOUT<br />
DESIGN&BUILD<br />
GRIDLAYOUTS<br />
FONTS<br />
10GOLDENRULES<br />
OFFONTCOMBOS<br />
ISSUE 271<br />
I<br />
E<br />
I<br />
10ofthebesttoinstantly<br />
o buildH MLpages<br />
I<br />
Make<br />
y<br />
sheetsmoree eefficient<br />
F<br />
E<br />
UtiliseGu<br />
liseGul<br />
l g<br />
id<br />
of repetitivetas ive taskss<br />
GettheJSlibraries<br />
e ies<br />
toworkinunison<br />
i<br />
I
Welcome<br />
Meta<br />
Welcome<br />
THE WEB DESIGNER MISSION<br />
To be the most accessible and inspiring voice for the industry, offering cuttingedge<br />
features and techniques vital to building future-proof online content<br />
Steven Jenkins<br />
Editor<br />
W<br />
Be<br />
better at design<br />
hat makes a good web page/site/app<br />
design? It’s a pretty broad question but<br />
you can guarantee that it will include<br />
fonts,colourandlayout.Theseareall<br />
essential components of the process and<br />
getting them right will go a long way to<br />
creating a design that works.<br />
This issue <strong>Web</strong> <strong>Designer</strong> has decided to<br />
bring together a swathe of tips, techniques and<br />
insight on fonts, type, colour and layout. It all kicks off<br />
on page 42 where we take a closer look at why you<br />
need to pick the right font, what a font portrays to<br />
the reader, the golden rules for picking font<br />
combinations and what is trending in the world of<br />
typography. UX/UI designer and Better <strong>Web</strong> Type<br />
author Matej Latin reveals his six steps to achieving<br />
meaningful typography. Then it’s on to colour.<br />
Discover what you need to know to get the perfect<br />
palette, how colour and accessibility should work<br />
together, the tools to help get the perfect colour<br />
scheme and what colours suggest to users.<br />
We take an in-depth look at the process of creating<br />
and designing layouts and how CSS Grid fits into the<br />
process. There is also a peek at what lies ahead for<br />
layouts. CSS Regions anyone?<br />
Do you want to build a HTML page in double<br />
quick? Of course you do. We reveal 10 of the best<br />
static site generators to help make this happen.<br />
Plus, we have the usual collection of must-read<br />
tutorials and interviews. Enjoy.<br />
“<br />
Layout is one of the most important aspects of the<br />
web and applications. Get it wrong and your users will<br />
get confused and leave<br />
”<br />
Highlight<br />
We want to<br />
“ maintain our<br />
commitment to the<br />
advancement of<br />
women from coding<br />
to leadership<br />
Dataviz specialists in an information-driven<br />
”<br />
world, FFunction make sense of information.<br />
<strong>Web</strong> <strong>Designer</strong> finds out more. Page 34<br />
Follow us on Twitter for all the news & conversation @<strong>Web</strong><strong>Designer</strong>Mag<br />
Visit our blog for opinion, freebies & more www.creativebloq.com<br />
FREE – exclusive with this issue<br />
<strong>Designer</strong> resources<br />
171<br />
Video Tuition – Over three hours of expert JavaScript video guides<br />
from Pluralsight (pluralsight.com)<br />
Assets –150 Nostalgia Lightroom presets and Dot Grid Photoshop actions<br />
from Sparklestock (sparklestock.com)<br />
– Tutorial files and assets<br />
www.filesilo.co.uk/webdesigner<br />
welcome ________________________________________________3
Meta<br />
Contributors<br />
This issue’s panel of experts<br />
Welcometothatbitofthemagwherewelearnmore<br />
aboutthefeaturedwritersandcontributors…<br />
“<br />
Typography and colour are the minimum<br />
components you would expect to use to form a design<br />
andcreatecontentthathasadistinctlookandfeel.”<br />
Steven Roberts<br />
Simon Jones<br />
Steven is a multi-disciplined<br />
creative developer from<br />
Teesside. He’s been<br />
designing and building<br />
layouts for over 10 years.<br />
This issue he’ll be revealing<br />
howtocreatelayoutswitha<br />
practicalfocusonCSSGrid.<br />
Page 62<br />
This issue Simon digs into<br />
the depths of his knowledge<br />
to talk about static site<br />
generators. They offer a<br />
simplewaytoproducehigh<br />
performance static pages<br />
for the web. Here he<br />
choosestenofthebestout<br />
there. Page 74<br />
Mark Shufflebottom<br />
Leon Brown<br />
MarkisaProfessorof<br />
Interaction Design at<br />
Sheridan College near<br />
Toronto. This issue he is<br />
exploring CSS4 variables<br />
andhowtheycanhelp<br />
designers experiment<br />
further with their web<br />
designs. Page 70<br />
Leon is a freelance web<br />
developerandtrainerwho<br />
assists web developers in<br />
creating efficient code for<br />
projects. This issue he<br />
recreates a host of<br />
techniques as seen on the<br />
top-class sites seen in<br />
Lightbox. Page 14<br />
Carl Cahill<br />
Carl is a creative who has<br />
been in the industy for over<br />
10yearswithapassionfor<br />
UID and has previously been<br />
awarded Creative of the Year.<br />
This issue Carl uses his<br />
knowledge to reveal how to<br />
pick the right font, the rules<br />
for combining fonts, how to<br />
choose the right colours and<br />
thetoolsandresourcesto<br />
help. Page 42<br />
Matej Latin<br />
Luke Harrison<br />
Matej is the author of<br />
Better <strong>Web</strong> Typography for<br />
aBetter<strong>Web</strong>andalsothe<br />
leadUX/UIdesigneratAuto<br />
Trader <strong>UK</strong>. This issue he<br />
unveils the six steps needed<br />
to create meaningful<br />
typography with some great<br />
examples. Page 46<br />
Luke is a web developer<br />
from Sheffield, <strong>UK</strong> who is all<br />
aboutscalable&efficient<br />
front-end architecture. In<br />
this issue, he explores how<br />
you can automate your<br />
workflow with Node.js<br />
powered task runner Gulp.<br />
Page 80<br />
Future PLC Richmond House, 33 Richmond Hill,<br />
Bournemouth, Dorset, BH2 6EZ<br />
Editorial<br />
Editor Steve Jenkins<br />
steve.jenkins@futurenet.com<br />
01202 586233<br />
<strong>Designer</strong> Harriet Knight<br />
Editor in Chief Amy Hennessey<br />
Senior Art Editor Will Shum<br />
Contributors<br />
James Norman, Mark BIllen, Leon Brown, David Howell, Carl<br />
<br />
White, Simon Jones, Luke Harrison, Tam Hanna, Philip Morris,<br />
<br />
Photography<br />
James Sheppard<br />
All copyrights and trademarks are recognised and respected<br />
Advertising<br />
<br />
Commercial Director Clare Dove<br />
clare.dove@futurenet.com<br />
Senior Advertising Manager Mike Pyatt<br />
michael.pyatt@futurenet.com<br />
01225 687538<br />
Account Director George Lucas<br />
george.lucas@futurenet.com<br />
Account Manager Chris Mitchell<br />
chris.mitchell@futurenet.com<br />
International<br />
<strong>Web</strong> <strong>Designer</strong><br />
Contact the International department<br />
to discuss partnership opportunities<br />
International Licensing Director Matt Ellis<br />
matt.ellis@futurenet.com<br />
Subscriptions<br />
contact@myfavouritemagazines.co.uk<br />
0344 848 2852<br />
+44 (0) 344 848 2852<br />
www.myfavouritemagazines.co.uk<br />
Sharon Todd<br />
Circulation<br />
Head of Newstrade Tim Mathers<br />
Production<br />
Head of Production Mark Constance<br />
Production Project Manager Clare Scott<br />
Advertising Production Manager Joanne Crosby<br />
Digital Editions Controller Jason Hudson<br />
Production Manager Nola Cokely<br />
Management<br />
Managing Director Aaron Asadi<br />
Commercial Finance Director Dan Jotcham<br />
Editorial Director Paul Newman<br />
Head of Art & Design Greg Whittaker<br />
Printed by<br />
Willenhall, WV13, 3XT<br />
Distributed by Marketforce, 5 Churchill Place, Canary Wharf,<br />
London, E14 5HU www.marketforce.co.uk Tel: 0203 787 9060<br />
ISSN 1745-3534<br />
We are committed to only using magazine paper which is derived from<br />
<br />
<br />
managed forests, conforming to strict environmental and socioeconomic<br />
standards. The manufacturing paper mill holds full FSC (Forest Stewardship<br />
<br />
<br />
<br />
<br />
<br />
<br />
<br />
is, as far as we are aware, correct at the time of going to press. Future cannot<br />
<br />
are advised to contact manufacturers and retailers directly with regard<br />
<br />
<br />
<br />
<br />
companies mentioned herein.<br />
<br />
or have the necessary rights/permissions to supply the material and<br />
<br />
<br />
<br />
<br />
is sent at your own risk and, although every care is taken, neither Future<br />
<br />
<br />
<br />
Mark White<br />
MarkWhiteisTechiques<br />
editor on sister mag<br />
Photoshop Creative. He has<br />
been using Photoshop for<br />
over ten years. This issue he<br />
shows how to create an<br />
impressive isometric design<br />
that relies on vital features in<br />
Photoshop. Page 56<br />
Tam Hanna<br />
Tamhasawealthof<br />
experience in a breadth of<br />
different development<br />
langauges. This issue he<br />
takeacloserlookathowto<br />
bring together TypeScript<br />
and React with the help fo<br />
the module bundler<br />
webpack. Page 86<br />
Follow us!<br />
Facebook: www.facebook.com/<br />
<strong>Web</strong><strong>Designer</strong><strong>UK</strong><br />
Twitter: https://twitter.com/<br />
webdesignermag<br />
<br />
<br />
London Stock Exchange<br />
<br />
www.futureplc.com<br />
Chief executive Zillah Byng-Thorne<br />
Peter Allen<br />
Penny Ladkin-Brand<br />
Tel +44 (0)1225 442 244<br />
4 __________________________________________________experts
C ntents<br />
Inside issue 271<br />
Cutting-edge features, techniques and inspiration for web creatives<br />
Meta<br />
Chat with the team and other readers and discuss the latest tech, trends and techniques. Here’s how to stay in touch…<br />
steve.jenkins@futurenet.com @<strong>Web</strong><strong>Designer</strong>Mag www.creativebloq.com<br />
08 Creative trends to watch out for<br />
Shutterstock recently released its <strong>2018</strong> Creative<br />
Trends Report. Find out what’s coming your way<br />
Cover focus<br />
10 <strong>Web</strong>Kit: The best must-try<br />
resources out there<br />
Discoverthelibrariesandframeworksthat<br />
will make your site a better place to visit<br />
11 NoexcuseforabadUI<br />
James Norman from Fasthosts tells you what<br />
makesagoodUIandwhyit’simportant<br />
14 Lightbox<br />
A showcase of inspirational sites and the<br />
techniques used to create them<br />
26 Angelic airplanes<br />
Russian agency Red Collar reveals how it<br />
delivered Inculerate’s distinctive new design<br />
34 Form and FFunction<br />
<strong>Web</strong> <strong>Designer</strong> finds out how dataviz specialist<br />
FFunction makes data beautiful and engaging<br />
42 Get pro design skills<br />
Learn how pick the right font, create<br />
meaningful typography, pick the perfect<br />
palette and build brilliant layouts<br />
62 Master layouts<br />
Whatmakesalayoutgreat?Discoverthesecrets<br />
behind designing and building what you need<br />
42<br />
74 10 best static site generators<br />
WanttobuildHTMLpagesindouble-quicktime?<br />
Then try one of these carefully selected options<br />
92 Hosting listings<br />
An extensive list of web hosting companies.<br />
Pick the perfect host for your needs<br />
94 Course listings<br />
Wanttostartlearningonline?Checkout<br />
what courses are out there with this list<br />
98 Next month<br />
What’s in the next issue of <strong>Web</strong> <strong>Designer</strong>?<br />
62<br />
Master layouts<br />
How to design and create the perfect page<br />
74<br />
10 best static site generators<br />
Create HTML pages in double-quick time<br />
6 ________________________________________________ contents
FileSilo<br />
96 Get the latest must-have resources and videos<br />
<br />
<br />
<br />
<br />
96<br />
Never miss<br />
an issue<br />
Subscribe<br />
Turn to page 32 now<br />
Save 20 percent and get the<br />
magazine delivered to your door<br />
WEB DESIGNER <br />
myfavouritemagazines.co.uk<br />
<br />
Tutorials<br />
<strong>Web</strong>gurustakeyoustep-by-step<br />
through professional techniques<br />
<br />
<br />
<br />
<br />
<br />
COMMENT — James Norman — p11<br />
34 18<br />
ProFile: <br />
Lightbox: <br />
Making data beautiful and engaging<br />
Dressing up eCommerce<br />
52 Code a dynamic SVG menu<br />
UseSVG,jQueryandtheGSAPanimationlibraryto<br />
create an animated radial menu<br />
56 Design isometric typography<br />
Learn how to build a city of letters, using the Pen tool,<br />
selections and layers in Photoshop<br />
70 Shrink your CSS<br />
UseCSS4variablestochangeavariableandeveryrule<br />
that depends on it<br />
<strong>Web</strong> Workshop<br />
50 Overlay graphics on video<br />
project-redspace.com<br />
Create designs to complement video backgrounds<br />
60 Multiple fade background colours<br />
rocka.co<br />
Code backgound colour changes on scroll<br />
<strong>Web</strong> Developer<br />
74 10 best Static Site Generators<br />
Discover the best options for creating HTML pages<br />
in double-quick time<br />
80 Automate your workflow<br />
Learn how to remove the nuisance of repetitive<br />
and mundane tasks with the help of Gulp<br />
86 Wire up TypeScript & React<br />
TypeScript makes coding easier, but deploying it with a<br />
framework can be a hassle. <strong>Web</strong>pack to the rescue<br />
contents _________________________________________________7
News<br />
CONTACT US AT: steve.jenkins@futurenet.com | @<strong>Web</strong><strong>Designer</strong>Mag<br />
Header<br />
What are the creative<br />
trends to watch for?<br />
Afterprovingprettysagefor2017’shottesttrends,thefolksat<br />
Shutterstockforecasttheyear’smostinfluentialvisualstyles<br />
Seeing the future would be<br />
agiftmostdesignersand<br />
influencers would die for. In<br />
truth, the most talented are<br />
more perceptive than lucky and can gauge<br />
current climates or social tastes to engineer<br />
solutions tomorrow’s world will want to see.<br />
<strong>Web</strong>designinnovatorsarenoexception<br />
and tend to be most adept at tapping into<br />
visual moods and fashions, not totally<br />
without insider help it seems.<br />
Shutterstock recently released its <strong>2018</strong><br />
Creative Trends Report which derives<br />
eleven styles by analysing billions of<br />
customer searches within the company’s<br />
vast repository of stock imagery. Paying<br />
most attention to those browsing habits of<br />
clients in the most influential trades such as<br />
film, TV, media and advertising,<br />
Shutterstock has some form when it comes<br />
to calling out creative cool. “Our 2017 report<br />
was particularly accurate in its predictions,<br />
identifying trends like ‘Glitch’ early on,”<br />
Shutterstock’s Curator Robyn Lange<br />
The tools, trends and news to<br />
inspire your web projects<br />
explains. So what are the trends set to turn<br />
headsin<strong>2018</strong>youmaywellask?<br />
Well topping the report are three major<br />
trends with “Fantasy” proving most<br />
bankable,representedbyahungerfor<br />
mythical characters, imagery and even<br />
sprawling orchestral music too. Search<br />
surges for “continuous line” and “neon<br />
circle” styles place “New Minimalism” in<br />
second spot before “Space” completes the<br />
trendiesttriotowatch.Whilethelatter’s<br />
recent popularity seems to reflect<br />
box-officecinemareleasessuchasStar<br />
Wars, other tips are more abstract forms<br />
including the “Natural Luxury” of marbles<br />
and crystal, candy-coloured “Punchy<br />
Pastels” and, bizarrely, Cactus plants.<br />
Aside from growing popularity for ancient<br />
geometrics, tactile craft wares such as<br />
embroidery, plus any imagery for<br />
cryptocurrency, Shutterstock reserve<br />
special mention for holographics. It might<br />
be bringing up the rear at the report’s<br />
position eleven but we recognise this one<br />
particularly among the trends observed in<br />
“<br />
Topping the report are three<br />
major trends with “Fantasy”<br />
proving most bankable<br />
recent site picks. Shimme nbow,<br />
prism-like colour palettes evoking the<br />
undeniable awe that holograms inspire<br />
seemagoodbet.Ifthatwasn’tenoughof<br />
aninsidertip,thereportalsomanagedto<br />
link many of the selected trends to specific<br />
countries. So what will be “rocking” our own<br />
creative shores by next Xmas? Terrazzo<br />
apparently… Yeah, we’ll let you know!<br />
STAT<br />
ATTACK<br />
MOBILE<br />
BROWSERS<br />
Who’s popular,<br />
and who’s not.<br />
Where’s Android?<br />
Chrome<br />
49.72 %<br />
Popular on desktop,<br />
popular on mobile<br />
Safari<br />
18.34 %<br />
Popular choice on<br />
Apple devices<br />
UC Browser<br />
15.76 %<br />
A well-known brand<br />
from Asia<br />
creativebloq.com<br />
In-depth tutorials,<br />
expert tips,<br />
cutting-edge<br />
features, industry<br />
interviews,<br />
inspiration and<br />
opinion. Make<br />
sure to get your<br />
daily dose of<br />
creativity, design<br />
and development.<br />
WEB DESIGNER<br />
DIGITAL EDITION<br />
Do you want to get your hands on<br />
a digital edition of your favourite<br />
web design magazine? Head to<br />
your preferred app store — Google<br />
Play (bit.ly/2wetvGp) or iTunes<br />
(apple.co/2igtBYq) — then<br />
download, install and purchase the<br />
issue of choice from within the app.<br />
Opera<br />
5.70 %<br />
Found on low-power<br />
smartphones<br />
Samsung<br />
5.49 %<br />
Popular mobile<br />
phone brand<br />
Source: gs.statcounter.com<br />
8 _____________________________________________________ news
Header<br />
Inspiration<br />
Sites of the month<br />
02.<br />
01.<br />
03.<br />
04.<br />
01. New Japan Pro-<br />
Wrestling KEIBA<br />
umabi.jp/njpw-keiba<br />
Japanese horse racing promo.<br />
02. Portfolio of Kadir Inan<br />
uix.me<br />
Cologne-based UI/UX designer showcases<br />
talent with smoking <strong>Web</strong>GL effects.<br />
03. Dot Agency<br />
dot-agency.it<br />
Italian agency crowds out the white space<br />
here with oversized SVG rollovers.<br />
04. Daijima<br />
daijima.jp<br />
How to choreograph impressive 3D<br />
animation skills to music.<br />
Graphics<br />
Thunder Rockets<br />
bit.ly/2EXDT6p<br />
Brazilian illustrators Thunder Rockets bring<br />
a wacky cartoonish style bursting with<br />
colour and packed full of charm.<br />
Colour picker<br />
Verdant Peninsula<br />
http://bit.ly/2FStA4w<br />
#CCFF94<br />
Typesetter<br />
Decoral<br />
bit.ly/2Djle4p<br />
ArtDecostylingwithamoderntwist,<br />
DecoralbyLaskoDzurovskiforTotem<br />
boasts 650 glyphs across three weights.<br />
WordPress<br />
Glytch<br />
bit.ly/2rrNuAt<br />
So called for the “glitch” effects employed<br />
throughout, Glytch is a set of music-themed<br />
homepage templates for selling sounds.<br />
#C4BE1E<br />
#F3BCA7<br />
#E2DC6E<br />
#614D92<br />
header ___________________________________________________9
Header<br />
Resources<br />
CONTACT US AT:<br />
steve.jenkins@futurenet.com | @<strong>Web</strong><strong>Designer</strong>Mag<br />
webkit<br />
Discover the must-try resources that<br />
will make your site a better place<br />
jQuery Tilted<br />
Page Scroll<br />
bit.ly/1jlj1t3<br />
Visual designer Pete R is known for his<br />
plugin work and this one for adding a<br />
tilted page scroll effect to a page is a<br />
great example. Achieve an eye-catching<br />
3D effect that flips elements<br />
up like a stack of cards. Compatible with<br />
modern browsers and smartphones.<br />
Animate.css<br />
bit.ly/1qTVdjA<br />
Daniel Eden’s collection of “just-addwater<br />
CSS animations” can be used to<br />
add smooth motion effects and physics<br />
to page elements.<br />
Fontjoy<br />
fontjoy.com<br />
Fontjoy is a web app that uses “deep<br />
learning” to grab Google fonts and<br />
generate complimentary combinations<br />
you can customise.<br />
SVGMagic<br />
dirkgroenen.nl/SVGMagic<br />
This clever little plugin is a fallback that<br />
doesn’t employ magic but jQuery to find<br />
SVG elements within a website and swap<br />
them for PNGs if unsupported.<br />
TOP 5 <strong>Web</strong> conferences – March <strong>2018</strong><br />
Get yourself a seat at the biggest and best conferences coming your way soon<br />
.concat() <strong>2018</strong><br />
<strong>2018</strong>.conc.at<br />
Inviting the web dev and UX<br />
community to Salzberg, this<br />
one day event boasts 18<br />
industry speakers.<br />
ngVikings <strong>2018</strong><br />
ngvikings.org<br />
This travelling Angular<br />
conference hits Helsinki<br />
Finland with a band of speakers<br />
including Google experts.<br />
SXSW <strong>2018</strong><br />
sxsw.com<br />
The world-famous Interactive,<br />
Film and Music conference and<br />
festival open its doors in Austin<br />
Texas with a packed schedule.<br />
UX In The City<br />
bit.ly/2Dsd4Xs<br />
This community-led UX<br />
conference hosts keynote<br />
speakers Sarah Richards, Molly<br />
Watt and Chris Atherton.<br />
UX Camp<br />
Brighton<br />
bit.ly/2BoSUfm<br />
A smaller, more personal<br />
“barcamp” event, that appeals<br />
to UX designers.<br />
10_____________________________________________ resources
Header<br />
Opinion<br />
There is no excuse<br />
for bad UI<br />
What makes a good User Interface and why is it important?<br />
James Norman<br />
Content editor<br />
fasthosts.co.uk<br />
A good user<br />
interface design is<br />
characterised by<br />
aesthetics, ease of<br />
use, and functionality.<br />
Apple devices are famous for their intuitive user interfaces and good design. The<br />
fact these two characteristics are so prevalent in their products is no accident.<br />
The late Steve Jobs was famous for his unflinching focus on good design,<br />
because he understood how critical design was to the user experience:<br />
“Most people make the mistake of thinking design is what it looks like. People<br />
think it’s this veneer — that the designers are handed this box and told, ‘Make it look good!’ That’s<br />
not what we think design is. It’s not just what it looks like and feels like. Design is how it works.”<br />
Having a good user interface means that a customer will know intuitively how to use your<br />
website or app without too much help. By contrast, bad user interface design can leave a user<br />
abandoning their session frustrated with an empty cart. That’s why it’s so important to optimise a<br />
user interface design, and think about how your customers are interacting with your website.<br />
It is worth taking a step back to see how user interfaces have evolved, in order to understand<br />
why users have such high expectations for user interfaces today.<br />
User interfaces have grown from a text-based command-line interface (CLI), to a<br />
two-dimensional text-based user interface (TUI), and into the graphical user interface (GUI) in use<br />
today. Where CLI and TUI were only interacted with by keyboard, a GUI is controlled by a<br />
keyboard, mouse or, ever more commonly, a touchscreen device.<br />
Also growing in popularity are voice user interfaces (VUI) like Siri on Apple devices and<br />
Amazon’s Alexa, where devices are controlled through speech. For web designers, the GUI<br />
remains the most logical interface to focus on, however interaction with the prevailing VUIs is<br />
something that should not be overlooked.<br />
A good user interface design is characterised by aesthetics, ease of use, and functionality. The<br />
design should be quite minimalistic. An overload of content, images and buttons can confuse<br />
users who will search unnecessarily around the screen trying to find the bit that is relevant to<br />
them. Remember to include whitespace to break up the content a bit.<br />
Make buttons and options easily recognisable by using existing icons. Think of classic user<br />
interface icons like the trash can – most computer savvy users would know what the trash can<br />
does. The same goes for the floppy-disk save icon. Even though a lot of the new internetgeneration<br />
would never have seen a floppy disk in real life, they recognise that the floppy-disk<br />
icon is synonymous with saving.<br />
These icons haven’t changed over time because they’re so iconic and recognisable that users<br />
immediately know what they do, and that’s a fundamental of good user interface design. You<br />
want to make it intuitive. Users expect certain icons and will search for them, so there’s no use<br />
having a wacky, well-designed icon in place of a traditional, simple and effective one.<br />
You want to make the user interface as simple to use as you can, whilst still giving users all of<br />
the functionality they require. And of course you want it to look great.<br />
The bounce rates of your website can have an effect on your SEO (search engine optimisation).<br />
If someone lands on your site and bounces straight back because they’re overwhelmed and can’t<br />
figure out how to navigate, then that’s going to reflect on your bounce rates, which will affect your<br />
search rankings. This is particularly prevalent on mobile devices.<br />
Make sure that your internal linking is intuitive and easy to follow for humans, because search<br />
engine web crawlers will look at the internal navigation structure of your site and analyse its<br />
effectiveness when deciding on your search ranking.<br />
As well as that, having a page cluttered with too much content or too many features can cause<br />
the page to load slower, which can also have an effect on search engine optimisation.<br />
Remember; design is how it works. Strike the right balance between form, functionality and<br />
content, and you’ll deliver a smooth and intuitive user experience for your customers. Never<br />
forget Steve Jobs’ words; “Design is not just what it looks and feels like. Design is how it works.”<br />
header __________________________________________________ 11
Header<br />
Resources<br />
CONTACT US AT:<br />
steve.jenkins@futurenet.com | @<strong>Web</strong><strong>Designer</strong>Mag<br />
webkit<br />
Discover the must-try resources that<br />
will make your site a better place<br />
Devices.css<br />
picturepan2.github.io/devices.css<br />
Keen to render the very latest<br />
smartphones and devices in nothing but<br />
CSS? Well if so, Devices.css is a Github<br />
listed collection of gorgeously realised<br />
new iPhones, Google Pixels, Samsung<br />
Galaxy handsets and more. As a<br />
lightweight testament to what inventive<br />
HTML and minified stylesheets can<br />
achieve it’s worth a look.<br />
Bulma<br />
bulma.io<br />
Tipped for broad adoption in <strong>2018</strong>,<br />
Bulma is an open source, mobile-first<br />
CSS framework based on Flexbox that<br />
promises to be simple to learn and use.<br />
A-Frame<br />
aframe.io<br />
A-Frame is a library for creating <strong>Web</strong>VR<br />
experiences from HTML-based worlds,<br />
producing a 3D perspective from two<br />
screens at multiple angles.<br />
mark.js<br />
markjs.io<br />
Usable as a jQuery or pure JS plugin,<br />
mark.js is a flexible keyword highlighter<br />
for dynamically marking search terms<br />
within paragraphs of page text.<br />
TOP 5 WordPress themes for February <strong>2018</strong><br />
Shortcut your way to blogging brilliance with a handful of the hottest new themes<br />
Travelmatic<br />
travelmatic.purethe.me/<br />
Get Google Maps integration<br />
for plotting stop-off landmarks.<br />
This theme is ideal for a journey<br />
with photos and stories.<br />
Susastho<br />
bit.ly/2F4CWJm<br />
Susatho offers an elegant and<br />
clean design perfect for<br />
marketing yoga, health and<br />
gym services.<br />
Halena<br />
http://bit.ly/2n6lgFK<br />
Want to add a touch of<br />
sophistication to your<br />
eCommerce? Halena offers<br />
minimal & modern in abundance<br />
Esquise<br />
http://bit.ly/2rwXqsl<br />
Big, bold and beautiful. This<br />
magazine theme will ensure<br />
that your content stands out<br />
and will get seen.<br />
Ambesten<br />
MarketPlace<br />
bit.ly/2DyTKMv<br />
Ambesten is a flexible<br />
WooCommerce theme ideal<br />
for responsive shop fronts.<br />
12 _____________________________________________ resources
Reader survey<br />
FREE<br />
The JavaScript<br />
Handbook<br />
After completing the survey,<br />
you’ll receive a digital copy of<br />
The JavaScript Handbook<br />
as a thank you for<br />
ack.<br />
Each and every issue, we do our best to create a<br />
maga i e that you love to read, and we’re always<br />
looking for wa s to make it even better. Once<br />
again, we’d like<br />
your<br />
help in<br />
improving <strong>Web</strong> <strong>Designer</strong><br />
magazine, and all you<br />
need to do is answer some<br />
very quic questions<br />
about yo rself – we’ re<br />
really lo king forward to<br />
earin from you.<br />
Ste<br />
Editor<br />
Jenkins<br />
reader survey ________________________________________13
Millennials Are Screwed<br />
highline.huffingtonpost.com/articles/en/poor-millennials<br />
<strong>Designer</strong>: Gladeye — gladeye.com<br />
Development technologies WordPress, jQuery, Three.js, HTML5<br />
“<br />
Michael Hobbes and the<br />
Huffington Post present a<br />
vibrant scrolling narrative on<br />
a scary financial future<br />
”<br />
14 ________________________________________________lightbox
Li htBox<br />
Millennials Are Screwed<br />
#000000 #3BE370<br />
#E84CF5 #3059D6<br />
Above<br />
The GT Walsheim font, by Noël Leu for Grilli Type, is used<br />
in Regular and Bold weights, plus Oblique forms.<br />
Above<br />
The Simplon BP Mono font, by Emmanuel Rey for b+p<br />
swiss typefaces, also styles the left side text boxes.<br />
lightbox _________________________________________________15
LightBox<br />
Millennials Are Screwed<br />
Above<br />
As the user scrolls, the site animates the 'fall' of a pixelated character called Becky, who represents millennials<br />
Above<br />
Gladeye’s design incorporates eye-catching typography from Jason Wong, adding<br />
realstyletotheheadingspunctuatingthestory<br />
Above<br />
A myriad of image-based illustrations are also animated during scrolling, using<br />
frames and CSS transformations to implement<br />
16 ________________________________________________lightbox
LightBox<br />
Millennials Are Screwed<br />
Create a scroll up panel<br />
to reveal more content<br />
Create an interactive content cover that fades to reveal page content in response to user scrolling<br />
1. Initiate HTML<br />
The first step is to define the HTML document. All of the<br />
document is contained within the HTML container, which<br />
consists of the head and body sections. While the head<br />
section is responsible for loading the external CSS and<br />
JavaScript resources, the body section will store the<br />
content created in step 2.<br />
<br />
<br />
<br />
Scroll Fade<br />
<br />
<br />
<br />
<br />
*** STEP 2<br />
<br />
<br />
2. Content definition<br />
The HTML content consists of a header and main<br />
section. The header section is responsible for the 'cover'<br />
content that will be displayed to initially cover the full<br />
screen. The following main section will be used to store<br />
content that will move into view after the user starts to<br />
scroll the page.<br />
<br />
<br />
Once Upon a Time...<br />
<br />
<br />
In a land far away...<br />
<br />
3. Scroll listener<br />
Create a new file called 'code.js'. This JavaScript code<br />
must first wait for the page to load, upon which it will<br />
activate a page scroll event listener. When the user scrolls<br />
the page, a function will be triggered to search for the<br />
header section’s image, upon which some calculations<br />
will be performed to alter its size, positioning and opacity<br />
based on the current scroll position.<br />
window.addEventListener("load", function()<br />
{<br />
window.addEventListener("scroll",<br />
function(){<br />
var img = document.querySelector("header<br />
img");<br />
img.style.width = (100+(window.<br />
scrollY/20))+"%";<br />
img.style.left = (0-(window.<br />
scrollY/50))+"%";<br />
img.style.opacity = 1-(1/(window.<br />
innerHeight/window.scrollY));<br />
});<br />
});<br />
4. Body style<br />
Create a new file called 'styles.css'. The first part of the<br />
CSS sets the page to cover the full screen without any<br />
border spacing. This is achieved using the width and<br />
height attributes, along with margin and padding to<br />
eliminate any default spacing set by the browser. A black<br />
background and default font are also applied.<br />
html,body{<br />
display: block;<br />
width: 100%;<br />
height: 100%;<br />
margin: 0;<br />
padding: 0;<br />
font-family: "Trebuchet MS", Helvetica,<br />
sans-serif;<br />
background: #000;<br />
}<br />
5. Main container<br />
The main content container is set to cover half of the<br />
available screen width. A minimum height of double the<br />
screen height is set to guarantee the ability to scroll,<br />
regardless of how much content is set. The auto settings<br />
in the margin attribute are used to centrally align the<br />
container so that the child content automatically appears<br />
in the middle of the screen.<br />
main{<br />
width: 50%;<br />
min-height: 200%;<br />
font-size: 3em;<br />
color: #fff;<br />
margin: 10em auto 0 auto;<br />
}<br />
6. Header container<br />
The header container is set to display with relative<br />
positioning so that any child items can be positioned in<br />
relation to its location. Its height is set to match the<br />
screen height so that it covers the full space available.<br />
Hidden overflow is also applied to avoid excess cover<br />
content conflicting with the main content.<br />
header{<br />
display: block;<br />
position: relative;<br />
}<br />
height: 100vh;<br />
text-align: center;<br />
overflow: hidden;<br />
7. Header’s heading<br />
The H1 element inside the header is set to have specific<br />
size, colour and shadow settings. Other unique settings<br />
can also be applied in this definition. The application of<br />
the text shadow helps to avoid any conflict in the<br />
background image where colours may be difficult for the<br />
user to distinguish the text from.<br />
header h1{<br />
font-size: 6em;<br />
color: #c00;<br />
margin-top: 0;<br />
text-shadow: 2px 2px #000<br />
}<br />
***<br />
8. Header’s children<br />
Settings for all first level children of the header are set to<br />
share properties. This approach avoids having to repeat<br />
settings for each unique item; keeping the CSS small and<br />
manageable. All children will used fixed positioning<br />
placed in the top-left corner. They will also have a width<br />
matching the header container, along with margining to<br />
centrally align them.<br />
header > * {<br />
position: fixed;<br />
top: 0;<br />
left: 0;<br />
margin: 0 auto 0 auto;<br />
width: 100%;<br />
}<br />
lightbox _________________________________________________17
Open Wear<br />
www.open-wear.com<br />
<strong>Designer</strong>: Build in Amsterdam – buildinamsterdam.com<br />
Development technologies jQuery, Squarespace, WordPress, WooCommerce<br />
“<br />
This catalogue and eShop for the<br />
outerwear brand marries a reduced<br />
colour palette and readable page text<br />
with bold product placement<br />
”<br />
18 ________________________________________________lightbox
#5F9DCC<br />
#5A293E<br />
#0D738C<br />
#B6AEAB<br />
Above<br />
The geometric sans serif font Circular by Laurenz Brunner<br />
is employed in Book, Medium and Bold typefaces.<br />
Above<br />
The Druk Condensed Super font by Berton Hasebe is<br />
employed for the span headings running down the page.<br />
lightbox ________________________________________________ 19
Above<br />
A highly bold catalogue, the site blends high-impact product photography with action shots against a clean minimal template<br />
Above<br />
SelectanitemtoaccessaJavaScript-basedrotatorforexamininga360-degreelookattheavailablegarmentonhover<br />
20 _______________________________________________lightbox
LightBox<br />
Open Wear<br />
Create an animated<br />
slant box border effect<br />
Create an effect for images and other types of content components that responds to user interaction<br />
1. HTML initiation<br />
The first step is to create the page document architecture<br />
from HTML. This consists of the HTML document<br />
definition, which holds the head and body sections. While<br />
the head section is used to load the external CSS file, the<br />
body section is used to store the HTML created in step 2.<br />
<br />
<br />
<br />
Hover Frame: Slant<br />
<br />
<br />
<br />
*** STEP 2 HERE<br />
<br />
<br />
2. Visible HTML<br />
The visible content consists of a series of containers<br />
using the 'slant' class. You can place any content inside<br />
these containers. This example uses an individual image<br />
for each example container. The HTML is designed to be<br />
kept to a minimum, without any unnecessary elements<br />
for formatting or embedded styling.<br />
<br />
<br />
<br />
<br />
<br />
<br />
<br />
<br />
<br />
3. CSS initiation<br />
With the HTML now complete, create a new file called<br />
'styles.css'. The first definition in this file sets the HTML<br />
document and body container to display as a block with<br />
no margin or padding. This guarantees that the page will<br />
display without any visible border spacing. Optionally, you<br />
could add other properties, such as setting their<br />
min-height to 100%, meaning that the page is sized to fit<br />
the full screen.<br />
html,body{<br />
display: block;<br />
margin: 0;<br />
padding: 0;<br />
}<br />
4. Container class<br />
The slant container is identified using the 'slant' class.<br />
This element uses relative positioning, along with an<br />
inline-block display mode to allow it to flow as a normal<br />
text item while having sizing-related properties if required.<br />
Overflow is hidden to support the feature created in<br />
steps 5 and 6.<br />
.slant{<br />
position: relative;<br />
display: inline-block;<br />
overflow: hidden;<br />
}<br />
5. Border slant<br />
The slanted border feature is made from a box element<br />
overlaying the content container. This is achieved using<br />
the '::before' selector, which is used to define a virtual<br />
element inside CSS. This is set to be placed at the bottom<br />
of the slant container with a width and height that will<br />
cover enough space for the effect to work.<br />
.slant::before{<br />
content: "";<br />
display: block;<br />
position: absolute;<br />
bottom: -3em;<br />
left: -2em;<br />
width: 150%;<br />
height: 6em;<br />
}<br />
6. More border slant<br />
The border slant needs to match the page background<br />
colour for the effect to work. Additionally, the element<br />
needs to be rotated via the transform attribute so that it<br />
doesn’t appear as a straight line. Finally, a transition with a<br />
duration of one second is applied so that any changes to<br />
the rotation transform appear animated.<br />
.slant::before{<br />
background: #fff;<br />
transform: rotate(8deg);<br />
transition: transform 1s;<br />
}<br />
7. Hovered slant<br />
The rotation is required to change when the slant is<br />
being hovered. This step sets the rotation angle when<br />
this occurs. The changes that occur will appear animated<br />
due to the previous step’s transition attribute. Changing<br />
the -8 to another number will alter the angle that the<br />
slant rotates towards.<br />
.slant:hover::before{<br />
transform: rotate(-8deg);<br />
}<br />
***<br />
lightbox _________________________________________________21
Brand Love Score<br />
www.brandlovescore.com/blackfriday2017<br />
<strong>Designer</strong>: Drumroll — www.drumroll.com<br />
Development technologies ASP.NET, Respond, jQuery, Typekit<br />
“<br />
Leveraging social media data,<br />
Drumroll presents a dynamic web<br />
visualisation illustrating the most<br />
popular brands of Black Friday 2017<br />
”<br />
22________________________________________________lightbox
#FF4B33<br />
#151D1E<br />
#9403B4 #D5154A<br />
Above<br />
The Azo Sans font, by Rui Abreu and available through Adobe Typekit, is used exclusively in Light, Regular and Bold<br />
lightbox ________________________________________________23
LightBox<br />
Brand Love Score<br />
Create an interactive navigation<br />
controlled image caption<br />
Employ the power of attributes to tell your story with the help of captions<br />
1. Get started<br />
The first step is to define the document architecture that<br />
will be used to present the page content. This consists of<br />
a definition of the HTML document, which stores a head<br />
and body section. While the head section is used to load<br />
the JavaScript and CSS resources, the body section is<br />
used to store the content created in step 2.<br />
<br />
<br />
<br />
Picture Caption Navigationr<br />
<br />
<br />
<br />
<br />
*** STEP 2 HERE<br />
<br />
<br />
2. Body content<br />
The page content consists of two child containers; an<br />
article container that stores a navigation and a figure for<br />
storing text corresponding to the navigation options. The<br />
navigation contains the interaction options, and each<br />
have a unique title attribute. The figure stores the caption<br />
text that corresponds to the equivalently positioned<br />
option located within the navigation container.<br />
<br />
<br />
Page 1<br />
Page 2<br />
Page 3<br />
<br />
<br />
Caption 1<br />
Caption 2<br />
Caption 3<br />
<br />
<br />
3. JavaScript listening<br />
Create a new file called 'code.js'. There’s a need to set the<br />
value of the article’s 'data-theme' attribute to match the<br />
navigation option being highlighted by the user.<br />
JavaScript will wait until the page has loaded, upon which<br />
it will find all of the navigation links in order to apply a<br />
'mouseover' event listener. This listener will update the<br />
article’s 'data-theme' attribute to match the hovered<br />
navigation option’s title attribute.<br />
window.addEventListener("load", function()<br />
{<br />
var nodes = document.<br />
querySelectorAll("[data-theme] nav > *");<br />
for(var i=0; i
NEW YORK | 25–27 APRIL <strong>2018</strong><br />
DONNA LICHAW WES BOS ABBY COVERT DAN MALL VAL HEAD<br />
and<br />
more!<br />
TICKETS ON SALE NOW<br />
www.generateconf.com #generateconf
ANGELIC A RP AN S<br />
ANGELIC AIRPLANES<br />
WHEN SILICON VALLEY INVESTOR INCULERATE<br />
DEMAND A DISTINCTIVENEW WEBSITE, THEY<br />
OPTED FOR THE IMAGINATION OF RUSSIAN<br />
AGENCY RED COLLAR TO DELIVER AN IDEA FIT<br />
FOR GIVING ‘ANGEL’ ITS WINGS<br />
26 __________________________________________design diary
https://inculerate.com<br />
by<br />
RED COLLAR<br />
http://redcollar.digital<br />
@redcollars<br />
It’s fair to say the modern internet<br />
experience is dominated by a clutch<br />
of incredibly successful companies.<br />
Each has cleverly found a highly<br />
profitable niche within the online<br />
world to become clear leaders in areas<br />
of search, social media, eCommerce,<br />
video and more. These enduring brands,<br />
which we need not mention, very often<br />
rose out of the dotcom bubble in the late<br />
“BELIEVING THAT “CREATION STARTS WITH AN IDEA,”<br />
INCULERATE PRIDE THEMSELVES IN HELPING EXCITING<br />
STARTUPS TO GROW AS QUICKLY AS POSSIBLE”<br />
1990s and swerved being burst on the<br />
rise to the top. They outlasted the tidal<br />
wave of lesser competitors by seeing the<br />
future and evolving accordingly to<br />
conquer rapidly shifting territories.<br />
However, none of them did it without<br />
cost, and an equally important driver to<br />
success is always money, inspiring those<br />
with big chequebooks to take a gamble.<br />
The website we’re featuring this month<br />
relates directly to this, built to market a<br />
business that flashes the cash to fund<br />
the operations of fledging firms. An<br />
angel investment company based in<br />
Silicon Valley, California, Inculerate play<br />
a pivotal role in supporting promising<br />
new business ventures. Believing that<br />
“creation starts with an idea,” Inculerate<br />
pride themselves in helping exciting<br />
startups to grow as quickly as possible,<br />
furthering innovation and hopefully in<br />
turn making people’s life better. “They<br />
came to our agency with a request to<br />
create an impressive website that would<br />
reflect their principles and ideology,”<br />
begins the guys at commissioned<br />
agency Red Collar. “The main basic<br />
concept agreed quickly around this time<br />
was the paper airplane, deciding<br />
between us that the take-off theme<br />
probably reflects an investment<br />
company such as Inculerate the best.” If<br />
the colour of said collar seems familiar,<br />
it’s because we profiled the Russian<br />
agency’s equally imaginative web work<br />
for car paint manufacturer Auto Repair<br />
Materials, back in issue 259. Thankfully<br />
PROJECT STATS<br />
PROJECT DURATION<br />
2month<br />
P E OPLE INVOLVED<br />
5<br />
P E OPLE<br />
Creative Director<br />
Denis Lomov<br />
Producer<br />
Mikhail Serkov<br />
<strong>Designer</strong><br />
Daria Lomova<br />
Junior <strong>Designer</strong><br />
Anna Efremova<br />
Front-end Developer<br />
Anton Ustinov<br />
design diary _________________________________________27
ANGELIC AIRPLANES<br />
DESIGNING FOR DREAMS<br />
“Every aspect of the website was<br />
about showing what the client<br />
wanted to communicate out into<br />
the world,” revealed Red Collar’s<br />
Creative Director Denis Lomov. “So<br />
even every animation we created<br />
was done and chosen for areason.<br />
For instance, all the texts appear<br />
on eachscreen with amovement<br />
that is reminiscent ofhowanidea<br />
comes to mind. We wanted to<br />
create a special atmosphere on the<br />
site sowepaid considerable<br />
attention to all the animations and<br />
sounds. Suchas the sound of<br />
rustling paper making the action<br />
more immersive while making it<br />
more realistic, and the background<br />
melody helping to evoke the<br />
feeling ofimportance around the<br />
moment when a dream is being<br />
launched. We chose gold and a<br />
deep blue colour that was<br />
intended to be representative of a<br />
boundless space for opportunities.<br />
We then created all the content<br />
ourselves from training and<br />
performing airplane folding<br />
gestures, buying blue cardboard,<br />
applying golden body paint and<br />
capturing more than 1,500 shots<br />
for stop-motion video.”<br />
though we are assured no amount of<br />
that particular product was used<br />
Goldfinger-style to makeup the star of<br />
this latest URL! Intrigued? Well read on<br />
to discover how the story of inculerate.<br />
“THE MAIN QUESTION WAS HOW TO EMPHASISE THAT THE<br />
COMPANY INVESTS IN ANY PERSON INDEPENDENTLY OF<br />
GENDER, NATIONALITY, SEXUAL IDENTITY”<br />
com ‘unfolded’ to launch an angelic<br />
website worthy of investment.<br />
TAKING FLIGHT<br />
If you don’t already know them, Red<br />
Collar are an exciting digital agency<br />
from Voronezh, Russia, with a keen<br />
sense of the unique and innovative.<br />
Recognised by a passionate attitude and<br />
an impressive list of industry awards, the<br />
team insist on a principle of helping to<br />
make a client’s wishes come true.<br />
“Creative vision, technology and digital<br />
experience are the main principals of<br />
our agency, so it’s important for us to<br />
stay ahead of market strategies,<br />
technologies and creativity. Design and<br />
front-end development are our strength<br />
and so that’s why in every project you<br />
can see exclusive design and interesting<br />
decisions of front-end development.”<br />
These guys love what they do and the<br />
process of the work involved, and this<br />
enthusiasm was undoubtedly what drew<br />
Inculerate to a Soviet solution. “We<br />
always start think about the main idea of<br />
the website just after the contract is<br />
signed,” begins Creative Director Denis<br />
Lomov when explaining perceptions of<br />
Inculerate’s requirements. “The main<br />
question was how to emphasise that the<br />
company invests in any person<br />
independently of gender, nationality,<br />
sexual identity and so on. That was<br />
really important along with an insistence<br />
they didn’t want a classic investment<br />
website.” What followed was a gathering<br />
of Red Collar’s managers, designers and<br />
front-end developers to establish what<br />
that meant and brainstorm a<br />
fundamental concept right away.<br />
“Lots of ideas came to our mind but<br />
after a while we came up with an idea of<br />
an airplane to represent the kinds of<br />
startup businesses that Inculerate<br />
support. The great thing here was that<br />
the client absolutely trusted in us and<br />
were willing to let us create whatever<br />
we wanted.”<br />
28 __________________________________________design diary
ANGELIC AIRPLANES<br />
INTO THE FOLD<br />
So the core idea that underpins the<br />
finished site was established early and<br />
very much from all that initial creative<br />
brainstorming. This work in idea<br />
generation was however also informed<br />
by some competitor analysis that<br />
confirmed certain things that the client<br />
wanted to avoid. “We came through<br />
dozens of sites looking for good<br />
solutions,” confirms Lomov. “And after<br />
that we realised that all the investment<br />
websites are absolutely similar. Given<br />
that the client had already said they<br />
didn’t want to have a classic investment<br />
website, we centred around the take-off<br />
theme most enthusiastically.”<br />
The freedom Red Collar had to pursue<br />
this direction was aided by an admirably<br />
loose reign from Inculerate, who<br />
encouraged the team to go its own way<br />
throughout the project. Such an open<br />
attitude was made even more refreshing<br />
given the long-distance proximity<br />
between client and agency – an<br />
international relationship that hasn’t<br />
always been so trusting. “After the brief<br />
our Junior <strong>Designer</strong> made sketches and<br />
we showed them to our client,”<br />
continues Lomov. “It’s important to say<br />
that the company is from the USA and<br />
we’re in Russia, but in spite of different<br />
state of mind we managed to establish a<br />
very good and trusting relationship.<br />
They trusted in our professionalism and<br />
let us create at our discretion. They liked<br />
our idea and so we started to implement<br />
sketches into a real website. On every<br />
stage of design and front-end<br />
development we presented what we did<br />
and the client was really excited.”<br />
That front-end work would involve<br />
some inventive animation work, with<br />
lots of attention paid to creating an<br />
atmosphere with the visuals and sound<br />
too. Visitors to the finished site today<br />
will immediately appreciate the<br />
dedication to an idea, the choice of<br />
colours and the stop-motion gestures all<br />
performed lovingly by the team.<br />
HOVER CRAFTING<br />
The front-end development of the site<br />
was all written in PixiJS with the images<br />
and animations etc rendered onto<br />
Canvas. This approach consciously<br />
ensures that the content is displayed<br />
using the fastest and most flexible 2D<br />
rendering of <strong>Web</strong>GL while ensuring<br />
consistency across devices. “PixiJS<br />
allows us to make cross-platform sites<br />
that open on almost any device and<br />
browser, so the site is 100% optimised<br />
for all these types of devices,” Lomov<br />
confirms. The main interaction with the<br />
site of course happens via an interactive<br />
“THE FRONT-END DEVELOPMENT OF THE SITE WAS<br />
ALL WRITTEN IN PIXIJS WITH THE IMAGES AND<br />
ANIMATIONS ETC RENDERED ONTO CANVAS”<br />
slider, dragging a point on the screen to<br />
symbolise the ‘do-it-yourself’ effort<br />
associated with a startup. This makes<br />
the whole site more like an interactive<br />
story; in a few steps a paper plane is<br />
folded and launched like a business. “We<br />
have thought out all the details to make<br />
the UI most effective,” says Lomov.<br />
“When you hover the cursor to the start<br />
point it sticks to the element like a<br />
magnet because of a 60-pixel invisible<br />
hover zone around the starting point. To<br />
not confuse the user we created a<br />
‘running’ light spot on the guideline in<br />
order to direct visitor’s interaction. The<br />
stop-motion shots automatically play<br />
thanks to TweenMax (GSAP) technology<br />
ABOVE: No red collars and<br />
no trousers for a few<br />
members of the team<br />
design diary _________________________________________29
ANGELIC AIRPLANES<br />
Red Collar Creative Director<br />
Denis Lomov offers an insight<br />
into a standout feature that says<br />
something broader about why<br />
the project was successful.<br />
“The main thing is an idea. The<br />
company has high humanistic<br />
goals and an innovative<br />
approach to startups searching.<br />
The site should clearly reflect<br />
the company’s activity and<br />
arouse real emotions.”<br />
and the frames don’t just follow each<br />
other. We used TweenMax to achieve the<br />
most realistic effect and to create our<br />
own easing, so at the beginning frames<br />
nicely speed up to slow down in the end<br />
for better vividness. It’s this sense of<br />
“THE SERVER AUTOMATICALLY GENERATES, INSTALLS<br />
AND RENEWS SSL CERTIFICATES FROM LETSENCRYPT.ORG<br />
AND WORKS ON THE HTTP2 PROTOCOL”<br />
BELOW: The hands<br />
animation is the work<br />
of many frames<br />
smoothness that we believe delivers a<br />
more realistic perception.” As far as the<br />
nuts and bolts underneath goes, the<br />
important back-end base and backbone<br />
of the site is in the platform where it’s<br />
located. The server automatically<br />
generates, installs and renews SSL<br />
certificates from letsencrypt.org and<br />
works on the http2 protocol, ensuring<br />
parallel, fast and secure loading of<br />
content. This also has implications for<br />
the general adaptiveness achieved,<br />
something that has already garnered the<br />
site SOTD, WOTD and Mobile Site of the<br />
Week accolades by Awwwards and<br />
indeed Google.<br />
PLANE SAILING<br />
When it comes down to talking about<br />
the site’s launch after just a two-month<br />
development time, the team are keen to<br />
remember what the project was always<br />
about. Gauging any reflective notion of<br />
‘success’ on that basis then comes from<br />
how well it communicates the original<br />
message at its heart. “First of all this<br />
project is a story about inspiration and<br />
searching for the right ideas. It’s about<br />
people who want to change the life of<br />
the whole world for the better, and that’s<br />
what both investors and startups want.<br />
The client promotes the most<br />
humanistic ideas and doesn’t care about<br />
gender, skin colour or confession of a<br />
person, but only about the quality of<br />
their idea.” A great and admirable<br />
philosophy always, so what about the<br />
idea at the site’s heart? How effective do<br />
the people behind it think that has<br />
proved to be now it’s out there live?<br />
30 _________________________________________design diary
ANGELIC AIRPLANES<br />
“Well the site appears to be a<br />
communicator, a place where people<br />
with valuable ideas find their Angel<br />
investor. The unusual concept of the site,<br />
the launching of a paper plane by a<br />
visitor, seems to reflect the spirit of the<br />
company and the principles of kickstarting<br />
a startup. It offers visitors to<br />
record a soundless video where they<br />
would get out a message visually. If it is<br />
clear and impressive, Inculerate reaches<br />
out and the cooperation starts. Similarly,<br />
all the components across the full<br />
interactivity of the site, sounds and<br />
colour create an encouraging picture.<br />
You want to share the site with friends<br />
and never leave it. The project already<br />
has more than 20k page views in the<br />
first week, so it’s safe to say we are<br />
proud of the reception.”<br />
Thankfully the client echoes this<br />
understandable pride, after showing the<br />
kind of faith in Red Collar it shows it<br />
typically reserves for its investments.<br />
“We think that such a successful result is<br />
another confirmation of the importance<br />
of trust,” concludes CEO of Inculerate<br />
Inc, Umit Khairollayev. “When you go to<br />
real professionals you should remember<br />
that they know what they’re doing and<br />
there’s no need to doubt. Only then you<br />
will have a really cool project.”<br />
PAPER TRAILS<br />
As we all know, the period after a<br />
site’s launch rarely puts afull<br />
stop on the project’s story.<br />
Usually somebody, whether it’s<br />
up to the client orthe creator to<br />
undertake, willbe concerned<br />
with marketing the final result<br />
and getting it out there to be<br />
admired. In this instance, Red<br />
Collar did some of that legwork<br />
themselves by submitting the<br />
URL to leading online awards<br />
programmes touseful effect. “In<br />
two days after the site was<br />
launched, as soon as we applied<br />
for awards, the client got a<br />
partnership request,” enthuses<br />
Creative Director Denis Lomov.<br />
“A coolBrooklyn-based Art<br />
Director fell inlove with the site<br />
after seeing it at Awwwards, and<br />
decided to collaborate. That’s<br />
what the site is, acatchy idea and<br />
a quality implementation<br />
multiplied bythe recognition of<br />
one of the web’s best award<br />
platforms.” So what about any<br />
further work, given the resulting<br />
recognition and success, is any<br />
kind ofsubsequent aftercare on<br />
the cards? “TheInculerate<br />
website is self-sufficient, so it<br />
doesn’t have personal accounts<br />
and things of that sort. It is a<br />
promotional presence that<br />
doesn’t really require any<br />
on-going support. In fact, we<br />
always think about site’s<br />
sustainability, the relevance of<br />
design and technological<br />
solutions, and that’s why the<br />
project’s going to be relevant<br />
and trending for years. But we<br />
continue to work with the client<br />
–infact we are already creating<br />
something innovative so rest<br />
assured thata new digital bomb<br />
is coming!”<br />
ABOVE: Users drag one point to the other<br />
point to bring the animation to life<br />
design diary __________________________________________31
Subscription offer<br />
Every issue, delivered straight to your door<br />
*<br />
Never miss an issue<br />
<br />
sure to get every single one<br />
Delivered to your home<br />
Free delivery of every issue,<br />
direct to your doorstep<br />
Get the biggest savings<br />
Get your favourite magazine for<br />
<br />
<br />
<br />
Magazine since the early days.”<br />
@sixrevisions via Twitter<br />
“Love the latest magazine that<br />
I purchased today”<br />
@navigation_web via Twitter<br />
“My favourite magazine!!!”<br />
@eduardomurillo via Twitter
Subscription offer<br />
<br />
MOST<br />
<br />
GREAT<br />
<br />
Subscribe and save 20%<br />
Automatic renewal – never miss an issue<br />
<br />
<br />
saving 20% on the retail price<br />
One year subscription<br />
<br />
<br />
<br />
<br />
direct to your doorstep<br />
<br />
<br />
Instruction to your Bank<br />
or Building Society to pay<br />
<br />
<br />
7 6 8 1 9 5<br />
<strong>UK</strong> £67.60 (saving 20% on the retail price)<br />
€81.55 USA $103.20<br />
Rest of the world $103.20<br />
<br />
<br />
Visa Mastercard Amex<br />
Account Name<br />
Postcode<br />
<br />
<br />
Account no<br />
Expiry date<br />
<br />
<br />
<br />
<br />
Signature<br />
Date<br />
<br />
I enclose a cheque for<br />
Signature<br />
£<br />
Date<br />
<br />
Future Publishing LTD<br />
Name<br />
Your information<br />
Address<br />
<br />
<br />
Email address<br />
Please tick if you want to receive any communications<br />
from Future and its group companies containing news,<br />
special offers and product information.<br />
Postcode<br />
Please post this form to<br />
Future Publishing Ltd, <br />
7BF, United Kingdom<br />
Order securely online <br />
Speak to one of our friendly<br />
customer service team<br />
<br />
These offers will expire on
FORM AND FFUNCTION<br />
who FFunction<br />
what Data visualization,<br />
data-rich design, information<br />
design, user interface,<br />
infographics, UX, data portals,<br />
and interactive<br />
FORM<br />
where 400 Atlantic #205,<br />
Montreal (QC) H2V 1A5, Canada<br />
web ffctn.com<br />
DataisbeautifulinthehandsofFFunction.Adatavizspecialiststudioinaninformation-driven world,<br />
FFunctionnotonlymakessenseoftheinformationspace,butdefinesitsparameters to communicate<br />
oftencomplexideastoanaudiencehungryfornewexperiences,knowledge and insights<br />
AND<br />
FFUNC<br />
34___________________________________________________profile
FORM AND FFUNCTION<br />
It was2005,andFFunction’sfounder,<br />
SébastienPierre,wasfeeling<br />
disillusionedwithFrance.Hehada<br />
Mastersinsoftwareengineeringand<br />
abachelordegreeindesignandwanted<br />
tofindawaytobringthetwofields<br />
together in his career.<br />
“WhereIcomefrom,cross-disciplinary<br />
innovation is not that common,” explains<br />
Sébastien.“Francehasacultureof<br />
excellence,butthinkingoutofthebox<br />
andstartingsomethingnewisunusual,<br />
almost to the point of being frowned<br />
upon.There,yougototherightschool,<br />
getajob,payyourdues,moveupthe<br />
ladder,stayinyourownlane.So,Icame<br />
to Canada.”<br />
After working in Montreal startups for a<br />
couple of years, he decided to start his<br />
own company. But he needed a graphic<br />
designer to work with, so he went to the<br />
graduate show of UQAM (Université du<br />
Québec à Montréal) to see if there were<br />
any contenders. “I saw one display that<br />
was very strong; the designer had an<br />
innate understanding of typography and<br />
form,” Sébastien continued. “Other people<br />
seemed to agree — there were no<br />
business cards left so I had to Google her<br />
name: Audrée Lapierre.”<br />
Audrée also remembers this time<br />
vividly: “Funnily enough, when I graduated<br />
I had every intention of being a print<br />
designer. I was interested in aesthetics and<br />
Key Clients<br />
UNESCO Institute<br />
for Statistics<br />
Google<br />
Deloitte University<br />
Press<br />
Heifer International<br />
Children’s<br />
Investment Fund<br />
Foundation (CIFF)<br />
decorativearts,abstractimages,punchy<br />
coloursandfinetypography.Ididn’tknow<br />
whereIwantedtowork,butIknewIdidn’t<br />
want to work in advertising. I wanted to<br />
design to inform people, not to sell things.<br />
OnedayIgotanemailfromaFrenchman<br />
whosaidhe’dseenmyworkandwanted<br />
to talk. It was Sébastien.”<br />
After several discussions, Sébastien and<br />
Audrée decided to set up shop, and rented<br />
acoupleofdesksinthecornerofanother<br />
company’s office in downtown Montreal.<br />
Audréeexplains:“Thiswasbeforethe<br />
InfographicBoomof2010andatthat<br />
stagemostpeopledidn’tevenknowwhat<br />
datavisualisationwas.Atthattime,themix<br />
of visual communication, data journalism,<br />
information, UI and design were a very<br />
new way to get information across, and<br />
wespentalotoftimedoingself-generated<br />
infographics and explaining to prospective<br />
clientswhytheywouldevenwantto<br />
publishtheirdatainthefirstplace.”<br />
Ashorttimelater,thestudiomovedto<br />
an industrial-zone/hipster-enclave called<br />
Mile-Ex, which has been FFunction’s home<br />
eversince.Thestudioitselfisina<br />
century-old brick building that has been<br />
convertedintolargeopenplanloftspaces.<br />
Asadatavisualisationstudio,Sébastien<br />
andAudréelookedforanamefortheir<br />
new business that would encapsulate the<br />
kind of work they wanted to do. Sébastien<br />
explains how they named their business:<br />
“Being in a bilingual environment like<br />
Montreal adds an extra layer of complexity<br />
tochoosinganame.Istartedwiththe<br />
name ‘Donnéelicieuse’ which translated to<br />
‘Datalicious’ in English. But datalicious.com<br />
The name FFunction comes from the<br />
combination of form and function,<br />
which to me is what data<br />
visualisation is all about<br />
TION<br />
was taken by another company working<br />
inaparallelindustry,andanyway,having<br />
different names in French and English<br />
was not ideal.<br />
“Donnéelicieuseisstillourlegalname<br />
butwestartedtradingasFFunction<br />
shortly thereafter. The name FFunction<br />
comes from the combination of form and<br />
function, which to me is what data<br />
visualisation is all about. It was also a wink<br />
to fffound.com, which at that time was a<br />
strictly invite-only magnet for graphic<br />
designersallovertheworld.Thedomain<br />
name ffunction.com wasn’t available,<br />
profile___________________________________________________35
FORM AND FFUNCTION<br />
AGENCY<br />
BREAKDOWN<br />
1 Founder/CEO/<br />
Technical Lead<br />
1 Creative<br />
Director<br />
1 Project<br />
Manager<br />
1 Marketing<br />
Director<br />
1 Art<br />
Director<br />
1 UX<br />
<strong>Designer</strong><br />
3 Developers<br />
1<br />
Dog (100 per cent<br />
certifiedGoodBoy)<br />
FREELANCE:<br />
1 Data<br />
Journalist<br />
1 Studio<br />
Administrator<br />
2 Graphic<br />
<strong>Designer</strong>s<br />
1 Translator<br />
but we managed to get www.ffctn.com,<br />
which gets rid of those pesky superfluous<br />
vowels. Who needs them anyway?”<br />
FFunction was doing information<br />
design before it was really a clearly<br />
understood component of<br />
communication. As such, locating clients<br />
was difficult at first. “In the early days of<br />
the studio we created a bunch of<br />
self-generated projects for our portfolio,<br />
and presented at every conference that<br />
would have us,” says Audrée. “Once we<br />
had won a couple of awards and landed<br />
our first big clients — the Gates<br />
Foundation, National Geographic, Heifer<br />
International and Edelman all came to us<br />
quite early in FFunction’s journey — it was<br />
easier to maintain our momentum and<br />
attract new clients. I suppose the work<br />
began to speak for itself, and we carved<br />
out a serious niche in creating interactive<br />
data visualisations for UN agencies, major<br />
non-profits and corporations.<br />
“Because of the nature of our clients’<br />
work and the layers of compliance that<br />
Above Some of the<br />
FFunction team (L-R):<br />
Wim Bruyninckx (Art<br />
Director), Chloé-Ève<br />
Levasseur (Graphic<br />
<strong>Designer</strong> & UX<br />
Specialist), Rebecca<br />
Galloway (Marketing<br />
Director), Audrée<br />
Lapierre (Creative<br />
Director) with Byron the<br />
dog, Sébastien Pierre<br />
(Director, Technical<br />
Lead), Jackie Smoak<br />
(Project Manager), Sam<br />
Dupras (<strong>Web</strong> Developer)<br />
they need to adhere to, we tend to<br />
respond to RFPs (Request for Proposal)<br />
asourmainbusinessdevelopment<br />
method.Iknowalotofstudiosdislike<br />
RFPs, but they have their advantages.<br />
One major plus is this: if the client has<br />
issued an RFP it means they have data,<br />
findingsandabudget,andthey’reready<br />
towork.Weare,however,verymuch<br />
againstspecwork,andhaverefused<br />
andlobbiedagainstitonseveral<br />
occasionswithinthecontextofa<br />
procurement process.<br />
“Occasionally we do cold-call<br />
organisationsthatwewouldliketowork<br />
with, but in general our approach is more<br />
aboutcommunicatingFFunction’swork<br />
effectively than creating a sales funnel. We<br />
don’t do the conference circuit so much<br />
these days, but we’re active on social<br />
media, and both Sébastien and I<br />
occasionally write opinion pieces for<br />
design publications, like DesignEdge,<br />
AppliedArtsandO’Reilly.Ithelpstostay<br />
relevant,Ithink.”<br />
“I think that good information<br />
design demands a certain level of<br />
customisation, which is why the<br />
notionofcustomtoolsisvery<br />
strong on the dev side of FFunction.<br />
Internally, we mostly use custom<br />
languages that transpile to<br />
JavaScript/HTML/CSSandacustom<br />
setoflibrariesforcomponentbasedUIandanimated,interactive<br />
data visualisation”<br />
SÉBASTIEN PIERRE<br />
Co-founder and director<br />
36___________________________________________________profile
FORM AND FFUNCTION<br />
MAKING THE CONNECTION<br />
one.or /makin -the-connection/index-en.html<br />
Shortlisted for the<br />
Kantar Information is<br />
Beautiful Award 2017<br />
Right now, more than half<br />
the world is not connected<br />
to the internet, and almost<br />
75 per cent of Africa is<br />
offline. Why does this<br />
matter? For people living<br />
in the poorest parts of the<br />
world, access to the<br />
internet isn’t a luxury —<br />
it’s life-changing.<br />
ONE, a campaigning and<br />
advocacy organisation, is<br />
currently rolling out several<br />
programs to address this<br />
digital gap. It asked<br />
FFunction to create an<br />
interactive data<br />
visualisation that would<br />
highlight some key findings<br />
and contextualise them in<br />
an engaging, shareable way.<br />
As part of ONE’s larger<br />
Poverty is Sexist campaign<br />
that calls on communities,<br />
governments and private<br />
sectors around the world to<br />
help impoverished women<br />
within their countries, this<br />
site illustrates how access<br />
to the internet and digital<br />
media can empower people<br />
in developing countries,<br />
especially women.<br />
Displayed on a single<br />
scrolling page, the site<br />
presents two main<br />
visualisations: one shows<br />
the current rate of internet<br />
usage in African countries,<br />
and another further<br />
breaks down the first viz<br />
by gender to show the<br />
disparity between women<br />
and men who use the<br />
internet in Africa and<br />
around the world. A form<br />
at the bottom of the page<br />
directs visitors to sign the<br />
Poverty is Sexist petition.<br />
FFunction’s design team<br />
decided the best way to<br />
contextualise the data<br />
would be to contrast how<br />
the internet improves the<br />
quality of life in the<br />
wealthiest parts of the<br />
world, compared with the<br />
most poverty-stricken.<br />
For example, every<br />
month, over 560 billion text<br />
messages are sent worldwide.<br />
Of course, these can<br />
be useful for chatting with<br />
friends or receiving<br />
appointment reminders.<br />
But in sub-Saharan Africa,<br />
text messages can enable<br />
women who live far from a<br />
doctor to receive advice on<br />
how to have a safe and<br />
healthy pregnancy.<br />
Poverty is sexist — in<br />
so many ways, girls and<br />
women are hit harder and<br />
have fewer opportunities,<br />
and access to the internet is<br />
no different. Women in the<br />
poorest countries are<br />
almost a third less likely<br />
to have access to the<br />
Internet than men, and<br />
the gap is increasing.<br />
Visualising this data and<br />
putting some context<br />
around it helps engaged<br />
citizens, journalists and<br />
policymakers to understand<br />
the problem in both broad<br />
strokes and granular detail,<br />
and, hopefully, take action.<br />
Above Digging deeper into the data, reveals personal stories<br />
that place a human face on this data-based project<br />
The business case for working with a<br />
client can have many components. As<br />
FFunction doesn’t generally do spec work,<br />
but how does it decide which clients to<br />
work with? Audrée explains the studio’s<br />
approach: “We have turned down projects<br />
because the timeline is too tight, or<br />
doesn’t fit with the other projects already<br />
in our pipeline. We’re a boutique agency<br />
and intend to remain that way. The upside<br />
of working at this scale is that one of the<br />
directors is always personally involved in<br />
any given project. Crucially, we stay<br />
connected to the workflow. The downside<br />
is that project planning can be kind of like<br />
a game of Tetris because our human<br />
resources are limited.<br />
“Historically we have also refused<br />
projects where our added value is<br />
minimal, like branding or website design<br />
or PowerPoint design. There are so many<br />
extremely competent branding agencies<br />
out there that should win those contracts<br />
instead. Why choose dataviz specialists<br />
for that?”<br />
We’re a<br />
boutique<br />
agency and<br />
intend to<br />
remain that<br />
way. The<br />
upside of<br />
working at<br />
this scale is<br />
that one of<br />
the directors<br />
is always<br />
personally<br />
involved in<br />
any given<br />
project<br />
Audrée concludes: “And this is<br />
somewhat delicate, but we’ve also<br />
turned down projects from clients whose<br />
businesspracticeswedisagreewithin<br />
somefundamentalway.Lastyear,for<br />
example, we were approached to do a<br />
project by a cigarette company. The<br />
budget was good, but the idea of having<br />
acigarettemanufactureronourclient<br />
roster alongside the Canadian Cancer<br />
Society?Itdoesn’tlookright,andit<br />
certainly doesn’t feel right.”<br />
Oftenanagencyorstudiowillbecome<br />
knownforacertaintypeofwork.For<br />
FFunction, its approach means its<br />
clients are looking to use their data to<br />
communicate their messages. Sébastien<br />
outlines one project that spoke to<br />
FFunction’s design sensibilities: “One of my<br />
favourite projects is still HP Earth Insights.<br />
It applied a Hewlett-Packard analytics<br />
platform to research provided by<br />
Conservation International, an NGO<br />
dedicated to the protection of the planet<br />
and its resources. FFunction’s role was to<br />
package data that charted fluctuating<br />
biodiversityinkeynationalparksnear<br />
the equator. HP Earth Insights contains<br />
everything I like about dataviz. There’s<br />
an interesting scientific dataset, a<br />
data-driven narrative, free exploration<br />
that lets users make their own findings<br />
and gorgeous photos overlaid with<br />
simple, but rich charts.”<br />
With specialist design needs and client<br />
data that can be presented in many forms,<br />
the tools that FFunction uses are varied.<br />
“We tend to be early adopters of new tools<br />
and plugins,” says Audrée. “There are new<br />
ones coming out all the time, and we like<br />
to give them a try. We draw user flows in<br />
OmniGraffle. Also, we use the Adobe suite<br />
a lot (naturally), and Sketch for user<br />
interfaces. We prototype using Invision<br />
and Craft, and the designers send their<br />
files to the devs via Zeplin. We also sketch<br />
on old-fashioned paper a lot.”<br />
Sébastien also comments: “I think that<br />
good information design demands a<br />
certain level of customisation, which is<br />
profile___________________________________________________ 37
FORM AND FFUNCTION<br />
Below and opposite The offices of FFunction are clearly<br />
those of data obsessives. The precise separation of the<br />
plant life is no accident we think<br />
“We tend to be early adopters of<br />
new tools and plugins. There are new<br />
ones coming out all the time, and we<br />
like to give them a try. We draw user<br />
flows in OmniGraffle. Also, we use<br />
the Adobe suite a lot (naturally), and<br />
Sketch for user interfaces. We<br />
prototype using Invision and Craft,<br />
and the designers send their files to<br />
the devs via Zeplin. We also sketch<br />
on old-fashioned paper a lot”<br />
AUDRÉE LAPIERRE<br />
Co-founder and creative director<br />
MAIZE SEED SYSTEM MAP<br />
Internal tool for organisation<br />
The Maize Seed System<br />
is an interactive map of<br />
the agricultural and<br />
trade network in sub-<br />
Saharan Africa.<br />
This data-driven<br />
application is used for<br />
sharing knowledge and<br />
identifying connections<br />
among system actors —<br />
such as seed suppliers,<br />
farmers, importers and<br />
policymakers — in order<br />
to better understand how<br />
to improve investments,<br />
programs, and interventions<br />
within the maize seed<br />
system as a whole.<br />
The need for a stronger<br />
and more impervious maize<br />
network is more pressing<br />
each year, as the effects of<br />
climate change become<br />
more evident worldwide.<br />
Across much of sub-<br />
Saharan Africa where maize<br />
is the most important staple<br />
crop, production is<br />
primarily rain-fed, which<br />
makes farmers vulnerable<br />
to food insecurity.<br />
Approximately 40 per cent<br />
of Africa’s maize crop<br />
suffers a loss in yield due<br />
to drought conditions,<br />
endangering the livelihoods<br />
of millions of smallholder<br />
farmers and several<br />
hundred million consumers.<br />
DAI, an International<br />
development company, is<br />
working with other agencies<br />
and organisations including<br />
USAID to establish a new<br />
climate-resilient maize<br />
initiative to help solve these<br />
problems. Mapping out the<br />
maize seed system as it<br />
currently stands is an<br />
important first step; the<br />
next will be using the<br />
information generated to<br />
identify the right solutions,<br />
and provide them.<br />
Right FFunction created a<br />
detailed map of the current<br />
maize seed system as a vital first<br />
step to improving supply<br />
reliability of maize<br />
38 ___________________________________________________profile
FORM AND FFUNCTION<br />
TIMELINE<br />
whythenotionofcustomtoolsisvery<br />
strong on the dev side of FFunction.<br />
Internally,wemostlyusecustom<br />
languagesthattranspiletoJavaScript/<br />
HTML/CSS and a custom set of libraries<br />
for component-based UI and animated,<br />
interactivedatavisualisation.Datavizisa<br />
demanding field that pushes web<br />
browsers to their limits. If you want to<br />
innovate, chances are there’s no library<br />
out there that covers your needs — if<br />
you limit yourself to what’s already<br />
available, you’ll need to compromise on<br />
your ideas and, at the end of the day, limit<br />
your technical abilities.<br />
“We’re critical engineers; we believe in<br />
the value of a deep understanding of how<br />
technology works and the power of<br />
technology ownership. That is why we<br />
spend the time to create custom tools that<br />
give us the independence we need to<br />
preserve our creative freedom.”<br />
How technology is developing and how<br />
this can be harnessed for creative<br />
applications is something FFunction is<br />
always keen to explore. Sébastien<br />
continues: “HTML/CSS/JavaScript are here<br />
to stay: they’re the basic building blocks<br />
for the <strong>Web</strong>. But the ecosystem that sits<br />
on top of these core technologies is<br />
changing fast. Technologies like jQuery<br />
wereagreatoptionafewyearsback,but<br />
don’treallycutitnowadayswhen<br />
visualisations have to be more than<br />
animated bar charts.<br />
“Libraries like D3 and React are<br />
currently the better options, but they<br />
won’tcoverallyourneeds.Reactisnot<br />
very good at data visualisation as it has an<br />
overhead that is directly proportional to<br />
thenumberofdatapointsyou’re<br />
mapping, and has a model that is not<br />
optimal for animating elements. D3 is<br />
great for data visualisation in general,<br />
and mapping in particular, but lacks the<br />
structure required for larger applications<br />
or more complex visualisations that<br />
integrate interactive controls.<br />
2008<br />
Sébastien and Audrée<br />
meetoverabeer.Shortly<br />
after,FFunctionisborn.<br />
Employees 2<br />
2010<br />
The Worldwide<br />
Infographic Boom.<br />
Edelman becomes a<br />
regular FFunction client,<br />
and FFunction is busy<br />
creating infographics and<br />
dashboards for its<br />
Fortune 500 clients.<br />
Employees 3<br />
2012<br />
First major interactive<br />
dataviz contract, for<br />
National Geographic.<br />
Employees 4<br />
2014<br />
Recipient of the AIGA<br />
Justified, plus Top Studio<br />
at the Kantar Information<br />
is Beautiful Awards.<br />
Employees 5<br />
2015<br />
Demand is ramping up<br />
for FFunction’s work. The<br />
studio lands major<br />
application contracts<br />
with Google, DAI/USAID.<br />
FFunction becomes a<br />
certifiedBCorp.<br />
Employees 7<br />
2017<br />
FFunction decides to<br />
develop its first product,<br />
a project planning<br />
software called Min.<br />
Employees 9<br />
Since we<br />
started using<br />
Zeplin, the<br />
designers<br />
spend much<br />
less time<br />
reviewing the<br />
finished<br />
projects, as<br />
they’re pretty<br />
much pixelperfect<br />
from<br />
the get-go<br />
“In our development kit, we designed<br />
primitives that scale well across this<br />
spectrum,fromsimpleanimated<br />
visualisations to complex data-driven<br />
components that interact with each other.<br />
Wemanagedtostrikethisbalance partly<br />
because we’ve used and learned from<br />
libraries such as D3, React and others, but<br />
also because our work has become more<br />
complexasthestudiohasgrown.”<br />
Asmoreinformationisnow consumed<br />
on mobile devices, how does this impact<br />
FFunction’s approach to each project?<br />
“I’ve said this before: mobile dataviz is not<br />
justadesktopdatavizinminiature — it’s a<br />
different thing entirely,” said Audrée. “I’ve<br />
triedlotsofdifferenttacticsto create<br />
dataviz for mobile. Smaller devices force<br />
you to develop succinct data visualisations<br />
that get your points across cleanly. My two<br />
main strategies are to reduce the amount<br />
of information and use small multiples.<br />
“It’sthe‘smallifyorsimplify’ approach.<br />
Small multiples (AKA trellis charts, lattice<br />
charts, grid charts, panel charts) are<br />
incredibly handy if you want to make<br />
dataviz that works equally well on mobile<br />
or desktop. It’s just a series of similar<br />
graphs or charts that use the same scale<br />
andaxes,whichallowsforeasy<br />
comparison. In the desktop version, they<br />
can sit next to each other, and in the<br />
mobile version you can stack them up.<br />
When he was still with NPR, Brian Boyer<br />
championed the notion of ‘small multiples<br />
on desktop, GIFs on your phone’, which I<br />
thinkisalsoasupergoodsolution.”<br />
As the environment that FFunction<br />
workswithinisconstantlyshifting, what<br />
technologies are attracting its attention<br />
at the moment? Sébastien comments:<br />
“There’s been a boom in tools that<br />
facilitate the design process, from the<br />
creation (Sketch, Figma, <strong>Web</strong>flow) to the<br />
collaboration and delivery (InVision,<br />
Zeplin). This all helps having a smoother<br />
flow of work while also increasing quality<br />
and efficiency.<br />
“For instance, since we started using<br />
Zeplin, the designers spend much less<br />
time reviewing the finished projects, as<br />
they’re pretty much pixel-perfect from the<br />
get-go. On the other hand, there is a<br />
plethora of new data-visualisation tools,<br />
but, for me, none of them strikes the right<br />
balance of creative freedom and<br />
sufficiently powerful data manipulation<br />
features. It’s really difficult, because you<br />
don’t want something overly simplified like<br />
a data-driven Illustrator, but you don’t want<br />
something that only Computer Science<br />
majors would be able to use. I’m looking<br />
profile___________________________________________________39
FORM AND FFUNCTION<br />
Above Samuel Dupras (developer), Chloé-Ève Levasseur<br />
(UX specialist) and Audrée Lapierre (creative director and<br />
co-founder) discuss their latest project<br />
forwardtousingD3Expressandseeifit<br />
fulfilsitspromiseofamoreinteractiveand<br />
creative way of designing (and coding)<br />
data visualisation.”<br />
Withaspecificapproachtoeach<br />
project, how has FFunction approached<br />
itsrecruitment?Audréeexplains:“Most<br />
FFunction’s employees come from<br />
multidisciplinarybackgrounds.Wehave<br />
adeveloperwithabackgroundin<br />
educationanddesign.Amarketing<br />
director with an art history degree. An<br />
artdirectorwithaMastersinengineering.<br />
Ourprojectmanagerhasachemistry<br />
degree(and,incidentally,isalsoa<br />
certified yoga teacher).<br />
“We look for smart people with a rich<br />
knowledge base who can look at a<br />
problem from several angles and find the<br />
most creative, functional solution. We also<br />
want to maintain our commitment to the<br />
advancement of women from coding to<br />
leadership, so we make sure the<br />
composition of the team is at least 50 per<br />
cent women. We also hire for team culture<br />
fit; we want people who are interested in<br />
staying current in terms of their outlook<br />
andskillset.Andwewantpeoplethat<br />
we’re happy to eat lunch with every day<br />
too! It’s a small, close-knit team, and<br />
there’s no room at FFunction for big<br />
egos or jerks.<br />
“In terms of design positions, we never<br />
hire pure information designers. We hire<br />
graphicdesignerswithapassionfor<br />
information design. This is an important<br />
distinction because employees need to<br />
be able to work on a wide spectrum of<br />
projects and we always need the ‘form’ as<br />
well as the ‘function’. Honestly a lot of<br />
people who specialise in information<br />
design simply don’t have strong aesthetic<br />
skills, or don’t understand typography.”<br />
And Audrée advises: “My advice to<br />
designers looking for work is this: design a<br />
super tight CV, and publish new work<br />
regularly. Create interesting side projects<br />
that show off your skills and interest areas.”<br />
The future will increasingly become<br />
even more data driven. For FFunction this<br />
means a landscape it can shape. “We’re<br />
actually in a very exciting phase right<br />
We also<br />
want to<br />
maintain our<br />
commitment<br />
to the<br />
advancement<br />
of women<br />
from coding<br />
to leadership,<br />
so we make<br />
sure the<br />
composition<br />
of the team is<br />
at least 50<br />
per cent<br />
women<br />
now,” Audrée concludes. “FFunction is<br />
launching its first product; a project<br />
planning tool called Min. We’re developing<br />
this software because, honestly, we’ve<br />
tried just about every project<br />
management tool on the market, and<br />
none of them were that great at servicing<br />
the needs of an agency.<br />
“Min will allow the user to quickly make<br />
a project timeline and track budgets,<br />
projects and resources. But I think the<br />
clincher is this: Min auto-calculates the<br />
best delivery dates based on your task<br />
dependencies and current team<br />
availability. I always wished that we had<br />
that capability at our fingertips when<br />
planning client projects, it would have<br />
been so useful.<br />
“The response so far to Min has been<br />
extremely enthusiastic; we’ve signed up<br />
more than 600 people for early access to<br />
the beta without doing any advertising.<br />
That tells us that other people are feeling<br />
just as frustrated with the current tools on<br />
the market as we are and there is demand<br />
for this combination of features.<br />
40 __________________________________________________profile
AIGA Justified<br />
2014<br />
-<br />
Winner 2014<br />
GRAFIKA 2015<br />
-<br />
100 Best<br />
Projects 2015<br />
FORM AND FFUNCTION<br />
HP EARTH INSIGHTS<br />
ffctn.com/a/earthinsi hts<br />
FFUNCTION<br />
ffctn.com<br />
FOUNDER<br />
SébastienPierreandAudréeLapierre<br />
YEAR FOUNDED<br />
2008<br />
CURRENT EMPLOYEES<br />
9(inhouse)<br />
LOCATION<br />
Montreal, Canada<br />
SERVICES<br />
Interactive data visualisation<br />
Data-driven applications and portals<br />
Infographics<br />
Data-rich reports<br />
Motion design<br />
Earth Insights is an innovative<br />
collaboration between HP and<br />
Conservation International that<br />
applies data-processing<br />
technology to monitor<br />
biodiversity loss across the<br />
world’s tropical forests. Using<br />
millions of animal photos<br />
captured by camera traps,<br />
scientists are able to track how<br />
land use, human activity and<br />
climate change affect species.<br />
FFunction’s mission was to<br />
design an interactive touchscreen<br />
presentation introducing<br />
Earth Insights at HP Discover<br />
Barcelona, an industry<br />
conference which was attended<br />
by approximately 10,000<br />
customers, partners and IT<br />
thought leaders.<br />
Data-rich visualisations<br />
were overlaid on lush forest<br />
photography to create an<br />
intriguing nature-meetstechnology<br />
ambience. The<br />
experience was structured to<br />
guide the user from a big picture<br />
overview to granular data<br />
insights through three separate<br />
sections that each expressed a<br />
different aspect of the data.<br />
Using slideshow, timeline,<br />
animated map and data<br />
visualisation elements, the<br />
finished presentation told stories<br />
about threatened animals around<br />
the world, the conservationists<br />
who are working to protect them<br />
and the biodiversity trends they<br />
are discovering with the help of<br />
data-analysis solutions.<br />
It also integrated statistics<br />
and animal photos from<br />
fieldwork sites — all into a<br />
seamless, intuitive layout that<br />
captivated visitors to the exhibit<br />
and won over the jury of the<br />
AIGA Justified Design<br />
Competition in 2014.<br />
Here’s what AIGA juror<br />
Christopher Simmons had to say:<br />
“This is an awe-inspiring,<br />
seductive and immersive display<br />
of quantitative information that<br />
expertly treads the line between<br />
gratuitous technological flash<br />
and accountable and decodable<br />
data. It’s a triumph of interaction<br />
and experience design.”<br />
“FFunction will still remain FFunction;<br />
we’re not planning on phasing out any our<br />
service offerings or pivoting into a product<br />
company. Interactive dataviz is what we’re<br />
most well-known for and there is still a<br />
high demand for it. But there is another<br />
area of our work that has been growing<br />
almost exponentially over the last four<br />
years: UX for large-scale data-driven<br />
applications. Going forward, I can see<br />
that becoming a very core part of what<br />
FFunction has to offer.”<br />
The need to understand the increasing<br />
quantities of data being generated by<br />
businesses has always been important.<br />
Data has now become a highly valuable<br />
currency. Studios like FFunction help<br />
businesses and organisations make sense<br />
of the shifting sea of information to clearly<br />
communicate their messages. And these<br />
messages can be designed to not only<br />
deliver their insights, but also illustrate<br />
how beautiful that information can be.<br />
As information denizens, the creatives<br />
at FFunction are on the cutting-edge<br />
of digital design.<br />
Right<br />
Connecting the masses<br />
of data to the real-world<br />
impact deforestation is<br />
having on wildlife is<br />
bought to life with<br />
engaging images and<br />
dataviz design<br />
profile___________________________________________________ 41
GET PRO DESIGN SKILLS<br />
Typography and colour are the minimum<br />
components you would expect to use to form a<br />
design and create content that has a distinct look<br />
and feel. The wide range of typography and<br />
colour available to us enables any creative to<br />
design with a personality in mind for a brand or<br />
project. The way we compose our designs with<br />
textual matter hasn’t evolved a great deal but the<br />
resources and trends we use and follow do.<br />
The perfect combination of colour and<br />
typography comes from understanding the visual<br />
and tonal direction of a brand or message.<br />
42 __________________________________________________feature
GET PRO DESIGN SKILLS<br />
FONTS & TYPOGRAPHY<br />
PICKING THE RIGHT FONT<br />
There are a few things to consider<br />
when choosing a font and it has a<br />
great deal to do with personality.<br />
Before starting a project, it’s good to<br />
think about values and words that<br />
describe the feeling of what you’re<br />
creating. They can be anything! For<br />
example; is the design going to be<br />
friendly, intelligent or confident? By<br />
limiting these values, say to three or<br />
five, we can start to get a sense of a<br />
direction that our chosen font needs<br />
to relate to. So a friendly font might be<br />
one that’s nice, round and really<br />
legible. Confident might be angular,<br />
perhaps full caps?<br />
This might be sucking eggs but<br />
running this type of exercise can help<br />
you focus your decision and so<br />
choose the right font.<br />
WHAT DOES A FONT SAY?<br />
So we briefly mentioned visual and tonal<br />
direction earlier. Visual is very much the<br />
font and how it looks, whilst tonal is the<br />
arrangement of words to form a<br />
message — both of which need to<br />
harmonise and be sympathetic to each<br />
other. Use the values you decided earlier<br />
to understand what a font truly says and<br />
howamessagelookswhenyou<br />
compare it to what is written. The right<br />
font can amplify words in this way so<br />
the visual characteristics of a font are<br />
important to make the relationship work.<br />
Some of the characteristics to look out<br />
for are weights, roundness, length and<br />
how they flow from letter to letter. You<br />
might be torn between Serif, San-Serif,<br />
Script or even hand-drawn styles. Each<br />
personality of a font will help evoke a<br />
feeling or message.<br />
Select the right font to get on the path to great typography<br />
FONTS TO TYPOGRAPHY<br />
Afontortypesetbecomes<br />
typography when the written matter<br />
becomes a visual component. You<br />
have written a message in your<br />
chosen font and it looks and reads just<br />
the way you want it to. Typography<br />
will also be a combination or<br />
composition of more words or<br />
phrases. This could include more<br />
than one font whereby you have key<br />
headline and body text fonts. It’s more<br />
common to use characterful fonts for<br />
headlines and keep cleaner fonts for<br />
body text.<br />
The mix between styles for<br />
typography is fine but there’s always a<br />
limit, so never overcook all of your<br />
favourite fonts. Some work well<br />
together and a healthy contrast can<br />
work well too. For example you may<br />
have a nice large Serif font headline<br />
with a clean Sans-Serif font for body<br />
text. Experiment with scale to see<br />
whatworksonyourcanvas.<br />
IS YOUR FONT WEB SAFE?<br />
It’s always worth making sure that<br />
your chosen font is web safe and can<br />
be rendered perfectly on a browser.<br />
Most fonts are these days, using a<br />
good font library or a web-safe font file<br />
(OTF or WOFF). This is all good but<br />
another important factor with websafe<br />
fonts lies in their performance.<br />
Using a font online can be done in a<br />
number of ways. You can upload your<br />
font to a server and link to that font in<br />
your CSS. This is perfectly fine but<br />
always be cautious of font licensing<br />
and whether a heavy font file loads<br />
quickly. Using a font library such as<br />
Google Fonts or Adobe Typekit<br />
ensures that everything is taken care<br />
of and you can expect better<br />
performance. A font hosted with these<br />
guys are likely to be faster in most<br />
cases. It’s good to always make sure<br />
that you’re only loading the character<br />
setyouneedtoo.There’snopoint<br />
using all the available weights if you<br />
don’t need them. The good news is<br />
that there’s no need to use Arial or<br />
Verdana any more!<br />
TOP4TOOLS<br />
GRIDLOVER<br />
gridlover.net<br />
Grid Lover is awesome at<br />
gauging font sizes and spacing<br />
on a web page when you’re<br />
considering how big your H1 and<br />
H2 titles need to be. This free tool<br />
enables you to dynamically set<br />
scaling rules that apply to your<br />
headers and tinker with the CSS.<br />
It’s also a great tool for when you<br />
need to hand over designs to a<br />
developer since the output CSS<br />
and rules are really useful for<br />
getting consistency between<br />
design and code.<br />
A must-have collection of resources to enhance your designs<br />
CANVA FONT<br />
COMBINATIONS<br />
bit.ly/2rfTqfU<br />
Canva is a useful tool if you want<br />
to simply see font pairings and<br />
get some inspiration. Select your<br />
starter font and see where it<br />
takes you, providing you with a<br />
list of useful ideas of great font<br />
pairings. A great advantage of<br />
this tool is seeing the pairing in<br />
situ with live examples. Although<br />
the font listing is not huge, you<br />
can count on every font being<br />
web safe and is a great starting<br />
point for inspiration.<br />
ADOBE TYPEKIT<br />
typekit.com/fonts<br />
Adobe Typekit is a healthy<br />
alternative to Google Fonts,<br />
providing you an abundance of<br />
choice on web-safe fonts. Create<br />
kits for individual projects and<br />
navigate through a variety of<br />
available fonts. What’s useful<br />
about this tool is the ability to<br />
rewrite the sample text and filter<br />
through typography styles.<br />
With a font chosen it’s really easy<br />
to install on a web page using a<br />
couple of lines of code in the<br />
head of your HTML and CSS.<br />
FONTS.COM<br />
fonts.com<br />
A great resource if you want your<br />
project to be more individual and<br />
unique. Font libraries like Google<br />
Fonts and Adobe Typekit are<br />
always great, but you can count<br />
on your chosen fonts being used<br />
by others too. The wonderful<br />
thing about Fonts.com is that you<br />
can browse through a larger<br />
portfolio of fonts and see how<br />
they are being used by the font<br />
authors. It’s again a great<br />
inspiration resource, especially<br />
for the personal and unique.<br />
feature _________________________________________________43
GET PRO DESIGN SKILLS<br />
FOR COMBINING FONTSBringing<br />
together compatible<br />
fonts is essential for great designs<br />
1<br />
COMPLIMENT YOUR FONT PAIRING<br />
Don’t go mad with fonts, pick a couple that work together and<br />
set the tone and mood you want to portray. Contrasting fonts<br />
tend to work but be careful of readability and scale.<br />
6<br />
APPLY COLOUR WITH ACCESSIBILITY IN MIND<br />
Legibility is essential when choosing a colour for typography.<br />
Contrasting colours are best, but be mindful of accessibility. A<br />
resource to check is <strong>Web</strong>AIM Color Contrast Checker.<br />
2<br />
UNDERSTAND CONTEXT<br />
Where is your typography being displayed and who is going to<br />
read it? The right visual direction and tone is important when it<br />
comes to making your messages readable and relatable.<br />
7<br />
MIX YOUR STYLES<br />
Use contrasting styles/fonts like Sans-Serif and Serif, to achieve<br />
more varied looks. Sizing and hierarchy is very important but<br />
the difference in styles can make a big difference.<br />
3<br />
DON’T BE AFRAID OF SPACE<br />
Clarity and breathing space is important when making a<br />
message noticeable. Don’t make textual elements fight each<br />
other in a tight space. Nobody wins. Space helps keep focus.<br />
8<br />
WATCH YOUR WEIGHT<br />
Most fonts come in variety of options and weights. Don’t<br />
deviate from ‘normal’ on body text, keep text readable. Don’t<br />
use too many weights, reserve for your headlines.<br />
4<br />
SIZE MATTERS<br />
It’s important there’s not a huge variety of text sizes on a page.<br />
Consistency, hierarchy and readability are key. Ensure your<br />
fonts follow set size rules and don’t vary. Stick to a pattern.<br />
9<br />
MAKE USE OF FONT FAMILIES<br />
When pairing with other fonts, you can use variations from<br />
families but be mindful not to overuse. Use one or two<br />
weights to add variety and hierarchy.<br />
5<br />
STYLE CONSISTENCY<br />
If you decide to use uppercase or letter spacing for your<br />
headlines, don’t deviate and ensure the other style changes<br />
you make are followed.<br />
10<br />
PLAY AROUND<br />
It’s good to find font pairings you like that you stick to, but with<br />
the amount of fonts out there to experiment with, it’s always<br />
worth having a play with new and interesting fonts.<br />
PROXIMA NOVA<br />
adobe.ly/1k4Zr4S<br />
MRS EAVES XL<br />
adobe.ly/2rdMDmz<br />
ALTERNATE GOTHIC<br />
adobe.ly/2rhkNGr<br />
PLAYFAIR DISPLAY<br />
bit.ly/2j4b4eL<br />
FREIGHT TEXT<br />
adobe.ly/2DhOexG<br />
OPEN SANS<br />
adobe.ly/2D86IMU<br />
ROBOTO<br />
typekit.com/fonts/roboto<br />
ALICE<br />
bit.ly/2DBlvR4<br />
44 _________________________________________________feature
GET PRO DESIGN SKILLS<br />
RESOURCES<br />
GOOGLE WEB DESIGNER<br />
bit.ly/2DCT2uk<br />
Best used for creating Google Ads<br />
but also a neat little tool to create<br />
dynamic displays whereby you can<br />
animate textual elements.<br />
SLIDER REVOLUTION<br />
bit.ly/2avbF9a<br />
WHAT’S TRENDING TODAY<br />
Thereareanumberofdifferent<br />
treatments and trends that you can<br />
apply to typography in order to<br />
better tell your stories. Generally,<br />
making your typography more<br />
integrated into your design is a<br />
good start and less about a<br />
headline plonked onto the canvas.<br />
Here are some examples of<br />
typographical treatments to try<br />
and look out for:<br />
TYPOGRAPHY CHAOS<br />
This trend is still going and enables<br />
you to be a bit more chaotic with your<br />
composition of typography. Splitting<br />
words and even letters around the<br />
canvas can offer a really interesting<br />
look. In some cases, the<br />
unconventional arrangement can test<br />
the readers with curiosity.<br />
CROP AND CUT TYPE<br />
On the same lines of creating interest<br />
and making typography unique,<br />
simply crop or cut letters up within a<br />
word. Make sure it’s enough that the<br />
letters are still readable. There’s a really<br />
interesting neuro behaviour that<br />
readers can still identify letters within<br />
words, even if characters are missing.<br />
Take Hangman for example.<br />
Make sure that your<br />
typography is contemporary<br />
NEGATIVE SPACE<br />
Mostly using artwork within your<br />
typography creates negative space.<br />
This is a wonderful way of really<br />
integrating artwork within your<br />
typography and making your text<br />
stand out. A great technique when<br />
using negative space is it enable<br />
graphical elements to pop out of the<br />
type, creating a dimensional space.<br />
GRAPHICAL TYPE<br />
Typography can be a little flat so<br />
enhancing your typography<br />
graphically makes and textual<br />
elements stronger on the page. It<br />
might be that your typography is<br />
made furry or even paint like. The<br />
objective here is to make your<br />
typography more like an object as<br />
opposed to a character.<br />
If you’re developing in WordPress,<br />
this slider plugin is incredible for<br />
creating custom sliders with very<br />
little limitations. Using the timeline<br />
and various animation styles, your<br />
typography can really make an<br />
impact on the page. You can work<br />
with numerous layers and<br />
integrate your graphics too. A truly<br />
smart way of bring more life to<br />
your web projects.<br />
ADOBE ANIMATE CC<br />
adobe.ly/2rb71Vs<br />
If you haven’t dipped into this yet,<br />
it’s worth doing and not being put<br />
off the association with Flash. You<br />
can export HTML5 canvases and<br />
achieve a higher level of animation.<br />
When it comes to typography and<br />
more complex graphic directions,<br />
Adobe Animate will help you out.<br />
DYNAMIC: WHY & HOW?<br />
In many cases, typography is<br />
really static. It doesn’t move<br />
or engage other than serving<br />
one purpose and that’s to be<br />
read and understood. We’re<br />
all well aware of other media<br />
formats that are used to be<br />
more engaging — video, for<br />
example — but text can be<br />
just as exciting.<br />
Have you ever seen<br />
Honda’s ‘Keep Up’ campaign?<br />
For a 2015 campaign, it’s still<br />
a great example on how<br />
words can be the focus point<br />
and heart of a campaign. The<br />
campaign projects words<br />
quickly in the video forcing<br />
you to read in order to keep<br />
up. The central alignment<br />
and placement of the text<br />
makes it easier to read.<br />
Speed reading is the core<br />
method used here, causing<br />
viewers to focus entirely on<br />
the words that are displayed.<br />
There are many methods<br />
other than speed reading to<br />
make textual elements more<br />
engaging, but thinking more<br />
about movement and<br />
integration within a design<br />
can be really effective<br />
and creative.<br />
How? Well there are tools<br />
out there to help, but it all<br />
depends on what you’re<br />
executing and where it’s<br />
going. The easiest way is<br />
to use video, but if you can<br />
achieve animations through<br />
web languages such as<br />
JavaScript and CSS3, then<br />
go for it!<br />
Honda - ‘Keep up’<br />
bit.ly/2rjtDU0<br />
feature _________________________________________________45
GET PRO DESIGN SKILLS<br />
6 STEPS TO MEANINGFUL<br />
TYPOGRAPHY<br />
1<br />
READ THE CONTENT<br />
Meaningful typography<br />
starts with one thing —<br />
the content. Typographers know<br />
this since they’ll always read the<br />
book before they start typesetting<br />
for it. Unfortunately, it<br />
seemsthatmanywebdesigners<br />
underestimate the importance of<br />
contentinawebdesignprocess.<br />
They will often find excuses in<br />
the fact that the website doesn’t<br />
existyetsothere’snocontentto<br />
work with. When that’s the case,<br />
use content that is similar. If<br />
you’re designing a website<br />
about finance and economics,<br />
for example, find an article<br />
about that and read it.<br />
2<br />
CHOOSE A TYPEFACE<br />
BASED ON CONTENT<br />
Now you have read the<br />
content, you’re ready to choose<br />
your main typeface. If a website<br />
isabouttechnology,butis<br />
expected to have medium to long<br />
articles,useatypefacethatlooks<br />
abitmodernbutiseasytoread.<br />
If it’s an art gallery portfolio, you<br />
can get away with something<br />
edgy.Don’tuseLoremIpsumas<br />
placeholder text — it’s a strange<br />
form of the Latin language that<br />
has nothing to do with your<br />
website. Use the content from<br />
Step 1, in the language that<br />
will be used, and then design<br />
around that.<br />
3<br />
START MOBILE-FIRST<br />
An important step is to<br />
design the best reading<br />
experience for the screen that’s<br />
hardest to design for — mobile.<br />
Mobile-first is a fundamentally<br />
different approach to web design<br />
where progressive enhancement<br />
is favourable to graceful<br />
degradation. Don’t design the<br />
best reading experience for<br />
desktopscreensandthenadapt<br />
for mobile or, even worse, forget<br />
about mobile altogether. Choose<br />
a combination of font size and<br />
line height that works best on<br />
smaller screens. Your starting<br />
pointshouldbetheagreed-on<br />
browser default of 16 pixels.<br />
GREAT EXAMPLES Matej Latin picks a selection of typography that works well<br />
4<br />
ADAPT FOR<br />
LARGE SCREENS<br />
Don’t let mobile-first<br />
turn into mobile-only. The tools<br />
forshapingthebestreading<br />
experiences for different screens<br />
areinplaceandtheyshouldbe<br />
used.Largerscreensareusually<br />
further away from reader’s eyes<br />
so the base font size needs to be<br />
larger.18pixelsiswidely<br />
considered a good starting point.<br />
Don’t forget to limit the width of<br />
paragraphs — recommended for<br />
best reading experiences is up to<br />
60charactersperline.Theline<br />
height needs to be looked at<br />
again — 1.4 or 1.5 times the font<br />
size is usually best.<br />
Wired — wired.co.uk<br />
Wired comes with a typeface designed for web usage (Exchange<br />
<strong>Web</strong>) and neatly designed reading experiences for both, mobile (17<br />
pixels and 1.3 line height) and desktop (19 pixels and 1.4 line height).<br />
The Independent — independent.co.uk<br />
The Independent benefits from a bespoke typeface, Indy Serif, which<br />
seems very capable at delivering any type of news content on any<br />
medium. Well-shaped paragraphs offer a great reading experience.<br />
46 _________________________________________________feature
GET PRO DESIGN SKIL<br />
5<br />
USE A SCALE<br />
It’snowtimetodefinea<br />
rangeofreusablefont<br />
sizesbasedonascaleandthe<br />
most common way to do that is<br />
to use a modular scale. Go to<br />
modularscale.com, enter your<br />
base font size and choose a scale.<br />
Itwillgiveyouarangeoffont<br />
sizestochoosefrom.Defininga<br />
scaleandtryingtosticktoitadds<br />
meaningtofontsizechoicesand<br />
prevents the chaos that often<br />
arises from randomly assigning<br />
them instead.<br />
MATEJ LATIN<br />
Lead UX/UI <strong>Designer</strong> at<br />
Auto Trader <strong>UK</strong><br />
matejlatin.co.uk<br />
@matejlatin<br />
6<br />
SET A BASELINE GRID<br />
The next step is to start<br />
thinking about other<br />
text elements around the body<br />
text you should have designed<br />
by now. Titles, lists, captions, side<br />
comments, etc. To add meaning<br />
behind placing these elements<br />
on your website, it’s best to use a<br />
baseline grid. This grid originates<br />
from your body text line height. If<br />
your line height is 22 pixels, you<br />
need a vertical grid based on<br />
that. When that is in place, you’re<br />
ready to set the sizes and<br />
margins of other text elements<br />
so they’ll fit inside this grid.<br />
The Great Discontent — thegreatdiscontent.com<br />
The Great Discontent uses Leitura News for its body text. Its<br />
unique style complements the type of content (interviews) very<br />
well. A large base size makes the content very easy to read.<br />
The Economist — theeconomist.com<br />
The Economist comes with generously sized body text, topped with<br />
a crisp, slightly lighter typeface — Milo Serif Pro. Mobile-dedicated<br />
font size and line height help improve the reading experience.<br />
feature _________________________________________________47
GET PRO DESIGN SKILLS<br />
COLOUR &<br />
ACCESSIBILITY<br />
Colour and accessibility are key<br />
things to be mindful of, but are too<br />
often forgotten about by designers.<br />
You may be designing something<br />
on your nice shiny iMac with an<br />
incredibly glossy Retina display but<br />
not everyone will have one of<br />
those. Screens render colours<br />
differently and you can count on<br />
older screens having a harder time<br />
telling the difference between<br />
closely matched colours.<br />
Not only that, you have<br />
accessibility considerations<br />
whereby the viewer may have eye<br />
sight difficulties or colour blindness.<br />
Contrast will always save you here<br />
and there are many good guides<br />
to avoid these issues.<br />
Check out <strong>Web</strong> AIM (<strong>Web</strong><br />
Accessibility in Mind) to see how<br />
your chosen colours rate within the<br />
AA and AAA web standards.<br />
SCREENS RENDER<br />
COLOURS<br />
DIFFERENTLY AND<br />
YOU CAN COUNT<br />
ON OLDER<br />
SCREENS HAVING<br />
A HARDER TIME<br />
TELLING THE<br />
DIFFERENCE<br />
CHOOSING COLOURS<br />
1<br />
BEST FIT<br />
Colours can be very<br />
subjective but are<br />
nevertheless important when it comes<br />
to look and feel. The personality of<br />
your project still has a complete hold<br />
of the colours you choose. The first<br />
step would again be to think about<br />
your values and what colours best fit.<br />
It’s best to acknowledge colour<br />
psychology before you start picking<br />
any colour. This is because you can<br />
really influence human behaviour and<br />
perceptions of what is being seen by<br />
the colour used — take warm and cold<br />
colours, for example. Although<br />
obvious, we have the ability to control<br />
a reader’s feelings and behaviour just<br />
by the colours we use.<br />
2<br />
LESS IS MORE<br />
As with text, hierarchy is<br />
important. Having some<br />
ground rules for colour usage<br />
prevents your artwork looking like a<br />
pack of fruit pastilles. Think about<br />
primary, secondary and even tertiary<br />
colours that can be used. There’s no<br />
real limit to how many colours you<br />
can use but less is often more.<br />
Knowing how many colours<br />
you’re planning to use, will help<br />
maintain consistency.<br />
It’s common for more corporaterelated<br />
designs to have less colours<br />
than something perhaps more friendly.<br />
Another thing to be very mindful of<br />
is reserving a single colour for your<br />
call-to-actions and buttons. It’s a good<br />
idea to single out a colour so that links<br />
and buttons are more individual and<br />
user-friendly.<br />
ESSENTIAL RESOURCES<br />
ADOBE COLOR CC<br />
adobe.ly/2wLilqq<br />
Adobe provides a range of rules<br />
that will help discover closely<br />
matched colours from selecting a<br />
primary colour. If you work with<br />
Adobe products, save your<br />
palette to a library to get rid of<br />
copying and pasting.<br />
3<br />
CHOOSING COLOURS<br />
Let’s start by choosing<br />
colours since we now know<br />
the personality and hierarchy. You can<br />
useatoollikeAdobeColorCCtoplay<br />
around with your colour choices. This<br />
tool is simply a colour wheel that gives<br />
youthefreedomtoselectandfind<br />
colour palettes.<br />
Focus on your primary colour first<br />
and play with the rules that Adobe<br />
gives you if you want help finding<br />
other colours. These calculated rules<br />
are a useful headstart but not<br />
restrictive. Once you have selected<br />
your primary colour, work through<br />
selecting your other colours.<br />
Remember accessibility and contrast<br />
in your options.<br />
4<br />
SHADES OF COLOUR<br />
Once you have selected<br />
your colours, there’s a few<br />
COLBLINDOR<br />
bit.ly/1qSSJSu<br />
A great tool to check your design<br />
against colour blindness. You can<br />
safely upload your artwork and<br />
get a feeling of how it is to have a<br />
colour vision handicap.<br />
Five steps to the perfect palette<br />
more things to think about. Lightness<br />
and darkness will be one. Although<br />
you have your chosen colours, there<br />
are no rules to restrict you from using<br />
lighter or darker versions. For example,<br />
we may have a bright blue as our<br />
primary colour and we are using it for<br />
some of our foreground content. We<br />
could darken the same blue (with a<br />
shade of black) for a treatment in the<br />
background. Be mindful of consistency<br />
and not create too many variations of<br />
your colours, but this method will<br />
steer you clear of the fruit pastilles and<br />
help with creating contrasting colours<br />
basedonyourownpalette.<br />
5<br />
TEST AND TRY<br />
Apply, play and change if<br />
necessary. It’s only when<br />
using everything in context that you<br />
can truly gauge if your design is<br />
working. Look back over your values<br />
since this will help validate whether<br />
your creation works.<br />
Create a number of versions and<br />
try new arrangements of colour.<br />
There’s never a single right answer to<br />
any creative project and the process<br />
of experimenting is fun. If you have<br />
options and a history of experiments,<br />
it’s easier to see how your design has<br />
progressed and evolved.<br />
Make sure to get your colour right<br />
WEB AIM COLOUR<br />
CONTRAST CHECKER<br />
bit.ly/2ALPtTp<br />
Usingthistoolwillhelpensure<br />
that your chosen colours meet<br />
accessibility criteria. The AA and<br />
AAA web standards will make<br />
sure that your designs are<br />
compliant and user friendly.<br />
48 _________________________________________________feature
GET PRO DESIGN SKILLS<br />
COLOUR<br />
PERSONALITY<br />
BLUE<br />
<br />
<br />
<br />
<br />
<br />
COMBINE CAPTURE & COLOUR<br />
Adobe Capture CC is a fantastic app<br />
that enables you to find fonts and<br />
colours simply by taking a photo. You<br />
may be wondering what fonts are<br />
used on a favourite magazine, ahem.<br />
Or you may wish to take colour<br />
references from an object or scenery.<br />
2<br />
FIND COLOURS<br />
FROM A PHOTO<br />
From the Colors tab within<br />
the app, simply tap the ‘+’ button and<br />
point the camera towards the object<br />
or scenery you wish to capture. You<br />
will see that the app is already working<br />
at finding popular colours. Once you’re<br />
happy with your arrangement, take<br />
the photo and refine it further.<br />
Youcanproceedtosaveyour<br />
captured colours to a library, picking<br />
them back up and using them in<br />
other Adobe tools.<br />
Quickly create a<br />
palette with Adobe<br />
photo and then make sure the app<br />
has cropped the text correctly. Hit the<br />
big tick and let Adobe analyse the<br />
image. Once it has finished analysing,<br />
it will provide you with a list of best<br />
matched fonts within Adobe Typekit<br />
that you can then go on to use.<br />
RED<br />
<br />
<br />
<br />
GREEN<br />
<br />
<br />
<br />
<br />
<br />
<br />
<br />
1<br />
DOWNLOAD THE APP<br />
You can find the app on the<br />
iOS App Store or Google<br />
Play. Simply search for Adobe Capture,<br />
download and register/log in.<br />
3<br />
WHAT THE FONT?<br />
You can also find out what<br />
fontshavebeenusedorfind<br />
closely matched fonts in printed<br />
material. Head over to the Type tab<br />
within the app and direct the camera<br />
over the typography you wish to<br />
capture. There will be a blue line that<br />
helps you with alignment. Once you<br />
have the typography in view, take the<br />
4<br />
CREATE A SHAPE<br />
Although it’s not strictly<br />
typography or colourrelated,<br />
Shape is a very useful feature<br />
for a number of reasons. It’s a great<br />
way of vectorising an object so that<br />
you can play around with it further<br />
in Illustrator.<br />
For example, you may wish to<br />
vectorise a signature or perhaps<br />
some freehand typography. It’s<br />
great for capturing elements that<br />
are just sometimes easier to draw<br />
with pen and paper.<br />
YELLOW<br />
<br />
<br />
<br />
feature _________________________________________________49
web workshop<br />
Overlay graphics on<br />
video backgrounds<br />
Inspired by http://project-redspace.com<br />
Call to Action<br />
After the images have animated<br />
onto the screen, the text and call<br />
to action button appear on the<br />
screen enabling the user to go<br />
deeper into the experience.<br />
Main navigation<br />
The main navigation is<br />
available, hidden behind<br />
the main burger menu.<br />
Clicking this animates the<br />
overlay menu down from<br />
the top of the screen.<br />
Video background<br />
The site is set up to tell a<br />
story, very similar to a<br />
documentary, and the<br />
main background is a full<br />
screen video.<br />
Overlaid SVG images<br />
When the video starts to<br />
play,thecrispSVGimages<br />
spring forward and expand<br />
intoplaceinthecentreof<br />
the display.<br />
Keeping you orientated<br />
The bottom of the screen has<br />
three stages of the story and<br />
locatestheuserwheretheyare<br />
as a means of navigation to<br />
efficiently get around.<br />
50 ____________________________________________workshop
Overlay graphics on video backgrounds<br />
DOWNLOAD TUTORIAL FILES www.filesilo.co.uk/webdesigner<br />
EXPERT ADVICE<br />
Engage the user<br />
The Project Redspace site works so<br />
well because it engages the user with<br />
a strong narrative. Having a story at<br />
its core makes the user intrigued,<br />
wanting to know more as they are<br />
drawn deeper into the unfolding<br />
events. With the user actively<br />
engaged in the content, they will take<br />
time to explore all that the site offers.<br />
<br />
What our<br />
experts think<br />
of the site<br />
An easy to follow process<br />
Making use of video segments throughout the site shows the design process<br />
of the car in a very visual way that creates a compelling story to hook the user<br />
into the ideology of the project’s goals. Three main pages work together to tell<br />
different aspects of the story and make for easy navigation.<br />
Mark Shufflebottom, Professor of Interaction Design<br />
Technique<br />
1. Creating graphics over video<br />
The first step in creating graphics over video background<br />
is to add the video to the document. The video<br />
placeholder here is an open source movie that will serve<br />
as a background. This is placed inside a div tag and<br />
appropriate classes are added for CSS control.<br />
<br />
<br />
<br />
<br />
<br />
<br />
<br />
2. Adding the graphics<br />
Below the video in the body section, the content is<br />
added. In this case that content is going to be two SVG<br />
graphic elements and a heading. The content is placed<br />
over the top of the video and then the graphics will be<br />
stacked up through CSS.<br />
<br />
<br />
<br />
<br />
<br />
<br />
<br />
<br />
Journey<br />
<br />
3. Creating your CSS<br />
In the heading section of the page, or in a separate style<br />
sheet, add the following code. The first rule sets all<br />
elements to have border-box sizing so that the border<br />
and padding are included in sizes. The body of the page<br />
is given the full height of the browser.<br />
* {<br />
box-sizing: border-box; }<br />
html, body {<br />
margin: 0;<br />
padding: 0;<br />
height: 100%; }<br />
4. Position the background video<br />
The background video is positioned absolutely over the<br />
full dimensions of the screen and given a minimum<br />
width and height so that they always completely fill the<br />
screen. This video element is centred vertically and<br />
horizontally in the browser.<br />
.fullscreen-bg_video {<br />
position: absolute;<br />
top: 50%;<br />
left: 50%;<br />
width: auto;<br />
height: auto;<br />
min-width: 100%;<br />
min-height: 100%;<br />
transform: translate(-50%, -50%); }<br />
5. Content positions<br />
The container for the video is given a fixed background<br />
position and is positioned to fill the entire screen, while<br />
being placed behind all other elements on the display.<br />
The content runs, by default, over the top of the other<br />
media and is told to be relatively positioned.<br />
.fullscreen-bg {<br />
position: fixed;<br />
top: 0; right: 0;<br />
bottom: 0; left: 0;<br />
overflow: hidden;<br />
z-index: -100; }<br />
.content {<br />
margin: 0 auto;<br />
width: 100%; height: 100%;<br />
max-width: 960px;<br />
padding: 0 15px;<br />
position: relative; }<br />
6. Positioning the graphics<br />
The graphics are placed over the top by placing them<br />
absolutely in the relatively positioned content box. This<br />
class is applied to graphics and heading so that it’s over<br />
the top. Finally the heading is styled up with the<br />
appropriate font and colours.<br />
.graphics {<br />
width: 100%;<br />
position: absolute;<br />
top: 50%;<br />
transform: translateY(-50%); }<br />
h1 {<br />
font-size: 8em;<br />
text-align: center;<br />
font-family: “Helvetica Neue”, Helvetica,<br />
Arial, sans-serif;<br />
color: #fff;<br />
}<br />
workshop ______________________________________________51
Tutorials<br />
Code a dynamic<br />
SVG radial menu<br />
Use SVG, jQuery and the GSAP animation library to<br />
create an animated radial menu<br />
52 __________________________________________________tutorial<br />
DOWNLOAD TUTORIAL FILES<br />
www.filesilo.co.uk/webdesigner
Tutorials<br />
There’s so much that can be achieved<br />
natively in the browser using CSS3 or the<br />
<strong>Web</strong> Radial menus. It’s something we’ve<br />
seen used on the web before, mainly<br />
back in the days of Adobe Flash — although recently<br />
implementations in JS and/or Canvas have been<br />
spotted in the wild — but they’re often seen in software<br />
used on touch screens. We’ll be creating our very own<br />
radial menu but we’ll be using SVG for the drawing and<br />
jQuery and GSAP to handle the interaction and animation.<br />
SVG is perfect for these kinds of elements due to its<br />
navigable DOM and responsive nature. We can capitalise<br />
on these properties to create a complete user interface<br />
(UI) or specific parts of a UI — such as a menu.<br />
The idea behind our radial menu is that each circular<br />
layer would be revealed when the layer before is<br />
interacted with. The menu contains three layers; the first<br />
layer is the menu button in the middle; the second<br />
consists of four icons; and the final layer contains three<br />
buttons for each of the four buttons found on the<br />
previous layer.<br />
We’ll be creating the design in a graphics editor (this<br />
example was created in Sketch) but you can use any<br />
vector drawing program that exports to SVG.<br />
1. Design the menu<br />
The first step is to create a design for the menu using a<br />
graphics editor. The grouping of elements here is<br />
important as we need to create all of the layers we’ll need<br />
later for the reveal process. The circular backgrounds on<br />
the icons are the hover states and the hit area for each<br />
button. Once complete we need to export the SVG file.<br />
Check out the code snippets here: http://srt.lt/c0H1.<br />
2. Create our first timeline<br />
GSAP offers two timeline types: TimelineLite and<br />
TimelineMax. The ‘max’ version offers us access to<br />
additional features such as the ability to repeat<br />
animations, as well as playing them in reverse among<br />
other features. Our first timeline will be the water which<br />
we will repeat infinitely and yo-yo back and forth.<br />
var animation_water = new TimelineMax({<br />
repeat: -1,<br />
yoyo: true<br />
});<br />
http://srt.lt/D9rN0m<br />
3. Container styles<br />
Next we’ll create a new pen on CodePen and paste our<br />
optimised SVG code into the HTML editor. We’ll wrap a<br />
container div around the SVG and provide some simple<br />
styles to position and size the container, as well as<br />
applying the background image.<br />
.container {<br />
position: relative;<br />
display: flex;<br />
align-items: center;<br />
justify-content: center;<br />
min-width: 100vw;<br />
min-height: 100vh;<br />
...<br />
}<br />
http://srt.lt/k7EeS<br />
4. SVG styles<br />
Next we’ll add a class to our SVG and provide some<br />
simple styles to control the size of the menu.<br />
.menu {<br />
width: 100%;<br />
height: auto;<br />
max-width: 792px;<br />
max-height: 100%;<br />
}<br />
http://srt.lt/zYcA4c<br />
5. Hover and active states<br />
We can use CSS to create our hover states and use a class<br />
name of ‘is-active’ to control the basic interaction. We’ll<br />
change the cursor to a pointer and change the opacity of<br />
background circles. We will also add some similar styles to<br />
the main button in centre.<br />
[class$=”-button”] {<br />
cursor: pointer;<br />
circle {<br />
opacity: 0;<br />
transition: opacity 250ms;<br />
&:hover {<br />
opacity: 0.6;<br />
} } }<br />
http://srt.lt/RtXn<br />
6. JavaScript<br />
For the remainder of the interaction we’ll need to turn to<br />
JavaScript. Make sure you’ve included the GSAP and<br />
jQuery libraries, so we can create our first timeline and<br />
animation. We’re going to animate the middle layer of<br />
buttonsfromascaleof‘0’toitsoriginalsize.<br />
Accessibility<br />
The code we are writing for this demo is meant as<br />
an example of creating interactive SVGs. The code<br />
is not accessible and shouldn’t be used for<br />
production without modification.<br />
Left<br />
Create the design using a vector graphics editor such as<br />
Sketch for Mac<br />
Top<br />
Using CSS we’ve provided a simple interaction when the<br />
buttons are hovered over<br />
tutorial _________________________________________________53
Tutorials<br />
Code a dynamic SVG radial menu<br />
var animate_middle = new TimelineLite();<br />
animate_middle<br />
.from(“.middle-layer”, 0.5, {<br />
transformOrigin:”50% 50%”,<br />
scale: “0”<br />
}, 0, 0)<br />
;<br />
http://srt.lt/kLc8M<br />
7. Spin and fade in the icons<br />
The GSAP library allows us to layer animations onto a<br />
single timeline. We’ll utilise this to create two more<br />
animations to the ‘animate_middle’ timeline. We’ll add<br />
rotation and opacity animations to the buttons of the<br />
middle layer. The animation will now grow the circle while<br />
spinning and fading in the icons.<br />
animate_middle<br />
...<br />
.from(“.middle-layer .button-group”,<br />
0.75, {<br />
transformOrigin: “50% 50%”,<br />
rotation: “-=135” }, 0, 0)<br />
.from(“middle-layer .button-group”,<br />
0.5, {<br />
opacity: “0” }, 0, 0)<br />
;<br />
http://srt.lt/YjKm5C<br />
8. Animate the outside layer<br />
Next we’ll create a new timeline for the outside circle. The<br />
animation will be exactly the same as the first animation<br />
we created to animate the inside layer. This time we won’t<br />
be adding anything else to the timeline as we won’t<br />
GSAP documentation<br />
and forums<br />
The Greensock site is an invaluable resource for<br />
learning to utilise GSAP. The site includes learning<br />
resources, examples and a beautiful showcase of<br />
sites built using the library. https://greensock.com<br />
always need to animate the buttons and circle together.<br />
var animate_outside = new TimelineLite();<br />
animate_outside<br />
.from(“.outside-layer”, 0.5, {<br />
transformOrigin:”50% 50%”,<br />
scale: “0”<br />
}, 0, 0)<br />
;<br />
http://srt.lt/S1jNa<br />
9. Timeline play states<br />
Now we have both of the layers animating we can update<br />
their initial play states. This will allow us to pause the<br />
animations until we interact with them, hiding the two<br />
layers of buttons we’ve created animations for. We also<br />
want to create a new variable to set the menu state.<br />
var animate_middle = new<br />
TimelineLite({paused: true});<br />
var animate_outside = new<br />
TimelineLite({paused: true});<br />
var menuOpen = false;<br />
http://srt.lt/ZgCi7<br />
10. Create our first click function<br />
Now we have our animations created and paused when<br />
the page loads we need to create a function to trigger the<br />
animation when the centre circle is clicked. Within our<br />
click function we will check to see if the menu is open<br />
using our ‘menuOpen’ variable.<br />
$(‘.main-menu’).click(function() {<br />
if(menuOpen == false) {<br />
...<br />
animate_middle.play();<br />
menuOpen = true;<br />
}<br />
});<br />
http://srt.lt/LaX0f<br />
11. Close the first layer<br />
In the last step we checked to see if the menu was closed,<br />
played the animation and updated the menu state<br />
variable. We now need to provide what happens when<br />
the button is clicked and the menu is already open. GSAP<br />
allows for timelines to be played in reverse so we can<br />
have the centre layer animate back into the centre.<br />
else {<br />
...<br />
animate_middle.reverse();<br />
menuOpen = false;<br />
}<br />
http://srt.lt/k3Ps0A<br />
12. Additional variables<br />
In the same vein as the main menu button we need to<br />
create a number of variables to keep track of the menu’s<br />
current state. The outside layer contains four separate<br />
menus and the circle. Here we’re creating a new variable<br />
for each of those menus and the outside circle.<br />
var outsideCircleOpen = false;<br />
var homeOpen = false;<br />
var faqOpen = false;<br />
var settingsOpen = false;<br />
var moreOpen = false;<br />
http://srt.lt/kG7pW<br />
13. Outside layer logic<br />
We now need to create a number of click functions, so<br />
we’ll start with the home button at the top. When we click<br />
this button we need to check for two things; if the home<br />
menu is already open, and then inside of that logic, if the<br />
outside circle is already open. If the outside circle is<br />
already open we don’t need to animate it, we can simply<br />
animate the buttons and leave the circle open.<br />
$(‘.home-button’).click(function() {<br />
if(homeOpen == false) {<br />
if(outsideCircleOpen == false) {<br />
animate_outside.play();<br />
}<br />
outsideCircleOpen = true;<br />
homeOpen = true;<br />
}<br />
}<br />
);<br />
http://srt.lt/E8tG<br />
Top left<br />
With our animations paused to begin with they are<br />
hidden when the page is loaded<br />
Top right<br />
We’ve now created the click function to play the first<br />
animation, revealing the first layer of buttons<br />
Bottom left<br />
The home buttons are now hidden due to the initial<br />
paused state of the timeline<br />
Bottom right<br />
The finished product including the active states for our<br />
buttons on each layer<br />
54 __________________________________________________tutorial
Tutorials<br />
Code a dynamic SVG radial menu<br />
GSAP animations<br />
The GSAP animation library is simple<br />
yet extremely powerful. The library<br />
gives us a really simple syntax and<br />
handles all of the complex calculations<br />
under the hood for us. In its simplest<br />
form the library allows us to create<br />
timelines and then add animations to<br />
these timelines. This concept will be<br />
familiar if you’ve used Flash or any<br />
other animation GUI.<br />
var tl = new timelineLite();<br />
Once we have created a timeline we<br />
can create an animation to add to it.<br />
The example below will animate the<br />
‘circle’ element from a scale of ‘0’ to<br />
its original scale, over the duration of<br />
one second. We’re also providing the<br />
delay and start times of ‘0’ although<br />
this isn’t required as they are the<br />
default values.<br />
tl.from(<br />
‘circle’, 1, {<br />
scale:’0’<br />
}, 0, 0<br />
);<br />
The library also has a number of more<br />
complicated functions we can use<br />
like the staggerTo and staggerFrom<br />
functions, which allow us to animate a<br />
number of elements one after another,<br />
as well as a number of paid plugins for<br />
really specific uses.<br />
The library is performant and<br />
handles much of the browser<br />
compatibility issues you would run into<br />
making it ideal for production.<br />
14. Outside layer else logic<br />
In the last step we created the logic for when the home<br />
menu was not already open, so here we create the<br />
opposite logic. We need to make sure to update the<br />
variables to ensure we can keep track of the menu’s state.<br />
We also play the ‘animate_outside’ timeline in reverse<br />
when clicking the main menu button.<br />
else {<br />
homeOpen = false;<br />
outsideCircleOpen = false;<br />
animate_outside.reverse();<br />
}<br />
http://srt.lt/zDcYw<br />
15. Animate the<br />
home menu buttons<br />
We now need to create a new timeline for our home<br />
menu buttons and change the initial play state to paused.<br />
We can utilise GSAP’s ‘staggerFrom’ function to apply the<br />
same animation to the buttons, one at a time, with a given<br />
delay between each iteration.<br />
var animate_home = new TimelineLite({paused:<br />
true});<br />
animate_home<br />
.staggerFrom(“.home-menu g”, 0.5, {<br />
transformOrigin:”50% 50%”,<br />
opacity: “0”,<br />
scale: “0”<br />
}, 0.125, 0.25)<br />
;<br />
http://srt.lt/q1SyG<br />
16. Add animations to<br />
click functions<br />
We’ve created our home button’s timeline so we now<br />
need to update our click function to include playing and<br />
reversing the animation when the home button is clicked.<br />
$(‘.home-button’).click(function() {<br />
if(homeOpen == false) {<br />
...<br />
animate_home.play();<br />
} else {<br />
...<br />
animate_home.reverse();<br />
}<br />
});<br />
http://srt.lt/qC2B5s<br />
17. More menu<br />
We now need to do exactly the same for the More menu<br />
by creating a click function and staggered animation<br />
timeline for the menu and its buttons. We also need<br />
to update the menu state variables within each of our<br />
click functions.<br />
http://srt.lt/i3rT<br />
18. Settings and FAQ menu<br />
As you may have guessed we need to repeat the same<br />
thing for both the Settings and FAQ menus. Remember to<br />
add the menu state variables to each of the layers and<br />
play the animation timelines in reverse.<br />
http://srt.lt/x5wTx<br />
19. Almost finished<br />
We now have all of the animations being triggered and<br />
played, or reversed given the appropriate click on the<br />
middle layer. We need to make sure all of the animations<br />
are reversed and the state variables updated when the<br />
main menu is clicked and is already open.<br />
$(‘.main-menu’).click(function() {<br />
animate_middle.reverse();<br />
animate_outside.reverse();<br />
...<br />
menuOpen = false;<br />
outsideCircleOpen = false;<br />
homeOpen = false;<br />
...<br />
});<br />
http://srt.lt/Bk2Hz4<br />
20. Active states — middle layer<br />
That’s all of our animations and click functions created –<br />
the only thing left to do is to add the ‘is-active’ class to the<br />
button that has been clicked. jQuery allows us to use<br />
advanced CSS selectors to first listen for any click to<br />
buttons in the middle layer and then to remove the class<br />
from all the other buttons.<br />
$(‘.middle-layer [class*=”-button”]’).<br />
click(function(){<br />
$(‘.middle-layer [class*=”-button”]’).<br />
removeClass(‘is-active’);<br />
$(‘.outside-layer [class*=”-button”]’).<br />
removeClass(‘is-active’);<br />
$(this).addClass(‘is-active’);<br />
});<br />
http://srt.lt/T8Z3f5<br />
21. Active states — outside layer<br />
We now do the same thing for the buttons on the outside<br />
layer, targeting, removing and adding our active class to<br />
the clicked button. That’s it, our radial menu, created with<br />
SVG, animated with GSAP and coded with jQuery is<br />
finished. The animations are simple yet effective and the<br />
active states and hover interactions allow the user to keep<br />
track of their place in the menu.<br />
$(‘.outside-layer [class*=”-button”]’).<br />
click(function(){<br />
$(‘.outside-layer [class*=”-button”]’).<br />
removeClass(‘is-active’);<br />
$(this).addClass(‘is-active’);<br />
});<br />
http://srt.lt/k9Gj1x<br />
Collection of tutorial pens - http://srt.lt/AmTp<br />
tutorial _________________________________________________55
Tutorials<br />
Design isometric<br />
typography<br />
Learn how to build a city of letters, using the Pen<br />
tool, selections and layers in Photoshop<br />
56__________________________________________________tutorial<br />
DOWNLOAD TUTORIAL FILES<br />
www.filesilo.co.uk/webdesigner
Tutorials<br />
Perspective is everything in design. If<br />
somethingyou’vedrawnhasaperfect<br />
perspective, it will help your work look<br />
more realistic; alternately, Pablo Picasso<br />
made history by drawing with a very skewed sense of<br />
the reality around him.<br />
Isometric art is as much of a science as anything,<br />
though.Ithasaverystrictsetofruleswhenitcomesto<br />
what goes where. That’s pretty difficult to sit down and<br />
draw yourself, but when it comes to Photoshop, you can<br />
create a guide for anything.<br />
In this tutorial, we’re going to set out a perfect<br />
isometric grid before we build a world on hexagonally<br />
facing lines. In this London-inspired image, we’re going<br />
to trace the Thames isometrically, and even create<br />
isometric versions of landmarks. You’ll find that anything<br />
can be created on this grid, since it simply holds cubic<br />
shapes together. Curves can simply be drawn from<br />
corner to corner.<br />
Everything in the image is going to follow this structure<br />
too; you can use images to copy, you can follow our steps<br />
religiously, or you can design your own icons following<br />
isometric patterns. It’s entirely up to you — within the<br />
limits of isometry, of course.<br />
1. Start the grid<br />
Begin by creating a new document of 20 x 20 pixels.<br />
Create a black strip down the right and bottom of the<br />
document with the Rectangular Marquee tool. Use the<br />
Grid if you need to, by hitting Cmd/Ctrl+’.<br />
2. Define Pattern<br />
GotoEdit>DefinePattern.NameitandthenclickOK.<br />
Create a new 1920 x 1080 document by going to File><br />
New, and then go to the Paint Bucket (G). Use Pattern fill<br />
and on a new layer, fill with the pattern you’ve created.<br />
3. Transform the pattern<br />
Nowwe’regoingtomakethepatternisometric!Makethe<br />
width and height much bigger, the angle 35 degrees and<br />
place in the centre of the document. The grid should be<br />
made of diamond shapes.<br />
4. Choose your palette<br />
We’re going to use five different colours for this, but<br />
different shades of each. The colours are Royal Blue<br />
(#021574), Muted Red (#f22f50), Spearmint (#6ec5cf),<br />
Peppermint (#6ecfb0), Tan (#ff935e) and White (#ffffff).<br />
5. Lay out your text<br />
Use the Type tool and create the text that you want to use<br />
across the document; we’re going with ‘London, England’.<br />
This is important, as it will dictate the size, spacing and<br />
wholelookofyourisometricposter.<br />
6. Create some letters<br />
Create isometric letters with the Pen tool, following the<br />
guide that you created. This is a trial-and-error part of the<br />
process, and will take the longest of everything.<br />
Experiment with shapes and Fill with #808080 for now.<br />
Selecting pixels<br />
on a layer<br />
Hold Cmd/Ctrl and click on the preview layer of<br />
a window to select all the pixels on that layer<br />
Above<br />
Create a flat guitar with the Pen tool, and transform it up<br />
so it’s in line with the grid. Duplicate and darken the lower<br />
layer by -20 lightness before moving this layer up slightly<br />
too, to make it 3D<br />
Left<br />
Use a reference photo of a whale tail to draw your own<br />
whale in the Thames with the Pen tool<br />
tutorial _________________________________________________ 57
Tutorials<br />
Design isometric typography<br />
7. Work on the letters<br />
The isometric letters are going to have to have one side<br />
that predominantly faces forwards. Work out where the<br />
curves are on each of the letters by reducing the<br />
opacities. This might take some time to figure out, and<br />
you may need to redraw some letters.<br />
9. Colour and build bridges<br />
Create new Overlay layers above each of the letters<br />
and fill with one of your colours. Add Colour layers,<br />
clip, and brush in another colour to flesh it out. Next,<br />
create bridges between some of the letters. Colour<br />
this with another colour.<br />
12. Plant some trees<br />
Trees are easy to create with the Pen; create a triangle<br />
with the two bottom sides lining up along the isometric<br />
guide and then darken one side. Repeat this twice, then<br />
add a stump. Colour with an Overlay layer.<br />
8. Shade the letters<br />
Group each set of layers for each letter. Create clipping<br />
masks for each, and add either light or shade to the<br />
letters so that they appear 3D. Work out where the light<br />
is in the image and judge accordingly.<br />
10. Create a speaker<br />
Now, we’re going to add objects to the scene. Create a<br />
box using the isometric guide, lightening and darkening<br />
either side of the box to create perspective. Create two<br />
circles, and Transform these to fit into the box along the<br />
guide; add a Stroke to the circles using Layer Styles.<br />
13. Escalators and map planning<br />
We’ve created escalators using the same methods we<br />
used to create the other objects, using the isometric<br />
guide to draw over. After that, we’ve used a real map of<br />
London to roughly trace the Thames and draw a white<br />
outline for some water to fill.<br />
11. Add a flag<br />
Next, we’re going to create a flag. Again, use the Pen tool<br />
to draw along the guide, and then fill with white. Clip<br />
layers to this, and touch soft black brushstrokes over<br />
one side of the flag to add shade.<br />
14. Curve the edges<br />
Use the Pen tool to curve the edges of the white structure<br />
that you’ve just created, and fill with #808080. Use a soft,<br />
black brush to create the illusion of a curved space for the<br />
water to sit in.<br />
Grouping and merging<br />
Group a set of layers that you may still want to edit<br />
individually; merge a set of layers that you want to<br />
start editing as one<br />
Above<br />
Create a circle with the Elliptical Marquee and Ctrl/<br />
right-click to choose Stroke to draw your main circle.<br />
Draw lines within it, and draw a structure to hold it up.<br />
Transform this to the grid<br />
Right<br />
With your London Eye in place, draw the round brush<br />
strokes around the outside of the wheel. Make them<br />
smaller the further away they are in perspective.<br />
58 __________________________________________________tutorial
Tutorials<br />
Design isometric typography<br />
Drawing the train<br />
Start by drawing the train<br />
track along the grid, and use<br />
a reference photo to design<br />
the front of a tube train with<br />
the Pen tool. Transform it to<br />
the grid and place it over the<br />
tracks. Create a new layer<br />
below the front of your tube<br />
train, and create straight lines<br />
leading up under the ‘N’ with<br />
the Pen tool, before you create<br />
the rest of the train by filling<br />
in selections with blue, red<br />
and white. Create a window<br />
in grey, and then create three<br />
new layers. Reduce these new<br />
layers to 20% opacity, and<br />
on each create a white circle<br />
getting progressively bigger<br />
with each layer.<br />
15. Fill with water<br />
Use the Pen tool to select the grey space in each of the<br />
white structures and falling from the top structures, and<br />
fill with blue on a new layer. Set this layer to Hard Light to<br />
make it look like it’s actual liquid. Clip a white layer and<br />
delete a jagged pattern in the middle for added effect.<br />
18. Create Big Ben<br />
Use a stock photo of Big Ben to draw the clock with the<br />
Pen tool; you don’t have to be as detailed, though, of<br />
course. Draw it in shades of grey; draw the spire to one<br />
side of the building rather than straight upwards, too.<br />
20. Finishing touches<br />
Make any final flourishes that you’d like to add more to<br />
the image; this might include stars in the background<br />
with little dots, a whale in the Thames or altering the<br />
colour with a Curves adjustment.<br />
16. Start the chandelier<br />
Create a new layer and add dots in the intersections of<br />
the lines like you can see in the screenshot. Select the<br />
back rows of these dots and reduce the Lightness to -10<br />
by using Hue/Saturation (Cmd/Ctrl+U). Duplicate this<br />
downwards to create more dots.<br />
19. Place the landmark<br />
Colour Big Ben with some Overlay<br />
layers, duplicate the layer and then<br />
flip this new one horizontally. Resize<br />
both layers and Skew with Free<br />
Transform to fit along the guide<br />
that you have created.<br />
21. Add noise<br />
Finally, select black and white in your Swatches (D). Create<br />
a new layer, fill with black (Alt/Opt+Delete) and go to<br />
Filter>Noise. Choose 400%, check Monochromatic and<br />
click OK. Set this layer to Soft Light, 10% opaque.<br />
17. Finish the<br />
chandelier<br />
Create the same effect three times<br />
with multiple rows of dots, then<br />
resize the two latter ones. Stack<br />
these to create a chandelier effect.<br />
On new 20% layers, create white<br />
dots to suggest light emanating<br />
outwards.<br />
tutorial _________________________________________________59
web workshop<br />
Create multiple fade<br />
background colours<br />
Inspired by https://rocka.co<br />
Page navigation<br />
Page navigation uses fixed<br />
positioning, always appearing in the<br />
same place regardless of how far<br />
down the page the user scrolls to.<br />
Go home<br />
logo link<br />
Alogoispresentedasa<br />
distinct part of the<br />
navigation, allowing<br />
users to return to the<br />
home page from any<br />
location and position.<br />
Changing<br />
background<br />
JavaScript event<br />
listening enables the<br />
colour of the<br />
background to change<br />
at specific scrolling<br />
locations generated by<br />
the user.<br />
Page content<br />
Thisisthepagecontentthatthe<br />
user can scroll through. The effect<br />
only works if there’s enough<br />
contenttoallowforscrolling.<br />
Navigation prompt<br />
A notification to help make sure that<br />
users of the website are aware of the<br />
additional content made available by<br />
scrolling the page.<br />
60 ____________________________________________workshop
EXPERT ADVICE<br />
Using body labelling<br />
Using JavaScript to apply a status<br />
label to the body section is an easy<br />
way to keep code simple and allowing<br />
visual reactions to be controlled from<br />
CSS. Take this further by applying<br />
additional labels to describe specific<br />
events that have occurred relating to<br />
user interactions or other events.<br />
<br />
What our<br />
experts think<br />
of the site<br />
Create multiple fade background colours<br />
DOWNLOAD TUTORIAL FILES www.filesilo.co.uk/webdesigner<br />
Avoid complexity to avoid headaches<br />
It’s worth spending extra time to identify the simplest way to create effects like<br />
this. Placing too much responsibility within JavaScript increases scope for future<br />
changes breaking functionality, costing time to fix. This example avoids the<br />
problem by keeping JavaScript’s involvement to a minimum.<br />
Leon Brown, freelance web developer and trainer<br />
Technique<br />
1. Initiate HTML document<br />
The first step is to initiate the HTML document that will<br />
be the framework for storing the content and loading<br />
external resources. This document contains a head<br />
section that loads CSS and JavaScript resources, along<br />
with a body section for defining the visible content in<br />
step 2.<br />
<br />
<br />
<br />
Scrolling Background Change<br />
<br />
<br />
<br />
<br />
*** STEP 2 HERE<br />
<br />
<br />
2. Body content<br />
The main content can consist of any HTML, providing<br />
that it covers enough space to allow for scrolling. This<br />
example will use an article container that will be<br />
controlled via CSS to allow for scrolling.<br />
<br />
Content<br />
<br />
3. JavaScript scrolling<br />
Create a new file called ‘code.js’. This JavaScript listens for<br />
a scrolling event, upon which it calculates a screen<br />
number based on the vertical scroll position and sets the<br />
DOM body’s ‘data-screen’ attribute as this value. Any<br />
visual changes to ‘data-screen’ can now be defined via<br />
some CSS.<br />
window.addEventListener(“load”,function(){<br />
window.addEventListener(“scroll”,function(){<br />
var screen = Math.round(window.scrollY/<br />
window.innerHeight);<br />
document.body.setAttribute(“data-screen”,<br />
screen);<br />
})<br />
});<br />
4. CSS screen definition<br />
Create a new file called ‘styles.css’. The ‘data-screen’<br />
attribute applied to the DOM body via the JavaScript is<br />
used to define the default screen properties. Its<br />
background colour is set to white, while a transition is set<br />
to animate changes to the background colour over a<br />
duration of one second.<br />
[data-screen]{<br />
background: #fff;<br />
transition: background-color 1s;<br />
}<br />
5. Screen colour changes<br />
The JavaScript processing of scrolling events from step 3<br />
allows CSS to define presentation rules for specific<br />
positions. Each count of ‘data-screen’ is the full height of<br />
the browser screen. This step sets different background<br />
colours as the user scrolls down the equivalent of a full<br />
screen height.<br />
[data-screen=”1”]{ background-color: red; }<br />
[data-screen=”2”]{ background-color: green; }<br />
[data-screen=”3”]{ background-color: blue; }<br />
6. Example content size<br />
Due to this example not having five screen heights of<br />
content to produce the required scrolling, this step sets<br />
the article container to fit this size. This allows you to test<br />
the effect before committing to inserting the content.<br />
article{<br />
display: block;<br />
min-height: 400vh; }<br />
workshop _____________________________________________ 61
GET PRO DESIGN SKILLS<br />
Layout is one of the most important aspects of<br />
the web and applications. We need to consider<br />
a number of different things from the target<br />
audience to the brand and the content. Get it<br />
wrong and your users will get confused and leave<br />
to find the information elsewhere. Here we take<br />
you though every aspect of the process, from the<br />
initial inception of the project through to building<br />
and structuring the code, and touch on which<br />
display properties you should use.<br />
62 __________________________________________________feature
GET PRO DESIGN SKILLS<br />
DESIGNING LAYOUTS The Design phase of a project typically<br />
includes a number of processes<br />
This image shows the design process for the Baltic Training website, from<br />
initial sketches through wireframes and design to the final live website<br />
THE PROCESS<br />
The design phase of a project usually<br />
begins with a scoping document of<br />
some description. This document<br />
will contain a specification of what<br />
you’re designing.<br />
The starting point for designing<br />
layouts really depends on the<br />
complexity of the project:<br />
Brochure websites — for example<br />
— will usually use a fairly simple design<br />
phase and usually include the<br />
following processes: content gathering<br />
-> site map creation -> wireframing -><br />
high-fidelity concept design.<br />
Whereas a more complex web app<br />
design phase might include a few<br />
extra processes: gathering content -><br />
site map creation -><br />
wireframing -> low-fidelity<br />
prototype -> high-fidelity<br />
concept design -> highfidelity<br />
prototype.<br />
There’s no right or wrong<br />
way to do this and different<br />
designers use different processes. It’s<br />
up to you — as the designer — to find<br />
the right process for the project at<br />
hand. This may also be dictated by the<br />
project’s budget, when this is the case<br />
you need to decide which of these<br />
processes are the most important for<br />
the project you’re working on.<br />
HIGH- VS LOW-FIDELITY<br />
In the process diagrams explained<br />
above they mention both high- and<br />
low-fidelity designs and prototypes —<br />
this simply is how far you go with the<br />
design. A low-fidelity prototype, for<br />
example, is usually made up from the<br />
elements in the wireframes; whereas<br />
a low-fidelity design may be slightly<br />
more designed than the wireframe<br />
you might use for the project’s brand<br />
colours and fonts.<br />
APPLYING THE BRAND<br />
This includes obvious things such as<br />
the logo and colours and typography,<br />
but also everything else that comes<br />
with it: the language; the intent (is it<br />
playfulorcorporate?Isitconfident<br />
and loud?); any printed materials; and<br />
anything the company has that<br />
ELEMENTS AND RULES ARE<br />
USUALLY REPRESENTED BY<br />
THE BRAND GUIDELINES<br />
represents them. This will help you<br />
understand how to display the content<br />
on the screen.<br />
These elements and rules are<br />
usually represented by the brand<br />
guidelines document — if you have<br />
one, be sure to study it!<br />
Once you understand the brand<br />
you can look for ways to apply it to<br />
your design — are there any brand<br />
elements you can use, such as shapes<br />
or patterns? Are there any ways to use<br />
what you know about the brand to<br />
influence the layout and design of<br />
your project?<br />
These details are what will give the<br />
design meaning and help cement the<br />
brand into the company’s DNA. For a<br />
lot of users the website will be the first<br />
time they see the brand and, since<br />
youdon’tgettomakeafirst<br />
impression twice, you need to get this<br />
right! Besides, being on-brand should<br />
help keep the client happy too, and<br />
that’s always good!<br />
STRUCTURING THE DATA<br />
You can use the wireframing stage of<br />
the design in order to work out the<br />
content that needs to be structured.<br />
It’s always best to get the<br />
content before you start the<br />
high-fidelity design stage, in<br />
the real world this very rarely<br />
happens, but it’s much easier<br />
to design something when<br />
you know what information<br />
you need to include. Once you know<br />
the content of the page you can start<br />
to structure the data by breaking it<br />
down into sections or chunks.<br />
Depending on the quality of the<br />
content this can be a really simple or a<br />
really difficult thing to do. It’s important<br />
to keep linked information together so<br />
you don’t confuse the user, but you<br />
can use these sections or chunks of<br />
content to influence the type of layout<br />
you’re going to create.<br />
SITEMAPS<br />
Visual Sitemaps<br />
Anecessarypartofthedesign.<br />
They tell everyone involved in a<br />
projectwhatpagesaregoingto<br />
be in the project and how they<br />
are going to be linked together.<br />
You can simply draw these on<br />
paperorcreatethemusinga<br />
graphics editor, you could use<br />
MicrosoftWordorevenExcelfor<br />
that matter. The idea here is to<br />
structurethedatafortheproject.<br />
There are a number of tools<br />
builtspecificallyforcreating<br />
sitemaps, such as Slickplan,<br />
MindNode and WriteMaps.<br />
XML Sitemaps<br />
Thesearecreatedoncethe<br />
projecthasfinished,andareused<br />
by search engines to index your<br />
project’s contents and structure.<br />
Whiletheycanbecreatedby<br />
hand, there are a number of<br />
tools available for generating<br />
sitemaps — the tool you need will<br />
depend on your project. If you’re<br />
using WordPress as the backend<br />
you can use a plugin to generate<br />
the XML sitemap. Once created<br />
you need to submit the sitemap<br />
to the search engines using their<br />
webmaster tools.<br />
feature _________________________________________________63
GET PRO DESIGN SKILLS<br />
WIREFRAMES<br />
Wireframes are structural designs of the layout<br />
Initial sketch for the Baltic<br />
Training website homepage<br />
These structural designs are meant to<br />
bekeptsimpleandtheyneedtobe<br />
quick and easy to make. They serve<br />
as a visual representation of the data<br />
that’s to be provided to the user on a<br />
particular page.<br />
Multiple iterations on the same<br />
page can be made at this stage.<br />
Wireframes should be used to flesh<br />
out initial ideas; the good, the bad and<br />
the ugly. Wireframes aren’t meant to<br />
be beautiful and the initial wireframes<br />
don’t even need to be shown to the<br />
client or stakeholders. Write down a list<br />
of elements and content you need to<br />
include and create every variation you<br />
can think of — it’s very rare that your<br />
first idea is your best! During the<br />
wireframing stage designers tend to<br />
be much less attached to an idea too,<br />
probably because of the amount they/<br />
you have created.<br />
The amount of time you spend<br />
wireframing a project will usually<br />
depend on its complexity and on<br />
budgetary constraints but wireframing<br />
a project and getting everything right<br />
at this stage can save a lot of money<br />
and heartache later on. By sharing<br />
these wireframes with the client or<br />
stakeholders early in the design phase,<br />
problems in the layout and usability<br />
can be spotted and fixed much more<br />
quickly and less expensively than in a<br />
concept design, or worse during the<br />
build process.<br />
CREATING WIREFRAMES<br />
The best place to get all of your ideas<br />
down is on paper. A good method is<br />
to use some kind of felt-tip pen since<br />
this won’t let you get into too much<br />
detail, we’re just creating structure at<br />
this point. You can draw them again<br />
later with a finer pen to flesh out more<br />
of the details.<br />
Draw blocks on the page and think<br />
about how they can be changed and<br />
moved and how this will affect the<br />
WIREFRAMES<br />
SHOULD BE USED<br />
TO FLESH OUT<br />
INITIAL IDEAS;<br />
THE GOOD, THE<br />
BAD & THE UGLY<br />
DESIGNS<br />
Now you have the wireframes in<br />
placeyournextstepistotochoose<br />
whichofthelayoutsyou’reactually<br />
going to design.<br />
By sharing wireframes with the<br />
clientorstakeholdersyouwillhave<br />
a clear indication of which of the<br />
wireframed designs is going to<br />
work best for them.<br />
Thedesigniswhereyouwill<br />
applythebrandtotheproject(the<br />
fonts, colours and logo); the brand<br />
language and content (if you have<br />
it); plus imagery and design assets.<br />
This is where you make the design<br />
truly unique to the project. These<br />
designscanbecreatedina<br />
number of different software<br />
packages. However, the two most<br />
popular are the Adobe Creative<br />
Suite and Sketch.<br />
WHAT TO USE:<br />
Adobe Creative Suite<br />
This is an industry-standard<br />
powerhouse and includes many<br />
different applications that you<br />
can use for your design, with<br />
Photoshop and Illustrator being<br />
the most popular. They both offer<br />
a number of useful features for<br />
web design. The grid system and<br />
smart guides are really useful if<br />
you’re following a rigid grid (like<br />
Bootstrap) and the custom<br />
document presets are useful for<br />
creating canvases sized to<br />
particular devices. Photoshop<br />
has a useful feature enabling you<br />
to copy elements from the layers<br />
panel to either SVG or CSS, while<br />
Illustrator excels when it comes<br />
to vector graphics.<br />
Sketch<br />
Sketch is a vector-based design<br />
tool for the Mac with a focus on<br />
screen design. When compared<br />
with Adobe’s Creative Suite apps<br />
it is closest to Illustrator. Sketch<br />
makes designing for the screen<br />
a breeze with an<br />
intuitive interface and<br />
simple-to-use tools.<br />
The third-party<br />
plugins allow for the<br />
functionality to be<br />
extended, offering<br />
almost endless<br />
possibilities. Sketch<br />
also integrates with<br />
a number of<br />
prototyping apps<br />
such as InVision. The<br />
rendering in Sketch<br />
(unlike Photoshop) is close to<br />
how the web renders content,<br />
ensuring that the design will be<br />
truer to the final product. Sketch<br />
is also fast and creates much<br />
smaller design files than some<br />
of its competitors.<br />
64 _________________________________________________feature
GET PRO DESIGN SKILLS<br />
flow of the content and the user’s<br />
journey through the website or app<br />
that you’re developing.<br />
From all of the designs you’ve<br />
drawn you can then select a few that<br />
you think will work best and then<br />
refine them further. At this point you<br />
could use any number of tools at your<br />
disposal — you could draw them again<br />
using a finer-point pen while taking the<br />
time to flesh out some of the details,<br />
or you could use apps such as Sketch,<br />
Photoshop or Illustrator to create<br />
these higher-detail wireframes.<br />
Alternatively you could use software<br />
specifically built for wireframes and<br />
prototypes such as Balsamiq Mockups,<br />
Axure or Adobe XD.<br />
PROTOTYPES<br />
A prototype is a design (high- or<br />
low-fidelity) that has some<br />
interactive elements to it. A<br />
prototype is used to show what<br />
happens when buttons are clicked,<br />
how the interactions will work and<br />
will simulate some aspects of how<br />
the project is going to function.<br />
Prototypes can be used to show<br />
how a full application will work or<br />
just how one small interaction will<br />
work. They’re much cheaper and<br />
quicker to create than building the<br />
product and can give you valuable<br />
feedback before building the<br />
project. There are a number of<br />
applications we can use to create<br />
these prototypes.<br />
WHAT TO USE:<br />
Adobe XD<br />
Short for Experience Design, this<br />
is a fairly new application from<br />
Adobe. You can do pretty much<br />
every part of the design process<br />
here, but the ability to create<br />
interactive prototypes is what<br />
makes it different from the other<br />
Creative Cloud applications. The<br />
interface is simple and intuitive,<br />
enabling you to link artboards<br />
together by simply dragging<br />
lines. Adobe has taken user<br />
feedback (including from the<br />
author of this article) and<br />
implemented requested<br />
features. The ability to connect a<br />
mobile device for testing designs<br />
in real-time is another feature<br />
that stands out. Adobe XD is an<br />
all-in-one UI/UX design tool that<br />
you’ll definitely want to try if you<br />
haven’t yet.<br />
InVision<br />
This is a web application used to<br />
link together static designs. The<br />
interface is intuitive and the<br />
tools are simple but powerful.<br />
The collaboration tools enable<br />
multiple designers to update the<br />
designs and make changes. With<br />
powerful integration with Sketch<br />
updating prototypes is quick and<br />
easy. The presentation and<br />
communication tools offered by<br />
InVision enable clients and<br />
stakeholders to add comments<br />
and feedback directly onto the<br />
designs, while the development<br />
workflow — called Inspect —<br />
enables developers to get the<br />
information they need (fonts,<br />
colours, images, and so on)<br />
without ever having to open a<br />
design application.<br />
InVision Studio<br />
The soon-to-be-released InVision<br />
Studio looks like it might actually<br />
be able to live up to its tagline<br />
— “The world’s most powerful<br />
screen design tool”. Much like<br />
Adobe XD, it’s a tool that can<br />
facilitate the entire design<br />
process. The interface looks<br />
clean and in the demos and<br />
videos that InVision has been<br />
showing on its website, Studio<br />
looks fairly similar to Adobe XD<br />
too — albeit with the addition of<br />
animation and collaboration<br />
tools. If you’re interested, you<br />
can request early access from<br />
invisionapp.com/studio. The<br />
first wave of invites have already<br />
been sent out.<br />
Wireframe for the Baltic Training website<br />
homepage, created using Sketch<br />
feature _________________________________________________65
GET PRO DESIGN SKILLS<br />
BREAKING DOWN DESIGNS FOR BUILD<br />
Methodologies, tooling<br />
and project structure<br />
This helps keep problems with<br />
specificity to a minimum as well as<br />
creating styles that can be reused<br />
throughout the project.<br />
It’s important to note that the BEM<br />
structure doesn’t necessarily follow<br />
the exact structure of the DOM. If you<br />
have a block with a container element,<br />
for example, subsequent elements do<br />
not need to be scoped to the element<br />
but to the block:<br />
<br />
<br />
<br />
<br />
<br />
When it comes to building the project<br />
there are a number of methodologies,<br />
tools and project structures which can<br />
be very useful for helping you manage<br />
the codebase.<br />
These methodologies are useful<br />
when working in teams. No matter<br />
which member(s) of the team wrote<br />
the code it will be familiar to everyone<br />
else should they need to make<br />
changes or take over the project.<br />
TOOLING<br />
Both SASS and LESS enable you to<br />
write BEM code nested using the<br />
ampersand (&). This is a really nice<br />
way to quickly see all the elements<br />
belonging to any given block.<br />
.block<br />
...<br />
&__element {<br />
...<br />
&--modifier {<br />
...<br />
}<br />
}<br />
}<br />
The code above will then be<br />
compiled to:<br />
.block { ... }<br />
There is no right or wrong way to<br />
do this, you can use whichever<br />
methodology you choose or even a<br />
mix of a few, you just need to make<br />
sure everyone in the team is working<br />
to the same principles and guidelines.<br />
METHODOLOGIES<br />
There are a number of different<br />
methodologies available to you, or you<br />
could simply create your own. Three<br />
.block__element { ... }<br />
.block__element--modifier {<br />
... }<br />
You can also use this to apply<br />
hover and pseudo classes:<br />
.block {<br />
...<br />
&:hover,<br />
&:focus,<br />
&:active {<br />
...<br />
}<br />
&::before {<br />
...<br />
}<br />
}<br />
of the most popular are BEM, OOCSS<br />
and SMACSS.<br />
BEM<br />
BEM or Block Element Modifier is, at<br />
its heart, a naming convention. It<br />
enables you to split the code into<br />
reusable components by scoping<br />
elements to a block. The naming<br />
convention works like this; blocks are<br />
the start of the class name:<br />
.block<br />
Elements are then scoped to a block<br />
using a double underscore:<br />
.block__element<br />
Then modifiers are used for smaller<br />
changes or additions, a different<br />
colour for example:<br />
.block__elements--modifier<br />
PROJECT STRUCTURE<br />
Folder structure within your<br />
project is important, keeping<br />
everything organised can be hard<br />
work and take a lot of your time.<br />
Luckily, there are a couple of ways<br />
you can manage unruly projects.<br />
One architecture that’s currently<br />
gaining in popularity is ITCSS<br />
(Inverted Triangle CSS). This is a<br />
OOCSS<br />
OOCSS stands for Object Orientated<br />
CSS, the two main principles of this<br />
methodology are:<br />
Separate structure and skin<br />
This means that the entire structure<br />
of the website should be separate to<br />
the styles that apply visual and<br />
decorative properties.<br />
Separate container and content<br />
This means “rarely use locationdependent<br />
styles”. In other words,<br />
any given element should look the<br />
same no matter where it appears<br />
on a site.<br />
SMACSS<br />
SMACSS stands for Scalable and<br />
Modular Architecture for CSS. There is<br />
nothing to download and include in<br />
your project — it’s more of a style<br />
guide, a set of rules to help keep the<br />
specificity demons at bay. The<br />
architecture is complex, which is why<br />
some teams overlook it but there are<br />
a lot of useful rules to apply.<br />
way to structure your files within<br />
your CSS. The styles at the top are<br />
the most far-reaching, whereas the<br />
files at the bottom of the triangle<br />
are the most specific. By<br />
implementing the same structure<br />
for all projects you can make every<br />
project, even those you haven’t<br />
worked on, seem familiar.<br />
66 _________________________________________________feature
GET PRO DESIGN SKILLS<br />
CREATING LAYOUTS<br />
TABLES<br />
Tables in HTML should be used<br />
for tabular data — elements that<br />
are presented in a table, a<br />
package comparison for<br />
example. In the early days of web<br />
design, tables were used in order<br />
to create complicated layouts<br />
using background images sliced<br />
to fit each table cell. These<br />
layouts are definitely a thing of<br />
the past now, even before we had<br />
the responsive web.<br />
BLOCK<br />
Understanding the box model<br />
is imperative when learning<br />
frontend development. Block and<br />
inline-block level elements are<br />
used to enable content to display<br />
next to each other or one after<br />
another. These properties can be<br />
used to create full grid systems<br />
like the one used in inuitcss and<br />
older versions of Bootstrap, but<br />
newer technologies like Flexbox<br />
and CSS Grid are now taking over<br />
for layout due to their responsive<br />
nature and powerful underlying<br />
layout algorithms.<br />
USING CSS GRIDS<br />
Creating layouts is about using the<br />
right HTML and CSS layout modules<br />
CSS Grid is perfect for creating 2-axis<br />
layouts (rows and columns). The<br />
syntax is simple and makes page<br />
layout a breeze. Layouts that would<br />
have required multiple nested<br />
containers can now be simply<br />
described in CSS.<br />
Grid works differently to the other<br />
layout properties — since applying the<br />
‘grid’ value to the ‘display’ property will<br />
affect any direct children. These<br />
elements are now grid items and will<br />
be positioned according to the rules<br />
you set on the parent (unless being<br />
specially placed).<br />
GRID FEATURES<br />
Grid brings a number of new features:<br />
Grid gap<br />
Instead of using margins, grid has<br />
its own property for defining gaps<br />
between grid items, enabling the<br />
layout of the grid to be defined and<br />
unaffected by any gaps. Grid<br />
systems (like those found in inuit<br />
and Twitter Bootstrap) usually rely<br />
on setting negative margins in order<br />
to align everything correctly.<br />
The Fr unit<br />
Short for fraction, this new unit of<br />
measurement is used to split the<br />
layout into fractions, with or<br />
without a gap.<br />
Grid placement<br />
CSS Grid allows for any element<br />
to be prioritised and positioned<br />
anywhere on the grid before all<br />
other items, which are then<br />
positioned automatically.<br />
Grid areas and templates<br />
Named areas on the grid are<br />
defined, which can then be<br />
referenced to define the layout<br />
in an almost ASCII fashion.<br />
minmax()<br />
The ‘minmax()’ property value<br />
enables you to apply a minimum<br />
and maximum size for grid items,<br />
columns and rows. This feature is<br />
sadly missing from Flexbox and<br />
every other layout module in CSS.<br />
BUILDING GRIDS<br />
CSS Grid’s powerful areas and<br />
templates enable complicated layouts<br />
to be easily achieved. You start by<br />
applying a name to the elements<br />
within your grid using the ‘grid-area’<br />
property; for example ‘header {<br />
grid-area: header; }’. Once you have<br />
named all of the areas in your grid you<br />
can then use the ‘grid-template-areas’<br />
property to describe the layout.<br />
grid-template-areas:<br />
“header header header”<br />
“left-sidebar article<br />
right-sidebar”<br />
“footer footer footer”<br />
;<br />
The code example above describes a<br />
3 x 3 grid, you simply repeat the name<br />
of the grid item if you want it to span<br />
multiple columns or rows. You can<br />
also use media-queries in order to<br />
change the grid layout for differentsized<br />
screens.<br />
You can then use the new ‘fr’ unit to<br />
define how the width is split among<br />
the different columns;<br />
grid-template-columns: 1fr 3fr<br />
1fr;<br />
The example shown above will split<br />
the available width into five equal<br />
width values, in other words it will<br />
apply one-fifth to the first column,<br />
three-fifths to the second column<br />
and the final fifth to the final column.<br />
In order to size the rows you can<br />
use the new ‘minmax’ property value<br />
to size the top and bottom columns to<br />
their content and then allow the<br />
middle row to span the remaining<br />
space in the grid.<br />
grid-template-rows:<br />
minmax(min-content, maxcontent)<br />
auto<br />
minmax(min-content, maxcontent)<br />
;<br />
FLOATS<br />
The ‘float’ display property<br />
allows for content to flow around<br />
an object. This should be used<br />
for wrapping text around an<br />
image, in an article for example.<br />
Floats used to be used for layout<br />
when combined with the Clearfix<br />
workaround. The workaround<br />
would clear the next object in the<br />
DOM, enabling columned layouts<br />
to be created using less-thanelegant<br />
CSS.<br />
GRID BY<br />
EXAMPLE<br />
This is one example of what’s possible<br />
with CSS Grid and some of the new<br />
features. Rachel Andrew (@<br />
rachelandrew) has put together the<br />
wonderful Grid by Example<br />
(gridbyexample.com/) covering<br />
“Everything you need to learn<br />
CSS Grid Layout”.<br />
feature _________________________________________________67
GET PRO DESIGN SKILLS<br />
FLEXBOX<br />
Flexbox is great for creating single-axis<br />
layouts, either vertically or horizontally.<br />
Supported by the browser’s powerful<br />
layout algorithm, spacing and sizing<br />
elements along an axis has never<br />
been more satisfying.<br />
The syntax can be confusing<br />
sometimes and there is a lot to learn<br />
but once you are familiar with this new<br />
way of aligning items you’ll wish it had<br />
always been this way.<br />
Flexbox shares some similarities<br />
with CSS Grid in that applying the<br />
value of ‘flex’ or ‘inline-flex’ to the<br />
‘display’ property will have an effect on<br />
direct children in the DOM.<br />
When Flexbox is applied the<br />
browser will align all of the direct<br />
children, or flex-items as they are<br />
called. By default these items will be<br />
placed in a row next to each other and<br />
each item will take up as much space<br />
as it needs, something that’s either<br />
Perfect for single-axis layouts<br />
FRAMEWORKS AND GRID SYSTEMS<br />
Powerful battle-tested systems<br />
dictated by its content, or by setting a<br />
width on each item.<br />
FLEX-GROW<br />
The ‘flex-grow’ property enables you<br />
to apply the leftover width in the<br />
container once the items have been<br />
aligned according to their content. By<br />
setting the flex-items grow property to<br />
the value of ‘1’ the remaining space in<br />
the container will be shared among<br />
the items equally. See fig.1<br />
If we set the ‘flex-grow’ property<br />
on the last flex-item to the value of ‘2’<br />
then the leftover space will not be<br />
split equally, the last item will be given<br />
twice as much of the left over space in<br />
the container. See fig.2<br />
FLEX-SHRINK<br />
The ‘flex-shink’ property does the<br />
opposite when the container is made<br />
smaller than its items’ widths. If you set<br />
the ‘flex-shrink’ property on all the<br />
items to the value of ‘1’ they will be<br />
reduced in size equally. See fig.3<br />
If you set the last item to ‘2’ the<br />
width with be reduced in size twice as<br />
much as the other flex-items. See fig.4<br />
WHEN FLEXBOX<br />
IS APPLIED THE<br />
BROWSER WILL<br />
ALIGN ALL OF THE<br />
DIRECT CHILDREN<br />
OR FLEX-ITEMS<br />
AS THEY<br />
ARE CALLED<br />
Default — flex-items — (flex-grow: 0;<br />
flex-shrink: 0;)<br />
Fig.1 — flex-items — flex-grow: 1;<br />
Fig.2 — flex-items — flex-grow: 2; for<br />
the last item, 1 for the others<br />
Fig.3 — flex-items — flex-shrink: 1;<br />
Fig.4 — flex-items — flex-shrink: 2;<br />
for the last item, 1 for the others<br />
You can save yourself hours of time in<br />
development since frameworks have<br />
been battle-tested by a number of<br />
developers and users.<br />
However, they can also add an<br />
unnecessary amount of code bloat to<br />
the project. When using a framework<br />
it is worth spending time choosing<br />
only the elements that you want. This<br />
will help keep down the size of the<br />
files to be used.<br />
However, thanks to the widespread<br />
adoption of CSS Grid and Flexbox<br />
these systems are starting to fall out of<br />
favour. These frameworks usually offer<br />
much more than just a grid system,<br />
but since we’re discussing layout we’ll<br />
concentrate on the most popular<br />
frameworks grid system.<br />
BOOTSTRAP<br />
The Twitter Bootstrap grid works<br />
much like old design grids — they<br />
apply 12 columns onto the container<br />
and you (as the developer of the<br />
project you’re working on) choose<br />
how many of these columns any<br />
given element should span.<br />
The grid itself is fully responsive and<br />
built using Flexbox. Grids are defined<br />
by using a series of containers, rows<br />
and columns.<br />
The number of columns an element<br />
spans at any given screen size is<br />
dictated by part of the class name.<br />
While this is a powerful grid system it<br />
is very rigid, the breakpoints for the<br />
grid are always the same and the<br />
syntax isn’t very intuitive for someone<br />
who is new to the system.<br />
HOW DOES IT WORK?<br />
<br />
The element shown in the code above<br />
will span 12 columns by default and<br />
then on medium-sized screens span 9<br />
columns and then on extra-large<br />
screens span 8 columns. The screen<br />
sizes are defined in Bootstrap and if<br />
you are just including Bootstrap as an<br />
external resource it is very difficult to<br />
update these values.<br />
While these grid systems and<br />
frameworks can be good for<br />
beginners it’s worth noting that unless<br />
you know how all of this works under<br />
the hood you’re cheating yourself out<br />
of learning the fundamentals of CSS<br />
and relying on someone else’s code.<br />
68 _________________________________________________feature
GET PRO DESIGN SKILLS<br />
WHAT NEXT FOR<br />
LAYOUTS?<br />
LAYOUTS?<br />
Standard<br />
STEVEN<br />
ROBETS<br />
<strong>Web</strong> designer and<br />
developer<br />
codepen.io/<br />
matchboxhero<br />
“CSS GRID’S NEW<br />
TEMPLATING ENGINE<br />
ALLOWS FOR QUICK AND<br />
EASY EXPERIMENTATION<br />
WITH LAYOUT AND<br />
DESIGN. BY SIMPLY<br />
CHANGING THE TEMPLATE<br />
WE CAN RE-ORDER THE<br />
CONTENT.”<br />
“CSS REGIONS ALLOW<br />
FOR ELEMENTS TO BE<br />
PLACED INSIDE OF<br />
FLOWING CONTENT, THIS<br />
ALLOWS ELEMENTS<br />
BELOW THE FOLD ON<br />
MOBILE TO BE SHOWN AS<br />
PART OF THE CONTENT,<br />
ABOVE THE FOLD.”<br />
“CSS SHAPES ALLOW US<br />
TO WRAP TEXT AROUND A<br />
SHAPE BRINING YET MORE<br />
DESIGN ELEMENTS FROM<br />
THE PRINT WORLD OVER<br />
TO THE WEB”<br />
CLOSE UP WITH NEW CSS SPECS CSS REGIONS<br />
http://bit.ly/2n6D6cE<br />
layouts are still the staple diet of many sites, but new<br />
specifications can mean new direction for layouts. Here we check<br />
out what’s happening in the world of layouts with expert insight<br />
and the resources to help get you get to the next level<br />
CSS SHAPES<br />
http://bit.ly/2DB6r8L<br />
4 MUST-READ RESOURCES<br />
1<br />
2<br />
THE EXPERIMENTAL LAYOUT<br />
LAB OF JEN SIMMONS<br />
http://labs.jensimmons.<br />
com/index.html<br />
JenSimmonsiteprovidesahostof<br />
experiementsthatrevealwhatcan<br />
be done CSS Grid. It’s not just CSS<br />
Grid that is included take a look at<br />
Whitespace, Flexbox & more.<br />
3<br />
CSS GRID LAYOUT AND<br />
ACCESSIBILITY<br />
https://mzl.la/2nsykId<br />
Accessibility is an often forgotten<br />
aspect of layout, but it shouldn’t<br />
be.Checkoutthisresourcefrom<br />
Mozilla. It asks and answers how<br />
users should approach<br />
accessibility with grid layouts.<br />
We know that CSS Grid is taking layouts to new levels, but<br />
what else does the W3 have in the pipeline? Find out more<br />
CSS BOX ALIGNMENT<br />
http://bit.ly/2BqrtS1<br />
A COMPLETE GUIDE TO GRID<br />
http://bit.ly/1UM0gSd<br />
As the title suggests this<br />
is an extensive look at CSS Grid. It<br />
introduces the basics, browser<br />
support and terminology before<br />
going in-depth on the specifics.<br />
Makesureyoubookmarkthisasit<br />
is a great reference point.<br />
4<br />
EXPERIMENTAL 3D ROOM<br />
EXHIBITION LAYOUT<br />
http://bit.ly/2n6qpO5<br />
This one is a bit more out there. It<br />
is an experimental 3D layout that<br />
uses CSS 3D transforms and CSS<br />
Flexbox to create its layout. VIew<br />
the demo at https://tympanus.net/<br />
Development/Exhibition<br />
CSS EXCLUSIONS<br />
http://bit.ly/2F9UR18<br />
The CSS Regions module, a<br />
working draft, allows content<br />
from multiple elements to flow<br />
through multiple boxes.<br />
This specification allows the use<br />
of geometric shapes in designs.<br />
Currently supported in Chrome<br />
and Safari but not Firefox.<br />
A working draft this module<br />
relates to the alignment of boxes<br />
within their containers in various<br />
CSS layout models.<br />
Currently a working draft this<br />
specification defines arbitrary<br />
areas around which inline<br />
content can flow.<br />
feature _________________________________________________69
Tutorials<br />
Shrink your code<br />
with CSS4 variables<br />
Change a variable and every rule that depends on that is updated, giving smaller<br />
style sheets and a more efficient way to experiment with your design<br />
70 _________________________________________________tutorial<br />
DOWNLOAD TUTORIAL FILES<br />
www.filesilo.co.uk/webdesigner
Tutorials<br />
<strong>Web</strong> designers have had access to<br />
variables for some time when<br />
using CSS preprocessors to create<br />
style sheets. Nowwithmajor<br />
browser support, CSS4 variables are poised to take the<br />
powerofCSSpreprocessorsandplacethisnativelyinthe<br />
browser for designers to harness.<br />
CSS preprocessors work by compiling their variables<br />
down to regular CSS. The benefit of having a variable in<br />
thebrowserisnotpartofwhattheyoffer,andthat’s<br />
whereCSS4variableshavetheadvantageovertheir<br />
preprocessor counterparts. It’s completely possible to<br />
change the value of variable by the user at any time.<br />
In this tutorial, a few different use cases are going to be<br />
explored. The first just being for the designer to change<br />
thecolourinonevariableandseeeveryinstanceofit<br />
updated to keep consistent colour. This is a great feature<br />
becauseit’seasytoexperimentwithideasmore.The<br />
second will be to control the widths of elements and just<br />
update the width in media queries for different sized<br />
screens, meaning the only change is a variable. Finally,<br />
the third way to use it will be to create two themes and let<br />
theuserswitchbetweenthem.<br />
Here, three variables can be changed that completely<br />
updates the design on display in the web browser.<br />
1. Declaring CSS variables<br />
Openthe‘start’folderinyourcodeIDEandlaunchthe<br />
‘style.css’ file for editing. The first task to perform is to<br />
declare some CSS variables that will control some of the<br />
colours within our design, which will make it very easy for<br />
a designer to experiment with colours. The following lines<br />
declare three variables to the whole page.<br />
:root {<br />
--primary: #ff368b;<br />
--secondary: #0098ac;<br />
--tertiary: #F06D06;<br />
}<br />
2. Applying the colours<br />
Applying these colours to elements is very easy. In your<br />
code find the ‘info.primary’ class, which should be on line<br />
81.Replacetheexistingborder-topcolourwiththe<br />
variable as shown here. Repeat the process for the class<br />
‘info.secondary’. This time the variable for the secondary<br />
colour is used instead.<br />
.info.primary {<br />
border-top: 8px solid var(--primary);<br />
}<br />
.info.secondary {<br />
border-top: 8px solid var(--secondary);<br />
}<br />
3. Different colours<br />
Now the tertiary colour is added to the ‘info.tertiary’ class.<br />
That has now used all three colours controlled by a<br />
variable. At present there’s no benefit to using this but it’s<br />
possible to use those colours in other contexts such as<br />
thebackgroundcolourinlinks–asshownhere.<br />
.info.tertiary {<br />
border-top: 8px solid var(--tertiary);<br />
}<br />
a.primary {<br />
background: var(--primary);<br />
}<br />
4. Linked in<br />
Now the remaining secondary and tertiary links are also<br />
styled with the relevant background colours by replacing<br />
their existing colour formatting with the colours from the<br />
variables.Nowisagoodtimetosavethisfileandjust<br />
make sure your browser is supporting CSS variables. Do<br />
this by opening the ‘index.html’ page and checking the<br />
colours are there.<br />
a.secondary {<br />
background: var(--secondary);<br />
}<br />
a.tertiary {<br />
background: var(--tertiary); }<br />
5. Text colours<br />
Let’s target the text colour now by finding the class ‘span.<br />
primary’. Again this class is given the appropriate primary<br />
variable. As you can see, when colour is being used<br />
consistently to theme up elements, controlling from one<br />
variable is incredibly powerful.<br />
span.primary {<br />
font-weight: 600;<br />
color: var(--primary);<br />
}<br />
6. Outlining the benefit<br />
Add the variable to the code shown here and then save<br />
your CSS. If you return to the code added in step one and<br />
change the colours, you will see it consistently change<br />
with the elements that have been styled up that way.<br />
span.secondary {<br />
font-weight: 600;<br />
color: var(--secondary);<br />
}<br />
span.tertiary {<br />
font-weight: 600;<br />
color: var(--tertiary); }<br />
Declaring in the root<br />
By declaring variables in the root, they are<br />
globally accessible by any object. If you declared<br />
a variable in a style applied to an element, only<br />
itself or children would be able to access it.<br />
Left<br />
The start of the project has a finished website design, but<br />
the tutorial will control many of the colours and widths<br />
using CSS variables<br />
Top<br />
Controlling multiple elements by the same colour variables<br />
mean that it is easy to update colours in a website when it<br />
has otherwise needed a CSS preprocessor<br />
tutorial __________________________________________________71
Tutorials<br />
Shrink your code with CSS4 variables<br />
7. Going responsive<br />
At present the design is not responsive so let’s set up a<br />
way to do that and use a CSS variable to control the width<br />
of the card layout. This means all that needs to be<br />
updated in media queries is the width variable. Add the<br />
width variable to the code you had in step 1.<br />
--width: 25%;<br />
8. Boxing clever<br />
Now find the ‘box’ CSS class, where the width is being<br />
calculated from 25% minus 40 pixels. Remove the<br />
‘25%’ and replace it with the width variable. This can<br />
now be controlled dynamically by changing the width<br />
CSS variable.<br />
.box {<br />
float: left;<br />
width: calc(var(--width) - 40px);<br />
margin: 20px;<br />
box-shadow: 0 2px 8px rgba(0, 0, 0, 0.5);<br />
background: #ccc;<br />
color: #666;<br />
}<br />
9. Break point<br />
Placing a media query into your CSS at the end of the<br />
CSS gives us the kind of mid-sized screen that is often<br />
found on tablets. Here the root section of CSS is updated<br />
to have the width set to 50% and therefore give us a<br />
two-column card layout that would better suit that sized<br />
screen. Resize your browser to see it switch.<br />
@media (max-width: 960px) {<br />
:root {<br />
--width: 50%;<br />
} }<br />
Changing via<br />
JavaScript<br />
It’s possible to update the CSS variables via JS as a<br />
quick way to update many items at once. It shows<br />
off the runtime power of CSS variables.<br />
10. Mobile friendly<br />
The final breakpoint will be for devices that are less than<br />
500 pixels, such as mobile screen sizes. Here the width<br />
variable is updated to take full advantage of the full width<br />
of the display in order to be able to see the card content.<br />
Again save this and resize your browser to see the display<br />
update when a smaller screen size is used.<br />
@media (max-width: 500px) {<br />
:root {<br />
--width: 100%;<br />
}<br />
}<br />
11. Creating colour themes<br />
The next part of the tutorial will focus on using JavaScript<br />
to dynamically alter the CSS variables to create different<br />
colour themes for the page. To get started some new<br />
variables need to be declared in the ‘root’ of the CSS…<br />
--main-bg: #fff;<br />
--main-type: #333;<br />
--alt-bg: #f5f5f5;<br />
12. Changing to variables<br />
Now various elements will start to get these variables<br />
added in order to control the theme of the page. Find the<br />
‘main-header’ class and change the colour and<br />
background colour to be controlled via variables added in<br />
the previous step.<br />
.main-header {<br />
color: var(--main-type);<br />
background-color: var(--alt-bg);<br />
text-align: center;<br />
padding: 15px 0 10px 0;<br />
box-shadow: 0 2px 8px rgba(0, 0, 0, 0.5);<br />
}<br />
13. Styling buttons<br />
Find the ‘buttons’ class. This time the variable will be the<br />
main background colour, whereas the header used an<br />
alternative background colour. By having two different<br />
background colours it allows the content to have some<br />
contrast as they are viewed. Controlling the text colour<br />
means that a high contrast text can be added.<br />
.button {<br />
text-decoration: none;<br />
padding: 5px 10px;<br />
color: var(--main-type);<br />
background-color: var(--main-bg);<br />
font-family: ‘Barlow Semi Condensed’,<br />
sans-serif;<br />
font-weight: 600;<br />
}<br />
14. Footing the bill<br />
Now move to the class that controls the footer – ‘mainfooter’.<br />
As with the header this will also have an alternate<br />
background colour so that it will stand out from the<br />
remainder of the page. The colour is also changed so that<br />
it will be visible.<br />
.main-footer {<br />
clear: both;<br />
Right<br />
By controlling the width property<br />
using a CSS variable, the variable is the<br />
only thing that needs updating when<br />
making a break point media query for<br />
tablet screens<br />
Far right<br />
Dynamically changing the variables<br />
can be easily achieved, and here the<br />
user can switch between a light<br />
theme and dark theme. Only three<br />
CSS variables are updated to change<br />
the entire theme<br />
72__________________________________________________tutorial
Tutorials<br />
Shrink your code with CSS4 variables<br />
Is it safe to use<br />
CSS variables?<br />
As with any relatively new web<br />
technologythequestionevery<br />
web designer wants to know is:<br />
“what’s the support like?”. The great<br />
news if you visit www.caniuse.<br />
com is that currently most of the<br />
major browsers support this, the<br />
exceptions being IE, Opera Mini and<br />
UC Browser for Android.<br />
So all in all this has very good<br />
support from the main desktop and<br />
mobile browsers at just under 79%<br />
browser support globally. As always<br />
whether you can use this depends<br />
on who your audience is.<br />
If you need to know more about<br />
CSS variables then the Mozilla<br />
Developer Network has good<br />
documentation on this, and it’s easy<br />
to understand (https://developer.<br />
mozilla.org/en-US/docs/<strong>Web</strong>/<br />
CSS/Using_CSS_variables). A more<br />
in-depth look at CSS variables,<br />
featuring a good description of why<br />
you would want to use them can be<br />
found on Medium (https://medium.<br />
com/dev-channel/css-variablesno-really-76f8c91bd34e).<br />
padding: 20px;<br />
text-align: center;<br />
background-color: var(--alt-bg);<br />
color: var(--main-type);<br />
}<br />
15. Body building<br />
The next part of the page to be targeted is the body<br />
element, so find the appropriate CSS that controls the<br />
look of this. The background will now be controlled by the<br />
main background CSS variable to give global control to<br />
the variables.<br />
body {<br />
margin: 0;<br />
padding: 0;<br />
font-family: “HelveticaNeue-Light”,<br />
“Helvetica Neue Light”, “Helvetica Neue”,<br />
Helvetica, Arial, “Lucida Grande”, sansserif;<br />
font-weight: 300;<br />
line-height: 1.4em;<br />
background: var(--main-bg);<br />
}<br />
16. Box fresh<br />
The ‘box’ CSS is going to be updated now, so find the<br />
code for this and change both the background colour<br />
and text colour to have control from CSS variables. Save<br />
this CSS page and just check the page has updated in the<br />
browser. Now move into the ‘index.html’ page.<br />
.box {<br />
float: left;<br />
width: calc(var(--width) - 40px);<br />
margin: 20px;<br />
box-shadow: 0 2px 8px rgba(0, 0, 0, 0.5);<br />
background: var(--alt-bg);<br />
color: var(--main-type); }<br />
17. Adding buttons<br />
In the ‘index.html’ page find the main header section and<br />
just after the heading two tag, some content will be<br />
added. Just to help you locate this in the code we’ve<br />
shown where the code will go with the HTML comment<br />
in this step. Once you’ve found it add the code in the<br />
next step.<br />
<br />
Make Me Hungry<br />
<br />
<br />
18. Span and chips<br />
The span is added to the page. This gives the instruction<br />
to change the theme. Two buttons are placed after this,<br />
and they will talk to the JavaScript to update the CSS<br />
variables so that they switch between light and dark.<br />
Choose Theme LIGHT<br />
DARK<br />
19. Stick to the script<br />
The code here should be added right before the final<br />
body tag of the page. The code in the remaining two<br />
steps will be placed inside these script tags. This function<br />
will be used to set a specific CSS variable with a value<br />
dynamically. Change it at run time via user control.<br />
<br />
function setDocumentVariable(propertyName,<br />
value) {<br />
document.documentElement.style.<br />
setProperty(propertyName, value);<br />
};<br />
<br />
20. Going dark<br />
When the user clicks the ‘dark’ button the function here<br />
will be called. As you can see it sets three variables with<br />
new values and these update the page immediately,<br />
changing the theme. Save this and try the button in your<br />
browser to see the theme change.<br />
function dark() {<br />
setDocumentVariable(‘--main-bg’,<br />
‘#918d82’);<br />
setDocumentVariable(‘--alt-bg’,<br />
‘#57534c’);<br />
setDocumentVariable(‘--main-type’,<br />
‘#ddd’);<br />
}<br />
21. Seeing the light<br />
The final step is to add the functionality for the ‘light’<br />
button. This switches the colours back to the regular light<br />
colours of the page. Save your work and refresh your<br />
browser to see the update take effect. Now you can<br />
switch between themes just by updating three CSS<br />
variables that, in turn, control many other elements on<br />
the page.<br />
function light() {<br />
setDocumentVariable(‘--main-bg’, ‘#fff’);<br />
setDocumentVariable(‘--alt-bg’,<br />
‘#f5f5f5’);<br />
setDocumentVariable(‘--main-type’,<br />
‘#333’);<br />
}<br />
tutorial _________________________________________________ 73
10 BEST STATIC SITE GENERATORS<br />
Most sites you visit on the web are<br />
probably generated dynamically<br />
– that is, rather than having all of<br />
their content encoded into the HTML<br />
stored on the server, they retrieve<br />
content from a database and<br />
construct pages to serve to you on<br />
the fly. Many also provide user<br />
interactivity through logins, forms and<br />
so on. Think of Facebook for an<br />
example of both of these things.<br />
To build this type of functionality<br />
yourself, you might look to a CMS<br />
such as WordPress.<br />
For some use cases, however, this is<br />
overkill. Simple pages, such as a<br />
personal profile, information about a<br />
business, or even a blog really don’t<br />
need this sort of overhead or<br />
complexity. You could of course just<br />
build static HTML yourself in a text<br />
editor, and indeed, many years ago<br />
this was how all sites were built, but<br />
“ PERFORMANCE<br />
WILL BE GREATLY<br />
IMPROVED”<br />
10<br />
BEST<br />
this rapidly becomes cumbersome to<br />
maintain when you want to scale up<br />
or make changes. Static site<br />
generators offer a solution to this, by<br />
enabling you to build static HTML<br />
pages using templates.<br />
Essentially, static site generators are<br />
command-line tools which shift the<br />
creation of the final HTML page<br />
forward from the point the user<br />
requests it to the point you write the<br />
content. When you make an update,<br />
you build the new page which can<br />
then be served as-is to every user who<br />
requests them. This offers several<br />
advantages. Performance will be<br />
greatly improved compared to a<br />
dynamic site, since serving static<br />
HTML and CSS has a very low<br />
footprint. Your server-side setup will be<br />
much simpler, which also means fewer<br />
security worries. Conversely, however,<br />
you’ll lose the opportunity to deliver<br />
real-time content or receive user input.<br />
Static site generators have exploded<br />
in popularity in recent years, so<br />
navigating the wide range of choice<br />
can be difficult. Here, we’ve taken a<br />
look at some of the best options you<br />
should be considering.<br />
1.<br />
74__________________________________________________feature
10 BEST STATIC SITE GENERATORS<br />
STATIC SITE<br />
GENERATORS<br />
DO YOU NEED THE COMPLEXITY OF ADYNAMIC SITE?<br />
1. JEKYLL<br />
https://jekyllrb.com<br />
PRO : Jekyll is one of the oldest<br />
static site generators out there,<br />
andstillthemostpopular<br />
First released in 2008 by Tom<br />
Preston-Werner, the co-founder of<br />
GitHub, Jekyll arguably popularised<br />
the concept of static sites and remains<br />
probably the most widely used static<br />
site generator. With Jekyll, you’ll<br />
typically work with content in<br />
Markdown, a lightweight markup<br />
language designed for text formatting.<br />
The Liquid templating engine is used<br />
to place this Markdown content into a<br />
HTML template, and to combine<br />
templates representing various parts<br />
of a page (say, header, footer and<br />
content) in a modular and re-usable<br />
manner. Support for Sass is built in for<br />
those with a preference for CSS<br />
preprocessing, and it’ll play fine with<br />
libraries like Bootstrap. Also included<br />
with Jekyll is an HTTP server which<br />
can be used to easily deploy and test<br />
your static pages locally.<br />
One of Jekyll’s key selling points is<br />
its wide range of ‘importers’, which<br />
enable an existing site to be migrated<br />
to Jekyll with relative ease. If you have<br />
a WordPress site, for example, you can<br />
switch to using Jekyll using one of the<br />
importers. It’s also trivial to convert<br />
existing static HTML sites to Jekyll,<br />
which can be great if you’ve been<br />
coding static HTML yourself or see a<br />
template you like the look of.<br />
Notably, Jekyll is used to power<br />
GitHub pages, a static site hosting<br />
service which is provided with GitHub.<br />
If you have a GitHub repository, you’re<br />
able to create a GitHub pages site for<br />
free using Jekyll. This can be a<br />
convenient way to give a polished<br />
landing page to your GitHub project.<br />
The big downside of Jekyll – and<br />
this applies to most generators – is<br />
that it can seem complex at first and is<br />
a new technology to master. You<br />
might not be up and running as<br />
quickly as with a CMS. However, it’s<br />
very well documented and the<br />
learning curve is quickly overcome.<br />
2.<br />
2. HEXO<br />
https://hexo.io<br />
PRO : Focusedonblogging,<br />
Hexo is fast to get started and<br />
simple to use, especially for<br />
JavaScript developers<br />
Hexo is powered by Node.js and<br />
aimed at blogging. While the<br />
JavaScript implementation<br />
shouldn’t in theory make too much<br />
difference to how you work with it,<br />
since you’ll be using with markup<br />
and templating languages, it can<br />
make installation and configuration<br />
more familiar for JavaScript<br />
developers. If you’re already using<br />
npm and git then it’s extremely<br />
simple to get up and running.<br />
Like many other general purpose<br />
generators, you’ll probably want to<br />
write your content in Markdown.<br />
The default templating engine is<br />
Swig, which is once again well<br />
suited for JavaScript developers.<br />
However, Hexo is extensible to<br />
allow other templating engines to<br />
be used if you want.<br />
The Hexo website includes a<br />
range of pre-built themes for you to<br />
try out, and one especially popular<br />
feature of the tool is its support for<br />
single-command deployment.<br />
feature _________________________________________________75
10 BEST STATIC SITE GENERATORS<br />
3. GATSBY<br />
www.gatsbyjs.org<br />
PRO : Gatsby uses some of the<br />
latest web technologies such as<br />
ReacttocreatestaticPWAs<br />
Like Hexo, Gatsby is powered by<br />
Node.js and so will be more familiar<br />
territory for experienced JavaScript<br />
developers. However, several things<br />
set it apart from other similar tools.<br />
Gatsby uses React, which means<br />
that everything is built with<br />
components, and allows it to benefit<br />
from React’s approach to DOM<br />
rendering. This means it can be<br />
picked up quickly by developers<br />
who have worked with React, but<br />
for those unfamiliar with it, learning<br />
React will be necessary.<br />
It also utilises GraphQL at build<br />
time to retrieve data and content<br />
from data sources, which provides a<br />
modern, consistent interface to<br />
ensure that each page receives the<br />
exact data needed when it is built.<br />
Finally, Gatsby will build pages as<br />
progressive single page apps,<br />
meaning that the entire site is<br />
downloaded and subsequent<br />
navigation is immediate.<br />
3.<br />
4.<br />
4. HUGO<br />
https://gohugo.io<br />
PRO : Aims to be the fastest static<br />
site generator. Hugo is the other<br />
big hitter alongside Jekyll<br />
Widely regarded as the ‘other’ leading<br />
static site generator, it’s only natural to<br />
compare Hugo with Jekyll. Hugo is the<br />
newer of the two, and one of its key<br />
focus areas is speed, which for some<br />
has been a complaint with Jekyll.<br />
Nobody likes waiting for a site to build,<br />
and Hugo can put together a simple<br />
site from your markup and templates<br />
in milliseconds, or even blaze through<br />
thousands of pages in seconds.<br />
With Hugo it’s also typical to write<br />
content with Markdown, and the<br />
templating engine is based on Go<br />
templates since Hugo itself is<br />
implemented in the Go programming<br />
language. Like Jekyll, it ships with a<br />
lightweight HTTP server to quickly<br />
serveyourpageslocally.Thetwo<br />
tools’ build workflows are overall<br />
fairly similar.<br />
Formany,thekeybenefitofHugois<br />
its quicker, simpler path to getting<br />
started, with very little need for<br />
configuration and no dependencies<br />
other than the core binary. Its<br />
documentation and tutorials are very<br />
good, and it has an ethos of<br />
maintaining simplicity which makes for<br />
a very approachable learning curve.<br />
One disadvantage Hugo has relative<br />
to Jekyll is that it lacks the extensive<br />
plugin ecosystem available for the<br />
latter. Given its wide range of built-in<br />
functionality, however, this is unlikely<br />
to be a problem for most users. It also<br />
may be marginally lighter on support<br />
on sites such as StackOverflow since it<br />
hasn’t been around as long; however,<br />
it continues to grow in popularity and<br />
many believe it may become the<br />
leading static site generator in the<br />
near future.<br />
“ HUGO CAN PUT<br />
TOGETHER A SIMPLE<br />
SITE FROM YOUR<br />
MARKUP AND<br />
TEMPLATES IN<br />
MILLISECONDS ”<br />
76 __________________________________________________feature
10 BEST STATIC SITE GENERATORS<br />
5. NUXT<br />
https://nuxtjs.org<br />
PRO : UseNUXTtotake<br />
advantage of Vue.js for your<br />
static sites<br />
Vue.js has gained immense popularity<br />
as a front-end framework in recent<br />
years, due to its combination of a<br />
gentle learning curve, high<br />
performance and powerful feature set.<br />
Nuxt.js is actually a framework for<br />
creating server-rendered Vue<br />
applications – that is, dynamic pages<br />
which are rendered by the server<br />
6.<br />
7. PELICAN<br />
http://docs.getpelican.com<br />
before being passed in their<br />
completed form to the client to display.<br />
However, it can also be use to build<br />
static sites, with a command line<br />
parameter that will build static<br />
HTML pages for all routes through a<br />
Vue project.<br />
Since Nuxt is a Vue framework,<br />
familiarity with Vue will be necessary<br />
to use it, but developers who have<br />
worked with Vue before will feel right<br />
at home. And, like Vue, it also brings a<br />
component-based approach to<br />
development of your sites.<br />
5.<br />
6. MKDOCS<br />
www.mkdocs.org<br />
PRO : MkDocs might well be the<br />
easiest way to create websites for<br />
project documentation<br />
MkDocs is more specialised than the<br />
tools we’ve looked at up until now. It<br />
sets out with one very simple<br />
objective in mind: to provide a fast<br />
and easy-to-use way to generate<br />
HTML sites for project<br />
documentation. And it absolutely<br />
succeeds at doing this. It’s built in<br />
Python, so you’ll need Python and<br />
pip (Python package manager)<br />
installed to get it.<br />
After that, getting started is easy.<br />
Documentation is written in<br />
Markdown, and the tool is<br />
configured using a single YAML file.<br />
The command-line build process is<br />
as simple as it could be.<br />
The MkDocs GitHub page<br />
includes a number of themes which<br />
are specially designed for<br />
documentation, or you can build<br />
HTML for your own theme.<br />
MkDocs is one of the easiest<br />
static site generators to get started<br />
with, and if documentation is your<br />
use case, there really isn’t much<br />
cause to look at other tools.<br />
PRO : Pelican is a highly popular<br />
static blog generator built in<br />
Python<br />
Pelican supports content written in<br />
multiple languages, including the<br />
ubiquitous Markdown. It uses the Jinja<br />
templating engine, which is both easy<br />
to use and extremely powerful,<br />
meaning that while Pelican is primarily<br />
optimised for building blogs, it is also<br />
well suited to building a wide range of<br />
different types of other sites. It’s also<br />
fast, and can comfortably handle sites<br />
with thousands of pages without<br />
making you wait for them to build.<br />
Like many of the leading static site<br />
generators, Pelican allows you to<br />
import your site from a variety of<br />
blogging platforms. This makes it<br />
trivial to convert an existing site built<br />
with WordPress or many other<br />
popular content management<br />
systems. If you’re familiar with<br />
Python, and especially if you’ve used<br />
7.<br />
Jinja templates before, Pelican is a<br />
very safe choice.<br />
Conversely, however, it may be a<br />
little harder to get to grips with for<br />
developers who are more familiar with<br />
JavaScript or Ruby.<br />
“ WHILE PELICAN IS<br />
PRIMARILY<br />
OPTIMISED FOR<br />
BUILDING BLOGS, IT<br />
IS ALSO WELL-<br />
SUITED TO BUILDING<br />
A WIDE RANGE OF<br />
DIFFERENT TYPES OF<br />
OTHER SITES ”<br />
feature _________________________________________________77
10 BEST STATIC SITE GENERATORS<br />
8.<br />
8. METALSMITH www.metalsmith.io<br />
PRO : Metalsmith is an extremely<br />
simple tool where all functionality<br />
is provided by plugins<br />
Metalsmith takes a different approach<br />
to many other static site generation<br />
tools, in that it doesn’t try to do very<br />
much at all. Essentially, static site<br />
generatorstakeasetofsourcefiles,<br />
manipulate them, and then generate a<br />
set of output files which is the static<br />
site itself. Metalsmith provides a<br />
framework for doing this, but leaves all<br />
of the actual manipulations to plugins.<br />
These manipulations are things which<br />
typically come out of the box with<br />
other static site generators, such as<br />
utilising templates, substituting<br />
variables, or interpreting languages<br />
like Markdown.<br />
When run through Metalsmith, all<br />
source files are converted to<br />
JavaScript objects, which means that<br />
manipulations by plugins are<br />
essentially modifications to properties<br />
“ METALSMITH IS<br />
IMMENSELY<br />
CUSTOMISABLE,<br />
BUT REQUIRES A<br />
LITTLE MORE<br />
CONSIDERATION<br />
DURING SETUP ”<br />
of these JavaScript objects. There is,<br />
for example, a markdown() plugin<br />
which transpires Markdown to HTML.<br />
The result of this approach is that<br />
Metalsmith is immensely customisable,<br />
but requires a little more consideration<br />
during setup than some of the more<br />
monolithic tools. Don’t like Jekyll’s use<br />
of the Liquid templating engine? Here<br />
you can pick your own. On the<br />
Metalsmith page, you’ll find a lengthy<br />
list of plugins to provide a wide range<br />
of functionalities, ranging from<br />
compiling Sass to CSS through to<br />
computing a word count.<br />
If you have a preference for<br />
unopinionated frameworks,<br />
Metalsmith is about as unopinionated<br />
as you can get.<br />
HONOURABLE<br />
MENTIONS<br />
THERE ARE MANY MORE STATIC SITE<br />
GENERATORS OUT THERE. HERE ARE A FEW<br />
MORE WHICH ARE WORTH A LOOK<br />
OCTOPRESS http://octopress.org<br />
Octopress is a framework for<br />
Jekyll which tailors specifically<br />
for blogging, and bundles a<br />
number of commonly-used<br />
plugins. If you like Jekyll’s style, it<br />
may take some of the setup work<br />
off your hands.<br />
9.<br />
9. MIDDLEMAN<br />
PRO : Middleman has been<br />
around for a long time, and is<br />
designed with more complex<br />
sites in mind<br />
Middleman was released around the<br />
same time as Jekyll, and will be most<br />
familiar to developers who have<br />
worked with Ruby on Rails. Its default<br />
template engine is ERB (Embedded<br />
RuBy) and it also includes built-in<br />
https://middlemanapp.com<br />
support for Haml, Sass, SCSS and<br />
CoffeeScript, and can be extended<br />
further to support more.<br />
Some leading static site generators<br />
are heavily geared towards blogs, but<br />
Middleman sets its ambitions wider<br />
and aims to provide the flexibility to<br />
develop any type of site. It’s highly<br />
unopinionated and extensible. This<br />
means, if all you are doing is a blog,<br />
the setup is a little more complex<br />
since you’ll have to configure it.<br />
10.<br />
10. SPIKE<br />
www.spike.cf<br />
PRO : Spike is the spiritual<br />
successor to Roots, a popular<br />
static site generator that is no<br />
longer maintained<br />
Spike is built by the same team as<br />
Roots, which saw great popularity<br />
while it was actively maintained. It<br />
provides a familiar ecosystem for<br />
JavaScript developers, utilising<br />
webpack, Postcss, Reshape and<br />
Babel. Much like Metalsmith, Spike<br />
is designed to provide a very<br />
simple framework and allow<br />
plugins to handle your<br />
transformations.<br />
PUBLII https://getpublii.com<br />
If you don’t want the trouble of<br />
setting up a command-line tool,<br />
Publii is a desktop application with<br />
GUI designed to develop static<br />
sites. Think of it like a CMS that<br />
sits on your local machine rather<br />
than a server.<br />
HAKYLL https://jaspervdj.be/hakyll/index.html<br />
Someone made a Haskell library<br />
for static site generation? It might<br />
not be that widely used, but fans<br />
of Haskell (and there are many<br />
around) will love this.<br />
78 __________________________________________________feature
CREATE THE IMPOSSIBLE<br />
www.photoshopcreative.co.uk<br />
Available<br />
from all good<br />
newsagents and<br />
supermarkets<br />
ON SALE NOW<br />
Striking imagery Step-by-step guides Essential tutorials<br />
PHOTO EDITING DIGITAL PAINTING PH T<br />
TOOL GUIDES BEGINNER TIPS<br />
BUY YOUR ISSUE TODAY<br />
Print edition available at www.myfavouritemagazines.co.uk<br />
Digital edition available for iOS and Android<br />
facebook.com/PhotoshopCreative<br />
twitter.com/PshopCreative
Developer tutorials<br />
Automate your<br />
workflow with Gulp<br />
Learn how to remove the nuisance of repetitive and<br />
mundane tasks with the help of Gulp, a Node.js task runner<br />
DOWNLOAD TUTORIAL FILES<br />
80 _________________________________________________tutorial www.filesilo.co.uk/webdesigner
Developer tutorials<br />
Intoday’swebdevelopmentworld,buildinga<br />
modern,complexwebsitewhichsupportsa<br />
variety of devices, both old and new, often<br />
constitutes a lot of work. Much of this work<br />
involves small, repeated tasks such as minifying<br />
JavaScript, optimising images, or compiling SASS.<br />
Whilethesetypesoftasksare useful, they also have to<br />
be performed again and again every time the code is<br />
changed. Understandably, this quickly grows repetitive,<br />
and eventually, it can be tempting to just ditch them<br />
altogether and spare yourself the headaches.<br />
Thankfully, this is an issue we can solve. The solution<br />
comes in the form of Gulp, a popular task runner which<br />
enablesustoautomatethesetypesofmundane,timeconsuming<br />
tasks through the use of Node.js streams,<br />
leaving us free to focus on the important stuff.<br />
In this tutorial, we’re going to create a basic build<br />
system using Gulp, which compiles and optimises a small<br />
projectanditsassets.Togetstarted,downloadthe<br />
project files from Filesilo and open ‘website-template’ in<br />
your favourite text editor. Then in Terminal, CD into<br />
‘website-template’ and run ‘npm install’ to install the initial<br />
project dependencies. Let’s begin.<br />
1. Install Gulp<br />
WefirstneedtoinstallGulpasaprojectdependency,and<br />
then its command line interface (gulp-cli), by running the<br />
commands below in Terminal. The latter will enable<br />
Terminal to recognise any commands beginning with<br />
‘gulp’, making it possible for us to actually run the tasks<br />
we’ll be building in this tutorial.<br />
npm install gulp-cli -g<br />
npm install gulp -D<br />
2. Create gulpfile.js<br />
Gulp searches for tasks in a JavaScript file called ‘gulpfile.<br />
js’. Let’s create one in the ‘website-template’ directory, and<br />
then in it, copy the contents of ‘support-files/step-2.txt’<br />
from the Filesilo package. This gives us a basic structure<br />
so we can organise our code.<br />
Thefirstthingweneedtodointhegulpfileisimport<br />
Gulp itself as a dependency. This can be done by adding<br />
the code below under the “Set Dependencies” header.<br />
We’lluseanES6constdeclarationforthisandother<br />
imports since we won’t be needing to reassign them.<br />
const gulp = require(‘gulp’);<br />
3. Project directory structure<br />
When building a gulpfile, it’s worth remembering that<br />
we may want to reuse it in future projects. These<br />
projects may all have different directory structures,<br />
whichmeanswewouldthenhavetogothrougheach<br />
Gulp task and edit the paths accordingly. Let’s spare<br />
our future-selves this inconvenience and declare our<br />
directory structure in reusable variables which can<br />
be easily changed. Add the declarations below under<br />
the Options header.<br />
const dev = ‘dev’;<br />
const dist = ‘dist’;<br />
const htmlDev = `${dev}/html`;<br />
const htmlDist = dist;<br />
const imgDev = `${dev}/img`;<br />
const imgDist = `${dist}/img`;<br />
const sassDev = `${dev}/sass`;<br />
const sassDist = `${dist}/css`;<br />
const jsDev = `${dev}/js`;<br />
const jsDist = `${dist}/js`;<br />
const dataDev = `${dev}/data`;<br />
4. Minify variable<br />
Next, again under the Options header, create a new<br />
variable called ‘minify’ and set its value to ‘true’. This will<br />
be used by some Gulp tasks to tell them if they should<br />
minify the compiled code.<br />
What minification does is remove all unnecessary<br />
characters such as whitespace and line breaks from the<br />
code without changing any of its functionality. This in<br />
turn, reduces its filesize, making it load a little faster in<br />
our end user’s browser.<br />
const minify = true;<br />
5. IF statements and file renaming<br />
By having a minify boolean in our build system which can<br />
be changed, we thus have to account for two differing<br />
scenarios in our Gulp tasks: One where we want Gulp to<br />
minify our code; and one where we don’t.<br />
To help us define this logic, we will install two new<br />
dependencies. The first is called gulp-if, and enables us<br />
to integrate simple ternary operators into our Gulp<br />
streams. The second is called gulp-rename, and simply<br />
enables us to rename files. Run the command below in<br />
Terminal to install these:<br />
npm install gulp-if gulp-rename -D<br />
Then import them into our gulpfile by adding this code<br />
under the Set Dependencies header:<br />
const rename = require(‘gulp-rename’);<br />
const gulpif = require(‘gulp-if’);<br />
6. Creating our first Gulp task<br />
As our Gulp tasks run, files will be taken from the<br />
specified ‘dev’ directory, processed, and then deposited<br />
into the specified ‘dist’ directory. To make sure no leftover<br />
files from previous builds can break things, we should<br />
delete any existing ‘dist’ directory first. To do this, we’ll<br />
build our very first Gulp task. We’ll require another<br />
dependency called ‘del’, which can be installed using<br />
the command below.<br />
npm install del -D<br />
Then add it to our list of dependency imports.<br />
const del = require(‘del’);<br />
Now, beneath the task’s header, let’s use the ‘gulp’ object<br />
we defined back in Step 2 and call its ‘task()’ method. This<br />
It’s just JavaScript<br />
Remember, Gulp is running on JavaScript, so we<br />
can use all the usual suspects like conditional<br />
statements and loops to enhance our tasks. A<br />
very simple example is using ‘console.log’ to<br />
print feedback, but we’ll also be using more<br />
complex ‘map’ functions soon enough.<br />
Left<br />
If you’d like to learn more about Gulp, you can visit its<br />
homepage at www.gulpjs.com.<br />
Top<br />
With ‘gulp-cli’ installed, you can also type ‘gulp --help’ in<br />
Terminal to see what other commands are available to you.<br />
tutorial _________________________________________________ 81
Developer tutorials<br />
Automate your workflow with Gulp<br />
method accepts two parameters, a task name and a<br />
function specifying what it should do. In the function, we<br />
then simply tell it to delete the directory we’ve assigned<br />
tothe‘dist’variableusingthe‘del’functionwe’vejust<br />
imported.Inthesnippet,there’salsoahelpfulemoticonpowered‘console.log’whichwillsendfeedbacktothe<br />
Terminal.Thefirstofmany.<br />
gulp.task(‘deleteDist’, function(){<br />
console.log(`Deleting old ‘${dist}’<br />
directory `);<br />
return del(dist);<br />
});<br />
7. CompileSASSwithGulp–part1<br />
Asmentioned,Gulpcanbeusedwiththepreprocessor<br />
SASS to automate the compiling of SCSS files into CSS. To<br />
do this, we’ll be installing more dependencies. ‘gulp-sass’<br />
isagulpwrapperfornode-sass.‘gulp-sass-glob’enables<br />
ustouseglobbingpatternsinourSASStoimportmany<br />
filesatonceusingwildcardcharacters(See‘/dev/sass/<br />
main.scss’).Finally,‘gulp-autoprefixer’addsvendor<br />
prefixestothecompiledCSSbasedonbrowserusage<br />
data.Addthemallintheusualmanner,asbelow.<br />
npm install gulp-sass gulp-sass-glob<br />
gulp-autoprefixer -D<br />
Thenaddittoourlistofdependencyimports.<br />
const sass = require(‘gulp-sass’);<br />
const sassGlob = require(‘gulp-sass-glob’);<br />
const autoprefixer = require<br />
(‘gulp-autoprefixer’);<br />
8. Compile SASS with Gulp – part 2<br />
Now we’ve installed the SASS dependencies, create a new<br />
task called ‘sass’. Within it, use Gulp’s ‘src()’ method to grab<br />
all the SCSS files from our root ‘sassDev’ directory, and<br />
Running tasks<br />
At any point in this tutorial, if you need to test that a<br />
Gulp task is working correctly, run it by typing ‘gulp<br />
my-task-name’ in the Terminal.<br />
then — using Node’s ‘pipe()’ method — pass them to<br />
sassGlob so their own SASS imports can be parsed in<br />
preparation for compile.<br />
gulp.task(‘sass’, function() {<br />
console.log(‘Compiling SASS ’)<br />
return gulp.src(`${sassDev}/*.scss`)<br />
.pipe(sassGlob())<br />
});<br />
9. Compile SASS with Gulp – part 3<br />
Next, pipe our stylesheet to gulp-if, which looks at the<br />
truthiness of the minify variable from Step 4, and then<br />
compiles the SASS either in a compressed (AKA minified)<br />
state or an expanded state. Let’s then pipe the compiled<br />
CSS to the rename dependency, which will add a ‘.min’<br />
filename prefix if required.<br />
.pipe(gulpif(minify, sass({outputStyle:<br />
‘compressed’, precision: 8}), sass<br />
({outputStyle: ‘expanded’, precision: 8})))<br />
.pipe(gulpif(minify, rename({ suffix: ‘.min’<br />
})))<br />
If ‘minify’ is true, we’ll have a stylesheet called ‘main.min.<br />
css’ in the Node.js stream. If there were compile errors, it’s<br />
important that we print these to the Terminal with the<br />
‘.on()’ method. Pipe the stylesheet to autoprefixer for<br />
vendor prefixing, and then finally send it to gulp’s ‘dest()’<br />
method, which places it in the correct ‘dist’ directory, as<br />
defined back in Step 3.<br />
.on(‘error’, sass.logError)<br />
.pipe(autoprefixer({<br />
browsers: [‘last 2 version’],<br />
cascade: false<br />
}))<br />
.pipe(gulp.dest(sassDist))<br />
10. Implementing UnCSS<br />
With Gulp, we can also leverage a powerful plugin called<br />
UnCSS, which analyses HTML files and then removes any<br />
unused styles from our CSS. Among other advantages,<br />
this is great way to reduce stylesheet file sizes. As usual,<br />
install the dependency like so:<br />
npm install gulp-uncss -D<br />
Then add UnCSS to our list of dependency imports.<br />
const uncss = require(‘gulp-uncss’);<br />
Now create a new Gulp task called ‘uncss’ and grab any<br />
CSS files from the ‘sassDist’ directory using ‘src()’. Next,<br />
after piping these to UnCSS, we have to tell the plugin<br />
where our HTML is located so that it can be analysed,<br />
before sending the edited CSS files back to ‘sassDist’<br />
using the ‘dest()’ method.<br />
gulp.task(‘uncss’, function() {<br />
console.log(‘Removing unused CSS ’)<br />
return gulp.src(`${sassDist}/*.css`)<br />
.pipe(uncss({<br />
html: [`${htmlDist}/*.html`]<br />
}))<br />
.pipe(gulp.dest(sassDist))<br />
});<br />
11. Image optimisation<br />
Another useful thing we can automate in Gulp is lossless<br />
image optimisation. It requires ‘gulp-imagemin’, which we<br />
should install in the usual way and then include in the<br />
gulpfile as a dependency called ‘imagemin’. Create a new<br />
task called ‘images’, use ‘src()’ to grab any bitmap images,<br />
and then pass these to imagemin.<br />
gulp.task(‘images’, function(){<br />
console.log(‘Optimising bitmaps ’);<br />
return gulp.src<br />
(`${imgDev}/*.+(png|jpg|jpeg|gif)`)<br />
.pipe(imagemin([<br />
imagemin.jpegtran({progressive: true}),<br />
imagemin.optipng({optimizationLevel: 5})<br />
], { verbose: true }))<br />
.pipe(gulp.dest(imgDist));<br />
});<br />
12. Bundling JavaScript – part 1<br />
If you open ‘/dev/js/main.js’ you’ll see ‘require’ statements,<br />
which import project functionality. We can automate the<br />
bundling of these into one concatenated, minified file<br />
using Browserify. Using Babelify, we can also auto<br />
transpile any ES6 JavaScript into JS, which older browsers<br />
can understand. Let’s install some dependencies.<br />
Above<br />
When you run ‘gulp dev’ in the Terminal after finishing the<br />
tutorial, you should see the results of the build process in<br />
the Terminal, including the feedback we’ve been adding<br />
via ‘console.log’ statements.<br />
Right<br />
Since the ‘serve’ task has created a local server, you’ll also<br />
see the finished result running live at the localhost port<br />
mentioned in the Terminal. This is typically ‘localhost:8000’.<br />
82__________________________________________________tutorial
Developer tutorials<br />
Automate your workflow with Gulp<br />
The Gulp<br />
ecosystem<br />
At the time of writing, there are<br />
3,399 plugins listed at gulpjs.<br />
com/plugins. This means<br />
there’s an incredible amount<br />
of potential automation we can<br />
apply to our workflows. Here’s<br />
abriefoverviewofsomeofour<br />
favourite plugins not featured<br />
in this tutorial:<br />
‘gulp-notify’ enables you<br />
to send OS notifications from<br />
Gulp tasks. Possible uses<br />
include notifying when a build is<br />
complete,orifthere’sanerror.<br />
‘gulp-plumber’ changes<br />
Gulp error handling so that<br />
when things break (such as<br />
SASS not compiling) the task<br />
won’t quit prematurely.<br />
‘gulp-stylelint’ and ‘gulpeslint’<br />
bring these popular<br />
frameworks to Gulp, enabling<br />
you to automatically lint your<br />
SASS and JavaScript on build.<br />
‘gulp-git’ enables you to<br />
run Git commands from a Gulp<br />
task, so for example, when you<br />
complete a build, you could<br />
choose to commit it also.<br />
npm install browserify vinyl-source-stream<br />
glob gulp-streamify gulp-uglify babelpreset-es2015<br />
babelify babel-core -D<br />
Then add these to our list of dependency imports.<br />
const browserify = require(‘browserify’);<br />
const source = require(‘vinyl-sourcestream’);<br />
const glob = require(‘glob’);<br />
const streamify = require(‘gulp-streamify’);<br />
const uglify = require(‘gulp-uglify’);<br />
13. Bundling JavaScript – part 2<br />
Next, create a new Gulp task called ‘js’ and within it, use<br />
the glob plugin to grab all the JavaScript files in our root<br />
‘jsDev’ directory and return them in an array. We’ll then<br />
loop through this using a map function, enabling us to<br />
process each JavaScript file individually.<br />
gulp.task(‘js’, function() {<br />
console.log(‘Bundling JavaScript ’);<br />
var files = glob.sync(`${jsDev}/*.js`);<br />
files.map(function(file) {<br />
});<br />
});<br />
14. Bundling JavaScript – part 3<br />
Within the map function, the ‘file’ variable references a<br />
string containing the full path of the current file (For<br />
example ‘/dev/js/main.js’). If we want to rename a minified<br />
‘main.js’ in a later step to ‘main.min.js’ like within the SASS<br />
task, we will need its base filename ‘main’. Let’s filter out<br />
the path information which isn’t required, by adding the<br />
snippet below to the map function.<br />
const filename = file.replace(`${jsDev}/`,<br />
‘’)<br />
.replace(‘.js’, ‘’);<br />
15. BundlingJavaScript–part4<br />
Next,let’ssendthefiletoBrowserifythroughthe<br />
transformfunctionsoitcanbebundledanditsES6<br />
transpiled. The vinyl-source-stream dependency is<br />
thenusedtosendthefilebackusingGulpsoitcanbe<br />
renamed if minify is ‘true’. Finally, if minify is true, we run<br />
thebundledfilethroughuglifytominifyitandthensend<br />
it to the ‘jsDist’ directory.<br />
return browserify({entries: file})<br />
.transform(‘babelify’, {presets:<br />
[‘es2015’]})<br />
.bundle()<br />
.pipe(source(file))<br />
.pipe(gulpif(minify, rename({<br />
dirname: ‘’,<br />
basename: filename,<br />
suffix: ‘.min’,<br />
extname: ‘.js’<br />
}), rename({<br />
dirname: ‘’,<br />
basename: filename,<br />
extname: ‘.js’<br />
})))<br />
.pipe(gulpif(minify, streamify(uglify())))<br />
.pipe(gulp.dest(jsDist));<br />
16. Setting up Nunjucks<br />
One thing possible to automate with Gulp is static site<br />
generation. In this project, a templating language called<br />
Nunjucks will be used to generate HTML files from<br />
templates using car data in a JSON file. We can see these<br />
Nunjucks templates for ourselves at ‘dev/html’. Install<br />
‘gulp-nunjucks’ in the usual way and then include it as a<br />
dependency called ‘nunjucks’ in gulpfile. Next, create a<br />
new task called ‘makes-list’.<br />
gulp.task(‘makes-list’, function() {<br />
console.log(‘Generating homepage ’);<br />
});<br />
17. Import JSON data<br />
In the task, the first thing we’ll be doing is importing the<br />
car data, which will feed into the static site generation.<br />
However, before we do even that, we first need to delete<br />
any leftover cache from previous builds to make sure the<br />
car data we’re using is always up to date. If we don’t, when<br />
we make changes to the car data in future, the out-of-date<br />
cached version may be used by the task instead.<br />
delete require.cache[require.<br />
resolve(`./${dataDev}/cars.json`)];<br />
let config = require(`./${dataDev}/cars.<br />
json`);<br />
18. Inject data into a single page<br />
Using Nunjucks, we’ll make the car data available to the<br />
‘index.html’ template, enabling it to display a list of car<br />
makes once compiled. With the ‘src()’ method, grab the<br />
‘index.html’ template and then pipe it to Nunjucks. Next,<br />
we’ll use Nunjucks’ ‘compile()’ method to inject car data<br />
from the JSON we’ve imported to the template and then<br />
render it. Finally we’ll send the compiled HTML to the<br />
‘htmlDist’ directory.<br />
return gulp.src(`${htmlDev}/index.html`)<br />
.pipe(nunjucks.compile({<br />
date: config[‘date’],<br />
makes: config[‘makes’]<br />
}))<br />
.pipe(gulp.dest(htmlDist));<br />
19. Render new pages – part 1<br />
It’s also possible in Gulp to generate lots of HTML files<br />
tutorial _________________________________________________83
Developer tutorials<br />
Automate your workflow with Gulp<br />
fromasingletemplate.Inthiscase,onepageforeachcar<br />
make,whichdisplaysalistofavailablemodels.Createa<br />
newtaskcalled‘models-list’andgrabthesamecardata<br />
file,deletingcachefromanypreviousbuildslikebefore.<br />
gulp.task(‘models-list’, function() {<br />
console.log(‘Generating car pages ’);<br />
delete require.cache[require.<br />
resolve(`./${dataDev}/cars.json`)];<br />
let config = require(`./${dataDev}/cars.<br />
json`);<br />
});<br />
20. Rendernewpages–part2<br />
We’llnowloopthroughthemakesfromthecardata<br />
usingamapfunction.Bydefault,therearethreedifferent<br />
makesinthecardata,sotheloopshouldrunthreetimes.<br />
Foreachone,we’llfirstpassthetemplatetoNunjucksand<br />
injectthecardata,thenrenameittoincludethemakein<br />
itsfilenamebeforefinallysendingthecompiledHTMLto<br />
the ‘htmlDist’ directory.<br />
config[‘makes’].map(function(make) {<br />
return gulp.src(`${htmlDev}/template.<br />
html`)<br />
.pipe(nunjucks.compile({<br />
date: config[‘date’],<br />
make: make.name,<br />
cars: make.cars<br />
}))<br />
.pipe(rename({basename:<br />
`${make.name.toLowerCase()}-leaseprices`}))<br />
.pipe(gulp.dest(htmlDist));<br />
});<br />
21. Automating XML sitemaps<br />
Next, we’ll use Gulp to generate an XML sitemap based<br />
on our statically generated HTML pages. Typically, we<br />
would need one for SEO purposes, and having to update<br />
it every time a page is added would be a pain. Install<br />
‘gulp-sitemap’ and include it as a dependency called<br />
‘sitemap’ in gulpfile.<br />
22. Create sitemap task – part 1<br />
Create a new task called ‘sitemap’ and within it, use ‘src()’<br />
to grab any compiled HTML files from the ‘htmlDist’<br />
directory. To save a bit of processing time, we’ll set the<br />
method’s ‘read’ option to false, meaning it won’t read<br />
each files contents, instead only registering its existence.<br />
gulp.task(‘sitemap’, function() {<br />
console.log(‘Generating sitemap ’);<br />
return gulp.src(`${htmlDist}/*.html`, {<br />
read: false<br />
})<br />
});<br />
23. Create sitemap task – part 2<br />
We need to pass the compiled HTML files to the sitemap<br />
plugin so they can be registered. The options we’re<br />
configuring here largely correspond to tags within an<br />
XML sitemap page entry. One thing to note is that in<br />
places, we’re using regex through the ‘replace()’ method.<br />
This removes the ‘.html’ file extension where visible, as<br />
typically,onalivewebserver,thesewouldn’tbeusedin<br />
web addresses.<br />
.pipe(sitemap({<br />
siteUrl: ‘http://www.example.com’,<br />
mappings: [{<br />
pages: [ ‘**/*.html’ ],<br />
changefreq: ‘monthly’,<br />
lastmod: Date.now(),<br />
hreflang: [{<br />
lang: ‘en-GB’,<br />
getHref(siteUrl, file, lang, loc) {<br />
return siteUrl + file.<br />
replace(/\.\w+$/, ‘’);<br />
}<br />
}],<br />
getLoc(siteUrl, loc, entry) {<br />
return loc.replace(/\.\w+$/, ‘’);<br />
}<br />
}]<br />
}))<br />
.pipe(gulp.dest(htmlDist));<br />
24. Copy static files<br />
Inanybuildsystem,sometimestheonlythingweneed<br />
to do with certain files is copy them from directory A to<br />
directoryB.Inthisproject,there’sacollectionoffonts<br />
whereweneedtodojustthat.Createanewtaskcalled<br />
‘copy’,callthe‘src()’methodandgrabanythingin‘fonts’<br />
within the ‘dev’ directory, before using the ‘dest()’<br />
method to copy them to ‘dist’.<br />
gulp.task(‘copy-fonts’, function() {<br />
console.log(‘Copying fonts ’);<br />
return gulp.src(`${dev}/fonts/**`)<br />
.pipe(gulp.dest(`${dist}/fonts`));<br />
});<br />
25. Createawebserver<br />
Beingabletoeasilycreateasimplewebservertoserve<br />
ourprojectfromwouldbeabigconvenience.Thisis<br />
something we can do in Gulp with the ‘gulp-webserver<br />
plugin’,whichweshouldinstallandthenlistasa<br />
dependency called ‘webserver’ in gulpfile.<br />
Under the Production Tasks header, add the task below.<br />
We’llsettheplugin’s‘livereload’optiontotrue,sothat<br />
when changes are made, the page automatically<br />
refreshes in the browser.<br />
gulp.task(‘serve’, function() {<br />
console.log(“Serving the project ”);<br />
gulp.src(`${dist}`).pipe(webserver({<br />
livereload: true<br />
}));<br />
});<br />
26. Install run-sequence<br />
Nowwehaveallofourtasksinplace,itwouldbeuseful<br />
ifwecouldrunthemallwithoneeasycommand,rather<br />
thanbeingforcedtorunthemindividually.<br />
Themostreadablewayforustodothisrequiresa<br />
plugin called ‘run-sequence’. Install it in the usual<br />
mannerandincludeitasaprojectdependencycalled<br />
‘runSequence’.Next,createanewtaskunderthe<br />
ProductionTasksheadercalled‘build’.<br />
gulp.task(‘build’, function() {<br />
});<br />
27. Creating the build task<br />
With run-sequence, we can define whether tasks should<br />
run synchronously or asynchronously, which is helpful<br />
when one task (Such as UnCSS) depends on another<br />
being completed first (such as SASS).<br />
Gulp comes with this kind of functionality out of the<br />
box in the form of task dependencies, but run-sequence<br />
enables us to define this behaviour in a much more<br />
obvious, readable way, in large tasks. Add the snippet<br />
below to the build task. Tasks passed on their own run<br />
synchronously, while tasks passed in an array all run<br />
asynchronously.<br />
runSequence(<br />
‘deleteDist’,<br />
[‘makes-list’, ‘models-list’,<br />
‘sass’, ‘js’, ‘copy-fonts’, ‘images’],<br />
[‘uncss’, ‘sitemap’]<br />
);<br />
28. Dev task – part 1<br />
So far, we have created a build task which does exactly<br />
that, build the task. One issue with this is that during<br />
development, we’ll keep having to run this or individual<br />
tasksaswemakechangestoourfiles,aswellasserve<br />
our project. Let’s create another task called ‘dev’ that<br />
automates all of this.<br />
You may notice that before the task’s function, we’re<br />
adding an array mentioning the ‘build’ and ‘serve’ tasks,<br />
which tells Gulp to run these first. These are the same<br />
tasks dependencies mentioned in Step 27, and are more<br />
suited to this simple use.<br />
gulp.task(‘dev’, [‘build’, ‘serve’],<br />
function() {<br />
});<br />
29. Dev task – part 2<br />
Next, we’ll use a method belonging to Gulp called<br />
‘watch()’. This keeps an eye on any files we pass to it via<br />
the first parameter, and if they change, runs the task<br />
passed in the second. This removes the need for us to<br />
manually run tasks as we develop the project. Add these<br />
watch tasks to ‘dev’ and that should cover everything.<br />
gulp.watch([`${htmlDev}/**/*.html`,<br />
`${dev}/data/cars.json`],<br />
[‘makes-list’, ‘models-list’]);<br />
gulp.watch(`${imgDev}/*.+(png|jpg|jpeg|gif)`<br />
,[‘images’]);<br />
gulp.watch(`${sassDev}/**/*.scss`,[‘sass’]);<br />
gulp.watch(`${jsDev}/**/*.js`,[‘js’]);<br />
30. Run dev task<br />
Finally, run the dev task in terminal with ‘gulp dev’ and<br />
watch as the project is built and a server is created at<br />
localhost:8000. From then on, if we change any of the<br />
files which are being watched, the appropriate task will<br />
then run and recompile your edited file.<br />
Congratulations! You now have a build system<br />
powered by Gulp.js.<br />
84 _________________________________________________tutorial
Special offer for readers in North America<br />
6issuesFREE<br />
FREE<br />
resource<br />
downloads<br />
eve y issue<br />
When you subscribe<br />
T<br />
stu<br />
tun<br />
unn<br />
ly magazine<br />
ed to design<br />
develop<br />
ng websites<br />
Order hotline +44 (0) 344 848 2852<br />
Online at myfavouritemagazines.co.uk/WEDPQ17<br />
*Terms and conditions This is a US subscription offer. 6 free issues refers to the USA newsstand price of $14.99 for 13 issues being $194.87,<br />
compared with $103.20 for a subscription. You will receive 13 issues in a year. You can write to us or call us to cancel your subscription within 14 days of<br />
purchase. Payment is non-refundable after the 14 day cancellation period unless exceptional circumstances apply. Your statutory rights are not affected.<br />
Prices correct at point of print and subject to change. Full details of the Direct Debit guarantee are available upon request. <strong>UK</strong> calls will cost the same as<br />
<br />
full terms and conditions please visit: bit.ly/magtandc Offer ends March 31 <strong>2018</strong>.<br />
Expires<br />
31 March<br />
<strong>2018</strong>
Developer tutorials<br />
Deploy TypeScript<br />
with React<br />
While TypeScript makes coding easier, deploying it with a<br />
framework can be a hassle. Here’s webpack to the rescue…<br />
86 _________________________________________________tutorial<br />
DOWNLOAD TUTORIAL FILES<br />
www.filesilo.co.uk/webdesigner
Developer tutorials<br />
While TypeScript brings a variety of<br />
advantages to the arsenal of the<br />
JavaScript programmer,<br />
transpiling (and syntax-checking)<br />
large amounts of TS code in the browser is ineffective.<br />
Sadly, an old adage teaches us that manual processes<br />
tendtobreakdownovertime–ifeachandevery<br />
deployment takes a lot of console work, deployment<br />
frequency will take a hit. webpack’s automatic packing<br />
feature absorbs some of the heat so that when the<br />
pipeline is set up, transpilation is performed with minimal<br />
developer input.<br />
This, furthermore, frees up capacity for other tasks. In<br />
our example, the powerful React framework is integrated<br />
into the webpack compilation process via a group of<br />
helper utilities. React’s JSX syntax is augmented via a<br />
proprietary language called tsx, thereby enabling tighter<br />
integration between React and TypeScript’s advanced<br />
run-time checking.<br />
In short, working through this tutorial demonstrates<br />
the creation of a workflow combining the best of both<br />
worlds. Save time by using React’s logic, and avoid errors<br />
via the enhanced syntax. If you are not a bug, there is little<br />
not to like here.<br />
1. Deploy webpack<br />
Seasoned Node.JS developers will not be surprised about<br />
thefactthattheuseofwebpackrequiresitsglobal<br />
installation via the npm ‘install -g’ command. When done,<br />
webpack can be invoked from your workstation’s<br />
command line.<br />
2. Create the scaffolding structure<br />
Microsoft recommends the creation of a specific folder<br />
structure to contain the various files constituting our<br />
project. When working on an Ubuntu workstation,<br />
simply execute the command sequence shown in a<br />
convenient location.<br />
tamhan@TAMHAN14:~$ mkdir tsreactspace<br />
tamhan@TAMHAN14:~$ cd tsreactspace/<br />
tamhan@TAMHAN14:~/tsreactspace$ mkdir src<br />
tamhan@TAMHAN14:~/tsreactspace$ cd src<br />
tamhan@TAMHAN14:~/tsreactspace/src$ mkdir<br />
components<br />
tamhan@TAMHAN14:~/tsreactspace/src$ cd ..<br />
3. Create a Node.JS project<br />
As with all Node.JS-related programs, the next step<br />
involvesthecreationofarepositoryandtheloadingof<br />
the various dependencies that are needed. Simply enter<br />
the commands shown below to complete the creation<br />
of the structure.<br />
tamhan@TAMHAN14:~/tsreactspace/src$ npm init<br />
tamhan@TAMHAN14:~/tsreactspace/src$ npm<br />
install --save react react-dom @types/react<br />
@types/react-dom<br />
tamhan@TAMHAN14:~/tsreactspace/src$ npm<br />
install --save-dev typescript awesometypescript-loader<br />
source-map-loader<br />
4. Automate your<br />
TypeScript process<br />
Most developers use TypeScript via the in-browser<br />
transpiler or an IDE. The capabilities of the tsconfig.json<br />
file are less known – it allows the pre-definition of a<br />
compiler toolchain. Create an empty file in root folder.<br />
5. Populate the file<br />
In the next step, the TypeScript compilation process must<br />
be set up. Open the file created in step 4, and replace its<br />
contents with the ones shown accompanying this step.<br />
{<br />
“compilerOptions”: {<br />
“outDir”: “./dist/”,<br />
“sourceMap”: true,<br />
“noImplicitAny”: true,<br />
“module”: “commonjs”,<br />
Be awesome and<br />
keep Microsoft happy<br />
Authors of TypeScript examples like to substitute<br />
‘awesome-typescript-loader’ with ‘ts-loader’. This<br />
is bad for two reasons. First of all, ‘awesome-*’ has<br />
better multithreading capabilities. Secondarily,<br />
Microsoft’s ‘official’ guidelines prefer ‘awesome-*’.<br />
Left<br />
NPM’s graphically verbose output showcases the colour<br />
capabilities of Ubuntu’s terminal emulator<br />
Above<br />
Once the package.js file is created, the rest takes place<br />
almost completely automatically<br />
tutorial _________________________________________________87
Developer tutorials<br />
Deploy TypeScript with React<br />
Below Thanks to the use of the ‘./’ syntax, the ‘config’ file can sit above the source folders<br />
“target”: “es5”,<br />
“jsx”: “react”<br />
},<br />
“include”: [<br />
“./src/**/*”<br />
]}<br />
6. Understand the structure<br />
Oneinterestingaspectofthe‘tsconfig’fileinvolvesthe<br />
useof‘./.’Asingledotrepresentsthelocalfolder,while..<br />
representsthefolder‘above’thecurrentone.Inourcase,<br />
‘./dist/’pointsatthedistfolderbelowthelocationofthe<br />
configuration file.<br />
7. Configure webpack<br />
Asworkstationsage,yourNode.JSconfigcangetmessed<br />
up.Thisisparticularlyproblematicforwebpack:ifthe<br />
productcan’tberunfromyourshell,installitagainlocally.<br />
Next,usethenpmbintofindthefoldercontainingit,and<br />
invokeitfromtheretogettheerrormessageshown<br />
accompanying this step.<br />
8. Get configuring<br />
Createafilecalled‘webpack.config.js’intherootfolderof<br />
the current project. Next, replace its contents with the<br />
onesshownaccompanyingthisstep–wewilldiscuss<br />
relevantpartsoftheconfigurationfilenext.<br />
module.exports = {<br />
entry: “./src/index.tsx”,<br />
output: {<br />
filename: “bundle.js”,<br />
path: __dirname + “/dist”<br />
},<br />
devtool: “source-map”,<br />
resolve: {<br />
extensions: [“.ts”, “.tsx”, “.js”, “.<br />
json”]<br />
},<br />
module: {<br />
rules: [<br />
{ test: /\.tsx?$/, loader: “awesometypescript-loader”<br />
},<br />
{ enforce: “pre”, test: /\.js$/, loader:<br />
“source-map-loader” }<br />
]<br />
},<br />
externals: {<br />
“react”: “React”,<br />
“react-dom”: “ReactDOM” },<br />
};<br />
9. Do the module!<br />
webpack’s packaging process can be expanded by<br />
loading so-called modules. Think of them like expansion<br />
projects for XNA’s legendary content pipeline. In our case,<br />
both JS and TS files are declared to be processable.<br />
10. Externalise stuff<br />
Bundling large libraries into your webpack output is not<br />
sensible because browser caching and CDNs get<br />
disabled. Using the externals module allows you to mark<br />
parts of the codebase as ‘foreign’, which changes the<br />
mode used for their inclusion.<br />
Even more options!<br />
The‘AwesomeTypeScriptLoader’canbe<br />
consideredtheSwissArmyknifeofTypeScript–<br />
look at its options described at https://github.<br />
com/s-panferov/awesome-typescript-loader to<br />
adjust its behaviour even further.<br />
Above Index.htm must stand outside of the ‘/src’ folder and its contents<br />
Top<br />
If webpack cannot be<br />
found, re-install it and<br />
run it from the npm<br />
bin folder<br />
Bottom<br />
Microsoft’s preferred<br />
arrangement does not<br />
work with recent<br />
versions of webpack<br />
88 _________________________________________________tutorial
Developer tutorials<br />
Deploy TypeScript with React<br />
Analyse<br />
your options<br />
Ourdiscussionof<br />
tsconfig.json is relatively<br />
superficial in scope.<br />
The limited space in<br />
the magazine does<br />
not allow us to go into<br />
depth. TypeScript<br />
comes with literally<br />
dozens of options,<br />
most of which are<br />
documented in the portal<br />
accessible at https://<br />
www.typescriptlang.<br />
org/docs/handbook/<br />
tsconfig-json.html. Keep<br />
in mind that the ‘root’<br />
webpage does not list<br />
all options. Instead, click<br />
the Project Configuration<br />
node at the left-hand side<br />
of the screen to reveal<br />
further parameters and<br />
fields which might be of<br />
interest. Finally, be aware<br />
that some of the options<br />
require the presence of<br />
Visual Studio – Microsoft,<br />
after all, wants to push its<br />
own IDE.<br />
11. Create an entry point<br />
The next step involves the creation of an application entry<br />
point using the structure shown accompanying this step.<br />
We simply load a bunch of predefined resources and<br />
place the file outside of the ‘/src/’ folder in accordance<br />
with the tree output below.<br />
<br />
<br />
<br />
<br />
<br />
<br />
<br />
<br />
<br />
<br />
12. Create a TypeScript file<br />
Displaying information in TypeScript is relatively simple.<br />
Due to the inclusion of React, ‘index.tsx’ – to be placed<br />
in ‘/src/’ – requires some additional code to include<br />
various modules.<br />
import * as React from “react”;<br />
import * as ReactDOM from “react-dom”;<br />
ReactDOM.render(<br />
Hello, world!,<br />
document.getElementById(“example”)<br />
);<br />
13. Take a stab<br />
At this point, it is time to try and compile the project for<br />
the first time. If you followed Microsoft’s instructions<br />
carefully, the error shown in the figure will pop up.<br />
Fortunately, the problem can be fixed by adjusting the<br />
folder structure (see figure).<br />
14. Pack it again!<br />
With that out of the way, adjust the path for calling<br />
webpack and take another stab at the compilation<br />
process. It will pass, yielding output similar to the one<br />
shown in the listing accompanying this step.<br />
tamhan@TAMHAN14:~/tsreactspace$ /home/<br />
tamhan/tsreactspace/node_modules/.bin/<br />
webpack<br />
. . . Asset Size Chunks<br />
Chunk Names<br />
bundle.js 2.95 kB 0 [emitted]<br />
main<br />
bundle.js.map 3.19 kB 0 [emitted]<br />
main<br />
[0] ./src/index.tsx 252 bytes {0} [built]<br />
+ 2 hidden modules<br />
15. Say hello<br />
With that out of the way, it is time to open ‘index.htm’. The<br />
browser will load the page, and will present our simple,<br />
React-based greeting to the world. When distributing the<br />
finished application, make sure to include the ‘dist’ folder.<br />
16. Use source mapping<br />
One frequent criticism of TypeScript is that debugging it is<br />
tiresome. Browsers, after all, cannot run TypeScript<br />
directly. This problem is thankfully mitigated via Map files<br />
such as ‘bundle.js.map’. They contain a data structure<br />
which permits correlation between the output and the<br />
source files.<br />
17. Celebrate the map file<br />
While many browsers demand the manual loading of the<br />
map file, using our webpack output with Firefox leads to<br />
the output shown in the figure. This is made possible by a<br />
comment at the bottom of ‘bundle.js’, which references<br />
tutorial _________________________________________________89
Developer tutorials<br />
Deploy TypeScript with React<br />
Above Moving the body of the Node project to the same level as the webpack ‘config’ file fixes weird problems<br />
the source map directly.<br />
. . .<br />
/***/ })<br />
/******/ ]);<br />
//# sourceMappingURL=bundle.js.map<br />
18. Create a component<br />
One of TypeScript’s most important features is the use<br />
of classes and data types. Creating a new component<br />
is done with a structure similar to the one shown<br />
below – ‘Props’ and ‘State’ can be declared using the<br />
‘type’ keyword.<br />
type Props = { ... };<br />
type State = { ... };<br />
class MyComponent extends React.<br />
Component {<br />
...<br />
}<br />
19. Do it with interfaces<br />
Another way to solve the problem involves the use of<br />
interfaces. In this case, the syntax does not change<br />
significantly – Microsoft’s favourite example demos it<br />
via a set of string parameters passed in via the<br />
‘HelloProps’ object.<br />
export interface HelloProps { compiler:<br />
string; framework: string; }<br />
export class Hello extends React.<br />
Component {<br />
render() {<br />
return Hello from {this.props.<br />
compiler} and {this.props.framework}!;<br />
}<br />
}<br />
20. Deploy the component<br />
With that out of the way, the component can be<br />
integrated into our main window as if it were a normal<br />
React element.<br />
import { Hello } from “./components/Hello”;<br />
ReactDOM.render(<br />
,<br />
document.getElementById(“example”)<br />
);<br />
21. Use advanced features<br />
Simply introducing TypeScript to your code is not<br />
enough. Make sure to read the documentation carefully,<br />
as to enable your developers and yourself to use the<br />
most advanced features found in the language standard.<br />
22. Try it out online<br />
Should you ever feel like testing a bit of TypeScript, keep<br />
www.typescriptlang.org/play in mind. It contains a live<br />
version of the TypeScript compiler running in your<br />
browser. Simply enter code on the left-hand side, and see<br />
the JavaScript output on the right.<br />
23. Load some examples<br />
The TypeScript playground comes with a set of<br />
pre-loaded examples which can be loaded via the<br />
combination box on the left-hand side of your screen. In<br />
addition to various syntax samples, the product even<br />
contains an extremely interesting implementation of a<br />
ray tracer.<br />
90_________________________________________________tutorial
Discover another of our great bookazines<br />
From science and history to technology and crafts, there<br />
are dozens of Future bookazines to suit all tastes
Get your listing in our directory<br />
ToadvertiseherecontactChris<br />
chris.mitchell@futurenet.com<br />
+44 (0)1225 687832<br />
HOSTING LISTINGS<br />
Featured host: tidyhosts<br />
www.tidyhosts.com / 05603 674610<br />
About us<br />
Tidyhostshasbecomealeading<br />
cloud hosting provider throughout<br />
the world. Itboastsafeature-rich<br />
selectionofservicesincludingdomain<br />
registration, shared web hosting,<br />
WordPresshosting,hostedexchange<br />
email, cloud virtual servers and media<br />
streaming. Its passion and drive for<br />
successhasgaineditahighlyreliable<br />
and trusted reputation from its<br />
customers, making it the number one<br />
for hosting services. Founded in 2004<br />
bythreedeveloperswhowantedto<br />
build hosting infrastructure for<br />
developers – years on, the company<br />
hasexpandedtooffermuchmore.<br />
“<br />
When you are ready to<br />
purchase hosting, check<br />
that you have enough<br />
resources<br />
”<br />
What we offer<br />
Domain names –Simple<br />
domain registration with a<br />
large choice of TLDs<br />
Shared web hosting<br />
– Includes one-click<br />
application installers and a<br />
choiceofWindowsorLinux<br />
Cloud virtual servers – Take<br />
fullcontroloveryourhosting,<br />
and install the software you<br />
need on your server<br />
SHOUTcast hosting – Start<br />
your own radio station with<br />
oureasytosetupanduse<br />
SHOUTcast hosting service<br />
5Tipsfromthepros<br />
1.Ensurethatyouchoosethe<br />
right domain<br />
When choosing your domain, make<br />
sure it’s easy to remember and<br />
resembleswhatyouareoffering.<br />
Customersaremorelikelytocome<br />
back if they can remember your URL.<br />
2.Createclear,concise<br />
website content<br />
Keep the content on your website<br />
clear,informativeand,more<br />
importantly, relative! Avoid any<br />
duplicationofcontentondifferent<br />
pagesasthiscanaffectyourrankings<br />
on search engines.<br />
3. Utilise SSL certificates to<br />
stay secure<br />
More sites are moving to SSL security<br />
toprotecttheircustomersfromthe<br />
ever-increasing threats on the web.<br />
Search engines are now ranking sites<br />
with an SSL higher than those without.<br />
4.Makesureyouchoosethe<br />
right plan<br />
Whenyouarereadytopurchase<br />
hosting,checkthatyouhaveenough<br />
resources, especially if you expect<br />
your website to grow quickly. Seek<br />
advicefromtidyhostsifyouareunsure.<br />
5. Use one-click installers<br />
when building a website<br />
Ifyouarenewtobuildingawebsite<br />
thenwehaveanumberofuseful<br />
one-click application installers. These<br />
helpyougetupandrunning,including<br />
thepopularWordPresssystem.<br />
Testimonials<br />
Kelly Underwood<br />
“ I’vebeenwithanumberofwebhostprovidersinthepastwhichhaveat<br />
somepointletmedown.Inowrealisetheimportanceofusingahostthat is<br />
well known ”<br />
John Corey<br />
“ We have our email hosted with tidyhosts, which serves a small number of<br />
usersinouroffice.Wehavefoundthissolutionismuchmorecost-effective ”<br />
Jenny Brice<br />
“ A great host with fantastic knowledge. I have only had to use the<br />
supportchannelsafewtimes,buttherepliesIhavehadhelpedmeinstantly,<br />
so well worth it ”<br />
92__________________________________________________listings
Get your listing in our directory<br />
To advertise here contact Chris<br />
chris.mitchell@futurenet.com<br />
+44 (0)1225 687832<br />
Supreme hosting<br />
SSD web hosting<br />
www.cwcs.co.uk<br />
0800 1 777 000<br />
CWCS Managed Hosting is the <strong>UK</strong>’s<br />
leading hosting specialist. They offer a<br />
fully comprehensive range of hosting<br />
products, services and support. Their<br />
highly trained staff are not only hosting<br />
experts, they’re also committed to<br />
delivering a great customer experience<br />
and are passionate about what they do.<br />
www.bargainhost.co.uk<br />
0843 289 2681<br />
Since 2001, Bargain Host have<br />
campaigned to offer the lowest possible<br />
priced hosting in the <strong>UK</strong>. They have<br />
achieved this goal successfully and built<br />
up a large client database which includes<br />
many repeat customers. They have also<br />
won several awards for providing an<br />
outstanding hosting service.<br />
Co-location hosting<br />
VPS<br />
100% Network uptime<br />
<strong>UK</strong>-based hosting<br />
www.cyberhostpro.com<br />
0845 5279 345<br />
Cyber Host Pro are committed to<br />
providing the best cloud server<br />
hosting in the <strong>UK</strong>; they are obsessed<br />
with automation. If you’re looking for a<br />
hosting provider who will provide you<br />
with the quality you need to help your<br />
business grow, then look no further<br />
than Cyber Host Pro.<br />
Budget hosting<br />
www.hetzner.com<br />
+49 (0)9831 505-0<br />
Hetzner Online is a professional web<br />
hosting provider and experienced data<br />
centre operator. Since 1997, the company<br />
has provided private and business clients<br />
with high-performance hosting products<br />
as well as the infrastructure for the<br />
efficient operation of sites. A combination<br />
of stable technology, attractive pricing,<br />
flexible support and services has enabled<br />
Hetzner Online to strengthen its market<br />
position both nationally & internationally.<br />
Dedicated/shared hosting<br />
Colocation racks<br />
SSL certificates<br />
Shared hosting<br />
Cloud servers<br />
Domain names<br />
Value Linux hosting<br />
patchman-hosting.co.uk<br />
01642 424 237<br />
Linux hosting is a great solution for<br />
home users, business users and web<br />
designers looking for cost-effective and<br />
powerful hosting. Whether you are<br />
building a single-page portfolio, or you<br />
are running a database-driven<br />
eCommerce website, there is a Linux<br />
hosting solution for you.<br />
Cloud VPS servers<br />
Reseller hosting<br />
Dedicated servers<br />
Student hosting deals<br />
Site designer<br />
Domain names<br />
Cluster web hosting<br />
Flexible cloud servers<br />
www.fasthosts.co.uk<br />
0808 1686 777<br />
<strong>UK</strong> based and operating 24/7 from<br />
dedicated <strong>UK</strong> data centres. Fasthosts<br />
keep over one million domains running<br />
smoothly and safely each day.<br />
Services can be self-managed through<br />
the Fasthosts Control Panel.<br />
Dedicated servers<br />
Cloud servers<br />
Hosted email<br />
All-inclusive hosting<br />
www.1and1.co.uk<br />
0333 336 5509<br />
1&1 Internet is a leading hosting<br />
provider that enables businesses,<br />
developers and IT pros to succeed<br />
online. Established in 1988, 1&1 now<br />
operates across ten countries. With a<br />
comprehensive range of highperformance<br />
and affordable products, 1&1<br />
offers everything from simple domain<br />
registration to award-winning website<br />
building tools, eCommerce packages and<br />
powerful cloud servers.<br />
Easy domain registration<br />
Professional eShops<br />
High-performance servers<br />
elastichosts.co.uk<br />
020 7183 8250<br />
ElasticHosts offer simple, flexible and<br />
cost-effective cloud services with<br />
high performance, availability and<br />
scalability for businesses worldwide.<br />
Their team of engineers provide<br />
excellent support 24/7 over the phone,<br />
email and ticketing system.<br />
Cloud servers with any OS<br />
Linux OS containers<br />
24/7 expert support<br />
listings __________________________________________________93
Get your listing in our directory<br />
To advertise here contact Chris<br />
chris.mitchell@futurenet.com<br />
+44 (0)1225 687832<br />
COURSE LISTINGS<br />
About us<br />
Northcoders is the coding bootcamp<br />
for the north, based in the heart of<br />
Manchesterandbuiltuponnorthern<br />
values of grit, determination and<br />
community spirit. No matter what<br />
your background, you can fast-track<br />
your career and become a web or<br />
software developer in 12 weeks at their<br />
Featured:<br />
Northcoders<br />
www.northcoders.com<br />
Twitter:@northcoders<br />
Facebook: Northcoders<br />
full-time bootcamp, or fit their course<br />
around your life with their 24-week<br />
part-time bootcamp. Their internal<br />
career support team will help find you<br />
work as a developer, setting up<br />
interviews with your choices of<br />
Northcoders Hiring Partners across<br />
the north of England.<br />
“<br />
No matter what your<br />
background, you can fasttrack<br />
your career and<br />
become a web or software<br />
developer in 12 weeks ”.<br />
What we offer<br />
<br />
Fast-track your career in just<br />
12 weeks<br />
<br />
Fit our curriculum around<br />
your life in 24 weeks<br />
5 tips from the pros<br />
<br />
The best way to know if coding<br />
is for youistojusttryit!We<br />
recommend the free, online<br />
JavaScript track of<br />
Codecademy to get you started<br />
with the basics.<br />
<br />
Make sure you read plenty<br />
of student reviews to make<br />
sure you’re applying<br />
somewhere reputable. Read<br />
their blog and have a look at<br />
their social channels.<br />
<br />
Once you’ve decided it’s right<br />
foryou,setasideafewevenings<br />
each week to really start making<br />
progress!Ifcodingisforyou,<br />
this should be fun.<br />
<br />
We’llbewithyoueverystepof<br />
the way when you apply. Make<br />
sure you go through all the<br />
materials we recommend and<br />
askforhelpifyou’restuck.<br />
<br />
With Northcoders, you’re not<br />
just on a course, you’re part of a<br />
community that will stay with<br />
you long after you graduate.<br />
Make the most of it!<br />
Becoming part of this vibrant, caring community was<br />
something I hadn’t expected before the course, but<br />
now I couldn’t be without it. To be a Northcoder is to<br />
be enlightened, inspired and supported.<br />
Joanne Imlay<br />
Primary school teacher to software developer at Careicon<br />
Northcoders delivered their part of the bargain in spades.<br />
They provided tremendous assistance in turning me into<br />
the full product – a well-rounded, capable future tech<br />
employee – and they have the contacts to deliver the<br />
opportunities for such people.<br />
Joe Mulvey<br />
Maths teacher to software developer at Auto Trader<br />
94 _________________________________________________listings
Get your listing in our directory<br />
To advertise here contact Chris<br />
chris.mitchell@futurenet.com<br />
+44 (0)1225 687832<br />
WE GOT CODERS<br />
UDEMY<br />
www. udemy.com<br />
Twitter: @udemy<br />
Facebook: udemy<br />
The inspiration for Udemy began in a<br />
small village in Turkey, where founder<br />
Eren Bali grew up frustrated by the<br />
limitations of being taught in a<br />
one-room school house. Realising<br />
the potential of learning on the internet,<br />
he set out to make quality education<br />
more accessible. Udemy is now a<br />
global marketplace for learning and<br />
teaching online. Students can master<br />
new skills by choosing from an<br />
extensive library of over 40,000<br />
courses including HTML, CSS, UX,<br />
JavaScript and web development.<br />
40,000+ courses: There is a<br />
course for every designer and dev<br />
Self-paced learning: Learn how<br />
to code at your own pace<br />
THE<br />
IRON YARD<br />
www. theironyard.com<br />
Twitter: @TheIronYard<br />
Facebook: TheIronYard<br />
The Iron Yard is one of the world’s<br />
largest and fastest-growing in-person<br />
code schools. It offers full-time and<br />
part-time programs in back-end<br />
engineering, front-end engineering,<br />
mobile engineering and design. The<br />
Iron Yard exists to create real, lasting<br />
change for people, their companies<br />
and communities through technology<br />
education. The in-person, immersive<br />
format of The Iron Yard’s 12-week<br />
courses helps people learn to code<br />
and be prepared with the skills needed<br />
to start a career as junior-level<br />
software developers.<br />
12-week code school: Learn<br />
the latest skills from industry pros<br />
Free crash courses: One-night<br />
courses, the perfect way to learn<br />
www.wegotcoders.com<br />
hello@wegotcoders.com<br />
We Got Coders is a consultancy that<br />
provides experts in agile web<br />
development, working with startups,<br />
agencies and government. Take one of<br />
their 12-week training courses that covers<br />
all that is required to become a web<br />
developer, with highly marketable<br />
full-stack web development skills.<br />
Classroom-based training<br />
Real-world work experience<br />
Employment opportunities<br />
FUTURELEARN<br />
www.futurelearn.com<br />
feedback@futurelearn.com<br />
Choose from hundreds of free online<br />
courses, from Language & Culture to<br />
Business & Management; Science &<br />
Technology to Health & Psychology.<br />
Learn from the experts. Meet educators<br />
from top universities who’ll share their<br />
experience through videos, articles,<br />
quizzes and discussions.<br />
Learn from experts<br />
Free courses<br />
All-device access<br />
GYMNASIUM<br />
www.thegymnasium.com<br />
help@thegymnasium.com<br />
Gymnasium offers free online courses<br />
designed to teach creative<br />
professionals in-demand skills.<br />
Courses are all self-paced and taught by<br />
experienced practitioners with a passion<br />
for sharing practical lessons from the<br />
design trenches.<br />
Gain real-world skills<br />
Get expert instruction<br />
Career opportunities<br />
listings __________________________________________________95
Free with<br />
your magazine<br />
Essential assets<br />
and resources<br />
Get textures, fonts,<br />
backgrounds and more<br />
Exclusive<br />
video tutorials<br />
Learn to code/create with<br />
HTML, CSS, JS & PHP<br />
Tutorial<br />
project files<br />
<br />
to follow our tutorials<br />
Plus, all of this<br />
is yours too…<br />
<br />
<br />
and JavaScript techniques<br />
<br />
video from Pluralsight<br />
(www.pluralsight.com)<br />
<br />
and Dot grid Photoshop actions<br />
(www.sparklestock.com)<br />
Log in to www.filesilo.co.uk/webdesigner<br />
Register to get instant access<br />
to this pack of must-have<br />
creative resources, how-to<br />
videos and tutorial assets<br />
Free<br />
for digital<br />
readers, too!<br />
Read on your tablet,<br />
download on your<br />
computer
Thehomeofgreat<br />
home of downloads – exclusive to<br />
your favourite magazines<br />
from Future!<br />
Secure and safe online<br />
access, from anywhere<br />
Free access for every<br />
reader, print and digital<br />
Download only the files<br />
you want, when you want<br />
All your gifts, from all your<br />
issues, in one place<br />
Get started<br />
Everything you need to<br />
know about accessing<br />
your FileSilo account<br />
Unlock<br />
every<br />
issue<br />
Follow the instructions<br />
on screen to create an<br />
account with our secure FileSilo<br />
system. Log in and unlock the<br />
issue by answering a simple<br />
question about the magazine.<br />
gifts from more than 50 issues<br />
Access our entire library of resources with a money-saving<br />
<br />
You can access FileSilo<br />
on any computer, tablet<br />
or smartphone device using any<br />
popular browser. However, we<br />
recommend that you use a<br />
computer to download content,<br />
as you may not be able to<br />
download files to other devices.<br />
Over 60 hours<br />
of video guides<br />
Let the experts teach you<br />
to create and code<br />
More than<br />
400 tutorials<br />
Get the code you<br />
need to get creative<br />
Over 210<br />
creative assets<br />
Templates, fonts, textures<br />
and backgrounds<br />
If you have any<br />
problems with<br />
accessing content on FileSilo,<br />
take a look at the FAQs online<br />
or email our team at the<br />
address below.<br />
filesilohelp@futurenet.com<br />
Head to page 32 to subscribe now<br />
Already a print subscriber?<br />
<br />
Unlock the entire <strong>Web</strong> <strong>Designer</strong> FileSilo library with your<br />
unique <strong>Web</strong> ID – the eight-digit alphanumeric code printed<br />
above your address details on the mailing label of your<br />
subscription copies – also found on any renewal letters.<br />
More than<br />
900 reasons<br />
to subscribe<br />
More<br />
added<br />
every<br />
issue
NEXT MONTH<br />
CREATE CUSTOM<br />
HTML<br />
DISCOVER THE POWER OF WEB COMPONENTS<br />
AND HOW TO BUILD WITH GOOGLE’S<br />
POLYMER LIBRARY<br />
FASTER WEB<br />
ANIMATIONS<br />
Learn a host of techniques to improve<br />
the performance of web animations<br />
CONVERSION RATE<br />
OPTIMISATION<br />
Discover how to increase site visitor<br />
numbers and turn them into customers<br />
CODE WITH GOOGLE<br />
& TWITTER APIS<br />
Learn how to show tweets and pictures<br />
from a selected location on a map<br />
Visit the WEB DESIGNER online shop at<br />
myfavouritemagazines.co.uk<br />
for the latest issue, back issues and specials<br />
ALL IN YOUR NEXT<br />
WEB DESIGNER<br />
Issue 272 on sale<br />
Thursday 8th March <strong>2018</strong><br />
98 __________________________________________next month
9000<br />
1