Delaware Eats Magazine_First Issue
Delaware Eats is a magazine dedicated to the foodies of Delaware
Delaware Eats is a magazine dedicated to the foodies of Delaware

You also want an ePaper? Increase the reach of your titles
YUMPU automatically turns print PDFs into web optimized ePapers that Google loves.
q<br />
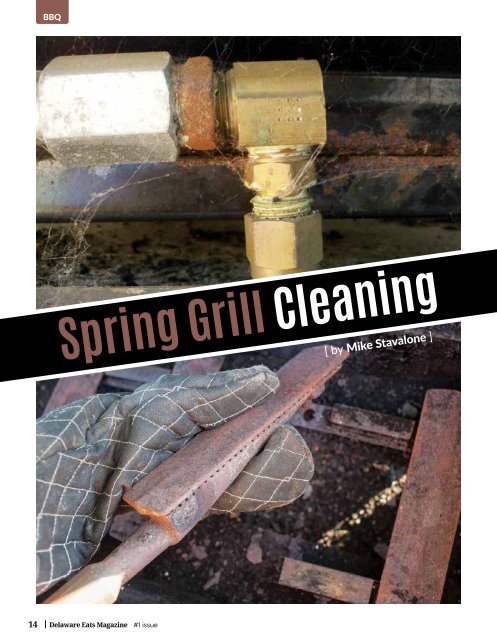
Check the fuel lines<br />
for invisible openings.<br />
Last year’s grease on the grill, last<br />
year’s ashes on the bottom. That’s<br />
what makes a Bundy Burger special.<br />
Al Bundy, Married With Children, 1989<br />
Create a sudsy mixture of soap and<br />
water. Using a paintbrush, apply the<br />
soapy mixture to the fuel lines. Turn<br />
on the gas, and brush more soapy water<br />
onto the gas lines. If any bubbles<br />
form, that indicates a gas leak. Immediately<br />
replace any fuel lines that exhibit<br />
signs of a gas leak.<br />
Check the ignition system.<br />
Spring Grill Cleaning<br />
[ by Mike Stavalone ]<br />
That may be true for the<br />
sitcom “Married With Children”,<br />
however for real-life<br />
back yard pit-masters, year<br />
old food is not the starting<br />
place for the perfect burger. The reasons<br />
are obvious but for the sake of<br />
clarity, let’s review them<br />
Pretty simple equation: Grease<br />
and oil go rancid and spoil causing<br />
bacteria to form inside your grill.<br />
Rancid food on the grates flavors<br />
you food but not the same way<br />
that salt and pepper do!!<br />
The grease that drips<br />
to the bottom of<br />
your grill vaporizes<br />
and also<br />
ruins your<br />
food. Grease<br />
sitting too<br />
long forms<br />
a black crust<br />
which is<br />
mostly carbon.<br />
The carbon<br />
tastes like<br />
burnt toast,<br />
Besides adding<br />
the wrong flavor<br />
to your food, the grease<br />
and oil contains water which<br />
in turns to rust. Unless your hubby<br />
wants a new grill every spring (hint …<br />
Father’s Day!!), a rusted grill is not a<br />
man’s best friend!<br />
So what does this all mean? A<br />
spring and fall cleaning of your favorite<br />
grill not only extends the life or<br />
your grill but also keeps the unwanted<br />
flavors off of your food. These 2<br />
cleaning along with regular maintenance<br />
– pre and post cook will keep<br />
your grill and more important, your<br />
pit-master happy for many seasons.<br />
So let’s talk about the BBQ spring<br />
cleaning and discuss the basics steps.<br />
Check the fuel lines<br />
for visible defects.<br />
If any fuel lines have<br />
damage, replace<br />
the parts prior to<br />
your next cook.<br />
Also be sure<br />
that the fuel<br />
lines have<br />
no kinks<br />
or bends.<br />
Bent lines<br />
can prevent<br />
gas from<br />
flowing correctly.<br />
Check<br />
the exterior<br />
of the gas tank<br />
for any damage as<br />
well; things like dents,<br />
erosion, punctures, or any<br />
evident signs of damage. If you find<br />
areas that have obvious damage, you<br />
could potentially have a gas leak. If<br />
you are unsure about the condition<br />
of your gas tank, have it inspected by<br />
a professional gas supplier.<br />
Turn the gas off, and test your ignition<br />
button to see if it creates a spark.<br />
If both the pressure regulator on the<br />
gas tank and the ignition system are<br />
running normally (meaning the pressure<br />
regulator is tracking and maintaining<br />
correct gas tank pressure, and<br />
the ignition system is sparking and<br />
lighting correctly), you can finish testing<br />
the grill by turning the gas back<br />
on and lighting the grill up as you normally<br />
would.<br />
If there is no spark, check the<br />
pressure regulator, and be sure it is<br />
secured tightly on the tank. Just like<br />
your stove at home, you can try to<br />
manually light the grill using a grill<br />
lighter. Just be sure to keep your arms<br />
and face away from the grilling area<br />
so you don’t burn yourself when the<br />
burners ignite.<br />
Once you know your grill is operating<br />
properly, it is time for the actual<br />
deep cleaning process.<br />
Turn the grill on high for 15 minutes<br />
allowing the grates to get hot.<br />
Allow enough time to burn off any<br />
leftover food and debris and wait until<br />
the smoke diminishes. Wire brush<br />
the grates removing any leftover food<br />
or debri. Turn over grates and repeat<br />
the process, being careful not to burn<br />
yourself. DO NOT clean your grates<br />
in the dishwasher. The grease from<br />
the grates will coat the entire inside<br />
of the dishwasher.<br />
If your grill grates are overly dirty,<br />
simply fill a bucket with hot water and<br />
dish detergent. With a brush, scrub<br />
both sides and rinse thoroughly. Be<br />
warned, if you do this on cast iron it<br />
will likely lose some of its non-stick<br />
14 <strong>Delaware</strong> <strong>Eats</strong> <strong>Magazine</strong> #1 issue<br />
#1 issue <strong>Delaware</strong> <strong>Eats</strong> <strong>Magazine</strong> 15