
You also want an ePaper? Increase the reach of your titles
YUMPU automatically turns print PDFs into web optimized ePapers that Google loves.
<strong>How</strong> <strong>to</strong> <strong>Make</strong> a Cus<strong>to</strong>m <strong>Vinyl</strong> <strong>Record</strong> <strong>Clock</strong>: <strong>13</strong> <strong>Steps</strong><br />
Follow By yehole<strong>13</strong><br />
Download Favorite<br />
Featured Write an Instructable Login | Sign Up<br />
Classes Contests Community Teachers<br />
advertisement<br />
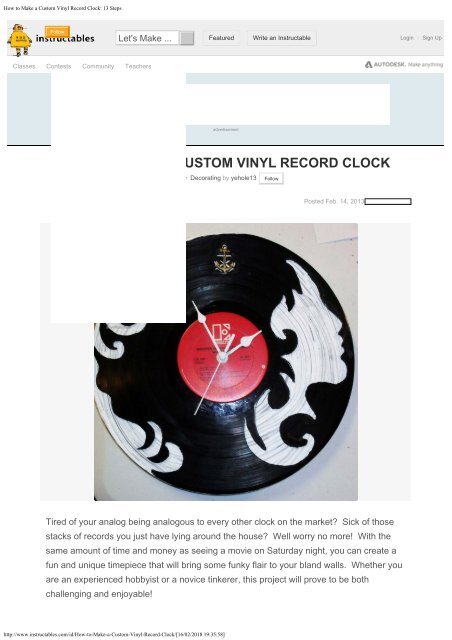
HOW TO MAKE A CUSTOM VINYL RECORD CLOCK<br />
Home > Decoratingby yehole<strong>13</strong><br />
Follow<br />
182.649 1<strong>13</strong> 7 Posted Feb. 14, 20<strong>13</strong> |<br />
advertisement<br />
Tired of your analog being analogous <strong>to</strong> every other clock on the market? Sick of those<br />
stacks of records you just have lying around the house? Well worry no more! With the<br />
same amount of time and money as seeing a movie on Saturday night, you can create a<br />
fun and unique timepiece that will bring some funky flair <strong>to</strong> your bland walls. Whether you<br />
are an experienced hobbyist or a novice tinkerer, this project will prove <strong>to</strong> be both<br />
challenging and enjoyable!<br />
http://www.instructables.com/id/<strong>How</strong>-<strong>to</strong>-<strong>Make</strong>-a-Cus<strong>to</strong>m-<strong>Vinyl</strong>-<strong>Record</strong>-<strong>Clock</strong>/[16/02/2018 19:35:58]
<strong>How</strong> <strong>to</strong> <strong>Make</strong> a Cus<strong>to</strong>m <strong>Vinyl</strong> <strong>Record</strong> <strong>Clock</strong>: <strong>13</strong> <strong>Steps</strong><br />
<br />
Add Tip<br />
V<br />
Ask Question<br />
| Comment Download<br />
Step 1: Materials Needed<br />
http://www.instructables.com/id/<strong>How</strong>-<strong>to</strong>-<strong>Make</strong>-a-Cus<strong>to</strong>m-<strong>Vinyl</strong>-<strong>Record</strong>-<strong>Clock</strong>/[16/02/2018 19:35:58]
<strong>How</strong> <strong>to</strong> <strong>Make</strong> a Cus<strong>to</strong>m <strong>Vinyl</strong> <strong>Record</strong> <strong>Clock</strong>: <strong>13</strong> <strong>Steps</strong><br />
Total Cost: ~ $10<br />
1. <strong>Vinyl</strong> record X 2<br />
2. Superglue or hot-glue<br />
3. Acryllic paint<br />
4. <strong>Clock</strong><br />
Optional Materials (Not Pictured)<br />
1. Numbers<br />
2. Decorative adornments<br />
3. Plain white paper<br />
*Tips - If this is your first time working with vinyl, I recommend having several spare<br />
records on hand in case you mess up. These are cheap and can be found at about any<br />
thrift shop. I also suggest using superglue as opposed <strong>to</strong> a hot-glue gun as the heat from<br />
the gun can dis<strong>to</strong>rt the vinyl.<br />
http://www.instructables.com/id/<strong>How</strong>-<strong>to</strong>-<strong>Make</strong>-a-Cus<strong>to</strong>m-<strong>Vinyl</strong>-<strong>Record</strong>-<strong>Clock</strong>/[16/02/2018 19:35:58]
<strong>How</strong> <strong>to</strong> <strong>Make</strong> a Cus<strong>to</strong>m <strong>Vinyl</strong> <strong>Record</strong> <strong>Clock</strong>: <strong>13</strong> <strong>Steps</strong><br />
<br />
Add Tip<br />
V<br />
Ask Question<br />
| Comment Download<br />
Step 2: Tools Needed<br />
1) Paint brush<br />
2) Pen or marker<br />
3) X-ac<strong>to</strong> knife<br />
4) Heat knife or wood burning <strong>to</strong>ol<br />
5) Screwdriver<br />
6) Pliers<br />
Optional Tools (Not Pictured)<br />
1) Sandpaper<br />
*Tips - If you do not have access <strong>to</strong> a heat knife or wood burning <strong>to</strong>ol, you can either heat<br />
the blade of an X-ac<strong>to</strong> knife with a lighter or warm up the record in the oven prior <strong>to</strong><br />
cutting. This second option can be done by heating the oven <strong>to</strong> 200-250°F and placing<br />
http://www.instructables.com/id/<strong>How</strong>-<strong>to</strong>-<strong>Make</strong>-a-Cus<strong>to</strong>m-<strong>Vinyl</strong>-<strong>Record</strong>-<strong>Clock</strong>/[16/02/2018 19:35:58]
<strong>How</strong> <strong>to</strong> <strong>Make</strong> a Cus<strong>to</strong>m <strong>Vinyl</strong> <strong>Record</strong> <strong>Clock</strong>: <strong>13</strong> <strong>Steps</strong><br />
the record on the middle rack for a couple seconds at a time.<br />
<br />
Add Tip<br />
V<br />
Ask Question<br />
| Comment Download<br />
Step 3: Disassemble the <strong>Clock</strong><br />
1) Using the screwdriver, remove the screws from the back of the clock.<br />
*Tips - Depending on how many screws your clock has, they can be saved and later glued<br />
<strong>to</strong> the face of your record <strong>to</strong> act as replacement numbers.<br />
<br />
Add Tip<br />
V<br />
Ask Question<br />
| Comment Download<br />
Step 4: Disassemble the <strong>Clock</strong> (continued)<br />
http://www.instructables.com/id/<strong>How</strong>-<strong>to</strong>-<strong>Make</strong>-a-Cus<strong>to</strong>m-<strong>Vinyl</strong>-<strong>Record</strong>-<strong>Clock</strong>/[16/02/2018 19:35:58]
<strong>How</strong> <strong>to</strong> <strong>Make</strong> a Cus<strong>to</strong>m <strong>Vinyl</strong> <strong>Record</strong> <strong>Clock</strong>: <strong>13</strong> <strong>Steps</strong><br />
2) After the screws have been taken out, use the pliers <strong>to</strong> remove the clock hands and<br />
gearbox<br />
*Tips - Be careful when removing the clock hands as they can be bent easily. If this<br />
happens, just bend them back in<strong>to</strong> place using the pliers.<br />
<br />
Add Tip<br />
V<br />
Ask Question<br />
| Comment Download<br />
Step 5: Paint the <strong>Clock</strong> Hands and Background<br />
http://www.instructables.com/id/<strong>How</strong>-<strong>to</strong>-<strong>Make</strong>-a-Cus<strong>to</strong>m-<strong>Vinyl</strong>-<strong>Record</strong>-<strong>Clock</strong>/[16/02/2018 19:35:58]
<strong>How</strong> <strong>to</strong> <strong>Make</strong> a Cus<strong>to</strong>m <strong>Vinyl</strong> <strong>Record</strong> <strong>Clock</strong>: <strong>13</strong> <strong>Steps</strong><br />
1) Using the brush and acrylic paint, apply a coat of your color of choice <strong>to</strong> both the<br />
http://www.instructables.com/id/<strong>How</strong>-<strong>to</strong>-<strong>Make</strong>-a-Cus<strong>to</strong>m-<strong>Vinyl</strong>-<strong>Record</strong>-<strong>Clock</strong>/[16/02/2018 19:35:58]
<strong>How</strong> <strong>to</strong> <strong>Make</strong> a Cus<strong>to</strong>m <strong>Vinyl</strong> <strong>Record</strong> <strong>Clock</strong>: <strong>13</strong> <strong>Steps</strong><br />
second record and the clock hands. Doing this step early in the process will allow the<br />
paint <strong>to</strong> dry while you finish the remainder of the clock.<br />
*Tips - You can use various types of paint for this step. I chose acrylic paint because I like<br />
the brushed texture it leaves on both the background and the hands. <strong>How</strong>ever, not all<br />
types of paints will apply well <strong>to</strong> the materials used in this project so be sure <strong>to</strong> read the<br />
label before purchasing!<br />
<br />
Add Tip<br />
V<br />
Ask Question<br />
| Comment Download<br />
Step 6: Create the Design<br />
http://www.instructables.com/id/<strong>How</strong>-<strong>to</strong>-<strong>Make</strong>-a-Cus<strong>to</strong>m-<strong>Vinyl</strong>-<strong>Record</strong>-<strong>Clock</strong>/[16/02/2018 19:35:58]
<strong>How</strong> <strong>to</strong> <strong>Make</strong> a Cus<strong>to</strong>m <strong>Vinyl</strong> <strong>Record</strong> <strong>Clock</strong>: <strong>13</strong> <strong>Steps</strong><br />
1) After you set the background and hands aside <strong>to</strong> dry, sketch your desired design on<strong>to</strong><br />
the record using a pen or marker. Colored sharpies work especially well for this.<br />
*Tips- Try first creating your design on plain white paper and then laying the cu<strong>to</strong>ut on the<br />
record. The white paper will allow you <strong>to</strong> trace your design while also visualizing what the<br />
finished product will look like.<br />
<br />
Add Tip<br />
V<br />
Ask Question<br />
| Comment Download<br />
Step 7: Cut the <strong>Vinyl</strong><br />
http://www.instructables.com/id/<strong>How</strong>-<strong>to</strong>-<strong>Make</strong>-a-Cus<strong>to</strong>m-<strong>Vinyl</strong>-<strong>Record</strong>-<strong>Clock</strong>/[16/02/2018 19:35:58]
<strong>How</strong> <strong>to</strong> <strong>Make</strong> a Cus<strong>to</strong>m <strong>Vinyl</strong> <strong>Record</strong> <strong>Clock</strong>: <strong>13</strong> <strong>Steps</strong><br />
*Warning* - Wood burning <strong>to</strong>ols and heat knives can heat up <strong>to</strong> temperatures that exceed<br />
1000°F. Please use extreme caution when performing this step.<br />
1) Now that your design has been transferred <strong>to</strong> the record, begin <strong>to</strong> slowly cut out your<br />
http://www.instructables.com/id/<strong>How</strong>-<strong>to</strong>-<strong>Make</strong>-a-Cus<strong>to</strong>m-<strong>Vinyl</strong>-<strong>Record</strong>-<strong>Clock</strong>/[16/02/2018 19:35:58]
<strong>How</strong> <strong>to</strong> <strong>Make</strong> a Cus<strong>to</strong>m <strong>Vinyl</strong> <strong>Record</strong> <strong>Clock</strong>: <strong>13</strong> <strong>Steps</strong><br />
pattern with the wood burning <strong>to</strong>ol.<br />
*Tips - <strong>Make</strong> sure <strong>to</strong> place something beneath the record <strong>to</strong> prevent the knife from<br />
damaging your work<strong>to</strong>p. If you are using one of the alternative methods discussed in the<br />
"Tools" section, it is best <strong>to</strong> alternate moderate heating of the record/knife with cutting and<br />
cooling <strong>to</strong> prevent the vinyl from warping.<br />
<br />
Add Tip<br />
V<br />
Ask Question<br />
| Comment Download<br />
Step 8: Remove the Rough Edges<br />
*Caution* - If your design involves intricate details and cuts, it may be necessary <strong>to</strong> get<br />
your fingers near the knife blade when removing rough edges. Be sure <strong>to</strong> take caution<br />
when doing this and remember <strong>to</strong> always cut AWAY from your body.<br />
1) Remove any burrs or rough edges left from the previous step by carefully cutting them<br />
off with the X-ac<strong>to</strong> Knife.<br />
*Tips - Working the blade in a sawing motion can help <strong>to</strong> remove stubborn burrs without<br />
http://www.instructables.com/id/<strong>How</strong>-<strong>to</strong>-<strong>Make</strong>-a-Cus<strong>to</strong>m-<strong>Vinyl</strong>-<strong>Record</strong>-<strong>Clock</strong>/[16/02/2018 19:35:58]
<strong>How</strong> <strong>to</strong> <strong>Make</strong> a Cus<strong>to</strong>m <strong>Vinyl</strong> <strong>Record</strong> <strong>Clock</strong>: <strong>13</strong> <strong>Steps</strong><br />
applying <strong>to</strong>o much pressure <strong>to</strong> the knife. This will reduce your chances of slipping and<br />
accidentally injuring yourself. If your design does not involve <strong>to</strong>o many tight corners or<br />
cuts, it may be possible <strong>to</strong> use sandpaper <strong>to</strong> complete this step.<br />
<br />
Add Tip<br />
V<br />
Ask Question<br />
| Comment Download<br />
Step 9: Assemble the <strong>Clock</strong><br />
1) Using the superglue, glue the cut record <strong>to</strong> the painted record<br />
*Tips - Lay the cut record face down on your work surface and apply the glue <strong>to</strong> the<br />
backside. This will help you <strong>to</strong> avoid placing glue on cu<strong>to</strong>ut portions, while also making it<br />
easier <strong>to</strong> align the two records. If using a hot glue gun for this step, avoid contacting the<br />
vinyl with the metal tip of the gun.<br />
<br />
Add Tip<br />
V<br />
Ask Question<br />
| Comment Download<br />
http://www.instructables.com/id/<strong>How</strong>-<strong>to</strong>-<strong>Make</strong>-a-Cus<strong>to</strong>m-<strong>Vinyl</strong>-<strong>Record</strong>-<strong>Clock</strong>/[16/02/2018 19:35:58]
<strong>How</strong> <strong>to</strong> <strong>Make</strong> a Cus<strong>to</strong>m <strong>Vinyl</strong> <strong>Record</strong> <strong>Clock</strong>: <strong>13</strong> <strong>Steps</strong><br />
Step 10: Assemble the <strong>Clock</strong> (continued)<br />
http://www.instructables.com/id/<strong>How</strong>-<strong>to</strong>-<strong>Make</strong>-a-Cus<strong>to</strong>m-<strong>Vinyl</strong>-<strong>Record</strong>-<strong>Clock</strong>/[16/02/2018 19:35:58]
<strong>How</strong> <strong>to</strong> <strong>Make</strong> a Cus<strong>to</strong>m <strong>Vinyl</strong> <strong>Record</strong> <strong>Clock</strong>: <strong>13</strong> <strong>Steps</strong><br />
2) Attach the clock mechanism (removed in Step 4) <strong>to</strong> the backside of your record by<br />
placing a few drops of superglue on the gearbox and pressing it against the record.<br />
*Tips - Be sure <strong>to</strong> orient the <strong>to</strong>p of the clock mechanism with the <strong>to</strong>p of your clock's<br />
design.<br />
<br />
Add Tip<br />
V<br />
Ask Question<br />
| Comment Download<br />
Step 11: Assemble the <strong>Clock</strong> (continued)<br />
*Optional Step<br />
3) If you so desire, attach any numbers, markings, or decorations <strong>to</strong> the face of your clock.<br />
*Tips - This is a great opportunity <strong>to</strong> recycle those screws from Step 3!<br />
<br />
Add Tip<br />
V<br />
Ask Question<br />
| Comment Download<br />
http://www.instructables.com/id/<strong>How</strong>-<strong>to</strong>-<strong>Make</strong>-a-Cus<strong>to</strong>m-<strong>Vinyl</strong>-<strong>Record</strong>-<strong>Clock</strong>/[16/02/2018 19:35:58]
<strong>How</strong> <strong>to</strong> <strong>Make</strong> a Cus<strong>to</strong>m <strong>Vinyl</strong> <strong>Record</strong> <strong>Clock</strong>: <strong>13</strong> <strong>Steps</strong><br />
Step 12: Assemble the <strong>Clock</strong> (continued)<br />
4) Reattach the clock hands <strong>to</strong> the mechanism by popping them in<strong>to</strong> place<br />
*Tips - The clock hands might not fit the first time due <strong>to</strong> excess paint on the mounting<br />
ring. To solve this, simply scrape it off using the X-ac<strong>to</strong> knife.<br />
<br />
Add Tip<br />
V<br />
Ask Question<br />
| Comment Download<br />
Step <strong>13</strong>: Brag!<br />
http://www.instructables.com/id/<strong>How</strong>-<strong>to</strong>-<strong>Make</strong>-a-Cus<strong>to</strong>m-<strong>Vinyl</strong>-<strong>Record</strong>-<strong>Clock</strong>/[16/02/2018 19:35:58]
<strong>How</strong> <strong>to</strong> <strong>Make</strong> a Cus<strong>to</strong>m <strong>Vinyl</strong> <strong>Record</strong> <strong>Clock</strong>: <strong>13</strong> <strong>Steps</strong><br />
*Warning* - Extreme jealousy may ensue from your friends with less awesome time<br />
keeping devices. Proceed at your own risk.<br />
1) If you have followed the instructions properly, at this point you should have an<br />
awesome wall clock much like the one seen above. If you instead have mangled pile of<br />
vinyl and clock scraps, try again! Browse the "*Tips" icon on each step <strong>to</strong> see if there is a<br />
step or two you overlooked. This is a fun home project and not everybody will master it on<br />
their first go.<br />
<br />
Add Tip<br />
V<br />
Ask Question<br />
| Comment Download<br />
http://www.instructables.com/id/<strong>How</strong>-<strong>to</strong>-<strong>Make</strong>-a-Cus<strong>to</strong>m-<strong>Vinyl</strong>-<strong>Record</strong>-<strong>Clock</strong>/[16/02/2018 19:35:58]
<strong>How</strong> <strong>to</strong> <strong>Make</strong> a Cus<strong>to</strong>m <strong>Vinyl</strong> <strong>Record</strong> <strong>Clock</strong>: <strong>13</strong> <strong>Steps</strong><br />
advertisement<br />
advertisement<br />
Share<br />
Did you make this project?<br />
Share it with us!<br />
I Made It!<br />
Recommendations<br />
http://www.instructables.com/id/<strong>How</strong>-<strong>to</strong>-<strong>Make</strong>-a-Cus<strong>to</strong>m-<strong>Vinyl</strong>-<strong>Record</strong>-<strong>Clock</strong>/[16/02/2018 19:35:58]
<strong>How</strong> <strong>to</strong> <strong>Make</strong> a Cus<strong>to</strong>m <strong>Vinyl</strong> <strong>Record</strong> <strong>Clock</strong>: <strong>13</strong> <strong>Steps</strong><br />
<strong>Make</strong> a Jacket Warmer Using an Old Sweater<br />
by hudasx inhome<br />
http://www.instructables.com/id/<strong>How</strong>-<strong>to</strong>-<strong>Make</strong>-a-Cus<strong>to</strong>m-<strong>Vinyl</strong>-<strong>Record</strong>-<strong>Clock</strong>/[16/02/2018 19:35:58]
<strong>How</strong> <strong>to</strong> <strong>Make</strong> a Cus<strong>to</strong>m <strong>Vinyl</strong> <strong>Record</strong> <strong>Clock</strong>: <strong>13</strong> <strong>Steps</strong><br />
Autumn Wind Blow Wire Tree<br />
by Awesome Crafts indecorating<br />
http://www.instructables.com/id/<strong>How</strong>-<strong>to</strong>-<strong>Make</strong>-a-Cus<strong>to</strong>m-<strong>Vinyl</strong>-<strong>Record</strong>-<strong>Clock</strong>/[16/02/2018 19:35:58]
<strong>How</strong> <strong>to</strong> <strong>Make</strong> a Cus<strong>to</strong>m <strong>Vinyl</strong> <strong>Record</strong> <strong>Clock</strong>: <strong>13</strong> <strong>Steps</strong><br />
Starting a Handmade Business<br />
3,523 Enrolled<br />
http://www.instructables.com/id/<strong>How</strong>-<strong>to</strong>-<strong>Make</strong>-a-Cus<strong>to</strong>m-<strong>Vinyl</strong>-<strong>Record</strong>-<strong>Clock</strong>/[16/02/2018 19:35:58]
<strong>How</strong> <strong>to</strong> <strong>Make</strong> a Cus<strong>to</strong>m <strong>Vinyl</strong> <strong>Record</strong> <strong>Clock</strong>: <strong>13</strong> <strong>Steps</strong><br />
<br />
Add Tip<br />
V<br />
Ask Question<br />
|<br />
Post Comment<br />
We have a be nice policy.<br />
Please be positive and constructive.<br />
Add Images<br />
Post<br />
6 Comments<br />
andyny22 4 months ago<br />
Reply<br />
Isn't it super dangerous <strong>to</strong> burn <strong>Vinyl</strong> (PVC)? it releases chlorine gas. I wouldn't recommend doing<br />
this.<br />
mattcin<strong>to</strong>sh 1 year ago<br />
Reply<br />
http://www.instructables.com/id/<strong>How</strong>-<strong>to</strong>-<strong>Make</strong>-a-Cus<strong>to</strong>m-<strong>Vinyl</strong>-<strong>Record</strong>-<strong>Clock</strong>/[16/02/2018 19:35:58]
<strong>How</strong> <strong>to</strong> <strong>Make</strong> a Cus<strong>to</strong>m <strong>Vinyl</strong> <strong>Record</strong> <strong>Clock</strong>: <strong>13</strong> <strong>Steps</strong><br />
I was at a garage sale and found this. I don't have a pic of the front, but from the back you can see<br />
they somehow heated the record, pressed it in a mold and then added a clock mechanism <strong>to</strong> it<br />
<strong>to</strong>m12385 1 year agoin reply <strong>to</strong> mattcin<strong>to</strong>sh<br />
Reply<br />
heckin cool, i wonder how they did that<br />
clh 9 months agoin reply <strong>to</strong> <strong>to</strong>m12385<br />
Reply<br />
I've seen a number of playful "bowls" made by putting LPs in the oven <strong>to</strong> heat them and<br />
molding by hand or over objects.<br />
Elizajc83 3 years ago<br />
Reply<br />
Your clock looks fantastic!<br />
My friend and I are attempting <strong>to</strong> use your method of cutting with a woodburning pen. It's going ok,<br />
but I wonder what kind of tip you used?<br />
Ours is a standard tip but has the option for smaller tips, which we thought would work better. Any<br />
suggestions on that?<br />
Also, we wondered if you were still living or if you've quite possibly died from the the "black lung"? ;)<br />
X<br />
8<br />
|<br />
Muhaiminah Faiz 4 years ago<br />
Reply<br />
This looks amazing! great work.<br />
Post Comment<br />
http://www.instructables.com/id/<strong>How</strong>-<strong>to</strong>-<strong>Make</strong>-a-Cus<strong>to</strong>m-<strong>Vinyl</strong>-<strong>Record</strong>-<strong>Clock</strong>/[16/02/2018 19:35:58]
<strong>How</strong> <strong>to</strong> <strong>Make</strong> a Cus<strong>to</strong>m <strong>Vinyl</strong> <strong>Record</strong> <strong>Clock</strong>: <strong>13</strong> <strong>Steps</strong><br />
advertisement<br />
robot<br />
Newsletter<br />
About Us<br />
Find Us<br />
Resources<br />
Let your inbox help you discover our best<br />
projects, classes, and contests. Instructables<br />
will help you learn how <strong>to</strong> make anything!<br />
I'm in!<br />
Who We Are<br />
Advertise<br />
Contact<br />
Jobs<br />
Help<br />
Facebook<br />
Youtube<br />
Twitter<br />
Pinterest<br />
Google+<br />
For Teachers<br />
Residency Program<br />
Gift Premium Account<br />
Forums<br />
Answers<br />
http://www.instructables.com/id/<strong>How</strong>-<strong>to</strong>-<strong>Make</strong>-a-Cus<strong>to</strong>m-<strong>Vinyl</strong>-<strong>Record</strong>-<strong>Clock</strong>/[16/02/2018 19:35:58]
<strong>How</strong> <strong>to</strong> <strong>Make</strong> a Cus<strong>to</strong>m <strong>Vinyl</strong> <strong>Record</strong> <strong>Clock</strong>: <strong>13</strong> <strong>Steps</strong><br />
Sitemap<br />
© 2017 Au<strong>to</strong>desk, Inc.<br />
Terms of Service | Privacy Statement | Legal Notices & Trademarks | Mobile Site<br />
http://www.instructables.com/id/<strong>How</strong>-<strong>to</strong>-<strong>Make</strong>-a-Cus<strong>to</strong>m-<strong>Vinyl</strong>-<strong>Record</strong>-<strong>Clock</strong>/[16/02/2018 19:35:58]