
Create successful ePaper yourself
Turn your PDF publications into a flip-book with our unique Google optimized e-Paper software.
ADD TRANSITIONS<br />
Transitions are used to create a smooth passage from one clip to another. Use transitions<br />
to add emphasis, change scenes, make a point, etc.<br />
The ‘T’ track in the video section of the Construction Window is used to place the<br />
transitions between the clips on tracks ‘A’ and ‘B’.<br />
To add a transition:<br />
1) See Figure 8. Clip ‘One’ on the ‘A’ track should be overlapping clip ‘Two’ on the ‘B’<br />
track by about one second. Position your clips to look about the same.<br />
2) In the Transitions window, scroll down to the transition called “Center Split”, click<br />
and drag it to the ‘T’ track.<br />
3) Adjust the transition to span the overlap (move it back and forth slowly until it adjusts<br />
to fit the overlap).<br />
4) Click and drag three additional transitions to the ‘T’ track and adjust to fit. (Match<br />
the layout in Figure 8.)<br />
NOTE: After completing this section, remember to save your project.<br />
MAKE AN OPENING TITLE<br />
Use the Adobe Premiere Title editor feature to overlay text (i.e. key) on your video clips.<br />
1) From the menu bar, select File, then New, then Title.<br />
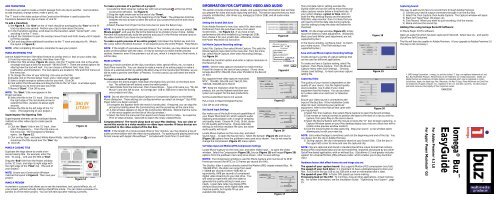
2) When the Title window (Figure 11) opens, click the ‘T’ button and click in the white<br />
rectangle and type a title (for example ”SKI IN UTAH!”). There are several options for<br />
altering how the text will look. You can choose a different Font, Style, Size,<br />
Justification and Orientation. The text options are located in Title and Font menus on<br />
the menu bar.<br />
3) To change the color of your lettering: click once on the title.<br />
4) Double click on the box below ‘tools’ and a ‘color picker’ will open.<br />
5) Select a bright orange or yellow color for your text. Click OK.<br />
6) Click within the title window and drag the title to the ‘S1’ track. A window opens<br />
prompting you to name and save your title.<br />
7) Name it ‘Start’. Click OK to save.<br />
NOTE: The ‘Start ‘ title now appears in the<br />
Project window.<br />
8) Select the title in the ‘S1’ track. Click and drag<br />
the right edge of the red double-arrow to<br />
extend the title’s duration to about eight<br />
seconds.<br />
9) Move the title to the left edge of the ‘S1’<br />
track . (The beginning of your project.)<br />
Superimpose The Opening Title<br />
Superimposed elements can be overlayed (keyed,<br />
matted) on other video clips to create special<br />
effects.<br />
1) Click the ‘Start ‘ title in the ‘S1’ track , then<br />
Figure 11<br />
select Transparency.... from the Clip menu on<br />
the menu bar. The Transparency Window<br />
opens. See Figure 12.<br />
2) Click on Key Type: and select White Alpha Matte. Select the Peel icon 16 and you<br />
should see the title keyed over the ‘One’ clip.<br />
3) Click OK.<br />
MAKE A CLOSING TITLE<br />
Duplicate the steps above to create a tensecond<br />
closing title. For example, enter the<br />
text: ’So Long...’ and save the title as ‘End’.<br />
Drag the ‘End’ title from the Project window<br />
to the ‘S1’ track, and align its right edge with<br />
the right edge of the ‘Final’ clip. (The end of<br />
16<br />
your project.)<br />
NOTE: Ensure your Construction Window<br />
matches the layout in Figure 8. Then save your<br />
project.<br />
Figure 12<br />
MAKE A PREVIEW<br />
A preview is a process that allows you to see the transitions, text, special effects, etc. of<br />
your project, without actually making a QuickTime movie. You can make a preview of a<br />
portion or of the entire project. You can still edit clips after making a preview.<br />
To make a preview of a portion of a project:<br />
1) Locate the Work Area bar (yellow bar with red arrowheads)15 at the top of the<br />
Construction Window. See Figure 8.<br />
2) Drag the right arrow over to the end of clip ‘Three’.<br />
3) Drag the left arrow over to the beginning of clip ‘Two’. The yellow bar stretches<br />
between the two arrows to select the area of your project that will be built into a<br />
preview.<br />
4) Select Preview from Project on the menu bar (or press the Return key).<br />
NOTE: You may be prompted to save your project, if so, name and save your project ‘Ski<br />
Movie.project’, and save the file to the Desktop or to a folder of your choice. Adobe<br />
Premiere will automatically build the preview and play it in the Preview window (and on<br />
the video monitor if you have one connected).<br />
To make a quick preview of an entire project, hold down the Option key and click<br />
the cursor within the Work Area bar. It will expand across the entire Project. Press Return.<br />
NOTE: If the length of a preview exceeds three or four minutes, you may observe a loss of<br />
audio synchronization with the video. It may be necessary to make shorter preview<br />
sections. However, even if the preview is out of sync, when it is made into a final movie, it<br />
will be okay.<br />
MAKE A MOVIE<br />
Making a movie combines all the clips, transitions, titles, special effects, etc., to make a<br />
QuickTime movie file. You can choose to make a movie of an entire project or make a<br />
movie of a selected portion by setting the Work Area in the Construction Window, as you<br />
did to make a preview (see Make a Preview). For this tutorial, you will select the entire<br />
project.<br />
To make a movie of the entire project:<br />
1) To select the entire project, hold down the Option key and click on the Work Area<br />
bar. The yellow bar will extend across the entire project.<br />
2) Select Make from the menu bar, then choose Movie... Type a file name (e.g. “My Ski<br />
Movie”) and click OK to save. An <strong>Iomega</strong> Jaz <strong>®</strong> 1GB or 2GB drive is ideal for storing<br />
your projects and clips.<br />
NOTE: Do not alter the movie Output Options or Compression Options on the Make<br />
Movie dialog box. These settings are configured when you select an <strong>Iomega</strong> <strong>Buz</strong> NTSC<br />
Preset when you begin a project.<br />
3) A progress bar appears while the movie is constructed. If required, you can stop the<br />
process by holding down the Command key and the period key at the same time.<br />
4) A Clip window appears on top of the Construction Window. (Notice that the name<br />
of the movie appears on the title of this clip window.)<br />
5) Select File from the menu bar then Export and choose Print to Video... to reveal the<br />
Print to Video window. Select OK to watch the newly created Movie.<br />
Congratulations! The movie plays back on your Mac desktop. You can view or<br />
record the movie to a video monitor or video tape recorder if these devices are<br />
connected to the video output of the <strong>Buz</strong> Box.<br />
NOTE: If the length of a movie exceeds three or four minutes, you may observe a loss of<br />
audio synchronization with the video during playback. Try opening and playing back long<br />
format movies with Apple’s MoviePlayer (included with QuickTime 2.5 and later).<br />
INFORMATION FOR CAPTURING VIDEO AND AUDIO<br />
This section includes important tips, details, and supplemental information that will help<br />
you prepare for video and audio capturing with <strong>Buz</strong>. This section assumes that you have<br />
properly installed <strong>Buz</strong>, disk drives (e.g. <strong>Iomega</strong> Jaz 1GB or 2GB), and all audio-video<br />
peripherals.<br />
Setting the Scratch Disk Area<br />
From Adobe Premiere’s menu bar, select File, then select<br />
Preferences from the pull-down menu, then select<br />
Scratch Disks... See Figure 13. If you have a highperformance<br />
disk drive installed (e.g. <strong>Iomega</strong> Jaz 2GB),<br />
then choose it for your scratch disk - otherwise, choose<br />
the Power Macintosh G3 hard drive.<br />
Set Movie Capture Recording settings:<br />
Select File, Capture, then select Movie Capture. This adds the<br />
Movie Capture menu item to the menu bar. From the menu<br />
bar, select Movie Capture, then select Recording Settings...<br />
See Figure 14 .<br />
Disable the Constrain option and enter a capture resolution in<br />
the Record at: box.<br />
NOTE: Set the video capture resolution to match the <strong>Buz</strong><br />
Preset file chosen at the start of your project. (If you chose<br />
<strong>Iomega</strong> <strong>Buz</strong> NTSC 352x240, then enter 352x240 in the Record<br />
at: box.)<br />
<strong>Buz</strong> supports these video capture resolutions:<br />
NTSC: 720x480, 352x240 and 176x120, PAL:<br />
720x526, 352x288 and 176x144<br />
TIP: Keep the resolution small for practice<br />
projects, but use the highest resolution your<br />
system can support for the best productions.<br />
Set the Audio Block Size to 1/2 second.<br />
Put a check in Report Dropped Frames.<br />
Click OK to save settings.<br />
Figure13<br />
Figure14<br />
Figure15<br />
Set Sound Input Settings<br />
<strong>Buz</strong> makes use of the built-in sound capabilities of<br />
your Power Macintosh G3, which supports audio<br />
digitizing and playback over a range of sampling<br />
and quality levels. Choose 44.1 kHz, 16-bit, stereo<br />
for CD-quality performance. Choose alternate<br />
settings to minimize resultant file sizes, but lower<br />
audio quality will result.<br />
Figure 16<br />
Locate Movie Capture on the menu bar, and select<br />
Sound Input… to open the Sound menu. Select the Sample (Figure 15) and Source<br />
(Figure 16) options from the pulldown menu and set as shown. You do not need to<br />
change the Compression (Figure 17) menu option.<br />
Set Video Input and Motion-JPEG Compression Settings<br />
Locate Movie Capture on the menu bar, and select Video Input… to open the Video<br />
window. Select the Compression (Figure 18), Source (Figure 19) and Image (Figure 20)<br />
options from the pulldown menu and set as shown. Click to save settings.<br />
NOTES: The Compression window is used for Movie Capture and must be set to 29.97<br />
frames per second (for NTSC) or 25 frames per second (for PAL).<br />
The Quality: slider is used to directly control the Motion-JPEG chipset onboard <strong>Buz</strong>. At<br />
720x480 NTSC), the slider can range from Least<br />
(~500KB per second) fo Best (~6000 KB, or<br />
equivalently, 6MB per second) of compressed<br />
digital video streaming to your disk drive. You<br />
will need to experiment with the slider to<br />
generate the quality setting to meet your<br />
needs. Lower data rates may display JPEG<br />
artifacts (blockiness), while higher data rates<br />
improve quality, but rapidly fill up your<br />
available disk storage.<br />
Figure 17<br />
The Limit data rate to: setting overides the<br />
Quality slider and can be used to ensure that your<br />
video captures remain below a threshold rate. If<br />
your system displays a green or blue color on<br />
both the Mac desktop display and the attached<br />
NTSC/PAL video monitor, then it is likely that you<br />
will need to limit the data rate during captures.<br />
Use this setting to keep the data rate below the<br />
threshold.<br />
NOTE: On the Image window (Figure 20), simply<br />
move the sliders to make adjustments. (Sharpness,<br />
Black Level and White Level adjustments are not<br />
supported by <strong>Buz</strong>.)<br />
In the Source window, configure Input: to match<br />
your video source. (The Filter setting is not<br />
supported by <strong>Buz</strong>.)<br />
Save and Load Movie Capture Recording Settings<br />
Create and save a variety of capture settings that<br />
can be used for different applications.<br />
To create and save a Capture setting, select File,<br />
Capture , then Movie Capture. From the Movie<br />
Capture menu select Save Settings... Similarly,<br />
choose Load Settings... to load a previous capture<br />
setting file.<br />
Figure 18<br />
Figure 19<br />
Capturing Video<br />
The quality of your movies is dependent on the<br />
quality of your source. Use the highest quality<br />
source possible. Use S-video if your video<br />
equipment has this feature. You can purchase<br />
an S-video cable at an electronic or television<br />
dealer.<br />
Ensure your video source is connected to the<br />
input of the <strong>Buz</strong> Box. If the Installation G<strong>uide</strong><br />
does not cover connecting your particular<br />
equipment, refer to the manual that came with<br />
Figure 20<br />
your equipment.<br />
1) Select File, then Capture, then select Movie Capture to open the Record window.<br />
2) Use remote or manual controls to position the tape to the start of a clip you wish to<br />
capture, then press Play on the source device.<br />
3) Select the Record button with the mouse (or press the “G” key) to begin capturing. A<br />
Capture Window opens on your Mac desktop display (you may see a black box with a<br />
smaller video preview window inside it).<br />
4) Click the mouse button to stop capturing. Stop your source. A clip window opens<br />
allowing you to edit your new clip.<br />
NOTE: Extra video footage is sometimes useful at the beginning and end of the clip. You<br />
can always trim the clip in Adobe Premiere.<br />
5) During capture, the clip is temporarily saved on your Scratch Disk. Click the box in<br />
the upper left corner to name and save the captured clip.<br />
NOTE: Clips are captured and stored in standard QuickTime movie format that contains<br />
Motion-JPEG compressed data and can be transferred, imported and played by any other<br />
QuickTime-based application, with or without <strong>Buz</strong>. (Quicktime v2.5 and greater includes<br />
support for universal Motion-JPEG software codec, which enables you to play back <strong>Buz</strong><br />
clips.)<br />
Hardware factors that affect frame rate and image size are:<br />
The speed of your capture board: <strong>Buz</strong> supports Motion JPEG compression (very fast).<br />
The speed of your hard drive: It is important to have a dedicated space to store your<br />
files. A SCSI drive like Jaz 1GB or Jaz 2GB with a new or reformatted disk is ideal.<br />
The speed of your CPU: A faster CPU speeds up movie-making.<br />
Processing load on the CPU: To minimize, close all other applications, virtual memory,<br />
etc. For further information, see the Installation G<strong>uide</strong>: “Optimizing Your System”, page<br />
15.<br />
Capturing Sound:<br />
One way to add sound clips is to record them through Adobe Premiere.<br />
1) Connect your device output connectors through In on the <strong>Buz</strong> Box.<br />
2) Select File, then Capture, then Audio Capture. The Capture window will open.<br />
3) Start your Tape Player, CD player, etc.<br />
4) Click Record. When you want to quit recording, click the mouse.<br />
5) Name and save the sound clip.<br />
Adding Files using <strong>Iomega</strong> RecordIt Software:<br />
In Movie Player 3.0 Pro software:<br />
Open an audio file which has been captured in RecordIt. Select Save As... and specify<br />
QuickTime Self Contained.<br />
The file will then be useable in Adobe Premiere. (If you upgrade to Adobe Premiere 5.0<br />
this step is not neccessary.)<br />
© 1998 <strong>Iomega</strong> Corporation. <strong>Iomega</strong>, Jaz and the stylized “i” logo, are registered trademarks of, and<br />
<strong>Buz</strong>, <strong>Buz</strong> Multimedia Producer, RecordIt and Jet are trademarks of, <strong>Iomega</strong> Corporation. Adobe and<br />
Adobe Premiere are trademarks of Adobe Systems Incorporated which may be registered in certain<br />
jurisdictions. Apple, the Apple logo, Mac, Macintosh, the Mac OS logo, Power Macintosh and QuickTime<br />
are trademarks of Apple Computer, Inc., registered in the U.S. and other countries. All other product<br />
and brand names are the property of their respective owners.<br />
EN603500<br />
For Apple <strong>®</strong> Power Macintosh <strong>®</strong> G3<br />
For Adobe Premiere <strong>®</strong> 4.2 LE<br />
<strong>EasyG</strong><strong>uide</strong><br />
<strong>Iomega</strong> <strong>®</strong> <strong>Buz</strong>