Muscles: working from the zero point - Simon Fischer
Muscles: working from the zero point - Simon Fischer
Muscles: working from the zero point - Simon Fischer

You also want an ePaper? Increase the reach of your titles
YUMPU automatically turns print PDFs into web optimized ePapers that Google loves.
<strong>Muscles</strong>: <strong>working</strong> <strong>from</strong> <strong>the</strong> <strong>zero</strong> <strong>point</strong><br />
1 H.G.Q. Rowett:<br />
Basic Anatomy and<br />
Physiology (London,<br />
1973), 32.<br />
2 Continual<br />
contraction without<br />
release is experienced<br />
as ‘tension’. When we<br />
say of somebody that<br />
<strong>the</strong>y are tense, or say<br />
‘I feel a bit tense<br />
today,’ it would be<br />
more accurate to say<br />
that he or she is<br />
‘contracted’, or ‘I feel<br />
a bit contracted<br />
today.’<br />
188<br />
<strong>Muscles</strong>: <strong>working</strong> <strong>from</strong> <strong>the</strong> <strong>zero</strong> <strong>point</strong><br />
The following description of how muscles work uses no more than <strong>the</strong> simplest terms possible. These<br />
few images are all that are necessary for <strong>the</strong> purposes of playing <strong>the</strong> violin.<br />
<strong>Muscles</strong> can only contract<br />
An essential thing to know about muscles is that <strong>the</strong>y can only contract. They cannot leng<strong>the</strong>n by<br />
<strong>the</strong>mselves. They can pull but can never push.<br />
Muscle tissue consists of cells which are capable of contraction…Each skeletal muscle fibre …acts in an “all or nothing”<br />
manner, and <strong>the</strong> degree of contraction of <strong>the</strong> whole muscle is proportional to <strong>the</strong> number of fibres acting. Normally a few<br />
fibres are stimulated, maintaining tone even when <strong>the</strong> muscle is at rest. When many fibres are stimulated toge<strong>the</strong>r, <strong>the</strong>y<br />
produce shortening of <strong>the</strong> whole muscle or tension between <strong>the</strong> two ends…If <strong>the</strong> stimulus is prolonged or too frequently<br />
repeated <strong>the</strong> muscle may become fatigued. 1<br />
The contraction of <strong>the</strong> muscles is one of <strong>the</strong> reasons why all of our attention needs to be on constant<br />
‘leng<strong>the</strong>ning and widening’, and on avoiding ‘pulling down’ and ‘pulling in’. 2<br />
There are always at least two sets of opposing muscles that move a joint or limb one way or <strong>the</strong> o<strong>the</strong>r.<br />
For example, to close your arm at <strong>the</strong> elbow <strong>the</strong> muscles on <strong>the</strong> inside of <strong>the</strong> arm contract, causing <strong>the</strong><br />
forearm to move towards <strong>the</strong> upper arm. While <strong>the</strong>se muscles contract, <strong>the</strong> muscles on <strong>the</strong> outside of<br />
<strong>the</strong> arm are stretched, but cannot <strong>the</strong>mselves push out.<br />
The muscles that contract are active; <strong>the</strong> opposing set of muscles are passive. To move <strong>the</strong> hand away<br />
<strong>from</strong> <strong>the</strong> shoulder again, <strong>the</strong> opposite occurs: <strong>the</strong> muscles on <strong>the</strong> outside of <strong>the</strong> arm contract while<br />
those on <strong>the</strong> inside are passive. Sometimes we use activity on both sides in opposition to each o<strong>the</strong>r, in<br />
order to fine-tune a movement.<br />
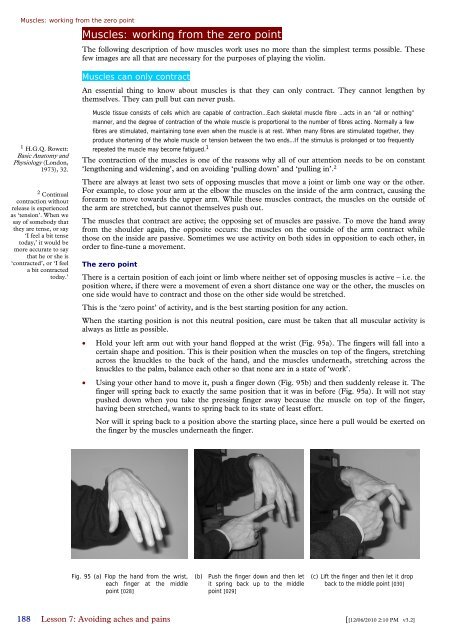
The <strong>zero</strong> <strong>point</strong><br />
There is a certain position of each joint or limb where nei<strong>the</strong>r set of opposing muscles is active – i.e. <strong>the</strong><br />
position where, if <strong>the</strong>re were a movement of even a short distance one way or <strong>the</strong> o<strong>the</strong>r, <strong>the</strong> muscles on<br />
one side would have to contract and those on <strong>the</strong> o<strong>the</strong>r side would be stretched.<br />
This is <strong>the</strong> ‘<strong>zero</strong> <strong>point</strong>’ of activity, and is <strong>the</strong> best starting position for any action.<br />
When <strong>the</strong> starting position is not this neutral position, care must be taken that all muscular activity is<br />
always as little as possible.<br />
• Hold your left arm out with your hand flopped at <strong>the</strong> wrist (Fig. 95a). The fingers will fall into a<br />
certain shape and position. This is <strong>the</strong>ir position when <strong>the</strong> muscles on top of <strong>the</strong> fingers, stretching<br />
across <strong>the</strong> knuckles to <strong>the</strong> back of <strong>the</strong> hand, and <strong>the</strong> muscles underneath, stretching across <strong>the</strong><br />
knuckles to <strong>the</strong> palm, balance each o<strong>the</strong>r so that none are in a state of ‘work’.<br />
• Using your o<strong>the</strong>r hand to move it, push a finger down (Fig. 95b) and <strong>the</strong>n suddenly release it. The<br />
finger will spring back to exactly <strong>the</strong> same position that it was in before (Fig. 95a). It will not stay<br />
pushed down when you take <strong>the</strong> pressing finger away because <strong>the</strong> muscle on top of <strong>the</strong> finger,<br />
having been stretched, wants to spring back to its state of least effort.<br />
Nor will it spring back to a position above <strong>the</strong> starting place, since here a pull would be exerted on<br />
<strong>the</strong> finger by <strong>the</strong> muscles underneath <strong>the</strong> finger.<br />
Fig. 95 (a) Flop <strong>the</strong> hand <strong>from</strong> <strong>the</strong> wrist,<br />
each finger at <strong>the</strong> middle<br />
<strong>point</strong> [028]<br />
(b) Push <strong>the</strong> finger down and <strong>the</strong>n let<br />
it spring back up to <strong>the</strong> middle<br />
<strong>point</strong> [029]<br />
(c) Lift <strong>the</strong> finger and <strong>the</strong>n let it drop<br />
back to <strong>the</strong> middle <strong>point</strong> [030]<br />
Lesson 7: Avoiding aches and pains [[12/06/2010 2:10 PM v3.2]
<strong>Muscles</strong>: <strong>working</strong> <strong>from</strong> <strong>the</strong> <strong>zero</strong> <strong>point</strong><br />
Similarly if you lift a finger (Fig. 95c) using your o<strong>the</strong>r hand to do it, and <strong>the</strong>n suddenly let go, <strong>the</strong><br />
finger will spring back again more to <strong>the</strong> position shown in Fig. 95a. It will not stay up, since <strong>the</strong><br />
muscle underneath <strong>the</strong> finger has been stretched and wants to spring back to its state of least effort.<br />
Nor will it spring back down to a place lower than <strong>the</strong> starting-<strong>point</strong>.<br />
Find <strong>the</strong> same ‘<strong>zero</strong> <strong>point</strong>’ in <strong>the</strong> muscles on ei<strong>the</strong>r side of each lever in <strong>the</strong> arms and hands:<br />
• Starting with <strong>the</strong> right hand flopped <strong>from</strong> <strong>the</strong> wrist (Fig. 96a), with your left hand push your right<br />
hand down; <strong>the</strong>n let it spring back up to <strong>the</strong> starting place.<br />
Pushing down causes <strong>the</strong> muscles on top of <strong>the</strong> hand and arm to be stretched, and <strong>the</strong>y naturally<br />
want to return to a neutral state. The hand will not spring back past <strong>the</strong> starting-<strong>point</strong>.<br />
With your left hand, lift <strong>the</strong> right hand and allow it to fall. It will not fall past <strong>the</strong> starting-<strong>point</strong>.<br />
• Position your right forearm at a right angle to <strong>the</strong> upper arm. Make sure <strong>the</strong> upper arm is nei<strong>the</strong>r<br />
too far forwards, nor too far back.<br />
With your left hand, pull <strong>the</strong> forearm in towards you (Fig. 96b). Then let go and watch how it<br />
swings back out, slightly past <strong>the</strong> starting-<strong>point</strong>; <strong>the</strong>n swings back in, now only slightly past <strong>the</strong><br />
starting-<strong>point</strong>; and finally settles at <strong>the</strong> starting-<strong>point</strong>.<br />
With your left hand, push <strong>the</strong> forearm away <strong>from</strong> you (Fig. 96c), and <strong>the</strong>n let it swing back in<br />
again. Watch how, after swinging back in past <strong>the</strong> starting-<strong>point</strong>, it takes a few seconds to settle<br />
back to <strong>the</strong> starting place.<br />
• Starting again in <strong>the</strong> position shown in Fig. 96b, do exactly <strong>the</strong> same with <strong>the</strong> upper arm: with your<br />
left hand, pull <strong>the</strong> upper arm in towards you and <strong>the</strong>n let go, and push it away <strong>from</strong> you and let go.<br />
The upper arm will perform <strong>the</strong> same little movements, briefly going ei<strong>the</strong>r side of <strong>the</strong> middle <strong>point</strong><br />
before settling, as <strong>the</strong> forearm did.<br />
PHOTO<br />
(a) Description text<br />
Fig 96 (a) Suspend <strong>the</strong> arm with <strong>the</strong> hand<br />
flopped <strong>from</strong> <strong>the</strong> wrist [xxx]<br />
PHOTO<br />
(b) Description text<br />
PHOTO<br />
(c) Description text<br />
(b) Pull <strong>the</strong> forearm in, and <strong>the</strong>n let it spring (c) Push <strong>the</strong> forearm out, and <strong>the</strong>n let it<br />
back out to <strong>the</strong> middle <strong>point</strong> [xxx]<br />
spring back in to <strong>the</strong> middle <strong>point</strong> [xxx]<br />
Ideally, each finger is in this neutral state of inaction when not in use, or before beginning any action;<br />
similarly <strong>the</strong> muscles in <strong>the</strong> bow arm, depending on where you are in <strong>the</strong> bow, often do not need to be<br />
active before beginning a bow stroke.<br />
When muscles remain free or neutral, ra<strong>the</strong>r than in any unnecessary state of contraction, everything<br />
becomes less effortful.<br />
The key to freedom and ease in violin playing is that you constantly have this <strong>point</strong> of balance as <strong>the</strong><br />
starting-<strong>point</strong>, before any movement one way or <strong>the</strong> o<strong>the</strong>r, and return to it afterwards.<br />
Suspending your arm without using any muscles in it<br />
If you want to move a finger, <strong>the</strong> main parts of <strong>the</strong> muscle or tendon involved are in <strong>the</strong> hand.<br />
To move <strong>the</strong> hand, <strong>the</strong> main parts of <strong>the</strong> muscles used are in <strong>the</strong> forearm; to move <strong>the</strong> forearm, <strong>the</strong>y are<br />
in <strong>the</strong> upper arm; to move <strong>the</strong> upper arm, <strong>the</strong> main muscles involved are in <strong>the</strong> shoulders, upper back<br />
and upper chest.<br />
So <strong>the</strong> main part of <strong>the</strong> muscle used to make <strong>the</strong> movement is always in <strong>the</strong> next higher area of <strong>the</strong> arm,<br />
going in <strong>the</strong> direction of <strong>the</strong> shoulder.<br />
[v5.1 12/06/2010 2:10 PM] Lesson 7: Avoiding aches and pains 189
<strong>Muscles</strong>: <strong>working</strong> <strong>from</strong> <strong>the</strong> <strong>zero</strong> <strong>point</strong><br />
1 See Widening at <strong>the</strong><br />
shoulders: releasing<br />
<strong>the</strong> minor pectoral,<br />
page 196; Staying<br />
free in <strong>the</strong> upper arm,<br />
page 277<br />
190<br />
Therefore, you can suspend your arm in <strong>the</strong> air<br />
using those muscles in <strong>the</strong> shoulder, upper back<br />
and upper chest, without a single muscle in <strong>the</strong><br />
arm being active. This gives <strong>the</strong> arm a feeling of<br />
‘floating’ or being suspended in <strong>the</strong> air, ra<strong>the</strong>r than<br />
of being held. It is easy to demonstrate.<br />
Without <strong>the</strong> bow, float your right arm in playing<br />
position (Fig. 97). With your left hand, squeeze<br />
<strong>the</strong> muscles in your right hand, forearm and upper<br />
arm. You should find <strong>the</strong>y are all soft and relaxed.<br />
Make sure you are not clenching <strong>the</strong> minor<br />
pectoral muscle. 1<br />
Once you are holding <strong>the</strong> bow you need to use certain<br />
muscles; but when <strong>the</strong> basic condition of <strong>the</strong> arm is<br />
one of floating ra<strong>the</strong>r than of being held, everything feels lighter and more responsive.<br />
That is <strong>the</strong> starting-<strong>point</strong> <strong>from</strong> which you can go to ‘relaxing <strong>the</strong> weight of <strong>the</strong> arm into <strong>the</strong> string’, and<br />
all <strong>the</strong> o<strong>the</strong>r functions of <strong>the</strong> bow arm, and to which you can return.<br />
Feeling <strong>the</strong> contraction–release in <strong>the</strong> palm of <strong>the</strong> hand<br />
• Find <strong>the</strong> muscles on ei<strong>the</strong>r side of your hand that move <strong>the</strong> third finger (Fig. 98).<br />
• Move <strong>the</strong> finger up and down, as though tapping <strong>the</strong> finger on <strong>the</strong> string. You can feel <strong>the</strong> muscle<br />
in <strong>the</strong> palm of your hand, under your thumb, alternating between contraction and release.<br />
• If <strong>the</strong> muscle <strong>the</strong>re feels permanently contracted as <strong>the</strong> finger moves, it means that you are resisting<br />
a state of release that would produce an entirely new sensation of freedom in your left hand.<br />
Squeezing <strong>the</strong> arm to make <strong>the</strong> fingers move<br />
The muscles that move <strong>the</strong> fingers originate in <strong>the</strong> forearm. If<br />
you press <strong>the</strong>re, between elbow and wrist (which has <strong>the</strong> same<br />
effect as shortening <strong>the</strong> muscle), <strong>the</strong> fingers move on <strong>the</strong>ir own.<br />
• Without <strong>the</strong> violin, hold <strong>the</strong> left arm in playing position.<br />
Make sure your hand and fingers are completely relaxed.<br />
• With your right hand, put fingers one side of <strong>the</strong> forearm<br />
and <strong>the</strong> thumb <strong>the</strong> o<strong>the</strong>r (Fig. 99). Finding <strong>the</strong> muscle,<br />
experiment by pressing in different places until <strong>the</strong> fingers<br />
move downwards at <strong>the</strong> same moment that you press.<br />
If your finger action is not free, perhaps because of your hand<br />
position, you may feel tired or aching in your forearm; but <strong>the</strong><br />
problem will not be in <strong>the</strong> forearm where <strong>the</strong> discomfort is, but<br />
in <strong>the</strong> finger action. It also works <strong>the</strong> o<strong>the</strong>r way round.<br />
Someone’s entire left hand can sometimes be transformed simply<br />
by <strong>the</strong>ir seeing <strong>the</strong> fingers move on <strong>the</strong>ir own, and feeling <strong>the</strong><br />
freedom in <strong>the</strong> fingers, when you squeeze <strong>the</strong>ir forearm muscles.<br />
Fig. 97 Squeeze <strong>the</strong> muscles in your right arm with your<br />
left hand [125]<br />
Fig. 98 (a) Feel how <strong>the</strong> muscle is soft [010] (b) Feel <strong>the</strong> muscle contract [011]<br />
Fig. 99 (a) Squeezing <strong>the</strong> arm to make<br />
<strong>the</strong> fingers move [124]<br />
Lesson 7: Avoiding aches and pains [12/06/2010 2:10 PM v5.1]
Massaging <strong>the</strong> upper forearm<br />
<strong>Muscles</strong>: <strong>working</strong> <strong>from</strong> <strong>the</strong> <strong>zero</strong> <strong>point</strong><br />
Whenever you feel any tension in your hand or fingers – and certainly <strong>the</strong> moment you feel any pain or<br />
discomfort in <strong>the</strong> muscles or tendons in your wrist, hand or fingers – <strong>the</strong> place to work on is probably<br />
<strong>the</strong> area of your forearm just below <strong>the</strong> elbow.<br />
First find <strong>the</strong> muscles: grip that area of <strong>the</strong> arm with your right hand and move <strong>the</strong> fingers of your left<br />
hand as though playing (Fig. 100a). Feel <strong>the</strong> muscles and tendons in <strong>the</strong> forearm moving under your<br />
right hand.<br />
Having found <strong>the</strong>m, massage <strong>the</strong>m with deep strokes along <strong>the</strong> muscle, always moving in <strong>the</strong> direction<br />
of <strong>the</strong> upper arm. Always move along <strong>the</strong> muscle, not directly pressing down in to it.<br />
If <strong>the</strong> muscles feel sore or tender, this may be a reason to go on ra<strong>the</strong>r than to stop. In fact, it is easy to<br />
discover places which are extremely sensitive to <strong>the</strong> touch, but <strong>the</strong>se are <strong>the</strong> places to concentrate on,<br />
not to avoid. A little gentle work – though it has to be as deep as possible – on those muscles instantly<br />
creates greater ease and elasticity in <strong>the</strong> entire left hand.<br />
A little work on a regular basis completely cures a wide range of different aches or pains that typically<br />
appear in a violinist’s left arm and hand. Pain in <strong>the</strong> right wrist can often be cured by massaging <strong>the</strong><br />
right upper forearm in <strong>the</strong> same way.<br />
Simple stretching exercises can be as good as massage or even better. If you regularly do simple, fivesecond<br />
stretches, <strong>the</strong> balance of <strong>the</strong> muscles is maintained and massage is less often needed. 1<br />
Fig. 100 (a) Move <strong>the</strong> left fingers to<br />
find which muscles to<br />
massage<br />
Massaging <strong>the</strong> hand<br />
PHOTO<br />
Pinching muscle on side of hand<br />
while closing fourth finger<br />
(b) The muscle remains soft while<br />
closing <strong>the</strong> finger at <strong>the</strong> middle<br />
joint [xxx]<br />
PHOTO<br />
(b) Description text<br />
(c) Gently massage <strong>the</strong> muscles on<br />
ei<strong>the</strong>r side of <strong>the</strong> knuckle joints<br />
[xxx]<br />
Bring freedom to your left fingers by gently massaging <strong>the</strong> muscles in <strong>the</strong> palm just below <strong>the</strong> beginning<br />
of each finger as in Fig. 98 (previous page).<br />
There are three movements of each finger: moving only at <strong>the</strong> nail joint without moving <strong>the</strong> rest of <strong>the</strong><br />
finger; moving only at <strong>the</strong> middle joint; moving <strong>the</strong> whole finger as a piece <strong>from</strong> <strong>the</strong> base joint. Find <strong>the</strong><br />
muscles with your thumb while moving <strong>the</strong> fingers.<br />
The first, second and third fingers each use <strong>the</strong> same muscle or tendon for all three movements.<br />
The fourth finger is different. To move it at <strong>the</strong> middle joint, <strong>the</strong> muscle used is between <strong>the</strong> third and<br />
fourth fingers, slightly to <strong>the</strong> right of <strong>the</strong> spot shown in Fig. 98; but <strong>the</strong> muscle that moves <strong>the</strong> finger<br />
forward <strong>from</strong> <strong>the</strong> base joint is on <strong>the</strong> side of <strong>the</strong> hand.<br />
Feel this by gently squeezing <strong>the</strong> side muscle between your thumb and fingers while closing <strong>the</strong> fourth<br />
finger at <strong>the</strong> middle joint (Fig. 100b). The muscle on <strong>the</strong> side will remain soft and not contracted. 2<br />
Ano<strong>the</strong>r place to work, to free <strong>the</strong> fingers, is <strong>the</strong> muscles on each side of <strong>the</strong> knuckle joint (Fig. 100c).<br />
Minimum muscular effort<br />
A common image concerning <strong>the</strong> right degree of muscle tone is that <strong>the</strong> correct amount of strength you<br />
need is somewhere in <strong>the</strong> middle between being ‘floppy’ and being tense.<br />
According to this image, complete relaxation (in <strong>the</strong> sense of being floppy and limp) is at one end of <strong>the</strong><br />
spectrum. This is mainly good for only one thing: going to sleep.<br />
Tension is at <strong>the</strong> o<strong>the</strong>r end of <strong>the</strong> spectrum; and somewhere in <strong>the</strong> middle is a balance <strong>point</strong> where<br />
<strong>the</strong>re is enough muscle tone to be able to move around and do things.<br />
1 See Counterexercising<br />
and<br />
stretching,<br />
page 186<br />
2 See also O<strong>the</strong>r<br />
ways to improve <strong>the</strong><br />
fourth finger,<br />
page 181<br />
[v5.1 12/06/2010 2:10 PM] Lesson 7: Avoiding aches and pains 191
<strong>Muscles</strong>: <strong>working</strong> <strong>from</strong> <strong>the</strong> <strong>zero</strong> <strong>point</strong><br />
1 See Placing finger<br />
gently: <strong>the</strong> secret of<br />
a relaxed left hand<br />
page 207<br />
192<br />
However, this image may be misleading in violin playing: a ‘middle <strong>point</strong>’ between <strong>the</strong> two extremes<br />
already means far too much tension or over-use (over-contraction) of <strong>the</strong> muscles. Instead, think of <strong>the</strong><br />
<strong>point</strong>-of-use as being only just past <strong>the</strong> <strong>point</strong> of floppiness:<br />
‘Point-of-use’ means <strong>the</strong> amount of muscle tone required to hold and move <strong>the</strong> bow, to move <strong>the</strong><br />
fingers up and down on <strong>the</strong> violin, stop <strong>the</strong> strings, vibrate, change position, and so on.<br />
Bringing <strong>the</strong> <strong>point</strong>-of-use closer to <strong>the</strong> <strong>point</strong> of floppiness, immediately produces a wonderful sensation<br />
of lightness and ease. An extraordinary new aliveness and alacrity immediately comes into every action.<br />
Experiment on <strong>the</strong> back of your hand<br />
It used to be thought that a good left-hand technique meant that you could hear <strong>the</strong> fingers banging on<br />
<strong>the</strong> fingerboard with a hard impact. Perhaps <strong>the</strong> display of power and energy of doing this, and <strong>the</strong> fact<br />
that some players are able to make a louder thud than o<strong>the</strong>rs, became confused with ability.<br />
Instead, a fast finger action should be <strong>the</strong> norm ra<strong>the</strong>r than a heavy one. There may be notes which<br />
need firmer finger action for greater articulation or rhythm, but apart <strong>from</strong> <strong>the</strong>m <strong>the</strong> only time to drop<br />
<strong>the</strong> finger with energy is when playing ascending slurs – since o<strong>the</strong>rwise <strong>the</strong>re is a moment of ‘fuzz’ if<br />
<strong>the</strong> finger stops <strong>the</strong> string too slowly; 1 but even <strong>the</strong>n <strong>the</strong> fingers should not thud on to <strong>the</strong> string.<br />
Fig. 101 (a) Are your hand and finger completely light, free<br />
and effortless? [050]<br />
The fingers must move quickly to create <strong>the</strong> different string lengths, but always using minimum power<br />
and effort and stopping <strong>the</strong> strings as lightly as possible.<br />
• Finger with your fourth finger on <strong>the</strong> back of your hand as though playing <strong>the</strong> violin (Fig. 101).<br />
Is your hand, and are your fingers, almost ‘floppy’; or are <strong>the</strong>y over-active and perhaps even tense<br />
and inflexible? Are you certain you cannot release even a tiny fraction more?<br />
Make sure that <strong>the</strong> contact of <strong>the</strong> thumb on one side of your hand, and <strong>the</strong> finger on <strong>the</strong> o<strong>the</strong>r, is as<br />
light as a fea<strong>the</strong>r – ‘tickle–light’.<br />
• Finger on <strong>the</strong> back of your hand as a constant reminder of how your left hand should feel most of<br />
<strong>the</strong> time during <strong>the</strong> normal course of playing.<br />
Expecting tension produces it<br />
(b) Make sure <strong>the</strong> thumb is as light as a fea<strong>the</strong>r, never<br />
pressing into <strong>the</strong> hand [051]<br />
• Without <strong>the</strong> violin, hold your left hand in <strong>the</strong> air in playing position. Allow every muscle in <strong>the</strong><br />
hand and fingers to let go so that <strong>the</strong> fingers fall into a natural shape (Fig. 102a).<br />
• Move <strong>the</strong> fingers <strong>from</strong> <strong>the</strong>re into <strong>the</strong> position <strong>the</strong>y may be in to play some wide thirds, fingered<br />
octaves, or tenths (Fig. 102b).<br />
• Wait! Has your hand now become tight? Are you clenching <strong>the</strong> muscles at <strong>the</strong> same time as<br />
widening <strong>the</strong> space between <strong>the</strong> fingers? Has your wrist suddenly tightened?<br />
Do you have a mental picture of this feeling in <strong>the</strong> hand as being an unquestionable part of playing<br />
double stops, an automatic by-product of widening <strong>the</strong> hand in any way?<br />
Lesson 7: Avoiding aches and pains [12/06/2010 2:10 PM v5.1]
<strong>Muscles</strong>: <strong>working</strong> <strong>from</strong> <strong>the</strong> <strong>zero</strong> <strong>point</strong><br />
Key <strong>point</strong>: Spreading <strong>the</strong> fingers is one thing; tightening is ano<strong>the</strong>r. They are two separate factors. After<br />
only a short time of playing double stops with a tight hand, when we first attempt <strong>the</strong>m as beginners,<br />
we form an association between tension and double stops and forever afterwards expect that feeling.<br />
Instead, picture <strong>the</strong> hand remaining soft, flexible and free as you widen it. Then find this feeling of<br />
letting go, releasing and remaining free as you widen <strong>the</strong> fingers.<br />
It is perfectly possible to widen <strong>the</strong> hand a long way and remain soft and free at <strong>the</strong> same time. You just<br />
have to break <strong>the</strong> association with tension, and begin to expect softness and freedom ra<strong>the</strong>r than<br />
contraction and hardness.<br />
Fig. 102 (a) Release every muscle in <strong>the</strong><br />
hand [xxx]<br />
Leng<strong>the</strong>ning and widening<br />
Leng<strong>the</strong>ning <strong>the</strong> back and neck<br />
(b)Widening <strong>the</strong> fingers as though playing a minor third<br />
Since muscles can only contract, undoing bad habits of posture usually involves leng<strong>the</strong>ning <strong>the</strong><br />
muscles, as well as finding <strong>the</strong> middle <strong>point</strong> where a muscle is nei<strong>the</strong>r contracted nor stretched.<br />
Suppose you notice in <strong>the</strong> mirror that your shoulders seem too rounded (Fig. 103a). The top of <strong>the</strong><br />
chest is pulled down; notice <strong>the</strong> chin jutting out and <strong>the</strong> back of <strong>the</strong> head pulled down.<br />
So, using <strong>the</strong> muscles around your shoulder blades, you pull your shoulders back, leaving everything<br />
else as it was before (Fig. 103b). Of course if you were to do this it would cause great strain. The<br />
position in <strong>the</strong> photograph is exaggerated to illustrate <strong>the</strong> <strong>point</strong>; but many people do an imperceptible<br />
amount of pulling back, which creates great tension.<br />
Instead, <strong>the</strong> answer to <strong>the</strong> rounded shoulders is to leng<strong>the</strong>n <strong>the</strong> back (Fig. 103c). The shoulders <strong>the</strong>n<br />
naturally want to ease back into <strong>the</strong>ir correct position. Then, because <strong>the</strong> spine is more upright, <strong>the</strong><br />
head naturally finds a position of balance where it can just sit on top of <strong>the</strong> spine.<br />
Key <strong>point</strong>: If you pull down in <strong>the</strong> upper chest, your head is right to want to go into <strong>the</strong> position shown<br />
in Fig. 103b, since that is actually ‘correct’ for <strong>the</strong> head, given <strong>the</strong> position of <strong>the</strong> back.<br />
If <strong>the</strong> back leng<strong>the</strong>ns, and finds more of an upright position of balance, <strong>the</strong> best position of balance for<br />
<strong>the</strong> head naturally changes too.<br />
(a) Pulling down, rounded<br />
shoulders, head back and down<br />
Fig. 103 (a) Pulling down [xxx]<br />
(b) Same plus pulling back<br />
shoulders<br />
(b) Pulling <strong>the</strong> shoulders back does not<br />
help [xxx]<br />
(c) Description text<br />
(c) The shoulders naturally ease back when<br />
you leng<strong>the</strong>n and widen [xxx]<br />
[v5.1 12/06/2010 2:10 PM] Lesson 7: Avoiding aches and pains 193
Leng<strong>the</strong>ning and widening<br />
194<br />
1 See also<br />
Localising: <strong>the</strong><br />
ultimate key to<br />
mastery,<br />
page 219<br />
Image of <strong>the</strong> ladder<br />
A good image to illustrate <strong>the</strong> ease of keeping your head upright, when it is sitting in a state of balance,<br />
compared with having to hold it in place when it is not, is of supporting a long ladder with your hands.<br />
The ladder is not leaning against anything, but is standing vertically on its end, supported only by <strong>the</strong><br />
ground and your hands.<br />
If <strong>the</strong> ladder is standing upright in a state of balance, it requires only <strong>the</strong> smallest amount of effort <strong>from</strong><br />
you to keep it <strong>the</strong>re. You give it <strong>the</strong> lightest push or pull to correct it, as it moves fractionally <strong>from</strong> side<br />
to side across <strong>the</strong> central balance <strong>point</strong>, but o<strong>the</strong>rwise <strong>the</strong> ladder basically supports itself.<br />
Now imagine that <strong>the</strong> ladder begins to lean much fur<strong>the</strong>r away <strong>from</strong> <strong>the</strong> balance <strong>point</strong>. Now you have<br />
to push or pull with a lot of strength to prevent it <strong>from</strong> falling. The fur<strong>the</strong>r <strong>from</strong> <strong>the</strong> balance <strong>point</strong> <strong>the</strong><br />
ladder leans, <strong>the</strong> greater <strong>the</strong> effort to keep it <strong>from</strong> falling to <strong>the</strong> ground.<br />
Similarly, if your head sits on top of your spine in a state of balance, <strong>the</strong> muscles have little work to do<br />
to keep it <strong>the</strong>re (Fig. 103c).<br />
But if your head is not sitting freely in a state of balance you need to ‘hold it on top of your spine’, and<br />
work <strong>the</strong> muscles in your neck and shoulders very hard to keep your head <strong>the</strong>re. Fig. 103a shows <strong>the</strong><br />
classic position of <strong>the</strong> head, pulling ‘back-and-down’ and sticking <strong>the</strong> chin out.<br />
Not pulling down: leng<strong>the</strong>ning <strong>the</strong> back and raising <strong>the</strong> chest<br />
‘Pulling down’ means contracting <strong>the</strong> muscles in <strong>the</strong> front of <strong>the</strong> body so that <strong>the</strong> upper chest is<br />
lowered in <strong>the</strong> direction of <strong>the</strong> stomach (Fig. 104a).<br />
Pulling down in <strong>the</strong> upper chest is one of <strong>the</strong> occupational hazards of playing <strong>the</strong> violin or viola. If you<br />
work on a building site, an occupational hazard is that something may fall on your head; so wearing a<br />
hard hat is essential. Playing <strong>the</strong> violin, you have to pay constant attention to leng<strong>the</strong>ning <strong>the</strong> back and<br />
raising <strong>the</strong> chest.<br />
Fig 104 (a) Leng<strong>the</strong>ning <strong>the</strong> back and raising <strong>the</strong> chest [xxx] (b) Pulling down[xxx]<br />
The tell-tale sign is a hump or curve at <strong>the</strong> top of <strong>the</strong> back (Fig. 104b). This posture leads to a<br />
catalogue of problems in <strong>the</strong> back and in <strong>the</strong> <strong>working</strong> of <strong>the</strong> arms and hands, and <strong>the</strong>n in <strong>the</strong> fingers.<br />
It is all-too-easy to link bowings and left hand actions (and musical feelings), with a simultaneous<br />
pulling-down, so that <strong>the</strong> scroll always visibly lowers whenever a particular note or phrase is played.<br />
When you cut <strong>the</strong> link between <strong>the</strong>se actions, so that (say) playing a strong accent with <strong>the</strong> bow does<br />
not automatically trigger shortening <strong>the</strong> muscles in <strong>the</strong> front of <strong>the</strong> body, an extraordinary new sense of<br />
economy, freedom, control, focus and stature immediately enters <strong>the</strong> overall playing. 1<br />
Go up to go up; go up to go down<br />
As he watched a violinist playing some large string crossings, and pulling down as she did so, <strong>the</strong><br />
Alexander teacher Walter Carrington observed: ‘You have to go up to go up, and go up to go down!’<br />
Lesson 7: Avoiding aches and pains [12/06/2010 2:10 PM v5.1]
(1) Suppose you play up <strong>from</strong> <strong>the</strong> A string to <strong>the</strong> E string: you’ve got to go up to go up. If you pull<br />
down as you go up, <strong>the</strong> tone may weaken; <strong>the</strong> bow may slide away <strong>from</strong> <strong>the</strong> bridge; your body<br />
contracts and your breathing is constricted, and so on.<br />
Instead, leng<strong>the</strong>n <strong>the</strong> back as you crescendo up <strong>the</strong> arpeggio, with a feeling of raising <strong>the</strong> chest and<br />
becoming taller.<br />
Keep <strong>the</strong> scroll still, or allow it to rise slightly, with a feeling of buoyancy in <strong>the</strong> instrument so that<br />
it floats on a cushion of air without any hint of dropping with gravity.<br />
(2) Suppose you play down <strong>from</strong> <strong>the</strong> A string to <strong>the</strong> G string: you’ve got to go up to go down.<br />
Leng<strong>the</strong>n <strong>the</strong> back, raise <strong>the</strong> chest, keep <strong>the</strong> scroll still or allow it to rise slightly as <strong>the</strong> strings meet<br />
<strong>the</strong> bow-hair, <strong>the</strong> same as when playing ascending.<br />
One way to avoid pulling down is to have a feeling of <strong>the</strong> string or violin coming up to meet <strong>the</strong> bow. 1<br />
Ano<strong>the</strong>r way to avoid pulling down is to link leng<strong>the</strong>ning <strong>the</strong> back, or raising <strong>the</strong> chest, with flattening<br />
<strong>the</strong> violin. Instead of two unrelated subjects, see <strong>the</strong>m as two parts of <strong>the</strong> same thing:<br />
• Use a certain amount of leng<strong>the</strong>ning your back in order to flatten <strong>the</strong> violin<br />
• Flatten <strong>the</strong> violin in order to leng<strong>the</strong>n <strong>the</strong> back. 2<br />
Examples<br />
Widening at <strong>the</strong> base joints of <strong>the</strong> left hand<br />
Sometimes <strong>the</strong> fingers touch each o<strong>the</strong>r during <strong>the</strong> course of playing, sometimes <strong>the</strong>y do not,<br />
depending on <strong>the</strong> shape of <strong>the</strong> hand and <strong>the</strong> note pattern. It makes no difference, but what does matter<br />
is that <strong>the</strong>re is never any sideways squeezing-toge<strong>the</strong>r (Fig. 78, page 159).<br />
I often remember a student who had an awkward-looking left hand action. I made various suggestions<br />
which she seemed unable to pick up. Finally it came out that she had always thought that no finger<br />
should ever touch ano<strong>the</strong>r finger, so she was trying to keep <strong>the</strong>m unnaturally spread apart all <strong>the</strong> time.<br />
Ano<strong>the</strong>r common misconception is that all <strong>the</strong> fingers should <strong>point</strong> in <strong>the</strong> same direction. Maxim<br />
Vengerov and Joshua Bell are two examples of leading players with hands where <strong>the</strong> fingers do remain<br />
more or less parallel most of <strong>the</strong> time; but for many hands <strong>the</strong> fingers should as often form a fan-like<br />
shape.<br />
Widening at <strong>the</strong> base joints encourages this shape, and gives <strong>the</strong> left hand increased range, flexibility<br />
and mobility.<br />
Leng<strong>the</strong>ning and widening<br />
1 See also Image<br />
of <strong>the</strong> cat,<br />
page 29<br />
2 See also The<br />
tilt of <strong>the</strong> violin,<br />
page 60<br />
[v5.1 12/06/2010 2:10 PM] Lesson 7: Avoiding aches and pains 195