


You also want an ePaper? Increase the reach of your titles
YUMPU automatically turns print PDFs into web optimized ePapers that Google loves.
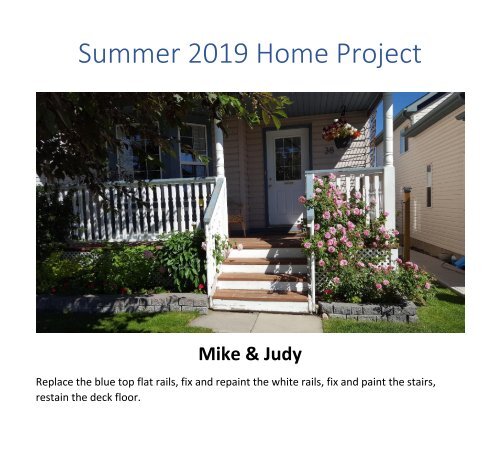
Summer <strong>2019</strong> Home <strong>Project</strong><br />
Mike & Judy<br />
Replace the blue top flat rails, fix and repaint the white rails, fix and paint the stairs,<br />
restain the deck floor.
Painting and Repairing our <strong>Deck</strong>s: <strong>2019</strong><br />
It’s been 10 years since we painted them, which is really quite good, but we decided this<br />
year that we’d have to repaint, starting with the front deck.<br />
FRONT DECK:<br />
Here’s what we decided to do:<br />
1. Replace the top blue rails with composite (mixture of wood and plastic) as it would<br />
not weather, wouldn’t need painting and will be a generally low-maintenance<br />
solution.<br />
2. Some of the wooden upright railings were rotting and would need repair (filling<br />
with wood filler).<br />
3. At the left corner where the rails joined the main post, they were rotting at the join<br />
(and so was the post). The rails would have to be replaced and the post repaired<br />
with wood filler.<br />
4. The front deck plank is weathering badly in places, and cannot be removed<br />
because the posts stand on it. Instead I will fill and repair the cracks with epoxy<br />
filler that should preserve the wood for years to come.<br />
5. The blue paint on the woodwork around the door and windows needs redoing.<br />
6. The deck floor will have to be repainted. We will use stain instead of paint: it looks<br />
the same, but stain adheres to the wood much better than paint.
Getting started:<br />
The top (blue) rail has already<br />
been removed. This is the corner<br />
post where I had previously filled<br />
and patched the hole caused by<br />
wood rot with foam before<br />
smoothing and painting over it.<br />
Now it all has to come out so that<br />
the hole can be filled with solid<br />
wood filler.
View of the left side rail. The white supporting rail on top was badly rotted where it<br />
joined the post, so I had to remove it and cut another piece to replace, first making sure<br />
it was thoroughly painted.<br />
Some of the rails are also rotting at the bottom as can be seen: these will be cleaned out<br />
and filled with wood filler.
Here the top cross rails have been removed, and the pillar has been filled with wood<br />
filler. There was a fairly big hole once the rotten wood was removed, which I filled with<br />
odds and ends until I could apply the wood filler. This will then be sanded to make a<br />
smooth, solid surface.
The top rails are badly weathered, and would require sanding down and repainting. The<br />
wood is badly cracked, so water and frost would soon get in and lift the paint, and crack<br />
the wood. Best option is to replace with composite as it is weather-proof (and the birds<br />
would still be happy to rest on it).
Looking along the front deck, with the top rail now removed (but still place for the birds<br />
to sit).<br />
Several of the rails will need repairing at the bottom where they join the lower cross<br />
piece. The deck, too, is going to be restained.
The handrails up the stairs<br />
are in really bad shape.<br />
Sanding and repairing them<br />
will not work, as there are<br />
too many deep cracks.<br />
I’ll replace these with<br />
composite rails, too.<br />
The steps (and kickboards)<br />
will need repainting.
This lower step is badly<br />
rotted. If it weren’t a<br />
big job, I’d replace the<br />
whole left riser but that<br />
would mean replacing<br />
the whole step<br />
assembly.<br />
I’ll fix it by filling the<br />
hole with paper mache<br />
mixed with glue, and<br />
then covered with<br />
wood filler. It will make<br />
for a hard, solid side.<br />
This all started by just<br />
one nail allowing<br />
moisture in and then<br />
the rot set in.<br />
Fortunately, the stair<br />
itself is solid and not<br />
dependent on its<br />
attachment to the riser.
The old handrails are<br />
removed.<br />
I’ll have to find long (5-<br />
inch) screws at the<br />
hardware store so that I<br />
can attach the new<br />
handrails through the<br />
bottom of the 2x4<br />
support.
I then fixed all the bad<br />
pieces of wood where it<br />
was rotting from<br />
moisture getting in and<br />
then sanded all the wood<br />
filler areas.<br />
The next few days were<br />
spent painting all the<br />
white rails and pillars.<br />
This was quite tedious<br />
because of their fancy<br />
shapes and indents, but<br />
we got it done. It looks a<br />
lot better.<br />
Next came the fun bit:<br />
getting my table saw out<br />
of the shed (to my<br />
“outside workshop” as I<br />
call it) so that I could cut<br />
the composite rails to fit.
The new top rails are<br />
in, securely fastened<br />
from beneath so that<br />
no screws are visible<br />
along the top.<br />
We still have to<br />
repaint the blue (on<br />
the walls) and the<br />
deck itself.
This corner is looking a lot better: no sign of the rot that had taken hold where the rails<br />
joined the post.
The rails look nice and bright now: the steps still have to be stained, as does the deck<br />
itself but there’s no sign of the big hole on the left of the steps, as you’ll see on the next<br />
photo:
Certainly looking a<br />
lot better, and once<br />
the step is painted it<br />
should look quite<br />
good.
One thing always leads<br />
to another: Judy came<br />
home the other day with<br />
a new light for our front<br />
deck. She thought we<br />
could take the old one<br />
(that I put up about two<br />
years ago) and use it on<br />
the back deck, where we<br />
need a new one. At least<br />
this one doesn’t look like<br />
most of the lights our<br />
neighbours have.<br />
This is the old light …
… and this is the new.
More to follow …