LiteHawk 285-40008 BIG TOM SC NIMH IM A4 E-F web
- No tags were found...

Create successful ePaper yourself
Turn your PDF publications into a flip-book with our unique Google optimized e-Paper software.
<strong>LiteHawk</strong> <strong>BIG</strong> <strong>TOM</strong> <strong>SC</strong> Instruction Manual<br />
Powered by<br />
<strong>N<strong>IM</strong>H</strong><br />
Alimenté par<br />
How To Charge!<br />
Page 5<br />
Litehawk Videos! Tech Support!<br />
Replacement Parts!<br />
Just a Mouse Click Away!<br />
PLEASE DO NOT RETURN THIS PRODUCT TO ANY RETAIL STORE.<br />
For any questions or problems with this product please visit our <strong>web</strong>site www.litehawk.ca<br />
Made for and distributed by Borgfeldt (Canada) Limited 50 Konrad Cres., Markham, ON L3R 8T4
<strong>LiteHawk</strong> <strong>BIG</strong> <strong>TOM</strong> <strong>SC</strong> Instruction Manual 2<br />
<strong>LiteHawk</strong> <strong>BIG</strong> <strong>TOM</strong> <strong>SC</strong> Precautions - The <strong>LiteHawk</strong> <strong>BIG</strong> <strong>TOM</strong> <strong>SC</strong> is not intended for children under the age of 6<br />
unless closely supervised by an adult. Improper use may cause serious injury. Please read <strong>N<strong>IM</strong>H</strong> Battery section<br />
before use. Do not run in rain or if there is lightning and/or thunder. Do not touch ANY moving parts while the<br />
model is powered.<br />
WARNING: CHOKING HAZARD - Small parts. Not For Children under 3 years<br />
CAUTION: Do not touch the running model! Adult supervision is required!<br />
CAUTION: Never insert any sharp objects, pins or screws into the model as this may puncture the internal<br />
battery!<br />
SAFETY PRECAUTIONS<br />
- Keep hands, hair and loose clothing away from moving parts when the model is powered ON.<br />
- Turn off controller/charger and <strong>BIG</strong> <strong>TOM</strong> <strong>SC</strong> when not in use.<br />
- Remove battery from controller/charger when not in use.<br />
- Parental guidance is recommended for use.<br />
- Keep your <strong>BIG</strong> <strong>TOM</strong> <strong>SC</strong> in your sight so that you can supervise it at all times.<br />
- New AA alkaline batteries are recommended for use in the controller to obtain maximum performance.<br />
- Your charger is tailor made for the <strong>N<strong>IM</strong>H</strong> battery used in your <strong>LiteHawk</strong> <strong>BIG</strong> <strong>TOM</strong> <strong>SC</strong>. Do not use it to charge any<br />
battery other than that in the <strong>LiteHawk</strong> <strong>BIG</strong> <strong>TOM</strong> <strong>SC</strong>.<br />
BATTERY SAFETY INFORMATION<br />
- Requires 3 x 1.5V AA batteries (not included)<br />
- Batteries are small objects.<br />
- Replacement of batteries must be done by adults.<br />
- Follow the polarity (+/-) diagram.<br />
- Promptly remove dead batteries from the toy.<br />
- Dispose of used batteries properly.<br />
- Remove batteries for prolonged storage.<br />
- DO NOT incinerate used batteries<br />
- DO NOT dispose of batteries in fire, as batteries may<br />
explode or leak.<br />
- DO NOT mix old and new batteries or different types of<br />
batteries (i.e. alkaline/standard)<br />
- Always replace the whole set of batteries at one time.<br />
- DO NOT short-circuit the supply terminals<br />
CARE AND MAINTENANCE -<br />
- Always remove batteries from the controller when it is not being used for a long period of time.<br />
- Unplug battery from toy when not in use.<br />
- Keep the toy away from direct heat or extreme cold.<br />
- Do not expose the toy’s interior to water or moisture. This can damage the electronic assemblies.<br />
Your <strong>LiteHawk</strong> <strong>BIG</strong> <strong>TOM</strong> <strong>SC</strong> is equipped with a<br />
<strong>N<strong>IM</strong>H</strong> battery.<br />
Special <strong>N<strong>IM</strong>H</strong> Battery Instructions:<br />
- Never charge battery unattended.<br />
- Charge battery in isolated area. Keep away from<br />
flammable materials.<br />
- Do not expose to direct sunlight.<br />
- Do not disassemble, modify, heat or short circuit the<br />
batteries. Do not place them in fires or leave them in hot<br />
places.<br />
- Only charge the batteries with the specified battery<br />
charger.<br />
- Only use the batteries in the device specified by<br />
<strong>LiteHawk</strong>.<br />
- Batteries must be recycled or disposed of properly.<br />
- Do not leave plugged into model when not in use.<br />
- Do not charge if battery or connector is wet.<br />
Before charging the <strong>LiteHawk</strong> <strong>BIG</strong> <strong>TOM</strong> <strong>SC</strong> please read the following!<br />
- DO NOT leave the battery unattended during charging.<br />
- DO NOT leave the battery plugged into the charger any longer than 5 hours maximum.<br />
- DO NOT install another battery without letting the motor cool first! 5-10 minutes is sufficient.<br />
- DO NOT recharge the battery until it is cool to the touch! 10 minutes is sufficient.<br />
- DO NOT charge if the battery or connector are wet.<br />
- Remove battery from model when charging.
Welcome to the World of <strong>LiteHawk</strong>!<br />
Before we get ready for your first driving adventure, lets cover the basics together!<br />
<strong>BIG</strong> <strong>TOM</strong> <strong>SC</strong> is a scaled down version of an Off Road truck - It has incredible traction<br />
from the 4 wheel-drive and the option of a tracked or wheeled driving setup. <strong>BIG</strong> <strong>TOM</strong><br />
<strong>SC</strong> has a solid front and rear axle with link suspension and coil over shocks which allows<br />
it to climb over all kinds of terrain. We do not recommend driving with wheels and tracks<br />
mixed as there is a reduction in track setup that will cause a push / pull effect. Suggestions<br />
of surfaces for wheels: Indoors, hard packed dirt, grass, and rock, asphalt and<br />
cement. Suggestions of surfaces for tracks: Loamy dirt, sand and snow (packing type).<br />
<strong>LiteHawk</strong> <strong>BIG</strong> <strong>TOM</strong> <strong>SC</strong> - Transmitter Set Up<br />
- Always use fresh AA batteries in the Pistol Grip Radio Controller (Transmitter).<br />
1/ Make sure the transmitter is turned off.<br />
2/ Open the Battery Cover using a Phillips screw driver (not included).<br />
3/ Insert 3 x AA batteries, noting correct polarity.<br />
4/ Replace battery door securely.<br />
- ALWAYS REMOVE THE BATTERIES<br />
FROM THE TRANSMITTER WHEN YOU<br />
WILL NOT BE USING YOUR MODEL FOR<br />
LONG PERIODS OF T<strong>IM</strong>E.<br />
- Dispose and recycle correctly when<br />
there is no longer power in the batteries,<br />
they should be disposed of at an<br />
approved battery recycling center. DO<br />
NOT THROW IN HOUSEHOLD WASTE!<br />
- Never expose the transmitter or batteries<br />
to moisture.<br />
<strong>LiteHawk</strong> <strong>BIG</strong> <strong>TOM</strong> <strong>SC</strong> Instruction Manual 3<br />
<strong>LiteHawk</strong> <strong>BIG</strong> <strong>TOM</strong> <strong>SC</strong> - 2.4 Ghz<br />
Your <strong>LiteHawk</strong> <strong>BIG</strong> <strong>TOM</strong> <strong>SC</strong> comes with a 2.4 Ghz radio system, which allows you to<br />
play without the fear of ever losing control! Race or play with countless other drivers.<br />
The range of your model is approximately 150ft which, due to its small size, is in excess<br />
of normal vision. The farther the model goes away from you the smaller it will become<br />
and the harder it will be to determine the model’s direction We suggest you stay at a<br />
distance between 5ft-20ft, this keeps your <strong>BIG</strong> <strong>TOM</strong> <strong>SC</strong> within a safe operational<br />
distance.<br />
Quick Tip: always turn the transmitter on first and<br />
off last.
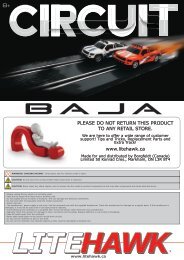
<strong>LiteHawk</strong> <strong>BIG</strong> <strong>TOM</strong> <strong>SC</strong> - Controller Functions<br />
<strong>LiteHawk</strong> <strong>BIG</strong> <strong>TOM</strong> <strong>SC</strong> Instruction Manual 4<br />
Power Button<br />
Throttle: Forward<br />
drive is initiated by<br />
pulling the throttle<br />
trigger towards the<br />
grip or handle like a<br />
trigger. The throttle<br />
is 100% proportional<br />
and will react to<br />
even slight input.<br />
Release the trigger<br />
to slow and stop the<br />
model.<br />
Brake/Reverse: To<br />
initiate the brake you<br />
simply push the trigger<br />
away from the<br />
grip just past the<br />
neutral position. You<br />
will notice the model<br />
will stop much quicker.<br />
By pushing the trigger<br />
away from the grip a<br />
second time, reverse<br />
will be activated.<br />
Steering: The steering wheel controls the<br />
model’s direction. Turn the wheel left to<br />
steer to the left. Turn the wheel to the<br />
right and the model will steer to the right.<br />
The radio is designed to self-centre.<br />
Simply release the wheel from a steering<br />
input and it will go straight.<br />
Steering trim<br />
Run your <strong>BIG</strong> <strong>TOM</strong> <strong>SC</strong> on a<br />
smooth level surface - it should<br />
drive straight.<br />
- If your <strong>BIG</strong> <strong>TOM</strong> <strong>SC</strong> steers to<br />
the RIGHT, click the trim lever<br />
LEFT until it drives straight.<br />
- If your <strong>BIG</strong> <strong>TOM</strong> <strong>SC</strong> steers to<br />
the LEFT, click the RIGHT trim<br />
lever the until it drives straight.<br />
<strong>LiteHawk</strong> <strong>BIG</strong> <strong>TOM</strong> <strong>SC</strong> - Battery & Charger<br />
Your <strong>LiteHawk</strong> <strong>BIG</strong> <strong>TOM</strong> <strong>SC</strong> comes with a <strong>N<strong>IM</strong>H</strong> battery and a USB charger.<br />
Battery:<br />
You should expect 15-20 min run time. Extra batteries are available at www.litehawk.-<br />
ca.<br />
- Once the model starts to slow, drive your model to a safe place, walk over and turn it<br />
off.<br />
- Never dead short a <strong>N<strong>IM</strong>H</strong> battery (never touch positive and negative together)!<br />
- You Must FULLY charge the battery before using your new model.<br />
- Do not leave the battery plugged into the model when it is not being used.<br />
- Keep the battery dry at all times.
<strong>N<strong>IM</strong>H</strong> Battery and Charger Instructions:<br />
Your New <strong>LiteHawk</strong> comes with a rechargeable <strong>N<strong>IM</strong>H</strong> battery. This battery powers the<br />
vehicle.<br />
Please read the following information before using your new <strong>LiteHawk</strong>.<br />
Always have your model turned off when not in use.<br />
STEP 1: Plug the USB into your supply USB adaptor port. The LED on the charger will<br />
turn RED<br />
STEP 2: Connect the battery to the USB Charger. The LED will flash RED signaling its<br />
charging<br />
STEP 3: When the LED indicator light on the charger turns stops flashing and remains a<br />
solid red the battery is charged.<br />
STEP 4: Unplug the battery from the charger.<br />
STEP 5: Install the battery into your vehicle.<br />
During charging:<br />
- It is normal for the battery to get warm during the charging process. Do not charge the<br />
battery on a surface that is flammable or can be damaged by heat.<br />
- Do not leave the battery and charger unattended while charging.<br />
- Do not store the battery plugged into the charger<br />
<strong>LiteHawk</strong> <strong>BIG</strong> <strong>TOM</strong> <strong>SC</strong> Instruction Manual 5<br />
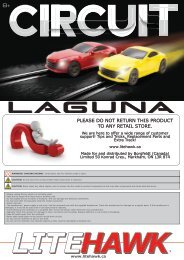
Installation of battery into the <strong>BIG</strong> <strong>TOM</strong> <strong>SC</strong>:<br />
Place your <strong>BIG</strong> <strong>TOM</strong> <strong>SC</strong> on a clean flat surface.<br />
Avoid areas where small parts may be<br />
lost. The battery is housed in the battery<br />
compartment located in the top of the chassis.<br />
You will see 4 turn tabs or posts that hold<br />
the cover in place.<br />
- Turn the tabs, open the battery compartment<br />
door.<br />
- Place your fully charged battery in the battery<br />
slot. Connect the battery connector.<br />
Don’t force it, it only goes one way!<br />
- Close the battery compartment door and<br />
turn the tabs back into place.<br />
How to Start!<br />
Power Button<br />
<strong>LiteHawk</strong> <strong>BIG</strong> <strong>TOM</strong> <strong>SC</strong> is ready to use - however you must follow these<br />
steps carefully:<br />
1. Switch ON the transmitter.<br />
2. Plug in the battery in the <strong>BIG</strong> <strong>TOM</strong> <strong>SC</strong>.<br />
3. Turn the <strong>BIG</strong> <strong>TOM</strong> <strong>SC</strong> power switch ON.
<strong>LiteHawk</strong> <strong>BIG</strong> <strong>TOM</strong> <strong>SC</strong> Instruction Manual 6<br />
Battery Guidelines:<br />
-The battery can be re-charged many times, however over time the battery will lose its<br />
ability to take or hold a charge. At this point the battery will need to be properly recycled.<br />
- Do not store or leave batteries in areas with extreme heat or cold. Batteries should be<br />
left and stored at room temperature.<br />
- Always have the battery unplugged from the toy or charger when not being used.<br />
- Do not submerge batteries under water. Always wipe off any water with a clean towel<br />
or rag.<br />
- It is best to store the battery out of the toy and on a non-flammable surface.<br />
Before you drive:<br />
Before every use it’s recommended to check that the steering and drivetrain are<br />
moving freely and nothing is binding. Next ensure that the model and the transmitter are<br />
working correctly. Before you drive your model, range test the radio system to ensure<br />
that it operates properly! Turn on the transmitter and then the model, check its operating<br />
as it should. Walk away from the model giving steering input with the radio until you<br />
reach the maximum distance you are planning to drive your model. If you lose input<br />
control walk back towards the model. You now know the safe operating distance for your<br />
immediate environment. Do not attempt to operate the model if there is any problem<br />
with the radio system/external interference with your radio signal at your location.<br />
How to remove tracks / wheels:<br />
1/ Using a Phillips screwdriver (not included), locate the retaining screw and unscrew in<br />
a counter clockwise direction.<br />
2/ Now gently pull the track / wheel away from the axle.<br />
3/ Replace with track / wheel.<br />
4/ Re-insert screw, then carefully, but firmly tighten in a clockwise direction.<br />
Do not over tighten!<br />
Let’s hit the road!<br />
The E<strong>SC</strong> system is not waterproof. Avoid driving through puddles, mud, or snow. If water<br />
gets into the electronics it could damage them.<br />
- Avoid overloading your model. Never run it in areas where its movement will be restricted,<br />
e.g.thick grass, weeds, mud etc. as this can over stress the motor and bind the drivetrain.<br />
- Ensure nothing prevents the smooth running of the moving parts.<br />
- Do not run your model in confined spaces.<br />
- Never run your model in a public space where it might upset or endanger people or wildlife.<br />
- Immediately discontinue use of your vehicle and transmitter if you see lightning or hear
thunder. Never use your vehicle in the rain.<br />
- Do not dismantle or tamper with this R/C vehicle or its transmitter. The manufacturer and<br />
distributor will accept no responsibility, expressed or implied, for accidents or injuries<br />
caused as a result of dis-assembly, modification and/or usage against the instructions for<br />
this product.<br />
- The transmitter’s range will vary depending on your surroundings and battery strength.<br />
Do not operate the model too far away or control could be lost (stay within 5-20 ft).<br />
- Ensure that all batteries are correctly installed and that the <strong>N<strong>IM</strong>H</strong> battery is fully charged<br />
and in good condition.<br />
- Do not touch ANY moving parts during operation.<br />
- Don’t run in public roads with traffic!<br />
- If your Car/Truck becomes stuck against something, release the throttle. Do not continue<br />
to push the throttle or run the motor. Do not try to push, pull, or tow objects of any weight<br />
as this will increase heat in the electronics and cause failures.<br />
<strong>LiteHawk</strong> <strong>BIG</strong> <strong>TOM</strong> <strong>SC</strong> - After Use Care<br />
1. When you have finished using your <strong>LiteHawk</strong> <strong>BIG</strong> <strong>TOM</strong> <strong>SC</strong> you should first disconnect the<br />
<strong>N<strong>IM</strong>H</strong> battery, then switch OFF the transmitter.<br />
2. Remove the <strong>N<strong>IM</strong>H</strong> battery from the vehicle.<br />
Care and Maintenance:<br />
When you are finished running your model for the day, blow it off with compressed air or<br />
use a soft bristled paint brush to dust-off the vehicle. Always disconnect and remove the<br />
battery from the model whenever the model is stored.<br />
Your model is going to require maintenance in order to stay in tip top running order. Check<br />
for the following:<br />
1. Check the wheels / tracks and steering for binding.<br />
2. Look for any cracked, bent, or damaged parts<br />
3. Check for any loose screws in the chassis structure or suspension<br />
4. Inspect the gears for wear, broken teeth.<br />
<strong>LiteHawk</strong> <strong>BIG</strong> <strong>TOM</strong> <strong>SC</strong> Instruction Manual 7<br />
<strong>LiteHawk</strong> <strong>BIG</strong> <strong>TOM</strong> <strong>SC</strong> - Storage<br />
- Remove all batteries before storing your vehicle.<br />
- Never store your <strong>LiteHawk</strong> <strong>BIG</strong> <strong>TOM</strong> <strong>SC</strong> near open flames, in high temperatures (including<br />
near radiators) or in direct sunlight. Ideally, place the model in a warm dry location.<br />
- Care must be taken when handling rechargeable batteries to avoid the possibility of injury<br />
and/or damage to property.<br />
Notes:
Notes:<br />
<strong>LiteHawk</strong> <strong>BIG</strong> <strong>TOM</strong> <strong>SC</strong> Instruction Manual 8<br />
<strong>LiteHawk</strong> Parts & Tech<br />
There’s nothing worse than buying a new toy, having a question, or needing a replacement<br />
part, and then being left out in the cold. No worries! We pride ourselves on the<br />
very best customer service!<br />
We have all the parts you’ll ever need to keep your new <strong>LiteHawk</strong> in tip top shape! Like<br />
we always say, “accidents happen, even to the best of us”....with that in mind<br />
www.litehawk.ca is available 24 hours a day, 7 days a week!<br />
We ship your parts Same Day! Except weekends of course - that’s when we are out<br />
playing too!<br />
<strong>LiteHawk</strong> Guarantee<br />
All <strong>LiteHawk</strong> products have been tested and designed to perform as claimed out of the<br />
box. If you have an issue with a product or part of a product please contact us directly.<br />
We cover claims towards manufacturing defects. We know that there is nothing worse<br />
than having a question or needing a replacement part and having nowhere to go. Lite-<br />
Hawk is not responsible for covering the costs of replacement parts or repair on products<br />
that have been damaged due to product use.<br />
See all of our Litehawk products in action! Everything from<br />
videos that show <strong>LiteHawk</strong>s in their natural environments - flying,<br />
sailing, power boating....to helpful In-Depth product information<br />
too! It’s all just a mouse click away!<br />
Get the inside scoop - by joining <strong>LiteHawk</strong><br />
INSIDER e-bulletin!<br />
Keep up to speed with our newest product releases<br />
- we have some great stuff just around the corner!<br />
Ever missed a contest, simply because it happened<br />
so fast? Heck, it was over before you even got to the<br />
party! <strong>LiteHawk</strong> will never, ever share your email<br />
address - it’s private and we respect that.
Guide d’utilisation du <strong>LiteHawk</strong> <strong>BIG</strong> <strong>TOM</strong> <strong>SC</strong><br />
Powered by<br />
<strong>N<strong>IM</strong>H</strong><br />
Alimenté par<br />
Mode de chargement!<br />
Page 5<br />
Vidéos du <strong>LiteHawk</strong>! Soutien technique!<br />
Pièces de rechange!<br />
Tout cela à portée d’un clic de souris!<br />
VEUILLEZ NE PAS RETOURNER CE PRODUIT À UN MAGASIN DE DÉTAIL.<br />
Si vous avez des questions à poser ou des problèmes à rapporter relativement à ce produit consulter notre site<br />
Web www.litehawk.ca.<br />
Fabriqué pour et distribué par Borgfeldt (Canada) Limited, 50 Konrad Crescent, Markham (Ontario) L3R 8T4
Guide d’utilisation du <strong>LiteHawk</strong> <strong>BIG</strong> <strong>TOM</strong> <strong>SC</strong> 2<br />
LITEHAWK <strong>BIG</strong> <strong>TOM</strong> <strong>SC</strong>- CONSIGNES DE SÉCURITÉ : Le <strong>LiteHawk</strong> <strong>BIG</strong> <strong>TOM</strong> <strong>SC</strong> n’est pas conçu pour être utilisé<br />
par des enfants âgés de moins de 6 ans, sauf s’ils sont surveillés étroitement par un adulte. Tout mésusage peut<br />
causer de graves lésions. Veuillez lire la section sur la batterie <strong>N<strong>IM</strong>H</strong> avant toute utilisation. Ne pas le faire<br />
fonctionner sous la pluie ou lorsqu’il y a de la foudre ou du tonnerre. Ne toucher AUCUNE pièce mobile lorsque le<br />
modèle est sous tension.<br />
MISE EN GARDE! Danger d’étouffement –petites pièces. Ne convient pas aux enfants âgés de moins 3 ans<br />
ATTENTION! Ne pas toucher le modèle en mouvement. La supervision d’un adulte est requise!<br />
ATTENTION! Ne jamais insérer un objet acéré, une épingle ou une vis dans le modèle, car cela risque de<br />
perforer la batterie interne!<br />
CONSIGNES DE SÉCURITÉ<br />
- Tenir les mains, les cheveux et tout vêtement ample loin des pièces mobiles lorsque le modèle est en MARCHE.<br />
- Éteindre la télécommande, le chargeur et le <strong>BIG</strong> <strong>TOM</strong> <strong>SC</strong> lorsque ceux-ci ne sont pas utilisés.<br />
- Enlever les batteries de la télécommande ou du chargeur lorsque ceux-ci ne sont pas utilisés.<br />
- La surveillance parentale est recommandée lors de l’utilisation.<br />
- Gardez votre appareil <strong>BIG</strong> <strong>TOM</strong> <strong>SC</strong> en vue en tout temps.<br />
- L’utilisation de piles alcalines AA neuves dans la télécommande est recommandée afin d’assurer des performances<br />
maximales.<br />
- Votre chargeur mobile est conçu expressément pour charger la batterie <strong>N<strong>IM</strong>H</strong> utilisée dans votre <strong>LiteHawk</strong> <strong>BIG</strong><br />
<strong>TOM</strong> <strong>SC</strong>. Ne l’utilisez pas pour charger une batterie autre que celle du <strong>LiteHawk</strong> <strong>BIG</strong> <strong>TOM</strong> <strong>SC</strong>.<br />
CONSIGNES DE SÉCURITÉ RELATIVES AUX PILES<br />
- Ce jouet requiert 3 piles AA de 1,5 V (non comprises)<br />
- Les piles sont de petites pièces.<br />
- Le remplacement des piles doit être effectué par un<br />
adulte.<br />
- Respectez la polarité (+/-) indiquée.<br />
- Retirez les piles usées sans délai du jouet.<br />
- Éliminez les piles usées convenablement.<br />
- Enlevez les piles si vous entreposez le jouet longtemps.<br />
- NE PAS incinérer les piles usées.<br />
- NE PAS jeter les piles au feu, car elles risquent<br />
d’exploser ou de laisser échapper leur contenu.<br />
- NE PAS mélanger des piles neuves et des piles usées ou<br />
des types différents de piles (p. ex., alcalines et<br />
ordinaires)<br />
- Toujours remplacer le lot complet des batteries en<br />
même temps.<br />
- NE PAS court-circuiter les bornes d’alimentation.<br />
ENTRETIEN -<br />
- Enlevez toujours les piles de la télécommande lorsque celle-ci n’est pas utilisée pendant une longue période.<br />
- Débranchez la batterie du jouet lorsque celui-ci n’est pas utilisé.<br />
- Ce jouet craint la chaleur directe et le froid extrême.<br />
- Ne pas exposer l’intérieur du jouet à l’eau ou à l’humidité, car celles-ci peuvent abîmer les dispositifs électroniques.<br />
Votre <strong>LiteHawk</strong> <strong>BIG</strong> <strong>TOM</strong> <strong>SC</strong> est muni d’une<br />
batterie <strong>N<strong>IM</strong>H</strong><br />
Consignes spéciales pour la batterie <strong>N<strong>IM</strong>H</strong> :<br />
- Ne jamais charger la batterie sans supervision.<br />
- Charger la batterie dans un endroit à l’écart. Garder<br />
loin des matières inflammables.<br />
- Ne pas exposer aux rayons directs du soleil.<br />
- Ne pas démonter, modifier, chauffer ou court-circuiter<br />
les batteries. Ne pas les mettre au feu ou les exposer à<br />
la chaleur.<br />
- Uniquement charger les batteries au moyen du chargeur<br />
spécifié.<br />
- Uniquement utiliser les batteries dans l’appareil spécifié<br />
par <strong>LiteHawk</strong>.<br />
- Les batteries doivent être recyclées ou éliminées<br />
convenablement.<br />
- Ne laissez pas la batterie branchée sur le jouet lorsque<br />
celui-ci n’est pas utilisé.<br />
- N’effectuez pas le chargement si les piles ou le connecteur<br />
sont mouillés.<br />
Avant de charger le <strong>LiteHawk</strong> <strong>BIG</strong> <strong>TOM</strong> <strong>SC</strong>, veuillez lire les consignes suivantes!<br />
- NE PAS laisser la batterie sans surveillance pendant qu’elle se charge.<br />
- NE PAS laisser la batterie branchée dans le chargeur pendant plus de 5 heures maximum.<br />
- NE PAS installer une autre batterie sans avoir laissé le moteur refroidir au préalable! Un intervalle de 5 à 10 minutes suffit.<br />
- NE PAS recharger la batterie avant qu’elle ne soit redevenue froide au toucher! Un intervalle de 10 minutes suffit.<br />
- N’effectuez pas le chargement si les piles ou le connecteur sont mouillés.<br />
- Retirez la batterie du modèle lorsque vous la chargez.
Bienvenue dans l’univers de <strong>LiteHawk</strong>!<br />
Avant de nous préparer à vivre notre première aventure, couvrons ensemble quelques principes<br />
de base! <strong>BIG</strong> <strong>TOM</strong> <strong>SC</strong> est une version réduite d’un camion tout-terrain. Ses quatre roues motrices<br />
lui donnent une traction incroyable. Il peut en outre être doté de chenilles ou de roues. <strong>BIG</strong> <strong>TOM</strong><br />
<strong>SC</strong> dispose d’essieux avant et arrière solides avec suspension à tige et amortisseurs à ressorts<br />
hélicoïdaux qui lui permettent d’arpenter tous types de terrains. Nous déconseillons d’opter pour<br />
une configuration combinant roues et chenilles, car la différence de rotation entraînera un effet de<br />
propulsion/traction. Types de terrains suggérés pour les roues : intérieur, terre dure, herbe, roche,<br />
asphalte et ciment. Types de terrains suggérés pour les chenilles : terrain glaiseux, sable et neige<br />
(damée).<br />
<strong>LiteHawk</strong> <strong>BIG</strong> <strong>TOM</strong> <strong>SC</strong> – Configuration de l’émetteur<br />
- Utilisez toujours des piles AA neuves dans la radiotélécommande à poignée-pistolet<br />
(l’émetteur).<br />
1/ Assurez-vous que l’émetteur est éteint.<br />
2/ Ouvrir le couvercle du compartiment à pile<br />
avec un tournevis Phillips (non inclus).<br />
3/ Insérez 3 piles AA en veillant à respecter la<br />
polarité indiquée.<br />
4/ Refermer le compartiment à piles.<br />
- ENLEVEZ TOUJOURS LES PILES DE L’ÉMET-<br />
TEUR LORSQUE VOUS NE PRÉVOYEZ PAS<br />
UTILISER VOTRE MODÈLE PENDANT UNE<br />
LONGUE PÉRIODE.<br />
- Éliminez et recyclez convenablement les piles<br />
usées; celles-ci doivent être éliminées dans un<br />
centre approuvé de recyclage de piles. NE LES JETEZ PAS<br />
AUX ORDURES!<br />
- N’exposez jamais l’émetteur ou les piles à l’humidité.<br />
Guide d’utilisation du <strong>LiteHawk</strong> <strong>BIG</strong> <strong>TOM</strong> <strong>SC</strong> 3<br />
<strong>LiteHawk</strong> <strong>BIG</strong> <strong>TOM</strong> <strong>SC</strong>– 2,4 GHz<br />
Votre appareil <strong>LiteHawk</strong> <strong>BIG</strong> <strong>TOM</strong> <strong>SC</strong> est vendu avec un système de radiotélécommande à<br />
2,4 GHz conçu pour vous permettre de jouer sans la moindre crainte de perdre le contrôle<br />
de votre modèle! Faites la course ou jouez avec un nombre indéfini d’autres pilotes. Votre<br />
modèle a une portée d’environ 150 pi; étant donné sa faible taille, cela dépasse la portée<br />
visuelle normale. Plus votre modèle s’éloigne de vous, plus il devient petit et plus vous<br />
aurez de la difficulté à déterminer sa direction. Nous vous conseillons de le garder dans un<br />
rayon de 5 à 20 pi; votre <strong>BIG</strong> <strong>TOM</strong> <strong>SC</strong> restera ainsi à l’intérieur d’une distance d’utilisation<br />
sécuritaire.<br />
Conseil pratique : allumez toujours l’émetteur en pre-<br />
mier lieu et éteignez-le toujours en dernier lieu.
<strong>LiteHawk</strong> <strong>BIG</strong> <strong>TOM</strong> <strong>SC</strong> - Fonctions de la télécommande<br />
Guide d’utilisation du <strong>LiteHawk</strong> <strong>BIG</strong> <strong>TOM</strong> <strong>SC</strong> 4<br />
Bouton d’alimentation<br />
Puissance : Pour<br />
déclencher la marche<br />
avant, tirez sur le levier<br />
de commande de la<br />
puissance vers la poignée,<br />
tout comme sur<br />
une détente. La commande<br />
de puissance est<br />
proportionnelle à 100<br />
%; elle réagit au moindre<br />
déplacement de la<br />
détente. Pour ralentir et<br />
arrêter le modèle,<br />
relâcher la détente. e.<br />
Frein/Marche arrière :<br />
Pour freiner, il suffit fit de<br />
pousser le levier de<br />
commande de la<br />
puissance de manière à<br />
l’éloigner de la poignée,<br />
en dépassant légèrement<br />
le point neutre. Vous<br />
constaterez que le<br />
modèle s’arrête beaucoup<br />
plus rapidement. Si<br />
vous éloignez la détente<br />
de la poignée une deuxième<br />
fois, le modèle fera<br />
marche arrière.<br />
Direction : Le volant contrôle la direction du<br />
modèle. Tournez-le vers la gauche pour faire<br />
tourner le modèle à gauche. Tournez-le vers<br />
la droite et le modèle tournera à droite. La<br />
radiotélécommande est conçue pour revenir<br />
au centre automatiquement. Il suffit de lâcher<br />
le volant dans un virage pour reprendre une<br />
trajectoire rectiligne.<br />
Garniture de direction<br />
Exécutez votre<br />
<strong>BIG</strong> <strong>TOM</strong><br />
<strong>SC</strong> sur une surface lisse<br />
niveau - il devrait con-<br />
duire droit.<br />
- Si votre <strong>BIG</strong> <strong>TOM</strong> <strong>SC</strong><br />
se dirige vers la<br />
DROITE,<br />
cliquez sur le levier de<br />
trim LEFT jusqu'à ce qu'il<br />
soit droit.<br />
- Si votre <strong>BIG</strong> <strong>TOM</strong> <strong>SC</strong><br />
se dirige vers la<br />
GAUCHE, cliquez sur le<br />
levier DROITE trim<br />
jusqu'à ce qu'il conduit<br />
droit<br />
<strong>LiteHawk</strong> <strong>BIG</strong> <strong>TOM</strong> <strong>SC</strong> – Batterie et recharge<br />
Le <strong>LiteHawk</strong> <strong>BIG</strong> <strong>TOM</strong> <strong>SC</strong> est fourni avec une batterie <strong>N<strong>IM</strong>H</strong> et un USB chargeur.<br />
Batterie :<br />
La durée de fonctionnement est d’environ 15 à 20 minutes. Il est possible de se procurer<br />
des batteries supplémentaires en consultant le site www.litehawk.ca.<br />
- Lorsque le modèle commence à ralentir, il convient de le conduire jusqu’à un endroit sûr,<br />
puis de l’éteindre.<br />
- Ne jamais vider complètement une batterie <strong>N<strong>IM</strong>H</strong> (ne jamais toucher positif et négatif<br />
ensemble)!<br />
- Il importe de recharger COMPLÈTEMENT la batterie avant d’utiliser un modèle neuf.<br />
- Ne pas laisser la batterie branchée dans le modèle lorsqu’on ne l’utilise pas.<br />
- Garder la batterie au sec en tout temps.
Instructions relatives à la batterie <strong>N<strong>IM</strong>H</strong> et au chargeur:<br />
Le <strong>LiteHawk</strong> est fourni avec une batterie <strong>N<strong>IM</strong>H</strong> rechargeable. Cette batterie alimente le véhicule.<br />
Prière de lire les renseignements suivants avant d’utiliser le <strong>LiteHawk</strong>:<br />
Toujours avoir votre modèle éteint quand il n'est pas utilisé.<br />
ÉTAPE 1 : Brancher le câble USB dans le port USB de l’adaptateur d’alimentation. La DEL<br />
du chargeur devient rouge.<br />
ÉTAPE 2 : Brancher la batterie dans le chargeur USB. La DEL rouge clignote, ce qui<br />
indique que l’appareil est en cours de chargement.<br />
ÉTAPE 3 : Lorsque la DEL rouge du chargeur cesse de clignoter et devient fixe, la batterie<br />
est chargée.<br />
ÉTAPE 4 : Débrancher la batterie du chargeur.<br />
ÉTAPE 5 : Monter la batterie dans le véhicule.<br />
Pendant la charge:<br />
- Il est normal que la batterie s’échauffe pendant la charge. Pendant la charge, ne posez<br />
pas la batterie sur une surface inflammable ou susceptible d’être abîmée par la<br />
chaleur.<br />
- Ne pas laisser la batterie et le chargeur sans surveillance pendant la charge.<br />
- Ne pas entreposer la batterie alors qu’elle est toujours branchée sur le chargeur.<br />
Installation de la batterie dans le modèle <strong>BIG</strong> <strong>TOM</strong> <strong>SC</strong><br />
Posez votre modèle <strong>BIG</strong> <strong>TOM</strong> <strong>SC</strong> sur une<br />
surface plane et propre. Évitez les endroits<br />
où il serait facile de perdre les petites<br />
pièces. La batterie est installée dans le<br />
compartiment qui lui est réservé, dans la<br />
partie inférieure du châssis. La pile est<br />
logée dans le compartiment de batterie<br />
situé dans la partie supérieure du châssis .<br />
Vous verrez 4 onglets de tour ou des postes<br />
qui maintiennent le couvercle en place .<br />
- Tournez les onglets , ouvrir la porte du<br />
compartiment de la batterie<br />
- Placez votre batterie complètement<br />
chargée dans l'emplacement de la batterie .<br />
Branchez le connecteur de la batterie; il<br />
n’entre que dans un sens! - Fermez la porte<br />
du compartiment à piles et tournez les<br />
onglets en place<br />
Bouton d’alimentation<br />
Guide d’utilisation du <strong>LiteHawk</strong> <strong>BIG</strong> <strong>TOM</strong> <strong>SC</strong> 5<br />
Comment démarrer!<br />
Le <strong>LiteHawk</strong> <strong>BIG</strong> <strong>TOM</strong> <strong>SC</strong> est prêt à être utilisé - toutefois, vous devez suivre attentivement<br />
les étapes suivantes :<br />
1. Allumez l'émetteur.<br />
2. Branchez la pile dans le <strong>BIG</strong> <strong>TOM</strong> <strong>SC</strong>.<br />
3. Mettez l'interrupteur d'alimentation du <strong>BIG</strong> <strong>TOM</strong> <strong>SC</strong> sur la position ON (MARCHE).
Guide d’utilisation du <strong>LiteHawk</strong> <strong>BIG</strong> <strong>TOM</strong> <strong>SC</strong> 6<br />
Lignes directrices concernant la batterie :<br />
- Il est possible de recharger la batterie à de nombreuses reprises. Ceci étant, au<br />
fil du temps, la batterie va perdre de sa capacité à se recharger ou à conserver sa charge.<br />
À ce stade, il importe de recycler la batterie comme il se doit.<br />
- Ne pas entreposer ou laisser la batterie dans une zone extrêmement chaude ou froide.<br />
Il convient de l’entreposer à température ambiante.<br />
- Veiller à toujours débrancher la batterie du jouet ou du chargeur lorsqu’on ne l’utilise pas.<br />
- Ne pas immerger la batterie. Toujours essuyer les traces d’eau avec une serviette ou un chiffon<br />
propre.<br />
- It est préférable d’entreposer la batterie à l’extérieur du jouet et sur une surface<br />
ininflammable.<br />
Avant d’utiliser le modèle :<br />
Avant chaque utilisation du modèle, nous vous recommandons de vérifier que la direction et la<br />
transmission se déplacent librement et que rien ne les coince. Vérifiez ensuite que le modèle et<br />
l’émetteur fonctionnent convenablement. Avant de piloter votre modèle, vérifiez la portée du<br />
système radio pour vous assurer qu’il fonctionne convenablement! Allumez<br />
l’émetteur, puis mettez le modèle en marche; vérifiez qu’ils fonctionnement comme ils le<br />
devraient. Éloignez-vous du modèle tout en actionnant la commande de direction au moyen de<br />
la radio, jusqu’à ce que vous atteigniez la distance maximale à laquelle vous prévoyez piloter<br />
votre modèle. Si vous perdez le contrôle des commandes, marchez vers le modèle. Vous savez<br />
maintenant quelle est la distance sécuritaire d’utilisation du système à l’endroit où vous vous<br />
trouvez. N’essayez pas d’utiliser le modèle si vous décelez le moindre problème de radio ou<br />
brouillage externe de votre signal radio à l’endroit où vous vous trouvez.<br />
Comment enlever les pistes / roues:<br />
1/ À l’aide d’un tournevis cruciforme (non fourni), repérez la vis de fixation et dévissez-la<br />
dans le sens contraire des aiguilles d’une montre.<br />
2/ Maintenant, retirez doucement la chenille / roue de l’essieu.<br />
3/ Remplacez par voie / roue.<br />
4/ Réinsérez la vis, puis soigneusement, mais fermement, dans le sens des aiguilles<br />
d'une montre. Ne pas trop serrer!<br />
En route!<br />
Le système de régulation automatique de la vitesse (E<strong>SC</strong>) n’est pas étanche. Évitez de passer dans les<br />
flaques, la boue ou la neige. Si de l’eau s’infiltre dans les dispositifs électroniques, elle pourrait les<br />
endommager.<br />
- Évitez de surcharger votre modèle. Ne le faites jamais rouler sur un terrain où ses<br />
mouvements risquent d’être entravés (p. ex., herbes longues, mauvaises herbes, boue), car cela pourrait<br />
surcharger leur moteur et coincer la transmission.<br />
- Assurez-vous que rien n’entrave les mouvements des pièces mobiles.<br />
- N’utilisez pas votre modèle dans un espace exigu.<br />
- N’utilisez jamais votre modèle dans un espace public où il risque de déranger ou de mettre en péril des<br />
personnes ou des animaux sauvages.<br />
- Cessez immédiatement d’utiliser votre modéle et votre émetteur si vous voyez un éclair ou que vous<br />
entendez un bruit de foudre. N’utilisez jamais votre véhicule sous la pluie.<br />
- Vous ne devez ni démonter ni trafiquer ce modéle téléguidé ou son émetteur. Le fabricant et le distributeur<br />
déclinent toute responsabilité, expresse ou tacite, quant aux accidents ou lésions découlant du démontage<br />
de ce produit, de sa modification ou d’une utilisation qui déroge aux instructions.
- La portée de l’émetteur variera selon votre environnement et l’état des piles. Ne laissez pas le modèle<br />
s’éloigner trop, car vous risquez d’en perdre le contrôle (gardez-le à l’intérieur d’un rayon de 5 à 20 pi).<br />
- Assurez-vous que toutes les piles et la batterie sont convenablement installées;<br />
assurez-vous également que la batterie <strong>N<strong>IM</strong>H</strong> est chargée à fond et en bon état.<br />
- Ne touchez AUCUNE pièce mobile lorsque le modèle fonctionne.<br />
- N’utilisez pas votre modèle sur un chemin public ouvert à la circulation!<br />
- Si votre véhicule se coince contre un obstacle, lâchez le levier de commande de la puissance.<br />
Ne continuez pas d’appuyer sur le levier de puissance ou de faire tourner le moteur.<br />
N’essayez pas de pousser, de tirer ou de remorquer une masse, quelle qu’elle soit, car cela<br />
surchauffera les dispositifs électroniques et cela provoquera des défaillances.<br />
<strong>LiteHawk</strong> <strong>BIG</strong> <strong>TOM</strong> <strong>SC</strong> – Entretien après chaque utilisation<br />
1. Lorsque vous avez terminé d’utiliser votre <strong>LiteHawk</strong> <strong>BIG</strong> <strong>TOM</strong> <strong>SC</strong>, vous devez d’abord<br />
débrancher la batterie <strong>N<strong>IM</strong>H</strong>, puis éteindre l’émetteur.<br />
2. Enlevez la batterie <strong>N<strong>IM</strong>H</strong> du véhicule.<br />
3. Remettez les goupilles de retenue sur le véhicule afin d’éviter de les perdre.<br />
Entretien :<br />
Lorsque vous avez terminé d’utiliser votre modèle pour la journée, dépoussiérez-le en<br />
vous servant d’air comprimé ou d’un pinceau à soies douces. Vous devez toujours<br />
débrancher et enlever la batterie du modèle chaque fois que le modèle est rangé.<br />
Votre modèle exige un entretien régulier pour rester en parfait état de fonctionnement.<br />
Vérifiez les éléments suivants :<br />
1. Vérifiez les roues / pistes et la direction pour la liaison<br />
2. Inspectez le modèle pour vérifier qu’aucune pièce n’est fendue, pliée ou abîmée.<br />
3. Vérifiez qu’aucune des vis du châssis ou de la suspension n’est desserrée.<br />
4. Inspectez les engrenages pour vérifier qu’aucune dent n’est usée excessivement ou<br />
brisée.<br />
Guide d’utilisation du <strong>LiteHawk</strong> <strong>BIG</strong> <strong>TOM</strong> <strong>SC</strong> 7<br />
<strong>LiteHawk</strong> <strong>BIG</strong> <strong>TOM</strong> <strong>SC</strong> – Entreposage<br />
- Enlevez toutes les piles et la batterie avant d’entreposer votre véhicule.<br />
- Ne rangez jamais votre <strong>LiteHawk</strong> <strong>BIG</strong> <strong>TOM</strong> <strong>SC</strong> à proximité de flammes ou de surfaces à<br />
haute température (notamment les radiateurs), ou dans un endroit exposé aux rayons<br />
directs du soleil. Idéalement, rangez le modèle dans un endroit tiède et sec.<br />
- Lors du maniement des batteries rechargeables, prenez grand soin d’éviter tout risque de<br />
blessure ou de dommage matériel.<br />
Notes:
Notes:<br />
Guide d’utilisation du <strong>LiteHawk</strong> <strong>BIG</strong> <strong>TOM</strong> <strong>SC</strong> 8<br />
Pièces et soutien technique <strong>LiteHawk</strong><br />
Après avoir acheté un nouveau jouet, rien n’est plus décevant que d’avoir une question<br />
à poser ou d’avoir besoin d’une pièce de rechange, mais d’être laissé en plan. Ne vous<br />
inquiétez pas! Nous nous targuons d’offrir à nos clients le meilleur service après-vente<br />
qui soit!<br />
Nous avons toutes les pièces dont vous pourriez avoir besoin pour garder votre Lite-<br />
Hawk en parfait état! Comme nous le répétons, « les accidents arrivent, même aux meilleurs<br />
d’entre nous ».... c’est pourquoi le site Web www.litehawk.ca est disponible 24<br />
heures sur 24, 7 jours sur 7!<br />
Nous expédions vos pièces le jour même! sauf les fins de semaine, évidemment – car<br />
nous aussi, nous aimons jouer dehors!<br />
Garantie <strong>LiteHawk</strong><br />
Tous les produits <strong>LiteHawk</strong> sont testés et conçus pour offrir les performances publiées dès<br />
la sortie de l’emballage. Si vous avez un problème avec un produit ou une pièce d’un produit,<br />
veuillez communiquer directement avec nous. Nous couvrons les réclamations pour<br />
vice de fabrication. Nous savons qu’il n’y a rien de plus décevant que d’avoir une question<br />
à poser ou d’avoir besoin d’une pièce de rechange, mais de n’avoir nulle part où s’adresser.<br />
<strong>LiteHawk</strong> décline toute responsabilité pour le coût des pièces de rechange ou des réparations<br />
faites sur les produits abîmés en conséquence de leur utilisation.<br />
Voyez tous les produits <strong>LiteHawk</strong> en action! Il y a de tout,<br />
depuis des vidéos montrant les produits <strong>LiteHawk</strong> dans leur<br />
milieu naturel – en vol ou propulsés par leurs voiles ou leur<br />
moteur – jusqu’aux renseignements utiles sur les produits! Tout<br />
cela est à portée d’un clic de souris!<br />
Joignez les initiés en vous abonnant à notre bulletin électronique<br />
– <strong>LiteHawk</strong> INSIDER!<br />
Tenez-vous au courant de nos lancements de nouveaux produits<br />
– nous sommes toujours sur le point de mettre des merveilles sur<br />
le marché! N’avez-vous jamais raté un concours tout simplement<br />
parce que tout s’est passé trop vite? La fête avait peut-être<br />
même pris fin avant même votre arrivée! <strong>LiteHawk</strong> ne partagera<br />
jamais votre adresse électronique – ce renseignement est privé et<br />
nous respectons cela.