Wireless Bicycle Computer With Pulse Indicator
Wireless Bicycle Computer With Pulse Indicator
Wireless Bicycle Computer With Pulse Indicator

You also want an ePaper? Increase the reach of your titles
YUMPU automatically turns print PDFs into web optimized ePapers that Google loves.
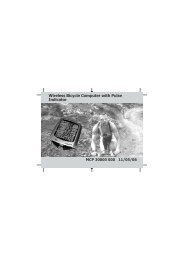
<strong>Wireless</strong> <strong>Bicycle</strong> <strong>Computer</strong> with <strong>Pulse</strong> <strong>Indicator</strong><br />
User's Guide MCP 30084 000 07/07
Table of Contents<br />
Page 1<br />
Contents Pages 1 to 3<br />
Safety Precautions 4<br />
Safety Precautions, Batteries 5<br />
Instructions for Use 6<br />
Package Contents 7<br />
Technical Data /Disposal 8<br />
Preparation for Operation 9<br />
Changing Batteries 9-10<br />
Restart and Reset 10<br />
Description of Buttons and Display 11<br />
Description of Symbols 12<br />
Description of <strong>Pulse</strong> Rate Display 13-14<br />
Description of Speed Display 15-16<br />
Mounting 17<br />
Installation of <strong>Computer</strong> Holder 17-18<br />
Mounting Transmitter for Speedometer 19<br />
Installation of Spoke Magnet 20<br />
Attaching the <strong>Computer</strong> 21<br />
Wearing the Chest <strong>Pulse</strong> Transmitter 22<br />
Helpline 00800-14703690
Table of Contents<br />
Page 2<br />
Basic Settings (Summary) 23<br />
Language 24<br />
Kilometers / Miles 25<br />
Wheel Size, Bike 1 26-28<br />
Wheel Size, Bike 2 28<br />
Total Mileage, Bike 1 29-31<br />
Total Mileage, Bike 2 31<br />
Service, Bike 1 32-34<br />
Service, Bike 2 34<br />
Body Weight 35-37<br />
<strong>Pulse</strong> Limits 38-40<br />
Sound Setting 41<br />
Battery Change 42<br />
12/24 Hour Format 43<br />
Time 44-45<br />
Backlight 46<br />
Light Manager 47<br />
Changing Basic Settings 48<br />
Menu Sequence and Operation (Summary) 49<br />
Helpline 00800-14703690
Table of Contents<br />
Page 3<br />
Time 50-51<br />
Stopwatch 52<br />
Trip Mileage and Trip Time 53-56<br />
Average and Maximum Speed 57-58<br />
Odometer, Bike 1 and Bike 2 59<br />
Switch Over, Bike 1 / Bike 2 60<br />
Total Mileage 61<br />
Temperature 62-63<br />
Calorie Consumption / Training Target 64-67<br />
Fat Consumption 68<br />
<strong>Pulse</strong> Rate Time Zone 69-70<br />
Scan Feature 71<br />
Frequently Asked Questions (FAQ's), 72-73<br />
Trouble Shooting<br />
Index 74-75<br />
Guarantee 76<br />
Helpline 00800-14703690
Safety Precautions<br />
8<br />
8<br />
8<br />
8<br />
8<br />
8<br />
8<br />
Page 4<br />
Please read and observe these operating instructions and particularly<br />
the following safety precautions for safe and successful use of your<br />
new bicycle computer.<br />
When riding your bicycle give primary attention to the traffic and check<br />
the display on your computer only when safe to do so.<br />
Learn how to operate your computer before stating a trip and program<br />
the computer before begining or during a break.<br />
Keep these instructions safe and give them to any other users.<br />
The chest strap transmitter and pulse rate display are a training and<br />
fitness aid for measuring and monitoring your pulse rate.<br />
Before starting with a training program, check with your physician and<br />
have him determine reasonable upper and lower pulse limits according<br />
to your age, condition and training objectives.<br />
If you have a heart pacemaker, always consult your physician or the<br />
manufacturer of the pacemaker before using the chest belt transmitter.<br />
Helpline 00800-14703690
Safety Precautions, Batteries<br />
8 Never recharge batteries! Explosion hazard!<br />
8<br />
8<br />
8<br />
8<br />
8<br />
8<br />
8<br />
8<br />
8<br />
Page 5<br />
Keep batteries away from children, do not throw into fire, short-circuit<br />
or break open.<br />
If a battery is swallowed consult a physician immediately.<br />
When inserting the batteries pay attention to the polarity.<br />
Clean battery and unit contacts as required before installing.<br />
Remove discharged batters from unit immediately!<br />
Increased danger of leakage!<br />
Never subject batteries to extreme conditions, e.g. place on top of<br />
heaters! Increased danger of leakage!<br />
Failure to follow these precautions can cause the batteries to discharge<br />
beyond their maximum voltage and leak! Remove batteries immediately<br />
to avoid damage.<br />
Avoid contact with skin, eyes and mucus membranes. After contact<br />
with battery acid rinse affected areas with large quantities of clean<br />
water and consult a physician immediately.<br />
Helpline 00800-14703690
Instructions for Use<br />
Page 6<br />
8 Do not open the computer or transmitter with force! Have such work<br />
done by an authorized service agent.<br />
8 Do not expose the computer or transmitter to extreme weather<br />
conditions.<br />
8 Avoid contact with thinners, concentrated cleaning agents, etc.<br />
8 Use a soft rag with water and mild soap to clean the computer and<br />
transmitter.<br />
8 Avoid subjecting the computer and transmitter to hard impacts or<br />
improper handling.<br />
8 Do not use a water jet, garden hose or high pressure cleaner on the<br />
bicycle computer or sensor.<br />
8 Remove the batteries during long intervals between trips, during the<br />
winter season, etc.<br />
Helpline 00800-14703690
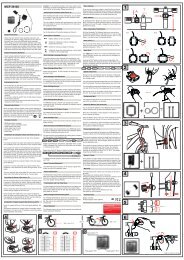
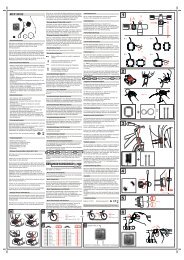
Package Contents<br />
1 2<br />
3<br />
1: BIKEmate bicycle computer<br />
5<br />
4<br />
2: <strong>Computer</strong> holder (handlebar mount)<br />
3: Transmitter for speedometer<br />
5<br />
6<br />
Page 7<br />
7 8 4: Spoke magnet<br />
with clamp<br />
5: Chest pulse<br />
6: Elastic chest strap<br />
7: Rubber rings<br />
8: Cable straps<br />
Helpline 00800-14703690
Technical Data / Disposal<br />
Technical Data<br />
Batteries: 1 lithium button cell 3 V, type CR 2032 in<br />
computer and in both transmitters<br />
Battery service life: 3 years when used for one hour daily<br />
Battery temperature: 10 to 55°C, splash-proof<br />
Page 8<br />
Note: Please note that at low temperatures the display may react sluggishly.<br />
This returns to normal again at higher temperatures. When exposed to direct<br />
sunlight the display can become black and illegible. After cooling down it is<br />
again legible. This is a technical peculiarity and not a malfunction.<br />
Disposal instructions:<br />
8 Dispose of the product packaging in an environmentally sound manner, when<br />
no longer required.<br />
8 Do not dispose of used batteries with domestic waste; take them to a collection<br />
point for used batteries.<br />
8 It is a legal requirement that the used device must be disposed of properly at<br />
the end of its service life. Check with your municipal disposal authorities.<br />
Helpline 00800-14703690
Preparation for Operation<br />
Page 9<br />
When shipped your BIKEmate bicycle computer and the two transmitters are<br />
already equipped with batteries and ready for operation. The computer is activated<br />
the first time a button is pressed and starts with the basic settings (beginning on<br />
page 23).<br />
Changing batteries<br />
Notes:<br />
8 Please note that all data and settings stored in the computer are lost when the<br />
batteries are replaced. If you want to re-enter the odometer setting after<br />
changing the batteries, note the values in the menus (Total mileage, Bike 1,<br />
Bike 2, Wheel sizes, etc) before removing the batteries.<br />
8 We recommend having the batteries replaced by a watchmaker or an authorized<br />
technician. Improper replacement of the batteries can lead to damage to the<br />
unit and loss of the manufacturer's guarantee.<br />
Otherwise proceed as follows to change the batteries:<br />
1. Open the battery cover on the rear of the computer or the chest pulse transmitter<br />
by turning it counter-clockwise with the aid of a coin or similar instrument. On<br />
the transmitter for the speedometer, it is necessary to loosen 4 screws with the<br />
aid of a small cross head screwdriver.<br />
2. Remove the used battery and dispose of it properly.<br />
3. Insert a new type 2032 battery so that you can see the "+" side of the battery.<br />
Helpline 00800-14703690
Restart and Reset<br />
Page 10<br />
4. Before attaching the battery cover always ensure that the rubber ring is not<br />
damaged and is inserted correctly. A damaged or improperly installed<br />
gasket can lead to penetration of moisture and damage to the unit.<br />
5. Reattach the battery cover and lock it on the computer and chest pulse<br />
transmitter by turning clockwise to the stop; on the transmitter for the<br />
speedometer tighten the 4 screws. Tighten the screws carefully; do not strip<br />
the threads under any circumstances.<br />
Restart / Reset<br />
If the display no longer reacts or errors are present, this can usually be corrected<br />
by restarting (resetting) the computer.<br />
Note: When the computer is reset all data and settings stored in the computer<br />
are lost. Proceed as follows to restart:<br />
1. Press the two buttons on the computer until all segments on the display<br />
illuminate momentarily. Then release the buttons.<br />
2. The computer restarts with the menu for the basic settings and should now<br />
function properly.<br />
3. Reenter the basic settings (beginning on page 23).<br />
Helpline 00800-14703690
Description of Buttons and Display<br />
Entry button "S"<br />
The entry button "S"<br />
allows you to enter<br />
and confirm data and<br />
delete values...<br />
Page 11<br />
8At<br />
this point we would like to give you a brief description of the<br />
buttons and symbols on your BIKEmate bicycle computer.<br />
Speed<br />
display<br />
Menu dispaly<br />
<strong>Pulse</strong> display<br />
Display for time, km,<br />
temperature, calories,<br />
(depending on menu)<br />
"F" Function button<br />
The function button "F"<br />
allows you to control the<br />
menus and make settings...<br />
Helpline 00800-14703690
Description of Symbols<br />
Y<br />
Replace battery as soon as possible.<br />
Symbol for maintenance interval, indicates preprogrammed<br />
servincing.<br />
Symbol for continuous display of trip data.<br />
Data recorded for Bike 1 is displayed.<br />
Data recorded for Bike 2 is displayed.<br />
Indicates present speed in relation to average speed.<br />
Page 12<br />
Flashing heart indicates: <strong>Pulse</strong> rate transmitted from chest belt<br />
transmitter. In combination with arrows the current pulse rate is<br />
indicated in comparison to the set limits.<br />
ZShows the current speed graphically. = The interval displayed<br />
ranges from 0 – 199.5 km/h.<br />
Helpline 00800-14703690
Description of <strong>Pulse</strong> Rate Display<br />
Page 13<br />
The BIKEmate bicycle 4 computer can indicate your pulse rate in<br />
the first line on the display. Note: This display is active only when<br />
the chest pulse transmitter has been put on correctly. Please<br />
observe the instructions on Page 22 of this operating manual!<br />
2,5<br />
143 The flashing heart symbol indicates<br />
Y<br />
that signals are being received from<br />
the chest belt transmitter.<br />
0:28:35<br />
MPH<br />
The top line on the display indicates<br />
STPWATCH<br />
your current pulse rate.<br />
S F<br />
Z<br />
Helpline 00800-14703690
Description of <strong>Pulse</strong> Rate Display<br />
15,5<br />
182 4<br />
20,3<br />
122<br />
Y<br />
4<br />
Y<br />
0:30:25 0:32:48<br />
MPH<br />
Z<br />
STPWATCH STPWATCH<br />
S F<br />
The arrow pointing upward<br />
indicates that your current<br />
pulse rate is higher than<br />
the upper limit set previously.<br />
Z<br />
S F<br />
MPH<br />
Page 14<br />
The arrow pointing downward<br />
indicates that your current pulse<br />
rate is lower than the lower<br />
limit set previously. An arrow is<br />
not displayed when your pulse<br />
rate is within the set limits.<br />
Helpline 00800-14703690
Description of Speed Display<br />
Page 15<br />
4<br />
19,5<br />
The arrow pointing upward indicates<br />
that you are traveling faster than<br />
the current average speed.<br />
0:22:45<br />
The beam display indicates the current<br />
AVGSPEED<br />
speed in relation to the maximum<br />
measuring range of 199.5 mph.<br />
0<br />
When in motion the BIKEmate bicycle computer indicates your<br />
current speed in the second line on the display. The beam display<br />
also indicates the speed graphically. The two arrow symbols on<br />
the display indicate the relationship between the current speed<br />
and the average speed.<br />
Y AVG<br />
MPH<br />
E F<br />
Z<br />
Helpline 00800-14703690
Description of Speed Display<br />
Z<br />
Y<br />
10,5 0<br />
10,5<br />
AVG 0<br />
0:20:15 0:20:15 AVGSPEED<br />
MPH<br />
AVGSPEED<br />
The arrow pointing downward<br />
indicates that you are traveling<br />
slower than the current average speed.<br />
Y AVG<br />
Z<br />
MPH<br />
Page 16<br />
Both arrows appear on the<br />
display to indicate that you are<br />
traveling at approximately<br />
your average speed. (+1mph).<br />
Helpline 00800-14703690
Installation of <strong>Computer</strong> Holder<br />
1<br />
First remove the protective<br />
foil on the rear of the<br />
computer holder.<br />
2<br />
Page 17<br />
Before Installing:<br />
First decide which hand (right or left) you want to use to operate the computer.<br />
This determines the mounting location for the computer holder on the right<br />
or left side of the handlebar as well as the position for the transmitter for<br />
the speedometer. Check to determine the angle at which you can best read<br />
off the computer. Then start installing the computer holder.<br />
Then hook the rubber ring, which<br />
best matches the diameter of<br />
your handlebars, in one of the<br />
hooks on the computer holder.<br />
Helpline 00800-14703690
Installation <strong>Computer</strong> Holder<br />
3<br />
4<br />
Page 18<br />
Then position the holder 4 on the handlebars at<br />
the angle determined previously. Guide the<br />
bottom part of the rubber ring below the<br />
handlebars and attatch to the hook on the<br />
other side.<br />
Alternatively you can also fasten the computer<br />
holder with the cable straps included. To do<br />
this, guide the cable straps through the<br />
openings provided for this purpose and pull<br />
them down tight. Cut off the excess at the<br />
ends with a pair of scissors.<br />
Helpline 00800-14703690
Mounting Transmitter for Speedometer<br />
Attach the transmitter 4in<br />
the middle<br />
of the fork arm using the cable straps.<br />
Make sure to attach the transmitter<br />
on the same side as the computer<br />
holder.<br />
The back of the transmitter needs to<br />
point towards the spokes of the wheel.<br />
The maximum distance between the<br />
transmitter and the computer should<br />
be no more than 60 cm<br />
Note: Before fixing the cable straps<br />
firmly, make sure to adjust the position<br />
of the magnet and transmitter as<br />
described on page 20. Once the<br />
position is properly adjusted, pull firmly<br />
on the cable straps and cut off the<br />
loose ends with a pair of scissors or<br />
pliers.<br />
Page 19<br />
Helpline 00800-14703690
Installation of Spoke Magnet<br />
Page 20<br />
Screw the magnet to 4 one of the outer<br />
spokes opposite the valve. The distance<br />
between the magnet and transmitter<br />
should be between 1 mm and 4 mm.<br />
If necessary correct<br />
the position of the<br />
transmitter and<br />
swivel it.<br />
Caution:<br />
Do not install the magnet on the<br />
transmitter. The ideal mounting points are<br />
in the lower, or, as shown in the figure, in<br />
the upper half of the transmitter.<br />
Helpline 00800-14703690
Attaching the <strong>Computer</strong><br />
After you have installed 4 the holder, sensor<br />
and magnet, you can attach the computer.<br />
Insert the computer into the computer<br />
holder turned approx. 45° to the left.<br />
Turn the computer clockwise with gentle<br />
pressure until it firmly in the holder. To<br />
remove the computers proceed in the<br />
opposite order.<br />
Note: Remove the computer when you<br />
leave the bicycle unattended.<br />
Page 21<br />
Helpline 00800-14703690
Putting on the Chest Belt Transmitter<br />
Page 22<br />
Hook the end of the belt into the chest pulse transmitter<br />
and wrap the elastic belt 4 around your chest. Hook the<br />
other end of the belt into the chest pulse transmitter.<br />
The chest pulse transmitter should make close contact,<br />
but not disturb or interfere. Adjust the elastic belt to<br />
the correct length with the adjustment loop.<br />
For ideal transmission of the pulse rate, the chest pulse<br />
transmitter should be centered just below the chest<br />
muscles.<br />
Note:<br />
8 Ensure that the chest pulse transmitter is in direct<br />
contact with the skin with the side with the battery<br />
cover against the skin. Maximum distance to<br />
computer 80 cm!<br />
8 If your skin is dry, moisten the electrodes on the<br />
inside of the chest pulse transmitter (ribbed area)<br />
with water or ECG gel before putting on.<br />
Helpline 00800-14703690
Basic Settings (Summary)<br />
Change menu<br />
with "S" button<br />
LANGUAGE<br />
SET KM<br />
WHEEL SIZE 1<br />
WHEEL SIZE 2<br />
TOT-ODO1<br />
TOT-ODO2<br />
SERVICE 1<br />
SERVICE 2<br />
SET-KG<br />
SETZONE<br />
24<br />
25<br />
26<br />
28<br />
29<br />
31<br />
32<br />
34<br />
35<br />
38<br />
Page 23<br />
After the first activation of the computer, after replacing the computer battery<br />
and after restarting (resetting) the computer starts up with the basic settings<br />
menu. The following illustration provides a summary of the menu sequence.<br />
Simply press the "S" key to switch over to the next menu step. If you<br />
accidentally skip a step or make an incorrect entry, proceed as described<br />
on Page 42 in the section "Changing Basic Settings".<br />
Description on<br />
Page<br />
ß<br />
Description on<br />
Page<br />
SOUND 41<br />
BATTERY CHANGE 42<br />
SETZONE 43<br />
H-FORMAT 43<br />
SETCLOCK 44<br />
BACKLIGHT 46<br />
CLOCK Menu<br />
ß<br />
Helpline 00800-14703690
Basic Settings, Language<br />
ENGLISH F<br />
You can scroll through<br />
the available languages<br />
with the "F" button.<br />
ENGLISH<br />
S<br />
Page 24<br />
After starting, replacing the battery or restarting (resetting) the computer<br />
the language setting GERMAN flashes in the menu display.<br />
Press the "S" button to select<br />
the desired language.<br />
The menu display then changes<br />
to SET MILE.<br />
Helpline 00800-14703690
Basic Settings, Kilometer / Miles<br />
MPH<br />
SET MILE<br />
F<br />
Press the "F" button to switch<br />
over from kilometers to miles<br />
and vice versa.<br />
4<br />
SET KM<br />
S<br />
MPH<br />
Page 25<br />
Confirm your selection, here<br />
Kilometers, by pressing the "S"<br />
button. The menu display then<br />
changes to WHEEL SIZE 1.<br />
Helpline 00800-14703690
Basic Settings, Wheel Size, Bike 1<br />
Page 26<br />
Tip: You can measure the circumference 4 of the wheel by<br />
positioning a measuring tape around the wheel. It is necessary<br />
to enter the wheel circumference in millimeters.<br />
2I00 SET WS<br />
F<br />
You are in the menu for setting the wheel<br />
circumference for bike 1. When the "F"<br />
button is pressed the first digit starts to flash.<br />
Helpline 00800-14703690
Basic Settings, Wheel Size, Bike 1<br />
0I00<br />
F<br />
Pressing the "F" button again<br />
changes the value of the first<br />
digit. Continue to press the<br />
"F" button until the desired<br />
value is reached.<br />
4<br />
2I00<br />
SET WS SET WS<br />
S<br />
Page 27<br />
Confirm your selection, here 2,<br />
by pressing the "S" button. The<br />
second digit starts to flash.<br />
Helpline 00800-14703690
Basic Settings, Wheel Size, Bike 1/2<br />
Page 28<br />
Your bicycle computer offers you the possibility of setting two<br />
differenent wheel circumferences. This feature is advantageous<br />
when you have two bicycles with 4different<br />
size wheels.<br />
2200<br />
SET WS<br />
F<br />
You can now set this value by<br />
pressing the "F" button.<br />
Confirm with "S".<br />
Proceed in the same manner for<br />
the next two digits.<br />
S<br />
2000<br />
SET WS<br />
After you have confirmed the last<br />
digit for wheel size 1 with<br />
"S", the setting for wheel size 2<br />
is displayed. To set this value,<br />
proceed in the same manner as<br />
for wheel size 1.<br />
Helpline 00800-14703690
Basic Settings, Total Mileage, Bike 1<br />
Page 29<br />
When you use your BIKEmate bicycle computer 4 for the first time,<br />
it is possible for you to set it to the previous mileage recorded<br />
on your old bicycle computer.<br />
TOT-ODO1 00000MPH<br />
S<br />
After you have confirmed the last digit for<br />
wheel size 2 with "S", the setting for the<br />
total mileage for Bike 1 is displayed.<br />
Helpline 00800-14703690
Basic Settings, Total Mileage, Bike 1<br />
TOT-ODO1 00000MPH<br />
F<br />
After momentarily pressing the<br />
"F" button, the first digit for the<br />
total mileage reading starts to flash.<br />
4<br />
TOT-ODO1 20000MPH<br />
S<br />
Page 30<br />
The value can be set by<br />
pressing "F" again.<br />
Helpline 00800-14703690
Basic Settings, Total Mileage, Bike 1/2<br />
TOT-ODO1 TOT-ODO2<br />
S<br />
20000MPH<br />
Confirm with "S". Proceed in<br />
the same manner for the<br />
next digits.<br />
4<br />
00000MPH<br />
F<br />
Page 31<br />
After entry of the total mileage<br />
for bike 1 is completed, the next<br />
menu allows you to enter the<br />
values for bike 2 using the same<br />
procedure. After conclusion of the<br />
entries the menu changes to<br />
ALARM.<br />
Helpline 00800-14703690
Basic Settings, Service, Bike 1<br />
Page 32<br />
Modern bicycles are technically complex 4 machines and should<br />
be checked and serviced by trained personnel at regular intervals.<br />
Your BIKEmate bicycle computer helps you to have such services<br />
performed at the right times. Your bicycle dealer will be glad to<br />
recommend the ideal mileage between services.<br />
ALARM 000MPH<br />
After confirming the value for total<br />
mileage 2 in the previous menu,<br />
your computer is ready to enter the<br />
service intervals.<br />
Helpline 00800-14703690
Basic Settings, Service, Bike 1<br />
600<br />
MPH<br />
ALARM<br />
F<br />
After momentarily pressing<br />
the "F" button, the first digit<br />
"6" appears and starts to flash.<br />
4<br />
ALARM 300MPH<br />
F<br />
The value can be set by<br />
pressing "F" again.<br />
Page 33<br />
Helpline 00800-14703690
Basic Settings, Service, Bike 1/2<br />
SERVICE 300MPH<br />
S<br />
Confirm with "S". Proceed in<br />
the same manner for the next<br />
digits.<br />
4<br />
SERVICE 000MPH<br />
F<br />
Page 34<br />
After completing the entry for the<br />
service interval for Bike 1, it is possible<br />
to enter the service interval for Bike<br />
2 in the next menu using the same<br />
procedure. After conclusion of this<br />
entry the menu display changes to<br />
SET KG.<br />
Helpline 00800-14703690
Basic Settings, Body Weight<br />
Page 35<br />
The BIKEmate bicycle computer can calculate 4 the calories<br />
consumed per trip. For precise calculation the software requires<br />
your body weight.<br />
SET-KG 065<br />
After you have completed entering<br />
the service interval for Bike 2, the<br />
computer is ready for you to enter<br />
your body weight.<br />
Helpline 00800-14703690
Basic Settings, Body Weight<br />
SET-LB I43<br />
F<br />
You can select kilograms or<br />
English pounds with the "F"<br />
button; the computer<br />
automatically converts the<br />
weight.<br />
4<br />
SET-KG 065<br />
S<br />
Page 36<br />
Confirm your selection with<br />
the "S" button; the display<br />
then changes to the entry<br />
mode for your weight.<br />
Helpline 00800-14703690
Basic Settings, Body Weight<br />
4<br />
SET-KG I65<br />
F<br />
You can change the first digit<br />
with the "F" button.<br />
4<br />
SET-KG I65<br />
S<br />
Page 37<br />
Confirm the first digit with<br />
the "S" button.<br />
You can then change the<br />
second digit with the "F"<br />
button.<br />
Continue to change the third<br />
digit in the same manner.<br />
Helpline 00800-14703690
Basic Settings, <strong>Pulse</strong> Limits<br />
Page 38<br />
You can enter the limits for pulse-control training for optimum<br />
training 4control<br />
or for checking. Check 4 with your physician<br />
regarding suitable upper and lower pulse rates for your age,<br />
your condition and your training objectives.<br />
080<br />
After you have concluded the basic<br />
setting for your weight, the display<br />
changes to the menu for setting the<br />
lower pulse rate.<br />
SETZONE<br />
Helpline 00800-14703690
Basic Settings, <strong>Pulse</strong> Limits<br />
I80<br />
Setting lower pulse rate:<br />
4<br />
F<br />
You can change the value for<br />
the first digit with the "F"<br />
button.<br />
I80<br />
4<br />
SETZONE SETZONE<br />
Page 39<br />
S<br />
Confirm the first digit with<br />
the "S" button.<br />
You can then change the<br />
second digit with the "F"<br />
button.<br />
Continue to change the third<br />
digit in the same manner.<br />
Helpline 00800-14703690
Basic Settings, <strong>Pulse</strong> Limits<br />
I50<br />
Setting upper pulse rate:<br />
4<br />
F<br />
I50<br />
4<br />
SETZONE SETZONE<br />
After confirming the last digit for<br />
the lower pulse rate, you can enter<br />
the upper pulse rate in the next<br />
menu. Change the first digit with<br />
the "F" button.<br />
Page 40<br />
S<br />
Confirm the first digit with the "S"<br />
button. Then change the second<br />
digit with the "F" button. Again<br />
confirm with the "S" button.<br />
Continue to change the third digit<br />
in the same manner.<br />
Helpline 00800-14703690
Basic Settings, Sound<br />
4 4<br />
ON OFF<br />
Setting Zone Sound ON - OFF<br />
Soun8<br />
F<br />
Soun8<br />
ON OFF<br />
Page 41<br />
Presetting of sound is off. SOUND - OFF means that the buzzer sound<br />
is deactivated. SOUND - ON means that the buzzer sound is activated.<br />
Every 5 seconds the buzzer will "bee..." when the current heart rate will<br />
be over the upper limit or below the lower limit.<br />
Press FUNCTION button to change between ON and OFF. Press SFT<br />
button to confirm and to continue SETUP menu.<br />
Helpline 00800-14703690
Basic Settings, Battery Change<br />
4<br />
4<br />
BAEE CHANGE<br />
4<br />
CLOCK<br />
F<br />
S F<br />
00:01 32,5 90<br />
YES<br />
LOW<br />
Y<br />
MPH<br />
Page 42<br />
After zone sound battery change mode will occur. If you want to change<br />
the battery please press Function button. If not press Set button to<br />
continue with the set up menu.<br />
Please change only battery when battery low indication is displayed at<br />
the upper right corner of display.<br />
In battery change mode the computer will store and keep the data<br />
memory for 15 seconds without battery. Datas like Service Reminder,<br />
Language, Odometer, Trip etc. will be stored.<br />
Helpline 00800-14703690<br />
Z
Basic Settings, 12/24 Hour Format<br />
Page 43<br />
Your BIKEmate bicycle computer is capable of displaying the<br />
time in 12 4 or 24 hour format. 4<br />
24 12 24 12<br />
H-FORMAT H-FORMAT<br />
F S<br />
After confirming the entry for the last<br />
digit in the previous menu, the display<br />
changes to the setting for the 12 /24<br />
hour format. Select the desired format<br />
with the "F" button.<br />
Confirm your selection with the<br />
"S" button. The display then<br />
changes to the time setting.<br />
Helpline 00800-14703690
Basic Settings, Time<br />
4 4<br />
01:40<br />
SETCLOCK<br />
09:40<br />
F SE<br />
The two digits for the hour flash<br />
on the display. You can now set<br />
the hour with the "F" button.<br />
SETCLOCK<br />
Page 44<br />
Confirm the hour setting with the<br />
"S" button. The display then<br />
changes to the setting for the<br />
minutes.<br />
Helpline 00800-14703690
Basic Settings, Time<br />
4 4<br />
09:40<br />
S F E<br />
09:45<br />
SETCLOCK SETCLOCK<br />
The two digits for the minutes<br />
flash on the display. You can<br />
now set the number with the<br />
"F" button.<br />
Page 45<br />
Confirm your selection with the "S"<br />
button. The second digit for the minute<br />
setting starts to flash. Continue to<br />
change the second digit in the same<br />
manner. After confirmation of the second<br />
digit, the menu changes to EL.<br />
Helpline 00800-14703690
Basic Settings, Backlight<br />
Page 46<br />
The backlight 4 allows you to read off the 4 4computer<br />
display even<br />
when visibility is poor or in the dark.<br />
32,5<br />
4<br />
In all modes, press Function button for 2<br />
1:55:02<br />
seconds. Backlight will be activated for 5<br />
seconds.<br />
90<br />
Y<br />
MPH<br />
RIDETIME S F<br />
Z<br />
Helpline 00800-14703690
Basic Settings, Light Manager<br />
4<br />
EL I9:00 START<br />
F<br />
4<br />
... you can set the starting time<br />
for the light manager with "F"<br />
and confirm with "S".<br />
Note: It is only possible to select<br />
full hours.<br />
EL<br />
23:00<br />
END<br />
F<br />
Page 47<br />
You can set the time for the light<br />
manager to end with the "F" button<br />
and press the "S" button to confirm.<br />
Here as well it is only possible to enter<br />
full hours.<br />
The basic settings are now completed and, after the last entry, the<br />
computer changes over to display the pulse rate, current speed and<br />
time.<br />
Helpline 00800-14703690
Changing Basic Settings<br />
Page 48<br />
If you skipped any steps in the basic settings or want to change your<br />
settings later, proceed as described below:<br />
Changing the time and light manager<br />
Press the "S" button in the Time Menu for approx. 5 seconds. The<br />
computer changes over to the basic settings for the time (description<br />
begins on page 41).<br />
Changing the other basic settings<br />
Press the "S" button in the Total Mileage Menu (TOTALODO menu) for<br />
approx. 5 seconds. The computer changes to the basic settings (description<br />
begins on page 23) and, after entry of the pulse limits, returns to the<br />
Total Mileage menu.<br />
Helpline 00800-14703690
Menu Sequence and Operation (Summary)<br />
Change menu<br />
with "F" button<br />
CLOCK<br />
STPWATCH<br />
TRIPDIST<br />
RIDETIME<br />
AVGSPEED<br />
MAXSPEED<br />
TOTODO-1 (2)<br />
TOTALODO<br />
TEMP C (F)<br />
CALORIE<br />
CALORIE<br />
FATBURN<br />
TIMEZON<br />
Page 49<br />
After conclusion of the basic settings the computer is ready for operation.<br />
The figure below provides a summary of the menu sequence. You can<br />
change to the next menu step by pressing the function button "F".<br />
SCAN-<br />
Display<br />
34<br />
Change menu<br />
with "S" button<br />
TOTODO-1 (2)<br />
TOTALODO<br />
TRIP-UP (DOWN)<br />
TRIP-DIST<br />
TIMER ( )<br />
RIDETIME<br />
TOT.KCAL<br />
CALTRAIN<br />
FATBURN<br />
CALORIE<br />
Beginning on<br />
Page<br />
50<br />
52<br />
53<br />
53<br />
57<br />
58<br />
59<br />
60<br />
62<br />
64<br />
65<br />
68<br />
69<br />
Helpline 00800-14703690
Time Menu<br />
Page 50<br />
After completing the basic settings the computer displays the<br />
Menu and shows your pulse rate, current speed and time.<br />
Note: Some 4 of the features described below are 4 displayed only when the<br />
chest belt transmitter is worn or while riding.<br />
The computer has a sleep mode, which activates when the bicycle has not<br />
moved for 5 minutes and none of the buttons have been pressed during<br />
this time. In this case the display shows only the time and the name<br />
"BIKEmate".<br />
0.0 0:00 09:45<br />
BIKEmate CLOCK<br />
S F<br />
Sleep mode (power saving feature).<br />
0<br />
Y AVG<br />
MPH<br />
S F<br />
The display on the computer can be<br />
activated by pressing any button.<br />
Helpline 00800-14703690
Time Menu<br />
4 4<br />
24 12<br />
H-FORMAT<br />
S<br />
Press the "S" button in the<br />
time mode for approx. 5 sec.<br />
to change over to the basic<br />
settings. You can make any<br />
required changes and then<br />
return to the time mode.<br />
Y AVG<br />
0.0 0:00:00<br />
0<br />
MPH<br />
STPWATCH<br />
F<br />
Page 51<br />
Pressing "F" in the time<br />
mode changes over to the<br />
stopwatch mode.<br />
Helpline 00800-14703690
Stopwatch Menu<br />
4<br />
0.0<br />
4<br />
Y<br />
0:00:02<br />
0<br />
Y AVG<br />
MPH<br />
STPWATCH<br />
S<br />
Start the stopwatch with the<br />
"S" button. Pressing the "S"<br />
button again stops the<br />
stopwatch.<br />
AVG<br />
0.0 0:00:23<br />
0<br />
MPH<br />
STPWATCH<br />
S<br />
Page 52<br />
When the "S" button is<br />
pressed again, the time<br />
stopped previously is<br />
continued. Hold down the<br />
"S" button for approx. 5 sec.<br />
to reset the stopwatch to<br />
zero.<br />
Helpline 00800-14703690
Trip Mileage and Trip Time Menu<br />
Page 53<br />
4<br />
4<br />
0.0 0.0 TRIPDIST<br />
0<br />
The trip mileage and trip time features help you organize your<br />
bicycle trip optimally and keep a record of your trips.<br />
Caution: Please note that the delete function for this data also<br />
affects the other data logged for the trip (distance, pulse memory,<br />
calories, fat, max. mileage...).<br />
Y AVG<br />
After the stopwatch pressing "F" again<br />
switches to the trip mileage feature.<br />
MPH The trip odometer starts automatically<br />
when you start a trip.<br />
F<br />
Helpline 00800-14703690
Trip Mileage and Trip Time Menu<br />
32,5<br />
90 4<br />
32,5<br />
90<br />
4<br />
44<br />
Y<br />
Y<br />
ZMPH<br />
11.5 1:30:91<br />
MPH<br />
TRIPDIST<br />
S<br />
Z<br />
TOTODO-1<br />
S<br />
Page 54<br />
32,5<br />
90 44<br />
Y<br />
2:30:11<br />
MPH<br />
TOTALODO<br />
Please press "S" in order to change to Odometer function bicycle 1 (2);<br />
Total Odometer and Trip-Up (Down) counter.<br />
Z<br />
S<br />
TRIP-UP<br />
Helpline 00800-14703690
Trip Mileage and Trip Time Menu<br />
4<br />
0.0 0:00:00<br />
0<br />
4<br />
Y<br />
Y<br />
AVG<br />
AVG<br />
MPH<br />
RIDETIME<br />
F<br />
Pressing "F" in the trip mileage<br />
mode changes over to the trip time.<br />
The trip time indicator starts<br />
automatically when you start a trip.<br />
The trip time indicator stops every<br />
time you stop riding.<br />
0.0 0<br />
ALLRESET MPH<br />
S<br />
Page 55<br />
Holding down the "S" button for<br />
approx. 2 sec. in the trip time and<br />
trip mileage modes deletes all data<br />
stored in the computer for the<br />
current trip. Please refer to the<br />
caution on Page 51!<br />
Helpline 00800-14703690
Trip Mileage and Trip Time Menu<br />
32,5<br />
4<br />
1:55:02<br />
90<br />
32,5<br />
4<br />
YZMPH<br />
0:00:12<br />
90<br />
Y<br />
RIDETIME<br />
S F<br />
Page 56<br />
Pressing "S" in the Ride Time mode, mode will change to Timer-Up<br />
(Down).<br />
Z<br />
TIMER<br />
S F<br />
MPH<br />
Helpline 00800-14703690
Average and Maximum Speed Menu<br />
Page 57<br />
4<br />
4<br />
0.0 I6.5 AVGSPEED<br />
0<br />
The "Average speed feature" allows you to calculate your<br />
anticipated time of arrival during a trip. If you keep a training<br />
log, this value is also suitable for recording your training<br />
achievements.<br />
Y AVG<br />
After the trip time you can press "F"<br />
to switch on to the display of the<br />
MPH average speed for the current trip in<br />
km/h or mph.<br />
F<br />
Helpline 00800-14703690
Average and Maximum Speed Menu<br />
4<br />
0.0 64,7<br />
0<br />
4<br />
0.0<br />
Y AVG<br />
MPH<br />
0<br />
Y AVG<br />
MAXSPEED<br />
F<br />
Pressing "F" in the average<br />
speed mode changes over to<br />
the maximum speed. This value<br />
indicates the highest speed<br />
attained during the current trip.<br />
ALLRESET MPH<br />
S<br />
Page 58<br />
Holding down the "S" button for<br />
approx. 2 sec. in the average and<br />
maximum MPH modes deletes all<br />
data stored in the computer for<br />
the current trip. Please refer to the<br />
caution on Page 51!<br />
Helpline 00800-14703690
Odometer Menu, Bike 1 and Bike 2<br />
Page 59<br />
The odometers 4 for Bike 1 and Bike 2 allow you to compare the<br />
distance traveled with each bike.<br />
4<br />
Y AVG<br />
0.0 235.9<br />
0<br />
MPH<br />
TOTODO-1<br />
F<br />
After the maximum speed display,<br />
you can press the "F" button to switch<br />
over to the odometer for Bike 1. This<br />
value indicates the total mileage of<br />
all trips made with Bike 1.<br />
After switching over (see Page 56)<br />
the odometer for Bike 2 is displayed.<br />
Helpline 00800-14703690
Switch Over Menu, Bike 1 / Bike 2<br />
Page 60<br />
4<br />
4<br />
0.0 458.9<br />
0<br />
In the KM BIKE 1 and 2 menu you can switch over between<br />
the two bikes.<br />
4<br />
0.0<br />
Y AVG<br />
0<br />
MPH<br />
0<br />
Y AVG<br />
MPH<br />
TOTODO-2 TOTODO-2<br />
F<br />
To switch over from Bike 1 to Bike 2<br />
hold down the "F" button for approx.<br />
5 seconds. To switch back to Bike 1<br />
press the "F" button again for approx.<br />
5 seconds.<br />
F<br />
After you have switched over to<br />
Bike 2, all specific information<br />
for Bike 2 is displayed.<br />
Helpline 00800-14703690
Total Mileage Menu<br />
4<br />
0.0 0<br />
Y AVG<br />
MPH<br />
TOTALODO 0<br />
F<br />
After the odometer mode<br />
pressing "F" again switches<br />
to total mileage measurement.<br />
This value indicates the total<br />
mileage for all trips.<br />
4<br />
ENGLISH<br />
S<br />
Page 61<br />
Pressing the "S" button in the<br />
total mileage mode for approx.<br />
5 sec. switches the computer<br />
over to the setting mode for the<br />
basic settings. The basic settings<br />
then begin with the language<br />
(beginning on Page 23).<br />
Helpline 00800-14703690
Temperature Menu<br />
4<br />
0.0 0<br />
Y AVG<br />
MPH<br />
TEMP C 2I<br />
F<br />
Pressing "F" in the total mileage<br />
mode changes over to the<br />
temperature display.<br />
4<br />
Y AVG<br />
0.0 0<br />
TEMP F69 MPH<br />
O O<br />
S<br />
Page 62<br />
Pressing the "S" button in the<br />
temperature mode for approx.<br />
5 sec. changes the display from<br />
°C to Fahrenheit and vice versa.<br />
Helpline 00800-14703690
Min. and Max. Temperature Menu<br />
Page 63<br />
4<br />
4<br />
0.023 MAX-TEMP<br />
0<br />
The temperature measurement and temperature memory features<br />
allow you to read off and record different temperatures during a<br />
trip, such as occurs over greatly varying altitudes.<br />
4<br />
0.0<br />
Y AVG<br />
I8<br />
MPH<br />
MIN-TEMP<br />
S<br />
Pressing the "S" button in the<br />
temperature mode displays the<br />
maximum temperature measured<br />
during the trip.<br />
0<br />
Y AVG<br />
MPH<br />
S<br />
Press the "S" button momentarily to<br />
display the minimum temperature<br />
measured during the trip. Pressing "S"<br />
again returns to display of the current<br />
temperature.<br />
Helpline 00800-14703690
Calorie Consumption Menu<br />
Page 64<br />
4<br />
4<br />
CALORIE 0 0.0 0<br />
If you want to reduce your weight or body fat with your bicycle<br />
training program, the BIKEmate bicycle computer can help you<br />
check your training acheivement. The bicycle computer<br />
automatically determines the kilo-calories or fat burned during<br />
each trip.<br />
Y AVG<br />
Pressing the "F" button momentarily<br />
in the temperature mode changes<br />
MPH<br />
over to the display of the calories<br />
consumed in kcal. This value indicates<br />
the approximate number of calories<br />
consumed during the current trip.<br />
F<br />
Helpline 00800-14703690
Training Calorie Target Menu<br />
Page 65<br />
4<br />
4<br />
0.0 0<br />
<strong>With</strong> your BIKEmate bicycle computer you can define the duration<br />
and intensity of your training with the aid of the calorie target<br />
setting. Simply set the desired number of calories and start your<br />
training. The computer signals when you have burned the<br />
calories set.<br />
Important: To utilize this feature, it is necessary to wear the chest<br />
belt transmitter!<br />
Y AVG<br />
Pressing the "F" button momentarily<br />
MPH switches the display over to the training<br />
calorie target.<br />
CALTRAIN 0<br />
F<br />
Helpline 00800-14703690
Training Calorie Target Menu<br />
4<br />
0.00 0<br />
4<br />
Y AVG<br />
MPH<br />
CALTRAIN<br />
S<br />
To set the calorie target,<br />
hold down the "S" button<br />
for approx. 5 sec.<br />
I I00 SET CALR<br />
F<br />
Page 66<br />
The default value1100 then<br />
appears in the display. Press<br />
the "F" button momentarily;<br />
the first digit starts to flash.<br />
To change the value press with<br />
the "F" again. Confirm your<br />
selection with the "S" button.<br />
Helpline 00800-14703690
Training Calorie Target Menu<br />
4<br />
4 4<br />
2100 SET CALR<br />
F<br />
After confirming the first digit<br />
with the "S" button, you can<br />
continue to change the second<br />
value "F" button. Then confirm<br />
this again with the "S" button.<br />
Y AVG<br />
S<br />
0.0 2350<br />
0<br />
MPH<br />
CALTRAIN<br />
Page 67<br />
Proceed in the same manner<br />
for the remaining digits.<br />
After the last digit has been<br />
confirmed with "S", the calorie<br />
target is set and the display<br />
returns to the menu sequence.<br />
Helpline 00800-14703690
Fat Consumption Menu<br />
4<br />
0.0<br />
4 4<br />
Y<br />
00<br />
0<br />
Y AVG<br />
MPH<br />
FATBURN<br />
F<br />
Pressing the "F" button<br />
momentarily in the calorie<br />
target menu changes over<br />
to display of the fat burned.<br />
This value indicates the<br />
approximate quantity of fat<br />
burned in the units of weight<br />
set (kilograms or pounds).<br />
AVG<br />
0.0 0<br />
ALLRESET MPH<br />
S<br />
Page 68<br />
Pressing the "S" button for approx.<br />
5 sec. in the fat consumption menu<br />
deletes all data stored in the computer<br />
for the current trip.<br />
Caution: This also affects the<br />
data for the trip odometer,<br />
calories...<br />
Helpline 00800-14703690
<strong>Pulse</strong> Rate Time Zone Menu<br />
Page 69<br />
4<br />
4<br />
0.0 0:00:00 TIMEZON<br />
0<br />
The time zone display for the pulse rate indicates how long you<br />
have exercised within the set pulse rate values during your<br />
bicycle trip. Moreover the display shows how long you have<br />
exercised above and below the set limits.<br />
Pressing the "F" button momentarily<br />
Y AVG<br />
in the fat consumption display, causes<br />
the computer to switch over to display<br />
the pulse rate time zones.<br />
MPH<br />
Normally the time, during which you<br />
have exercised within the limits is<br />
displayed. This is indicated by<br />
displaying a double arrow.<br />
F<br />
34<br />
Helpline 00800-14703690
<strong>Pulse</strong> Rate Time Zone Menu<br />
4<br />
0.0<br />
4<br />
0:00:00<br />
0<br />
Y AVG<br />
MPH<br />
S<br />
4<br />
Press the "S" button momentarily<br />
to switch the display over to the<br />
time during which you have<br />
exercised above your set upper<br />
pulse rate limit. The arrow then<br />
points up.<br />
4<br />
Y AVG<br />
0.0 0:00:00<br />
0<br />
TIMEZON TIMEZON<br />
S<br />
MPH<br />
3<br />
Page 70<br />
Press the "S" button again<br />
momentarily to switch the display<br />
over to the time during which<br />
you have exercised below your<br />
set lower pulse rate limit. The<br />
arrow then points down. Press<br />
"S" again momentarily to return<br />
to the menu sequence.<br />
Helpline 00800-14703690
Scan Menu<br />
Page 71<br />
4<br />
4<br />
0.0 0:00:00 TRIPDIST<br />
0<br />
The scan feature allows you to review all information saved<br />
without having to remove your hands from the handlebars<br />
to switch the display.<br />
Pressing the "F" button momentarily<br />
Y AVG<br />
during the pulse rate time zone<br />
display switches the display to the<br />
Scan mode. During scanning the<br />
MPH<br />
display shows all information for the<br />
current trip at intervals of 2 seconds.<br />
Pressing the "F" button again returns<br />
to the time menu with display of the<br />
pulse rate, current speed and time.<br />
F<br />
Helpline 00800-14703690
Frequently Asked Questions (FAQ's)<br />
No display or no reaction to buttons:<br />
Page 72<br />
- Check or replace batteries Page 9<br />
- Reset computer Page 10<br />
Caution: All entries will be deleted!<br />
Speed not indicated or to high or too low:<br />
- Check to ensure that magnet is properly mounted Page 20<br />
- Battery in transmitter discharged or transmitter<br />
defective<br />
- Distance between transmitter and computer too<br />
great (max. 60 cm)<br />
- Wheel circumference set or measured incorrectly Page 26<br />
- Check units of measure for circumference entry<br />
(enter in mm)<br />
- Brake Booster or fork stabilizer interferes with transmission<br />
- A bicycle basket can have a shielding effect<br />
Helpline 00800-14703690
Frequently Asked Questions (FAQ's)<br />
Speed or pulse rate appears on display after delay:<br />
Page 73<br />
- Synchronization between transmitter and computer<br />
not yet completed; wait approx. 30 seconds.<br />
- Reset computer Page 10<br />
Caution: All entries will be deleted!<br />
<strong>Pulse</strong> rate not displayed or pulse rate displayed<br />
is incorrect or varies highly:<br />
- Check/replace battery in chest pulse transmitter Page 9<br />
- Check/replace battery in computer Page 9<br />
- Skin too dry, moisten electrodes Page 22<br />
- Distance between chest transmitter and computer<br />
too great (max.80 cm)<br />
- Interference, e.g. from high tension lines,<br />
telephones, etc.<br />
If these tips do not help to solve your problem, please contact our service<br />
department. The service address in given at the back of this booklet.<br />
Helpline 00800-14703690
Index<br />
Scan<br />
Batteries, replacement and disposal<br />
Lighting, setting<br />
Chest pulse transmitter, putting on<br />
<strong>Computer</strong> displays<br />
Instructions for use<br />
Basic settings<br />
Changing basic settings<br />
<strong>Pulse</strong> rate display<br />
Questions and trouble-shooting<br />
Light manager, setting<br />
Mounting<br />
Restart<br />
Care<br />
<strong>Pulse</strong> display<br />
Reset<br />
Page 74<br />
71<br />
9<br />
47<br />
22<br />
11<br />
6<br />
23<br />
48<br />
65<br />
72<br />
47<br />
9<br />
10<br />
6<br />
69<br />
10<br />
Helpline 00800-14703690
Index<br />
Service address<br />
Safety precautions<br />
Stopwatch<br />
Symbols<br />
Button description<br />
Technical Data<br />
Time, setting<br />
Package contents<br />
Service intervals<br />
Switch-over between Bike 1 & Bike 2<br />
Page 75<br />
Back page<br />
4<br />
52<br />
12<br />
11<br />
8<br />
48<br />
7<br />
32<br />
60<br />
Helpline 00800-14703690
Guarantee<br />
8<br />
8 Your legal rights are not affected by this guarantee.<br />
Page 76<br />
8 The guarantee applies for faults resulting from material or workmanship.<br />
8 The display disc, belts and batteries are not covered by this guarantee.<br />
8<br />
8<br />
Your BIKEmate is guaranteed for three years beginning on the date<br />
of purchase.<br />
In the event of any problem please contact our service department<br />
then return the units to us FREEPOST with proof of purchase and<br />
completed guarantee card.<br />
This guarantee is voided when the units have been subjected to<br />
manipulation or improper treatment or disassembled.<br />
8 See back page service address.<br />
Helpline 00800-14703690
After Sales Support<br />
Now you have purchased a Bikemate product you can rest<br />
assured in the knowledge that as well as your 3 year parts<br />
and labour warranty you have the added peace of mind of<br />
dedicated helplines and web support :<br />
AFTER SALES SUPPORT<br />
UK / N.IRELAND HELPLINE NO 00800-14703690<br />
REP. IRELAND HELPLINE NO 00800-14703690<br />
WEB SUPPORT service@mcp-ag.net